may SCHIRM-SYSTEME Albatros User manual

Stand 30-2032 page 1 of 3
May Canopy Installation Instructions:
Installing or replacing the canopy
The following instructions include all information necessary for the correct mounting of your MAY
canopy covering onto a MAY sunshade frame. For your own safety please read these instructions
carefully.
Non-observation of mounting instructions can result in personal
injury or damage to property.
Please note that if these instructions are not observed, the manufacturer
cannot assume any liability or guarantee.
Always follow the safety regulations.
Should you not understand any part of these mounting instructions,
please contact your MAY dealer.
A loose canopy can be sailed away by the wind.
If mounted in windy conditions, an unfastened canopy can be carried away
by the wind with great force. This can result in personal injury and/or
damage to the canopy fabric, the framework or to any objects nearby.
Always mount the canopy in calm weather conditions.
Unpacking the canopy covering
1. Open the cardboard packaging.
If a knife is used to open and remove the packaging material, the
canopy fabric may get damaged.
Do not use a knife or any other sharp object to remove the packaging
material.
2. Take the canopy covering from the packaging.
If placed on the ground, the canopy fabric may get damaged or
soiled.
If placed on the unprotected ground, the fabric may get torn or scoured
due to the own weight of the canopy.
Always lay the canopy covering on a soft surface (e.g. a carpet or
blanket).
Caution
Attention
Attention
Caution

Stand 30-2032 page 2 of 3
Mounting the canopy covering
1. To mount the covering the umbrella must be in an upright position.
2. Make sure that your hands are clean or use protective gloves to avoid soiling the fabric.
3. Open the umbrella framework about halfway (cf. illus. below).
4. Using a step-ladder, carry the canopy covering to the top centre of the umbrella frame.
Take great care when using ladders: risk of personal injury or
damage to property.
You risk falling off a ladder if it is unstable or too weak.
Use a freestanding step-ladder.
Make sure that the ladder is in perfect condition.
Check whether the ladder is standing on even, stable ground.
Observe the guidelines of the manufacturer of the ladder.
5. Spread the canopy fabric over the framework of the umbrella. The bottom side of the
covering is the side with the hooks.
Caution
ref. 3 and 4

Stand 30-2032 page 3 of 3
6. In the middle of the canopy covering there is a round hole with hooks sewn on. Fasten these
hooks to the spokes. If you have a square or rectangular sunshade, you need to make sure
that you fasten the hooks to the correct spokes. (i.e. diagonal hooks to diagonal spokes,
etc.)
7. How to hook the canopy tensioning hook to the telescopic shaft:
Press the telescopic shaft toward the centre mast and pull the hook outward until it can be
snapped into position. Then press the end cap onto the spoke. If the cap doesn’t fit properly,
just turn it the other way round.
Risk of damaging the canopy fabric.
If the hooks are not all correctly fastened to the spokes, the umbrella will
not be able to resist the force of the wind. This will lead to premature wear
and tear of the fabric.
Make sure that each hook is correctly fastened. Check again to see if
you have followed these instructions correctly. Better safe than sorry.
telescopic shaft
end cap
ref. 7
Attention
fasten hooks
ref. 6

Stand
280614 Page 1 of 8
Operating instructions: type “Albatros”
with accessories AZ120 /AZ024
Thank you very much for purchasing a MA sunshade.
The following instructions include all information necessary for the correct assembly, operation
and maintenance of your MA sunshad
e. To guarantee absolute safety when handling your
sunshade, please read these instructions carefully and then keep them for later reference.
Non- observation o operating instructions can result in personal
injuries or damage to property!
Please note that if these instructions are not observed, the manufacturer
cannot assume any liability or guarantee.
Always follow the safety regulations.
Should you not understand any part of these operating instructions,
please contact your MA dealer.
Wind can damage your sunshade! No guarantee possible!
Always completely open or close the sunshade. Never leave it merely
half-opened, as it is then not fully stable.
Immediately close the sunshade whenever wind rises.
If sunshades are erected in an exposed location (e.g. in upcurrents, on
sloping ground, in wind corridors, etc.) the weight of the base must be
increased.
Unpacking the sunshade
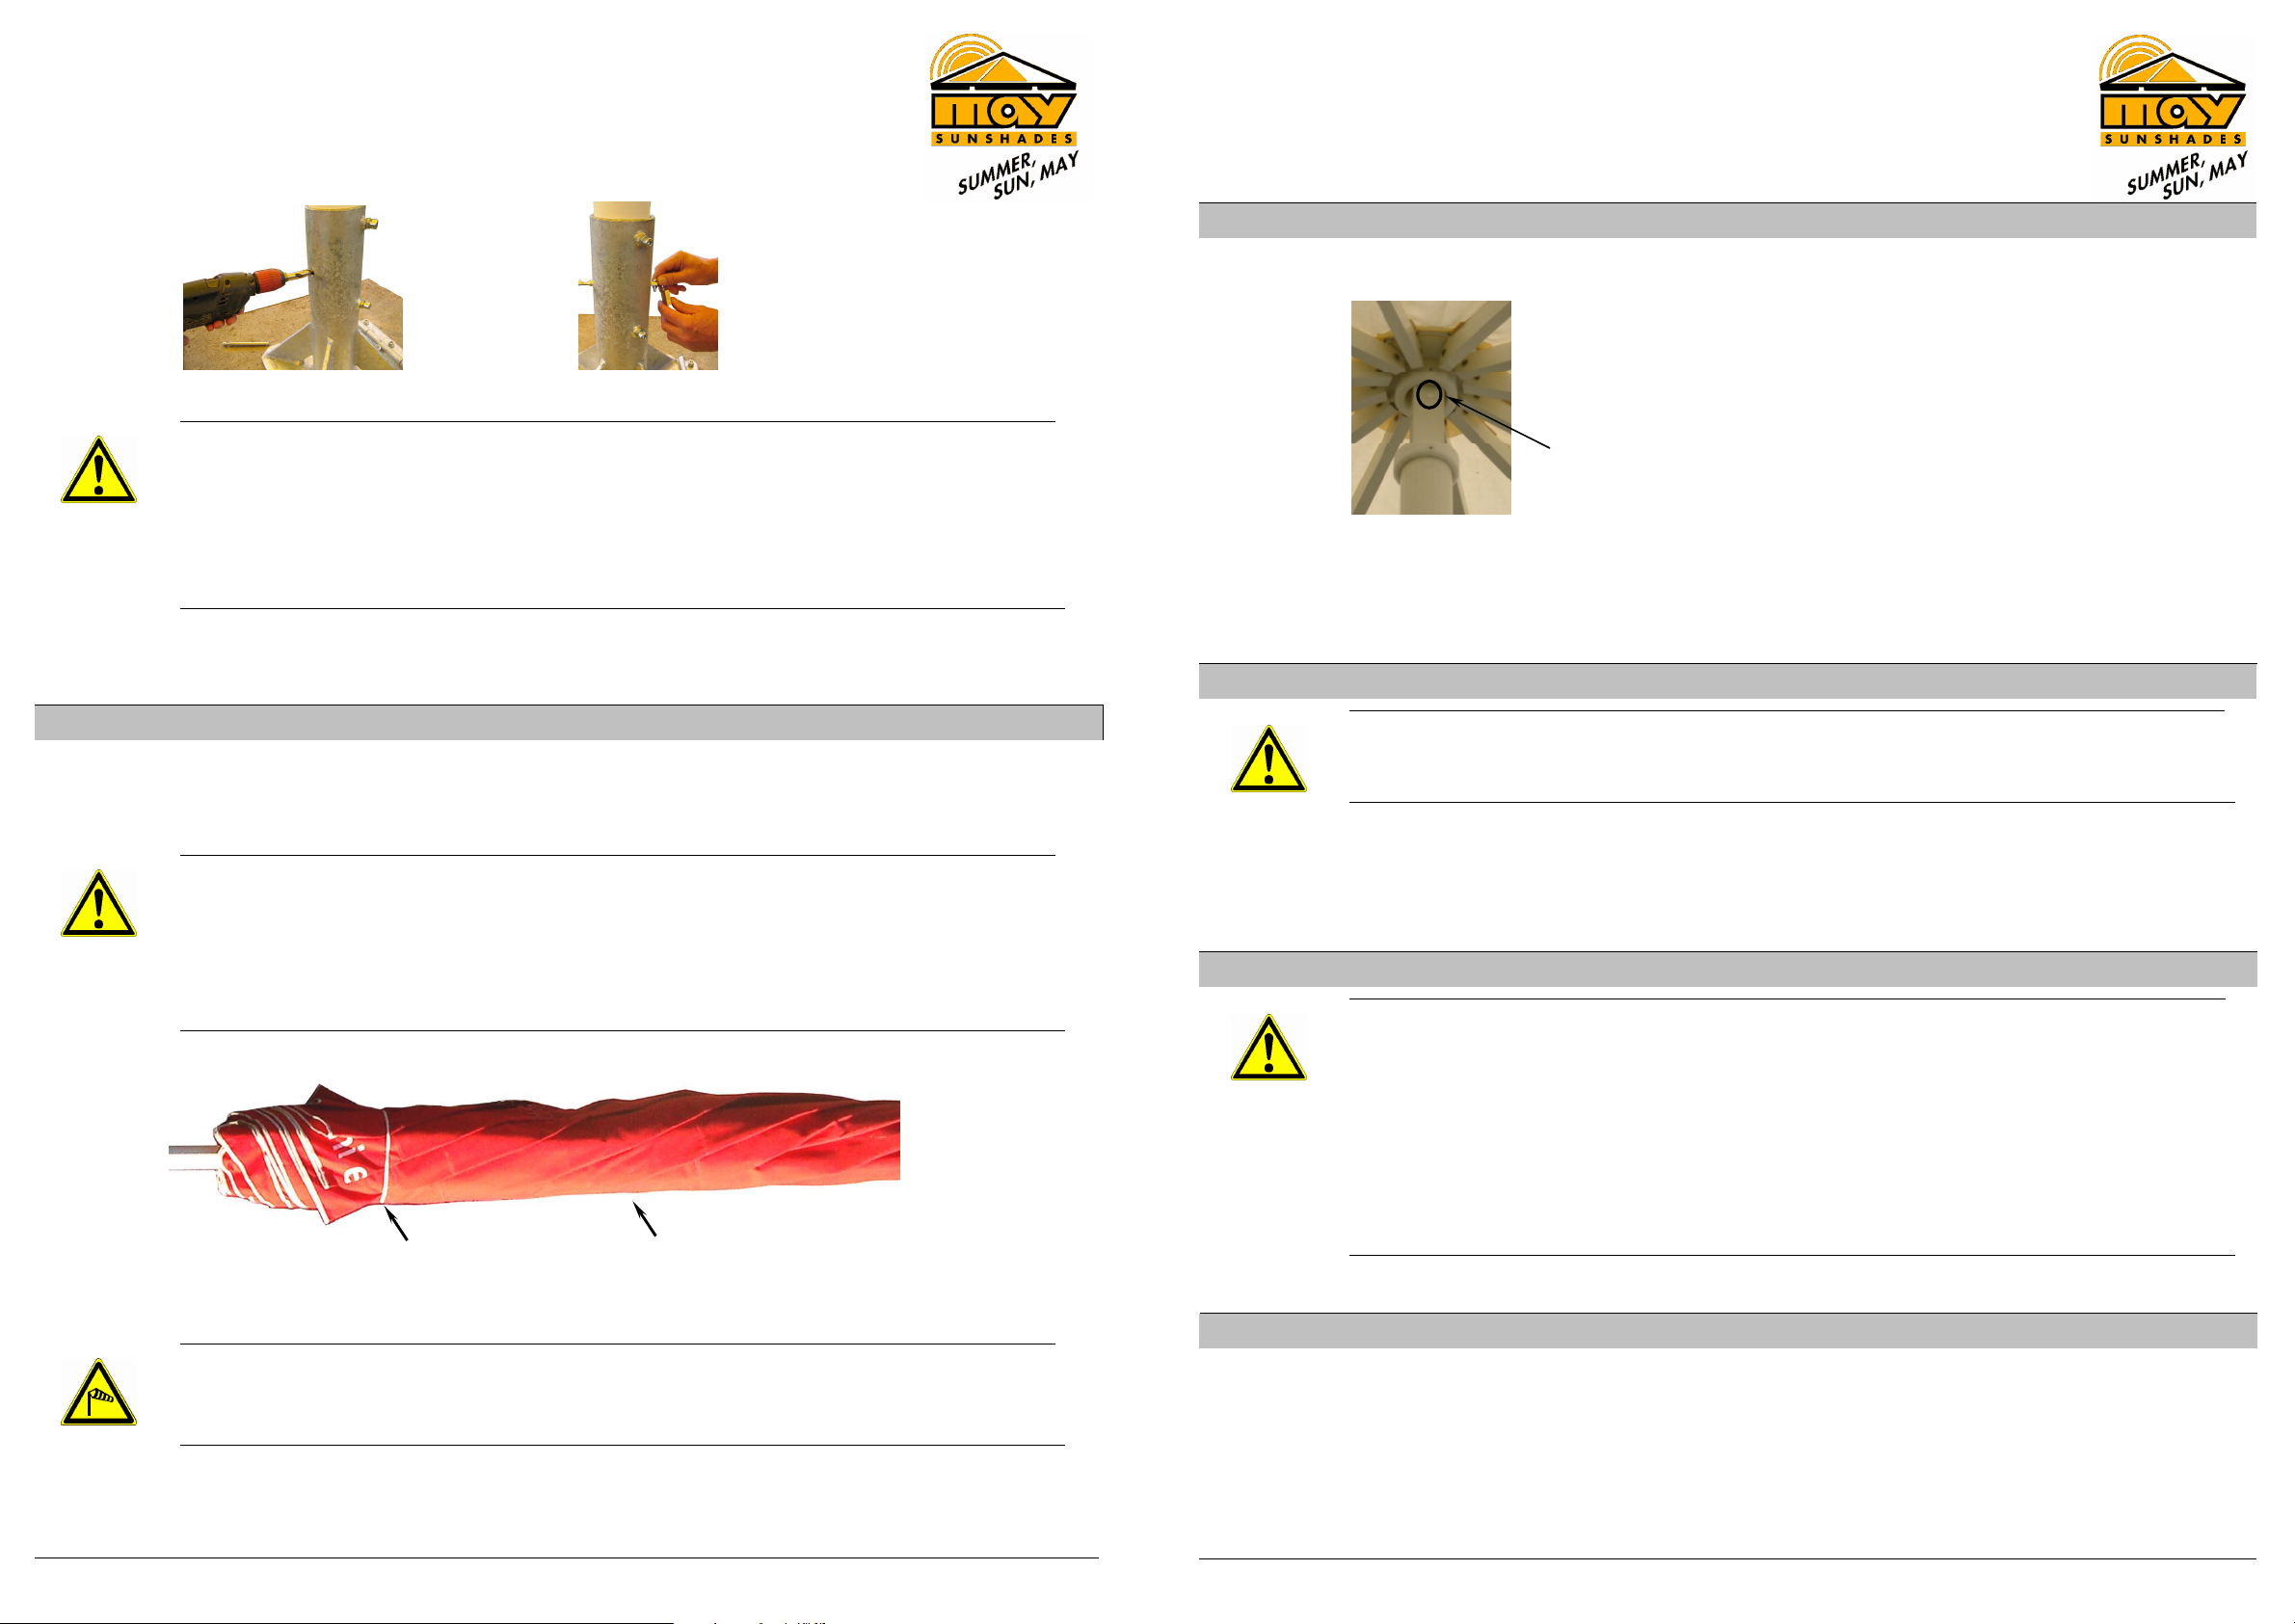
1. Remove the caps on either end of the cardboard tube.
I the sunshade is improperly withdrawn rom the cardboard tube,
the canopy abric may be damaged!
When the sunshade is withdrawn, the metal brackets that fasten the tube
caps can tear the fabric.
Remove all metal brackets from either end of the protective tube before
withdrawing the sunshade.
2. Remove the enclosed accessories attached to the centre pole. (headplate, hex spanner,
etc.).
3. Holding the support pole, carefully pull the sunshade out of the cardboard tube.
Caution
Warning
Caution
Stand 280614 Page 2 of
8
I the sunshade is laid directly onto the ground, the canopy abric
may get damaged!
When put on the ground, the canopy fabric may possibly get torn or
scratched due to the weight of the sunshade.
Ideally, the umbrella should be safely anchored at once or laid on a soft
surface (e.g. a mat or blanket).
Pulling the sunshade over rough sur aces (brinks, edges, uneven
loors) damages the abric!
Never pull the sunshade over brinks or edges.
Do not lean the sunshade against anything.
When withdrawing the sunshade, place the cardboard tube on a working
platform or trestle in order to be away from the ground.
Assembling and erecting the sunshade
1. Remove the protective sleeve. (It only serves transport and storage purposes.)
I a kni e is used to remove the packaging, the protective sleeve
and the canopy abric may get damaged!
Do not use a knife or any other sharp instrument to remove the
packaging.
2. The enclosed protective gloves should be used to avoid soiling the fabric.
3. Screw the headplate between the ornamental knob and rubber buffer. (cf. illus.)
4. Use the socket head screws to fasten both the upper part of the anchor foot and the hinge
plate to the bottom foot.
Caution
Caution
Caution
ref.
2.
accessories
ref.
3.
ref.
3.

Stand
280614 Page 3 of 8
A alling sunshade can cause serious or even atal injury!
If, during assembly, the anchor tube slips away, it will be impossible to
hold onto the sunshade. It will fall down and possibly cause a serious
accident.
Make sure all anchor foot screws and hinges function properly.
Tighten all hinge screws.
5. Unscrew the M16 screws of the anchor foot.
6. Tilt the upper part of the anchor foot until it is in a horizontal position.
7. Loosen the M10 socket head screws until there is sufficient clearance inside the anchor foot
for the centre pole to be inserted horizontally.
8. Push the bottom end of the pole into the upper anchor foot. Then firmly tighten the M10
screws of the upper anchor foot.
A alling sunshade can cause serious or even atal injury!
If, during assembly, the sunshade spins round in the anchor foot, it may
become uncontrollable, fall and thus cause a serious accident.
Tighten the M10 screws of the upper anchor foot really firmly to wedge
the centre pole of the sunshade.
9. [only for sunshades operated with electric power]
Hold the sunshade in a horizontal position and connect the underground cable with the electric
cable in the centre pole. (cf. illus. page 4). Allow a surplus of at least 50cm length of the
underground cable and pass this into the centre pole. The cable joint must be waterproof and
detachable.
Electric installation work should be carried out solely by a
certi ied electrician. Disregarding this warning may result in
serious personal injuries.
Secure your sunshade with a residual current circuit breaker /
RCB or RCBO (30mA). Please note: according to legal
requirements, RCB/RCBO protection switches must be checked by
the operator at least every six months. Non observation may
result in personal injuries.
Danger
ref.
4.
ref.
6.
ref.
5.
ref.
7
.
ref.
6.
Danger
Danger
Danger
Stand 280614 Page 4 of
8
10. Erect the sunshade.
A alling sunshade can cause serious or even atal injury!
If too few people attempt to erect the sunshade, it may become too
heavy and uncontrollable, thus causing a serious accident.
It will take at least four adults to erect the sunshade.
Make sure that there is enough room for the helpers to get out of the
way in case the sunshade does start falling.
Make sure that there are no other people standing around while the
sunshade is being erected.
Hold on to the upright sunshade until all screws have been tightened (cf.
description of next steps).
11. Fasten the upper anchor foot to the bottom foot using socket head screws and serrated
lock washer.
A alling sunshade can cause serious or even atal injury!
If the screws are not tightened firmly enough or they work loose because
no washers are used, the sunshade may topple down and cause serious
or even fatal injury.
Place the washers onto the M16 socket head screws.
Fasten the upper anchor foot to the bottom foot (embedded in concrete)
by using all four M16 socket head screws and tightening them with a
torque of 200 Nm.
ref
.
10
.
Danger
ref.
10
.
power connection
ref.
9.
Danger

Stand
280614 Page 5 of 8
Opening the sunshade
1. Remove the strap from the canopy.
2. Insert crank or drill bit into the designated bore of the canopy mechanism and open the
sunshade by turning it clockwise as far as the limit stop.
A alling sunshade can cause serious or even atal injury!
If the sunshade is not firmly anchored in the anchor foot, it may be lifted
by the wind.
Make sure all screws of the anchor foot have been tightened firmly.
I the crank/ drill bit is not ully inserted, it will wear!
Always insert the crank/ drill bit right up to the limit stop.
The sunshade can be damaged i it is opened with a drilling
machine!
When opening a sunshade with a drill, driving too close to the limit stop
may damage the operating mechanism.
Always use the crank for the last few turns up to the stop.
I the sunshade is not ully opened, it can get damaged by the
wind!
Always open the sunshade as far as the limit stop.
Caution
Warning
Danger
Caution
s
errated lock washer
+
socket head screw M16
ref.
1.
tighten with
200 Nm
Stand 280614 Page 6 of
8
Aligning the sunshade
1. Open the M10 screws of the upper anchor foot.
2. Open the sunshade. (cf. above heading: “Opening the sunshade“)
The wind can li t the sunshade out o the upper anchor oot!
When the M10 screws have been loosened, do not open the sunshade
unless the wind is absolutely calm.
3. Turn the erected sunshade within the anchor foot until the required position has been
reached (e.g. aligned parallel to the wall of the house).
4. Tighten the M10 screws on the upper anchor foot.
I the sunshade is not ully anchored, it can cause serious or even
atal injury!
If the M10 screws work loose, the wind can lift the sunshade and may
cause serious or even fatal injury.
Use only the original M10 screws supplied by us. Tighten them firmly
and then secure them with the locknuts.
The t and anti-twisting locks
Drilling holes or the t and anti-twisting locks may ruin the
electric motor (i installed).
If the sunshade is equipped with an electric motor, do not drill holes to
mount theft and anti-twisting locks.
1. Align the sunshade into the position required. (cf. heading “Aligning the sunshade“)
2. Drill the clearance hole for the theft and anti-twisting locks as follows: Holes have been
provided in the anchor foot for anti-twisting mechanism. Use these as master/ guide holes
and drill from either side through both the sunshade pole and the inner tube, using a ø 13.5
mm twist drill.
Warning
Danger
Warning
ref.
4.
weld
ed
nut
locknut
M10

Stand
280614 Page 7 of 8
[only for sunshades operated with electric power]
Drilling may damage electric cables that are routed through the
pole o the sunshade.
Make sure the cable is not energized.
Be sure to avoid routing the cables inside the sunshade pole too close to
bore holes, otherwise they will be penetrated or damaged by the drill.
3. Slip the bolt through the holes and mount the lock.
Closing the sunshade
1. Insert the crank or the drill bit into the designated bore of the canopy mechanism and close
the sunshade by turning it anti-clockwise as far as the limit stop.
2.
Fabric jammed between the spokes can cause abrasion and
scouring marks! No guarantee possible!
Pull the covering fabric from between the spokes and fold it round the
sunshade pole in one direction as you would with an ordinary portable
umbrella.
3.
Wind can do damage to an unsecured sunshade. No guarantee
possible!
Close the sunshade and secure it with the strap provided.
Caution
ref.
3
.
ref.
3.
Caution
Caution
ref.
2.:
Pull covering fabric from between spokes
and fold it in one direction!
ref.
3.:
strap
The photo has been tilted 90° to save space.
Stand 280614 Page 8 of
8
Maintenance: Annual lubrication o the spider rame
1. Remove the cap of the rectangular tube.
2. Squirt several drops of lubricating oil into the bore hole of the spider frame.
3. Put the cap back onto the rectangular tube.
Maintenance: Cleaning the canopy abric
I not cleaned properly, the canopy abric may become spoilt!
Follow our cleaning instructions.
Stains can be removed by using either a soft brush and soap solution or a pressure washer (at
max. 30° C, max. 30 bar and min. 30 cm standoff distance). Subsequently rinse well with
sufficient water so that no soap residues remain in the material.
Storing the sunshade
The canopy abric may be spoilt on account o improper storage!
If the following instructions are not observed, mildew may stain the
material or the sewing thread may start to moulder.
Make sure the sunshade is really dry.
Pull the protective sleeve over the closed sunshade.
Store the sunshade in a place where mice will not get at it. At best,
leave the sunshade outside the whole year round.
MAY maintenance and cleaning service
The MA company will be pleased to overhaul your sunshade and clean the canopy
fabric for you. However, this is only possible off-season, i.e. from October to
December.
Please contact your local dealer for information on transport to the MA premises.
Caution
Caution
ref.
1.
This manual suits for next models
2
Other may SCHIRM-SYSTEME Tent manuals
Popular Tent manuals by other brands

GigaTent
GigaTent POP UP PRIVACY POD owner's manual

Décor et Jardin
Décor et Jardin Gamagran 81801S000 Assembly Notice

skandika outdoor
skandika outdoor GOTLAND 5 Setup Instruction

mothercare
mothercare family user guide

Overland Vehicle Systems
Overland Vehicle Systems 26019910 Assembly instructions

Weka
Weka 651.2929.00 Series ASSEMBLY, USER AND MAINTENANCE INSTRUCTIONS