Maytag CE1500PAW User manual

ABOUT YOUR APPLIANCE
Should you have any questions about using your new
electric appliance, please writeto us at this address:
Congratulations on your choice of this range. As you use
your new range, we know you will appreciate the many Customer Assistance
features that provide excellent performance, ease of c/oMaytagCustomerService
cleaning, convenience and dependability. P.O.Box2370
New features have dramatically changed today's cooking Cleveland, TN 37320-2370
appliances andthe way we cook.It is therefore very
important to understand how your new electric range Be sure to include the model and serial numbers of your
operatesBEFOREyouuseit forthefirst time.appliance. Foryour convenience, we have provided space
onthe front cover to recordthis information.
InthisOwner's Guide, you will findawealth of information
regarding all aspectsofyour appliance. By carefully
followingtheinstructionsyouwill beableto fullyenjoyand Inourcontinuingeffortto improvethe qualityand customer
properlymaintainyournew range. NOTE: Yourappliancesatisfactionofour cookingproducts, wemay findit
maynotbe equippedwithsomeofthefeaturesreferredtoin necessarytomakechangestoourlineofapplianceswithout
thismanual, revisingtheOwner's Guide.

i
IMP(PRTANT SAFETY INSTRU(TIONS
Read all instructions before using this appliance.
instructionson the following pages are based on safety Besureallpackingmaterialsareremovedfromtheappiiance
considerationsand mustbestrictlyfollowedto eliminatethe before operatingit.
potentialrisksoffire, electricshock, or personal injury. Do not store or use gasoline or other flammable materials,
vapors and liquidsinthe oven,near surface units or inthe
__" ) i _|NQ vicinity0f thisor any other appliance.Thefumes can create
WA a fire hazard or explosion.
ALL RANGES
CAN TIP If applianceis installednearawindow,properprecautions
shouldbetaken to prevent curtains from blowing over
INJURYTOPERSONS surface elements.
COULD RESULT
_) •Do not leaveany itemson thecooktop,The hotair from the
INSTALLANTI-TIPvent mayigniteflammable itemsand mayincreasepressure
DEVICE PACKED in closedcontainers which may cause themto burst.
WITH RANGE
SEE INSTALLATION Many aerosol-typespraycansare EXPLOSIVE when
exposedto heat andmay behighlyflammable. Avoidtheir
INSTRUCTIONS use or storagenear an appliance.
Many plasticsare vulnerable to heat, Keep plasticsaway
WARNING:To reducethe riskoftippingoftheappliance frompartsoftheappliancethatmaybecomewarmorhot.Do
from abnormalusage or by excessiveloadingofthe oven not leaveplastic.itemsonthe cooktopas theymay melt or
door,theappliancemustbe securedbya properlyinstalled softenifleft toocloseto theventor surface element.
anti-tipdevice.To eliminate thehazard ofreaching over hot surfacr
If the rangeismovedfromthewallforcleaning,besuretheelements,cabinetstorageshouldnot be provideddirectl'
anti-tip device is engaged when therangeis replaced,abovea unit.Ifsuchstorageisprovided,itshouldbelimite_
Removestoragedrawer,if equipped,and lookunderneath to itemswhichareused infrequentlyand whicharesafe
rangetoverifythatone ofthe rear levelinglegsis properly stored in an area subjected to heat fromanapplianc,
engagedinthebracketslot.The anti-tip devicesecuresthe Temperaturesmaybe unsafe forsomeitems, such
rear levelingleg tothe floorwhen properly engaged,volatileliquids,cleaners or aerosol sprays.
Besureappliance is properly installed and grounded by a
qualified technician.
Locate and mark circuit breaker or fuse. Never replace a
blown fuse or reset a circuit breakeruptil you know what Turn offappliance and ventilatinghood to avoid sprea,
caused the problem.Alwaysreplace a blown fuse withone the flame.Extinguish flame then turn onhoodto rerr
of the correctamperage, do not useasubstitute,smokeand odor.
To ensure proper operation and avoid possible injury or Use dry chemicalorfoam-type extinguisheror baking
damageto unit do not attempt to adjust, repair,service,or to smother fire or flame. Never usewater on a grease
replaceany part of your appliance unless it is specifically If fire is intheoven or broiler pan, smother by closing
recommendedin thisbook. All other servicing should bedoor.
referredtoa qualifiedinstalleror servicer.Alwaysdisconnect
powerto unitbefore anyservicingby tripping circuitbreaker If fire isin a pan on the surface element, cover pan.
tothe OFF positionor removingthefuse.attemptto pick up or movea flaming pan.

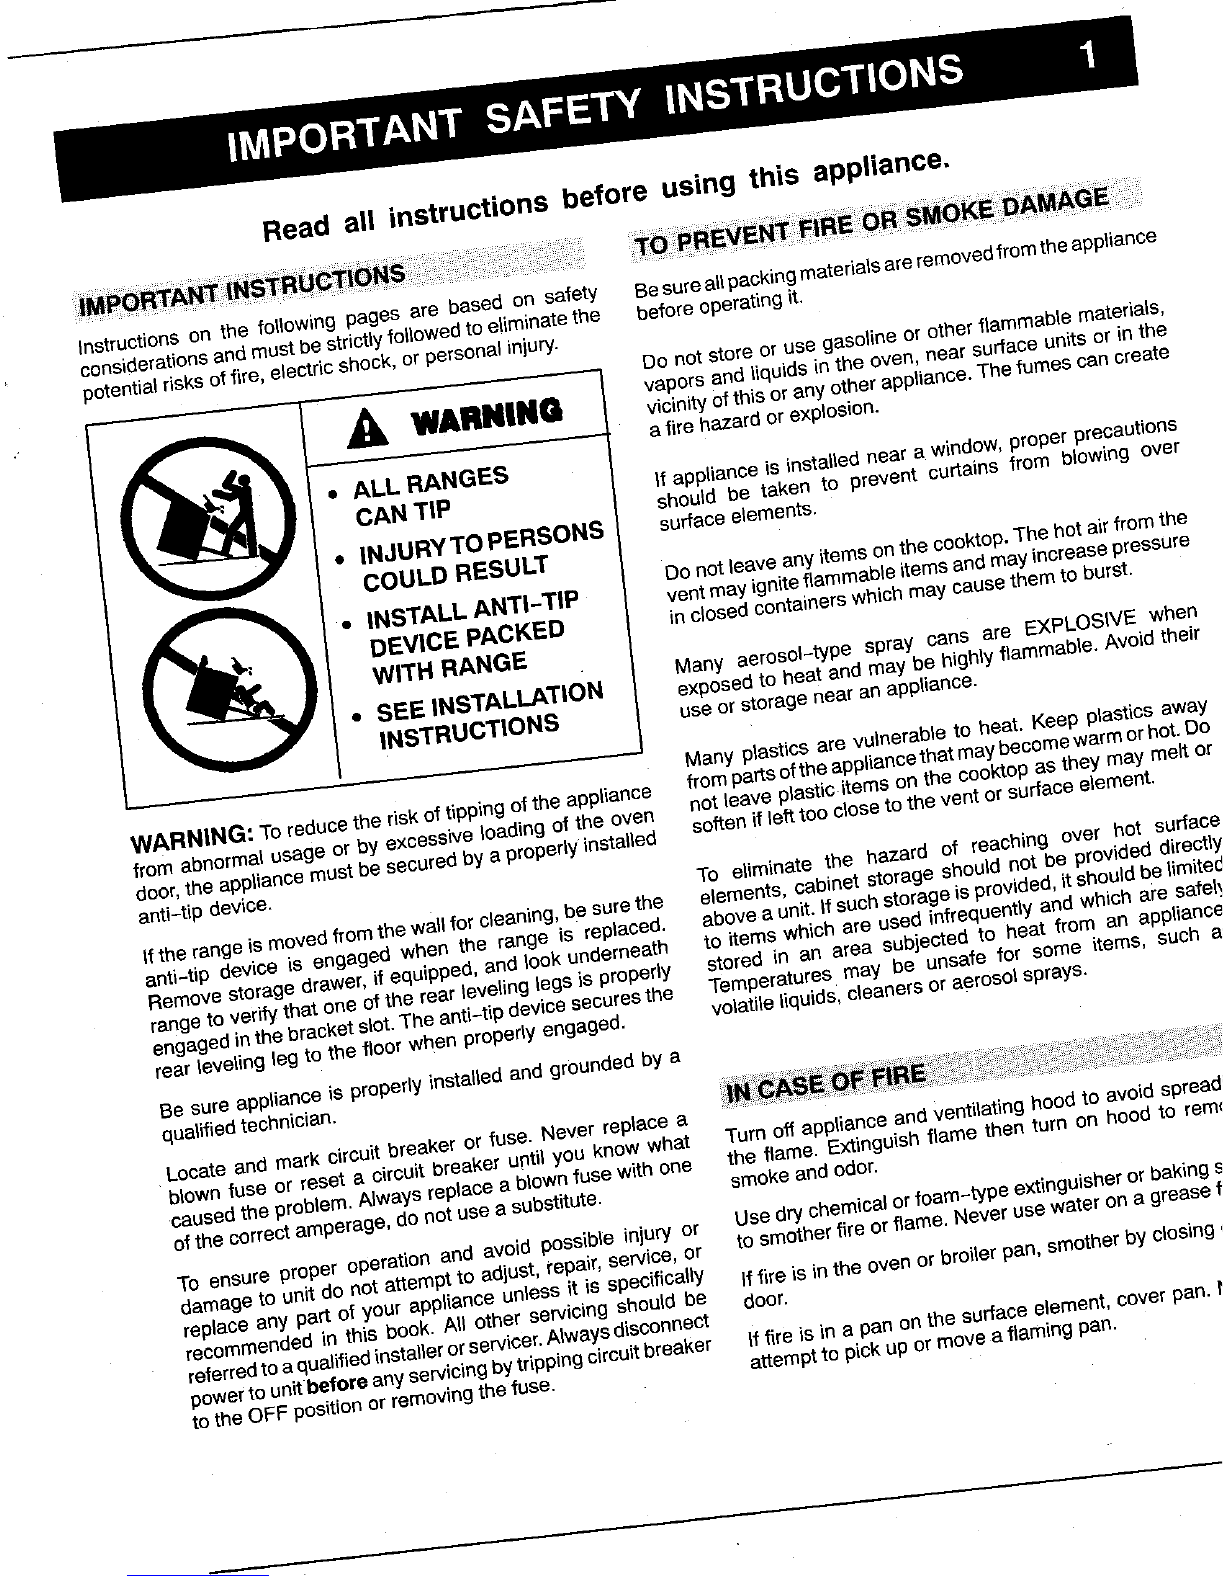
2 IMPORTANT SAFETY INSTRUCTIONS
Do notallowaluminumfoil,meatprobes or anyother metal
object, other than a utensil ona surface element, to contact
Do not leave children alone or unsupervised near the heating elements.
appliancewhenitisinuseorisstillhot.Childrenshouldnever
be allowedto sit or stand on any part ofthe appliance.Do not touch a hot oven light bulb with a damp cloth as the
bulb could break. If bulb breaks, disconnect power tothe
Children mustbetaughtthatthe applianceand utensils in applianceto avoidelectricalshock then remove bulb.
oronitcanbehot. Letbotutensils_ _.__ _ _
cool in a safe place, out of reach of CAUTION:Donotusean
smallchildren.Childrenshould beJ \"_"I"I_L'=toapplianCecabinetsaSa stePabove.Stool_
taught that an appliance is nota toy. Misuseof appliance
Children should not be allowed to doors or drawers, such -
playwith controlsor other parts of as stepping, leaning or
the unit. sitting on thedoor or
CAUTION: Donot store items of drawer, may result in
interesttochildrenincabinetsabove possible tipping of the
anappliance or on thebackguard of appliance, breakage of
arange. Childrenclimbing onthe_ door,and serious injuries.__
appliance or on the appliance door _
to reach items could be seriously
injured.
Always turn offsurfaceelementor theoven whencookingis
completed.
It is normal for some parts of the cooktop,especially areas
To prevent injuryor damageto the appliance, de not use surrounding the surface elements, to become warm or hot
appliance as a space during surface cooking operations. Therefore, do nottouch
heaterto heat or warm a the cooktop until it has had sufficient time to cool.If
room. Also, do not use necessary,usedry pot holders to protect hands.
the cooktop or oven as a
storage area for food or Make sure drip bowls are in place. Absence of these bowls
cooking utensits, during cooking may subject wiring or components
underneath todamage.
The oven vent is located
at the left rear element. Always place apan onasurface element beforeturning iton.
Keep oven vent duct Be sure you know which knob controls which surface
unobstructed. Blockage of the vent prevents proper oven element. Makesurethe correct element isturned on. Begin
air circulation and will affect oven performance. Avoid cooking on a higher heat setting then reduce to a lower
touching ventarea while oven ison andfor severalminutes settingto continue cooking.
after ovenis turned off. Some parts of the ventand Never leave a surface cookingoperationunattended
surroundingareas may become hot enough to cause especially when using a
bums. highheatsetting orwhen _ '_ ] t
deep fat frying. Boilovers
Donot touchsurface or ovenelements, areasnearelements cause smoking and
or interior surface of oven. Heating elements may be hot greasy spillovers may
even though they are dark in color.Areasnear surface ignite.Cleanup greasy
elementsand interiorsurfaces of an oven may become hot spills as soon as
enough to cause burns. During and after use, do nottouch, possible.Do notusehigh /,
orletclothingor otherflammable materials contact heating heat forextended/
elements, areas near elements, or interior surfaces of oven cooking operations.
until they have had sufficienttime to cool. Always let quantitiesof hot fat used for deep fatfryingcool
Other surfaces of the appliance may become hot enough to before attempting tomove or handle.
cause burns - among these surfaces are the cooktop,
surfacesfacingthe cooktop,ovenvent openingand surfaces Never heat an unopened container as pressure build-up
nearthe vent opening, oven door, and oven window, may cause container to burst resulting in serious personal
injuryor damageto the appliance.

IMP()RTANT SAFETY INSTRUCTIONS 3
Use dry,sturdy potholders.Moist ordamppotholders onhot frying.Besure panwillaccommodatethevolume offoodthat
surfaces maycause burnsfromsteam.Do notlet pot holders is to beadded as well as the bubbleaction of fat.
touchhot heatingelements. Donot use atowelor other bulky
cloth. To minimize burns, ignition of flammable materials and
spillagedueto unintentionalcontactwiththe utensil,do not
Do notlet cooking grease or other flammablematerials extend handles over )-
accumulateinornear the appliance,vent hood or vent fan.adjacentsurface k_-_--,_ _ /
Cleanhoodfrequentlyto prevent grease from accumulating elements. Always turn _.T_
onhoodor filter.Whenflamingfoods underthe hoodturn the pan handlestowardthe
fanoffas thefan mayspread theflame, side or back of the
appliance, not out into
Use caution when wearing garmentsmade of flammable the roomwhere theyl_rx, -_.,
material to avoid clothing ._ 1---_J---_2,,_ are easily hit or /zL\fires. Loose fitting or long _'_"-_J_l reached by small
hanging-sleevedapparel _ children.
should not be worn while
cooking.Clothing mayignite Never let a pan boildry as this coulddamagethe utensiland
orcatch utensil handles, theappliance.
Follow the manufacturer's directions when using oven
Always place oven racks in the desired positionswhile oven cooking bags.
is cool. Slide oven rack out to add or remove food; avoid
reaching into the oven. If a rack must be movedwhile oven Only certain types of glass,glass/ceramic, ceramic,
is hot,use a dry pot holder and avoid touching hot element earthenware or glazed utensils are suitable for cooktop or
in oven. oven usage without breaking due to the sudden change in
temperature.
Use care when opening the oven door. Lethot air or steam
escape before removing or replacingfood. This appliance has been testedfor safe performance using
conventional cookware. Do not use any devices or
accessories that are not specifically recommended in this
PREPAREDFOODWARNING:Followfood manufacturer's manual.Donotuse eyelidcoversforthe surfaceunits,stove
instructions.Ifa plasticfrozenfoodcontainerand/oritscover top grills,or add-on ovenconvectionsystems.Theuse of
distorts,warps, or isotherwisedamaged duringcooking, devicesoraccessoriesthat arenotexpresslyrecommended
immediatelydiscard the foodand its container.Thefood inthis manualcan createserious safety hazards,resultin
couldbecontaminated, performanceproblems,and reducethelife of the
componentsoftheappliance.
Use proper pan size. This appliance isequippedwith oneor Turnoffallcontrolsandwaitforappliance partstocool before
more surface elements of different sizes. Select utensils touching or cleaningthem. Cleanappliancewithcaution.Use
having flat bottoms large enough to cover the surface careto avoid steam burnsifa wet sponge orcloth isused to
element.Theuseofundersized utensilswillexposeaportion wipe spillson a hot surface. Some cleaners can produce
of the heating element to direct contact and may result in noxious fumes if appliedto a hotsurface.
ignition of clothing.Proper relationshipof utensil to element
willalsoimprove efficiency. Do notsoak or immerse removable heating elements in
water. Immersing element in water would damage element
Use pans with flat bottoms and handles that are easily and insulating material inside element.
graspedand stay cool. Avoidusing unstable, warped, easily
tipped or loose handled pans. Pans that are heavy to move Do not use aluminumfoil orfoil liners to linedrip bowls,cover
whenfilled withfood may alsobehazardous, anovenrack or linethe oven bottom. Improper useof these
liners may result in a risk of electric shock, or fire and may
Besure utensil is large enoughto properly containfood and causeovento overheat.Usefoil onlyasrecommended inthis
avoid believers. Pan size is particularlyimportant in deepfat manual.
SAVETHESE INSTRUCTIONS

USING THE COOKTOP
Yourcooktopisequippedwithcontrolknobsthat providean Use HIGH justuntil water comes to a boil or pressureis
infinitechoice of settingsfrom LOW to HIGH. Theknob can reachedin the pressurecanner.Then, reduceto the lowest
beset on or between any ofthe numberedsettings, heat setting that maintains the boil or pressure. Prolonged
use of HIGH or the use of incorrect canning utensils will
Tooperate=Push in and turn the knob in either directionto produce excessiveheat. Excessive heat can cause
the desired setting. A SURFACE indicator light will glow permanent damage to the porcelain cooktop, coil element
when a surface element isturned on. The indicator lightwill and the drip bowl.
remain on until the element is turned off. After a cooking
operation, be surethe element and indicator lightare off.
Cooking performance is greatly affected by the type of
cookware used.Proper cookwarewill reduce cookingtimes,
uselessenergyand produce moreevencooking results.For
To prevent damageto the range or utensil, never operate bestresults usea heavygauge metal panwith a smoothflat
surface unitwithoutapan in place,never allowa pantoboil bottom and a tight fitting lid.
dryand never operate an element on HIGH for extended
periods of time. Cookware with uneven,warped,or grooved bottomsdo not
makegood contactwiththe heating surface,willreduceheat
Foodwill not cook anyfaster ata highersettingthan needed conductivity and result in slower, less even heating.
to maintain a gentle boil. Water boils at the same
temperaturewhetherboiling gently or vigorously.If a high Differenttypes ofcookware materials requiredifferentheat
settingisused,excessivespatteringwilloccur andfood may settingsfor the same cooking operation. The chart below is
stick or burn ontothe bottom ofthe pan. basedon heavygauge aluminum cookware.Lowerthe heat
setting if using athinner gauge meta_orothermaterials.
If a higher heat setting is used to bring liquid to aboil or to Oversized cookware and cookware that rests across two
begincooking,alwaysreduce to a lower setting once liquid elements are not recommended as they may trap enough
comes to a boil orfood begins cooking. Never leavefood heat to cause damageto the cool<topor elements. This is
unattended during a oooking operation, especially importantwhen canning.
Fitthe sizeofthecookware to the size of theelement. This Do not use woks equipped with round metal rings.The ring,
conservesenergy, whichisdesignedtosupportthe wokabovethe element,will
trap heat and may damage theelement and the cooktop.
Referto oookware manufacturer's recommendationsfor suggested heat settings. Somemanufacturers do not recommend
the useof HIGH,or theuse of HIGH for extendedcooking operations.
HEATS_INGS ''USES,
' HIGH =Tobring ilquld t; a boil, bi;nch, Plehe;; skilI;;i or r;';ch pressUr; in a pressure Cooker.
Alwaysreduce to a lower heat settingwhen liquidsjust beginto boilor foods begin to cook. I
Medium-High Tobrown or sear meat; heat oil for deep fat frying; scald; to saute orfry.
7-9 Maintainfast boil for large amounts of liquids.
Medium Tomaintain moderateto slow boilfor largeamounts of liquids.
4-6 Tocontinue cooking uncoveredfoods and for most frying operations.
Medium-Low To continue cooking covered foods and to maintain pressure in most pressure cookers.
1-3 Stew,braise orsteam operations.
Tomaintain boilfor small amounts of liquid,poach,steam or simmer.
LOW To keepfoods warm before serving. Melt chocolate.

USING THE C()OKT(IP
• Coilsurface elements are self-cleaning.• Be sure drip bowls, located under each element, are in
• Do not immerse elements in water, place.
• When an element is turned on, it will cycleon and off to •Absenceof these bowls during cooking may subject
wiring or component parts underneath the cooktop to
maintainthe heat setting, damage.
•Topreventdamagetotherange, NEVERoperate surface
element without a pan in place and NEVER allow a pan °To prevent risk of electric shock or fire, do not line drip
to boil dry. bowls with aluminumfoil.
To remove: When _\ Your range will be equipped with either chrome plated or
cool, raise element _ porcelain coated steel drip bowls.
and carefully pull out
and away from the Chrome or porcelain drip bowls will discolor or craze over
receptacle,time or if overheated. This discoloration or crazing is
permanent and will not affect cooking performance.
To protect the chrome or porcelain finish, avoid using high
To replace: Insert theterminals on the element intothe settings for long periodsof time. Reduce to a lower setting
receptacle.Gently lift uponouter edge ofelement (opposite once food begins cooking. Do not use oversized cookware.
terminal-side of element) while inserting terminals into Pan shouldnot extend morethan 2 inchesfrom theelement.
receptacle. Gently press down on outer edge of element
until element sits level on drip bowl. Besure the drip bowlfor the left rear element has a hole
in the center to allow proper oven venting. To prevent
Besuredripbowlsareproperlyinstalled.Cutoutondripbowl bakingproblems, neverblocktheventopening by placing
should be centered over the screwsecuring the receptacle asolid drip bowl inthis locationor by coveringthe hole in
tothe maintop. Ifdrip bowlis not installed properlyand rests the center of the drip bowlwith aluminum foil.
onthis screw,thedrip bowlwill "rock".

USING THE OVEN
Theoven vent islocatedundertheleft rearsurface element. TheOVEN indicatorlight,locatedonthe control panel,turns
Whentheovenisinuse,thisareamayfeelwarmorhottothe onwhenevertheoven isturned on.Whentheoven reaches
touch. To prevent baking problems, donot block the vent the preset temperature,theindicatorlight willturn off and on
opening, as the oven elements cycle off and on.
Becauseeachoven has itsownpersonalcharacteristics,do1.When cool, positiontheracks in the oven.
notexpectthat your newoven willoperate exactly likeyour 2. Turn the Thermostat knob to the desired temperature.
previous oven. You may find that the cooking times, oven
temperatures, and cooking results differ somewhat from 3. Turn the Selector knob to BAKE.
your previous range. Allow a period of adjustment.If you Selecting a temperature higher than desired will NOT
have questions concerning baking results, please refer topreheat the oven any faster, and may have a negative
pages 8, 9, 10and 18for additionalinformation, effect on baking results,
4. Place the food in the center of the oven, allowing a
minimum of 1 to 2 inches between the utensil and the
oven walls.
_ 5. Check food for aloneness at the minimum time in the
recipe. Cook longer if necessary.
6. Removefoodfrom theoven and turnthe Selector knobto
OFF.
THERMOSTAT SELECTOR
Preheating is necessary for baking. Turn the Thermostat
NOTE:The knobs onyour range maynotlooklike the knobsknobtothe desired setting and allowabout 10to 15minutes
in the above illustration. However, they will operate asfor the oven to preheat. Selecting a higher temperature will
describedbelow,notshortenthepreheattimeand mayaffectbakingresults.It
TheTHERMOSTAT knobis usedto select and maintainthe isnot necessary to preheatfor roasting or broiling.
oven temperature.Always turnthis knobjust TO thedesired
temperature. Do not turn to a higher temperatureand then U_E _ _m_l;_m:__-_,l__ _/_HUIMi[:Ii_ ¢_J|t:
back. , ._ ._ ...._
Do not cover an entire rack with foil or place foil directly
The SELECTOR knob determines the type of oven under cookware.Tocatch spillovers, place a piece offoil, a
operation.Turnthis knobto the desiredsetting.Eachsetting little largerthan the pan, on the rack belowthe pan. Oo not
is identifiedby an indent (step) and a "click"sound, place foilonthe oven bottom.
Toturn the oven on, both theThermostat and Selector "jl
knobs must be set.The oven will not operate if the
Selectorknob isleftin the OFF position.Toturnthe oven
off, turn the Selector knobto the OFFposition.

USING THE OVEN
Yourrangewillfeature oneortwooven racks.The ovenrack in. Pullthe rackout to the lock-stop positionto be sure itis
isdesignedwithasafety lock-stoppositiontokeep the rack positionedcorrectly and then return itto its normalposition.
from accidently coming completely out of the oven when
pullingthe rack out to add or removefood. Itisimportantthataircancirculate freelywithintheoven and
around the food. To help ensure this, place food on the
centerofthe oven rack.Allow onetotwo inchesbetweenthe
i
CAUTION:Do not attempt to change the rack positions edge of the utensil(s)and the oven walls.
when the oven is hot. For optimum baking results of cakes,-cookies or biscuits,
useone rack. Positionthe racksothe food isinthe centerof
Toremove: Besuretherackiscool. Pulltherackstraightouttheoven.Use either rack position2 or3.
untilitstopsatthelock-stopposition.TiltthefrontendoftheIfcookingonmorethanonerack,staggerthefoodtoensure
rackup andcontinuepullingtherackoutoftheoven. properairflow.
To replace: PlacetherackontheracksupportsandtilttheIf cookingontwo racks,dependingonbakingresults,use
frontendoftherackupslightly.Slideitbackuntilitclearstherack positions 2 and 4, 1 and 3 or rack positions4 and 1.
lock-stop position.Lowerthefront andslidethe rack straight Never place two cookie sheets ononerack.
RACK 4Used for broiling thin foods and sometwo-rack
(highestposition) baking.
RACK 3Usedfor most baked goods on a cookie sheet or
jellyrollpan,or frozenconveniencefoods,fortwo-
rackbaking or broiling.
RACK2 Used for roasting smallcuts of meat, large
casseroles, baking loaves ofbread, cakes (in
either tube, bundt, or layer pans) or two-rack
baking.
RACK 1 Used for roasting large cuts of meat and large •
poultry,pies,souffles,or angel food cake,or for/
two-rack baking.

USING THE OVEN
Cakesare uneven. •Panstoo close or touching each other or oven walls. •Batter uneven in pans.
• Temperatureset too lowor bakingtime too short. • Oven not level.• Undermixing. • Too
much liquid,
Cake falls. • Toomuch shorteningor sugar. • Too much or toolittle liquid. • Temperaturesettoo low,
• Oldor too little baking powder. • Pan too small. • Oven door opened frequently. • Added
incorrecttype of oil to cake mix. • Added additional ingredients to cake mix or recipe.
Cakes,cookies, biscuits ° Oven not preheated. • Pans touchingeach other oroven walls. ° Incorrect rackposition.
toobrown on bottom. • Incorrect use ofaluminumfoil. ° Placed 2 cookiesheets onone rack. • Used glass,dark,
stained warped ordull finish metal pans. (Usea shiny cookie sheet.)
Follow cookware manufacturer's instructions for oven temperature.Glassware and dark
cookware such as Ecko's Baker's Secret may require lowering the oven temperature by
25°F.
Excessive shrinkage. • Toolittle leavening.• Overmixing.• Pantoo large. ° Temperatureset too high.• Baking
time too long. ° Pans too close to each other or oven walls.
Cakes have tunnels. • Not enoughshortening.• Toomuch baking powder.• Overmixingor attoo higha speed.
• Temperature settoo high.
Pie crust edges too • Temperaturesettoo high. • Panstouching each other or ovenwalls. • Edges ofcrusttoo
brown, thin; shield with foil.
Pieshave soaked crust. • Temperaturetoo lowat start of baking.• Fillingtoojuicy.° Used shiny metalpans.

USING THE OVEN
Usea reliable recipe andaccurately measurefresh Check the cooking progress at the minimum time
ingredients.Carefullyfollow directions for ovenrecommended in the recipe.Ifnecessary,continuechecking
temperature and cooking time. Preheat oven if at intervals untilthe food isdone.Ifthe oven door isopened
recommended, too frequently, heatwill escape fromthe oven;this can affect
baking results and wastes energy.
Usethe correct rackposition. Baking results may be
affected ifthe wrong rack position is used. If you add additionalingredients,use different pans,or
Top browning may be darker if food islocatedtoward alter the recipe, expect cooking times to increase or
the top ofthe oven. decrease slightly.
Bottom browning may be darker if food is located
toward the bottom of the oven.
When usingtwo racks for baking, allow enough space
between the racks for proper air circulation.Browning
and cookingresultswill beaffected if airflow isblocked. Most meats are roasted at 325°F. It is not necessary to
preheatthe even. Placetheroastingpanoneitherofthetwo
Cookwarematerial plays an important part in baking lowest rack positions.
results.Always usethe type and size of pancalledfor inthe
recipe.Cooking times or cooking results maybe affected if Use tender cuts of meat weighing three pounds or more.
the wrong size is used. Some good choices are: Beef rib, ribeye,top round, high
quality tip and rump roast,pork loin roast,leg of lamb,veal
Shiny metal pan reflects heat away from the food, shoulder roastand cured orsmoked hams.
produceslighterbrowningand a softercrust. Useshiny
pans for bakingcakes or cookies. Seasonmeat, ifdesired, eitherbefore or afterroasting. Rub
Dark metal pan or a pan with an anodized (dull) intothesurfaceofthe roast ifaddedbeforecooking.
bottomabsorbsheat,producesdarkerbrowninganda
crispercrust.Use thistypeofpanfor pies,pie crustsor Place the meatfat-side-up ona rack ina shallowroasting
bread, pan.Placing the meat ona rack holds itout ofthe drippings,
Foroptimumbaking results,bakecookies andbiscuits thusallowingbetter heatcirculationfor evencooking.As the
on a flat cookiesheet. If the pan has sides, such as a fat on top of the roast melts, the meat is basted naturally,
jelly roll pan, browning may notbe even. eliminating the needfor additional basting.
ifusingheatproof glassware, or dark pans such as
Baker's Secret reducetheoventemperatureby25°F Thecookingtime is determinedby theweightofthemeat
exceptwhenbakingpiesorbread.Usethesamebaking and the desireddoneness.Formoreaccurateresults,use
timeascalledfor intherecipe, a meatthermometer.Insertitsothetipisinthecenterofthe
thickestpartofthemeat.It shouldnottouchfator bone,
Allow hot airto flow freelythrough the ovenforoptimum
bakingresults.Improperplacementofpans intheovenwill Removetheroast from the ovenwhen thethermometer
blockairflow and may result in unevenbrowning. For registersapproximately5°Fbelowthedonenesswanted.As
optimumbrowningand even cooking results:the meat stands, thetemperature will rise.
Do not crowd a rackwith pans. Never place more than
one cookiesheet, one13xgx2-inchcake panor two NOTE:For more information about food safety, call I
9-inch round cake pans on one rack. USDA'sMeat & Poultry Hotlineat 1-800-535'4555. For Ii
Staggerpanswhen baking ontwo racks so one pan is cooking information write to the National Live Stock and I
notdirectly overanother pan. Meat Board, 444 North Michigan Avenue, Chicago,_
Allow one or two inches betweenthe pans or between Illinois60611. I
the pan and theoven walls or door.

10 USING THE OVEN
Broiling is a method of cooking tender meats bydirect
radiantheat.Thecookingtimeisdetermined bythedistanoe _ _
between the meat and the broil element, the desired degree
of doneness and thethickness of themeat.
Broiling Tips
Broiling requires theuse of the broiler pan and insert. The
broiler insert must be in place to allow fat and liquid to drain to THERMOSTATSELECTOR
the pan below to prevent spatters, smoke and flare-ups.
Improperusemaycausegrease fires. TOSet Oven To Broil:
For easier clean up, line thebroiler pan with foil and spray 1. Placetheovenrack intherecommendedrack position.
theinsertwithanon-stickvegetablespray. Donotcoverthe 2. Turn theThermostat knob to BROIL or, for lower
broilerinsert with aluminumfoil as this prevents fat from temperaturebroiling, to 450°F.
draining into pan below.3. Turn theSelector knobto BROIL•
4. Ifdesired, preheat thebroilelement for about 3 minutes
Trimexcess fat and slash remainingfat to helpkeep meat beforeplacing themeat in theoven.
from curlingand to reducesmokingand spattering. Season 5. Followthesuggested times inthechart below. Turnmeat
meat after cooking,onceabout halfway through cooking•
Place oven rack inthe correctrack position when oven is6.Cheekfordonenessbycuttingaslitnearthecenterofthe
cool. For darker browning, place meat closer to the broil meat.
element. Place meat further down ifyou wish meat to be well 7.After broiling, turn the oven off and remove the broiler pan
done or if excessivesmoking or flaring occurs, from theoven.
See Care and Cleaning Chart on page 12 for instructions on NOTE: Broil times may increase if the range is installed on
cleaning the broiler pan and insert. 208 volts.
BROiMNG CHART ,TOTALTIME
(MINUTES)**
BACON #4 or 3 WellDone 6to 10
BEEF STEAKS
1-inchthick #4 or3 Medium 15 to18
#4 or3 WellDone19 to23
CHICKEN Broilat 450°F
Pieces#4or3 WellDone30 to45
FISH
Fillets#4 or 3 Flaky 8 to 12
Steaks,1-inchthick #4 or3 Flaky 10 to15
GROUND BEEF PATTIES
3/4-inch thick#4or 3 Well Done15 to 18
HAM SLICE, precooked
t/2-inch thick #4 or3 Warm 8 to 12
PORK CHOPS
1-inch thick #4 or 3 Well Done 22 to 26
* The top rack position is position #4.
**Broiling timesare approximateand may vary depending on the meat.

MAINTENANq;E 11
The oven door is not designed to be removed by the The storage drawerat the bottom of the range is safe and
consumer, convenient for storing metal and glass cookware.DO NOT
store plastic, paperware,food or flammable material in this
Do not place excessive weight on an open oven door or drawer.Removedrawer to clean under range.
stand on an open oven door as, in some cases, it could To remove:Empty drawer then pull drawer out to the first
causethe rangetotip over,breakthe dooror cause serious stop position. Lift up front of drawer and pull to the second
injuryto the user. stop position. Grasp sides and lift up and out to remove
When opening the oven door, allow steam and hot air to drawer.
escape before reaching in oven to check, add or remove Toreplace:Fitthe ends of the drawer glides ontothe rails.
food. Lift updrawer front and gently push in to first stop position.
Lift up drawer again and continue to slide drawer to the
CAUTION: Hinge arms are spring mounted and will closed position.
slam shut against the range if accidently hit. Never
place hand or fingers between the hinges and the
front oven frame. You cou d be n ured if hingesnaps Some floors are not level.
back. Forproperbaking,your __1_ II
range mustbe level.
Levelinglegs are located on
each corner at the base of
the range. Level by turning
the legs.To prevent range
from accidently tipping,
range should be secured to the floor by sliding a rear
leveling leg intothe anti-tip bracketsuppliedwith the range.

12 CARE AND CLEANING CHART
Becauseofthe many newcleaning products introduced in Mildly Abrasive Powder or Liquid Cleansers - Ajax,
themarketplace each year, it is not possibleto list all BarkeepersFriend,Cameo,Comet,SoftScrub.(Note:Ifthe
productsthat canbe safelyusedtocleanthisappliance, cleaner is recommendedfor useon plastic,glass, or
porcelainfinishes,it canbeusedonthesameappliance
ALWAYS READ THE MANUFACTURER'S finish.)
INSTRUCTIONSto be surethe cleanercan besafely used
on this appliance. Also, read and carefully follow the Non-Abrasiveor Scratchless Plasticor Nylon Scouring
manufacturer'sdirectionswhenusinganycleaningproduct. Pads or Sponges - ChoreBoy PlasticcleaningPuff,
To determineif a cleaningproductis safe, test a small ScrungeScrubSponges, or Scotch-BriteNo Scratch,
inconspicuousarea usinga verylightpressureto see iftheCookwareorKitchenSponge.
surfacemayscratchordiscolor.Thisisparticularlyimportant
for porcelainenamel, highly polished, shiny, painted, or Abrasive or Scouring Pads - S.O.S.,BrilloSteel Wool
plasticsurfaces. Soap,or Scotch-Brite WoolSoap Pads.
The following brands mayhelp youto make an appropriate (Brandnames for the abovecleaningproductsare registered
selection: trademarksoftherespectivemanufacturers.)
Glass Cleaners- Bon Ami, Cinch, Glass Plus, Windex.Be sure appliance is off and all parts are cool before
Dishwashing Liquid Detergents- Dawn,Dove,Ivory,Joy. handlingor cleaningto avoiddamage and possibleburns.
If a part is removed, be sure itis correctly replaced.
MildLiquidSpray Cleaners- Fantastik, Formula 409. To prevent staining or discoloration, clean range
Non-Abrasive Cleaners -BenAmi, pasteof bakingsoda after each use.
and water.
PARTS
Baked Enamel: • Detergent and water Useadry paper towelorcloth towipe upspills,especiallyacid spills,assoonasthey
• Side panels *Mild liquidcleaner occur.Thisis especiallyimportant for whitesurfaces.Whensurface iscool, washwith
• Storage drawer •Glass cleaner detergent and water• Do not use abrasive or harsh cleaning liquids and powders or
• Oven door oven cleaners.These will scratchand permanently damagethe finish. Drywith a soft
• Backguard cloth.
Broiler Pan and • Detergentandwater Pretreatthebroilerpanandinsertwithanon-stickvegetablecoatingsuchasPamor
Insert • Plasticor soap-filledscouringpad Mazolato makecleaningeasier.
•DishwasherRemovefromovenafteruse.Coolthenpouroffgrease.Placesoapyclothoverinsert
andpan; letsoaktoloosensoil.Washinwarmsoapywater.Usesoapfilledscouring
padto removestubbornsoil.Broilerpan and insertcanbecleaned inthedishwasher.
Control Knobs * Detergent and water Foreaseofcleaning,turn offknob and remove by pullingforward. Wash, rinse,and
• Mild liquidsprays dry. Donor use abrasive cleaning agents as they mayscratch the finish and remove
• Glass cleaners the markings. Turnon each elementto besure knobs have beencorrectly replaced.
Drip Bowls, Chrome
•Brownfoodstains• Detergentandwater After eachuse,wash,rinseand dry topreventdifficultsoils.Ifheavilysoiled,gently
•Plasticscouringpadsscrubwithplasticscouringpad.If soilisallowedtoburnon, itmaybeimpossibleto
•Mildabrasivecleaners remove.
Do not cover with aluminum foil.
•Blue/goldheat •FlitsMetalPolishThesestainsare causedbyoverheating,and normallyoccurovera periodoftime.
stains(Followpackagedirections) Theyareusuallypermanentandwillnotaffectthecookingperformance.Tominimize:
t. Avoidexcessiveuseofthehighheatseffing.UseHIGH onlytostartcooking,then
lowerthesettingtofinishcooking.
2. Use flat b0ttom pans that donot extend morethan two inches from the surface
element.
A non-abrasive metalpolishsuch asFlitz may beused tohelp removestains.Flitzis
available in many automotive supply and hardware stores.

CARE AND CLEANING CHART 13
Drip Bowls, •Detergentandwater Aftereach use,wash,rinseanddryto preventdifficultsoils.Tocleanbyhand,soakin
Porcelain • Mild abrasivecleaners hot sudsywater,then usemildabrasivecleanerand plasticscouringpad.
• Plasticscouringpads Donot cover with aluminum foil.
•Dishwasher Porcelainbowlsmaydiscolororcra__eovertimeorifoverheated.Thisis normaland
doesnotaffectthecookingperformance.
Elements, Elementsareself-cleaning.Soilwillburnoffaselementsareused.Donotsprayoven
Oven and Coil cleaneronelements, electricalhook up orconnection,Do net immersecoil-type
surfaceelementsinwater.
Glass •Detergentandwater Topreventstainingoftheovenwindow,avoidusing excessive amountsof water
•Ovenwindow,if • Glasscleaner whichmay seep underor behindglass.Wash withdetergentand water. Remove
equippedstubbornsoilwithpasteofbakingsodaandwater.Donotuseabrasivematerialssuch
asscouringpads,steelwoolorpowderedcleaningagents.Theywilldamageglass.
Rinsewithclearwateranddry.
MetalFinishes •Detergentandwater Donotuseovencleanerorabrasiveagents,astheywilldamagethefinish.Remove
• Trim • Mildabrasivecleaners stubbornsoilwith soapand water. Polishwith asoft cloth.
Oven Racks• Detergent and water Clean with soapy water. Remove stubborn soil with cleansing powder or soap filled
• Plastic scouring pad scouring pad. Rinse and dry.
• Cleansing powders
• Soap-filled scouring pads
Plastic Finishes • Detergent and water Do not use oven cleaner,powderor liquidcleansers, abrasive or causticcleaning
•Doorhandle •Pasteof bakingsodaandwater agentson plasticfinishes.Thesecleaningagentswillscratchor marrthe finish.
•Controlpanel • Non-abrasiveplasticpad or To preventstainingor discoloration,remove fat,grease or acid (tomato, lemon,
•Endcapssponge vinegar,milk,fruitjuice,marinade)soilsimmediatelywitha drypapertowelorcloth.
•Trim When surfaceiscool,clean,rinse, anddry.
Porcelain Enamel • Detergentand waterPorcelainenamelis glass fused onmetal and may crackor chip withmisuse.
• Cooktop,coil • Paste of bakingsoda and water Porcelainenamel is acid resistant, notacid proof.All spillovers,especiallyacidicor
elements • Non-abrasive plastic pad or sugar spillovers, should bewiped up immediately with a dry cloth. Surface may
• Oven interior sponge discoloror dull ifsoil,especiallyacidic soil,is not removed. Neverwipeoff awarm or
• Ovencleaner,porcelainoven hotsurface witha damp cloth.This maycausecrackingand chipping.Neveruseoven
cavity only. cleaners, abrasive or caustic cleaning agents on exterior finishof range.Use oven
cleaner only on porcelain enamel oven interior,
Silicone Rubber • Detergentand water"Doorgasketis locatedOnthe doorplug.DONOTREMOVEGASKE]_Washwith
Door Gasketsoap.Rinsethoroughly,

14 SERVICE INF( )RMATI( PN
Part or all of your electric range does not operate • Didyouallowtimeforthebroil elementto preheat?
•Isthe rangepluglooseor disconnectedfromtheelectrical•Did you usethebroiler pan that came withthe range?
outlet? • Was aluminumfoil used onthe broiler insert,blocking the
•Areany housefusesblownor circuitbreakers tripped? slitsfor fat drainage?
• Has the power supplyto the home been interrupted? =Was the oven door opened to the broil stop position?
• Are the oven controls properlyset?
Surface elements failtoturn on or heat thefood
properly.Donot attempt to servicethe applianceyourselfunless
• Is therangeplugloose or disconnectfrom the electricaldirectedto do so inthis manual. Contact the dealerwho
outlet? sold you the appliance for service.
•Are coilelementsproperlypluggedintothereceptacles?
• Were appropriate utensils used? (See page 4.) If your appliance should require service or replacement
, parts,contact your dealer or authorized servicer.Use only
• Are the surface element controls properly set? genuine factory parts if replacement parts are necessary.
• Is voltageto the house reduced? Consultthe Yellow Pages inyour telephone directory under
appliance forthe authorized service center nearestyou. Be
Food not baking or cooking correctly sureto includeyour name, address,and phonenumber,
• Are theoven racks properlyplacedfor baking? alongwiththe modeland serialnumbersof the appliance.
(See front cover for location of your model and serial
• Haveyou used aluminumfoil correctly? numbers.)
• Wasthe oven preheated as recommended?
• Are the controls properly set? Ifyouere notsatisfiedwith the localresponsetoyourservice
requirements, writeto Maytag Customer Service, P.O.Box
• Isthere 1to 2inches ofspacebetween pansandthe oven 2370, Cleveland, TN 37320-2370. Include the complete
walls? modeland serialnumbersof the appliance, thenameand
• Are the range and oven racks level? address of the dealer from whom you purchased the
• Was good cookware/bakewareofthe propersizeused? appliance,the dateof purchaseanddetailsconcerningyour
problem.
• Was the oven vent covered or blocked on the range
surface? Ifyou do not receive satisfactory service, you may contact
• Are you using a tested recipefrom a reliablesource? the Major Appliance Consumer Action Program by letter
• Haveyou used aluminumfoil correctly? includingyour name,address,and telephonenumber, as
well as the model and serial numbers of theappliance.
Baking results differ from previous oven
•Oven thermostatcalibrationmay differbetweenoldand MajorApplianceConsumerActionProgram
20 NorthWackerDrive
new oven. The newer oventhermostatmay be moreChicago, IL 60606
accuratethantheoneonyourpreviousoven. Followa
reliablerecipeand reviewinformationonpages6-9. MACAP (MajorApplianceConsumerActionProgram)isan
independentagencysponsoredbythreetradeassociations
Food does not broil correctly as a courtof appeals onconsumercomplaintswhichhave
•Wasthe controlset properlyforbroiling?(Seepage10.) notbeenresolvedsatisfactorilywithinareasonableperiodof
•Wastheproperrack positionused?(Seepage10.) time.
50_POST-CONSUH£RHBEA
100%gE-INKEONEWSPAP_S,MAGAZINES&CATALOGS
Table of contents
Other Maytag Kitchen Appliance manuals