Mdex MX530 User manual

Setup Guide
mdex Router
MX530|MX880
Release: November 22, 2019 (v.2.1)
This Setup Guide describes the commissioning of the mdex Router MX530
and mdex Router MX880 with the commonly used functions.

Setup Guide - mdex Router MX530|MX880
Page 2
These setup instructions may differ on delivery of the MX530/MX880 with individual configuration, in
the project business or as an mdex package/bundle (e.g. with an mdex fixed.IP+/public.IP via
OpenVPN or an mdexSIM with public.IP). Please observe the enclosed supplementary instructions
and/or the additional router labels.
All functions and settings described are only available when using the software valid at the time of drafting of this
document. All information is provided without any guarantee.
The information and data contained in this document are subject to change without notice.
Copyright notice:
This document is copyrighted by mdex GmbH and may only be reproduced for internal use. All other reproductions, in
whole or in part, are not permitted without the prior written consent of mdex GmbH.
© 2019 mdex GmbH. All rights reserved
This Setup Guide and further information and descriptions of the mdex router
MX530/MX880 can be found in the mdex Support Wiki at https://wiki.mdex.de.

Setup Guide - mdex Router MX530|MX880
Page 3
Table of contents
1Specifications....................................................................................................................... 4
1.1 Scope of Delivery........................................................................................................4
1.2 Technical specifications ..............................................................................................5
1.3 Preconfiguration (factory default) ................................................................................ 6
1.4 Connectors and Interfaces ..........................................................................................7
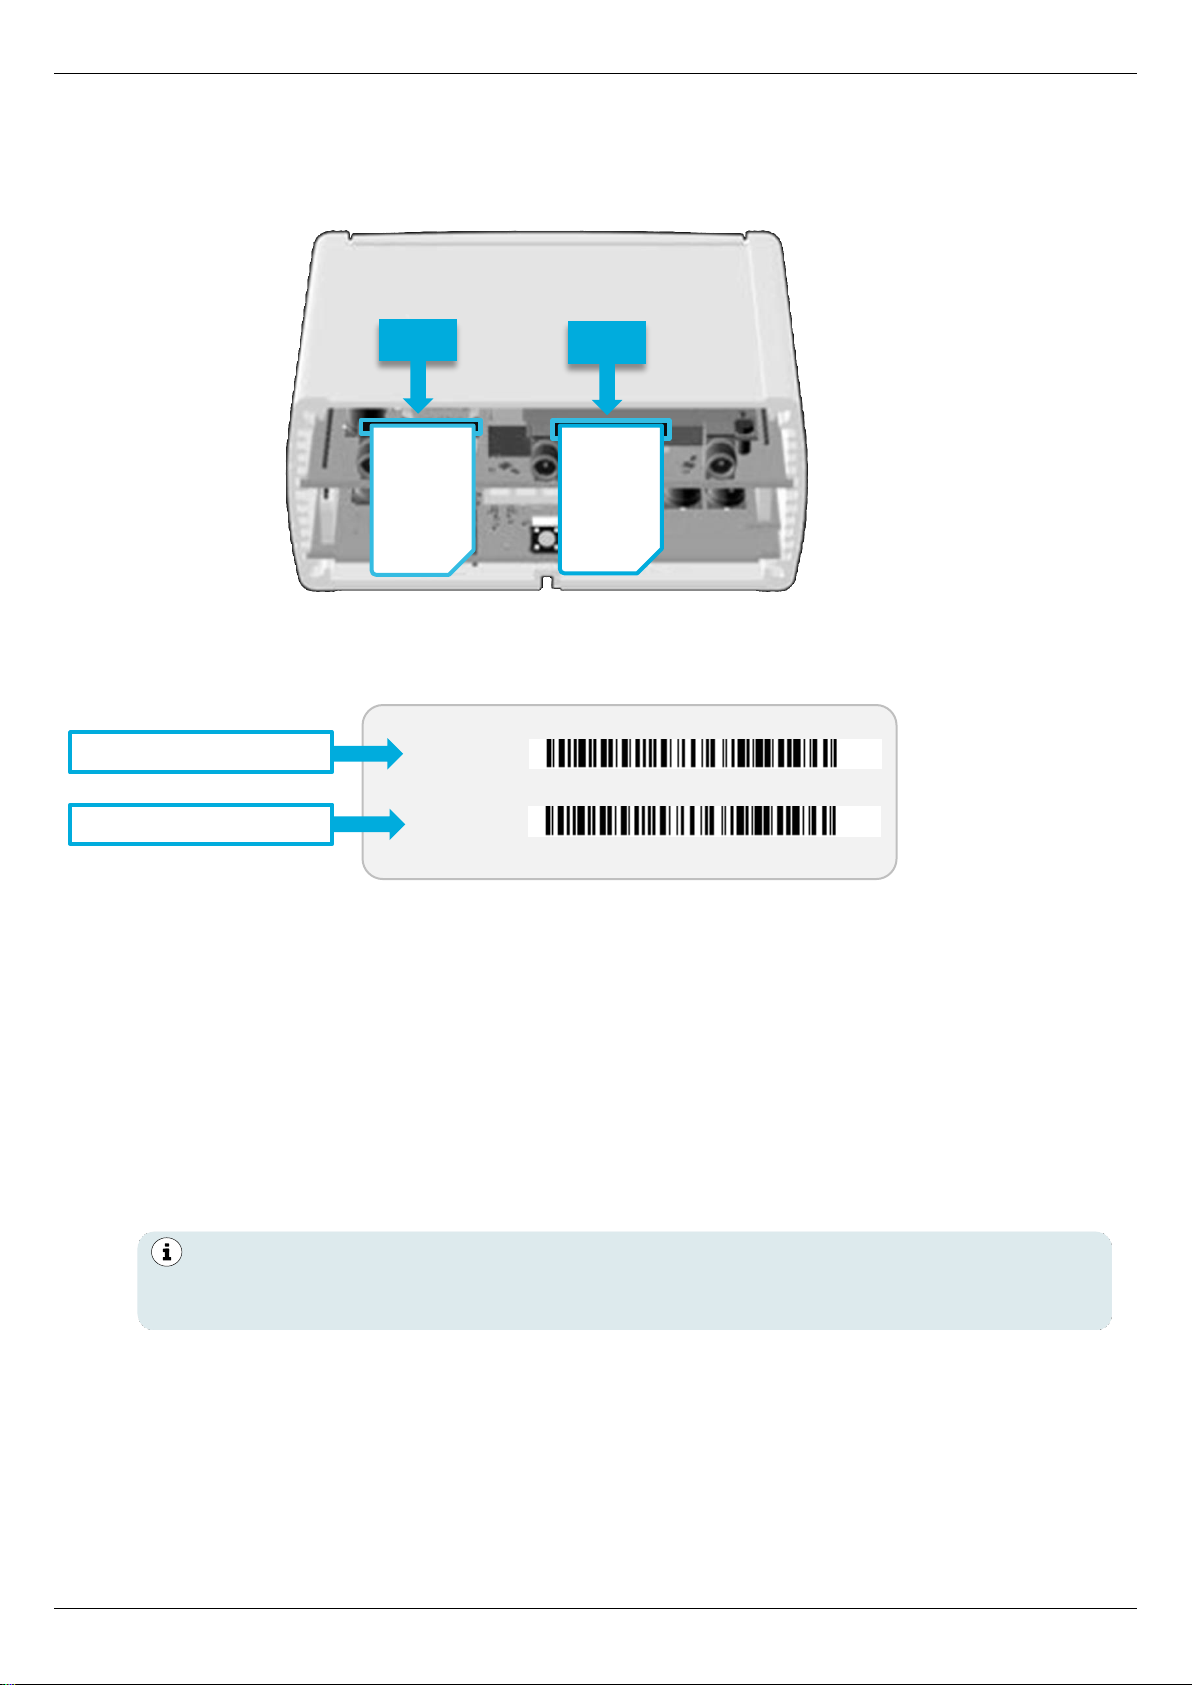
1.5 Preinstalled mdexSIM ................................................................................................. 8
2Installation........................................................................................................................... 11
2.1 Quick Start ................................................................................................................11
2.2 Replace SIM card...................................................................................................... 13
2.3 Connect antennas.....................................................................................................14
2.4 Powering the router................................................................................................... 15
2.5 DIN rail mounting....................................................................................................... 16
2.6 Connection of terminal devices ................................................................................. 17
3Configuration ...................................................................................................................... 19
3.1 Connecting the PC.................................................................................................... 19
3.2 Login to WebUI.......................................................................................................... 20
3.3 Setup Wizard............................................................................................................. 21
3.4 Login Password.........................................................................................................22
3.5 Mobile settings (SIM)................................................................................................. 22
3.6 mdex OpenVPN-Client..............................................................................................27
3.7 Router LAN IP address .............................................................................................29
3.8 DHCP-Server ............................................................................................................ 30
3.9 Forwarding ................................................................................................................ 32
3.10 Configuration Access / Remote Access .................................................................... 34
3.11 Ping Reboot............................................................................................................... 36
3.12 Periodic Reboot.........................................................................................................37
4Additional functions ........................................................................................................... 38
4.1 WiFi (Wireless Access Point) .................................................................................... 38
4.2 Connection status and signal strength ...................................................................... 39
4.3 NTP time server (automatic time synchronization)....................................................41
4.4 Backup & Restore configuration................................................................................41
4.5 Reboot....................................................................................................................... 42
4.6 Reset to factory default ............................................................................................. 42
4.7 Firmware Update.......................................................................................................43
4.8 Expert Mode.............................................................................................................. 44
4.9 IPsec connection (to plugged VPN-Router)............................................................... 44
5Important information......................................................................................................... 45

Setup Guide - mdex Router MX530|MX880
Page 4
1 Specifications
The MX530 is a Dual-SIM UMTS mobile router for the 2G and 3G mobile networks.
The MX880 is a Dual-SIM LTE mobile router and intended for the 2G, 3G and 4G mobile networks.
The MX880 has additional interfaces (RS232, RS485, USB) for optional special functions and offers
the possibility to connect an optional GPS antenna.
For further details see chapter 1.2 Technical specifications (Page 5).
1.1 Scope of Delivery
Accessories:
MX530
MX880
230V plug-in power supply with router connector
Quantity: 1
Quantity: 1
Additional power cable with router connector
(Only required with MX530 to connect an external power supply.)
Quantity: 1
-
Mobile rod antenna
-
Quantity: 2
Mobile antenna –with ccable and magnetic base
Quantity: 1
Quantity: 2
WiFi rod antenna
Quantity: 2
Quantity: 2
Network cable (Ethernet)
Quantity: 1
Quantity: 1
DIN rail bracket (including 2 fixing screws)
Quantity: 1
Quantity: 1
Blind plug for WAN socket
Quantity: 1
Quantity: 1
mdexSIM Vodafone (already preinstalled in ‘SIM1’ Slot) (1
Quantity: 1
Quantity: 1
mdexSIM Telekom (already preinstalled in ‘SIM2’ Slot) (1
Quantity: 1
Quantity: 1
MX530/MX880 Setup Guide
Quantity: 1
Quantity: 1
I/O connector (10-pin)
-
Quantity: 1
RS485 connector (6-pin)
-
Quantity: 1
(1 For the use of the respective mdexSIM see chapter 1.5 Preinstalled mdexSIM (Page 8).

Setup Guide - mdex Router MX530|MX880
Page 5
1.2 Technical specifications
Hardware:
MX530
MX880
Dimensions L x W x H:
80 mm x 106 mm x 46 mm
(without DIN rail bracket)
Weight:
about 280g
(without DIN rail bracket)
CPU / RAM:
560 MHz MIPS CPU, 128MB RAM
Input voltage:
9 - 30VDC, max. 7W
4-port switch:
(3 x LAN, 1 x WAN/configurable)
10/100 Mbps BASE-T, Auto MDI/MDIX
Environmental conditions:
Temperature range (operation):
-40° to +70° C
Humidity (operation):
10% to 90%, non-condensing
Temperature range (storage):
-45° to +80° C
Humidity (storage):
5% to 95%, non-condensing
Mobilfunk & WIFI:
4G LTE:
-
max. 150 Mbit/s Download /
50 Mbit/s Upload
3G HSPA+:
-
max. 42,2 Mbit/s Download /
5,76 Mbit/s Upload
3G HSPA:
max. 14,4 Mbit/s Download / 5,76 Mbit/s Upload
3G UMTS:
max. 384 kbit/s Download / 384 kbit/s Upload
2G GPRS/EDGE:
max. 236,8 kbit/s Download / 236,8 kbit/s Upload
WIFI:
IEEE 802.11 b/g/n (2,4 GHz), WEP/WPA/WPA2 encryption,
2T2R (max. 300 Mbit/s)

Setup Guide - mdex Router MX530|MX880
Page 6
1.3 Preconfiguration (factory default)
The MX530/MX880 is preconfigured for the operation of the mdexSIM Vodafone (SIM1) and for the
accessibility of a connected terminal device. Here you will find the factory default in detail.
Network settings
LAN IP address:
192.168.0.1
LAN access:
HTTP Port: 8080 | HTTPS Port: 443 | SSH Port: 22
Remote access:
HTTP Port 8080: enabled (via WAN IP of the SIM card)
HTTPS Port 443: locked | SSH port 22: locked
Login Username /
Password:
admin / admin01
DHCP Server:
enabled (IP address 192.168.0.100 is assigned)
Port-Forwarding:
Host forwarding to 192.168.0.100
Wireless LAN (WIFI):
disabled
NTP (Time Server):
Time synchronization enabled (Time Server: time.mdex.de)
Mobile settings
SIM 1 (primary SIM)
SIM 2
SIM card (preinstalled):
mdexSIM Vodafone
mdexSIM Telekom
APN:
m2m.cda.vodafone.de
mdex.ic.m2mportal.de
Username:
Password:
mdex
mdex
PIN:
without
without
Settings for stable connection
Daily restart
(Daily reboot):
enabled (daily at 23:00 pm)
Ping reboot:
enabled (every 5 minutes)
Ping Server:
ping.mdex.de
Please note that the preconfiguration of the MX530/MX880 may differ for orders with
individual configuration, in the project business or as another mdex product (for example,
'mdex mobile.LAN packet' or 'mdex LTE per packet').
The server ping.mdex.de is only accessible from
the mdex network! See Chapter 3.2.1 Important
notes about the Ping Reboot (Page20).

Setup Guide - mdex Router MX530|MX880
Page 7
1.4 Connectors and Interfaces
MX530 front panel MX880 front panel
LAN Ethernet ports with status LED for connecting a PC or terminal devices
WAN Ethernet port with status LED for special function to connect the MX530/MX880
to external networks or routers
Connection for power supply (9-30V DC, 7W) with power LED
Mobile connection Status Display ‘Led Status Display’ →4.2.1 LED Status
indicators (Page 39)
Mobile strength display ‘Led Status Display’→4.2.1 LED Status indicators (Page
39)
RS485 contacts for special functions (MX880 only)
RS232 socket for special functions for connecting serial devices (MX880 only)
I/O contacts for input and output for special functions (MX880 only)
MX530 back panel MX880 back panel
SMA connector for main mobile antenna (MAIN)
SMA connector for additional mobile antenna (AUX)
RP-SMA connectors for WIFI antenna
RESET button for restart and resetting to factory default
SMA connector for optional GPS antenna (MX880 only)
USB connector for special functions (MX880 only)
3
2
1
4
5
6
7
8
9
10
11
1
12
14
13
4
15
16
17
No PoE (Power over Ethernet) powered network cable may be connected to the LAN/WAN
sockets! The PoE voltage would destroy the MX530/MX880!
3
2
1
4
5
6
7
3
2
1
4
8
5
10
6
7
9
11
12
13
14
15
16
17
13
14
15
11
12

Setup Guide - mdex Router MX530|MX880
Page 8
1.5 Preinstalled mdexSIM
The MX530/MX880 comes with two preinstalled mdex SIM cards.
The ICCIDs of the preinstalled mdex SIM cards can be found on the label of the box or the bottom of
the MX530/MX880:
1.5.1 mdex SIM Vodafone (SIM1)
For the use of the preinstalled mdexSIM Vodafone , please note the following:
▪The mdex SIM Vodafone is preinstalled in SIM1 Slot of the MX530/MX880.
▪The desired tariff of this mdex SIM Vodafone must be ordered from mdex.
▪The mobile settings are already preconfigured to operate the mdex SIM Vodafone.
When using the mdexSIM Vodafone incl. mdex public.IP, a different SIM card username
may be required according to the chapter 3.5 Mobile settings (Page22).
▪The mdex SIM must be unlocked according to chapter 1.5.3 Unlock mdexSIM (Page10).
▪To avoid unnecessary costs, the mdex SIM is monitored by an alarm profile.
See https://wiki.mdex.de/Support/DOCKostenfallenVerhindern
▪Further information on using a mdex SIM can be found in the mdex Support Wiki at
https://wiki.mdex.de →mdex SIM
XXXXXXXXXXXXXXXX
X
XXXXXXXXXXXXXXXX
02
SIM1 ICCID:
SIM2 ICCID:
mdexSIM Vodafone
mdexSIM Telekom
The required username of the mdex SIM can be found in the order confirmation which
was sent to you by e-mail. Alternatively, you can also read the username in the mdex
Management Portal as described on the following page.
SIM 1
SIM 2
mdexSIM
Telekom
mdexSIM
Vodafone

Setup Guide - mdex Router MX530|MX880
Page 9
1.5.2 mdex SIM Telekom (SIM2)
To use the preinstalled mdexSIM Telekom please note the following:
▪The mdex SIM Telekom is preinstalled in SIM2 Slot of the MX530/MX880.
▪The desired tariff of this mdex SIM Telekom must be ordered from mdex.
▪The mdex SIM must be unlocked according to chapter 1.5.3 Unlock mdexSIM (Page 10).
▪To avoid unnecessary costs, the mdex SIM is monitored by an alarm profile.
See https://wiki.mdex.de/Support/DOCKostenfallenVerhindern
▪Further information on using a mdex SIM can be found in the mdex Support Wiki at
https://wiki.mdex.de →mdex SIM
Read the SIM card username in the mdex Management Portal
1. Log into themdex Management Portal: https://manager.mdex.de.
(Your access data have been sent to you via email.)
2. Click on SIM Cards →brows SIM cards.
3. Clicking on Start Search displays all mdex SIM cards.
(You can limit the search by, for example, entering the ICCID of the mdex SIM.)
4. Click on the respective SIM card and switch to the Access tab.
Under Access data you will find APN, username and password of your mdex SIM.
xxxxxxxxxxxxxxxxxxxx
Username
Access
To use the mdexSIM Telekom (SIM2) the following settings are required:
1. Click on the Network →Mobile (SIM): _SIM Management_.
2. Set the Primary SIM card to SIM 2 and click on Save.
SIM2 (mdex SIM Telekom)

Setup Guide - mdex Router MX530|MX880
Page 10
1.5.3 Unlock mdexSIM
For safety reasons, the mdex SIM cards are locked on delivery and must first be unlocked before
being used for the first time.
Unlock SIM card:
1. Log into mdex Management Portal at https://manager.mdex.de.
(Your login access data have been sent to you via email.)
2. Click on SIM Cards →Locked SIM Cards.
Check the SIM card(s) and click on the icon (Unlock SIM cards).
3. Follow the instructions on the portal to unlock the SIM card(s) and then click on
_Back to Search_button.
4. Full unlocking of the SIM card can take up to 20 minutes.
After a few minutes, check the SIM card status by clicking on _Start search_button.
This step is required only when using a preinstalled mdexSIM !
▪The tariff for the desired SIM card must have been ordered from mdex.
▪The ICCIDs of the preinstalled SIM cards are located on the router label.
SIM1: mdexSIM Vodafone SIM2: mdexSIM Telekom
Unlock SIM card(s)
Select SIM card(s)
As long as the status Locked is displayed, the process is still in progress.
To update the status display, click on Start Search button again.
As soon as the status Enabled is displayed, the SIM card is ready for use.
Update Status Display

Setup Guide - mdex Router MX530|MX880
Page 11
2 Installation
Please pay attention to the notes in the chapter 5 Important information (Page 45).
2.1 Quick Start
Depending on the intended use of the MX530/MX880, here you will find the necessary setup steps
for quick commissioning.
For more individual settings, see the chapters 3 Configuration and 4 Additional functions relevant
descriptions.
2.1.1 Own SIM card without mdex IP service
Using the MX530/MX880 as an Internet router with your own SIM card, without mdex IP service
(fixed.IP+ / public.IP) for remote access to a connected terminal device.
1. Install your SIM card according to chapter 2.2 Replace SIM card (Page 13).
2. Connect LTE mobile antennas according to chapter 2.3 Connect antennas (Page 14).
3. Connect power supply according to chapter 2.4 Powering (Page 15).
4. Change the login password according to chapter 3.4 Login Password (Page 22).
5. Set the mobile settings in MX530/MX880 (APN, username, password, PIN) for your SIM card
according to the chapter 3.5 Mobile settings (Page 22).
6. Expand the DHCP IP address range according to chapter 3.8 DHCP-Server (Page 30) for the
number of connected network devices.
7. Disable the ‘DMZ configuration’ according to chapter 3.9 Forwarding (Page 32).
8. As per chapter 3.11 Ping Reboot (Page 36) a publicly accessible server must be set as Ping
Server e.g. ‚public-ping.mdex.de‘ (185.39.176.22).
9. If remote access is not required, it should be disabled for security reasons according to
chapter 3.10 Configuration Access / Remote Access (Page 34).
10.Connect terminal devices according to chapter 2.6 Connection of terminal devices (Page
17).
2.1.2 With mdexSIM & mdex IP service
Using the MX530/MX880 with the preinstalled mdexSIM Vodafone or mdexSIM Telekom, optionally
with a mdex IP service (fixed.IP+ / public.IP).
1. Carry out the measures as per chapter 1.5 Preinstalled mdexSIM (Page 8)
2. Connect LTE mobile antennas according to chapter 2.3 Connect antennas (Page 14).
3. Connect power supply according to chapter 2.4 Powering (Page 15).
4. Change the login password according to chapter 3.4 Login Password (Page 22).
5. If remote access is not required, it should be disabled for security reasons according to
chapter 3.10 Configuration Access / Remote Access (Page 34).
6. Connect terminal device(s) according to chapter 2.6 Connection of terminal devices (Page
17).

Setup Guide - mdex Router MX530|MX880
Page 12
2.1.3 Own Vodafone/Telekom SIM card & mdex IP service
Using the MX530/MX880 with your own Vodafone/Telekom SIM card with mdex IP service fixed.IP+ /
public.IP as network type ‘Vodafone’ or ‘Telekom’.
1. Install your SIM card according to chapter 2.2 Replace SIM card (Page 13).
2. Connect LTE mobile antennas according to chapter 2.3 Connect antennas (Page 14).
3. Connect power supply according to chapter 2.4 Powering (Page 15).
4. Change the login password according to chapter 3.4 Login Password (Page 22).
5. If remote access is not required, it should be disabled for security reasons according to
chapter 3.10 Configuration Access / Remote Access (Page 34).
6. Set the mobile settings in MX530/MX880 (APN, username, password, PIN) for your SIM card
according to the chapter 3.5 Mobile settings (Page 22).
7. Connect terminal device(s) according to chapter 2.6 Connection of terminal devices (P. 17).
2.1.4 Own SIM card & mdex IP service, fixed.IP+ via OpenVPN'
Using the MX530/MX880 with your own (any) SIM card and the mdex IP service ‘public.IP’ as
network type ‚OpenVPN‘.
1. Install your SIM card according to chapter 2.2 Replace SIM card (Page 13).
2. Connect LTE mobile antennas according to chapter 2.3 Connect antennas (Page 14).
3. Connect power supply according to chapter 2.4 Powering (Page 15).
4. Change the login password according to chapter 3.4 Login Password (Page 22).
5. Set the mobile settings in MX530/MX880 (APN, username, password, PIN) for your SIM card
according to the chapter 3.5 Mobile settings (Page 22).
6. Setup the integrated OpenVPN Client according to chapter 3.6 mdex OpenVPN-Client (Page
27) with the Role ‚mdex fixed.IP+‘.
7. Set the Source zone to VPN for forwarding according to chapter 3.9 Forwarding (Page 32).
8. Set the Source zone to VPN for remote access according to chapter 3.10 Configuration
Access / Remote Access (Page 34) or disable it for security reasons if no remote access is
required.
9. Connect terminal device(s) according to chapter 2.6 Connection of terminal devices (P. 17).
2.1.5 Own SIM card & mdex IP servic, public.IP via OpenVPN‘
Using the MX530/MX880 with your own (any) SIM card and the mdex IP service ‘public.IP’ as
network type ‚OpenVPN‘.
1. Install your SIM card according to chapter 2.2 Replace SIM card (Page 13).
2. Connect LTE mobile antennas according to chapter 2.3 Connect antennas (Page 14).
3. Connect power supply according to chapter 2.4 Powering (Page 15).
4. Change the login password according to chapter 3.4 Login Password (Page 22).
5. Set the mobile settings in MX880 (APN, username, password, PIN) for your SIM card
according to the chapter 3.5 Mobile settings (Page 22).
6. Setup the integrated OpenVPN Client according to chapter 3.6 mdex OpenVPN-Client (Page
27) with the Role ‚mdex fixed.IP+‘.
7. Set the Source zone to VPN for forwarding according to chapter 3.9 Forwarding (Page 32).
8. Set the Source zone to VPN for remote access according to chapter 3.10 Configuration
Access / Remote Access (Page 34) or disable it for security reasons if no remote access is
required.
9. Connect terminal device(s) according to chapter 2.6 Connection of terminal devices (P. 17).

Setup Guide - mdex Router MX530|MX880
Page 13
2.2 Replace SIM card
This step can be skipped when using the preinstalled mdex SIM card(s).
To insert another SIM card, follow the steps below.
1. Unscrew the 4 screws on the back of the router (antenna side) and remove the back cover.
MX530 MX880
2. Pull out the preinstalled SIM card(s) and insert the new SIM card(s) into the desired SIM card
slot (preferably SIM 1).
3. Secure the back cover with the four screws.
4. The MX530/MX880's mobile settings must be adjusted to use the new SIM card(s) as per
chapter 3.5 Mobile settings (Page 22).
new
SIM
SIM 1
SIM 2
mdexSIM
Telekom
mdexSIM
Vodafone

Setup Guide - mdex Router MX530|MX880
Page 14
2.3 Connect antennas
There are labels on the antennas with the name of the associated antenna connection.
LTE
(MX880)
The MX880 comes with 4 LTE antennas (MOBILE/LTE). Depending on the installation
site, you can either attach the LTE antennas directly on the router using the articulated
joint or set the two magnetic base antennas with the connection cable and magnetic
base slightly away from the router, e.g. when the MX880 is mounted in an IT cabinet.
To establish a mobile connection, LTE antenna must be connected to the LTE MAIN
socket. By using the additional LTE antenna to LTE AUX the LTE download rate can be
increased.
MOBILE
(MX530)
The MX530 comes with a mobile antenna (with connection cable and magnetic base) for
connecting to the left MOBILE (MAIN) socket. (see figure)
(The other socket, MOBILE '(AUX) serves to connect another (optional) mobile antenna,
for example to increase the download rate in mobile use.)
WiFi
Only when using the WIFI according to chapter 4.1 WiFi (Wireless Access Point)
(Page 38) the two WiFi antennas must be connected to the WiFi sockets.
GPS
(MX880)
The MX880 has a GPS receiver to determine the current position. The optional GPS
antenna needs to be connected only when using the GPS function and is located in a
GPS reception area.
The magnetic base antennas have the best reception strength when mounted on a metal
surface. You can also use outdoor antennas in order to further enhance mobile reception.
MX530
WiFi
WiFi
MOBILE
(MAIN)
MX880
LTE MAIN
(MOBILE)
WiFi
WiFi
GPS
LTE AUX
(MOBILE)

Setup Guide - mdex Router MX530|MX880
Page 15
2.4 Powering the router
Power is supplied to the MX530/MX880 using the supplied plug-in power supply.
(Temperature range of the plug-in power supply: 0° to + 40° Celsius)
The router connector of the plug-in power supply is plugged into the PWR socket.
2.4.1 Using another power supply
As an alternative to the enclosed plug-in power supply, the MX530/MX880 can also be supplied with
a DIN rail power supply or own power supply (9V to 30V DC, 7W).
MX530
Use the supplied power cable and attach the red wire (+) and black wire (-) to the external power
supply. Pay attention to the correct polarity!
MX880
Unscrew the screws of the green router connector plug attached to the power supply and attach the
wires to the external power supply.
Pay attention to the correct polarity!
-
+
9V to 30V DC (7W)
9V to 30V DC (7W)
black
-
red +
MX530
MX880

Setup Guide - mdex Router MX530|MX880
Page 16
2.5 DIN rail mounting
The MX530/MX880 can be mounted on a DIN rail using the supplied DIN rail bracket. The DIN rail
bracket is fastened in the groove to the bottom or side of the router with the two supplied screws.
(Mounting the DIN rail bracket on the MX530 is the same as mounting on the MX880.)
Screw
Screw
bottom
laterally

Setup Guide - mdex Router MX530|MX880
Page 17
2.6 Connection of terminal devices
There are 3 LAN sockets available for connecting the terminal devices. The WAN socket is reserved
for special functions and is not intended for the connecting terminal devices.
2.6.1 Connection of only one terminal device
The MX530/MX880 is already preconfigured for connecting a terminal device.
Please note the following information.
1. Connect the terminal device to a free LAN socket (LAN1, LAN2 or LAN3) with a network
cable. The WAN socket is not intended for connecting terminal devices!
2. Network setting of the connected terminal device:
The terminal device can be set to ‘Obtain an IP address automatically’. The MX530/MX880
is preconfigured for dynamic assignment of IP addresses (DHCP) and then assigns the IP
address 192.168.0.100.
Alternatively, the network settings can also be set permanently in the terminal device:
•IP address: 192.168.0.100
•Default Gateway: 192.168.0.1 (LAN IP address of the MX530/MX880)
•DNS Server: 192.168.0.1 (LAN IP address of the MX530/MX880)
The IP address range of the DHCP-server should then be changed according to chapter 3.8
DHCP-Server (Page 30)as 192.168.0.100 is no longer assigned automatically.
3. All incoming data packets to the WAN IP address of the MX530/MX880 will be forwarded to
the IP address 192.168.0.100. This terminal device is thus accessible via remote access.
No PoE (Power over Ethernet) powered network cable may be connected to the LAN/WAN
sockets! The PoE voltage would destroy the MX530/MX880!
By default, the MX530/MX880 assigns only one IP address!
If you have connected a PC to the router for configuration, the IP address
192.168.0.100 assigned to the PC will be assigned to another connected terminal
device after 5 minutes (timer preset Lease time) once the PC has been removed.
Restarting the router releases the IP address immediately.
When using a public.IP, access is possible without restrictions via the Internet. For
security reasons, the terminal device should therefore be secured with a firewall
against unauthorised access. Additional protection is required if port forwarding is set
up only for the required ports according to the Chapter 3.9.2 Port-Forwarding (Page
33).

Setup Guide - mdex Router MX530|MX880
Page 18
2.6.2 Connection of several terminal devices
To connect multiple terminal devices to the MX530/MX880, note the following:
1. Connect the terminal devices to a free LAN socket (LAN1, LAN2 or LAN3) with a network
cable. The WAN socket is not intended for connecting terminal devices!
If more than 3 terminal devices are to be connected, an additional (commercially available)
Ethernet switch must be used which is connected to a free LAN port (LAN1, LAN2 or LAN3)
of the MX530/MX880.
2. Set the network settings of the connected terminal devices:
If the terminal devices are to obtain their IP addresses automatically from the MX530/MX880,
you must expand the DHCP-server to assign additional IP addresses according to chapter 3.8
DHCP-Server (Page 30) and, if necessary, set up a fixed assignment according to the
chapter 3.8.1 Fixed assignment of IP addresses (Page 31).
Alternatively, you can also set the IP addresses in the terminal devices permanently.
IP address: 192.168.0.2 to 192.168.0.255
Default Gateway: 192.168.0.1 (LAN IP address of the MX530/MX880)
DNS Server: 192.168.0.1 (LAN IP address of the MX530/MX880)
3. If several connected terminals should be accessible remotely, a forwarding according to
chapter 3.9.2 Port-Forwarding (Page 33) must be configured in the router.
If remote access is not desired for any connected terminal device, the default 'DMZ
Configuration' should be disabled for security reasons according to Chapter 3.9.1
Host-Forwarding (DMZ Configuration) (Page 32).

Setup Guide - mdex Router MX530|MX880
Page 19
3 Configuration
3.1 Connecting the PC
The network card of the PC can be set to Obtain an IP address automatically.
Plug the network cable of the PC into a LAN socket (LAN1, LAN2 or LAN3) of the MX530/MX880.
(The WAN socket is not intended for connecting terminal devices!)
MX530/MX880
The MX530/MX880 is preconfigured for the dynamic assignment of IP addresses (DHCP) and
automatically assigns the IP address 192.168.0.100 to the connected PC.
The PC and MX530/MX880 are now in the same IP address range, allowing the PC to access the
MX530/MX880 WebUI using a web browser.
By default, the MX530/MX880 assigns only one IP address (192.168.0.100) to a connected
network device!
•If another network device is connected that already has the IP address 192.168.0.100,
remove this device again.
•The IP address 192.168.0.100 will be released after 5 minutes and then assigned to
your connected PC. Restarting the MX530/MX880 immediately releases the IP address
and then assigns it to your connected PC.
•Alternatively, you can also set the PC NIC to a fixed IP address from the IP address
range 192.168.0.2 to 192.168.0.255 (for example, 192.168.0.20).

Setup Guide - mdex Router MX530|MX880
Page 20
3.2 Login to WebUI
Enter this URL in your web browser: http://192.168.0.1:8080
(Or the current IP address of the MX530/MX880, if it has been changed.)
Username: admin
Password: admin01
(Or the current password, if already changed)
3.2.1 Important notes about the Ping Reboot
Please note the following about the default Ping Reboot.
▪During the MX530/MX880 configuration, Ping Reboot should be temporarily disabled to prevent
the router from rebooting.
Services →Ping/Periodic Reboot:tab _Ping Reboot_
The changed setting must be saved by clicking on _Save_.
▪The "Ping Reboot" should then be enabled again for normal operation.
▪The default server ’ping.mdex.de‘’ is only accessible from the mdex network!
If you use the MX530/MX880 without mdex IP service (fixed.IP+ / public.IP) or without mdex SIM,
be sure to set a publicly accessible server with _Edit_, e.g. public-ping.mdex.de (185.39.176.22).
In the MX530/MX880, the automatic ping connection check for the Ping Server
ping.mdex.de is enabled by default.
Without mobile reception or without connection to mdex, an automatic reboot of the
MX530/MX880 is performed every 15 minutes.
Detailed instructions can be found in the Chapter 3.11 Ping Reboot (Page 36).
Username: admin
Password: admin01
Login
Disable
Other manuals for MX530
3
This manual suits for next models
1
Table of contents
Other Mdex Network Router manuals
Popular Network Router manuals by other brands

Cisco
Cisco Cable Mgmt Bracket Cisco 7513/7576 installation instructions

Siemens
Siemens RUGGEDCOM RSG2100 installation guide

Draytek
Draytek Vigor 2800Gi Declaration of conformity

ZyXEL Communications
ZyXEL Communications IES-5106M user guide

ZyXEL Communications
ZyXEL Communications ZyXEL ZyWALL P1 user guide

Linksys
Linksys SFE1000P Administration guide