MDMouse MD-100 User manual

Systolic
Diet
Diastolic
Exercise
Hypertension
Pharmacist
Regular
Relaxed
Daily
117 over 80
Prevention
Diet
Systolic
Diastolic
Pharmacist
Diet
Daily
Exercise
Doctor
Hypertension
Diastolic
Prevention
Pharmacist
110 over 77
Exercise
Regular
Diet
Diastolic
Prevention
Hypertension
110 over 77
Systolic
Diet
Exercise
Doctor
127over 90
Systolic
MD-100
Blood Pressure
Monitor
User Guide

MDMouse User Manual Model MD-100
2
Intended Use
The MDMouse blood pressure monitor is a noninvasive blood pressure measurement system
intended to measure the systolic and diastolic blood pressures and pulse rate of an adult indi-
vidual, over age 18, at home by using a non-invasive technique in which an inflatable cuff is
wrapped around the left index finger. The cuff circumference is designed to fit adult Left In-
dex Fingers from 1.5 to 3.5 inches (3.7-8.8 cm) in circumference.
Caution
This device is not intended to be a diagnostic device. Self-diagnosis and self-treatment
are dangerous. Contact your physician if you observe values indicating hypertension.
People with severe blood flow problems or disorders should consult their physician prior
to using any blood pressure monitoring device as cuff inflation can cause damage or in-
ternal bleeding.
Do not take measurements right after drinking alcohol, smoking, exercise, or eating as
those activities may distort the results.
Performance can be affected by a number of health factors including age, diabetes,
common arrhythmias, ventricular premature beats, atrial fibrillation, arterial sclerosis,
and pregnancy.
This unit will not serve as a cure for any symptoms of your heart or disease. The meas-
urement result is only for reference. Always consult your physician if any measuring re-
sults are to be interpreted.
Always follow the operation procedures described in this manual to measure your blood
pressure correctly.
Do not use the MDMouse to measure blood pressure on infants or children (it is OK to
use as a normal computer mouse).
Do not use the unit on infants or persons who cannot express one's intention.
Do not inflate the cuff without being wrapped on an index finger.
Do not drop the MDMouse.
Safeguard the unit from strong impact.
Measurement may be inaccurate if the device is used close to a television, microwave
oven, mobile phone, X-ray or other devices with strong electrical field.
Do not attempt to service the unit yourself –please refer to an authorized repair facility
if your MDMouse system needs repair.
Be sure to store this manual for future reference.
!

MDMouse User Manual Model MD-100
3
Requirements
Your MDMouse monitor requires the following to use:
Windows®-based Personal Computer with available USB port
CD-ROM drive to install software or internet connection to download software if you
don’t have a CD-ROM drive
Internet connection to email data or update online data records
Included in Package
1 MDMouse blood pressure monitor
1 Quick Start User Guide
1 CD-ROM with MDMouse application software

MDMouse User Manual Model MD-100
4
A Great Step to a Healthier Life
Thank you for choosing the innovative MDMouse® blood pressure monitor!
High blood pressure is a significant contributor to serious diseases such as heart attack and
stroke, but it is largely controllable with knowledge, lifestyle and diet, and working with your
physician. Regular monitoring will provide you and your physician with the knowledge needed
to decrease your risk of disease.
Use the MDMouse monitor as your normal computer mouse and you will always have a handy
blood pressure monitor right at your fingertips, making it easy to quickly track of your blood
pressure –a great step towards staying healthy!
The following instructions will guide you through installation and how to take a blood pressure
measurement, set user profiles, review your history, and transfer your data history to your phy-
sician. You can also find more information in the “Help” section of the MDMouse application, or
learn more on our website at www.mdmouse.com.
Also, please register your new MDMouse monitor to receive any updates or future information.
You can do this on our website at www.mdmouse.com/support.
Disclaimer
Information in this guide may change without notice. The manufacturer assumes no responsi-
bilities for errors that may appear in this guide.
Copyright © 2013 CalHealth, Inc. All rights reserved. No part of this publication may be repro-
duced, photocopied, stored in a retrieval system, or transmitted without prior written consent
of CalHealth, Inc.
MDMouse® is a registered trademark of CalHealth, Inc.
Windows® is a registered trademark of Microsoft Corporation

MDMouse User Manual Model MD-100
5
Table of Contents
Understanding Blood Pressure............................................................................................... 7
What is blood pressure? ........................................................................................................................... 7
What constitutes a high blood pressure?................................................................................................ 7
How can I tell how high my blood pressure is?......................................................................................... 7
Changes in Blood Pressure........................................................................................................................ 7
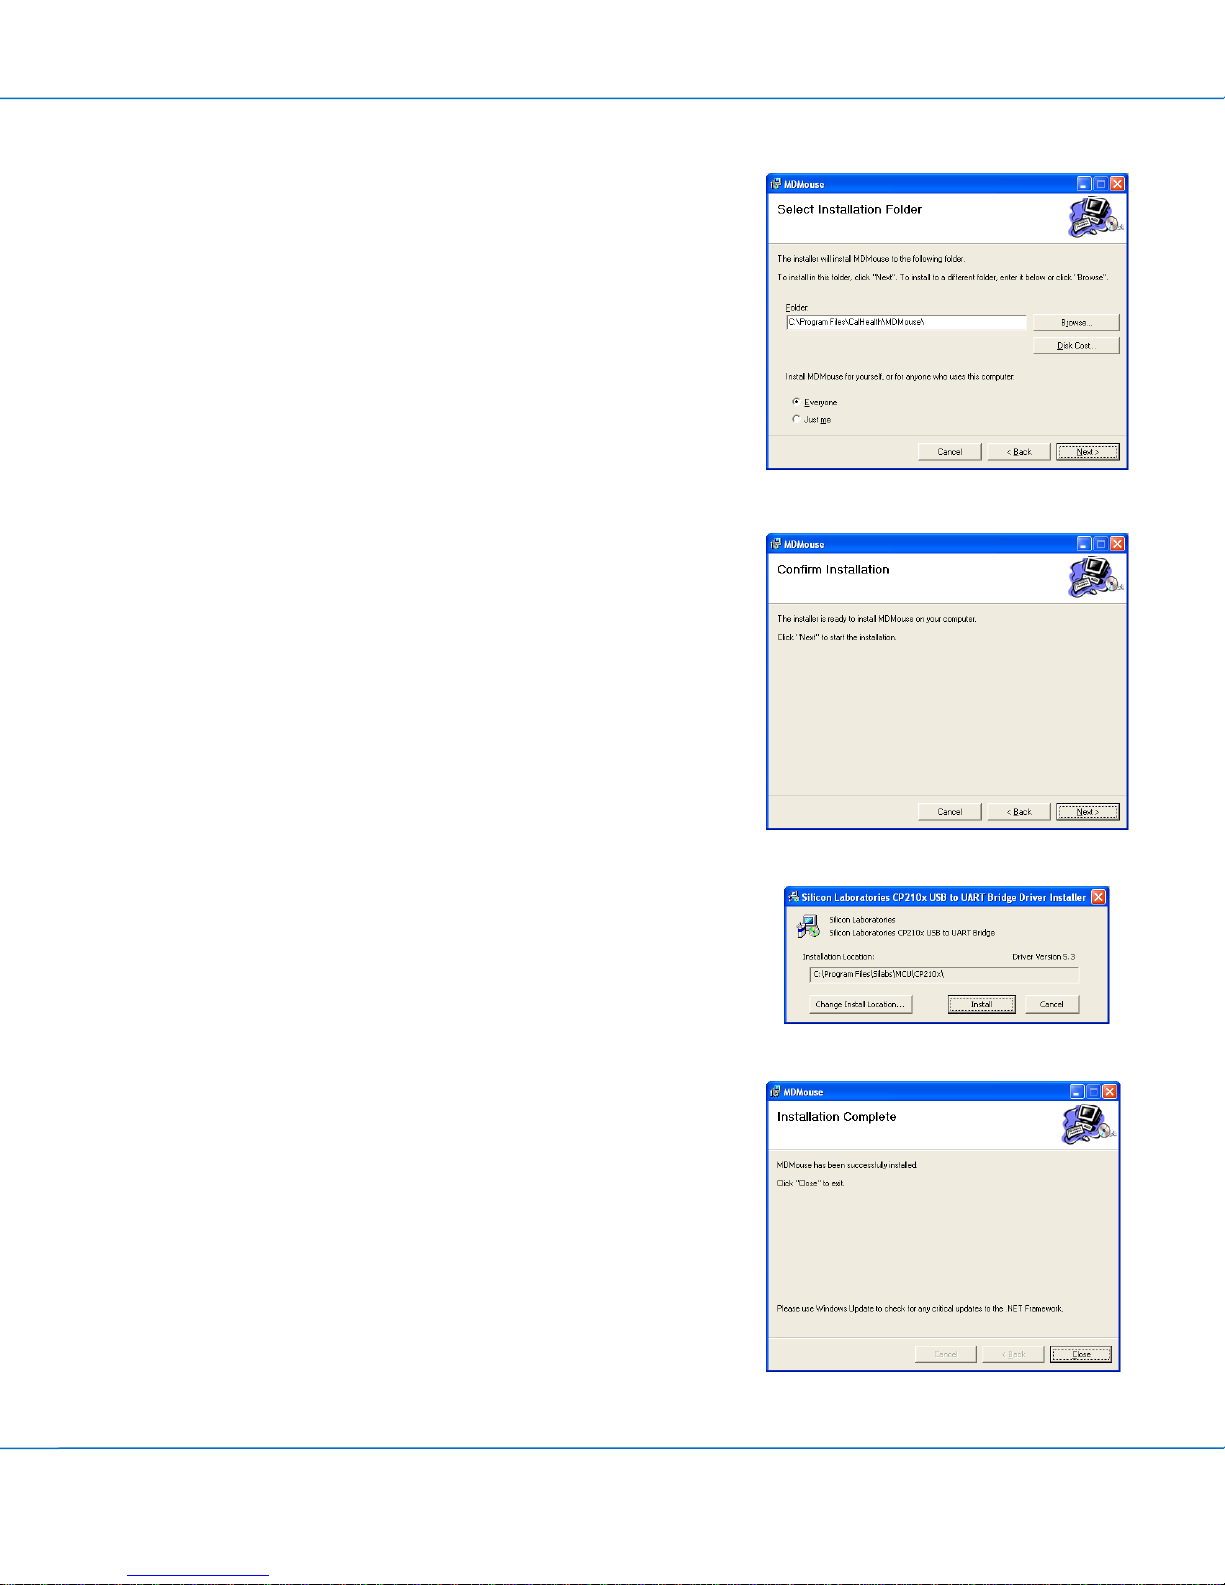
Installing the Software and Mouse ........................................................................................ 8
Making a Blood Pressure Measurement............................................................................... 11
Start the MDMouse Application ............................................................................................................. 11
Taking a Blood Pressure Measurement..................................................................................................12
Exploring the MDMouse Capabilities ................................................................................... 14
About the Application Screen ................................................................................................................ 14
Selecting a Display Language ................................................................................................................. 14
User Account Management ................................................................................................. 15
Switching to a Different User Account.................................................................................................... 15
Creating a New User Account................................................................................................................. 15
Deleting a User Account ......................................................................................................................... 15
User Profiles........................................................................................................................ 16
Personal Data .........................................................................................................................................16
Changing Your Account Password ..........................................................................................................16
Automatic Reminder............................................................................................................................... 16
Data Management and Personal Health Records.................................................................. 17
Data Storage........................................................................................................................................... 17
Nomore Clipboard...................................................................................................................................17
Options ............................................................................................................................... 18
Activating or De-activating MDMouse™ Tutorial at Start-up ................................................................ 18
Selecting a Video Clip.............................................................................................................................. 18
Starting and Storing a Measurement ..................................................................................................... 18
Sending Measurements Using Email ......................................................................................................19
Deleting Measurements .........................................................................................................................19
Using Data Logs ................................................................................................................... 20

MDMouse User Manual Model MD-100
6
Log Inquiry and Analysis .........................................................................................................................20
Printing Logs ...........................................................................................................................................20
Uninstalling the MDMouse Application................................................................................ 21
Care of Your MDMouse Monitor.......................................................................................... 22
Troubleshooting .................................................................................................................. 23
Error Messages.................................................................................................................... 24
Product Specification........................................................................................................... 25
Software and Product Update.............................................................................................. 26
About Us ............................................................................................................................. 26
Warranty............................................................................................................................. 27
Reference to Standards ....................................................................................................... 29
FCC Statement..................................................................................................................... 30

MDMouse User Manual Model MD-100
7
Understanding Blood Pressure
What is blood pressure?
The heart creates a force as it pushes blood into the arteries
and through the blood circulation system. The arteries create
another force as they resist the blood flow. Blood pressure is
the result of these two forces. The more blood your heart
pumps and the narrower your arteries, the higher your blood
pressure.
Blood pressure is expressed by two numbers which show your “Systolic” pressure (the higher
number, when the heart is pumping out blood) and “Diastolic” pressure (the lower number,
when the heart is at rest between beats).
What constitutes a high blood pressure?
According to the Joint National Committee 7 (JNC 7) definitions,
when systolic blood pressure exceeds 140 mmHg or diastolic
blood pressure exceeds 90 mmHg, this constitutes high blood
pressure (see figure below).
How can I tell how high my blood pressure is?
The MDMouse application displays measurement results (including systolic blood pressure, di-
astolic blood pressure, and pulse) based on the Joint National Committee 7 (JNC 7) classification
of blood pressure levels. The color-coded displays provide a convenient way of gauging the
condition of your blood pressure.
It is recommended that you consult a physician to fully understand blood pressure levels.
Changes in Blood Pressure
A person's blood pressure is constantly changing. Blood pressure can fluctuate considerably
through the course of a single day, and it is also affected by the seasons and by the weather.
One or two readings are not sufficient to get an accurate picture of your blood pressure. Ideally,
you should get into the habit of checking your blood pressure at fixed time several times a day,
every day, and keep a detailed record of these readings. This record can then be e-mailed or
faxed to your doctor, helping you to monitor your health on an ongoing basis.
A normal, healthy person's blood pressure fluctuates within a range of approximately ±10
mmHg.

MDMouse User Manual Model MD-100
8
Installing the Software and Mouse
Follow the steps below to install the MDMouse application and driver on your computer to use
the built-in blood pressure monitor.
1. Insert the software CD into the CD-ROM drive on
your computer. The CD should auto run; other-
wise, locate and double-click setup.exe.If you
are prompted to install Visual C++ runtime librar-
ies, click Install.
2. A Welcome screen displays prompting you to in-
stall the driver. Click Next.
3. In the license agreement screen, click Yes to
agree to the terms and continue.

MDMouse User Manual Model MD-100
9
4. Accept the default installation location or click
Browse to select one. Click Disk Space to view the
hard disk space required for the installation and
the disk space available on your computer.
Click Next to start installing the MDMouse appli-
cation.
5. Click Next to start the installation process. After
the MDMouse application is installed successfully,
click Finish.
6. If prompted to install the device driver, click In-
stall to continue.
7. After device driver installation is complete, a
pop-up window displays. Click OK.

MDMouse User Manual Model MD-100
10
8. After the device driver installation is complete,
click Close to close the window.
9. Hook up the MDMouse by connecting the USB
connector to an available USB port on your com-
puter.
You’re done! Now let’s take a blood pressure measurement.

MDMouse User Manual Model MD-100
11
Making a Blood Pressure Measurement
Start the MDMouse Application
1. To log into the MDMouse application, click
the MDMouse application on your desktop.
Tip: You can use the login screen to
create new user accounts. If you
have forgotten your account pass-
word, you can also use the login
screen to create your account
again.
2. For your first login attempt, enter a user
name and password to create a new account;
then, click OK to log in.
3. The animated MDMouse tutorial starts. It is
recommended that you complete the tutorial
before using your MDMouse.
Note: You can choose to stop playing
this tutorial every time you log
into the MDMouse application.

MDMouse User Manual Model MD-100
12
Taking a Blood Pressure Measurement
Before taking a reading, you should sit quietly for around 10 minutes, and there should be an
interval of at least 5 minutes between readings. While taking a measurement you should stay
calm and relaxed, and try not to talk. This will improve the accuracy of the readings.
Follow the instructions below to take a blood pressure measurement.
1. Lift the protective cover from the mouse and flip the finger cuff out. Flip the pro-
tective cover back closed.
2. Slide your left index finger all the way into the cuff so that the cuff is on the lowest
part of your finger.
3. Hold your finger against the MDMouse so that the inside of your finger is laying
along the side of the MDMouse.
4. Tighten the finger ring for the suitable finger size position. It should feel snug on
your finger, but not so tight that it restricts blood flow.
5. Locate the bottom of your sternum; this is the level you’ll want to hold the
MDMouse while taking a measurement. This places the MDMouse at the same
level as your heart, helping improve the consistency and accuracy of the meas-
urement.

MDMouse User Manual Model MD-100
13
6. Place the MDMouse at your sternum and click “Enter”on your keyboard to begin
a measurement.
7. During a blood pressure measurement, support your left arm by resting your el-
bow on a table or holding it with your other arm to help reduce the muscle tension
in your arm which can affect accuracy.
8. Note: If your finger feels cold, please warm it up before measuring your blood
pressure as cold temperature can affect accuracy. Please make sure the room
temperature will not be below 50 degree Fahrenheit or 10 degree centigrade.
During the measurement process, you will hear the inflation pump in the MDMouse activate,
and will feel the cuff pressure on your finger. A typical measurement takes approximately
35-45 seconds. If at any time during this process you need to stop the measurement, hit “En-
ter”again on your computer keyboard and the cuff will deflate.
After you have finished measuring, loosen the finger cuff by with the rotating finger ring. Re-
move your finger and rotate the cuff back inside the MDMouse into its original position and
close the protective cover.

MDMouse User Manual Model MD-100
14
Exploring the MDMouse Capabilities
Although it is simple and quick to begin using the MDMouse blood pressure monitor, there are
other features and capabilities you may wish to use. You can change the display language, set
up user profiles, and manage how you store your data or how to send it to your physician.
About the Application Screen
The MDMouse application screen consists of the following elements:
Navigation Panel—Use to navigate to a configuration screen or view logs and online
help contents
Settings and Display Area—This area displays settings, logs, or BP measurements
Start—Click “Enter” when you are ready to start your BP measurement
Status Panel—This panel displays the current user account
A
B
C
D
Selecting a Display Language
In the MDMouse application, you can select your own lan-
guage instead of the using the default (English). Start the
MDMouse application, click View > Language and select your
language from the list. The MDMouse application restarts
automatically and displays in your selected language. You do
not have to re-log in again.

MDMouse User Manual Model MD-100
15
User Account Management
This section shows you how to create or delete user accounts and configure a user profile. If
more than one person is going to use the MDMouse monitor to measure their blood pressure,
each user should set up their own account.
Note: If multiple people use the same user account, the measurement history will
consist of data from the different users, making this data useless.
Switching to a Different User Account
After you have logged in the MDMouse application, you can al-
ways switch to another user account. From the main menu, click
User > Select User and select the user account you want to use.
A screen similar to the login screen displays. Enter the password
for the user account and click OK to switch.
Creating a New User Account
There are two ways to create a new user account. The first
method is to create a new user account using the login screen.
When you start the MDMouse application, the login screen dis-
displays, simply enter a new user name and password to create
a new account and log in at the same time.
Alternatively, you can click User > Add User in the MDMouse
application to display the login screen. Enter a new user name
and password and click OK.
Deleting a User Account
To delete a user account, click User > Remove User
from the main menu and click the user name you
want to delete. A warning screen displays prompting
you to confirm the deletion. Once you delete an ac-
count, all related data is also removed.

MDMouse User Manual Model MD-100
16
User Profiles
You can use the User Profile screen (click User > User Profile) to configure the following set-
tings:
•Personal data (such as gender, weight, and so on)
•Blood pressure measurement alarms
•NoMore Clipboard
•Change your login password
Personal Data
You can enter your personal data such as your gender, height, weight, and age in the User Data
section of the User Profile screen.
Changing Your Account Password
To change your account password in the MDMouse application, click User > User Profile and
click Change Password to display the Password screen that is similar to the Login screen. Type a
new password in the fields and click OK. The new password applies the next time you log into
the MDMouse application.
Note: If you have forgotten your login password, click New User in the Login screen to create a
new account. Once you are logged in using the new user account, you can delete the old
account whose password you have forgotten (refer to Deleting a User Account).
Automatic Reminder
In the User Profile screen, you can configure reminders to notify
you to measure your blood pressure. Under Automatic Reminder,
select a time for each reminder. You can specify up to five re-
minders. When the time is reached, a pop-up notification screen
displays in the MDMouse application.
Note: The pop-up notification screen displays only when you have opened the
MDMouse application. If the MDMouse application is not running when the time
is reached, you will not be notified.

MDMouse User Manual Model MD-100
17
Data Management and Personal Health Records
Data Storage
Use the Data Storage menu to set the MDMouse application to
send your blood pressure measurements to a selected location.
By default, the results are stored on your computer.
The following describes the storage location options available:
•Local PC only—Stores your blood pressure measurements on your computer. This is the
default setting.
•Nomore Clipboard—Sends and stores your blood pressure measurements to your Nomore
Clipboard account. You should have already created a user account on
www.nomoreclipboard.com and specified your account information in the User Profile
screen.
•WPD—Sends and stores your blood pressure measurements to Microsoft HealthVault using
the Windows Portable Device (WPD) technology. Refer to www.healthvault.com for de-
tailed information on this service and how to create a user account.
Nomore Clipboard
You can set the MDMouse application to send your blood pressure measurements to no-
moreclipboard.com, an online health information management system. You will need to create
an account from the Web site and enter your account information in the User Profile screen.
Refer to the instructions on www.nomoreclipboard.com to create a user account.
Note: Select a Data Storage option to configure where you want to store your blood
pressure measurements.

MDMouse User Manual Model MD-100
18
Options
You can use the Options screen (click Tools >
Options) to enable or disable MDMouse tutorial
at start-up and select a video for the default
MDMouse application display, during blood
pressure measure and/or after blood pressure
measurement.
Activating or De-activating MDMouse Tutorial at Start-up
By default, when you start the MDMouse application, the MDMouse tutorial video plays. You
can disable MDMouse tutorial at start-up in the start-up screen or in the Options screen.
Select Do not show tutorial video at startup to disable the tutorial. To enable it again, clear the
check box. Click OK to save the settings and close the screen.
Selecting a Video Clip
You can select your own video clip to play as the initial screen, during blood pressure meas-
urement, and/or after blood pressure measurement. The MDMouse application supports HTML,
AVI, and WMV file formats. In the Options screen, select the type and location of the video file
from the URL From drop-down list. If the video file is stored on your computer, click Browse to
locate the file. If the video file is from a Web site, specify the Web site URL in the field provided.
Click OK to save the changes and close the screen.
Note: When selecting files from your computer, select “All files” file type to view all files in the
Open screen. If you select an HTML file that includes a JPG or JPEG graphic file, the graphic
will not be displayed properly in the MDMouse™ application.
Starting and Storing a Measurement
1. After you have applied the finger cuff, log into the MDMouse application.
2. Press “Enter” on the keyboard or click the Start button in any screen. The cuff begins to
inflate and the increasing cuff pressure is indicated on the screen.

MDMouse User Manual Model MD-100
19
3. You should see the animation on the screen and the music playing (if the speaker sound
is turned on). After the cuff reaches the maximum, the pump stops and the cuff begin to
deflate. The system starts to take your measurement.
a. You can stop the measure at any time by pressing the Enter key again on the keyboard.
The cuff automatically starts to deflate.
4. The measurement may take up to 70 seconds. You can view the results from the View >
View Log screen. Results shown are color-coded based on the WHO/ISH classification.
Sending Measurements Using Email
Follow the steps below can send selected blood pressure measurements stored on your com-
puter through email.
1. Open the MDMouse application and click View > View Log.
2. Select one or more blood pressure measurements you want to send over email.
3. Click Tools > Email Measurement. A new email screen displays with the selected meas-
urements in ASCII format.
4. Enter the sender email and your message, if required, before you send the email.
Deleting Measurements
The MDMouse application gives you the option to delete one or all blood pressure measure-
ments stored on your computer.
To delete a blood pressure measurement stored on your computer, click Tools > Delete Meas-
urement, select a measurement, and click Delete.
To delete all blood pressure measurements stored on your computer, click Tools > Delete All
Measurements. A screen displays prompting you to confirm the deletion. Click OK to delete.

MDMouse User Manual Model MD-100
20
Using Data Logs
To view blood pressure measurements stored on your computer, click View > View Logs. The
log screen displays listing the stored measurements by date. You can send selected logs
through email (refer to Sending Measurements Using Email for information).
Log Inquiry and Analysis
You can search logs by date and display the information in a table or chart. Click View > View-
ing Inquiry to display the Inquiry & Analysis screen.
In the Display panel, select the display format (Table or Chart).
To search and display a log, select a date from the From and To drop-down list boxes. The
screen can display the results of the three most recent measurements. Results shown are col-
or-coded based on the WHO/ISH classification.
Printing Logs
To print the queried logs, click File > Print. You can also display a print preview of the logs be-
fore printing (click File > Print Preview).
Other manuals for MD-100
2
Table of contents
Other MDMouse Blood Pressure Monitor manuals