Measurement Systems International MSI 9750 User manual

Measurement Systems International
2-9 (09/02)
Introduction
This quick start guide provides basic operating instructions for the MSI-9750 RF Remote Indicator.
The following information is intended as a reference to help you quickly begin using the MSI-9750.
This flexible, high performance, hand-held indicator supports proprietary protocols, providing
connectivity to Measurement Systems International Cellular Weighing Networks and CellScale
devices.
Detailed information on the operation, setup and servicing of the MSI-9750 RF Remote Indicator for
CellScalecan be found in the MSI-9750 User Guide. Consult your authorized Measurement
Systems International representative for information on advanced operations or for information on
available accessories. Review all instructions and safety precautions carefully.
Unpacking and Inspection
If upon delivery the shipping container for the Remote Indicator appears damaged, check for internal
damage and file a freight claim with the carrier if required.
If the container is undamaged, unpack the Remote Indicator from its packaging and inspect each
component for damage. Package contents for all RF Remote Indicators include one (1) MSI-9750,
one (1) AC adapter / battery charger input and one (1) AC adapter power cord.
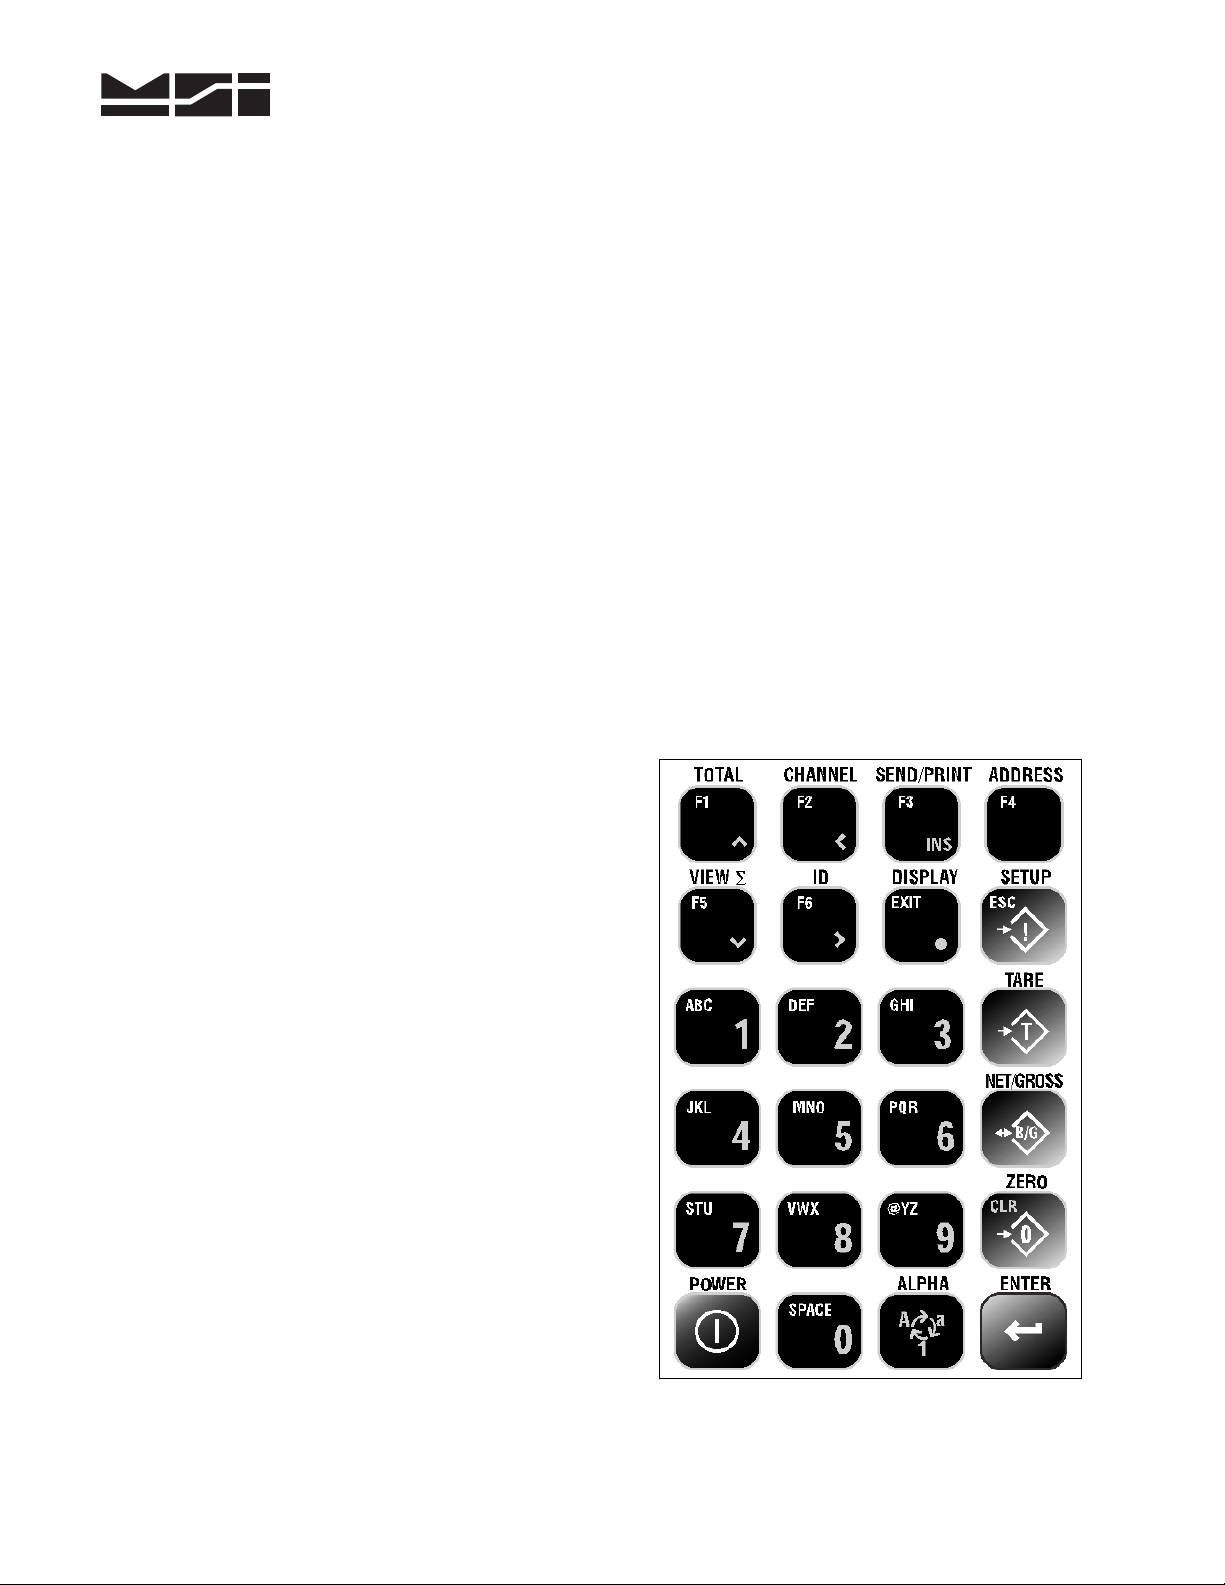
9750 Keypad
The MSI-9750 keypad consists of 24 keys: 11
alphanumeric keys, 7 control keys and 6 user
programmable keys. The keys perform the following
functions:
POWER Key ( ¢) is used to turn the unit “ON” and
“OFF”. Must be held for 1 second to ensure startup.
NUMERIC Keys (0through 9) are used to input all
numerals and letters for data entry. Submenus provide
punctuation and control characters.
ALPHA Key ( ALPHA ) is used during text entries to
select upper case, lower case or numbers.
ENTER Key ( Í) acknowledges a prompt, opens a
submenu, accepts data entered from the key pad or is
used as a shift key to access secondary functions.
ZERO Key ( 0 ) zeroes out residual weight on the scale
and allows you to clear ( CLR ) values that were
entered from the keypad.
Quick Start Guide
MSI-9750 RF Remote Indicator for CellScale
(09/02) 3-9
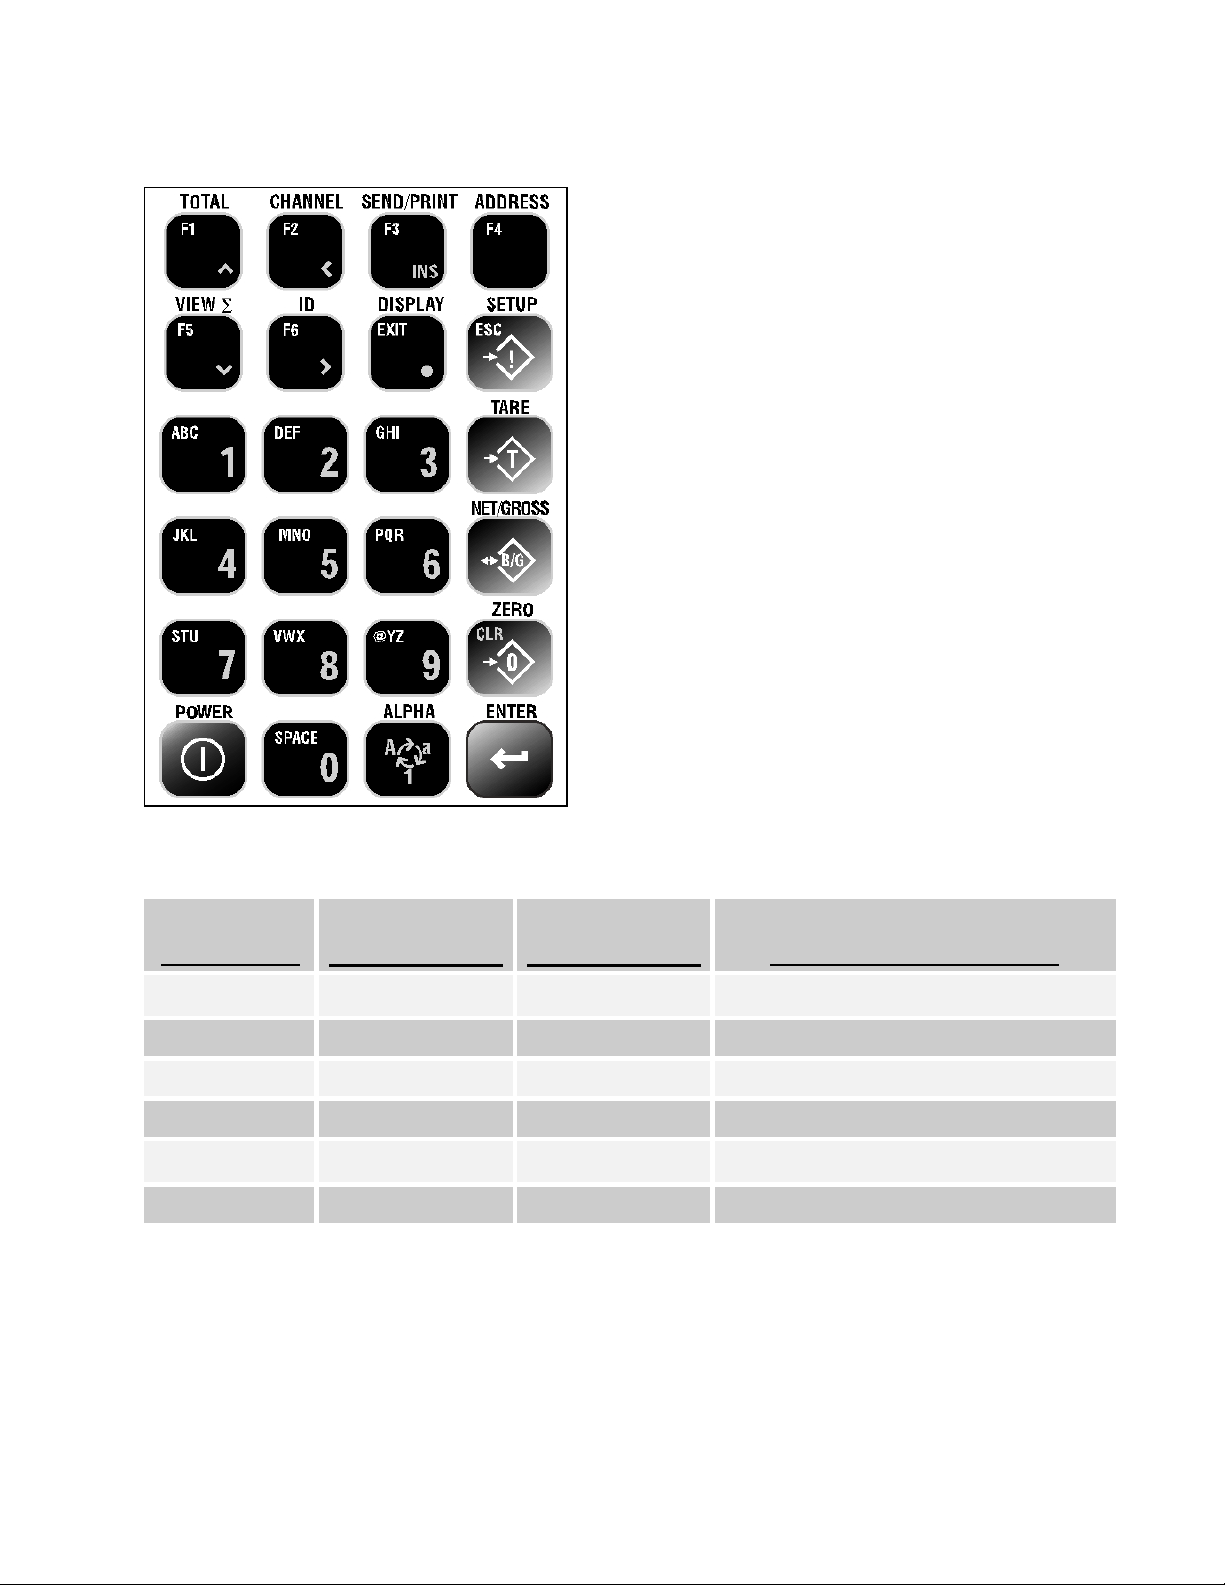
9750 Keypad (continued)
NET/GROSS Key ( B/G ) switches between Net
(Tared) weight display and Gross weight display when
a tare value has been entered.
TARE Key ( T ) is used to enters tare values or clear
the tare; i.e. – zero out the weight of containers, trucks
or carriers and place the scale in the Net weight mode.
SETUP Key ( ! ) is used to enter the setup selection
menus, exit the setup selection menus with new
selections saved or to escape ( ESC ) back to a previous
menu if no selections have been made.
DISPLAY Key ( EXIT y) is used to completely exit
selection menus and return to the normal display mode.
It is also used to enter a decimal place on numeric
keypad entries.
FUNCTION Keys (F1 through F6) are used to quickly
access assigned functions. Each of the user
programmable keys may be set up with a primary and
secondary function (See Programming Function Keys
in the User Guide). The Default assigned to each
function key is printed above the function key.
Function keys also serve as navigation keys for the
Setup Selection Menus. Reference the table below.
Function Key – Default Settings
Function Key
Primary
Default Function
Secondary
Default Function Setup Select Menu Function
F1 TOTAL Clr Last ∑( i) Curser Up
F2 CHANNEL Back Channel ( g) Curser Left or Scroll Increment
F3 SEND/PRINT Print Comm 1 ( INS ) Insert / Replace Entered Data
F4 ADDRESS Back Address
F5 VIEW ∑View Grand ∑( j) Curser Down
F6 ID New Prod ID ( h) Curser Right or Scroll Increment
Note: To access Secondary Functions, press [ ENTER ] followed by the Function Key.
Example: Press [ ENTER ] [ F1 ] to Clear Last ∑.

Measurement Systems International
4-9 (09/02)
9750 Display
The MSI-9750 RF Remote Indicator has one display where scale data and operational messages are
presented. The backlight, transflective LCD has a 128 x 64 pixel arrangement that is capable of 8
lines, 20 characters each. The character size is dependent upon the display setup chosen.
Display Test Characters
To ensure the MSI-9750 display is functioning properly, a character display test can be performed.
With the unit “ON”, press [POWER] [SETUP] [TARE] to initiate the character display test. The
MSI-9750 will cycle through a test of all display characters continuously (Note: There are 30 test
screens, each is displayed for 2 seconds). To end the test, press [SETUP] [DISPLAY]. The unit will
be returned to its normal operating mode.
9750 First Time Use
The operation of the MSI-9750 RF Remote Indicator for CellScaleis a simple task. Its user-friendly
interface and easy-to-read display allow one to quickly get up to speed. To get started, it is
recommended that the user familiarize themselves with the following:
¾Turning the Unit “ON” and “OFF”
¾Selecting System Settings
oKey Volume
oBacklight Time
oAuto Shutdown
oDate and Time
¾Selecting the Scale Display
oPreset Display Screens
¾Performing Basic Operator Functions
oZero the Scale
oEntering and Clearing Tare Values
oSwitching Between Net and Gross Display Modes
oChanging RF Networks
Turning the Unit “ON” and “OFF”
Turning “ON”
Make sure the CellScalemaster (MSI-9000 or MSI-6260CS) has been turned “ON” first. Then
press and hold [ POWER ] for one (1) second on the MSI-9750. The unit will proceed with its
powering up sequence.
Turning “OFF”
When the MSI-9750 is “ON”, press [ POWER ] to turn the unit “OFF”. The MSI-9750 will proceed
with its powering down sequence. If [ POWER ] was pressed in error, press [ DISPLAY ] to cancel
the shutdown process and continue with normal operation.

Quick Start Guide
MSI-9750 RF Remote Indicator for CellScale
(09/02) 5-9
Selecting System Settings
There are four (4) System Settings that can be set for the user’s operating preference; Key Volume,
Backlight Time, Auto Shutdown Time, Calendar Date and Time of Day. All of these selections are
made in the System Setup menu, which can be accessed by pressing [SETUP] [ 3].
Key Volume
The Key Volume setting controls how loud the tones will be when keypad buttons are pressed. To
adjust this volume, enter the System Setup menu by pressing [SETUP] [ 3], press [ 1] to enter the
Key Volume submenu. A “ `” symbol will point to the current Key Volume setting. To change it,
press the number (0through 9) that corresponds to your preference, or press [ CLR ] to turn the
keypad tones “OFF”. If no change is desired, press [ ESC ] to return to the System Setup menu.
After a selection has been made, the MSI-9750 will return to the System Setup menu. The new Key
Volume setting will be shown. At this point, the following choices are available:
•Press [ EXIT ] to completely exit selection menus and return to the normal display mode.
•Press [ ESC ] [ ESC ] to return to the normal display mode (one menu at a time).
•Press the number that corresponds with the next System Setting to be changed.
Backlight Time
The Backlight setting controls the duration of time the display backlight will stay “ON” after keypad
buttons have been pushed. To adjust this time, enter the System Setup menu by pressing [SETUP]
[ 3], press [ 3] to enter the Backlight submenu. A “ `” symbol will point to the current Backlight
setting. To change it, press the number (1through 4) that corresponds to your preference. If no
change is desired, press [ ESC ] to return to the System Setup menu.
After a selection has been made, the MSI-9750 will return to the System Setup menu. The new
Backlight setting will be shown. At this point, the following choices are available:
•Press [ EXIT ] to completely exit selection menus and return to the normal display mode.
•Press [ ESC ] [ ESC ] to return to the normal display mode (one menu at a time).
•Press the number that corresponds with the next System Setting to be change.
Auto Shutdown
The Auto Shutdown setting controls the duration of time the MSI-9750 will remain “ON” if no
further activity takes place. To adjust this time, enter the System Setup menu by pressing [SETUP]
[ 3], press [ 5] to enter the Automatic Shutdown submenu. A “ `” symbol will point to the current
Auto Shutdown setting. To change it, press the number (1through 5) that corresponds to your
preference. If no change is desired, press [ ESC ] to return to the System Setup menu.

Measurement Systems International
6-9 (09/02)
Auto Shutdown (continued)
After a selection has been made, the MSI-9750 will return to the System Setup menu. The new Auto
Shutdown setting will be shown. At this point, the following choices are available:
•Press [ EXIT ] to completely exit selection menus and return to the normal display mode.
•Press [ ESC ] [ ESC ] to return to the normal display mode (one menu at a time).
•Press the number that corresponds with the next System Setting to be change.
Date and Time
The Date and Time setting is used to enter/adjust the calendar date and time of day (clock time)
stored/displayed by the MSI-9750. To change the calendar date and/or clock time, enter the System
Setup menu by pressing [SETUP] [ 3], press [ 4] to enter the Set Calendar and Clock submenu. The
following choices appear:
1. Set Date ⇒Sets the Calendar Date. Press [ ENTER ] after setting the correct date.
2. Set Time ⇒Sets the Clock Time. Press [ ENTER ] after setting the correct time (It is
recommended that Daylite Saving be set prior to setting the clock time; see choice 5below).
Note: When in AM/PM mode, use [ 1 ] for AM or the [ 6 ] for PM.
3. Date Mode ⇒Sets the Date format as MM/DD/YY or DD-MM-YY. Press [ 3] to toggle to the
desired mode, then press [ ESC ] to exit and save your selection.
4. Time Mode ⇒Sets the Time format as AM/PM or 24 Hr. Press [ 4] to toggle to the desired
mode, then press [ ESC ] to exit and save your selection.
5. Daylite Saving ⇒Sets Daylight Saving Time as OFF, ON or AUTO (It is recommended that
Daylite Saving be set to AUTO). Press [ 5 ] to toggle to the desired choice, then press [ ESC ]
to exit and save your selection.
After the date and time setting have been made, the MSI-9750 will return to the System Setup menu.
At this point, you the following choices are available:
•Press [ EXIT ] to completely exit selection menus and return to the normal display mode.
•Press [ ESC ] [ ESC ] to return to the normal display mode (one menu at a time).
•Press the number that corresponds with the next System Setting to be change.
Selecting The Scale Display
Several preset Scale Display screens have been pre-programmed in the MSI-9750 for operator
convenience. To begin, press [ SETUP ] [ DISPLAY ] to enter the Scale Display Setup menu (an
alternate method is to press [ SETUP ] [ 7] [ 2] ). Press [ 1] for Single Scale preset display options.
Press the number (1through 4) that corresponds to your preference, a View of the display screen
selection will be displayed. Press [ ESC ] to return to the list, the new selection will be highlighted.
After a preset Scale Display screen is highlighted, the following choices are available:
•Press [ EXIT ] to completely exit selection menus and return to the normal display mode.
•Press [ ESC ] [ ESC ] [ ESC ] to return to the normal display mode (one menu at a time).

Quick Start Guide
MSI-9750 RF Remote Indicator for CellScale
(09/02) 7-9
Basic Operator Functions
Summarized below are instructions on a few of the MSI-9750 basic operator functions. For detailed
instructions of all operating functions, reference the MSI-9750 User Guide.
Zero the Scale
To establish a new zero center of reference for the scale, press [ ZERO ] when the MSI-9750 is in its
normal operating mode.
Entering and Clearing Tare Values
To enter a tare value, the MSI-9750 should be in its normal operating mode. Press the numeric keys
(0through 9) of the desired tare value, then press [ TARE ].
Example: Tare = 250, press [ 2] [ 5] [ 0], then press [ TARE ].
To clear the tare, press the numeric [ 0] key and [ TARE ]. This will set a zero tare value; the
MSI-9750 will only display weights in gross mode.
Switching Between Net and Gross Weights
Press [ NET/GROSS ] to change between Net and Gross weights. Note: a tare value must be entered
for this key to function. Pressing [ DISPLAY ] will momentarily show the current tare value.
Changing RF Networks
To change the RF Network, the MSI-9750 should be in its normal operating mode. Press the numeric
keys (0through 9) of the new network address, then press [ ADDRESS ].
Example #1: Changing to RF Network 3. Press [ 3] [ ADDRESS ].
Example #2: Changing to RF Network 15. Press [ 1] [ 5] [ ADDRESS ].
Battery Status and Charging
The MSI-9750 comes with a rechargeable NiMH battery pack. The unit will display a low battery
symbol when recharging is needed. To charge, plug either the AC or Automotive Adapter / Battery
Charger Input into the side of the unit (charger input jack). The LED charging status indicator on the
MSI-9750 will illuminate RED to indicate the battery is charging and change to GREEN when fully
charged (approximately 2 hours). Reference the MSI-9750 User Guide for detailed instructions on
battery maintenance.
Battery Monitor Function
To access the battery monitor function, press [ SETUP ] [ 3] [ 6]. The MSI-9750 main battery
voltage level, clock battery condition, and the CellScalebattery condition will be displayed.
Pressing [ EXIT ] will return to the normal operating mode.

Measurement Systems International
8-9 (09/02)
The MSI Limited Warranty
Measurement Systems International, Inc., warrants load sensing elements and meters against defects in
workmanship and materials for a period of one year from date of purchase and warrants electrical cables and
batteries against the same defects for a period of ninety (90) days from date of purchase.
Any device, which proves defective during the warranty period, will be replaced or repaired at no charge;
provided that the defective device is returned to the Company pre-paid.
In no event shall the Company be liable for the cost of any repairs or alterations made by others except those
repairs or alterations made with its specific written consent, nor shall the Company be liable for any damages
or delays whether caused by defective workmanship, materials or otherwise.
The Company shall not be liable for any personal injury or property damage resulting from the handling,
possession or use of the equipment by the customer.
The warranty set forth herein is exclusive and is expressly in lieu of all other warranties, express or implied,
including without limitation any implied warranties of merchantability or fitness, or of any other obligations or
liability on the part of the Company.
The liability of the Company under this warranty is limited solely to repairing or replacing its products during
the warranty periods; and the final judgment and disposition of all claims will be made by Measurement
Systems International, Inc.
NOTES

Quick Start Guide
MSI-9750 RF Remote Indicator for CellScale
Integrated System Solutions for Industrial Weighing and Process Control
14240 Interurban Avenue South STE 200
Seattle, Washington 98168-4661 U.S.A.
Ph: 206-433-0199 •Fax: 206-244-8470
Web: www.msiscales.com
Email: [email protected]
Table of contents
Other Measurement Systems International Accessories manuals

Popular Accessories manuals by other brands


Vectair
Vectair SensaMist S100 manual

Azoteq
Azoteq IQ Switch - ProxSense Series Programming and GUI Guide

PRECITEC
PRECITEC CHRocodile CLS0.2 Operation manual

LG
LG Power Tank PMC-1000 user manual

Osram
Osram SubstiTUBE ST8MS-0.6m-7.3W-840-EM quick start guide

GEORGE FISCHER
GEORGE FISCHER +GF+ SIGNET 2550 instruction manual