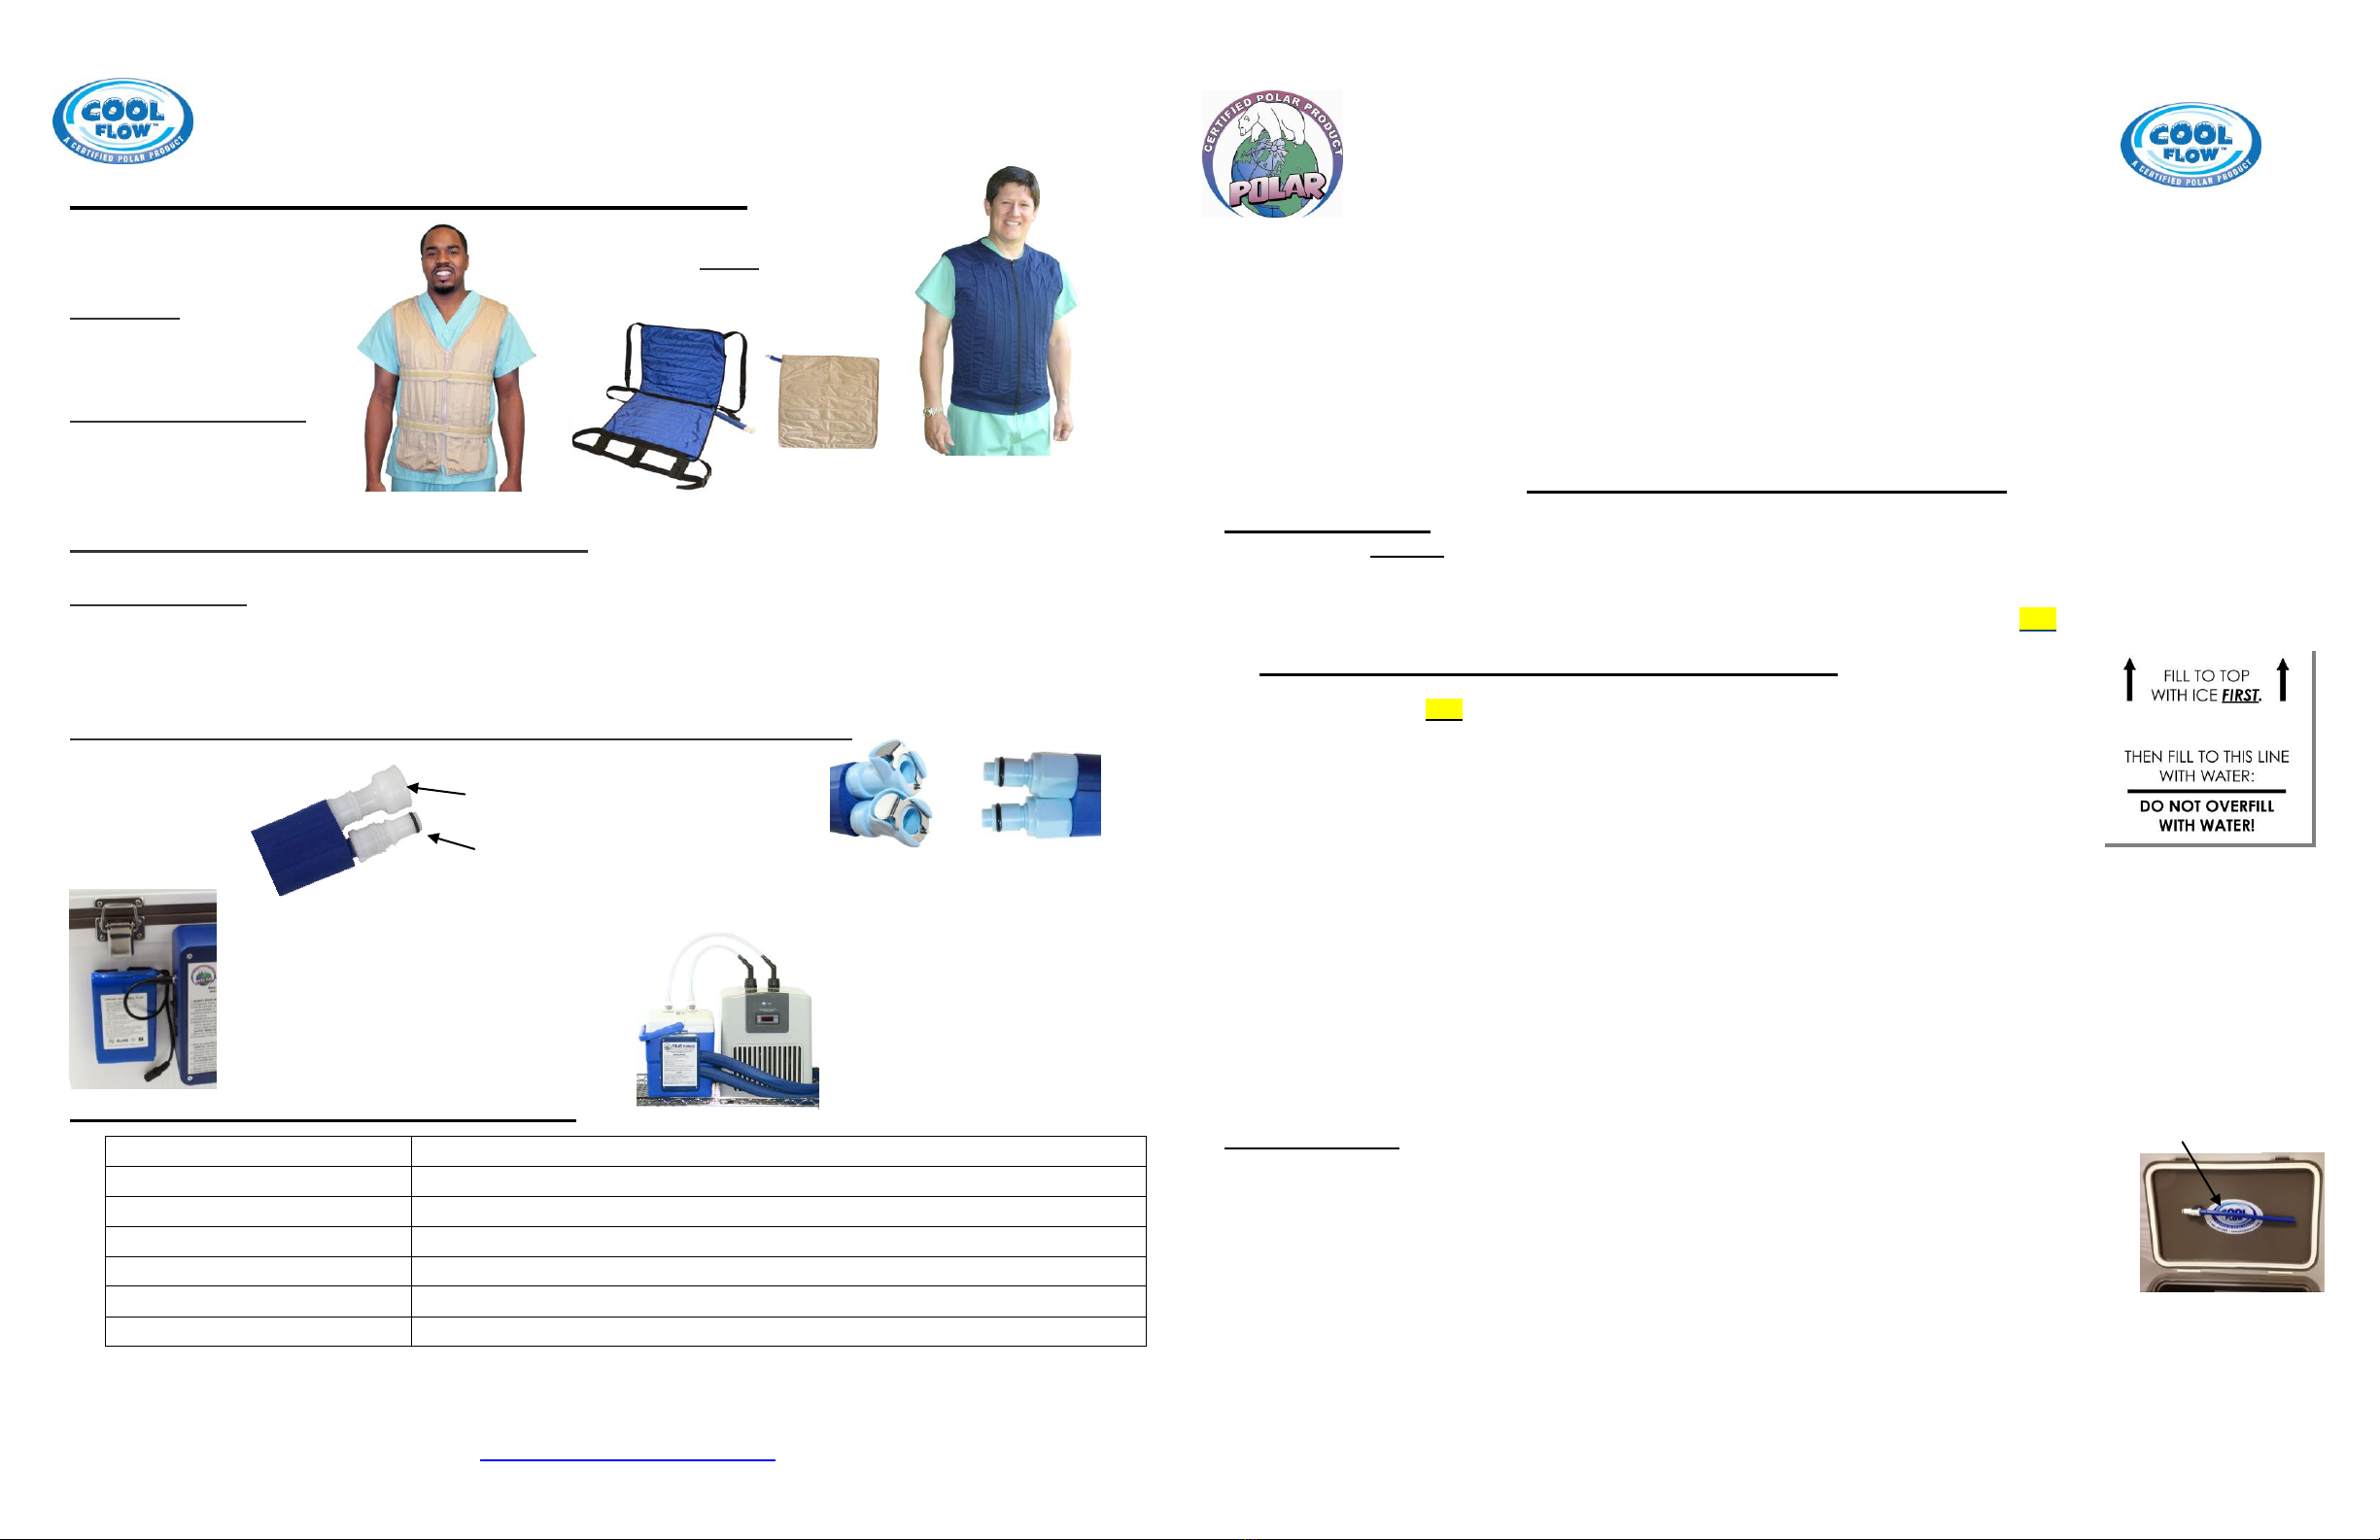
CoolFlow®Cooling System Instructions
VEST CARE AND MAINTENANCE
The following procedures will keep your vest working like new!
Cleaning the vest: Should the vest become soiled, hand wash with a mild detergent and air-dry, being careful
not to bend the tubing. The vest may also be spot cleaned with warm soapy water or washed on delicate cycle
in a laundry bag. Always air-dry.
Proper handling: The vest should never be roughly handled, bent, folded, crushed or treated harshly. Always
hang the vest when not in use!
Proper fit: The vest should fit comfortably on the body and not be over-strained or pulled.
Proper vest storage: Be sure the vest is always stored on a large hanger in a clean, dry environment.
Care of system: Once every 2 weeks, and prior to extended storage, pour 16 ounces (one pint) of Isopropyl
Alcohol (rubbing alcohol) in the cooling unit with the ice and water while the unit is being used. This will keep
the vest water lines, pump and hoses clear of the buildup that occurs in water-circulation systems. Wipe out
the cooling unit after each use.
As needed: Wipe cooling unit and hoses with warm soapy water (preferably antibacterial).
CAUTIONS AND WARNINGS
1) Prior to using this or any body cooling or therapy product for a medical condition or injury,
always consult a licensed healthcare practitioner.
2) Always wear the vest over a T-shirt or other clothing; do not wear directly on the skin.
3) Be sure the unit is unplugged prior to filling with water and ice.
4) Refer servicing to qualified personnel at Polar Products Inc.
WARRANTY AND SERVICE
Polar Products, Inc. warrants that the Cool Flow® System is fit for use under the normal use for
which it is intended and free of any defects in materials and / or workmanship for 12 months from
the date of initial purchase.
Polar's obligation under this warranty is limited to the replacement or repair of any defective part(s) of this
product. If you encounter a problem with your Cool Flow®System, please call Polar’s Customer Service
Department at 1-800-763-8423 to obtain a Returned Goods Authorization number (RGA.) To obtain
warranty service on your system, please return the system, dated sales receipt (or packing list, as proof
of purchase) and RGA number to: Polar Products, Inc. 3380 Cavalier Trail, Stow, OH 44224. Please
include your phone number, any correspondence, and an explanation of the problem. Upon receipt,
Polar’s Service Department will determine the cause of failure and, if determined to be an issue covered
by the warranty, will repair (or replace, as necessary) your system and return it to you, postage paid.
Please note: Couplings are a wear item and may need to be replaced. They are available for individual purchase.
SYSTEM SPECIFICATIONS
All electrical components (pump, battery pack, 110-volt adaptor) have CE mark and are UL approved.
Power Required: 12-volt DC, 3A to the cooler unit
WARNING: Prior to using this or any body cooling product for a medical condition, always
consult a licensed healthcare practitioner. Read all instructions and warnings before operating
this system. Polar Products, Inc. will not be liable for injuries that result from misuse or
misapplication of this system.
CoolFlow®Cooling System Instructions
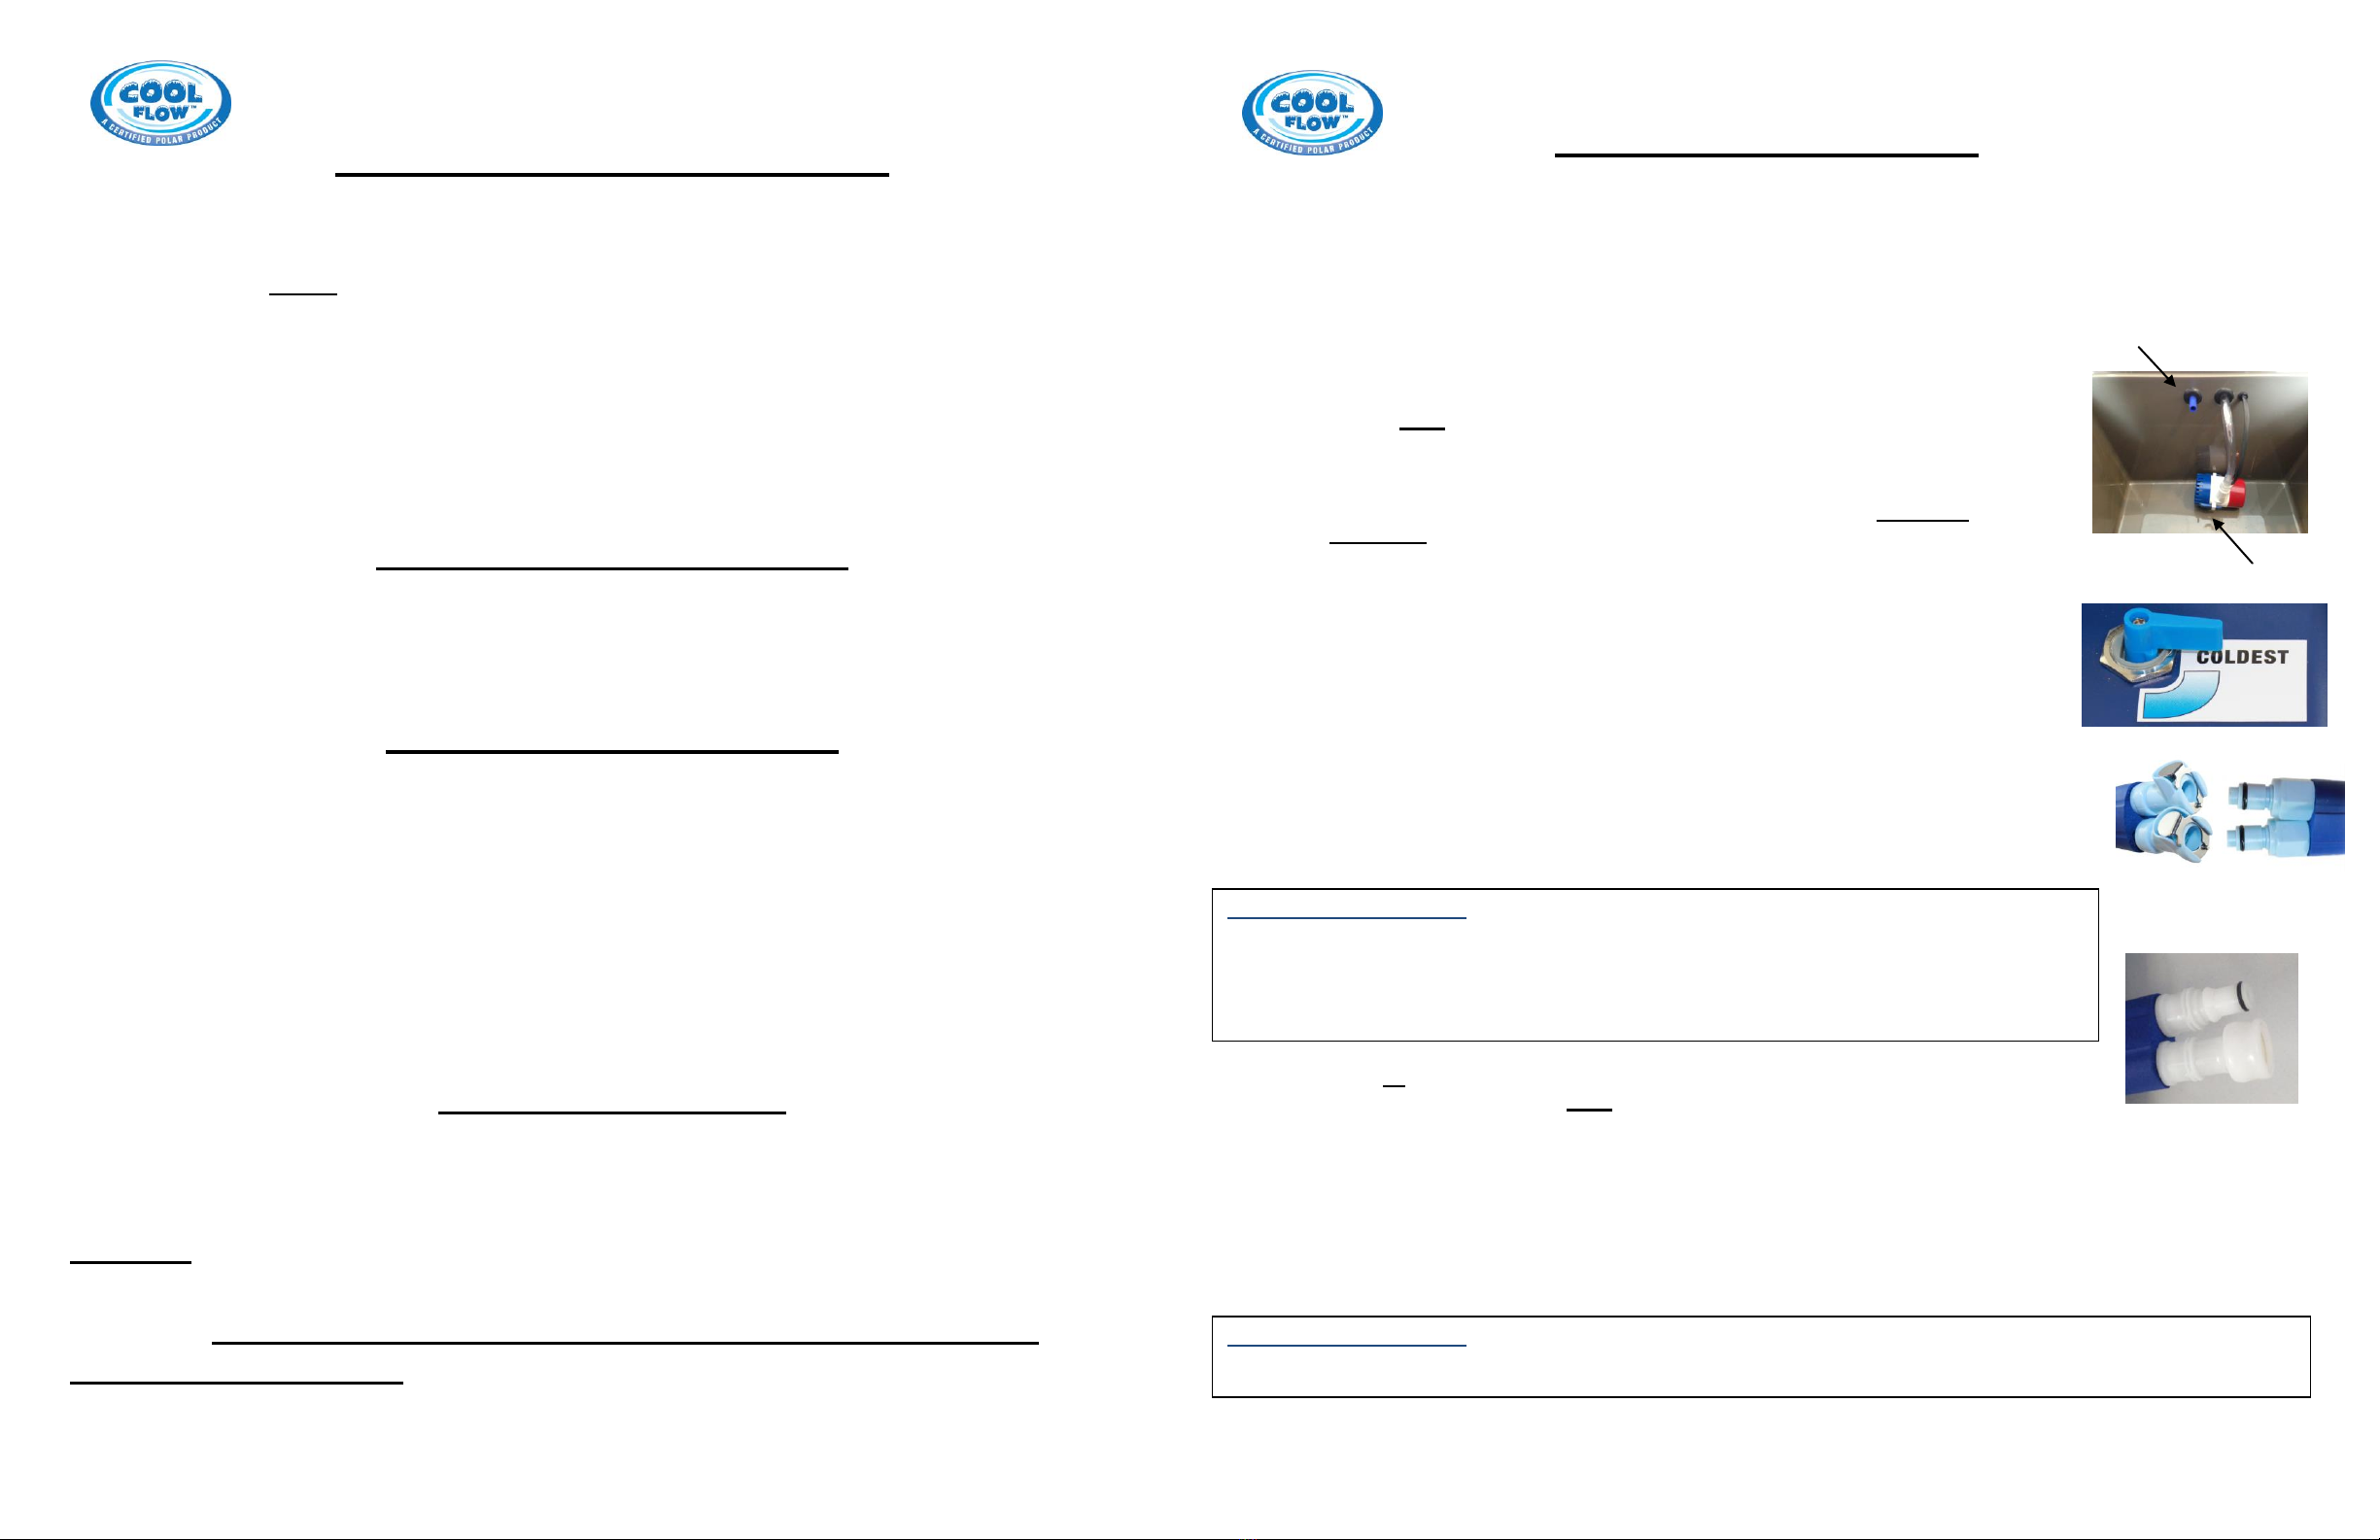
TROUBLESHOOTING GUIDE
If the solutions suggested below do not address your question or issue, please call our
Customer Service department at 1.800.763.8423 and we will do everything possible to help.
IF THE PUMP IS NOT RUNNING:
Confirm that the transformer is properly plugged into the unit and the wall outlet. A small green light (located on the
transformer box) should be on if the transformer has power.
IF THE VEST IS NOT GETTING COLD:
FIRST: Is water flowing out of the top water return tube in the cooler?
If water is NOT flowing out of the top return flow tube:
Check the temperature control knob. Ensure that the temperature control knob
located on the top of the blue box is turned to maximum cold (“COLDEST”). Always
adjust this control to ensure there is a flow of water from the water return tube.
Check the water level in the cooler. Confirm that the pump is completely
submerged in the water.
Check for kinks. Ensure there are no kinks or pinches in the hoses, tubing or vest.
Adjust the vest. Ensure that the vest fits snugly to the body but not so tight that flow
is impeded.
Check for obstructions. Turn the system off. Disconnect couplings to ensure there
is not an obstruction. Remove anything lodged in the coupling or tubing. Also ensure
there are no obstructions at the pump intake.
Check the couplings. Confirm that the vest couplings are properly seated. (Tab
couplings should “click” when locked). Reseat connectors between the hose and the
vest. Turn off the unit, disconnect couplings and reconnect. When connecting tab
couplings be sure the metal tab on the female coupling is pushed in before trying to
connect.
Check the pump. Occasionally an air bubble can get lodged in the pump intake.
Turn the pump motor, located in the reservoir, vertically to horizontally to dislodge
any air bubble.
If water IS flowing out of the top return flow tube:
Ensure that the reservoir is filled with ice.
Adjust temperature control to “COLDEST” (see picture above).
IF THE UNIT IS LEAKING AT THE CONNECTIONS:
If a leak exists, turn off the unit. Disconnect and reconnect the vest couplings and ensure both sides are clicked in
properly. When connecting tab coupling ensure that the silver release clip platform on the female coupling is pressed
down prior to insertion. NOTE: Tab couplings have rubber “O” rings that can become worn and dysfunctional.
Replacement couplings may need to be purchased from Polar Products.
TROUBLESHOOTING TIP! A good way to isolate the problem is to remove the couplings from
the insulated tubing attached to the reservoir. To do this, simply turn off the unit, pull off (or cut off)
the couplings, place the end of the hoses over a sink and turn the system on. If water flows freely,
the obstruction is in the couplings, tubing or bladder. Couplings can become blocked with
minerals, hair etc. Clear the blockage. A new coupling or vest may be necessary. To reattach the
couplings simply cut the tubing back to unused tubing and push the coupling back into the tube.
TROUBLESHOOTING TIP! To replace the couplings simply cut off the coupling just above where the coupling barbs extend
into the tube. Trim the blue insulation if necessary and push in the new coupling. Always push the new coupling into trimmed
tubing.
Female & Male Tab
Couplings
Male (top) & Female
Breakaway Couplings