Med-Fit 2 Premier Wireless User manual

Med-Fit 2
Premier ireless
TENS & Neuromuscular Stimulator
Please read this User Manual before using your device
med fit
Telephone: 0800 121 4626 www.tensmachineuk.com

www.tensmachineuk.com
2
Med- it UK Ltd.
Unit 8, Martel Court, S. Park Business Park , Hamilton Road, Stockport, SK1 2A .
Tel: 0161 429 7330 ax: 0161 427 0215
Email: [email protected]o.uk www.tensmachineuk.com
Company registration number 08758741 Vat registration number 308286105
med fit
Comes Complete with:
1 x Wireless TENS & Muscle Stimulator Unit
2 x Wireless Modules 5.5cm Dia 1.25cm depth
2 x 14x5cm Self-AdhesiveElectrodes
2 x 22x8cm Self-Adhesive Electrodes
2 x USB Charging Leads
1 x Mains Charging Adaptor
1 x User Manual

Telephone: 0800 121 4626
3
Contents
CONTENTS AND GENERAL INFORMATION 4
CONTROLS 5
STEP BY STEP GUIDE FOR CHARGING YOUR DEVICE 6
STEP BY STEP GUIDE INSTRUCTIONS FOR USE 8
INTRODUCTION 10
GENERAL DESCRIPTION 10
FA S 10
ELECTRODE AFTERCARE 11
ELECTRODES INSTRUCTIONS 12
WARNINGS & PRECAUTIONS 14
CAUTIONS 15
INTRODUCTION TO TENS 16
TENS PROGRAMMES 19
HELPFUL TIPS FOR A SUCCESSFUL TREATMENT 20
INTRODUCTION TO EMS 21
EMS PROGRAMMES 22
WARRANTY 23
GRAPHIC SYMBOLS 23
TENS ELECTRODE PLACEMENT 24
EMS ELECTRODE PLACEMENT 28
PAIRING YOUR MODULES 36
EMC INFORMATION 38
www.tensmachineuk.com
4
3
2
4
5
6
7
8
1
M
x2
x2
CONTENTS & GENERAL INFORMATION
Telephone: 0800 121 4626
5
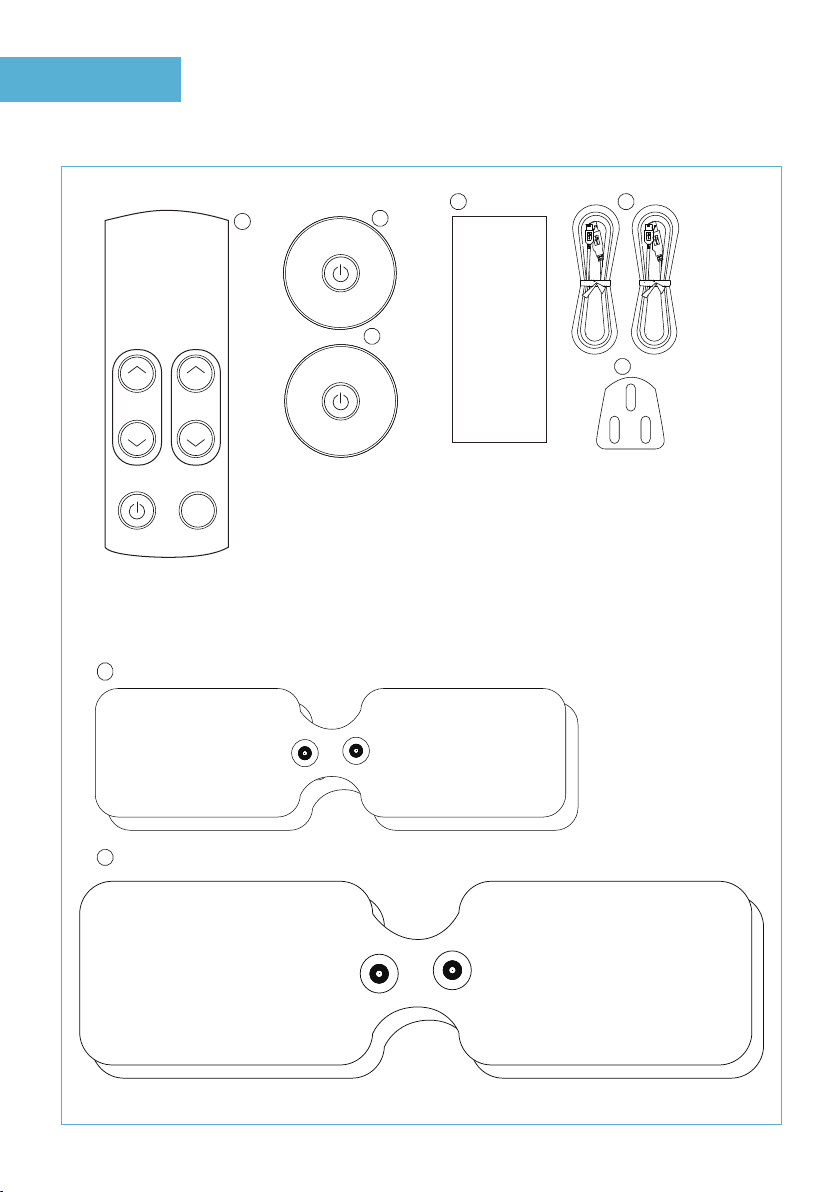
CONTENTS & GENERAL INFORMATION
Please check carefully the contents of the
Med- it 2 Wireless Premier TENS
1. Remote Control Unit
2. TENS Module Yellow
3. TENS Module Green
4. AC adaptor
5. USB and AC Adaptor Charging Leads x2
6. 14x5cm Self-Adhesive Electrodes x 4 SA550
7. 22x8cm Self-Adhesive Electrodes x 4 SA555
8. Instruction & User Manual
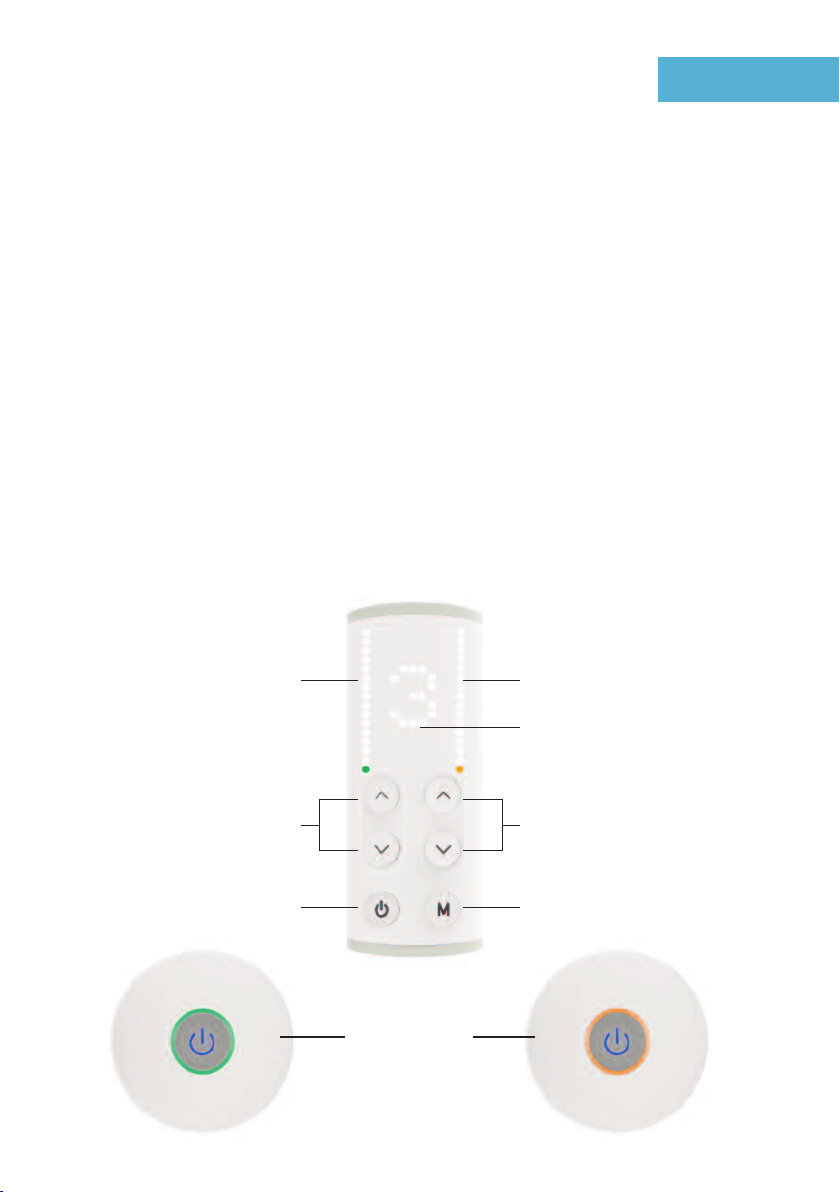
On/Off Button
Press and hold for 2 seconds
Green module intensity
up/down keys
Green module intensity display
Programme Button
1-12 ENS Programmes
A-F EMS Programmes
Yellow module intensity
up/down keys
Yellow module intensity display
Programme Number
On/Off Button
Press and hold
for
2 seconds
CONTROLS

www.tensmachineuk.com
6
A STEP BY STEP GUIDE CHARGING YOUR DEVICE
Please charge the remote control and both modules for a minimum of 3 hours
before the first use.
Charging the TENS remote control
Connect the small end of one of your charging cables to the remote control
(please ensure that you fit the correct way round) As shown in ig 2. Plug the
adaptor into any mains outlet socket. The red light will turn to green once fully
charged.
Charging the TENS modules
Connect the USB, as already described, to
the modules and plug the AC adaptor into any
mains outlet. A red light indicates the modules are
in charge mode. Once fully charged the light will
turn green.
Both modules and remote control may be charged
using the USB or cables connected to your
computer or any USB port
Please Note:
Your modules and remote control are fitted with lithium rechargeable batteries. Do not leave
on charge for more than 4 hours per charge. Overcharging the batteries eventually damages
the batteries capacity to be recharged.
Red light appears when the
device is connected to the mains
ig 2.
ig 3.
Telephone: 0800 121 4626
7
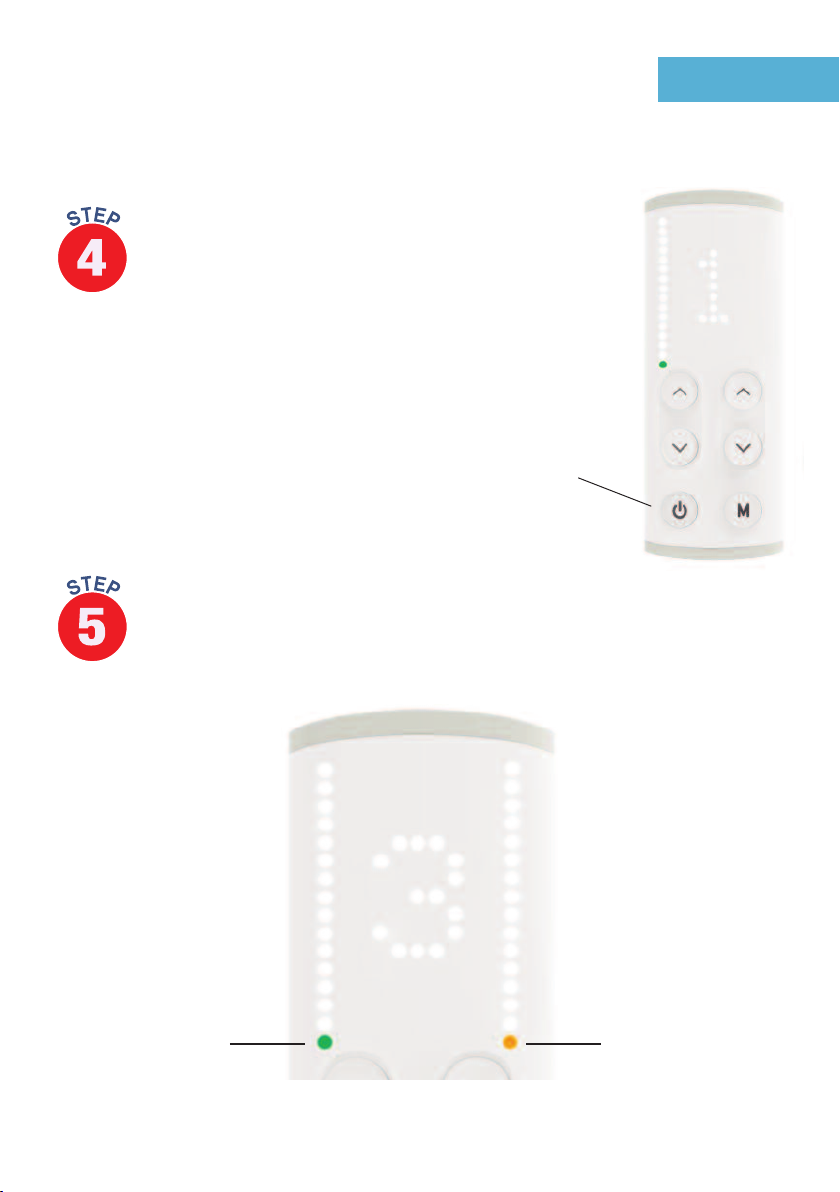
A STEP BY STEP GUIDE CHARGING YOUR DEVICE
Once fully charged turn on your remote control by
pressing and holding the Power button for
approximately 2 seconds. The remote will indicate a
number 1 as shown in ig 4.
Power Button. To switch on and off press
and hold for 2 seconds.
Now turn on both modules by pressing and holding the buttons in the centre of
the modules. One module will glow green and one module will glow yellow. You
will also notice that the remote control has two flashing LED’s (Green and
Yellow). This is indicates that the remote control and modules have paired and
are ready for use.
We recommend that you start with one module only so please now turn off the yellow module.
Yellow
flashing light
Green
flashing light
ig 4.

www.tensmachineuk.com
8
Choosing the programmes
The Med- it Premier 2 Wireless TENS device has 15 clinically validated
programmes to choose from. Nine TENS programmes (1-9). Six Muscle
stimulation programmes (A- ). To change programmes simply press the M
button in the bottom right hand corner of your remote control.
We always recommend that you start with programme 1. This is a gentle TENS
treatment with excellent pain block ability and is a good introduction to TENS
stimulation.
You are now ready to use your device for the first time.
Connect the Green Module to the self adhesive electrodes. Please remember you
must always connect as shown on pages 11 and 12. Now apply to the painful site
to be treated.
Please note you will feel no sensation until you increase the intensity which is described in step 10.
Programme Button
INSTRUCTION FOR USE
Programme display
1-9 ENS Programmes
A-F EMS Programmes

Telephone: 0800 121 4626
9
To increase the intensity, press the up arrow key as shown in ig 5. To reduce
intensity press the down arrow key
Maximum 15 levels of
intensity
Intensity Display
Green LED indicates which
module is switched on
Increase intensity
Green Module
Decrease intensity
Green Module
INSTRUCTION FOR USE
ig 5.
To increase and decrease the intensity press the corresponding keys. Do not hold the up
arrow keys down as this will increase the intensity at a fast rate.
All TENS programmes 1-9 run continuously. To turn off please use the arrow down keys
before turning off at the on-off button. Please put the modules on charge after each use.
Please note
Turning the remote off will automatically turn off the modules. Always remember to
turn off the modules and remote if not in use as this will conserve battery life.
The green and yellow lights on your modules will automatically turn off after 60
seconds. This will help to increase battery life.

www.tensmachineuk.com
10
INTRODUCTION
Thank you for purchasing the Med- it Premier 2 Wireless TENS and Neuromuscular
Stimulator.
It is the most advanced Wireless Stimulator and is manufactured to the highest of medical
standards which fully comply to the Medical Device Directive (M.D.D).
GENERAL DESCRIPTION
The Med- it Premier 2 Wireless TENS/EMS device is a rechargeable battery operated
Stimulator which sends electrical impulses from the remote control to the modules.
The TENS device uses the latest bluetooth technology which allows uninterrupted use of
the TENS regardless of where you may be. After 2 minutes of operating the device, your
remote control will go into sleep mode (saving battery life). By pressing any button on your
remote will reactivate the remote control allowing further adjustment if required.
The electrodes are attached to the modules using snap connectors, which are then placed
over the painful site. This stimulates the nerves causing the pain, which in turn blocks the
pain signals to the brain.
SKIN PATCH TEST
It is recommended that you carry out a patch test before applying your first treatment, To
do this, remove one electrode from the packaging and place on a part of your body which is
both visible and easy to inspect. After 30 minutes, remove the electrode and inspect the
area for any redness or irritations. If no change is noticed, proceed with your first TENS
treatment following the User Guide and Instructions provided. If skin irritation has been
noticed, we recommended the use of sensitive gel electrodes.
FA S
Question: The sensation is not as strong as when I first received my TENS.
Answer: Apply a small amount of water to the gel pad as described on page 11 of this
guide. Each gel pad has a maximum of 10/15 applications before a replacement
gel pad is required.
Question: I need to increase the intensity a little higher each day.
Answer: Applying TENS to the same area each day can dry out your skin. It is important
to wipe the treatment area with warm water before applying your electrodes

IMPORTANT PLEASE READ!
The Med- it Wireless TENS uses high quality medical grade Self-Adhesive Hydro-Gel pads,
which adhere to your skin (please see connecting the self-adhesive electrodes section in
this user manual).
Each time you apply the pad to your skin the Hydro-Gel loses a small amount of moisture.
After the 3rd or 4th application it is important to smear a small amount of water over the
gel pad and wait for approximately one minute for the water to be absorbed into the gel.
The process re-activities the gel pad and increases the adhesive properties. It also helps to
reduce the skin impedance on applications to the skin giving a more pleasant sensation.
SKIN PREPARATION BEFORE APPLYING YOUR
ELECTRODES
It is important that your skin is clean and free from any oils gels or creams before applying
your adhesive pads to the skin.
We recommend however to rub the area to be treated with warm water before applying the
electrodes as this will give the most comfortable stimulation and decrease your skin
resistance.
Telephone: 0800 121 4626
11
ELECTRODE GEL PAD AFTERCARE
www.tensmachineuk.com
12
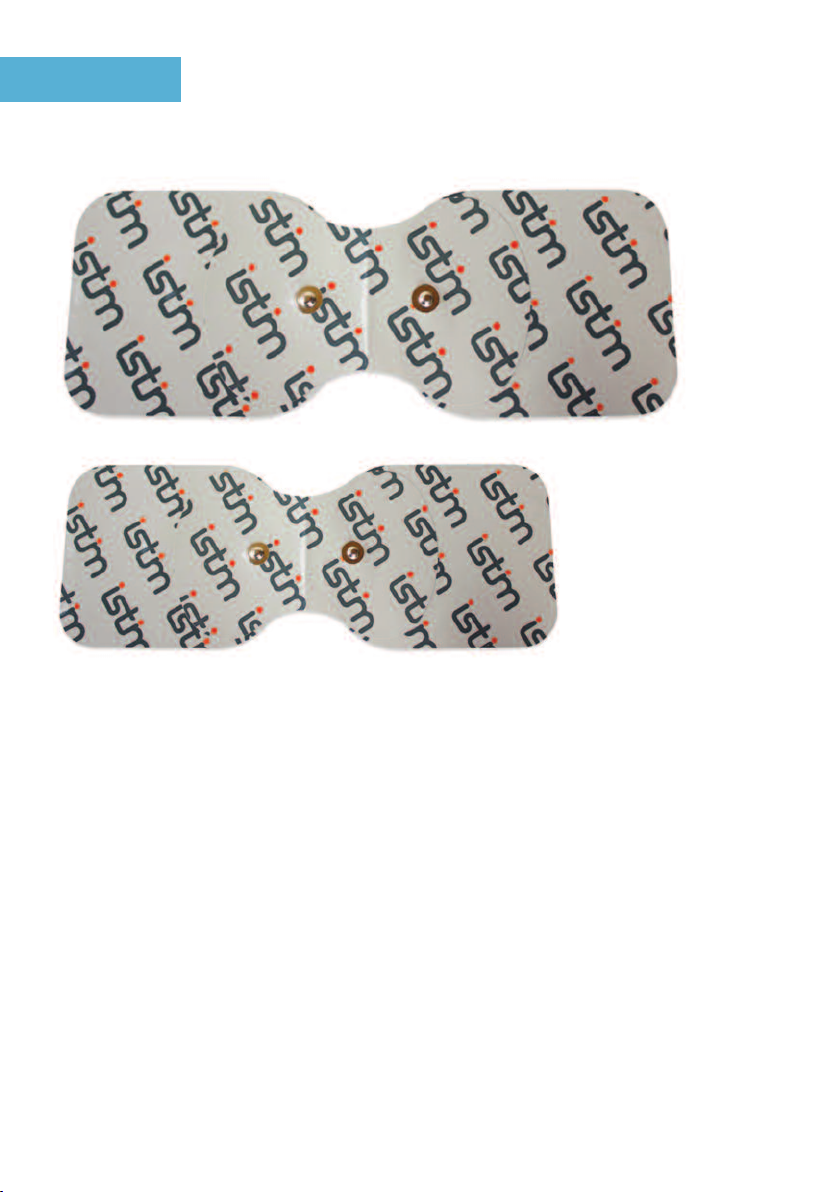
ELECTRODE INSTRUCTIONS
The Med- it Premier 2 Wireless TENS is supplied with
2 x 5cm x 14cm Electrodes
2 x 8cm x 22cm Large Back Electrode
To connect the module simply press the modules onto the snap connectors on your
electrodes. Remove the plastic film from the electrode and place directly to the area of the
body to be treated.
After each treatment please place your electrodes back onto the plastic film provided.

Telephone: 0800 121 4626
13
ELECTRODE INSTRUCTIONS
Turn Stimulator O before applying or removing electrodes
Appli ation
1. Skin site must be very clean and dry. Dirty, flaky or oily skin will prevent electrodes from adhering to
the skin. If necessary, trim excess hair with scissors. If skin is oily wipe down with an alcohol or
electrode skin prep prior to application. Be sure to wash hands before handling electrodes.
2. Remove electrodes from bag and reseal bag to protect remaining electrodes.
3. Grasping a tiny edge of the electrode, peel and remove electrode from the protective plastic liner.
Save liner for electrode storage.
4. Place electrode onto skin treatment site (as recommended by your clinician) by firmly applying from
the centre of the electrode to the outer edges. Adhesion improves when electrodes reach skin
temperature.
5. If gel appears oversaturated with excessive moisture or perspiration, allow the electrode to air-dry
in a refrigerator with the gel side facing up until the gel regains its tack. If the gel appears dry, try
adding a few drops of water to the gel and allow to rest in a dust-free environment until the gel
regains its tack.
Removal and storage
1. Lift a corner of the electrode and slowly peel the electrode off the skin, touching the adhesive gel as
little as possible.
2. Place the electrodes back onto the saved protective plastic liner.
3. While grasping the electrodes connector with one hand, use the other hand to gently twist and
disconnect the lead wire pin from the electrode connector. .
4. Return the electrodes back into the storage bag and reseal tightly to prevent dry-out.
5. Store at room or cool temperature and keep out of direct sunlight.
6. The life of the electrode varies depending on skin conditions, amount of use, storage and climate.
Electrode life may be extended by carefully following the application, removal, and storage
instructions.
Caution
1. DO NOT place electrodes on broken skin. If skin irritation develops discontinue use. Consult
physician. Replace electrodes when they do not adhere or when treatment becomes uncomfortable.
2. DO NOT use unit while driving or operating machinery
3. DO NOT wear electrodes when showering, bathing or swimming
4. DO NOT apply electrodes across the head or across the heart or on the front of your neck.
5. Keep electrodes separated during treatment
6. Using stimulation electrodes that are small or incorrectly applied could result in discomfort or skin
burns.

www.tensmachineuk.com
14
WARNINGS & PRECAUTIONS
PLEASE NOTE:
It is imperative that patients read and understand the warnings and precautions before
using this device. Do not allow your machine or electrodes to be used by anyone else, as
they are designed for single patient use only. It is recommended that proper medical advice
on the use of TENS is sought from a Qualified Practitioner (Physiotherapist, Doctor or
Nurse) prior to use, in order to ensure safe and effective treatment. If you are taking any
medication please carry on as normal but seek advice from your Doctor/Healthcare
Professional before using the device.
WARNING! PATIENTS WITH PACEMAKERS MAY NOT BE TREATED WITH TENS
• Do Not use during pregnancy except during labour
(under medical supervision)
• Do Not place electrodes over the Carotid Sinus
• Do Not use on broken or damaged skin
• Do Not place electrodes close to the eyes or in the mouth.
• Do Not use TENS whilst driving or operating machinery.
TENS is unsuitable and should not be used in the following situations.
• Persons suffering from conditions where the circulation is impaired.
• Epilepsy, Heart Condition or any form of Malignancy.
• Patients with poor skin sensation and non-compliant patients who are emotionally
disturbed or have dementia.
• Over metal implants or in conjunction with sleep apnea or heart monitors.
You should be aware that TENS units provide symptomatic relief only and are not
considered curative.

Telephone: 0800 121 4626
15
WARNINGS
1. The long term effects of chronic electrical stimulation are unknown.
2. Stimulation should not be applied over the carotid sinus nerves, particularly in patients with
a known sensitivity to the carotid sinus reflex.
3. Stimulation should not be applied over the neck or mouth. Severe spasm of the laryngeal
and pharyngeal muscles may occur and the contractions may be strong enough to close the
airway or cause difficulty in breathing.
4. Stimulation should not be applied transthoracically in that the introduction of electrical
current into the heart may cause cardiac arrhythmias.
5. Stimulation should not be applied transcerebrally
6. Stimulation should not be applied over swollen, infected, inflamed areas or skin eruptions,
eg, phlebitis, thrombophlebitis, varicose veins etc.
7. Stimulation should not be applied over or in proximity to cancerous lesions.
Contraindi ation
Electrical stimulators should not be used on patients with cardiac demand pacemakers.
Adverse Rea tions
On rare occasions skin irritation and burns beneath the electrodes have been reported with the
use of electrical stimulators. If irritation occurs, discontinue use and consult your Healthcare
Professional.
CAUTIONS
1. Safety of powered muscle stimulators for use during pregnancy has not been established.
2. Caution should be used for patients with suspected or diagnosed heart problems.
3. Caution should be used in the presence of the following:
a. When there is a tendency to haemorrhage following acute trauma or fracture;
b. ollowing recent surgical procedures when muscle contraction may disrupt the healing
process;
c. Over the menstruating or pregnant uterus; and
d. Over areas of the skin which lack normal sensation.
4. Some patients may experience skin irritation or hypersensitivity due to electrical stimulation
or electrical conductive medium. Using an alternate conductive medium, or alternate
electrode placement can usually reduce the irritation.
5. Electrode placement and stimulation settings should be based on the guidance of the
prescribing practitioner.
6. Powered muscle stimulators should be kept out of the reach of children.
7. Powered muscle stimulators should be used only with the leads and electrodes
recommended for use by the manufacturer.
8. Portable powered muscle stimulators should not be used while driving, operating machinery
or during any activity in which involuntary muscle contractions may put the user at undue
risk of injury.
www.tensmachineuk.com
16
INTRODUCTION TO TENS
What is TENS?
Transcutaneous electrical nerve stimulation is a pain control treatment. It is often called
TENS for short.
A TENS unit is a portable, pocket-sized, battery-powered device.
The TENS unit uses mild, safe electrical signals to help control pain and delivers the
electrical signal to the body through self-adhesive conductive electrodes.
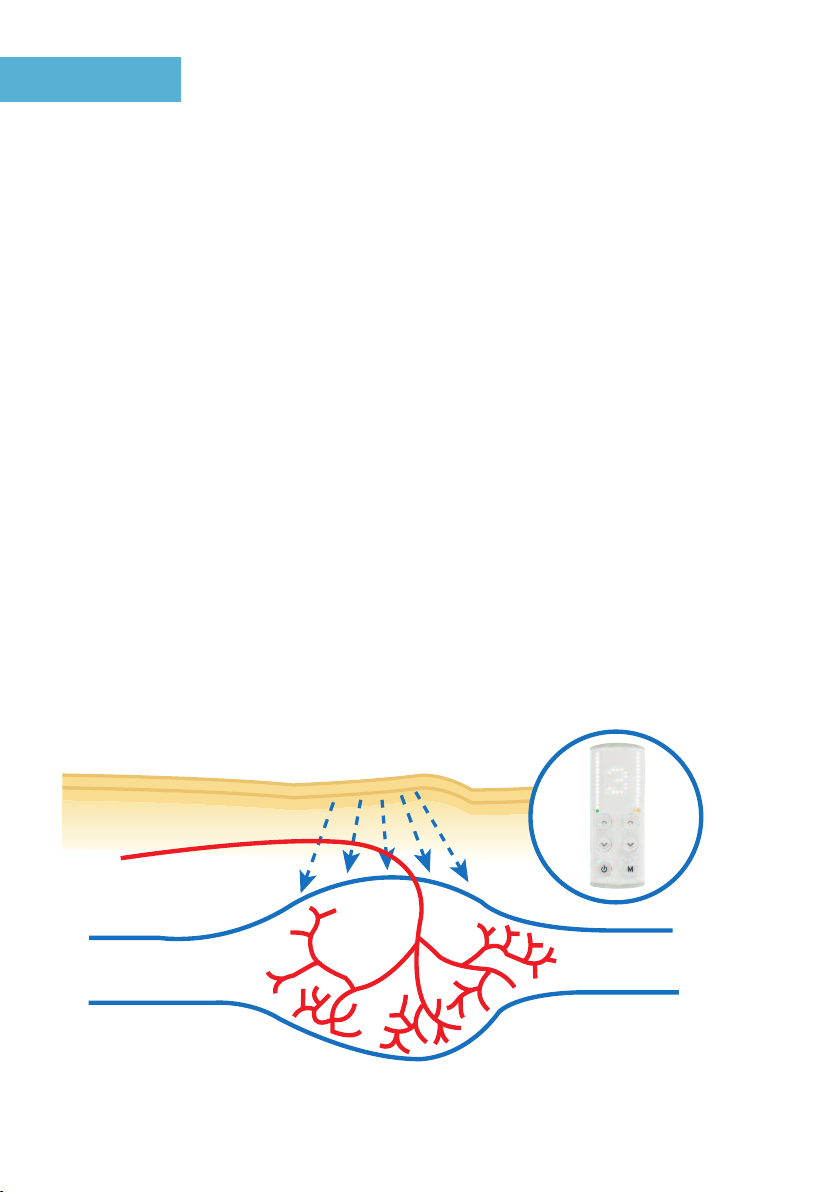
How does TENS work?
The most common TENS programmes use
high-frequency stimulation, which is the first choice for both acute and chronic pain.
High-frequency stimulation sends impulses to the nervous system’s own pain-inhibiting
mechanisms, which block the pain.You can use it as often and as long as you like, but each
treatment should last at least 1 hour.
Another type of TENS is low-frequency stimulation. Low-frequency TENS treatment can
alleviate pain by stimulating muscles to release the body’s own morphine-like substances,
called endorphins.
SKIN
NERVE
MUSCLE

Telephone: 0800 121 4626
17
INTRODUCTION TO TENS
During the TENS treatment
If your muscles start to twitch, this may mean that the TENS signals are too strong or too
fast. If you cannot feel any tingling at all, this may mean that the signal is too weak or too
slow.
The electrodes should be removed at least once a day if the TENS treatment is used around
the clock. The skin under the electrodes must be checked to see if it is red or tender. The
skin should also be cleaned and dried while the electrodes are off. Apply lotion to your skin
where the electrodes were placed. The electrodes should be applied to a different area for
each new treatment. This will help prevent the skin from becoming red or sore.
TENS an be used for
TENS can be used to treat most types of pain where the cause has been determined
including:
• Arthritis
• Back Pain Post Herpetic
• Bruising Neuralgia
• Calf Strain
• Dead Leg
• ibrositis inger Pain
• Rheumatism
• Sciatica
• Headaches
• Migraines
• Shoulder Pain
• Sleeplessness
• Knee Pain
• Lumbago Muscle
• Stress
• Sports Injuries
• Tennis Elbow
• Neck Pain
• Neuralgia
• Osteoarthritis

www.tensmachineuk.com
18
WHICH PROGRAMME SHOULD I USE?
We always recommend you start with programme 3, as already mentioned in your step-by-
step guide. The Med- it 2 Premier Wireless TENS has 9 programmes P1 to P9, Each
programme has been shown to reduce and block pain in a wide range of conditions. It is
very difficult to know which programme is best for you. It is therefore recommended that
over a period of time you try all 9 programmes. To help get you started, we have included
some common conditions with suggested electrode placements including treatment times
and recommended programmes you may wish to try.
HOW HIGH SHOULD I TURN THE INTENSITY?
Everybody reacts differently to TENS Stimulation so it is important that you increase the
intensity (sensation feeling) to the correct level.
Increase the intensity to a sensation which is comfortable and always perceptible; never
turn up to a level which is strong and uncomfortable.
You may use TENS if required for long periods of time to combat long term chronic pain;
however, please remember to place the electrodes in slightly different areas around the
painful site, as this will help reduce skin irritation.
The most up to date research in TENS treatment times indicates that a minimum of 1 hour
to 11/2hours is required for effective pain relief. Your TENS may be used for much longer
periods and you may find treatment times of 3 to 4 hours may work best for you.
Please remember that the intensity level is always kept at a pleasant sensation, never
increase the intensity to uncomfortable levels as this can possibly have a detrimental effect
on your results.
HOW LONG SHOULD A TYPICAL TREATMENT
TIME LAST

Telephone: 0800 121 4626
19
THE MED-FIT 2 PREMIER WIRELESS TENS
PROGRAMMES P1 - P9
NO PROGRAMME FREQUENCY PULSE WIDH
1 Covential ENS 80Hz 180µs
Ideal for first applications of TENS for
both acute and long term pain
CONDIIONS
Neck, Shoulder, Elbow Pain, Rheumatic Pain, Lumbago, Hip Pain, Osteoarthritic Pain in the knee
2 Burst ENS 2Hz 180µs
Most effective for radiating pain if arms
and legs and deep muscular pain
CONDIIONS
Osteoarthritic Pain in the Knee, Sciatica Central Pain
3 Modulated ENS 80Hz 70-180µs
Pain relief with a massage effect
CONDIIONS
Neck, Shoulder, Elbow Pain, Rheumatic Pain, Lumbago, Menstrual Pain, Hip Pain, Osteoarthritic Pain in the knee
4 Mixed Frequency ENS 15Hz/2Hz 180µs
CONDIIONS
Osteoarthritic Pain in the knee, Neck Pain, Shoulder Pain, Menstrual Pain, Central Pain Lumbago
5 Fixed Frequency ENS 80Hz/2Hz 180µs
Effective programmes for long term use
with reduced accommodation factor
CONDI IONS
Osteoarthritic Pain in the knee, Neck Pain, Shoulder Pain, Menstrual Pain, Central Pain Lumbago
6 Nausea 10Hz 180µs
Specifically for treatment of nausea, most
successful placing electrodes over
acupuncture point C6
CONDI IONS
Nausea
7 Migraine/Headaches 80Hz 60µs
Reduced pulse width ideal for treating
nerve rich areas
CONDI IONS
Tension Type Headache, acial Pain, Neck Pain, Postherpetic Neuralgia
8 70% Rate Modulation over 10 seconds 10Hz 200µs
CONDI IONS
Neck, Shoulder, Elbow Pain, Rheumatic Pain, Lumbago, Menstrual Pain, Hip Pain, Osteoarthritic Pain in the Knee
9 90% Rate Modulation over 10 seconds 50Hz 250µs
CONDI IONS
Neck, Shoulder, Elbow Pain, Rheumatic Pain, Lumbago, Menstrual Pain, hip Pain, Osteoarthritic Pain in the Knee

www.tensmachineuk.com
20
HELPFUL TIPS FOR SUCCESSFUL
TENS TREATMENT
Once you have familiarised yourself with the controls and features of your TENS device, it
is important to place the TENS electrodes in a position which gives the most pain relief.
This may take 3 or 4 attempts to find the most suitable position for maximum pain relief.
If you are using one module, place the electrode directly onto the painful area.
The alternative method is to use two modules surrounding the painful area. See examples
below.
The complete area between the electrodes will now be treated when positioning the
electrodes as shown.
One Module wo Modules
Table of contents
Other Med-Fit Fitness Equipment manuals

Med-Fit
Med-Fit Maxi-Stim EMS Plus Product information sheet

Med-Fit
Med-Fit EM6100A Instruction Manual

Med-Fit
Med-Fit 3 User manual

Med-Fit
Med-Fit Premier Series Instruction Manual

Med-Fit
Med-Fit EM6300A Instruction Manual

Med-Fit
Med-Fit EM6200A Instruction Manual

Med-Fit
Med-Fit EV-806 Instruction Manual

Med-Fit
Med-Fit EM6300A-4 User manual

Med-Fit
Med-Fit EM6300P Product information sheet
Popular Fitness Equipment manuals by other brands


G-FITNESS
G-FITNESS AIR ROWER user manual

CAPITAL SPORTS
CAPITAL SPORTS Dominate Edition 10028796 manual

Martin System
Martin System TT4FK user guide

CIRCLE FITNESS
CIRCLE FITNESS E7 owner's manual

G-FITNESS
G-FITNESS TZ-6017 user manual

Accelerated Care Plus
Accelerated Care Plus OMNISTIM FX2 CYCLE/WALK user manual


