MEDCHECK VITAL SIGNS MONITOR User manual

VITAL SIGNS MONITOR MANUAL BY SMARTFUTURE PTE LTD
CONSISTING OF
DEVICE MANUAL
APPLICATION MANUAL
VITAL
SIGNS
MONITOR
THE COMPLETE
MANUAL TO
MEDCHECK’S VITAL
SIGNS MONITOR

DISCLAIMER
This manual and product are not meant as a substitute for
advice provided by your doctor. You are not to use the
information contained herein, or this product for diagnosing or
treating a health problem or prescribing any medication. If you
have or suspect that you have a medical problem, promptly
consult your healthcare provider.
INTENDED USE
The Vital Signs Monitor is intended to be used for measuring,
displaying, reviewing and storing of multiple physiological
parameters including ECG, pulse oxygen saturation (SpO2), pulse
rate, temperature and blood pressure variation in home or
healthcare facilities environment.
ECG and Blood pressure variation is intended for use with adult.
The data and results provided by this device are for pre-check
screening purpose only and cannot be directly used for diagnostic
or treatment.

INTRODUCTION
- SAFETY
Warnings and Cautionary Advices
▶ We recommend not to use this device if you have a pacemaker or
other implanted devices. Follow the advice given by your doctor, if
applicable.
▶Do not use this device with a defibrillator.
▶ Do not use this device during MRI examination.
▶ Do not use the device in a combustible environment (i.e.,
oxygen-enriched environment).
▶Do not place this device in pressure vessels or gas sterilization device.
▶ This device is not intended for use by people (including children) with
restricted physical, sensory or mental skills or a lack of experience
and/or a lack of knowledge, unless they are supervised by a person who
has responsibility for their safety or they receive instructions from this
person on how to use the device.
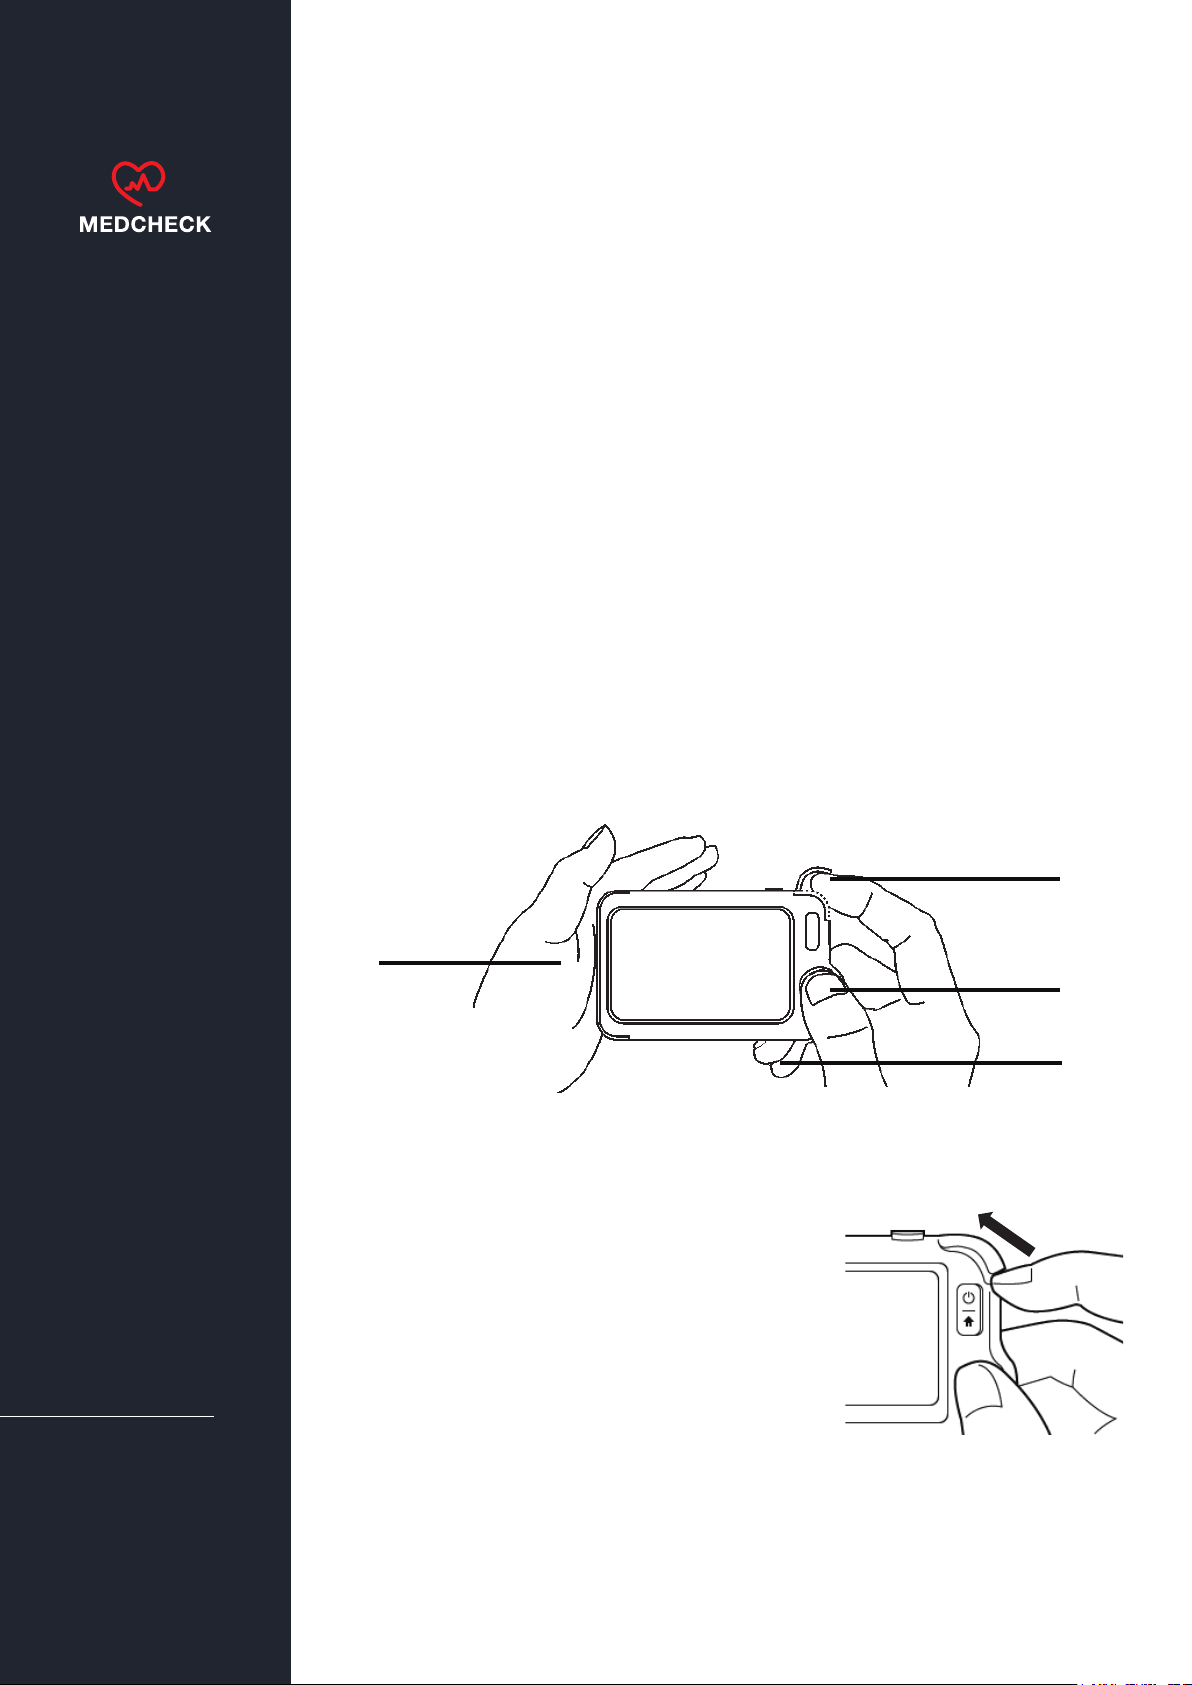
▶Do not allow the electrodes of the device to come into contact with
other conductive parts (including earth).
▶ Do not store the device in the following locations: locations in which
the device is exposed to direct sunlight, high temperatures or levels of
moisture, or heavy contamination; locations near to sources of water or
fire; or locations that are subject to strong electromagnetic influences.
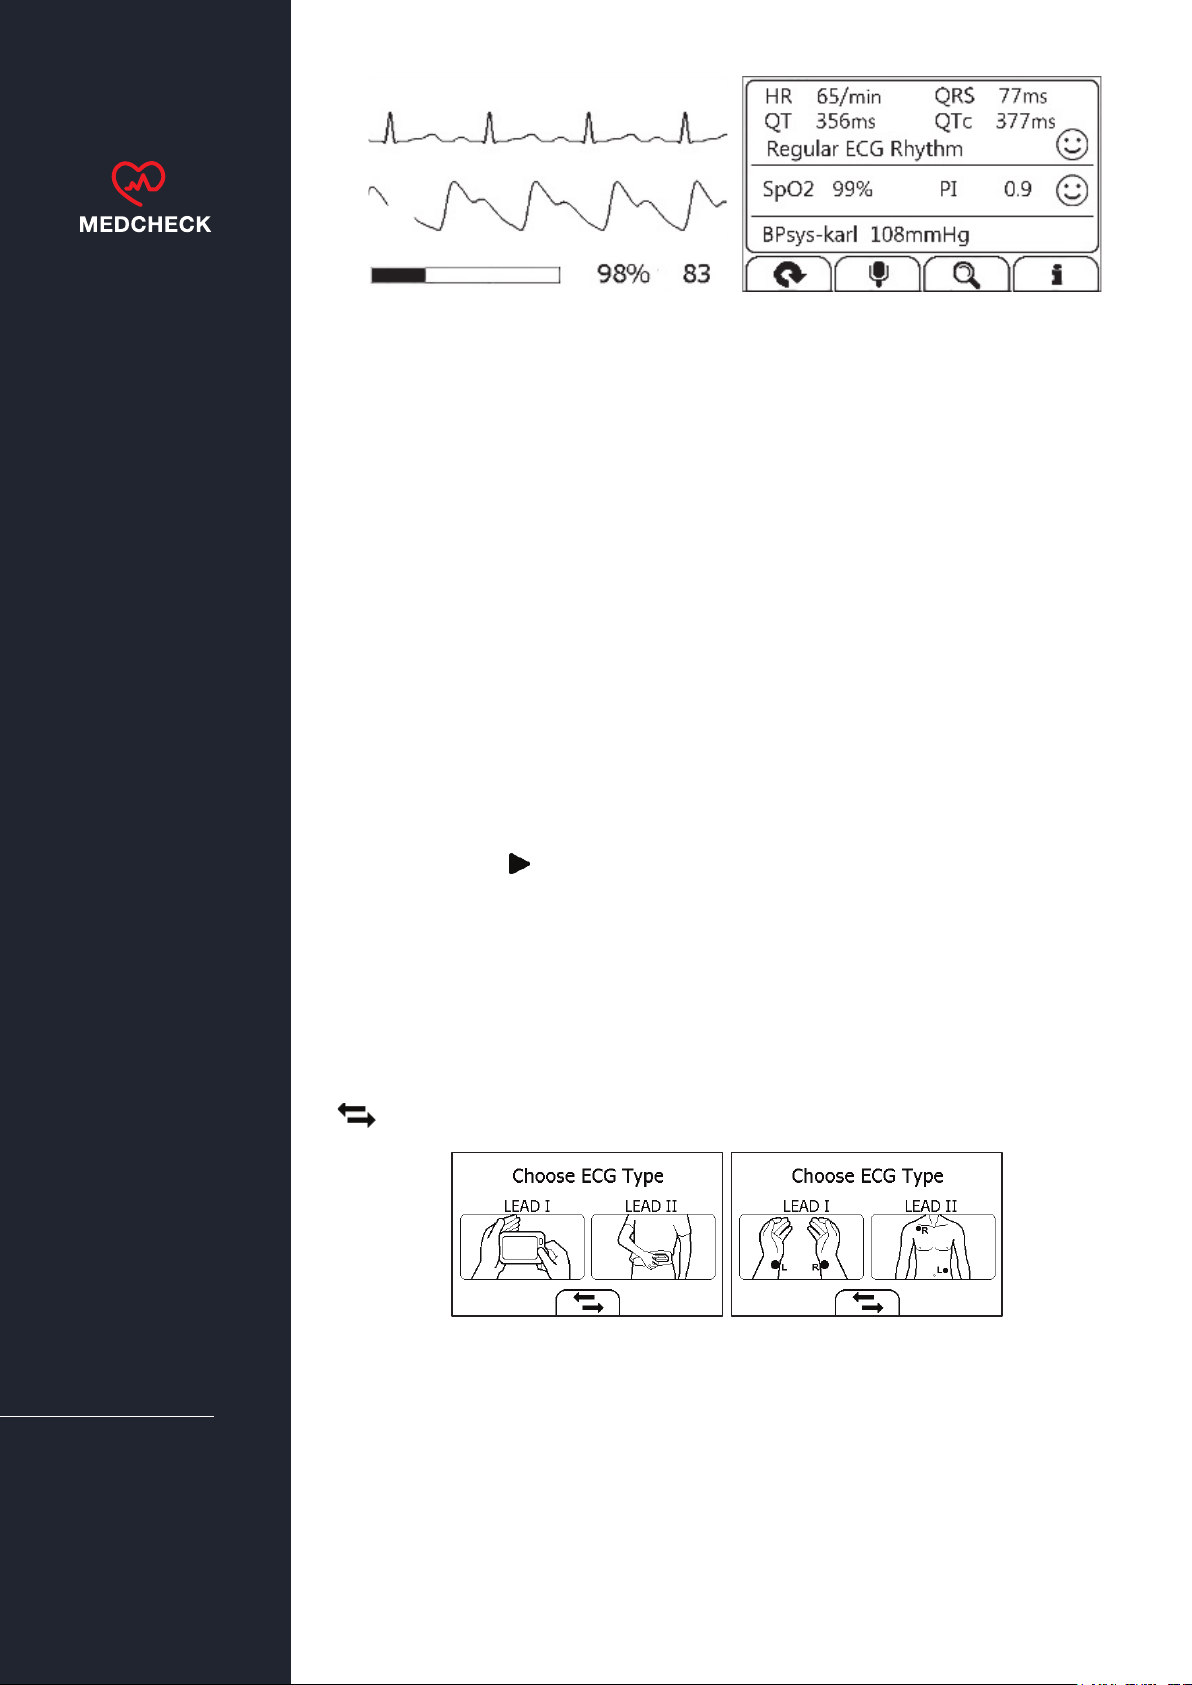
▶ Vital signs measurements, such as those taken with this device,
cannot identify all diseases. Regardless of the measurement taken
using this device, you should consult your doctor immediately if you
experience symptoms that could indicate acute disease.
▶ Do not self-diagnose or self-medicate on the basis of this device
without consulting your doctor. In particular, do not start taking any
new medication or change the type and/or dosage of any existing
medication without prior approval.
▶ The device has no alarms and will not sound if the measurement
reading is too low or too high.
▶ Check the SpO2 sensor application site every 6-8 hours to determine
the positioning of the sensor and the circulation and skin sensitivity of
the patient. Patient sensitivity varies depending on medical status or
skin condition. For patients with poor peripheral blood circulation or
sensitive skin, inspect the sensor site more frequently.
▶Do not use the Oximeter on the same hand/arm when using a blood
pressure cuff or monitor.

DEVICE OVERVIEW
DEVICE OVERVIEW
1. Touch Screen
2. Infrared temperature sensor
3. Internal SpO2 sensor
4. LED indicator
▶ Off: the monitor is turned off or working in Standby Mode;
▶Green: the monitor is turned on, and working normally; or when the
battery is fully charged;
▶ Blue: the battery is being charged;
▶ Red: the battery is low;
5. Multi-functional connector
It connects with external SpO2 cable, ECG cable, or charging cable.
6. Home, Power On/Off
▶ When the monitor is off, press this button to power it on.
▶ When the monitor is on, press and hold it for 2 seconds to turn it off.
▶During operation, press this button will switch to Main Screen, or
Calendar Screen, or return to upper menu.
7. ECG right electrode
Rest right thumb against it.
5
6
7
2
1
3
4

DEVICE OVERVIEW
DEVICE OVERVIEW
9
11
8
10
8. Speaker
9. ECG left electrode
Put it to your left palm, left abdomen or left knee.
10. Neck stripe hole
11. ECG back electrode
Use right forefinger or middle finger to press on it.
Main Screen
The Main Screen is shown as below. Slipping your finger from right to left can
switch to the second page, and vice versa.

DEVICE OVERVIEW
DEVICE OVERVIEW
1
2
3
4
6
7
5
Calendar Screen / Standby Mode
The device will enter Calendar Screen / Standby Mode when:
▶ No operation is detected for 120 seconds in other screen interface, the device will
automatically switch to the Calendar Screen.
▶ Pressing the Home button in the Main Screen.
1. Current time
2. Current date
When a reminder event happens, this area displays the event name, e.g.
“Daily Check”.
You are allowed to change the current time and date when the device is
powered on at the first time. Or you can also go to the Setting menu to
change it.
3. This arrow indicates users to press the Home button to exit the Calendar
Screen / Standby Mode.
4. Battery indicator
5. If you failed to respond to the previous reminder event, then that event
will be shown in this area.
6. This icon appears when <Quick ECG> is enabled.
7. This icon appears if you have set reminder event.
1.6 Result Screen
For each measurement, a Result report will be provided after the
measurement is finished. An example is shown as below.

DEVICE OVERVIEW
DEVICE OVERVIEW
Result Screen
For each measurement, a Result report will be provided after the measurement is
finished. An example is shown as below.
1. Measured parameters and readings
2. A summary of this measurement
3. A graphic indicator about the health status
: All measured parameters are within the reference range;
: One or more than one measured parameter(s) is (are) out of reference
range. When the icon appears, it is suggested to test again, and consult
your doctor for help.
4. Buttons
▶ Select button to start a measurement again.
▶Press and hold the button to add voice memo. Voice memo is only
available for Daily Check and ECG Recorder measurements.
▶ Select button to review previous results.
▶ Press button to open the help information.
1
2
3
4

SYMBOLS DEFINITIONS
CE0197
IP22
SYMBOLS DEFINITIONS
Application part type BF
Manufacturer
In conformity with Directive 93/42/EEC
European Representative
Symbol for “ENVIRONMENT PROTECTION – Waste electrical
products should not be disposed of with household waste. Please
recycle where facilities exist. Check with your local authority or
retailer for recycling advice”.
Against ingress of solid foreign objects ≥12.5mm diameter,
Against dripping(15° tilted)
Follow operating instructions
No alarm system.
Prior to Use
Charge the Battery
To charge the battery,
1. Connect the smaller end of the USB charging cable to the
multi-functional connector
2. Connect the other end of the USB charging cable to the USB charging
port.
3. When the LED turns to green, it means the battery is fully charged.
Warnings and Cautionary Advices
▶ The device cannot be used for any measurement during charging.
▶Use charging adapter provided by manufacturer, or USB charging
devices which comply with the standard of IEC 60950.
Power On/Off
Press the Power On/Off button to power on the device. Press and hold
Power On/Off button for 2 seconds to power off the device.

Daily Check measurement is a function that combines the measuring
of ECG (Electrocardiograph), SpO2 (blood oxygenation) and systolic
blood pressure. It takes only 20 seconds to collect your vital signs
before giving you vital signs readings and your health evaluation.
Using Daily Check
To start a Daily Check, follow the steps as below.
1. If you have not created user, then please follow the instruction in
[Settings Section] to add your user account.
2. Tap the <Daily Check> icon in the middle of the screen.
3. Choose the right user.
4. Hold the device according to the instruction, keep the device at the
same level as your heart, and keep stable posture and stay calm. Don’t
exert too much pressure on the ECG electrode, which may result in
EMG (electromyograph) interference. Just hold gently and ensure
good contact with the ECG electrode. Do not exert pressure on the
finger that put in the SpO2 sensor. Just fit it inside but gently to
ensure good blood perfusion.
DAILY CHECK
(1)
(2)
(3)
(4)
(1) Put the right forefinger into the built-in SpO2 sensor. Use the finger
nail to squeeze the edge of the SpO2 sensor
cover, then move in upward to the left
to raise it up as shown below.
(2) Press the right thumb on the right
electrode.
(3) Press the right middle finger on the back
electrode.
(4) Press the left electrode to the left palm.
5. Once the device detects stable waveform, it will automatically start
the measurement. The
countdown bar moves from left to right.
6. When the bar is fully filled, the device will analysis your data, and
then show the measurement result.
MEASUREMENT
PROCEDURE

Daily Check provides the trending graph of heart rate, SpO2 and blood
pressure. To view the trend, tap the button, then select one record, and
then tap the button.
BP Calibration
Warnings and Cautionary Advices
▶For a given user, it is suggested to make BP calibration every three
months.
To get blood pressure readings, this device should be calibrated by a
doctor with a traditional cuff blood pressure (BP) meter. Because of
individual differences, each user must make his/her own calibration
before using Daily Check to measure or track the blood pressure. The
calibration should be performed when the user is under calm status.
To calibrate with a cuff BP meter, follow the steps as below.
1. Select the <Settings> icon, select <BP Calibration>, and then choose
the right user.
2. Ensure that the cuff and the Vital Signs Monitor are at the same level as
your heart. Then start the blood pressure measurement from the cuff BP
meter.
3. Press the button on thescreen, and start the DailyCheck
measurement.
4. When the blood pressure measurement is finished, manually input the
readings of systolic pressure.
5. Repeat the calibration once again by following the above steps.
ECG Recorder
About ECG Recorder
The ECG recorder offers four different methods to measuring ECG. Tap the
f icon to switch between two pages.
As shown above, from left to right, there are:
▶ Method A: Lead I, right hand to left hand
▶ Method B: Lead II, right hand to left abdomen
▶ Method C: Lead I, left wrist to right wrist
▶ Method D: Lead II, right wrist to left lower abdomen
ST segment analysis is performed on selected LEAD.
MEASUREMENT
PROCEDURE

MEASUREMENT
PROCEDURE
Method A and B offer maximum comfort, than method C and D, but no ST
segment value. No matter which method you choose to measure ECG,
please keep stable posture and stay calm during the measurement.
Measuring without Cable
To start an ECG Recorder measurement without cable,
1. Choose the method A or B.
2. Follow the instruction according to the mode you selected.
▶ Press the right thumb on the right electrode;
▶ Press the right forefinger on the back electrode;
▶ For method A, press the left electrode to the left palm;
▶ For method B, press the left electrode to the left lower abdomen;
Do not press the device too firmly against your skin, which may result in
EMG (electromyograph) interference. After you finish the above steps,
hold the device stably and stay calm.
3. Once the device detects stable waveform, it will automatically start the
measurement. The countdown bar moves from left to right.
4. When the bar if fully filled, the device will analysis your data, and then
show the measurement result.

MEASUREMENT
PROCEDURE
Measuring with Cable
To start an ECG Recorder measurement with cable,
1. Choose the method C or D.
2. Follow the instructions to connect the ECG cable and place the ECG
electrodes.
▶ Sit down or stand,/ stay calm;
▶ Palms facing up, place an electrode in the middle of right wrist;
▶ For method C, place another electrode in the middle of left wrist;
▶ For method D, place another electrode in the left lower abdomen;
3. The display will then show your ECG waveform.
The device will monitor your ECG continuously, however no data will be saved
until you press the button.
4. Press the button to start collecting your ECG data. The countdown bar
moves from left to right.
5. When the bar is fully filled, the device will analysis your data, and then
show the measurement result.
Quick ECG
If the <Quick ECG> function is enabled, then you can start an ECG
measurement very quickly by picking up the device and hold it according to
method A. This saves time and is much easier for use.
In the Settings menu and tap <Quick ECG> to enable or disable this function.

MEASUREMENT
PROCEDURE
Temperature
About thermometer
Warnings and Cautionary Advices
The thermometer is only designed for the measuring area on the
human body stated in this manual.
▶The device needs to be in the room which the measurement is taken
for at least 10 minutes before use.
▶Physical activity, increased perspiration on the forehead, taking
vasoconstictive medication and skin irritations can distort the result.
▶ The forehead (temples) must be free from perspiration and
cosmetics.
Influences on forehead temperature include but not limited to
A person’s individual metabolism;
▶Age; Forehead temperature is higher in babies and infants than in
adults. Greater temperature fluctuations occur faster and more often in
children. Normal forehead temperature decreases with age.
▶ Environmental temperature;
▶Time of day; Forehead temperature is lower in the morning and
increases throughout the day towards evening.
▶ Activities; Physical and, to the lesser extent, mental activities increases
forehead temperature.
Taking Temperature Measurement
To start a temperature measurement,
1. In the Main Screen, select <Thermometer>.
2. Put the thermometer sensor on your temple.
Put sensor on
temple, click button
then scan to
forehead until you
hear a beep
3. Press the Home button once, you will hear “Bi-Bi” beep, which
indicates the measurement starts. Then move the thermometer
around the temple for around 3 seconds until you hear a long “Bi” beep,
which indicates the measurement is finished.
4. Take down the device, and the screen shows the measurement
result.
In the Settings menu, tap the <Thermometer> area to change between
Celsius degree (°C) and Fahrenheit degree (°F).

MEASUREMENT
PROCEDURE
Oximeter
The Vital Signs Monitor measures the amount of oxygen in your blood,
your pulse rate and pulse index. The oxygen saturation (SpO2) is
measured and displayed as a percentage of full capacity.
Measuring without Cable
To start a Oximeter measurement without cable,
1. In the Main Screen, tap the <Pulse Oximeter>
2. Insert the forefinger into the built-in SpO2 sensor as shown below.
Finger nail posion
3. When the device detects stable waveform, it will automatically start
the measurement. The countdown bar moves from left to right.
4. When the bar is fully filled, the device will analysis your data, and then
show the measurement result.
Measuring with Cable
1. Connect the external SpO2 sensor to the multi-functional connector.
2. Put your index finger or middle finger into the external SpO2 sensor.
Make sure the cable is positioned along the top of the hand, and the
finger nail is in the position as shown below.
3. Tap the <Pulse Oximeter> icon.
4. The display will then show your PLETH waveform, SpO2 and pulse rate.
5. Press the button to start collecting your SpO2 data. The countdown bar
move from left to right.
6. When the bar is fully filled, the device will analysis your data, and then
show the measurement result.
The device will monitor continuously, however no
data will be saved until you press the button.

MEASUREMENT
PROCEDURE
Sleep Monitor
Vital Signs Monitor offers a non-invasive method to monitor sleep
status for adult users who have sleep problem, sleep related breathing
disorders and obstructive sleep apnea.
To start a sleep monitor measurement,
1. Tie the wristband on one of your left hand.
2. Insert the SpO2 cable into the
multi-functional connector.
3. Put one of your finger into the sensor.
Forefinger or middle finger is suggested. If
needed, remove the colored nail polish from
the finger. Make sure that the sensor is
correctly placed so that the cable goes above
your hand back.
4. Press the Home button to enter the Main Screen. Then Tap the Sleep
Monitor icon to enter the screen as below.
5. Tap the button to start the sleep monitoring. During monitoring, a
countdown timer is always displayed at the lower left part.
6. You can press Home button to lock the screen, as shown below. The
device will work in a very low power consumption mode.
7. Insert the device into the wrist band cover, and then begin to sleep.
8. When you get up, or when you want to stop monitoring, you can
press the Home button again to unlock the screen, and then tap icon
to stop sleep monitoring.
9. You can tap button to view the SpO2 trending during your sleep, or
tap “Close” button and return to the Main Screen.

MEASUREMENT
PROCEDURE
Pedometer
To start a Pedometer measurement,
1. In the Main Screen, select <Pedometer> icon. If you have not created
user, then please add your user account.
2. Select a user to enter the screen as below.
3. Tap the button to set your target, if needed.
4. Tap the button to start calculating steps.
5. Place the device into your pocket.
6. When you finished calculating steps, press the Home button to stop
the pedometer.
7. Press Home button again to exit pedometer function.
Reminder
Up to 6 reminder events can be set by user. You can add, edit and delete
reminder events.

SETTINGS
Settings
Changing Sound Volume
In the Settings menu, tap the <Volume> area to change volume
directly. “X” means the volume is turned off.
Enabling/Disabling Voice Guide
In the Settings menu, tap the <Voice Guide> to enable or disable this
function.
User Management
To use the Daily Check measurement, you must create your account. If
the Daily Check measurement is used by more than one user, then
each user must create his/her own account.
To create a user account:
1. In the Settings menu, choose <User Management>.
2. Tap a “+” button to open the menu below.
3. Tap each button to edit corresponding information.
4. Tap “X” to return to < User Management > menu.
To edit the information of a user:
1. In the Settings menu, choose <User Management>.
2. Choose the user that you want to edit.
3. Tap the information that you want to edit, and then modify.
4. Tap <OK> and “X” to return to the< User Management > menu.
To delete a user:
1. In the Settings menu, choose <User Management>.
2. Choose the user that you want to delete.
3. Tap the button.
4. Choose <Yes> to confirm.

SETTINGS
Setting Date & Time
1. In the Settings menu, choose <Date & Time>
2. Tap “+” or “-” button to change the date, then tap .
3. Tap “+” or “-” button to change the time.
4. Tap to finish the setting.
Choosing Language
1. In the Settings menu, choose <Language>.
2. Choose the language from the list.
Changing ECG waveform length
To change the length of ECG waveform saved for each ECG Recorder
measurement:
1. In the Settings menu, choose<ECG Length>.
2. Then choose among <30s>, <60s>. And tap <OK> to enable the
change.
Setting ECG Bandwidth
In the Setting menu and choose <ECG bandwidth> to change between
<Normal> and <Wide>.

SETTINGS
Erasing Data
In the Setting menu, Tap <Erase All Data>, and then <Yes>.
All measurements saved in the device will be deleted.
Factory Reset
In the Setting menu, tap <Factory Reset>, then tap <Yes>.
All measurements, user information and other settings saved in the
device will be deleted, and the device will be restored to the factory
default settings.
Review
Reviewing Daily Check
To review Daily Check records,
1. In the <Review> menu, select <DailyCheck>.
2. Choose the right user to open the list as below, then select one record
to review more information as below.
In this menu, you can:
▶ Select to delete this measurement
▶ Select to replay the ECG waveform as shown below.
When the ECG waveform is being replayed, you can
▶ Select to change the waveform amplitude.
▶ Select to pause it.
▶ Select to return Daily Check list.
▶ Select to view the trend of heart rate, SpO2 and blood pressure.
▶ Select to return to the Daily Check list.

MAINTENANCE &
TROUBLESHOOTING
Problem Possible Cause Soluon
The device does
not turn on.
1. The baery may be low.
2. The device might be
damaged
1. Charge the baery and
try again.
2. Please contact with
your local distributor.
The ECG waveform
amplitude is small
The lead you choose is not
suitable for you.
Change another lead and
try again.
ECG waveform
dris
1. The pressure exerted on the
electrode is not stable or too
much.
2. Hand or body may be
moving.
1. Hold the device stably
and gently.
2. Try to keep perfectly
sll and test again.
SpO2or pulse rate
shows no value, or
the number
fluctuates
1. Finger may not be inserted
correctly.
2. Finger or hand may be
moving.
1. Remove finger and
reinsert, as directed.
2. Try to keep perfectly
sll and test again.
The app cannot
find the device.
The Bluetooth may not be
turned on.
Turn on theBluetooth on
the second page of Main
Screen.
“System Error”
occurred.
Soware or hardware failure. Restart the device and
measure again.If the
error persists, mark
down the error number
and contact with your
local distributor.
BP calibraon
failed.
1. Wrong height.
2. The difference between two
1. Reconfirm your height.
2. Try to keep perfectly
Maintenance
Care and Cleaning
Clean the device per week, carefully swabbing the device surface with a
soft cloth or cotton swab with rubbing alcohol.
Trouble Shooting
calibraons is too large. sll and calibrate again.
No voice during
ECG and SpO2
measurement.
The speaker is muted. Unmuted the speaker in
the Sengs menu.
Temperature value
is too low.
1. The measurement area is
covered by hair.
2. The thermometer sensor is
too far away from your skin.
3. The thermometer sensor is
dirty.
1. Remove hair from the
measurement area.
2. Keep the sensor
contact with your skin.
3. Clean the sensor with
a socloth or coon.
Table of contents