MedChip Solutions SpiroConnect User manual

1
SpiroConnect
Spirometer
Operators Manual
Issue 1.12
Note: This issue of the Operators Manual, Issue
1.12, is applicable to SDM 1.12 when used with
FW 3.02.
July 2022
Copyright © MedChip Solutions Ltd. All Rights Reserved

SpiroConnect Operators Manual
MedChip Solutions Ltd. Page 2 of 31 001.105.GBR Issue 1.12
Contents
1Introduction ..............................................................................................................................................3
1.1 MedChip Solutions COVID-19 Response............................................................................................3
2Package Contents......................................................................................................................................5
3Warnings and Cautions.............................................................................................................................6
4Relative Contraindications for Spirometry...............................................................................................7
5Intended Use.............................................................................................................................................7
6Environment.............................................................................................................................................7
7Getting Started..........................................................................................................................................8
7.1 Installing SpiroConnect Data Manager Software.................................................................................8
8Operation..................................................................................................................................................9
8.1 Patient Selection:..................................................................................................................................9
8.2 Unit Connection: ..................................................................................................................................9
8.3 Forced Spirometry:.............................................................................................................................10
8.4 Relaxed Vital Capacity:......................................................................................................................16
8.5 Review Results:..................................................................................................................................17
8.6 General information pertaining to the reviewing of examinations:....................................................18
8.7 Calibration:.........................................................................................................................................19
8.8 Settings:..............................................................................................................................................20
8.9 Menu Bar options:..............................................................................................................................20
8.10 Patient Database: ................................................................................................................................20
8.11 Android application:...........................................................................................................................21
8.12 ArtiQ AI Functionality:......................................................................................................................21
9Battery Management...............................................................................................................................22
10 Looking after your SpiroConnect...........................................................................................................23
11 Cleaning..................................................................................................................................................23
11.1 Unit Case Cleaning COVID-19 Update .............................................................................................23
11.2 Turbine/Transducer Cleaning.............................................................................................................23
11.3 Soft Carry Case Cleaning...................................................................................................................23
12 Accessories.............................................................................................................................................24
13 Servicing.................................................................................................................................................24
14 Warranty and Liability............................................................................................................................24
15 Software License Agreement..................................................................................................................25
16 Trouble Shooting Information................................................................................................................25
17 Electromagnetic Compatibility (EMC) ..................................................................................................25
18 IT Network .............................................................................................................................................27
19 Applied Parts ..........................................................................................................................................27
20 Symbols..................................................................................................................................................28
21 Classification..........................................................................................................................................28
22 Specifications .........................................................................................................................................29

SpiroConnect Operators Manual
MedChip Solutions Ltd. Page 3 of 31 001.105.GBR Issue 1.12
1Introduction
Thank you for choosing the SpiroConnect from MedChip Solutions. Please take a moment to
familiarise yourself with the instructions for use detailed in this manual and for further
information please refer to our website: www.medchipsolutions.com.
The SpiroConnect transmits real-time spirometric flow and volume data followed by
diagnostic quality spirometry indices to a PC running SpiroConnect Data Manager software
over a Bluetooth connection.
The spirometer is compact, battery operated, and fully portable.
The spirometer uses the MedChip Solutions turbine transducer. This is an extremely stable
form of volume transducer, which measures expired air directly at B.T.P.S (Body
Temperature and Pressure with Saturated water vapour) thus avoiding the inaccuracies of
temperature corrections. This transducer is insensitive to the effects of condensation and
temperature and avoids the need for individual calibration prior to performing a test.
The vertical turbine technology employed in the SpiroConnect ensures exceptional
performance at low flows exceeding the ATS/ERS requirements to respond to flows as low
as 0.025l/s.
The SpiroConnect turbine is a precision sensor and to avoid damage the following
precautions should be taken:
•Clean or sterilise the turbine in accordance with the instructions –See section 11
•Do not immerse the turbine in sterilising solution for more than 10 minutes
•The turbine should be dried in air, do not insert anything into the turbine to dry or clean
•Do not apply undue force when removing or inserting the turbine into the housing
1.1 MedChip Solutions COVID-19 Response
Spirometry should not be performed if the patient has any symptoms of COVID-19 infection
at the time of the test, or if they are known to have recently been in contact (within previous
10 days) with a confirmed case1.
MedChip Solutions recommends that a spirometry test using the SpiroConnect, should only
be performed using a bacterial/viral spirometry filter. These should be purchased from an
authorised SpiroConnect distributor to ensure they fit the device correctly.
After each use the unit should be wiped down with an alcohol infused wipe or other
medically approved anti-viral wipes such as Clinell wipes as per section “11.1 Case
Cleaning COVID-19 Update”.
The single use pulmonary filter should be safely disposed of immediately after the test by a
clinician wearing medical gloves.
Even though the SpiroConnect directs air downwards away from the clinician’s face, it is
recommended that a clinician is wearing personal protective equipment (PPE) that limits
aerosolized droplet acquisition2as the patient may cough after performing spirometry.

SpiroConnect Operators Manual
MedChip Solutions Ltd. Page 4 of 31 001.105.GBR Issue 1.12
The Bluetooth connectivity allows the clinician to remain at a safe distance from the patient
throughout the test and to be isolated from the patient, preferably behind a screen, in case
of a coughing event. Enhanced cleaning of the testing space should be carried out such as
wiping down surfaces with appropriate cleaners2.
If available, a room with mechanical air circulation should be used or a room where other
ways of ventilation are possible (e.g. opening windows). Ideally this should be in the region
of 6 room air changes per hour1.
The MedChip Solutions Covid-19 Response is based ATS guidance and on the ARTP
document “Risk minimisation in spirometry re-start” by Martin Allen3. Which includes:
•PCRS Spirometry in Primary Care - Guidance on reinstating spirometry in England
•ARTP Statement for the NHS NATIONAL RESPIRATORY PROGRAMME Task and
Finish Group Recommendations for undertaking risk-managed spirometry
-
Covid19 advice may be updated by the Medical Bodies and Governments. It is always
vital to act in line with the latest advice and any local Risk Assessment.
References
1
ARTP (Association for Respiratory Technology & Physiology) Statement for the NHS NATIONAL RESPIRATORY
PROGRAMME Task and Finish Group Recommendations for undertaking risk-managed spirometry.
2Meredith C. McCormack, MD MHS, David A. Kaminsky, MD, 2020 members of the ATS Proficiency
Standards for Pulmonary Function Testing Committee.
3https://www.artp.org.uk/write/MediaUploads/Standards/COVID19/ARTP_PCRS_spiro_re-
start_FINAL2.pdf

SpiroConnect Operators Manual
MedChip Solutions Ltd. Page 5 of 31 001.105.GBR Issue 1.12
2Package Contents
Your SpiroConnect comes complete with 2 Alkaline AA (LR6) batteries, quick start guide,
calibration certificate and the following items:
1 SpiroConnect spirometer
2 SpiroConnect Data Manager software on USB flash drive memory stick
(May be supplied by distributor on alternative format)
3a SpiroConnect Bluetooth dongle (alternative dongle 3b may be supplied)
4 Nose Clip
SpiroConnect Operators Manual
MedChip Solutions Ltd. Page 6 of 31 001.105.GBR Issue 1.12
3Warnings and Cautions
Warning: Conditions or practices that could result in personal injury.
Caution: Possibility of injury or serious damage to the equipment
Please Note: Important information for avoiding damage to the instrument or facilitating
operation of the instrument.
WARNING: The instrument is not suitablefor use in the presence of explosive or flammable gases,
flammable anaesthetic mixtures or in oxygen rich environments.
WARNING: The use of portable phones or other radio frequency (RF) emitting equipment near the
system may cause unexpected or adverse operation
WARNING: Medical electrical equipment needs special precautions regarding EMC and needs to
be installed and put into service according to the EMC information provided in the accompanying
documents
WARNING: Portable and mobile RF communications equipment can affect medical electrical
equipment
WARNING: Equipment should not be used adjacent to or stacked with other equipment and that
if adjacent or stacked use is necessary, the equipment or system should be observed to verify
normal operation.
WARNING: The USB socket on the device is for factory use only. Do not make any connection to
this socket.
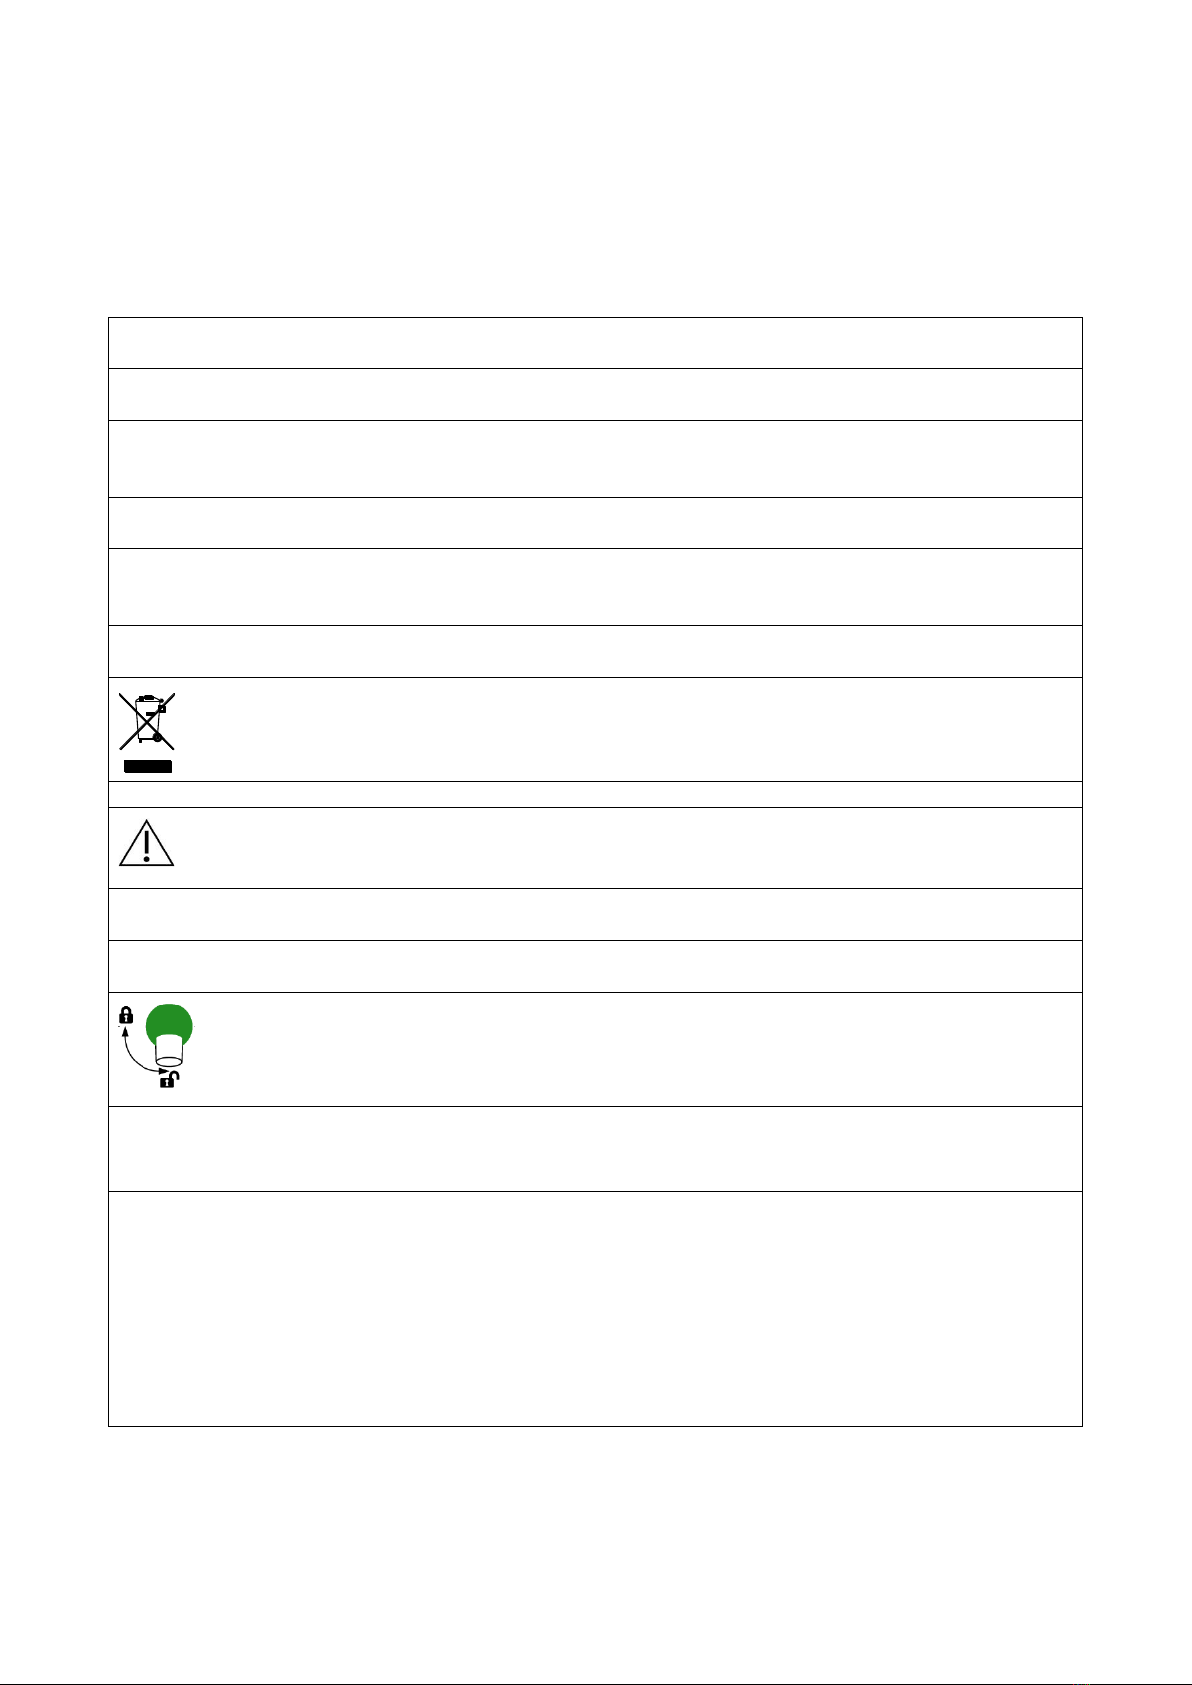
PLEASE NOTE: The product you have purchased should not be disposed of as unsorted
waste. Please utilise your local WEEE collection facilities for the disposal of this product.
WARNING: No modification of this equipment is allowed
CAUTION: Read the manual before use
CAUTION: Cleaning solutions containing alcohol or chlorine, e.g. bleach, must not be used on the
turbine transducer. See section 11.2 on how to clean the turbine.
CAUTION: When removing or replacing the turbine, the mouthpiece holder must be facing away
from the SpiroConnect product name as shown above. Do not use excessive force.
CAUTION: The turbine must be orientated to the unlock position when removing or
replacing and turned to the lock position for use as shown on the label on top of the
device. Do not use excessive force.
WARNING: If you use multiple turbines in the same SpiroConnect then the calibration should be
checked each time the turbine is swapped and the calibration updated in line with the
recommendations on screen.
PLEASE NOTE: Activities That Should Be Avoided before Lung Function Testing
•Smoking and/or vaping and/or water pipe use within 1 h before testing (to avoid acute
bronchoconstriction due to smoke inhalation)
•Consuming intoxicants within 8 h before testing (to avoid problems in coordination,
comprehension, and physical ability)
•Performing vigorous exercise within 1 h before testing (to avoid potential exercise-induced
bronchoconstriction)
•Wearing clothing that substantially restricts full chest and abdominal expansion (to avoid
external restrictions on lung function)

SpiroConnect Operators Manual
MedChip Solutions Ltd. Page 7 of 31 001.105.GBR Issue 1.12
4Relative Contraindications for Spirometry
WARNING: Due to increases in myocardial demand or changes in blood pressure:
Acute myocardial infarction within 1 wk
Systemic hypotension or severe hypertension
Significant atrial/ventricular arrhythmia
Noncompensated heart failure
Uncontrolled pulmonary hypertension
Acute cor pulmonale
Clinically unstable pulmonary embolism
History of syncope related to forced expiration/cough
WARNING: Due to increases in intracranial/intraocular pressure:
Cerebral aneurysm
Brain surgery within 4 wk
Recent concussion with continuing symptoms
Eye surgery within 1 wk
WARNING: Due to increases in sinus and middle ear pressures:
Sinus surgery or middle ear surgery or infection within 1 wk
WARNING: Due to increases in intrathoracic and intraabdominal pressure:
Presence of pneumothorax
Thoracic surgery within 4 wk
Abdominal surgery within 4 wk
Late-term pregnancy
WARNING: Infection control issues:
Active or suspected transmissible respiratory or systemic infection, including
tuberculosis
Physical conditions predisposing to transmission of infections, such as hemoptysis,
significant secretions, or oral lesions or oral bleeding
Spirometry should be discontinued if the patient experiences pain during the maneuver.
Relative contraindications do not preclude spirometry but should be considered when
ordering spirometry.
The decision to conduct spirometry is determined by the ordering healthcare professional on
the basis of their evaluation of the risks and benefits of spirometry for the particular patient.
Potential contraindications should be included in the request form for spirometry.
5Intended Use
The intended use of the SpiroConnect is to provide spirometry measurements used for the
diagnosis of common respiratory diseases such as asthma and COPD in adults and children
aged 3 and older. The SpiroConnect is intended to be used in doctors’ offices, hospitals and
clinics.
6Environment
The SpiroConnect is designed for routine clinical use in an office environment. Use in
temperatures outside the range 10 to 38 OC should be avoided.
The environment should be free of excessive vibrations, and sources of electrical noise.
SpiroConnect Operators Manual
MedChip Solutions Ltd. Page 8 of 31 001.105.GBR Issue 1.12
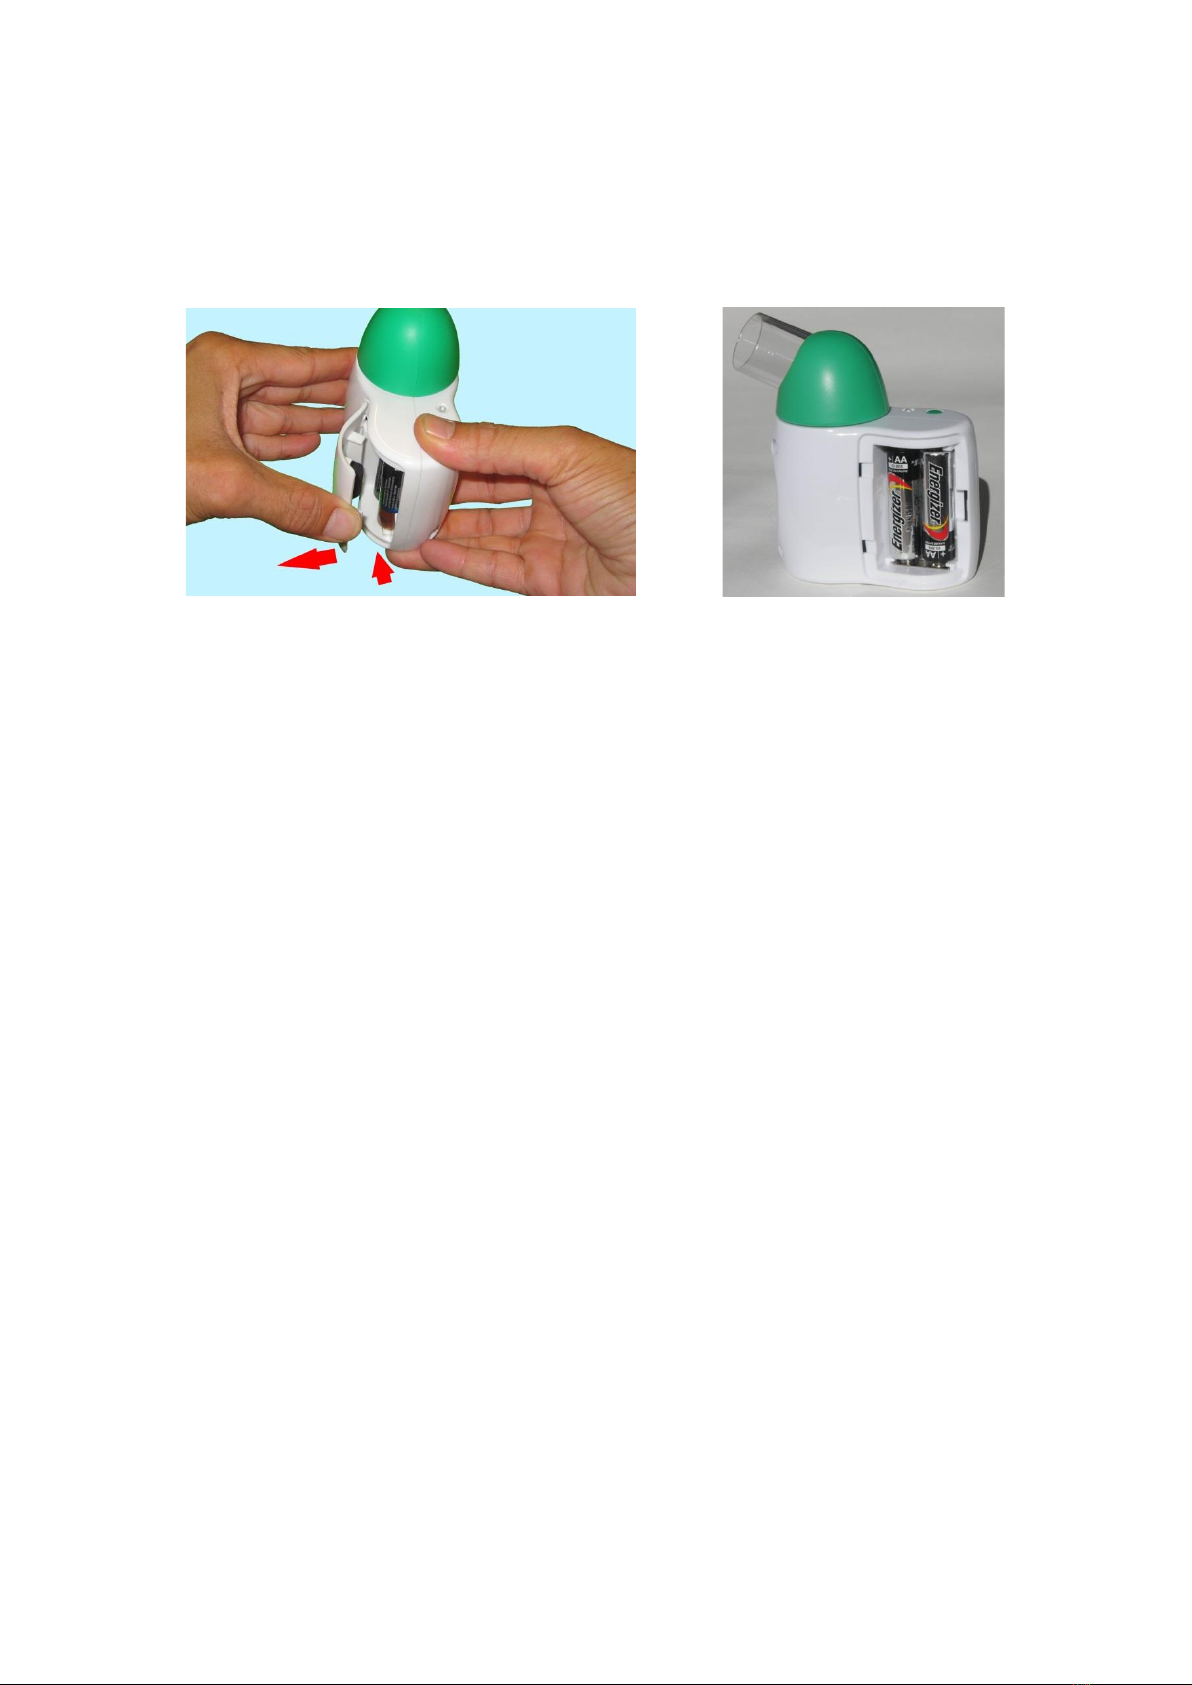
7Getting Started
Open the battery cover by pressing the ridged area on the battery cover towards the front of
the unit and simultaneously pulling outwards with your thumb, the lid will open like a door.
Insert 2 AA size alkaline batteries as shown below taking care to observe the correct polarity:
WARNING: do not touch the patient when the battery cover is removed.
7.1 Installing SpiroConnect Data Manager Software
The SpiroConnect DM software is supplied on a USB flash drive memory stick together with
this user manual. Install the software as follows:
NB: - If the software is supplied by the distributor then follow their installation instructions
- Administrative Rights are required for installation
- An installation is on a per-user basis. If multiple users on the same PC wish to use SDM under
their own login, it is necessary to run the installer for each user. The settings and database for
each user will be unique to that user, however the database can be shared between users if it is
configured to be in an accessible area for all users.
Run SpiroConnectDataManagerSetup_v1.XX.exe. There is no need to run any of the other
executable files on the drive, these will be automatically run during installation.
Please ensure the SpiroConnect Dongle is not plugged in to the USB port during installation.
After installation completes, plug the SpiroConnect Dongle into a free USB port, and wait until
Windows completes loading the correct drivers for the device and reports it as being ready
for use. At this point, installation is complete and the system is ready for use.
Please note that PDF reader software needs to be installed on the system in order to view
PDF reports that are generated by the software or the Operators Manual, which can be
opened by clicking ‘Help’ and then ‘Open operators Manual’.
When the application is launched it will automatically check for an updated software version
if the PC is connected to the internet. If an updated version is available, the operator will be
taken to a download page where he can download the installer for the newer version. This
file should be downloaded and then run to complete the update.

SpiroConnect Operators Manual
MedChip Solutions Ltd. Page 9 of 31 001.105.GBR Issue 1.12
8Operation
WARNING: Do not attempt to connect the SpiroConnect to the PC using the USB socket on
the SpiroConnect device via USB cable.
WARNING: Keep the patient away from the PC during use.
Start the SpiroConnect Data Manager software by clicking on the desktop icon, or from the
Windows Start Menu under All Programs->MedChip Solutions Spirometry.
The Home Screen will then be displayed:
8.1 Patient Selection:
Before performing a test, click on in order to open the Patient Selector. Select an existing
patient, or click ‘Create New’ to create a new patient. Click ‘Choose Selected’ when the
desired patient is selected. The program will return to the screen shown above.
From this screen a forced spirometry test or relaxed vital capacity test may be
selected.
8.2 Unit Connection:
Before ‘Start’ is clicked to initiate a test the unit needs to be powered on and connected for
tests to be performed.
Connect a disposable, CE-marked, mouthpiece or filter onto the mouthpiece holder of the
spirometer.
Turn the unit on at any point by pressing and releasing the power
button.
The LED indicator will flash blue at a fast rate for a few seconds whilst connection with
SpiroConnect Dongle is established, and then change to a slow blue flash whilst connection
with the SpiroConnect Data Manager application is established, finally displaying solid blue
once ready. will also be displayed in the bottom left hand corner of the PC
application, indicating successful connection and approximate remaining battery capacity.
Once ‘Start’ is clicked to initiate a test, the LED shows solid green to show that the unit is
ready for a blow.

SpiroConnect Operators Manual
MedChip Solutions Ltd. Page 10 of 31 001.105.GBR Issue 1.12
8.3 Forced Spirometry:
After clicking the Forced Spirometry icon on the main screen, a screen with a start button
and temperature reading is displayed. This temperature reading is the ambient room
temperature as measured by the unit. If the operator wishes to modify the temperature
value, he may do so by clicking on the displayed temperature, and he will then be given the
opportunity to enter a temperature to over-ride the automatic temperature. The ambient
temperature is used for BTPS correction during inspiration. The same is true when
conducting Relaxed Spirometry. The temperature can only be over-ridden before
performing the first blow in a test sequence.
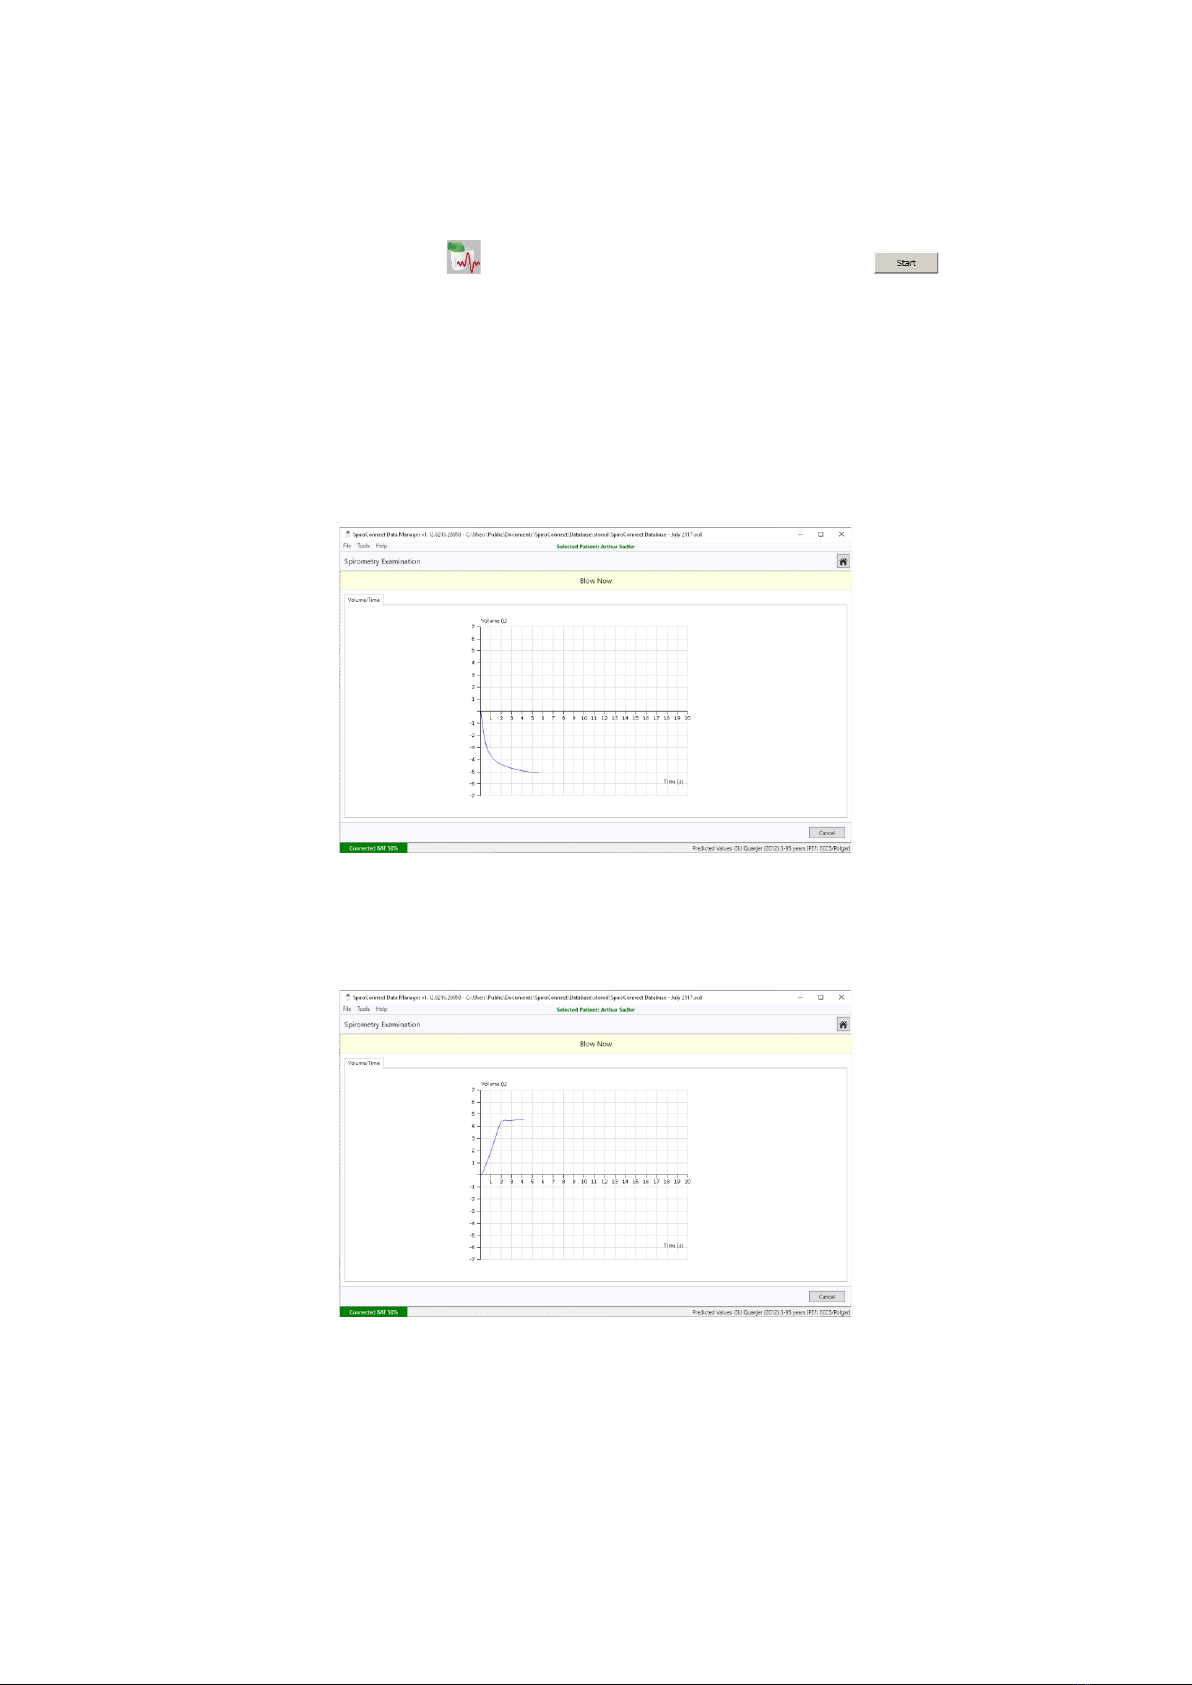
Press in the bottom right corner of the Spirometry Examination screen to initiate the
test.
Both flow-volume and volume-time graphs are shown and the unit will beep to indicate that it
is ready. At this point the operator can select a tab for a single graph or the Incentive tab, if
he wishes to view the FV graph, VT graph or Child Incentive graphic as an alternative to the
default Flow Volume loop and Volume Time graph during the live blow.
Instruct the patient to hold the mouthpiece between the teeth, and then apply the lips for an
airtight seal and breathe normally through the device. The patient should then be instructed
to breathe in rapidly until their lungs are completely full and the without delay, blast out the
air in their lungs as fast as they can and continue, until they cannot squeeze any more air out
of their lungs. They should aim to exhale until the graph border turns pink when a plateau in
the volume/time curve is detected, or to the point where they simply cannot squeeze any
more air out. They should then inhale as deeply and as rapidly as possible back to full lung
capacity, before removing the unit from their lips. After four seconds has passed without the
unit detecting any further flow, it will sound a beep and a test summary will be shown.
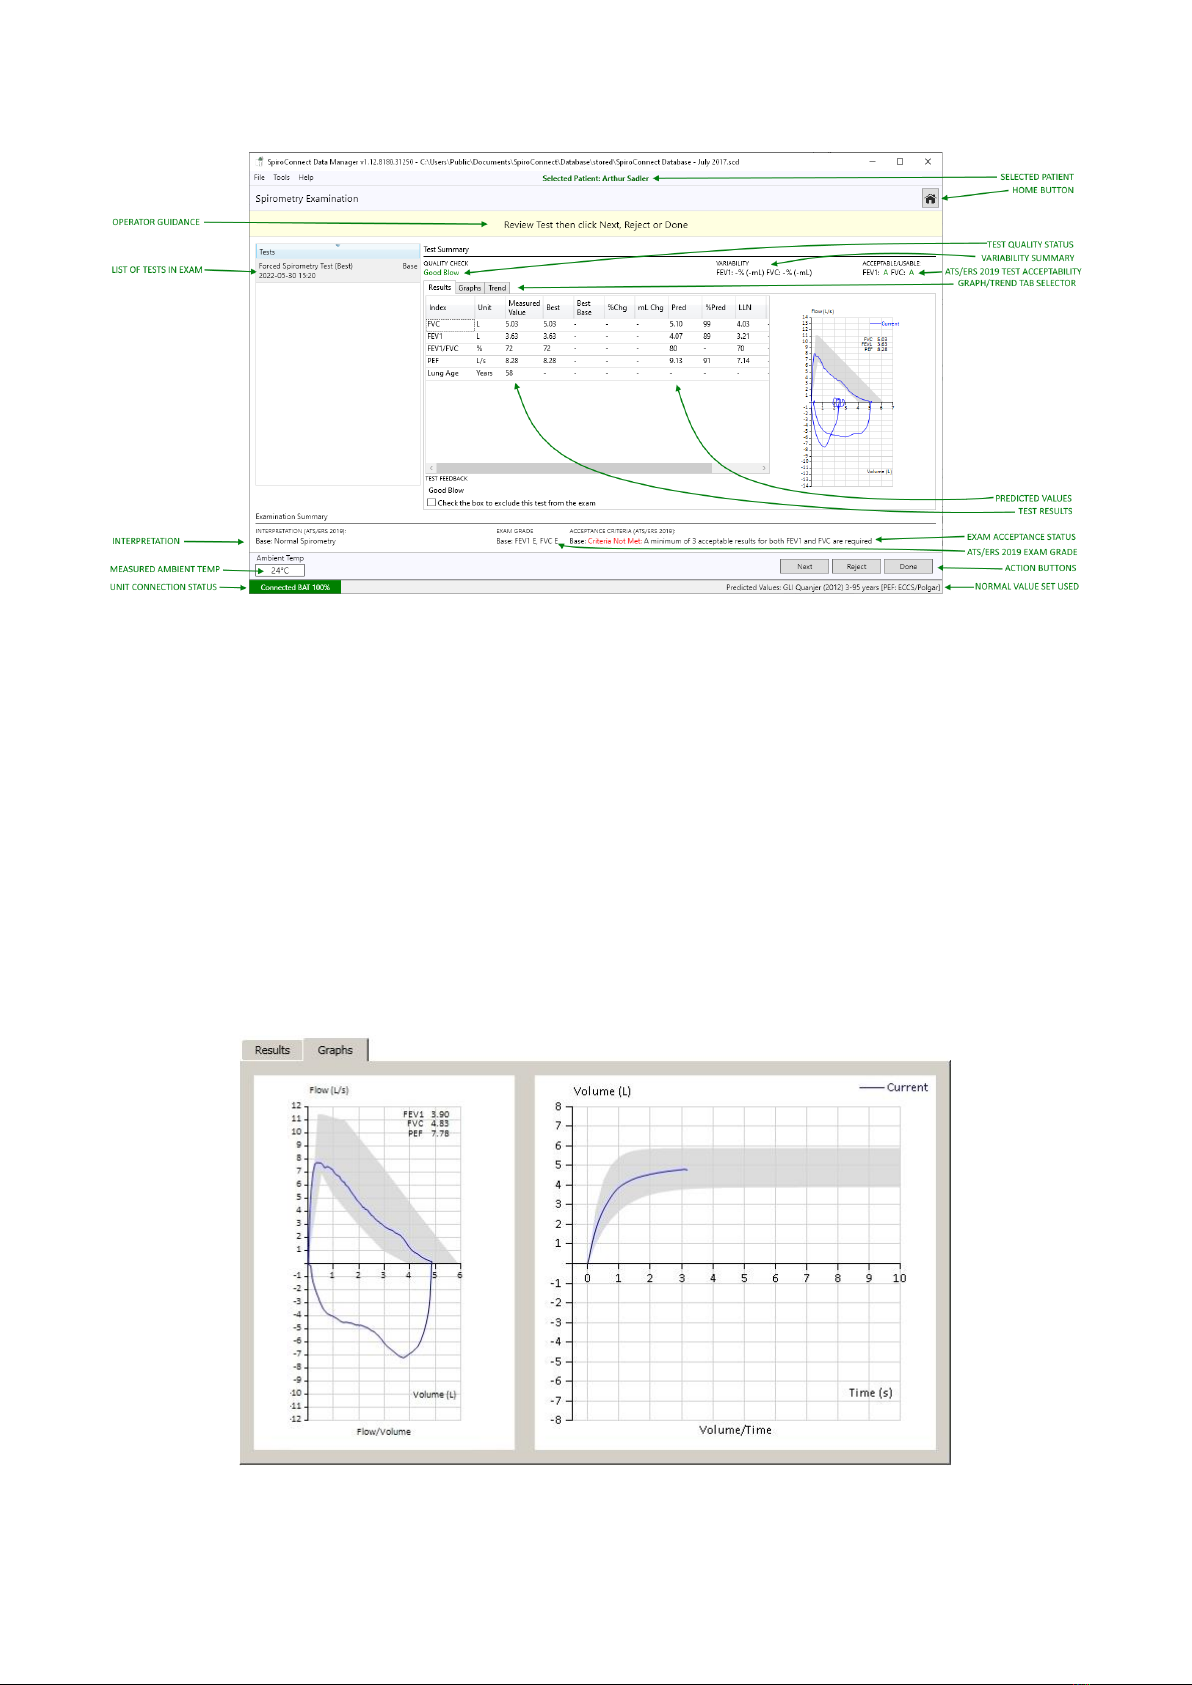
SpiroConnect Operators Manual
MedChip Solutions Ltd. Page 11 of 31 001.105.GBR Issue 1.12
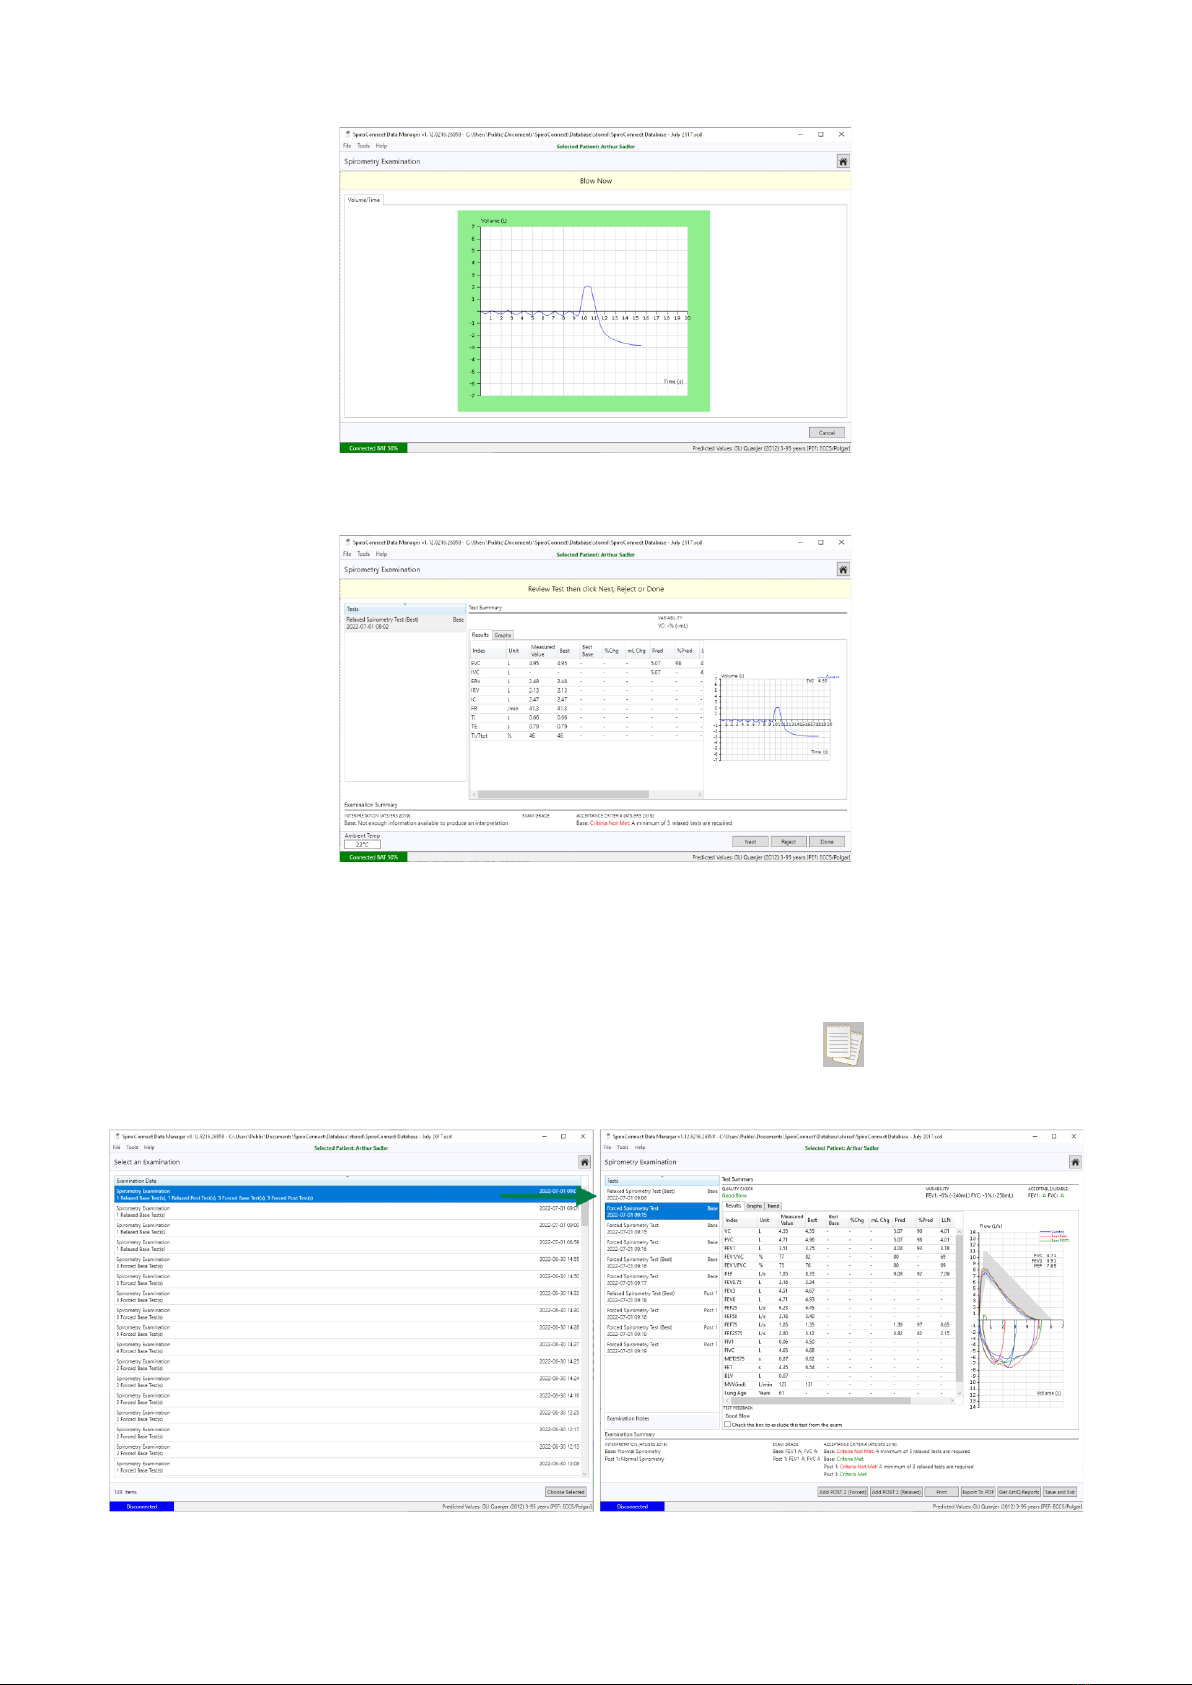
All parameters that have been selected for display in Settings are shown, along with the
predicted value (if available), best baseline value (*Base) and percentage change from Best
Base blow (if the blow is a Post blow), blow quality assessment, ATS/ERS 2019 FEV1 and
FVC acceptability status for this blow, ATS/ERS 2019 exam grade for the exam as a whole,
overall examination quality assessment and interpretation. If a Relaxed Spirometry test of
the same stage already exists within the exam, the VC result for the Relaxed test will be
displayed within the Forced Spirometry results directly underneath FVC, for convenience
sake.
Note: The values used for the interpretation are always the values in the ‘Best’ column. These
values comprise the best results for each parameter, taken from all tests of acceptable quality
from the current exam stage, in accordance with ATS/ERS guidelines.
Selecting the ‘Graphs’ tab will change the display to show both the flow-volume and volume-
time graphs.
NEXT can be clicked in order that the current blow is accepted into the exam stage and a
new blow is initiated. REJECT can be clicked to initiate a new blow without adding the last
blow to the exam. DONE can be clicked when all the desired blows have been added, and

SpiroConnect Operators Manual
MedChip Solutions Ltd. Page 12 of 31 001.105.GBR Issue 1.12
you wish to end the current exam stage and review results. After DONE is clicked, no further
blows can be added to the current exam stage. Post1 or Post2 blows can be added at a later
stage if they do not exist already.
A maximum of eight blows are allowed in any exam stage and the Next/Reject buttons should
be used to disregard blows of poor quality and eventually end with an exam that conforms to
the examination quality criteria. These are explained further below.
The QUALITY CHECK message for the blow can be seen above the Results tab. This reports
the quality of an individual blow (as opposed to overall exam quality –see the next section
below), and could be one of the ten following messages:
Hesitant Start: [BEV exceeds limit] - Blast out immediately when completely full
Slow Start: [PEF rise time > 150ms] Blast out immediately when completely full
No Plateau: [No plateau and expiration < 15 s] Keep going until completely empty
Hesitation at Max Vol: [Hesitation time > 2s] Blast out immediately when completely full
Low Volume: [FVC less than max previous FVC] Take the deepest breath possible
and keep going until completely empty
Incomplete Insp before Exp: [(FIVC after FVC) > FVC] Fill your lungs completely before
blasting out –take the deepest breath possible
Low Final Insp: [(FIVC after FVC) < 90% FVC] After completely emptying your lungs,
remember to breathe in –back to the top
Slow Filling: [Mean Inspiratory Flow of inhalation prior to FVC < 2 LPS] Breathe in
faster before blasting out
Cough in first second: [Suspected cough in first second of expiration] Try having a sip of
water before the next blow
Good Blow: The blow is of good quality
With many of the new ATS/ERS 2019 quality checks, a failure does not necessarily mean
that the test is ineligible for taking acceptable results from. The software automatically
determines whether the FEV1 and FVC from each specific test should be used for
interpretation or not, in accordance with rules published in the ATS/ERS 2019 update. You
can see whether the FVC and the FEV1 measurements in each blow have been categorised
as ACCEPTABLE, USABLE, or NOT USABLE by referring to the information on screen:
In the case above, the FEV1 was ACCEPTABLE and the FVC was USABLE. If either
parameter happened to be NOT USABLE, a dash would have been displayed instead of the
‘A’ or ‘U'.

SpiroConnect Operators Manual
MedChip Solutions Ltd. Page 13 of 31 001.105.GBR Issue 1.12
Note: If an older exam is being reviewed and it was conducted with SDM software < 1.12 or
unit firmware < V3.02, the exam will be presented with quality messages from ATS/ERS
2005 guidelines instead of ATS/ERS 2019, and could be one of the following messages:
Slow Start: The patient appeared to have paused slightly at the beginning of the
manoeuvre. He/she should blast air out as hard as possible from the
very beginning of test
Abrupt End: The patient appeared to stop blowing suddenly. The patient should
continue to squeeze every last bit of air out of their lungs at the end of
exhalation. A good guideline is that they should not stop before they have
exhaled for 6 seconds at least (the graph border turns green after 6
seconds to indicate this time has elapsed)
Possible Cough: A possible cough has been detected.
Good Blow: The blow is of good quality
The ACCEPTANCE CRITERIA messages for the current exam are shown below the Results
area. These messages report on the overall quality of the current and existing exam stages
(Base, Post1, Post2) and depend upon the criteria selected as follows:
ARTP (Association for Respiratory Technology and Physiology)
At least 3 good quality blows must exist within the exam stage
The two largest FVC values must be within 150mL (100mL if FVC<= 1L) of each other
The two largest FEV1 values must be within 150mL (100mL if FVC<= 1L) of each other
The two largest VC values must be within 150mL of each other
ATS/ERS 2019
At least 3 acceptable FEV1 and 3 acceptable FVC must exist within the exam stage
The two largest FVC values must be within 150mL of each other, or for patients aged 6 or
younger, 100mL or 10% of largest FVC, whichever is greater.
The two largest FEV1 values must be within 150mL of each other, or for patients aged 6 or
younger, 100mL or 10% of largest FEV1, whichever is greater.
The two largest VC values must be within 150mL of each other or 10% VC (whichever is
smaller) for patients older than 6 years; and 100mL or 10% of largest FVC, whichever is
smaller (for patients aged 6 or younger).
BTS
At least 3 good quality blows must exist within the exam stage
The two largest FVC values must be within 100mL or 5% (whichever is larger) of each other
The two largest FEV1 values must be within 100mL or 5% (whichever is larger) of each other
The two largest VC values must be within 100mL or 5% (whichever is larger) of each other
CUSTOM
You can select CUSTOM and set up your own set of acceptance criteria if desired
Please note that one can select either ATS/ERS 2019, BTS, ARTP or CUSTOM acceptance
criteria to be used for this assessment, from the Settings tab.
Whilst seeking to attain ‘Criteria Met’ for the Acceptance Criteria summary, it is useful to know
what the current variability status is. A VARIABILITY result is presented within the Test
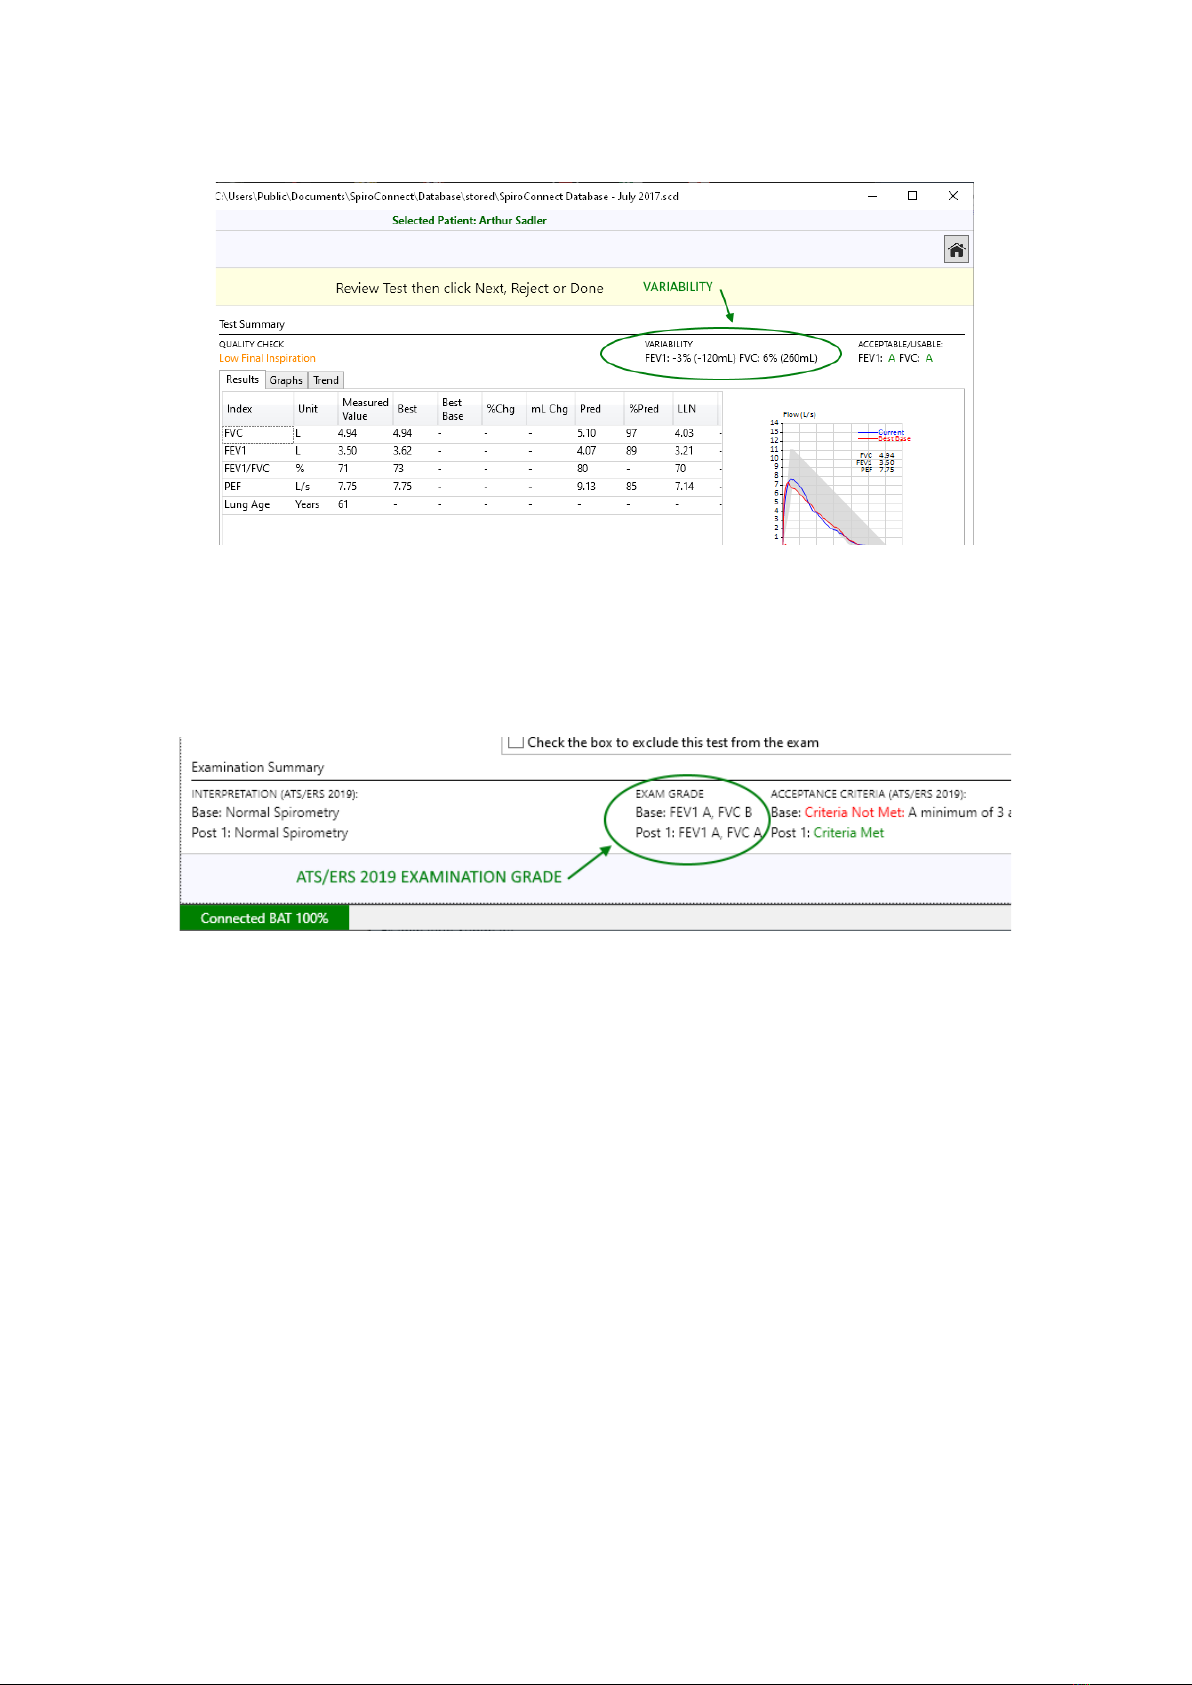
SpiroConnect Operators Manual
MedChip Solutions Ltd. Page 14 of 31 001.105.GBR Issue 1.12
Summary section - this reports the variability between the blow being observed and the Best
Blow in the same exam stage for FEV1 and FVC, in both percentage and millilitres.
The ATS/ERS 2019 update also introduces the concept of Exam Grade. This is an overall
grade that is given to an exam based upon how many FEV1 and FVCs were
acceptable/usable/not usable and what the reproducibility between the best values was.
The operator should always aim to get the highest exam grade possible. The grading
system goes as follows (from best to worst): A, B, C, D, E, U, F. The Exam Grade is
displayed on-screen in the Examination Summary section:
Once the operator is satisfied that the exam is at the best quality level attainable, the DONE
button can be clicked to finalise the exam.
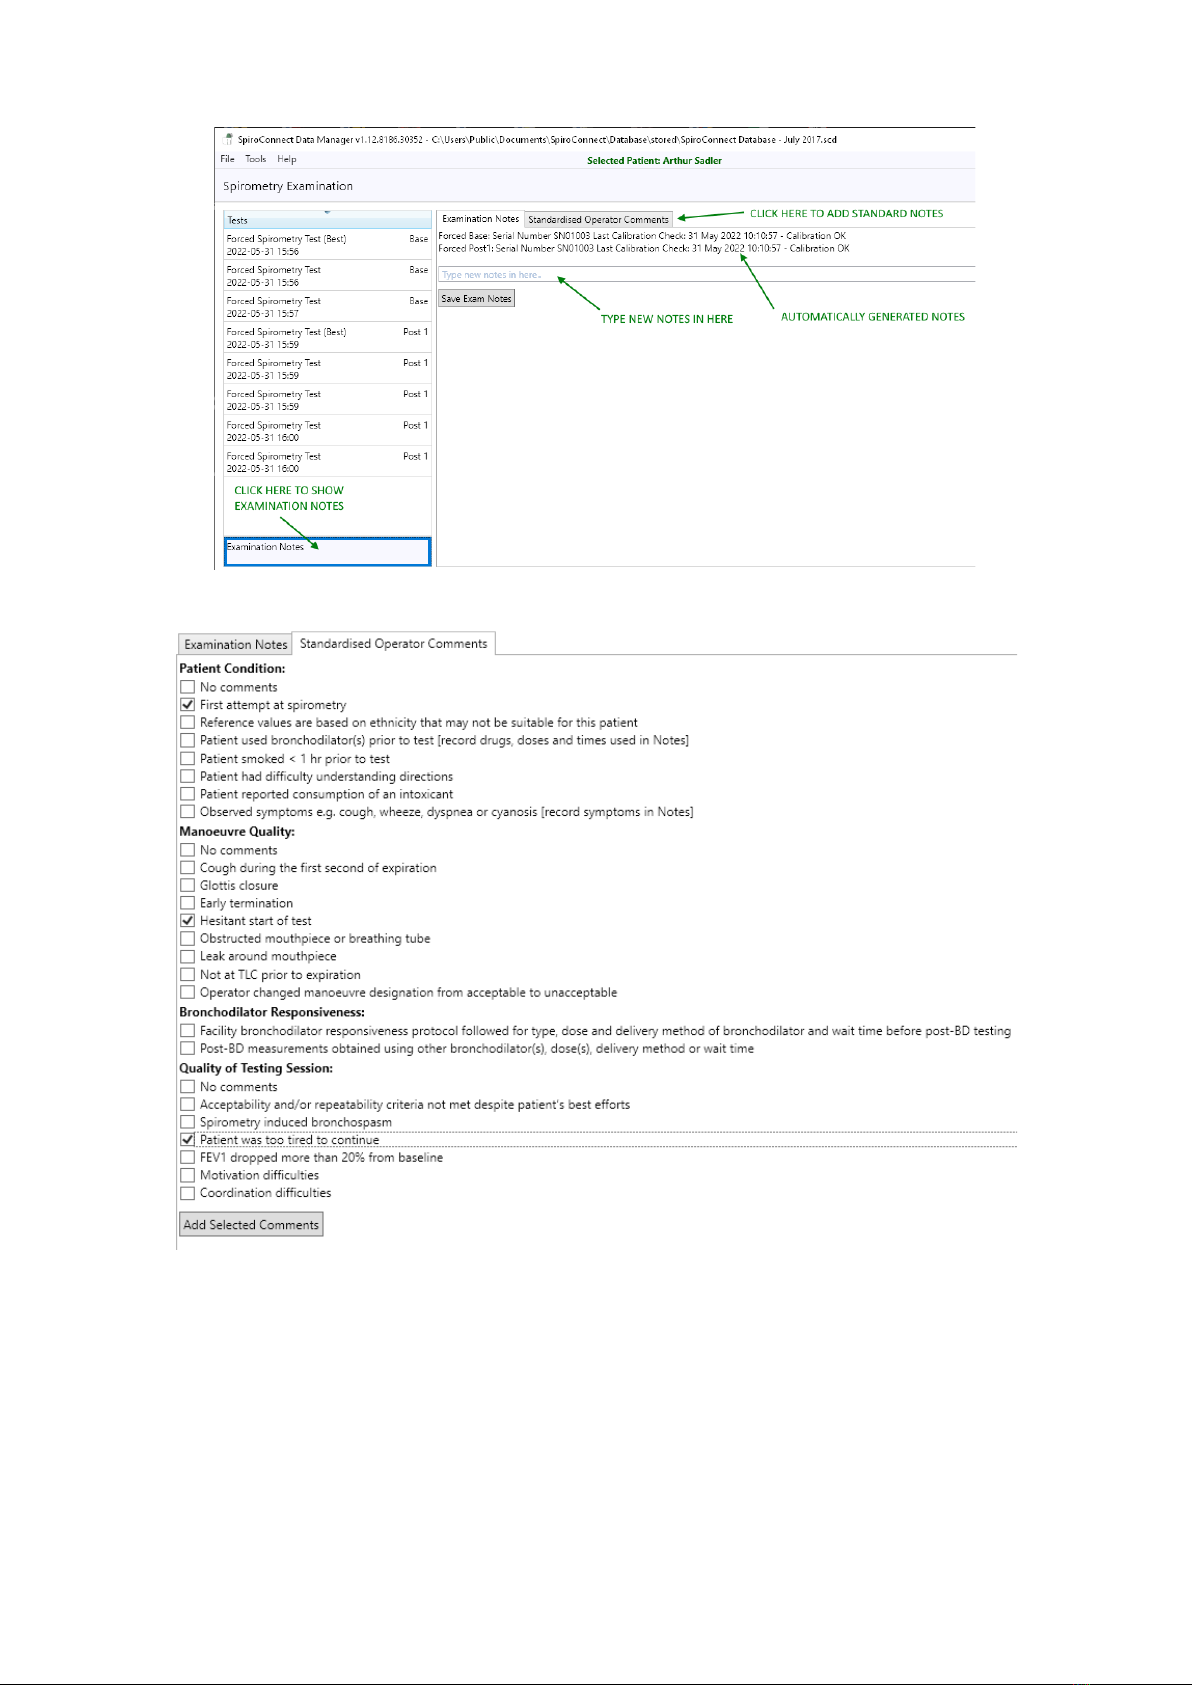
After DONE is clicked examination notes can be added, a report can be printed, or a PDF
report can be exported. The exam will automatically be saved into the database from where
it can be reviewed in the future.
The EXAMINATION NOTES feature can be accessed by clicking on the pane at bottom of
the list of tests:
SpiroConnect Operators Manual
MedChip Solutions Ltd. Page 15 of 31 001.105.GBR Issue 1.12
Standardised Operator Comments can be elected for addition to Exam Notes by selecting
the ‘Standardised Operator Comments’ tab:
NOTE:
All timing calculations are performed with reference to Tzero, which is determined
by locating the steepest rising point on the volume-time graph (which is the point of peak flow)
and back extrapolating a line drawn through that point with an angle representative of the
rate of change of volume at that point and determining where in time that line intercepts with
the point of zero flow. The point in time that the intercept occurred, represents Tzero.
SpiroConnect Operators Manual
MedChip Solutions Ltd. Page 16 of 31 001.105.GBR Issue 1.12
8.4 Relaxed Vital Capacity:
*Please note: Relaxed Vital Capacity tests MUSTbe added as the first test in any exam stage.
If Forced Spirometry is performed first, there will be no option to add a Relaxed Spirometry
test *
From the home screen, click on to select Relaxed Spirometry. Press in the bottom
right corner of the Spirometry Examination screen to initiate the test. A volume-time graph
will be shown and the unit will beep to indicate that it is ready.
The relaxed test may be performed with a single expiration, a single inspiration, or expiration
and inspiration after tidal breathing. The latter is used to provide a number additional indices
including Expiratory or Inspiratory Reserve Volume and tidal breathing indices if required.
For Expiratory Vital capacity instruct the patient to fully inhale and then seal their lips around
the mouthpiece and exhale at a comfortable rate until they have completely emptied their
lungs. The expiratory volume/time curve will be displayed:
For Inspiratory Vital capacity instruct the patient to fully exhale and then seal their lips around
the mouthpiece and inhale at a comfortable rate until they have completely filled their lungs.
The inspiratory volume/time curve will be displayed:
For the tidal breathing method instruct the patient to seal their lips around the mouthpiece
and breathe normally. The device will beep on each beginning of inhalation and monitor tidal
breathing until it has determined a stable tidal pattern has been recognised. At this point the
unit will beep once and the graph border will turn green, indicating that it is ready for the vital
capacity manoeuvre. At this point the patient should inhale as deeply as possible and then
exhale completely (if EVC is desired), or exhale as deeply as possible then inhale completely
(if IVC is desired). If an EVC is being performed and a plateau is detected at the end of
expiration, the unit will emit a double beep to signal that the patient can stop exhaling.
SpiroConnect Operators Manual
MedChip Solutions Ltd. Page 17 of 31 001.105.GBR Issue 1.12
Once this has been done, the patient can remove the device from their lips and the results
will be displayed.
Forced tests (and subsequent post-BD tests) can be added using the buttons on the bottom
right of the screen. When performing Relaxed Spirometry, Variability is shown on screen for
VC.
8.5 Review Results:
From the main window, clicking the Review Examinations button will open the Exam
Selector. This screen lists saved exams (the oldest exam at the top, newest at the bottom)
which can be opened for review and printing, or the addition of post-BD tests.
SpiroConnect Operators Manual
MedChip Solutions Ltd. Page 18 of 31 001.105.GBR Issue 1.12
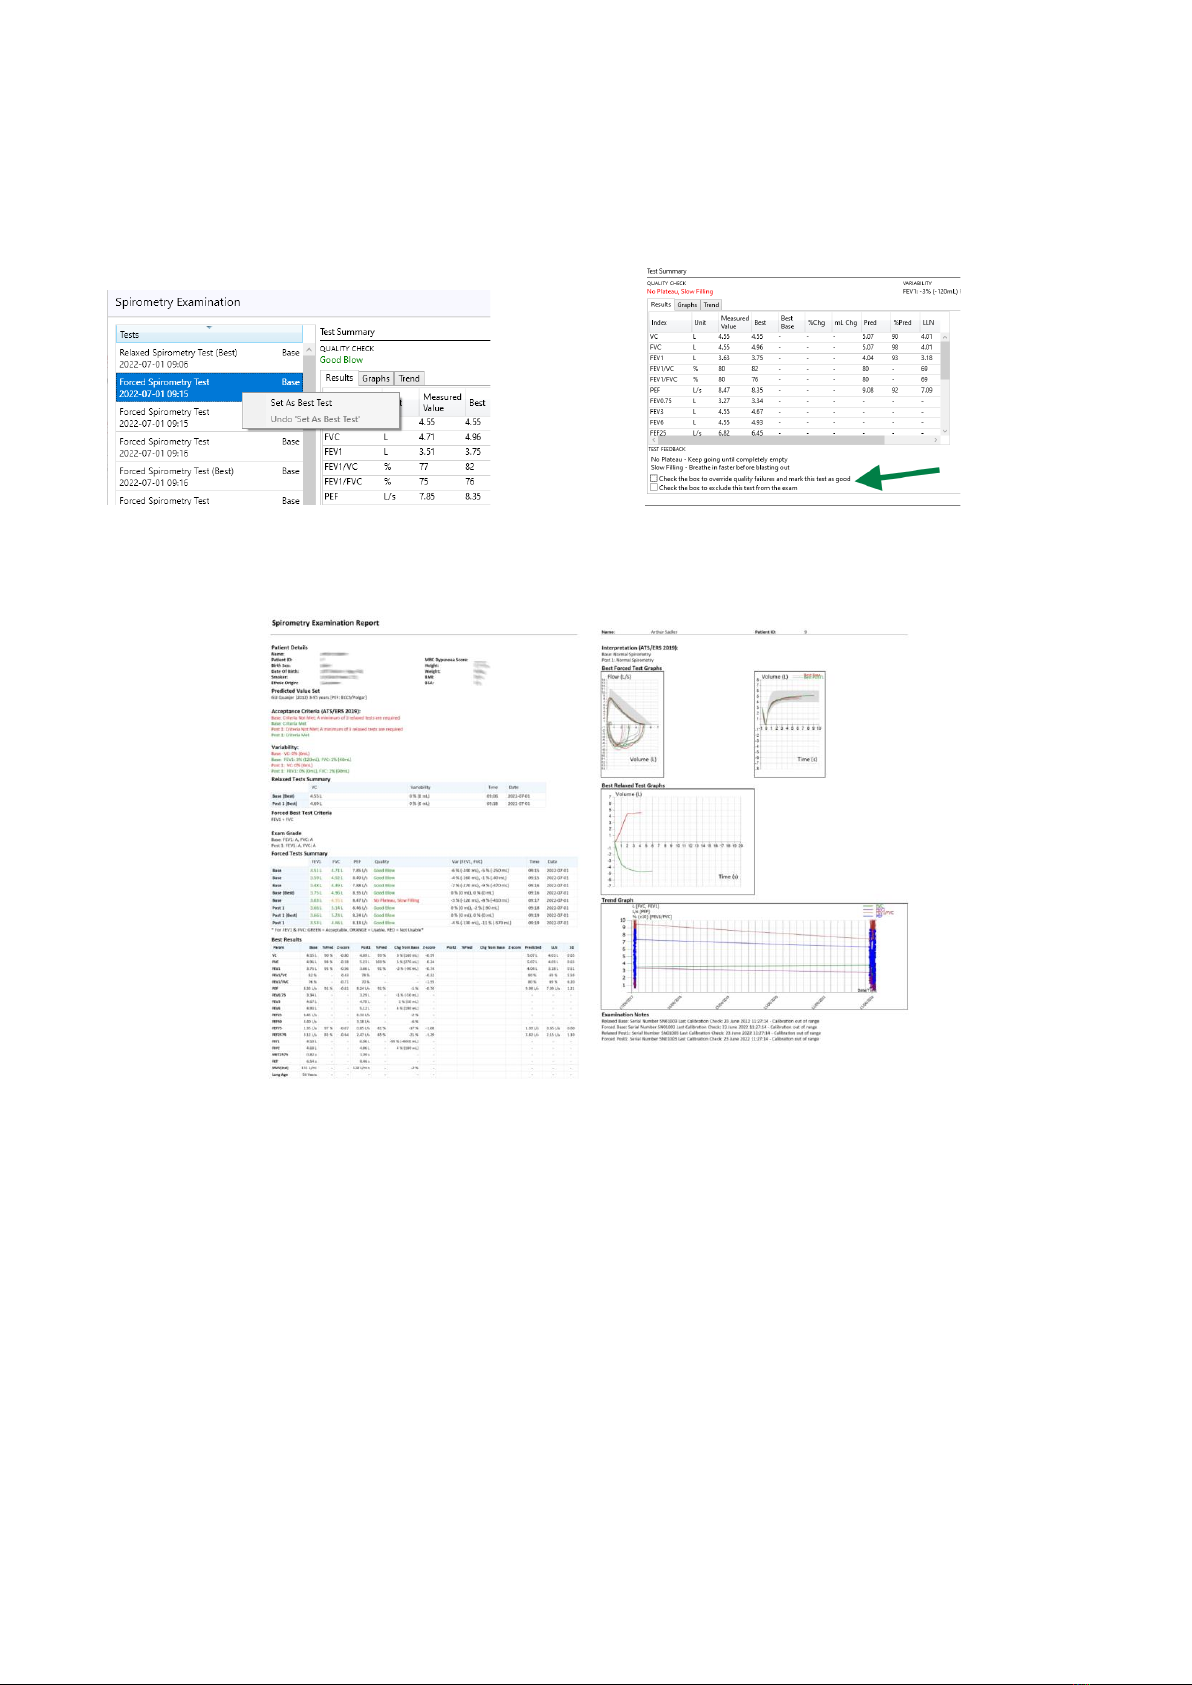
When reviewing an exam, specific tests which have acceptable or usable FEV1 and FVC
measurements can also manually be selected as Best Tests (over-riding the automatic Best
Test selection) by right-clicking on the test in question and selecting ‘Set as Best Test’. Tests
can also be excluded from being used in the exam or have quality failures overridden by
using the Exclude or Mark As Good functions below the results table, if desired.
A report can be printed or exported to PDF by using the relevant buttons on the lower button
bar.
8.6 General information pertaining to the reviewing of examinations:
Please note that when reviewing an existing exam, the patient details used for
determination of normal values and interpretations are that of the patient when the base
exam was conducted. The normal values therefore will not change with time, and even if
SpiroConnect Data Manager has been configured to use a different Normal Value set to
that used at the time the exam was created, the original Normal Value Set in use at the time
of exam creation will always be used when reviewing or adding post bronchodilator blows to
that exam.
There are exceptions to this: Interpretation and Acceptance Criteria. These are always
based on whatever the currently selected settings are in Settings
SpiroConnect Operators Manual
MedChip Solutions Ltd. Page 19 of 31 001.105.GBR Issue 1.12
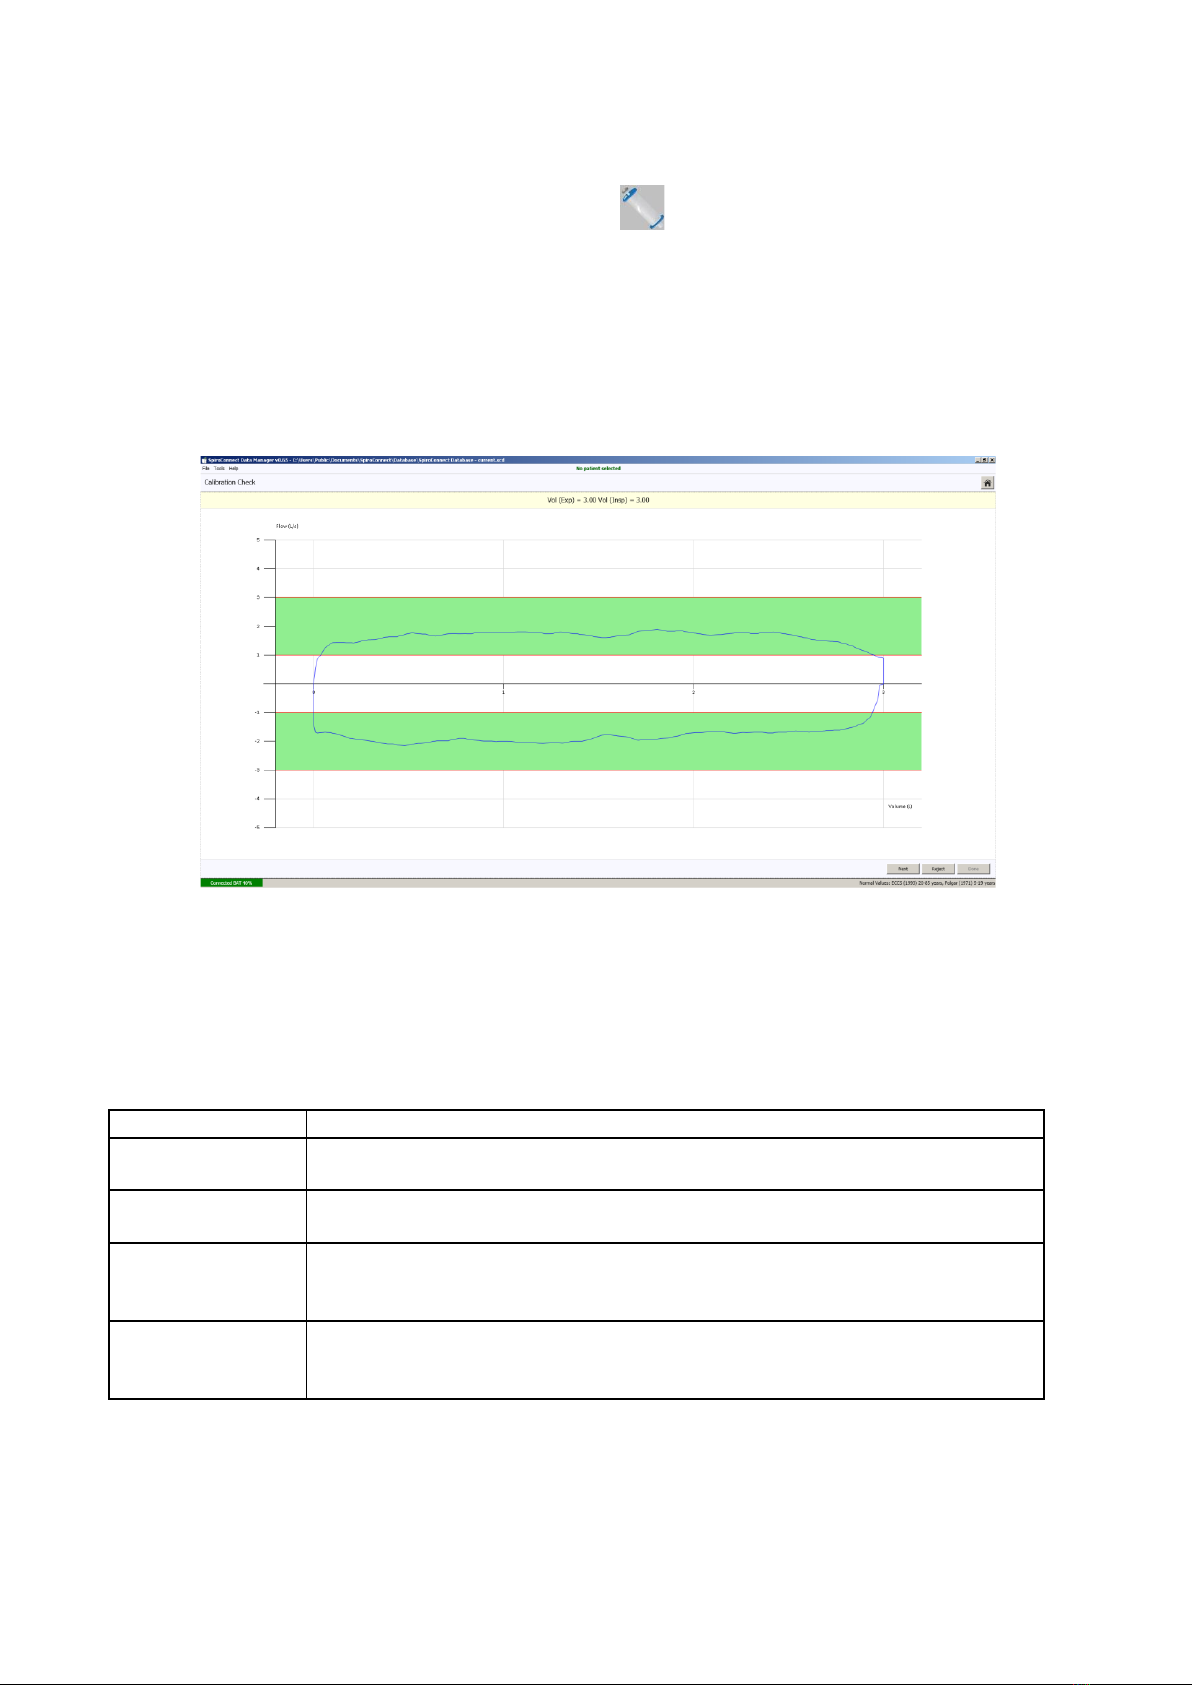
8.7 Calibration:
Calibration mode can be entered by clicking the icon.
A 3 litre syringe should be connected to the device, and the plunger fully withdrawn prior to
commencement of calibration. The unit should be in a vertical orientation or inverted by
180degrees –not orientated sideways. Once ‘Start’ is clicked, the syringe plunger should be
pushed in at a controlled rate such that the waveform enters and remains within the green
shaded area for the longest time possible, andupon reaching the end of the syringe discharge,
the operator should pause for approximately one second before withdrawing the plunger,
again at a pace such that the trace remains within the green shaded area.
Three consecutive cycles will be performed, each with a higher flow rate than the last. Once
the final highest flow rate cycle has been performed, click ‘Done’ and the calibration check
results dialog will be shown, possible outcomes of the Calibration Check are:
PASS
No change to the stored calibration is required.
PASS
Accuracy is within the ATS/ERS ±3% requirement. Accuracy can nonetheless
be improved by updating the calibration.
FAIL
Outside of ATS/ERS ±3%. If any doubts about the calibration being performed
correctly then redo the calibration check, else update the calibration.
FAIL >6% Change
If any doubts about the calibration being performed correctly then redo the
calibration check. If it still fails check the turbine for damage. If turbine is good
then update the calibration.
FAIL Out of Range
This could indicate a faulty turbine or syringe. Check both and repeat. If
Calibration Check continues to fail out of range do not use the turbine and
contact supplier for technical support.
If the calibration values are updated the procedure is then deemed a calibration rather than
a calibration check.
The results are stored for record keeping purposes, and the option to print a report is
displayed.

SpiroConnect Operators Manual
MedChip Solutions Ltd. Page 20 of 31 001.105.GBR Issue 1.12
Note: The calibration must be checked when switching to a different turbine, using the
calibration procedure within the SpiroConnect Data Manager PC software. To update the
calibration the user simply clicks the ‘Update’ button at the end of the calibration routine. If
on checking the turbine had a calibration factor very similar to the previous one then it will
display as PASS and the ‘Update’ option not given.
Note: The ATS/ERS spirometry guidelines state that calibration checks must be undertaken
daily
1
.
8.8 Settings:
The settings pane is accessed by clicking the icon. There are five tabs in the
Settings pane:
Display –regional specific formats
Spirometry 1/2 –normal value set, interpretation and other spirometry related settings
Spirometry 2/2 –quality check selection
Parameters –select which indices the user wishes to be displayed on the results
screens
Spirometry Printout –Report customisation
ArtiQ –Add or delete API credentials
8.9 Menu Bar options:
Tools –‘Spirometer Details’ displays data from the connected handheld unit,
temperature reading, serial number, firmware version.
‘Settings’ as Settings above.
‘Export Calibration History’ exports a listing of all calibrations done on this PC
Help –‘About’ displays the version number of the PC software
‘Check for Updates’ if the PC is connected to the Internet will check for a later
version of software.
‘Check for Firmware Update’ will guide the user through the process of checking
whether their unit firmware is up to date.
8.10 Patient Database:
The location of the currently used database is displayed in the SpiroConnect Data Manager
title bar. The database can support thousands of patients (each with numerous exams) up to
a maximum database size that is limited only by the amount of disk space available. The
operator may wish to maintain separate patient databases. The procedure for doing so is as
follows:
Click ‘File’ and the ‘New Database’ in order to create a new database. You will be prompted
to enter a new name for the database file, which will be saved in the default database location
unless you choose to change the path. If you wish to switch between the currently used
database and a new one, click ‘File’ and then ‘Open Database’. A window will open in which
you will be able to browse and select an existing database.
The database file may be located on a shared network location e.g. a file server / NAS (that
supports read/write access and file locking). A folder that is accessed by file sharing/syncing
software like SkyDrive, Dropbox or GoogleDrive is NOT supported.
1
SERIES ‘‘ATS/ERS TASK FORCE: STANDARDISATION OF LUNG FUNCTION TESTING’’ - Standardisation
of spirometry Eur Respir J 2005; 26: 319–338.
Other manuals for SpiroConnect
1
Table of contents
Popular Medical Equipment manuals by other brands


Getinge
Getinge Arjohuntleigh Nimbus 3 Professional Instructions for use

Mettler Electronics
Mettler Electronics Sonicator 730 Maintenance manual

Pressalit Care
Pressalit Care R1100 Mounting instruction

Denas MS
Denas MS DENAS-T operating manual

bort medical
bort medical ActiveColor quick guide

AccuVein
AccuVein AV400 user manual


