Medi CAD DOPPY 2 MHz User manual

DOPPY
2, 4, 5, 8 MHz
Ultrasonic blood flow and fetal heart
beat detector
USER’S MANUAL
1011

Ultrasonic blood
flow and fetal
heart beat
detector
Medi-CAD Méréstechnikai ft.
3529 Miskolc, Lázár Vilmos u. 4.
Phone: (46) 369-377, 431-395
Fax: (46) 560-423
http://www.medicad.hu/
medicad@medicad.hu

ontents
Contents 1
1 Field of application............................................2
2 Examples for the application possibilities of
sensors with various frequencies:.........................3
3 Operational description .....................................5
4 The device’s main parts.....................................6
5 Operation ..........................................................7
7 Charging the battery .........................................9
9 Cleaning, disinfecting.......................................13
10 Environmental and other conditions for the
usage, storage and transportation of the
device........................................................14
11 Technical parameters ....................................16
12. Contents of the kit .......................................19
13. Repair, maintenance......................................20
14Declaration of Conformity..............................21
Quality certificate / Warrantee ...........................22

1 Field of application
DOPPY is a battery powered, small sized, ultrasound
diagnostic device. With the device blood flow and/or
heart activity can be examined, by means of one of the
replaceable sensors which have operational frequencies
different from each other.
With the application of the 8 MHz sensor near surface
blood vessels can be examined, while with the 4 and
5 MHz sensors the blood vessel situated deeper can be
examined.
The sensor operating at 2 MHz frequency is primarily
suitable for the examination of deep situated blood
vessels (such as the aorta), or for the examination of
fetal heart activity.
2

2 Examples for the application possibilities of
sensors with various frequencies:
2 MHz – examination of deep situated blood
vessels, or embryonic cardiac sound
•Assured indication of the embryo’s existence.
•Examination of the living embryo, starting from
the 15h to 16h week calculated from the last
menstrual period, at the earliest.
•Estimation of embryonic heart-function during
pregnancy.
•Determination of the placenta’s location.
•Ascertainment of twin pregnancy.
•Examination of heart activity or blood flow in the
case of adult patients.
8 MHz – examination of surface blood flow
4 and 5 MHz – examination of deeper blood flow
•Examination of the circulatory system.
•Indication of systolic blood-pressure for the
determination of the “ABI”.
•Indication of systolic blood-pressure in the cases
of obese adult patients as well as in newborns.
•Indication of systolic blood-pressure in a state of
shock.
•Locating occlusions in the limbs.
3

•Evaluation of the patient’s condition.
•Accurate determination of the location of blood
vessels for the administration of injections or
infusions.
•Inspection of the functioning of the shunt
(Cimino- fistula) in the course of artificial kidney
dialysis.
•Estimation of the amount of intact blood vessels
in the case of a burn injury.
•Monitoring of the skin after a skin
transplant.
•Evaluation of venous valve-dysfunction and the
assessment of the therapeutic process in patients
after phlebitis.
•Diagnosing testicular vein-dilatation (tescular
varicoceles).
4

3 Operational description
In the process of the examination the device emits a
low-intensity ultrasound beam into the body, which
reverberates from the boundary surfaces of various,
different internal tissues. The sensor detects the
reverberated ultrasound. If the internal surfaces are in
motion, the frequency of the reverberated signals
changes. The change is in the range of sounds audible to
humans. The degree of the Doppler-shift, meaning the
tone of the acoustic signal is correlated with the speed
of the motion of the examined tissue or fluid.
By observing the change of tone, the motion of tissue
boundaries is traceable, or the blood flow change within
a heart-cycle. Sharp, short signals suggest swift motion,
high blood resistance (swift blood flow in a narrowed
blood vessel), while slowly increasing and decreasing
tone generally indicates the satisfactory condition of the
examined blood vessel.
The examination procedure is non-invasive, it doesn’t
cause any kind of discomfort or stress for the patient
and may be repeated at any time.
5
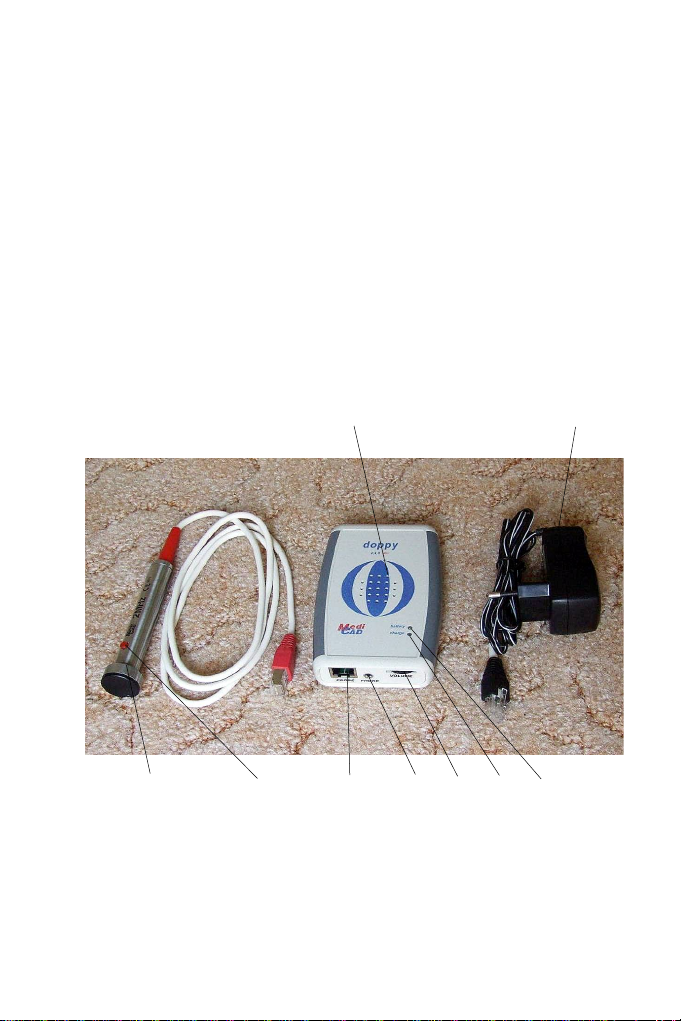
4 The device’s main parts
Sensor
Button (On/off switch)
Sensor/battery charger terminal (PROBE)
Volume control (VOLUME)
Head-phone socket (PHONE)
Speaker
Low battery indicator light (battery)
Charging indicator light (charge)
Power network charger adapter
6

5 Operation
Connect the proper sensor to the PROBE socket.
For application, place the sensor on the skin and turn
the device on by pressing the button for a short
time. The green light of the battery light indicates,
that the device is on. The button doesn’t need to be
kept pressed for the course of the examination. The
device may be turned off by pressing the button on
the sensor again, or if the device isn’t being used it will
automatically turn itself off after approximately one
minute.
To remove the sensor (such as in the case of sensor
switch or the connection of the battery charger) press in
the plastic flap at the bottom of the sensor connector
and pull out the connector.
The examinational diagnosis is based on the observation
and analysis of the sound signals. The volume may be
adjusted with the VOLUME control.
Attention! The volume control is not an on-off
switch, the turning knob only serves the adjustment
of the volume!
In the interest of ensuring the optimal conveyance of the
ultrasound the patient’s skin has to be coated with
ultrasound connective gel on the entire examination
surface, moreover in certain cases a specific amount of
7

gel has to be spread on the sensor head as well.
Do not use saline gels applied for EKG devices,
because they cause damage to the US ultrasound)
sensors!
DOPPY operates with one 9 volt battery, independently
of network electricity. The information regarding
battery charging is described in items 6 and 7.
The fully charged battery is sufficient for at least 3 hours
of continuous operation, in the case of normal signals
and average volume. Considering the average
examination time per patient and the usual switched off
periods, it’s presumable, that a single charging is
sufficient for several business days even if the device is
in constant use.
6 Inspection of the device and the battery
The device functions correctly as long as after switching
it on there is a hissing sound emitted by the speaker (in
the case of maximum volume), and when the radiating
surface of the sensor (while dry!) is touched or rubbed,
a powerful scrubbing sound can be heard.
A sound that is different from this – faltering, fading,
scraping - doesn’t necessarily mean, that the device is
defective, it rather indicates low battery! Requesting the
repair of the device is only justified if an inspection after
8

charging according to item 4.2 also suggests a
malfunction.
7 harging the battery
Low battery, in the case of a device which is turned on,
this fact is indicated by the changing of the battery light
from green to yellow. If the battery light
continuously glows with yellow light, then turn the
device off and commence the charging of the battery
according to the following:
After pulling out the connector of the ultrasound sensor,
by connecting the power network battery charger
provided by the manufacturer into the socket with
the caption PROBE (into the place of the sensor’s
connector), then connecting the network plug into a
network socket the charging of the battery will
commence, which is indicated by the flashing green
yellow light of the charge light . The completion of
charging is indicated by the continuous green light of
the device’s charge light . Subsequently to this, turn
the device on and inspect its functioning!
Do not commence the charging of the battery as long
as the battery light glows with green light, and do not
interrupt the charging of the battery as long as the
charge light is flashing, because by doing so you may
cause the reduction of the battery’s capacity! Long
9

term storage of the device with low battery may also
lead to the damage of the battery, therefore before
storing it for an extended period of time it’s advisable
to fully charge the battery!
The charging of the battery is controlled by electronics
built into the device, which ensure the optimal charging
of the battery and prevent its overcharging as well.
8 omments regarding ultrasound
examinations
Ultrasound travels very faintly in air. Exactly for this
reason proper connection is indispensable. The space
between the sensor and the skin ALWAYS has to be
filled with the appropriate amount of connective gel.
The examination of blood flow:
•In the course of the examination the sensor and
the blood vessel should be approximately at
a 45° angle. If the sensor is perpendicular to the
blood vessel, only the motion of vein walls is
detectible, it won’t highlight the motion of blood
cells. Since the device’s 4, 5 and 8 MHz sensors
emit a slim ultrasound beam, small veins are easy
to miss if you move the sensor on the skin too
quickly while searching for the vein.
10

•Always place the 4, 5 and 8 MHz sensor on the
skin gently, so the pressure won’t interfere with
blood flow!
•If the examination is targeted at the blood
vessels immediately under the skin (such as the
arteries of the fingers), then the end of the
sensor should be pulled back a bit from the
skin’s surface. Of course there shouldn’t be an
air gap in the way of the ultrasound in this case
either.
•The characteristic arterial and venous sounds are
easily discernable. The arterial sound is a
powerful pulsing sound, while the venous flow is
accompanied by a characteristic wind-buzzing
type sound, which is synchronized with the
patients breathing. The venous flow can be
stopped by deep inhalation or a
Valsalva maneuver, and can be accelerated by
pressure under the knee.
•Some blood vessels are situated excessively
close to each other, therefore the arterial and
venous sounds may be merged with each other
in certain sensor positions.
11

Fetal heart beat examination:
•Place ample ultrasound gel on the head
and slowly move it around on the mother’s belly,
until you can hear a clear, characteristic fetal heart
sound.
•You can achieve the best quality heart sound if the
examination head is in the most favorable posi-
tion.
•The position, in the case of which powerful pla-
centa, or umbilical cord blood flow can be heard,
should be avoided.
•If the fetus is in a cranial presentation and the
mother is laying on her back, the clearest heart
sound can be found on the midline under the na-
vel.
•Do not mix up maternal hearth rhythm with fetal
heart rhythm. The fetal pulse can be separated
from the maternal pulse if we palpate the mother’s
pulse during the examination.
12

9 leaning, disinfecting
Use a soft textile dampened with water for the cleaning
of the device and the sensors. In the course of cleaning,
you should pay attention, so water or other fluids can’t
leak into the interior of the device and the sensor
through the gaps on the device-case and the sensor
(such as the speaker grate, switch).
Never submerge either the sensor or the basic device
into any fluid (such as water, alcohol, oil), because they
may be irreparably damaged!
Sterilization with hot air or water-steam may also result
in irreparable damage to the sensor and the device!
ATTENTION! The face surface of the sensor and its
vicinity has to be cleaned and disinfected before each
examination! Recommended disinfectant: Secusept EN,
Barrycidal.
13

10 Environmental and other conditions for
the usage, storage and transportation of
the device
Temperature data:
Operational temperature range: +10 °C - +40 °C
Transportation temperature range: -40 °C - +55 °C
Storage temperature range: -20 °C - +55 °C
Humidity data:
Operational humidity: 30% - 95 %
Transportation, storage humidity: max. 95 %
(The vapor must not condense!)
The device should not be exposed to direct sunlight for
more than 30 minutes!
The device should be protected from impact and other
excessive mechanical stress (such as dropping it) in
the course of usage, transportation and storage!
The sensors contain fragile ceramic crystals, which may
be damaged in the case of impact or dropping!
At the end of its lifespan, the device can’t be treated as
household trash.
At the end of their lifespan, the device’s batteries have to be
placed into the receptacles located at the manufacturer or
the distributor of the batteries.
14

At the end of its lifespan, the device should be deposited at
the manufacturer or at a collection site dealing with
recycling and destroying electronic equipment.
15

11 Technical parameters
Sensors:
Frequency
[MHz]
Type Nominal
diameter
[mm]
Max. US
performance
output
[mW/cm²]
2 MHz DO-02 20 15
4 MHz DO-04 7 20
5 MHz DO-05 7 20
8 MHz DO-08 7 20
lassification:
Device powered by internal electricity source
BF type patient portion
Power supply:
9 V NiMH rechargeable battery (PP3)
Battery charger:
Type: NA 120P030P GS or its equivalent
Input: 240V-50Hz
Output: 12VDC; 3.6VA
Operational period: at least 3.5 hours (with a fully
charged battery)
16

Dimensions:
device: 117 x 78 x 25 mm
sensors: Ø16 x 105 mm
Weight: device: kb. 150 g
sensors: kb. 120 – 140 g/pc.
charger: kb. 250 g
The manufacturer reserves the right to change the spe-
cifications!
17

12. ontents of the kit
Basic device 1 pc.
sensor 1-4 pc.
(depending on the
order)
Connective gel 1 tube
Charger adapter 1 pc.
Case 1 pc.
User’s manual 1 pc.
18
This manual suits for next models
3
Table of contents
Popular Medical Equipment manuals by other brands


Getinge
Getinge Arjohuntleigh Nimbus 3 Professional Instructions for use

Mettler Electronics
Mettler Electronics Sonicator 730 Maintenance manual

Pressalit Care
Pressalit Care R1100 Mounting instruction

Denas MS
Denas MS DENAS-T operating manual

bort medical
bort medical ActiveColor quick guide

AccuVein
AccuVein AV400 user manual


