MediaSonic HUR1-SU3S2 User manual
RAID mode setup / LED display status
RAID Mode Selection 3
CONTENT
Version 1.3
QUICK INSTALLATION GUIDE
Quick Installation Guide 4
Overview 1
LED indication
RAID function
8
About RAID
10
System Requirements
Windows XP / Windows Vista / Windows 7 / Macintosh O.S. 10.3x or later
11
Microsoft Windows Installation
Single mode (Non-RAID) / Spanning & Striping (RAID 0) / Mirroring (RAID 1)
Macintosh System Installation 19
Cautions 22

Detail View
Front View
1. Power / Sleep indicator
2. Rebuild indicator
3. HDD1 Access Indicator
4. HDD2 Access Indicator
5. HDD1 Error Indicator
6. HDD2 Error Indicator
7. Ventilation
Rear View
1. FAN
2. USB 3.0 port
3. e-SATA port
4. DC IN
5. Synchronization mode switch
6. Smart Fan mode switch
7. Power button
LED Indicator Front panel
Power
Rebuild
Active HDD 1
Active HDD 2
Error HDD 1
Error HDD 2
Status
Blue
Red
Orange
Orange
Red
Red
5 6
7
Sleep mode Blue flicking
RAID MODE LED View
1. DIP switch
2. RAID Mode Confirmation button
3. Single Mode LED indication
4. RAID 0 Mode LED indication
5. JBOD (Spanning) Mode LED indication
6. RAID 1 Mode LED indication
Mode
Single Mode LED
RAID 0 Mode LED
JBOD Mode LED
RAID 1 Mode
Status
Green
Green
Green
Green
6. Smart Fan mode switch
5. Synchronization mode switch
5 6
When the PC is off, the device goes off in 15 seconds.
ON
OFF
1 2

RAID Mode Selection
Users should set up the RAID mode when the device is powered off.
SW1 RAID Mode SW (3)
Single
( Non - RAID )
Single
( Non - RAID )
Striping
( RAID 0 )
Striping
( RAID 0 )
Spanning
( JBOD )
Spanning
( JBOD )
Mirroring
( RAID 1 )
Mirroring
( RAID 1 )
Above 2TB
Under 2TB
Under 2TB
Above 2TB
Above 2TB
Under 2TB
Under 2TB
Above 2TB
Quick Installation Guide
A. Remove 4 screws from the bottom of the
unit and lift up the cover to open.
B. Remove 2 screws from the 2 bay rack
and slide it out.
RAID Mode
LED indication
3 4

C. Insert HDD1 and HDD2 into HDD rack and
secure them with screws provided.
E. Select the RAID mode via DIP switch referring to manual
on page 3 in the section of RAID mode selection.
D. Please insert 2 bay rack back to enclosure and reinstall screws
connect the power supply to the DC IN
and plug in the USB or e-SATA cable.
F. With the enclosure powered OFF, press and hold the RAID confirmation button
(next to the DIP switch), then press the power on button wait
for the Raid mode LED you selected to light up. (refer to page 3,
RAID Mode LED indication)
Note: User have to make sure the host e-SATA port supports port-multiplier.
65

RAID 0 JBOD (Spanning) MODE
RAID 0 - Striping: Two HDDs will show up as one large single drive
but speed performance will boost up.
The two HDDs will write Data in “column” effect. This form of array splits
each piece of Data across both HDDs in segments.
Data are store between first HDD and second HDD. While the HDD is stripe in writing,
the next head of next HDD is move to next track to write. The Data is writing
without any form of data-checking.
Once one HDD is damaged and all data can be lost.
Same capacity / Brand HDD
3TB 3TB
6TB
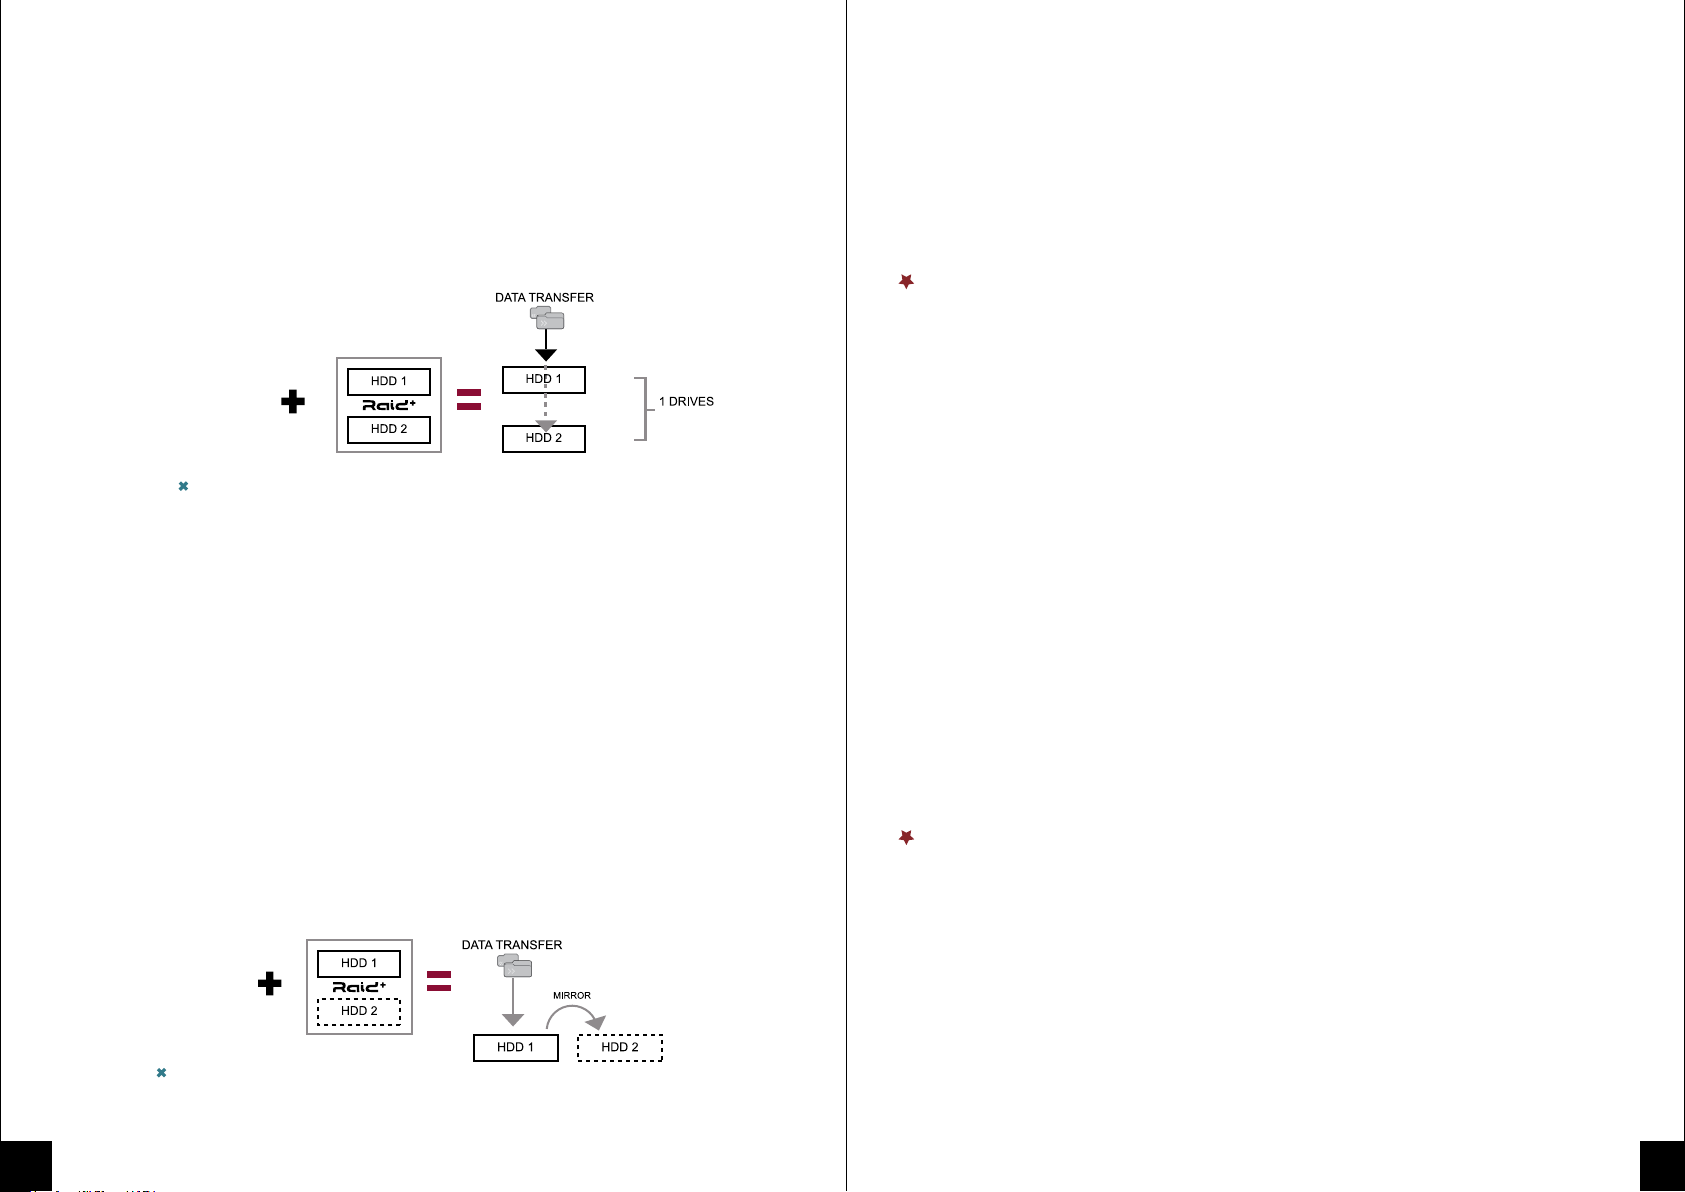
Non-RAID: (Single Mode) Computer will show up as two independent drives.
This function can be used if RAID is not required, if one HDD is installed
or two different barnds
or capacities of HDD are installed.
SINGLE MODE
About RAID
G. Put the cover lid back and
reinstall the screws.
Note: HDDs initialized format
If the HDDs are unformatted, you have to initialize,
partition and format them on your PC
For Mircosoft Windows Operating System refer to page 11
For Apple Mac OS X System refer to page 19.
LED light
687
Macintosh System
Minimum Requirements:
• Minimum Apple G4 processor , 128MB RAM
• e-SATA :With support for Port-Multiplier function
• USB 2.0 equipped Mac: Mac O.S. 10.X or Later
Windows System
Minimum Requirements:
• Minimum Intel Pentium III CPU 500MHz, 128MB RAM
• e-SATA :With support for Port-Multiplier function
• USB 2.0 equipped PC: Windows XP, Vista, Windows 7
• USB 3.0 equipped PC: Windows XP, Vista, Windows 7
Package Contents
• RAID enclosure X 1
• External Power Adapter: AC Input 100-240V~1.6A,
DC Output 5V / 12V 2A X 1
• Power Cord X 1
• USB3.0 X 1
• e-SATA cable X 1
• Screw Driver X 1
System Requirements
RAID 1 MIRRORING MODE
RAID 1– Mirroring: Using this mode will require 2 identical HDDs;
meaning they must be the same capacity, brand and model number. Under RAID1,
it will create an extra copy (or mirror) set of data to second drive.
The backup data are more important for safe keeping and
the available data only show up in one large single drive.
This is useful when first HDD fails and it can be replaced by second set
of identical data instantly.
Same capacity / Brand HDD 3TB
RAID 0 SPANNING MODE
RAID 0 - Spanning: Two HDDs will show up as one large single drive.
Spanning is an array (not RAID) that is written sequentially across two drives.
Same capacity / Brand HDD
3TB
3TB
6TB
910

Microsoft Windows Installation
Disk Initialization
Single mode (Non-RAID) - 2 New Simple Volumes
New simple volume / Partition
Single Mode - New simple volume
Start Search input diskmgmt.msc at “Start Search”
Microsoft Windows Installation
Microsoft Windows
•Before connecting to the PC, please refer to the Hard Drive Assembly
Procedures for RAID set-up.
•If HDD is pre-installed by our vendor; users can connect directly to PC
and start using the unit.
•If users wish to change the setting, please refer to the Hard Drive Assembly
for correct way of setting.
• Turn on PC and start Windows system.
• Connect the device with USB(or e-SATA) cable and the power adapter.
• Windows will search and install drive in “Disk Management”.
11 12
Note:
For 2TB Hard drive, users must format in GPT Partitions and use
Windows Vista or Windows 7 in 64bit.
Spanning and Striping (RAID 0) - 1 New Simple Volume
Disk Initialization
If Spanning or Striping mode capacity above 2TB,
please refer to Microsoft Windows Vista GPT FAQ.
http://www.microsoft.com/whdc/device/storage/GPT_FAQ.mspx
13 14

Disk Initialization
15 16

Mirroring (RAID 1) - 1 New Simple Volume
Disk Initialization
17 18
Before connecting to the Macintosh, please refer to the Hard Drive Assembly Procedures for RAID set-up.
If HDD is pre-installed by our vendor, user can connect directly to Macintosh and start using the unit.
If wish to change the settings please refer to Hard Drive Assembly for correct way of setting.
• Turn on Macintosh and start Mac OS.
• Connect the device with the power adapter.
• Mac OS will search and install drive in “Disk Utility”.
• External drive will appear on Desktop.
Macintosh System Installation
Create new partition in “Disk Utility”
19 20

21
Macintosh System
Remove the “external hard drive” from Macintosh...
• Drag the Ext Hard Disk to trash bin.
• Unplug USB and remove the power adapter.
Note: If users wish to use device under both Windows and Mac OS system,
HDD at FAT32 or HFS format is strongly recommended.
Also, please do the formatting under Windows OS.
If formatting is done under Mac OS,
the drive might not be recognized in Windows.
HDD format recommended
• Windows XP, Windows Vista, Windows 7 NTFS
• Mac OS X HFS+ (Mac OS Extended)
• Both Windows and Macintosh OS FAT32
Before using RAID enclosure
1. Changing RAID modes may cause data lost, backup your data before making changes.
2.Do not cover or block the ventilation hole.
3. Check for visible damage on unit, accessories and cables before using the device.
4. Do not expose the enclosure to water and humid condition.
5. When both HDD are installed at the same time in any RAID mode, all data will be formatted.
6. When using “RAID function”, HDD of the same capacity, model name
and brand is strongly recommended.
7. When using eSata interface on PC/MAC, the system's eSata port must
support Port-Multiplier.
Cautions
Erase Hard Driver
22
Table of contents
Other MediaSonic Enclosure manuals

MediaSonic
MediaSonic HF2-SU2S2 ProBox User manual

MediaSonic
MediaSonic H82-SU31C User manual

MediaSonic
MediaSonic HFR7-SU31CD User manual

MediaSonic
MediaSonic HFR7-SU31CH User manual

MediaSonic
MediaSonic HUR5-SU31C User manual

MediaSonic
MediaSonic HFR7-SU31CH User manual

MediaSonic
MediaSonic HF7-SU31C User manual


 user manual")


