MEDIZS Smart DR13 User manual


1
IMPORTANT NOTICE
This product may malfunction due to electromagnetic waves caused by portable
personal telephone, radio-controlled toys, etc. Please keep away any device that
can influence this product.
The information in this manual is checked out carefully and is believed to be
entirely accurate at the time of publication. However, MEDIZS Inc. takes no
responsibilities of the results caused by default, omission, or misuse of it.
MEDIZS Inc. reserves the right to modify the product itself or specifications of the product
without any prior notice, and is not required to update this documentation to reflect such
changes.
Operation Manual ver 1.15 / 2015.10
ⓒ2013 MEDIZS Inc.
94-10, Techno-2ro, Yuseong-gu, Daejeon,
305-509, Republic of Korea
All rights are reserved.
Under copyright laws, this manual may not be copied, in whole or in part,
without the prior written consent of MEDIZS Inc.

2
CONTENTS
1. Introduction ................................................................................................... 6
1-1. Outline of product........................................................................................................6
1-2. Features .............................................................................................................................7
2. Safety Information........................................................................................ 8
2-1. Symbols marked on the instrument ....................................................................8
2-2. EU Countries....................................................................................................................9
2-3. Safety Instruction ..........................................................................................................9
2-4. General safety information ....................................................................................10
3. Note for using the instrument .................................................................12
4. Nominations and Functions of Each Parts.............................................13
4-1. Front side of Body.....................................................................................................13
4-2. Back side of Body ......................................................................................................14
4-3. Control Pad (iPad-App)...........................................................................................15
4-4. Junction Box .................................................................................................................16
5. Installation and preparation .....................................................................17
6. Default Screen .............................................................................................18
6-1. Main Screen..................................................................................................................18
6-2. Data Chart .....................................................................................................................19
6-3. Registration...................................................................................................................21
6-4. Operation controller .................................................................................................22
6-5. Setting .............................................................................................................................23
6-5-1. Setting Menu.........................................................................................................23

3
6-5-2. Each Setting screen............................................................................................ 24
6-6. Help Guide.................................................................................................................... 31
7. Operation Panel .......................................................................................... 33
7-1. Basic Data Operation ............................................................................................... 33
7-2. PD value operation ................................................................................................... 34
7-3. Received Data and Prescription.......................................................................... 35
7-4. Chart Control ............................................................................................................... 39
8. Manual Mode Control ............................................................................... 40
8-1. Control method of each data .............................................................................. 41
8-2. Use of Auxiliary lens and operation penal of CP ....................................... 44
8-3. Open the Manu Bar.................................................................................................. 46
9. Basic Program and Functions................................................................... 47
9-1. Start System-Defined Basic Program ............................................................... 47
9-1-1. Adjustment of the SPH-CYL-AXIS Value (Right)................................... 48
9-1-2. Red/Green Balance Test for Monocular ................................................... 50
9-1-3. Cross Cylinder Test with Dots Chart (AXIS) ............................................ 51
9-1-4. Cross Cylinder Test with Dots Chart (CYL) .............................................. 52
9-1-5. Check the Power of Glasses for Right Eye.............................................. 53
9-1-6. Adjustment of the SPH-CYL-AXIS Value (Left) ...................................... 54
9-1-7. Cross Cylinder Test with Dots Chart (AXIS) ............................................ 55
9-1-8. Cross Cylinder Test with Dots Chart (CYL) .............................................. 55
9-1-9. Red/Green Balance Test for Monocular ................................................... 56
9-1-10. Check the Power of Glasses for Left Eye ................................................. 56
9-1-11. Check the Power of Glasses for the Binocular...................................... 57

4
9-1-12. Far Distance Horizontal/Vertical Unequal Coincidence (Aniseikonia).......................57
9-1-13. Near Distance Cross Grid Test ......................................................................58
9-1-14. Near Vision Test with Addition (Near VA with ADD).........................58
9-1-15. Near Vertical Von Graefe Test.......................................................................59
9-1-16. Near Horizontal Von Graefe Test.................................................................59
10. Unit Test .......................................................................................................61
10-1. Cylinder Axis Test.......................................................................................................61
10-2. Cylinder Power Test ..................................................................................................62
10-3. (Monocular) Red/Green Test ................................................................................63
10-4. Jackson Cross Cylinder Test..................................................................................64
10-5. Dual Cross Cylinder Test.........................................................................................65
10-6. Horizontal Maddox Rod Test ...............................................................................66
10-7. Vertical Maddox Rod Test......................................................................................67
10-8. Binocular Balance Test at Polarized Light ......................................................68
10-9. Polarized Light Red/Green Test...........................................................................69
10-10. Worth 4 Dots test................................................................................................70
10-11. Schober Test ..........................................................................................................72
10-12. Horizontal Von Graefe Test ............................................................................74
10-13. Vertical Von Graefe Test ..................................................................................75
10-14. Horizontal Coincidence (Aniseikonia) Test ..............................................76
10-15. Vertical Coincidence (Aniseikonia) Test ....................................................77
10-16. Phoria Test without Fixation...........................................................................78
10-17. Phoria Test with Fixation..................................................................................81
10-18. Minute Stereo Acuity Test...............................................................................85

5
10-19. Near Point of Convergence Test.................................................................. 86
10-20. Near Point of Accommodation Test .......................................................... 87
10-21. Negative Relative Accommodation Test .................................................. 88
10-22. Positive Relative Accommodation ............................................................... 89
10-23. Positive Relative Convergence ...................................................................... 90
10-24. Near Vision with Addition............................................................................... 91
10-25. Near Addition Test using Cress Grid (Near ADD) ............................... 92
11. Service Information and Maintenance ................................................... 93
12. Specifications............................................................................................... 96
13. Components................................................................................................. 97

6
1. Introduction
1-1. Outline of product
DR13, Digital Reflector of MEDIZS, is enable subjective refraction test regarding
visual accommodation of patient’s eye or its function. Also, you can measure
and check abnormal binocular vision such as muscle balance of the eyes,
binocular balance, aniseikonia, fusion and stereo acuity. The subjective test is
based on measurement results of Auto Ref/Keratometer in communication with
DR 13. Optometrist could significantly reduce the time by tapping the control
of iPad Application which has auto functions of DR 13.
Basic components of DR 13 are Refractor body, iPad-App and junction box. In
the body of DR 13, there are more than 100 lenses. It could be operated by
Automatic lenses loader and controlled through iPad application to control DR
13 via Bluetooth wireless connectors.
This iPad application to control DR 13 could not only control refractor body
and chart projector, but receive the data from Ref/Keratometer(RK), Auto
LensMeter(LM), and refraction program on your PC. It also has functions to
send data by email and to print data (Printers only for iPad wireless printing).
Junction Box supplies DR 13 with power.

7
1-2. Features
By using Tablet PC (iPad) via Bluetooth network, you can control SmartDR13,
SmartCP11, and SmartLC13 wirelessly and receive measurement data from
SmartRK11 and SmartLM14.
Measurement data tested by RK11 and LM14 can be sent to Application (Smart
MEDIZS) directly, and this data can be applied on DR13 (Digital Refractor) body,
only by using Tablet PC.
Smart MEDIZS application allows wireless refraction test, so that allowing users
to control the body with wider and clearer screen. The wireless operation cam
offer more flexible workspaces.
Through APP, measurement data from Ref/Keratometer(SmartRK11) can be
applied to DR13’s body automatically without lens operation, and App also
offers PRESE function that put in lenses including auxiliary lens at once.
New programs are always available thanks to easy and fast update of the
programs, which uses USB and Serial Cables of the PC.
All personal information or prescription of patients can be managed by using
email function or can be obtained from printers for iPad wireless printing.
The classification content of the instrument : DR 13
- Protection against electric shock : Class I;
- Protection against harmful ingress of water : Ordinary (IPX0);
- Method of sterilization : Not applicable;
- Stability of use in an Oxygen Rich Environment : Not suitable;
- Mode of operation : Continuous operation.

8
2. Safety Information
2-1. Symbols marked on the instrument
Symbol
Description
Type B Applied Part (Forehead rest)
Protective earth (ground)
Alternating Current
Direct Current
Caution
Manufacturer
Date of Manufacture
Authorized Representative in the European
Community
Follow Operating Instructions
Power off (separated with power source)
Power on (connected with power source)
Do not throw away the waste to inappropriate place

9
2-2. EU Countries
The following mark, the name & address of the EU Representative
shows compliance of the instrument with Directive 93/42/EEC.
EU Representative:
CALMED INVEST Kft.
1182 Budapest, Fiume utca 3., Budapest, Hungary
2-3. Safety Instruction
If you see any warnings or cautions printed on the warning labels, follow
the safety instructions in this manual. Ignoring such cautions or warnings
while handling the product may result in injury or accident. Be sure to
read and fully understand the manual before using this product.
Keep this manual in easy-to-access place.
WARING
It can strike a mortal blow if you are not careful.
Death or a severe wound might occur to you or others.
CAUTION
You can fall into a dangerous situation if you don’t care.
It could lead to a slight wound of you or others, or malfunction of
this equipment.
NOTE
Significant information about installation, operation, basic safety
and management of this equipment.
Please read out this information to prevent misuse.
WARING
Use the device that meets the standard power requirements on the
tablet. Unless, it could end up with a fire or an electric shock.
WARING
Please connect or separate the electric cables only after
powering off. Besides, don’t touch this equipment with wet
hands. Unless, it could end up with an electric shock that
accompanies death or severe wounds.
WARING
Please power the switch down and plug out power cables from
the AC socket. And then ask the agent you bought this product
about the following phenomenons.
Smoke, smell, or a loud noise

10
When you spilled a fluid on this product, or when any
metal was wedged into an opening
When you drop this product or when the outer case was
broken
WARING
You must not disassemble or reconstruct this product. It could lead
a fire or an electric shock. Be aware that high-voltage and other
dangerous parts are installed in this equipment. To touch these
parts can incur serious wounds
WARING
Please keep the temperature at 10℃~40℃and humidity at
30%~75% for normal operation.
WARING
DR13 shall be connected to the separate power supply as supplied
by Medizs Inc. with type DR 13J identified.
WARING
Do not position the equipment to make it difficult to operate the
disconnection device (Appliance coupler or separable plug)
CAUTION
Grounding power cables are put in this equipment.Always connect
them to the grounded AC socket, to reduce electric shock.
CAUTION
The Ref. body of DR 13 is heavy, so a strong cable is needed to
connect with it. If not, the REF.BODY might be damaged, or the
tester might by hurt.
CAUTION
If a visual acuity test is done in In the process of initialization of the
Ref. body, the person under vision test might hurt. Please do a test
only after the initialization is finished completely.
CAUTION
You wish to be careful so that the dust or metal doesn’t may enter
The inside of instrument.
CAUTION
Make a cable and don’t pull out the power cable.
2-4. General safety information
1. An exposure to the direct sunlight or very bright indoor lights may
influence on the result of accurate measurement. Recommend to use
in appropriate test room.

11
2. A sudden heating of the room in cold areas will cause condensation
on the protective glass in the monitor screen and on optical parts
inside the instrument. In this case, just wait until condensation
disappears before performing measurement.
3. This instrument is used with accessories from MEDIZS. If consumer
would like to use the accessories from other manufactures, safety of
accessories should be verified and identified by manufacturer or by
MEDIZS.
4. Operation manual should be keep at the place where the user can
easily access.
5. This instrument can be installed and maintained by the person who
have completed training or education course.
6. When moving this instrument, please keep vibration or impact away
from the equipment. It can bring some damage inside or outside of
the instrument. Please carefully handle the instrument.
7. When moving equipment, fixes the stage, always keep power off, and
then lift the bottom of the unit with both hands.
8. To connect this instrument with other relevant equipment, consult with
the dealer about the way to make it.
9. In case there is smoke, strange odor or noise on working, disconnect
the power supply and consult the dealer.
10. Don't use organic solution such as alcohol, thinner, benzene, etc. to
clean the surface of this instrument. It may damage the instrument.
11. Do not disassemble or modify this instrument.
12. If you are not using this instrument a long time, disconnect the power
supply and protect the unit with dust cover.
13. Do not pull on the cable of equipment.
14. Please check the condition of unit appearance before using the
instrument.

12
3. Note for using the instrument
Electromagnetic waves discharged from mobile phones,
radiotelegraphs, wireless toys can cause malfunction of this product.
Please keep away any device that can influence this digital Refractor.
All the information in this manual is checked out carefully and
discerned as accurate one at the time of publication. However,
MEDIZS Co., Ltd., takes no responsibilities of the results caused by
default, omission, or misuse of it.
MEDIZS Co., Ltd., has rights to modify the product itself or
specifications of the product without any prior notice, as well as rights
not to renew that modification on this manual.
Users must operate this device strictly following user’s manual or
explanations on service manual. More management is available only
to service technician of MEDIZS, or who is qualified to be in
proportion to that position.
Be careful not to load excessive shock or vibration on this product.
Please be guided by the agent when you move this product or
connect it with others.
Outer lightening can influence the test result. Use it in a proper test
room.
Keep the lenses clean always, since dirty lenses can influence the test
result. Please check the status of lenses essentially before use it.
A shock can damage the inside and outside of the product. Handle
with care, please.
Please keep the temperature at 10℃~40℃ and humidity at
30%~75% for normal operation. It must not be exposed to watery a
place or where lots of water splashed. Do not put any container or
product which contains liquid or gas, around this device.
13
4. Nominations and Functions of Each Parts
Basic components of DR 13 are Refractor body, iPad-App and junction box.
Explanation about each components and functions are following here
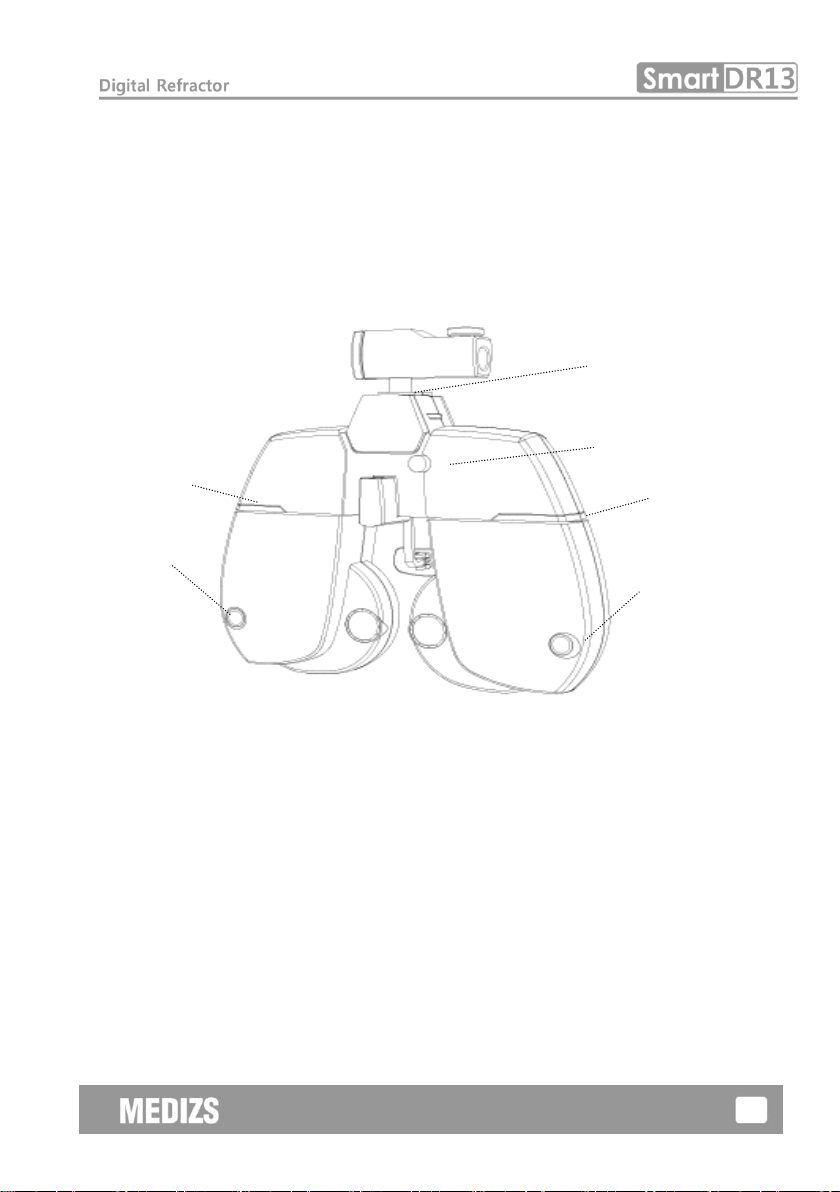
4-1. Front side of Body
[Fig 1] Front side of Body
①
②
③
③
④
④

14
4-2. Back side of Body
[Fig 2] Back side of Body
Name
Description
①Leveler
Inform whether the digital refractor
maintains horizontality.
②Forehead Fixing Dial
Fasten the patient’s forehead to forehead
rest with dial.
③LED
Turn on when the digital refractor power
on.
④VD Test window
Confirm the patient’s VD
⑤Forehead Prop
A plate to prop the patient’s forehead.
⑥Test Window
The patient can view the chart through the
lens.
⑤
⑥

15
4-3. Control Pad (iPad-App)
[Fig. 3] Control Pad Application on iPad
Buttons or Controllers are changed according to the measurement
circumstance. For detailed controlling method, please refer to explanation
of each mode.

16
4-4. Junction Box
Name
Description
①Power switch
Switch for turning power ON and OFF
②Body Connector
Connect with DR13 body
③Power Connector
Power supply connector
①
②
③

17
5. Installation and preparation
The most installation process of basic system is as below;
1) Check that all the basic components are.
2) Connect DR 13 Body and Junction Box with 8 pin cable, while
junction box must be turned on.
3) After connecting power cable of junction box, ensure that each cable
is properly connected.
4) Turn the power of junction box.
5) Turning on, DR 13 start initialization.
6) Download and install DR 13’s application onto your iPad.
7) Before running App, turn Bluetooth on. From home screen choose
Setting > Bluetooth.
8) In a while, Bluetooth name of DR 13 appears on the screen and pair
DR 13 with iPad.
9) Run the App.
10) When running App for the first time, one Message appears. Tap ‘OK’
button, then go to the page of connecting Bluetooth.
11) Tap “ON”on Device ON/OFF.
12) If several devices appear, tap the Bluetooth name of device that you
want to connect.
13) After setting and tapping “Operation Panel” button, you can see the
screen that can control DR 13.
14) For further examination options and operating method, refer to the
article 6 to 7.
18
6. Default Screen
DR 13 can be operated by Controller App of iPad. You can operate more
easily and efficiently by using iPad to tap and slide the screen.
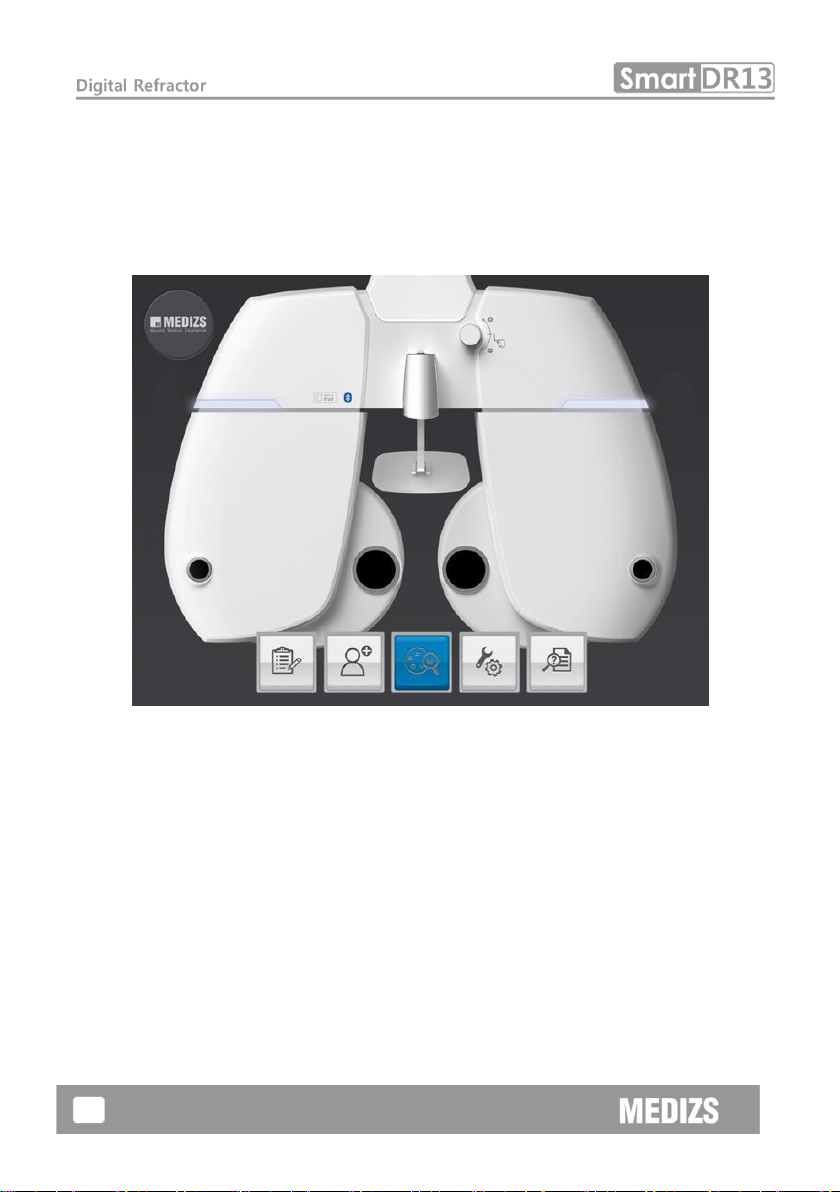
6-1. Main Screen
[Fig. 4] Main Screen
①Data Chart:
View the list of patient’s information and also
search for the information of specific patient.
②Registration:
Register new clients
③Operation controller:
Appear screen to control DR 13.
You can choose manual or digital type after
selecting on setting button.
④Set up:
Set functions to fit your preferences
⑤Help guide:
Provide the manuals of other devices and the
guide for each measurement way.
①②③④⑤

19
6-2. Data Chart
Data chart screen displays all clients by field name order. You can search
name or phone number.
If you select each line as single or duplicate and click on the trash box
button, you can delete data, and It is possible to amend data on detail
screen by clicking each line. In case schedule of next visit is within one
week, the date is blue color, if it is the day, its color is red.
[Fig 5] List of Date chart
If you touch each line longer, detail information view screen will be pop
up, and then you can check and amend personal information of
customer.
Table of contents
Other MEDIZS Medical Equipment manuals


