KCI ActiV.A.C. Application guide

ActiV.A.C.®Therapy Unit
Owner Service Manual
418474 Rev A
February 2018
Important Document
File in your maintenance records


1
Table Of Contents
Introduction / About This Manual.................................................................................................................. 3
Preparation For Use....................................................................................................................................... 3
Unpack The Unit ......................................................................................................................................... 3
Initial Inspection .......................................................................................................................................... 3
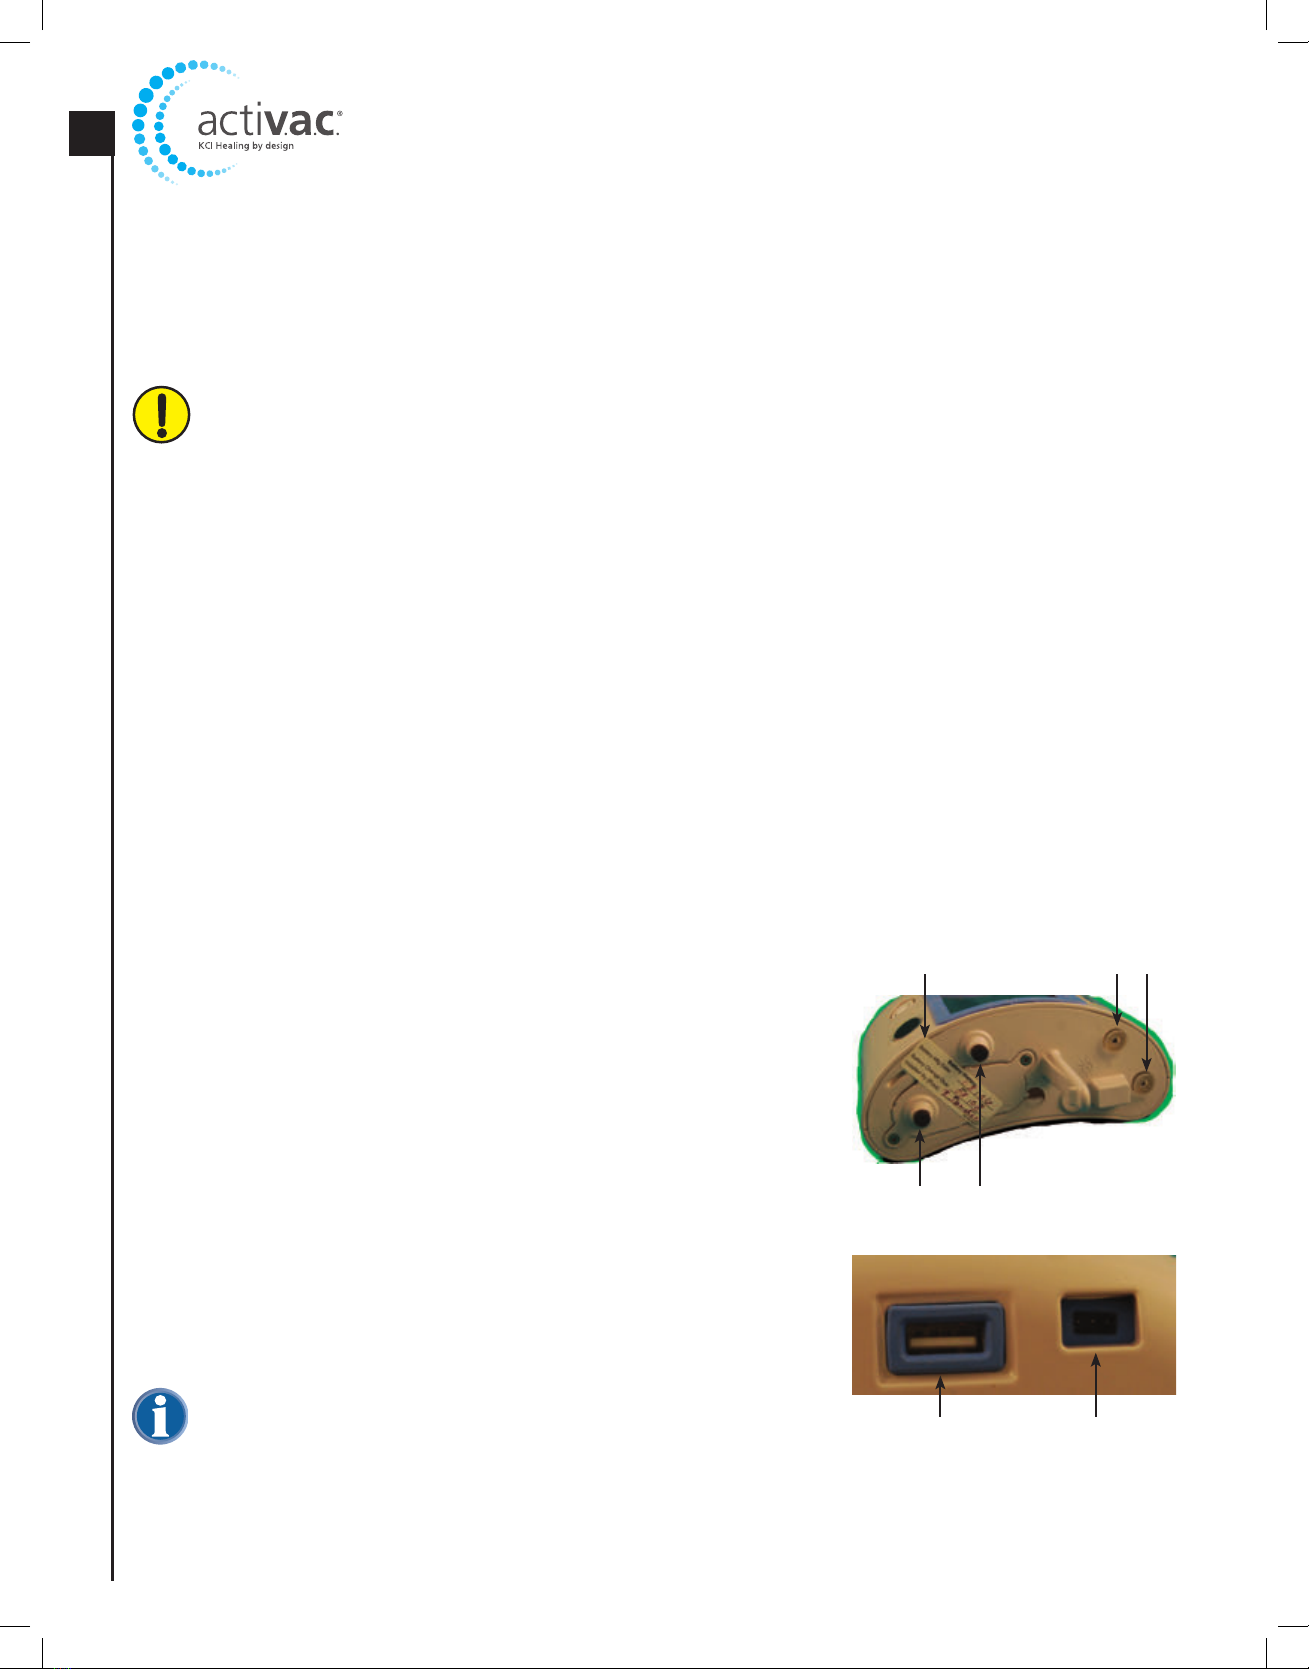
Unit Features ................................................................................................................................................ 4
Serial Number Location ............................................................................................................................... 5
Cleaning and Disinfection ............................................................................................................................. 5
Infection Control......................................................................................................................................... 5
Supplies and Equipment Needed ................................................................................................................. 5
General Cleaning Recommendations........................................................................................................... 5
Therapy Unit ............................................................................................................................................... 6
Power Supply .............................................................................................................................................. 7
Fabric Carrying Case ................................................................................................................................... 7
Service Procedures ........................................................................................................................................ 8
Parts and Equipment Needed ...................................................................................................................... 8
Inspect Unit for Damage ............................................................................................................................. 8
Replace Exhaust Filter.................................................................................................................................. 9
Data Download........................................................................................................................................... 9
Battery Check ........................................................................................................................................... 10
Battery Change ......................................................................................................................................... 11
Pressure Checks ........................................................................................................................................ 13
• Set-up ................................................................................................................................................. 13
• 25 mmHg Test ..................................................................................................................................... 14
• 125 mmHg Test ................................................................................................................................... 14
• 200 mmHg Test ................................................................................................................................... 15
• 125 mmHg Test .................................................................................................................................. 16
Charge Battery and 6 Hour Unit Verification Test....................................................................................... 17
Verify Time and Date................................................................................................................................. 20
Alarm Tests ............................................................................................................................................... 20
• Leak Alarm .......................................................................................................................................... 20
• Blockage Alert ..................................................................................................................................... 21
• Canister Not Engaged and Check Battery Level.................................................................................... 22
• Canister Full Therapy Interrupted ......................................................................................................... 22
Final Settings............................................................................................................................................. 23
Recharge Battery....................................................................................................................................... 23
Preparation for Transport and Patient Use ................................................................................................... 24
On-Premises Use ....................................................................................................................................... 24
• Supplies needed: ................................................................................................................................. 24
• Preparation For Use ............................................................................................................................. 24
Off-Premises Use....................................................................................................................................... 25
• Supplies needed: ................................................................................................................................. 25
• Preparation For Use ............................................................................................................................. 25
Specifications.............................................................................................................................................. 26
Spare Parts ................................................................................................................................................. 27
Symbols Used ............................................................................................................................................. 28
Service Manual.......................................................................................................................................... 28
Therapy Unit ............................................................................................................................................. 28
Contact Information ................................................................................................................................... 28
ActiV.A.C.®Therapy System Required Service Record............................................................ Inside Back Cover

2
DISCLAIMER OF WARRANTY AND LIMITATION OF REMEDY
KCI HEREBY DISCLAIMS ALL EXPRESS OR IMPLIED WARRANTIES, INCLUDING WITHOUT LIMITATION ANY IMPLIED
WARRANTY OF MERCHANTABILITY OR FITNESS FOR A PARTICULAR PURPOSE, ON THE KCI PRODUCT(S) DESCRIBED
IN THIS PUBLICATION EXCEPT FOR THE WRITTEN LIMITED WARRANTY INCLUDED WITH THIS PRODUCT. UNDER
NO CIRCUMSTANCES SHALL KCI BE LIABLE FOR ANY INDIRECT, INCIDENTAL, OR CONSEQUENTIAL DAMAGES AND
EXPENSES, INCLUDING DAMAGES OR INJURY TO PERSON OR PROPERTY, DUE IN WHOLE OR IN PART TO THE USE OF
THE PRODUCT OTHER THAN THOSE FOR WHICH DISCLAIMER OF WARRANTY OR LIMITATION OF LIABILITY IS EXPRESSLY
PROHIBITED BY SPECIFIC, APPLICABLE LAW. NO PERSON HAS THE AUTHORITY TO BIND KCI TO ANY REPRESENTATION
OR WARRANTY EXCEPT AS SPECIFICALLY SET FORTH IN THIS PARAGRAPH.
Descriptions or specifications in KCI printed matter, including this publication, are meant solely to generally describe the
product at the time of manufacture and do not constitute any express warranties except as set forth in the written limited
warranty included with this product. Information in this publication may be subject to change at any time. Contact KCI
(see page 28) for updates.
Important Information For Users
This manual contains routine service procedures for the ActiV.A.C.®Therapy Unit sold by KCI. This manual is not intended
for repair or non-routine service procedures. Contact KCI (see page 28) for any repair or non-routine service not covered
by this manual.
Please read and understand all sections of this manual before beginning any service procedures on this equipment.
In order for KCI products to perform properly, KCI recommends the following. Failure to comply with these conditions will
void any applicable warranties.
• Assembly, operations, extensions, re-adjustments, modifications, service or repairs must be performed by qualified
personnel authorized by KCI.
• Access codes to engineering screens are proprietary and remain property of KCI, and may only be used for the limited
purpose as outlined in KCI copyrighted documentation.
• The electrical installation of the room must comply with the appropriate national electrical wiring standards.
• Use this product only in accordance with its user manual and applicable product labeling.
• Ensure that personnel performing the procedures detailed in this manual are properly trained and qualified to perform
service on medical devices.
• Follow all procedures as outlined in this manual, including infection prevention and control and care and cleaning.
• Document and retain as a permanent record all service procedures performed.
• Use only KCI V.A.C.®Dressings and accessories with this product.
Notice
This product has been configured from the manufacturer to meet specific voltage requirements. Refer to the Product
Information Label for specific voltage.
Indications, contraindications, warnings, precautions and other safety information are contained in the V.A.C.®
Therapy System Safety Information Sheet. This information sheet is included with the ActiV.A.C.®Therapy Unit
and also included in every V.A.C.®Dressing carton. Please consult the ActiV.A.C.®Therapy Unit User Manual and
Safety Information Sheet before applying V.A.C.®Therapy. If there are questions or these documents are missing,
immediately contact your local KCI representative.

3
Introduction / About This Manual
This manual is designed to assist with routine service procedures for the ActiV.A.C.®Therapy Unit sold by KCI. Following
these procedures ensures that the ActiV.A.C.®Therapy Unit is properly cleaned, fully functional and ready for patient use.
These procedures include:
• Unpacking and initial unit inspection
• Cleaning and disinfection
• Inspection for damaged and/or missing parts
• Verifying unit function
• Ensuring battery is fully charged
• Verifying default settings are correct
All steps in these procedures must be followed in the order presented to provide proper functionality
and reliability of the ActiV.A.C.®Therapy Unit. Opening the therapy unit to gain access to the internal
components (other than the battery) may void the warranty.
Each ActiV.A.C.®Therapy Unit must be cleaned, disinfected, inspected and charged between each
patient use. For further questions about the required frequency of service procedures, contact KCI (see
page 28).
It is recommended that all sections of this manual be reviewed before beginning any routine service
procedures on the ActiV.A.C.®Therapy Unit. Please follow all applicable warnings and cautions and
use standard precautions where necessary.
Preparation For Use
Preparing the ActiV.A.C.®Therapy Unit for use includes unpacking, inspection for any damaged or missing parts, and
an initial round of service procedures to ensure the battery is fully charged and the unit is ready for patient use. The
following procedures should be performed when the unit is first received from KCI.
Unpack The Unit
1. Inspect the cardboard shipping box to ensure there are no visible signs of damage.
2. Unpack all items from the shipping box.
3. Inspect all items for damage. If damage is noted, contact the shipping company for reporting/return procedures.
4. Inventory all items in shipping box against the packing slip. Contact KCI (see page 28) if there are any items missing.
Initial Inspection
The purpose of this inspection is to ensure the unit has arrived without any internal damage and that the battery is fully
charged prior to the initial patient placement.
1. Obtain the ActiV.A.C.®Therapy System Required Service Record form and fill in the required information for the unit
in the spaces provided (see ‘Serial Number Location’ below). Form may be obtained either way as follows:
• Locate and make photocopies of the form in the back of this manual.
• Contact KCI (see page 28) to order a 25-pack of these forms. Ask for KCI part number 340141.
2. Perform the required service procedures as listed on the form. Start with ‘Inspect Unit For Damage’ on page 8 of
this manual.
3. After initial inspection and service are complete, retain the completed form for each unit as a permanent record.

4
Unit Features
Touch Screen
Infrared Data Port
Logo Label
Battery Charging/
Power Connection
Canister Stabilization Grommets
Canister Seals
Exhaust Filter
Battery Cover
Power On/Off Button
Battery Charging
Indicator LED
USB Data Port
Manufacturer
Service Port
Tripping Hazard No bathing or
showering
Tripping Hazard No bathing or
showering
Mains Power CordPower SupplyPower Cord
Warning Label
Battery Charging/
Power Connector
Note: The compliance label
and the manufacturer
information and serial number
label are located on the back
of the unit.
Pump Port
Wound Port

5
REORDER CODE: 340020
MODEL: ACTIVAC
*VFSRXXXXX*
SERIAL NUMBER BAR CODE
340394 REV A
MFG DATE BAR CODE
YYYY-MM
Serial Number
Serial Number Location
The ActiV.A.C.®has a serial number label, illustrated at right, that is
located on the back of the unit. This serial number will be recorded
on the ActiV.A.C.®Therapy System Required Service Record form.
Cleaning and Disinfection
Cleaning and disinfection of the ActiV.A.C.®Therapy Unit includes wipedown of all hard surface components. The
ActiV.A.C.®Therapy Unit must be cleaned and disinfected:
1. If it becomes soiled during patient use.
2. Between each patient use.
Infection Control
Institutional policies regarding infection control may vary; however, KCI recommends the following regarding infection
control when processing KCI V.A.C.®Therapy devices:
• Designate ‘contaminated’ and ‘clean’ areas for separating and storing equipment before and after transport, cleaning
and disinfection. Follow protocols to ensure no cross-contamination occurs between unclean and clean units.
• Use personal protective equipment (PPE) and hand hygiene protocols in accordance with the following standards:
• 29 CFR 1910.1030, OSHA Bloodborne Pathogens Standard
• MMWR October 2002;51 (No. RR-16), Guidelines for Hand Hygiene in Healthcare Settings
• Clean all organic material from the therapy unit prior to disinfection.
• Use hospital-grade cleaners and disinfectants, according to the CDC 2008 Guideline for Disinfection and Sterilization in
Healthcare Facilities.
• Do not immerse or saturate the therapy unit with fluids to avoid damage to the electronics in the device. Follow
institutional procedures used for the cleaning and disinfection of other hard surface durable electronic medical
equipment.
Ensure that the ActiV.A.C.®Therapy Unit and its power supply are not connected to AC power when
using cleaning fluids of any nature.
Supplies and Equipment Needed
• Hospital grade antiseptic used per label directions
• Clear plastic bags (as appropriate)
• Cotton tipped applicators
• Rubber bands
• Tweezers or similar tool
• #1 Phillips screwdriver
General Cleaning Recommendations
• Use PPE as appropriate.
• For items that are wiped down, ensure item’s entire surface is completely covered with the cleaning fluid and remains
wet for a minimum of 60 seconds.

6
Therapy Unit
1. Remove the unit from the plastic and/or fabric carrying case, as
applicable.
2. Ensure therapy unit is unplugged from power supply.
3. Remove canister seals from unit. Wipe/clean seals with antiseptic.
Ensure the seal cavities and adjacent surfaces are clean of any foreign
material. Replace seals when finished.
Canister Seals
4. Remove the Exhaust Filter. Discard the filter using local protocols.
Moisten a cotton tipped applicator with antiseptic; thoroughly wipe the
interior of the filter compartment.
The Exhaust Filter is single use only.
5. Wipe down the back of the unit with antiseptic.
Do not allow excess cleaning fluid into the areas surrounding
the Touch Screen Gasket.
6. When wiping the front of the unit, do not allow cleaning fluid to seep
into any gaps in the Touch Screen Gasket. Three such typical areas are
pointed out in the illustrations below.
Cleaning fluids allowed to seep past the gasket may damage
the Touch Screen to the point of requiring replacement.
Exhaust Filter

7
Fabric Carrying Case
The ActiV.A.C.®Fabric Carrying Case (KCI P/N 340122) is designed as a single use item; do not launder or reuse.
7. Wipe down the front and sides of the unit with antiseptic.
8. Once the unit is thoroughly cleaned, allow to air dry.
9. Place the clean unit in a clear plastic bag and move to the service area.
Power Supply
1. Ensure the power supply is unplugged from the therapy unit and/or any
power source.
2. Wipe the power supply and cord with antiseptic. Allow to air dry.
3. Inspect the power supply ‘brick’, cords and connectors for damage and
cracked or exposed wiring. Contact KCI if replacement is necessary.
4. Inspect the power supply safety labels for legibility. Replace as
necessary.
5. Loosely loop the power cord and secure with a rubber band.
6. Place the clean power supply in a clear plastic bag and move it to the
service area.
Tripping Hazard No bathing or
showering
Tripping Hazard No bathing or
showering

8
Inspect Unit for Damage
The purpose of this procedure is to inspect the ActiV.A.C.®unit for damage
using the following criteria:
1. Examine the unit top, bottom and sides for:
• Cracks of any size.
• Holes of any size that expose internal components.
2. Examine the canister attachment area for:
• Cracks of any size
• Damage to the canister seals
• Missing or damaged canister stabilization grommets
Service Procedures
The following service procedures are used to verify that the ActiV.A.C.®Therapy Unit is functioning properly and that the
battery is fully charged. Once these procedures are complete, the unit will be ready for patient use. These procedures
should be performed as listed and in order:
1. When the unit is first received from KCI, as part of the initial inspection (starting at ‘Inspect Unit for Damage’).
2. Between each patient use.
All service should occur in a clean area that is protected from contamination from unclean units or
other potential contamination sources. Use PPE as appropriate or as specified in local protocols.
Parts and Equipment Needed
• ActiV.A.C.®Canister KCI P/N M8275058, two (2) each
• These are normal ActiV.A.C.®canisters that can be reused for up to 6 months as a test canister. KCI recommends
marking the canister with ‘Test Canister-Not For Human Use’ and the in-use date.
• Tubing Cap, KCI P/N M6275069, one (1) each. Note: A tubing cap is attached to the canister tubing as delivered.
• ActiV.A.C.®Therapy System Required Service Record form, KCI P/N 340141, one (1) each
• Canister Seal, KCI P/N 340040, two (2) each (if required)
• Exhaust Filter, KCI P/N 340037, one (1) each
• ActiV.A.C.®Fabric Carrying Case KCI P/N 340122, one (1) each
• ActiV.A.C.®Pressure Accuracy Accessory, KCI P/N 340145, one (1) each
• Calibrated Digital Manometer, customer supplied, one (1) each. Manometer accuracy to be within 2.5 mmHg.
Canister Seals
Canister Stabilization Grommets
Battery
History Label
Battery Charging/
Power Connection
USB Data Port
3. Examine the battery charging/power connection and USB data port to
ensure they are clear with no visible bent pins or other obstructions.
4. Examine the touch screen area and ensure it is secure in the case.
5. Check for excessive screen scuffing, scratches and/or cracks that could
obscure screen elements.
Deep or extensive screen scratches or cracks can be the source
of intermittent erratic therapy unit operation.

9
6. Verify all labels are present per illustrations on pages 8 and 9.
7. Inspect all labels for readability. If replacement is necessary, see spare
parts list and apply new label over old.
ActiV.A.C.®Compliance Label
ActiV.A.C.®Logo Label
Labels for the ActiV.A.C.®unit are designed to be non-
removable by patients during normal use. If a label becomes
damaged, DO NOT use a sharp object to scrape the label off.
The powder coating on the unit may be damaged beyond
repair. Apply new label in the same position and orientation
as the original.
The label manufacturer recommends NOT using any cleaning
fluid or other cleaning material to remove any residual label
adhesive.
8. Should the unit fail any of the above criteria, contact KCI (see page 28).
9. With the unit inspection complete, continue on to ‘Replace Exhaust
Filter’.
Replace Exhaust Filter
The purpose of this procedure is to replace the exhaust filter. This procedure can be skipped if the unit is new and has not
been previously placed with a patient.
1. Insert a new exhaust filter.
2. Ensure the filter is fully seated.
3. With the Exhaust Filter replacement complete, continue on to ‘Data Download’.
Data Download
The purpose of this procedure is to download and archive the therapy
history file from the most recent use of the ActiV.A.C.®unit. This procedure
can be skipped if the unit is new and has not been previously placed with a
patient.
If a problem occurs with therapy and you would like
assistance diagnosing the problem, please contact KCI (see
page 28).
KCI recommends therapy history file be downloaded and saved as a
permanent digital record filed by unit serial number and download date.
1. Ensure the unit powered on and is in Clinician Mode. If the unit is in
Patient Mode, press ‘?’, then press ‘Clinician Mode’, then press and
hold ‘OK’ until the mode changes.
2. Press ‘Therapy’.
3. Press ‘Next’.
4. Press ‘History’.
5. Press ’Export History’.
6. Press ‘Export to USB’.
Continuous
Therapy Off
0mmHg
On/Off
Clinician Mode
6 Aug 2009
15:06
Utilities
Therapy

10
Always use a USB Flash Drive. Do not plug a USB PC cable
into the ActiV.A.C.®Therapy Unit.
7. Insert a USB Flash Drive into the USB Data Port.
8. Press ‘Next’.
9. Wait while the unit downloads the data to the Flash Drive.
10. When the download is complete, Press ‘OK’.
• If System Errors 2 through 6 occur, power the unit off and back on and try again.
• System Errors 7 and 8 are cleared by resetting patient defaults, see Final Settings section.
• If the error recurs, contact KCI (see page 28).
• If System Error 1 occurs, contact KCI (see page 28).
11. Press ‘Exit’ to return to the Clinician Home Screen.
12. Remove the USB Flash Drive from the ActiV.A.C.®unit.
13. Connect the USB Flash Drive to an external computer.
The ActiV.A.C.®unit exports a file folder that uses the unit serial number as its name. The folder
contains a Comma Separated Values (CSV) file named by date, YYYYMMDD.csv.
14. For the initial save operation, save the entire file folder to a secure computer.
15. For subsequent data exports from the same ActiV.A.C.®unit, save the new dated CSV file to the same secure
computer into the existing folder named with the ActiV.A.C.®unit serial number.
16. With the Data Download complete, continue on to ‘Battery Check’.
Battery Check
The purpose of this procedure is to determine if the battery needs changing.
1. Locate the Battery History label located on the bottom of the unit.
2. Verify the battery change date on the battery history label.
3. If the battery is within the date range, skip ahead to ‘Pressure Checks’; otherwise proceed to the ‘Change Battery’
procedure.

11
Battery Change
The purpose of this procedure is to change the battery.
Ensure that the ActiV.A.C.®unit is not connected to the
power supply when removing or replacing the battery.
1. Verify that the Battery Change Due date on the Battery History label is
at or exceeds the current date.
2. Remove the Battery History Label.
3. Using a #1 Phillips screwdriver, remove the two 4-40 Phillips head
screws.
Screws
Battery History Label
4. Remove the battery cover.
5. Remove the battery from the unit until the wiring connector is
accessible.
Battery Connector

12
6. Disconnect the battery from the unit.
7. Remove the old battery and dispose of it properly in accordance with
local, state and federal regulations for Lithium-ion (Li-ion) batteries.
The ActiV.A.C.®Therapy Unit battery must be replaced only
with batteries supplied by KCI. Use of any other battery may
compromise safety and/or cause erratic operation.
8. Obtain a new battery from KCI (KCI P/N 340079).
9. Obtain a new Battery History Label (KCI P/N 340168).
Shelf life of the battery is 12 months from battery
manufacture date. Verify that the battery manufacture
date is within 12 months of the date of installation. If the
manufacture date is outside 12 months, contact KCI (see page
28) for a replacement battery.
10. Calculate the next ‘Battery Change Due’ date as 18 months from the
installation date.
11. Record the required information on the Battery History label.
12. Slide new battery about halfway into unit until connectors meet. Plug
connectors together and ensure locking tabs are fully engaged.
13. Fit the battery into the housing ensuring the wiring harness is on the
front side of the battery and NOT behind and is otherwise not tangled
or obstructing fitting the battery fully into the battery compartment.
14. Press the Power On/Off switch to ensure the unit powers on properly.
15. Press the Power On/Off switch to turn the unit off.
16. Fit the battery cover, ensuring that it easily fits and does not need to
be forced into place. If force is required, the battery is not properly
installed. Double check that the wiring harness is not preventing the
battery from fitting fully into the battery compartment.
17. Install the two (2) screws tightly.
18. Install the new Battery History Label across the battery cover.
19. With the Battery Change complete, continue on to ‘Pressure Check’.
Screws
Battery History Label
Pressure Checks
The purpose of this procedure is to ensure the therapy unit pump responds to pressure setting adjustments.
The ActiV.A.C.®Therapy Unit MUST be connected to the ActiV.A.C.®power supply during this procedure.
The needle valve simulates the permeability of a V.A.C.®Drape.
The PVC test fixture and hygroscopic filter simulates the ActiV.A.C.®canister.
Set-up
1. Remove the Silicone Canister Interface Seals from the unit.
Seals Removed

13
2. Connect the PVC test fixture to the ActiV.A.C.®unit as illustrated below.
3. Ensure the calibrated manometer is connected as illustrated
and powered on.
Connected to
Power Supply
ActiV.A.C.®Unit
PVC Test Fixture
Customer Supplied
Calibrated Manometer
Needle Valve
Hygroscopic Filter
connected to Pump Port
Power On/Off
Switch
Hygroscopic Filter
connected to Pump Port
4. Ensure the tubing with the hygroscopic filter is connected to the pump port and the plain tubing is connected to the
wound port.
5. Ensure the ActiV.A.C.®Power Supply is plugged into mains power and is also plugged into the ActiV.A.C.®unit.
Power the unit on by pressing the power on/off switch for two seconds.
Plain tubing connected
to Wound Port

14
6. After acknowledging the warning screen, ensure the ActiV.A.C.®unit is
in Clinician Mode by observing the text in the upper right hand corner
of the screen, as illustrated.
7. If not in Clinician Mode, press ‘?’, press ‘Clinician Mode’, press and
hold ‘OK’ until the screen changes to Clinician Mode.
Clinician Mode
6 Aug 2009
15:06
25 mmHg Test
1. Press ‘Therapy’.
2. Press ‘Next’.
3. Press ‘Settings’.
4. Press ‘Pressure’ and use the arrow keys to set the pressure to 25.
5. Press ‘Exit two (2) times.
6. On the Confirm screen, ensure that settings are Pressure: 25 mmHg;
Mode: Continuous; Intensity: Low. If these settings are not correct,
press ‘Back’ to change the incorrect setting.
Continuous
Therapy Off
0 mmHg
Pressure Exit
+
_
25 mmHG
7. Press ‘OK’.
8. Start therapy by pressing ‘On/Off’, the ‘Therapy Start’ screen will
appear.
Continuous
Therapy Off
0 mmHg
Confirm
OK
Back
Pressure: 25 mmHg
Mode: Continuous
Intensity: Low
9. Adjust the needle valve so that the Leak Rate bar graph indicator on
the ‘Therapy Start’ screen indicates green and is below the dividing line
on the bar graph, see illustration.
10. Observe the digital manometer and the displayed pressure on the
ActiV.A.C.®Touch Screen.
11. The digital manometer should stabilize and indicate the pressure
displayed touch screen, ± 10 mmHg.
12. Press ‘Exit’.
13. Press ‘Therapy’.
14. Press ‘Next’.
15. Press ‘Settings’.
Continuous
Therapy On
25 mmHg
Log
Seal Audio
Therapy Start
Low
High
Leak Rate
Exit
125 mmHg Test
1. Press ‘Pressure’ and use the arrow keys to set the pressure to 125.
2. Press ‘Exit two (2) times.
Continuous
Therapy Off
0 mmHg
Pressure Exit
+
_
125 mmHG

15
3. On the Confirm screen, ensure that settings are Pressure: 125 mmHg;
Mode: Continuous; Intensity: Low. If these settings are not correct,
press ‘Back’ to change the incorrect setting.
4. Press ‘OK’.
Continuous
Therapy Off
0 mmHg
Confirm
OK
Back
Pressure: 125 mmHg
Mode: Continuous
Intensity: Low
5. Press ‘Therapy’.
6. Press ‘Next’.
7. Press ‘Seal Check™.
8. Adjust the needle valve so that the Leak Rate bar graph indicator on
the ‘Therapy Start’ screen indicates green and is below the dividing line
on the bar graph, see illustration.
9. Observe the digital manometer and the displayed pressure on the
ActiV.A.C.®Touch Screen.
10. The digital manometer should stabilize and indicate the pressure
displayed touch screen, ± 10 mmHg.
11. Press ‘Exit’ one (1) time.
12. Press ‘Settings’.
Continuous
Therapy On
125 mmHg
Seal Audio
Seal Check™
Low
High
Leak Rate
Exit
200 mmHg Test
1. Press ‘Pressure’ and use the arrow keys to set the pressure to 200.
2. Press ‘Exit two (2) times.
Continuous
Therapy Off
0 mmHg
Pressure Exit
+
_
200 mmHG
3. On the Confirm screen, ensure that settings are Pressure: 200 mmHg;
Mode: Continuous; Intensity: Low. If these settings are not correct,
press ‘Back’ to change the incorrect setting.
4. Press ‘OK’.
Continuous
Therapy Off
0 mmHg
Confirm
OK
Back
Pressure: 200 mmHg
Mode: Continuous
Intensity: Low

16
5. Press ‘Therapy’.
6. Press ‘Next’.
7. Press ‘Seal Check™’.
8. Adjust the needle valve so that the Leak Rate bar graph indicator on
the ‘Therapy Start’ screen indicates green and is below the dividing line
on the bar graph, see illustration.
9. Observe the digital manometer and the displayed pressure on the
ActiV.A.C.®Touch Screen.
10. The digital manometer should stabilize and indicate the pressure
displayed touch screen, ± 10 mmHg.
11. Press ‘Exit’.
12. Press ‘Settings’.
Continuous
Therapy On
200 mmHg
Seal Audio
Seal Check™
Low
High
Leak Rate
Exit
125 mmHg Test
1. Press ‘Pressure’ and use the arrow keys to set the pressure to 125.
2. Press ‘Exit two (2) times.
Continuous
Therapy Off
0 mmHg
Pressure Exit
+
_
125 mmHG
3. On the Confirm screen, ensure that settings are Pressure: 125 mmHg;
Mode: Continuous; Intensity: Low.
4. Press ‘OK’.
5. Observe the digital manometer and the displayed pressure on the
ActiV.A.C.®Touch Screen.
6. The digital manometer should stabilize and indicate the pressure
displayed touch screen, ± 10 mmHg, within 60 seconds.
7. If the ActiV.A.C.®Therapy Unit passes all four (4) pressure change
procedures, remove the test fixture tubing and reinstall the Silicone
Canister Interface Seals on the unit.
8. Should the ActiV.A.C.®Therapy Unit fail any one of these pressure
changes by not displaying the correct pressure within 60 seconds,
contact KCI (see page 28).
9. With the Pressure Check complete, continue on to ‘Charge Battery and
Six Hour Verification Test’.
Continuous
Therapy Off
0 mmHg
Confirm
OK
Back
Pressure: 125 mmHg
Mode: Continuous
Intensity: Low

17
Charge Battery and Six Hour Unit Verification Test
The purpose of this procedure is to ensure the ActiV.A.C.® unit is fully functional and the battery is fully charged. This six
hour test is a minimum time. The process can be extended overnight or over a weekend if necessary.
1. Set the unit in a secure place where it can be left for a minimum of six hours. Charging can extend longer than six
hours if necessary.
2. Plug the power supply cord into the ActiV.A.C.®unit.
3. Plug the mains power cord into the external power supply ‘brick’.
4. Plug the mains power cord into a grounded AC mains wall socket.
5. Verify the Battery Charging Indicator LED is lit.
Battery charging in-process
Battery charging complete
An amber light means the battery is charging. A green light
means the battery is fully charged.
6. Ensure the unit is powered on. If necessary, hold down the Power On/
Off button for a minimum of two seconds to power the unit on.
7. Once the unit has completed its power on self test, verify the ‘plug’
icon is present on the lower left of the touch screen.
Continuous
Therapy Off
0mmHg
On/Off
Clinician Mode
6 Aug 2009
15:06
Utilities
Therapy
‘Plug’ Icon
Continuous
Therapy Off
0mmHg
On/Off
Clinician Mode
6 Aug 2009
15:06
Utilities
Therapy
‘Battery’ Icon
8. Unplug the power supply cord from the ActiV.A.C.®unit. Verify the
‘battery’ icon is present on the lower left of the touch screen.

18
Continuous
Therapy Off
0mmHg
On/Off
Clinician Mode
6 Aug 2009
15:06
Utilities
Therapy
9. Plug the power supply cord into the ActiV.A.C.®unit. Verify the ‘plug’
icon reappears and the Battery Charging Indicator LED is lit.
10. Grasp the power cord approximately 3” (75mm) from the end plugged
into the ActiV.A.C.®unit and ‘wiggle’ the cord. Observe both the
Battery Charging Indicator LED and the ‘plug’ icon on the touch screen.
Should either of these indicators flicker, repeat the wiggle test using a
different power supply cord.
11. Should the ActiV.A.C.®unit fail any of the above steps, contact KCI (see
page 28).
Continuous
Therapy Off
0 mmHg
Pressure Exit
+
_
125 mmHG
Continuous
Therapy Off
0 mmHg
Confirm
OK
Back
Pressure: 125 mmHg
Mode: Continuous
Intensity: Low
Clinician Mode
6 Aug 2009
15:06
12. Attach a regular ActiV.A.C.®300 mL canister that has been designated
a ‘test canister’ to the ActiV.A.C.®unit.
13. Ensure that a tubing cap is attached to the canister tubing.
14. With the ActiV.A.C.®unit still in Clinician Mode,
15. Press ‘Therapy’.
16. Press ‘Next’.
17. Press ‘Settings’.
18. Press ‘Pressure’ and if necessary use the arrow keys to set the pressure
to 125.
19. Press ‘Exit two times.
20. On the Confirm screen, ensure that settings are Pressure: 125 mmHg;
Mode: Continuous; Intensity: Low. If these settings are not correct,
press ‘Back’ to change the incorrect setting.
21. Press ‘OK’.
Other manuals for ActiV.A.C.
6
Table of contents
Other KCI Medical Equipment manuals

KCI
KCI ActiV.A.C. User manual

KCI
KCI FIRST STEP Plus User manual

KCI
KCI infoV.A.C Application guide

KCI
KCI ActiV.A.C. User manual

KCI
KCI ActiV.A.C. Application guide

KCI
KCI V.A.C.Via User manual

KCI
KCI V.A.C. ATS User manual

KCI
KCI V.A.C.Via User manual

KCI
KCI PREVENA PLUS Series User manual

KCI
KCI NuTech PlexiPulse Installation instructions
Popular Medical Equipment manuals by other brands

promotal
promotal iQuest user guide

DJO Global
DJO Global VenaPRo Use and maintenance manual

Medela
Medela Invia Liberty Series Quick Card

SUNMED
SUNMED Ethox INFU-SURG + INFU-SURG CLARITY Instructions for use

Ambu
Ambu aScope 5 Broncho 2.7/1.2 Instructions for use

natus
natus Otometrics Madsen Alpha OAE+ user manual