MEDIZS Smart LC-13 User manual

1
IMPORTANT NOTICE
This product may malfunction due to electromagnetic waves caused by portable personal telephone, radio-
controlled toys, etc. Please keep away any device that can influence this product.
The information in this manual is checked out carefully and is believed to be entirely accurate at the time of
publication. However, MEDIZS Inc. takes no responsibilities of the results caused by default, omission, or
misuse of it.
MEDIZS Inc. reserves the right to modify the product itself or specifications of the product without any prior
notice, and is not required to update this documentation to reflect such changes.
Operation Manual ver 1.01 / 2015.10
ⓒ2014 MEDIZS Inc.
94-10, Techno-2ro, Yuseong-gu, Daejeon,
305-509, Republic of Korea
All rights are reserved.
Under copyright laws, this manual may not be copied, in whole or in part, without the prior written consent of
MEDIZS Inc.

2
CONTENTS
1. Introduction ...........................................................................................................................4
1-1. Outline of Device ............................................................................................................................................... 4
1-2. Features................................................................................................................................................................ 4
2. Safety Information .................................................................................................................5
2-1. Symbol information marked on the instrument ........................................................................... 5
2-2. EU Countries...................................................................................................................................................... 5
2-3. Safety Instruction ........................................................................................................................................... 6
2-4. General Safety Information....................................................................................................................... 7
2-5. Notes for using the instrument.............................................................................................................. 8
3. Configurations .......................................................................................................................9
3-1. Main Body (Front view)............................................................................................................................... 9
3-2. Main Body (Side and Rear view)............................................................................................................ 9
3-3. Remote Controller........................................................................................................................................11
3-4. Wireless control by iOS Application ..................................................................................................13
4. Installation...........................................................................................................................15
4-1. Securing Main body with Wall mounting bracket.....................................................................15
4-2. Securing Main Body with Stand Floor..............................................................................................16
5. Operating Instructions..........................................................................................................18
5-1. Basic Operation..............................................................................................................................................18
5-2. Usage of Remote control.........................................................................................................................18
5-3. Setting Screen.................................................................................................................................................19
5-4. Chart program mode..................................................................................................................................23
5-5. How to control by iOS application.....................................................................................................24
5-6. Setting on Application...............................................................................................................................28

3
6. Chart type ...........................................................................................................................31
7. Maintenance and repair .......................................................................................................35
8. Service Information..............................................................................................................35
8-1. Information ......................................................................................................................................................35
8-2. Supply of spare parts.................................................................................................................................35
9. Specification........................................................................................................................36
10. Components list...................................................................................................................37

4
1. Introduction
1-1. Outline of Device
LC-13 is a visual acuity chart system that has been designed to present more than 90 various
charts, Animation, Color-Blindness chart, etc on LED TFT LCD and WINCE system. Operator can
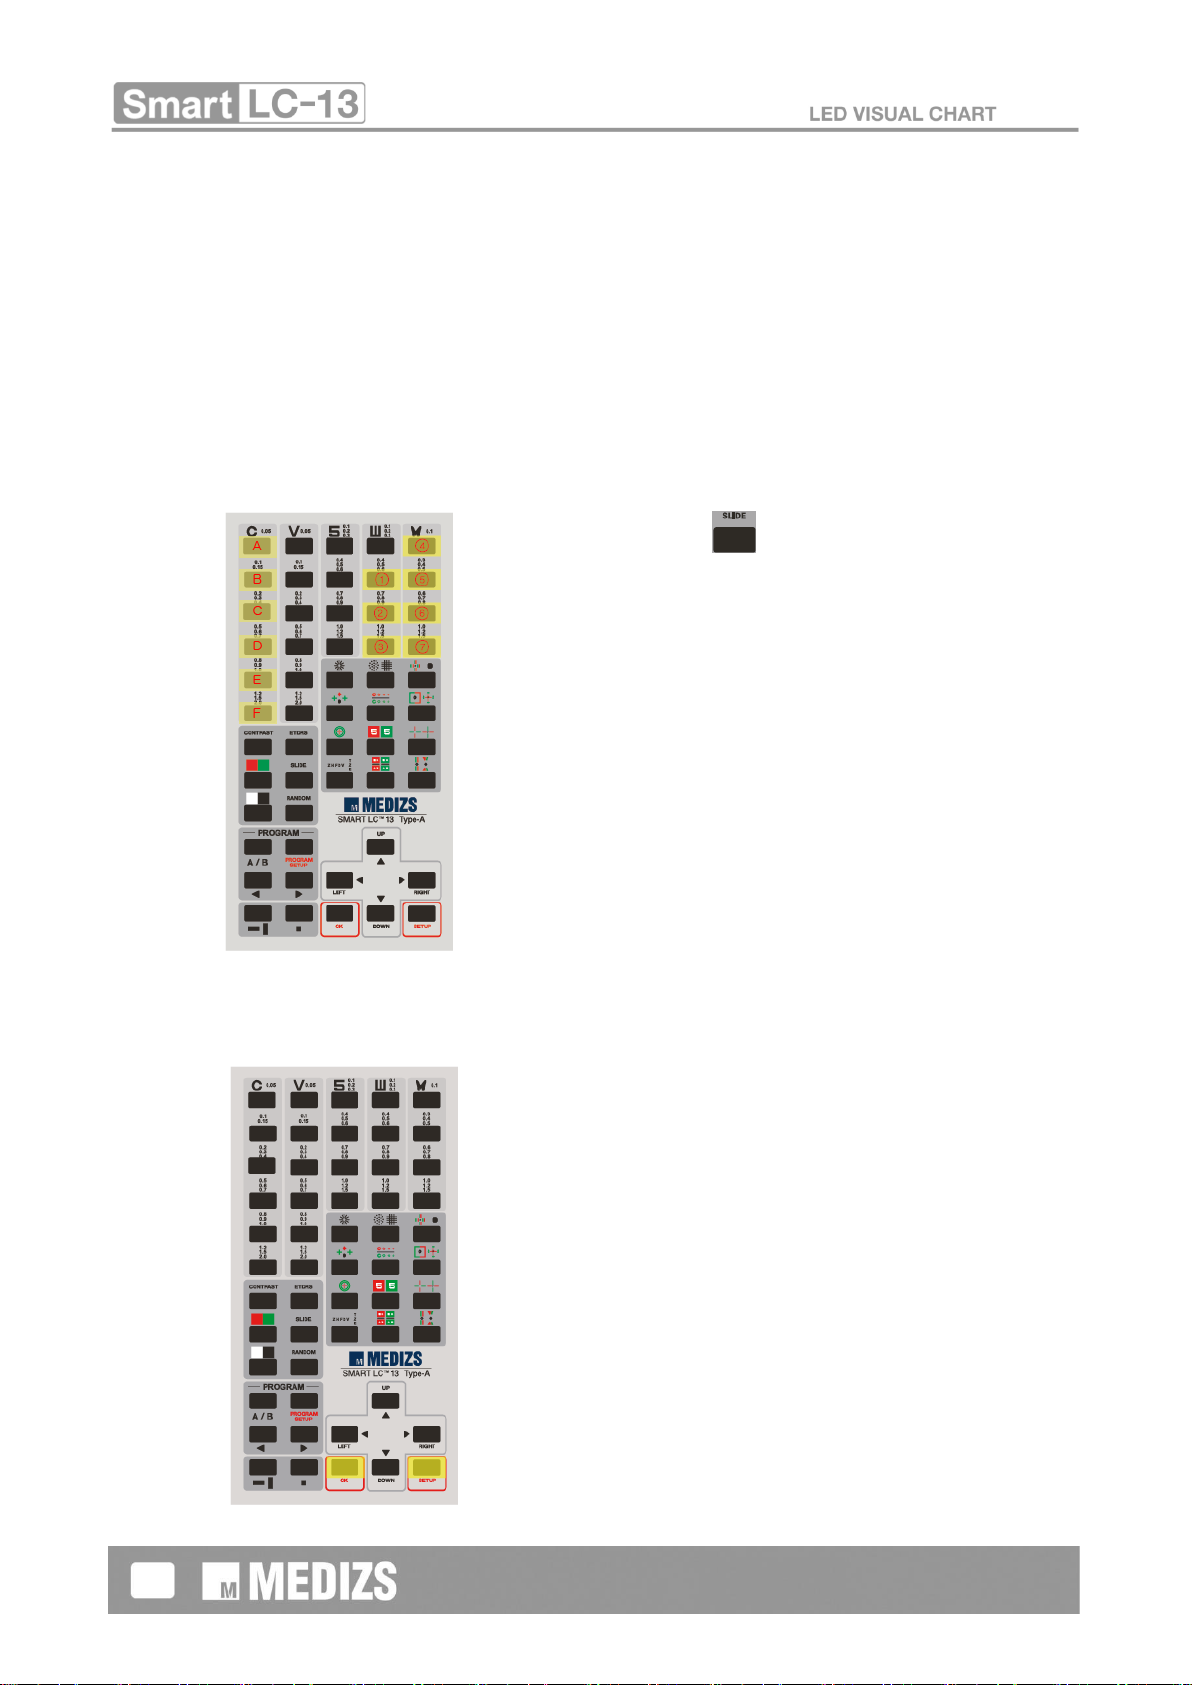
control the system and select the charts by an IR remote controller. In contrast to other chart
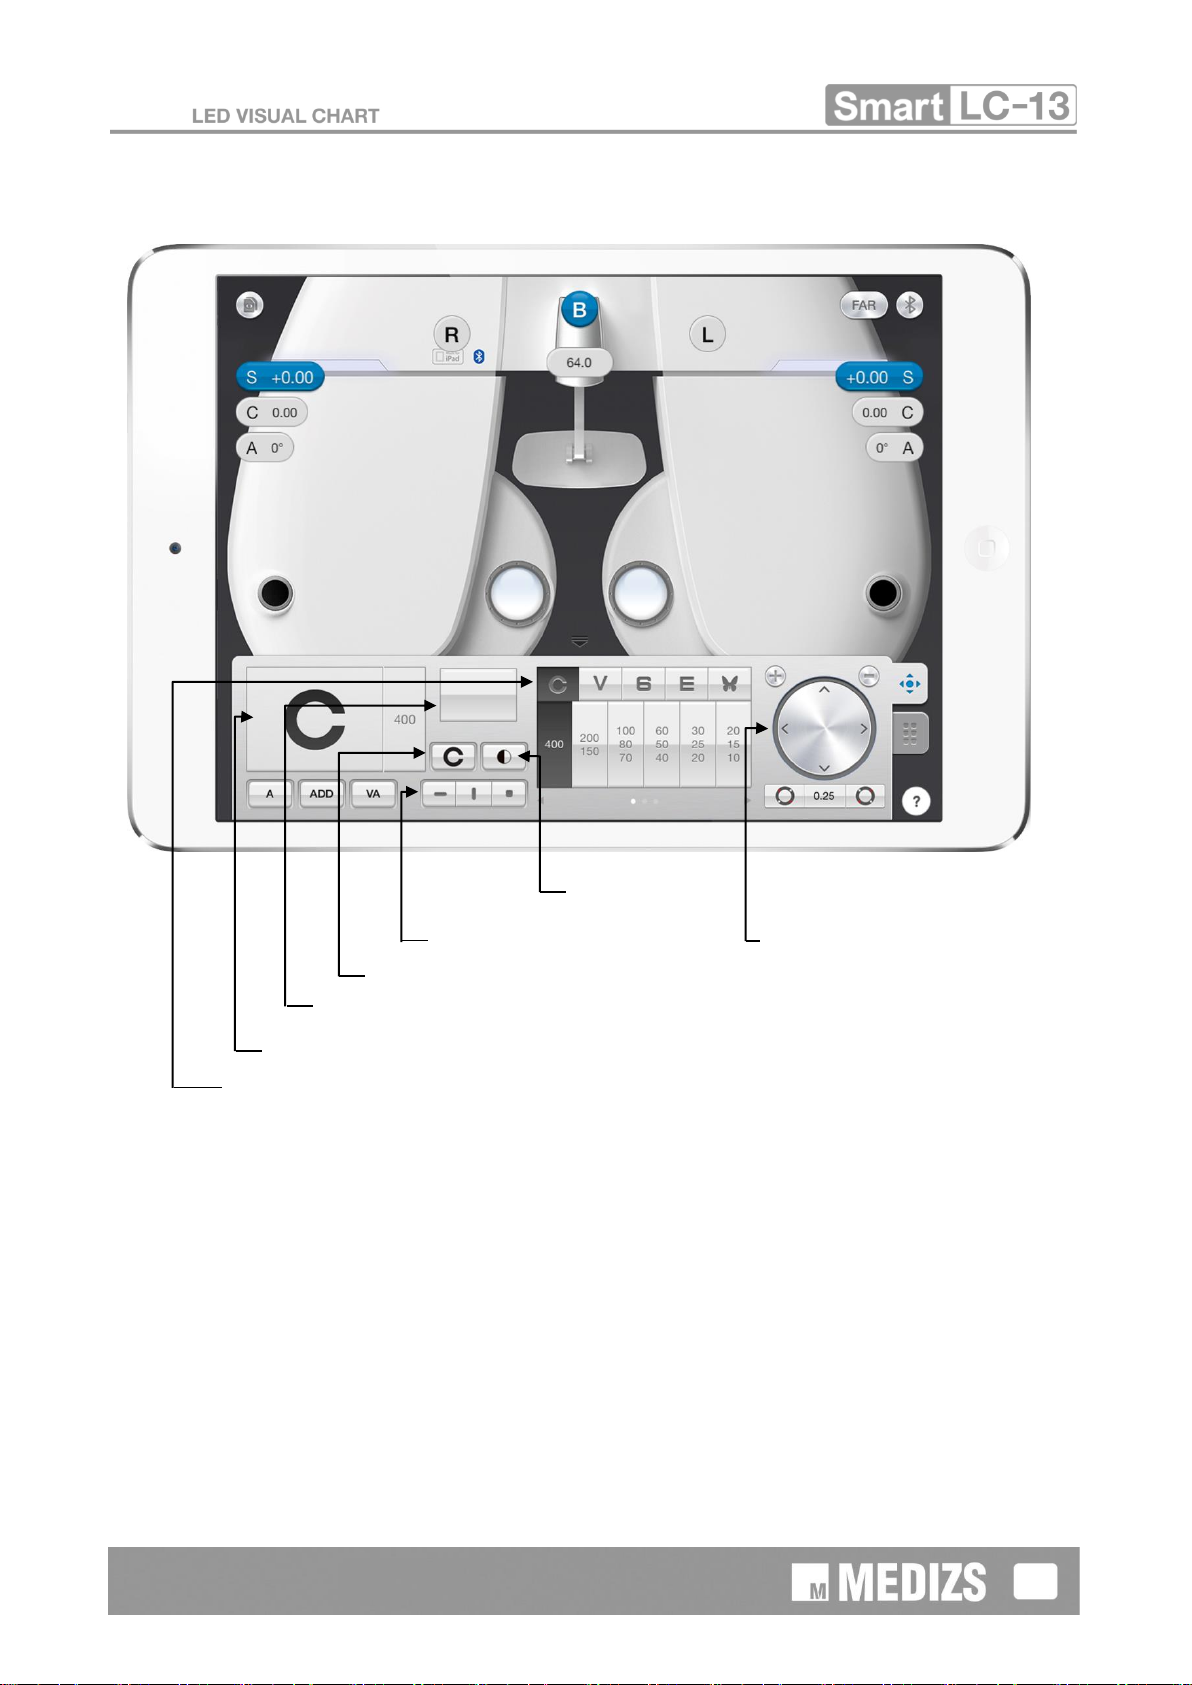
system, Smart LC-13 can be controlled by a tablet PC via Bluetooth communication, such as iPad
and iPad mini.
1-2. Features
∙LC-13 provides bright and clear screen using LED TFT LCD Panel and white uniform brightness
of 250cd/㎡.
∙High resolution LCD provides a wide range of testing option and sharper letter edge quality from
VA 0.05 to VA 2.0 without aliasing.
∙More than 90 various chats for LC-13 support all manners of tests for the visual acuity and visual
functions, such as Astigmatism, Color Blindness, Strabismus, Heterophoria, Stereopsis, Binocular
Balance, Binocular Fusion, Vision Suppression, Aniseikonia, etc.
∙In accordance with refraction circumstance, the testing distance can be set in the range of 1.5
to 8 m in increments of 0.25 m. Even in less than 1.5 m, refraction is available with Mirror function.
The chart size is reduced and enlarged as per the set refraction distance to keep the visual angle
same.
∙Using random adjustment function, the charts of a same visual acuity can be switched randomly.
This prevents erroneous test result from the subject memorizing the charts.
∙In accordance with refraction circumstance or patient’s eye condition, white and black function,
contrast function, or R/G adjustment function can be used.
∙For easy refraction, LC-13 provides standard programmed test having 16 steps and 5
customized program having maximum 20 steps can be programmed by the user.
∙High Resolution 19-inch LCD provides a wide range of testing option and sharper letter edge
quality from the biggest and the smallest.
∙Chart selection is performed by either IR Remote control or Table PC such as iPad or iPad mini.
Bluetooth Chip approved by Apple Inc. is mounted on the device for stable wireless communication.
∙Animation, Eye care information and Slide show may be displayed instead of Charts.
Customized Images and Video also can be displayed.

5
2. Safety Information
2-1. Symbol information marked on the instrument
The International Electro-technical Commission (IEC) has established a set of symbols for medical
electronic equipment which classify a connection or warn of any potential hazards. The classifications
and symbol are shown below.
Save these instructions.
Symbol
Description
Protective earth
Alternating Current Power
Caution
Power Off (separated with power source)
Power On (separated with power source)
Do not throw away the waste to inappropriate place
Manufacturer
Date of Manufacture
Authorized Representative in the European community
Consult operating instructions
2-2. EU Countries
The following mark, the name & address of the EU Representative shows compliance of the instrument
with Directive 93/42/EEC.
EU Representative:
CALMED INVEST Kft.
1182 Budapest, Fiume utca 3., Budapest, Hungary

6
2-3. Safety Instruction
If you see any warnings or cautions printed on the warning labels, follow the safety instructions in this
manual. Ignoring such cautions or warnings while handling the product may result in injury or accident. Be
sure to read and fully understand this manual before using this product. Keep this manual in easy-to-access
place.
WARNING
This indicates a potentially hazardous situation which could results in death
or serious injury to you or others.
CAUTION
This indicates hazardous situations which may result in minor injury to you or
others, or may result in machine damage.
CAUTION
Do not place the product on the floor in a multi- socket that is used to prevent
damage to the liquid inlet.
CAUTION
Single & Multi- specified socket , do not connect as well with additional multi-
socket or extension cord .
CAUTION
The maximum permissible value of the socket used for the product is less
than 100 VA is not allowed.
CAUTION
Such products and connections that are non- medical devices ( video
monitors , IT equipment, etc.) is connected directly to the wall socket with a
high current flows .
CAUTION
Multi-socket outlet must be a grounding -type type and must conform to IEC
60884-1.
NOTE
This is used to emphasize essential information. Be sure to read this
information to avoid incorrect operation.
WARNING
Only operate the instrument with the power supply indicated on the rating
plate. Otherwise, it may result in fire or electric shock.
WARNING
Be sure to turn OFF the power switch before connecting or disconnecting
the cables. Also, do not handle them with wet hands. Otherwise, you may
get an electric shock that may result in death or serious injury.
WARNING
Should any of the following occur, immediately turn OFF the power switch,
unplug the power cable from the AC outlet, and contact the dealer or the
agent who/where you purchase this instrument.
▪When there is smoke, strange odor or abnormal sound.

7
▪When liquid has been spilled into the instrument or a metal object has
entered through an opening.
▪When the product has been dropped or its housing damaged.
WARNING
Never disassemble or modify this instrument because it may result in fire or
electric shock. Also, since this instrument incorporates high-voltage parts and
other hazardous parts, touching them may cause death or serious injury.
WARNING
IT devices used to connect a USB A / B connector must comply with the
IEC60601-1 or IEC60950-1 standard.
WARNING
Devices to prevent damage to the electrical shock should be connected to the
power supply with the protective earth.
WARNING
Be sure to perform Wait until cool enough to heat the lamp replacement lamp.
Do not touch the lamp with bare hands ten thousand and one against. It can
cause severe burns.
WARNING
Do not Keep way the place where the temperatures very much.
2-4. General Safety Information
1. This instrument is used with accessories from MEDIZS Inc. If consumer would like to use the
accessories from other manufacturers, safety of accessories should be verified and identified by
manufacturer or by MEDIZS Inc.
2. Operation Manual should be kept at the place where the user can easily access.
3. When moving this instrument, please keep vibration or impact away from the equipment. It can bring
some damage inside or outside of the instrument. Please carefully handle the instrument.
4. In case there is smoke, strange odor or noise on working, disconnect the power supply and consult
the dealer.
5. To connect this instrument with other relevant equipment, consult with the dealer about the way to
make it.
6. Don’t use organic solution such as alcohol, thinner, benzene, etc. to clean the surface of this
instrument. It may damage the instrument.
7. Do not arbitrarily disassemble or modify this instrument.

8
8. If you are not using this instrument a long time, disconnect the power supply and protect the unit with
dust cover.
9. Do not pull power cable to disconnect from wall outlet.
Before every operation, visually check the equipment for exterior mechanical damage(s) and for
proper function.
2-5. Notes for using the instrument
1. Caution
①Do not disassemble the instrument. It may cause malfunction or electric shock.
②Do not hit or drop the instrument. The instrument may be damaged if it receives a vibration or
impact. It can bring some damage inside or outside of the instrument. Handle with care.
③Be careful not to enter any dust or metal material into interior of the device.
④Do not try to connect power cord in disconnection of spare parts. It can bring some damage on
the device.
2. Storage place
①Not humid place and not in the vicinity of water.
-Temperature : 10°C ~ 60°C
-Relative humidity : 30 - 75%
②Not dusty and not in the vicinity of filthy place with salt or sulfur.
③Not in the vicinity of vibration or shock.
④Not in the vicinity of direct sunlight.
3. Check list
①Check the test distance setting.
②Make sure the device is installed steady.
③Check the normal working of the device, if it is not working for a long time.
④If the screen is not clean, wipe it with soft and dry cloth carefully to avoid any scratch.

9
3. Configurations
3-1. Main Body (Front view)
3-2. Main Body (Side and Rear view)
③Power inlet
④FUSE
⑤Power switch
⑥USB A
⑦USB B
⑧SD Card Slot
①LCD Screen
②IR Receiver window

10
①LCD Screen:
- Charts are presented on this LCD
②IR Receiver window:
- Receives signals from the remote control.
③Power Inlet:
- Connector for power supply
④FUSE
⑤Power Switch:
- Power ON/OFF
⑥USB A:
- Connector with external equipment
⑦USB B:
- For Upgrade
⑧SD Card Slot:
- For uploading Image and Video

11
3-3. Remote Controller
①Transmitter
②Buttons for Optotype
③Buttons for Other Tests
④Direction Buttons
⑤SETUP button
⑥OK button
⑩CONTRAST button
⑪Red-Green Filter button
⑫Inversion button
⑬Program buttons
⑭Screen Mask
⑦ETDRS button
⑧SLIDE button
⑨RANDOM button

12
①Transmitter
- Sends a control signal to the main body
②Buttons for Optotype
- Used to select the type of the optotypes
③Buttons for other tests
- Used to select the charts for other tests
④Direction Buttons
- Move the position of the mask (Vertical
line/Horizontal line/Single letter)
- Move the direction on SETUP screen
⑤SETUP Button
- Enter SETUP screen to set beep sound, screen
brightness, refraction distance, and color density of
Red and Green filter.
⑥OK button
- Set the option on Setup screen
⑦ETDRS button
- Displays ETDRS charts
⑧SLIDE button
- Display the slide show such as eye care information,
color-blindness, eyeball exercise, animation, etc.
⑨RANDOM button
- Randomly rearranges letter order at the same VA
⑩CONTRAST button
- Selects the contrast of charts
⑪Red-Green filter button
- Applies the red-green filter to the VA charts
⑫Inverse button
- Pressing the button toggles between normal and
inversed black and white displays
⑬PROGRAM buttons
- Display the chart to be programmed by the user.
- : Pressing the button changes the program in
the order Program A →B →C →D →E →A …
- : Saves the displayed chart on selected
program
- : Displays the chart in order to be
programmed by the user
⑭Screen mask
- Select the mask (Vertical line/Horizontal line/Single
letter)

13
3-4. Wireless control by iOS Application
①Chart panel
②Chart Window
③PROGRAM screen
④Inverse button
⑤Screen mask
⑥CONTRAST
⑦Dial for the mask

14
①Chart panel
- Select the charts
- By swiping on the panel, you can move to next page for other test
②Chart window
- Displays the presented chart
③Program screen
- Displays the next chart on programmed test
④Inverse button
- Chart the chart between normal and inversed black-and-white displays
⑤Screen mask
- Selects the make
⑥Contrast button
- Appears the window for adjusting the contrast of charts
⑦Dial for the mask
- Moves the make on the VA chart

15
4. Installation
4-1. Securing Main body with Wall mounting bracket
Hang the LC-13 on a wall that is solid enough to support the weight (about 5kg) when using the
wall mounting bracket. Reinforce the wall as needed.
Before installation, check that the following items are one set of wall mounting bracket.
Wall adhesion panel
Monitor adhesion panel
Screw
Plastic Anchor
4 ØWasher
5 ØWasher
6 ØWasher
4*8mm
4*12mm
5*8mm
5*12mm
6*8mm
6*12mm
5*10mm

16
Follow the next step for installation.
Step 1.
Make four holes 50mm deep to fit holder of wall adhesion panel
by using diameter 8Ø. And then, put the B.Plastic anchor into
four wholes.
Step 2.
After put and fix the wall adhesion panel in wall, by inputting
A.screw
Step 3.
Select the washer (one of C,D,E) and screw (one of F,G,H,I,J,K)
which fits in back holder size of LCD . And then fix the monitor
adhesion panel.
Step 4.
Hang a monitor adhesion panel on step 3 on the wall adhesion
panel of step 2.
Step 5.
Insert two 5*10mm screws and fix the two panels.
4-2. Securing Main Body with Stand Floor
Please refer to ANNEX1.

17
Warning
To prevent damage or injury caused by the flipping or falling of the device, do not install the device on
a slanted surface.
To prevent electric shocks, do not touch the plug with wet hands.
Make sure to safely tighten the screws. If the screws are loose, the device might fall off and cause
damage or injury.
When installing the device on a wall, use a hanger provided by MEDIZS. Make sure the device is
installed on a firm wall that can withstand the weight of the device. (Do not install the device on a
plaster wall. The device might fall off and cause damage or injury.)
When moving the device on the floor, make sure that two people hold the ‘rack.’ A single person
handling the device could drop it and cause damage or injury. Improper installation of the device may
deteriorate the test.
Allow more than 5cm of space in the upper and lower area of the device, so that the ventilation opening
is not blocked.
Do not place any objects on the upper ventilation opening of the device. Overheating may cause
damage or injury.

18
5. Operating Instructions
5-1. Basic Operation
①Turn on the power switch of LC-13
②White light will be shown on the IR receiver window
③After loading, VA 0.05 Chart will be displayed.
5-2. Usage of Remote control
5-2-1. Slide Mode
A. Press SLIDE button. ( )
B. Select the followings
①Page for Eye care information
②Color Blindness
③Amsler grid
④Red / Green Images
⑤Eyeball exercise Type A –3 types
⑥Eyeball exercise Type B –3 types
A. Horizontal
B. Vertical
C. Left-diagonal
D. Right-diagonal
E. Center
F. Random
⑦Animation
5-2-2. SETUP
A. Press SETUP button
B. Move the Manu using direction buttons
C. Please OK button to apply setting option.
D. To return the chart screen, press SETUP button.

19
5-2-3. Change control channel
A. Press SETUP button during pressing Horizon/Vertical mask
button.
B. It changes in the order CH3-Ch4-Ch1-CH2.
5-2-4.
5-3. Setting Screen
On setting screen, there are 6 taps. You can control Chart type, Chart program, Vision Test, Display
and setting option and also check information for the device.
5-3-1. Chart Type
On chart type tap, you can select the chart type, distance indication function and Mirror function.

20
5-3-2. Chart Program
Customized program can be revised and deleted.
5-3-3. Vision Test
Select Clock Dial types, Phoria, and ETDRS.
Table of contents
Other MEDIZS Medical Equipment manuals
Popular Medical Equipment manuals by other brands

SonoSite
SonoSite V-UNIVERSAL STAND user guide

Braun
Braun Aesculap MACS II Instructions for use

CardiAid
CardiAid CT0207RS User Manual and Introduction to the Device

MHC Medical Products
MHC Medical Products SureLife Clearwave user manual

ulrich medical
ulrich medical Obelisc CS 2931 Series Assembly and disassembly instructions with special cleaning instructions

bon
bon E-20 SE instruction manual