Medonic M Series User manual

M-series Quick Reference Guide, art nr 1504436
16
Article no: 1504436_EN
Boule Medical AB, Domnarvsgatan 4, SE-163 53 Spånga, Sweden
Telephone: +46 8 744 77 00, Telefax: +46 8 744 77 20
M-series Quick Reference Guide, art nr 1504436
1
M-series Quick Reference Guide, art nr 1504436
2
Routine Procedures
A. Getting started each working day
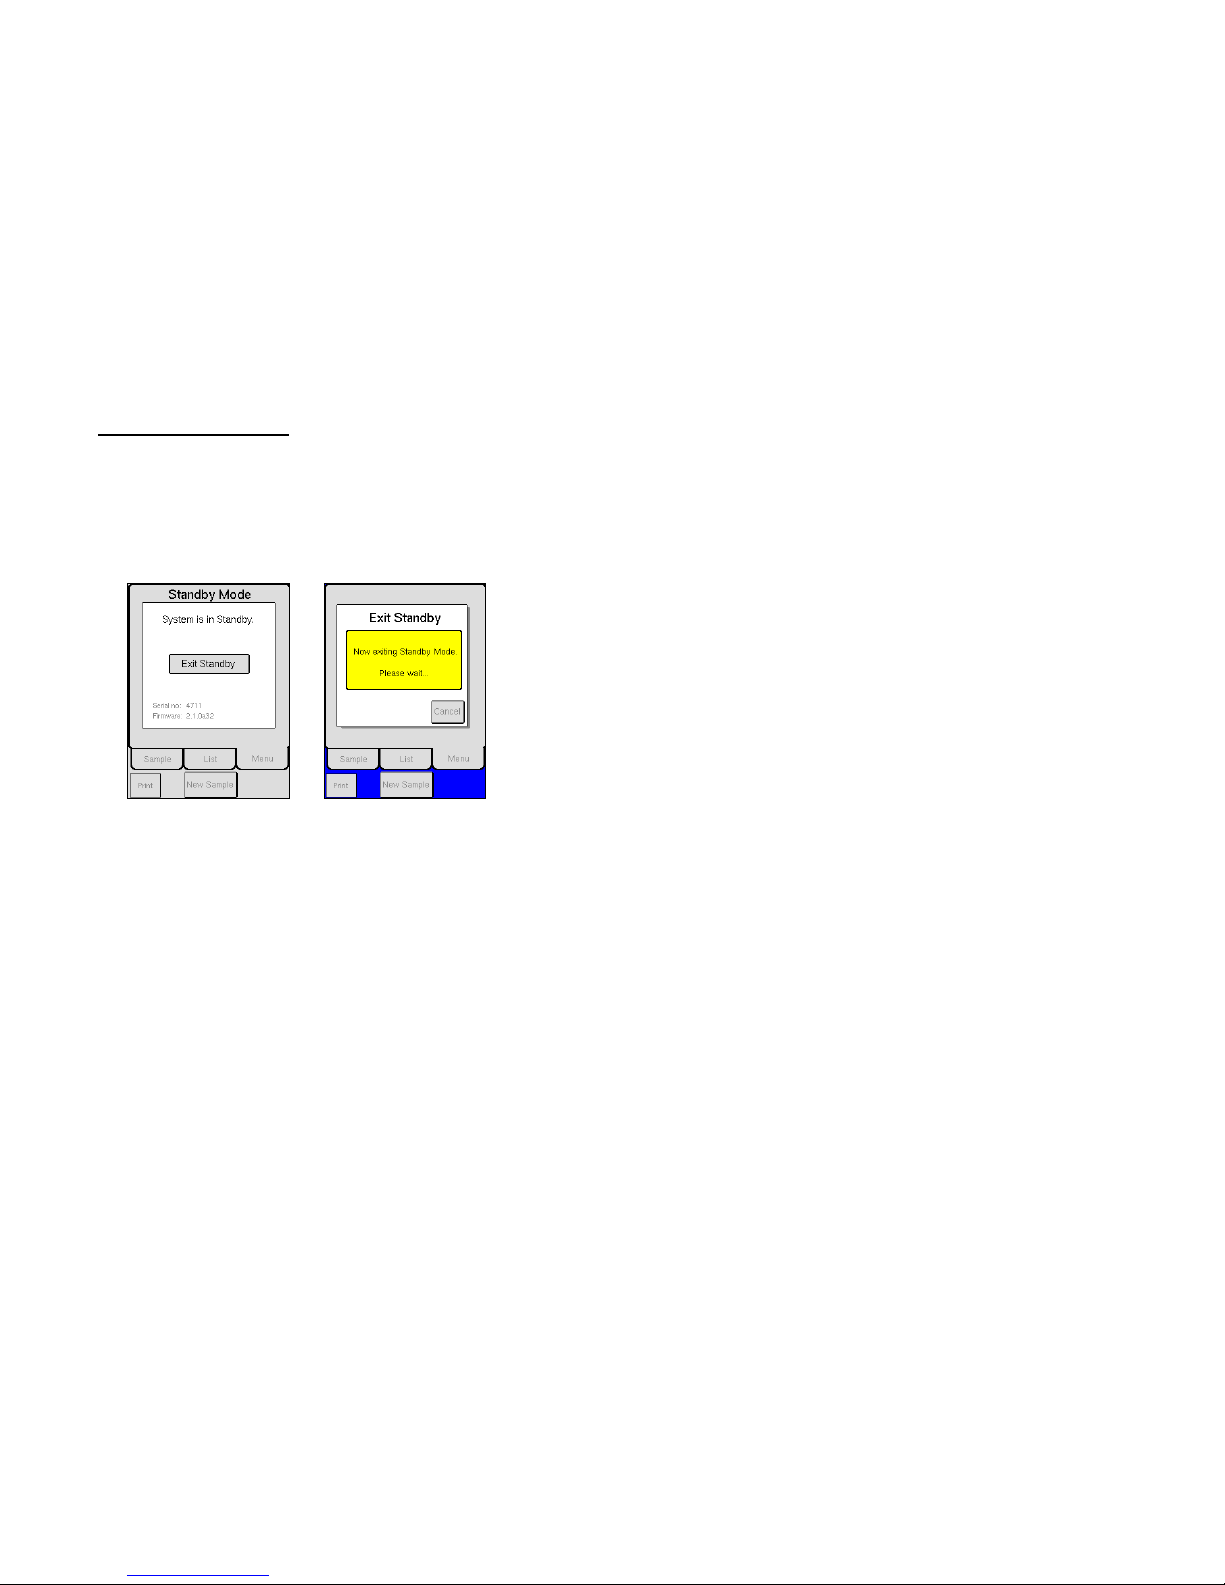
1. If the system is in Standby
Touch the screen to activate system.
On the initial screen display, select [EXIT STANDBY].
The instrument is now preparing itself for the day.
Continue to Section B for automated daily startup menus (set as
default) or Section C for manual daily performance verification.
M-series Quick Reference Guide, art nr 1504436
15

M-series Quick Reference Guide, art nr 1504436
14
Sample Collection and Handling
Correct sample processing is the most important step in obtaining
accurate results on an automated hematology system. Most
analytical errors are caused by improper sample collection and
handling. The following protocol assists the user in minimizing
microclot formation and obtaining the highest quality samples
possible.
1. Swift, atraumatic venipuncture
2. Human venous blood samples should be collected in an EDTA
K3 or EDTA K2 tube in sufficient quantity.
3. Immediately transfer blood into an EDTA collection tube, if not
using a vacutainer, by one of two methods:
A. Remove the needle from the syringe and remove the stopper
from the tube. Hold the top of the syringe over the tube and
gently dispense the blood into the tube. Fill the tube ½ - ¾
full then recap; OR
B. Change needle on the syringe to 18-19G, push needle
through the stopper and allow the vacuum to aspirate the
blood into the tube. Do not press on the syringe plunger!
This will cause hemolysis.
4. Immediately invert the tube 8 – 10 times to mix blood and
anticoagulant.
5. The sample should be mixed for 10-15 minutes before analysis.
It is recommended to use a mixer. A sample not correctly
handled may give erroneous results.
6. Note: Samples should be analyzed between 15 minutes and 6
hours for most accurate results.
The Medonic M-Series analyzer has the option to analyze capillary whole
blood samples with the use of the Micropipette Adapter (MPA). See
Section 5.7 in the User Manual for complete instructions on MPA usage.
M-series Quick Reference Guide, art nr 1504436
3
B. Daily Startup Sequence (Verifying Performance)
1. Perform a background check
Press Start plate to automatically initiate background check.
When background check passes, select [GO TO STEP 2].
2. Perform a quality control check
Scan in control tube barcode.
Follow the control preparation on the screen.
Introduce control sample and press Start plate.
Control results are displayed within one minute. Analyze next
control level. When control results are acceptable, the daily
startup sequence is complete.
Press [ANALYZE SAMPLES] to go to the main screen, and
follow instructions in Section D to analyze samples.
M-series Quick Reference Guide, art nr 1504436
4
C. Manual Daily Performance Verification
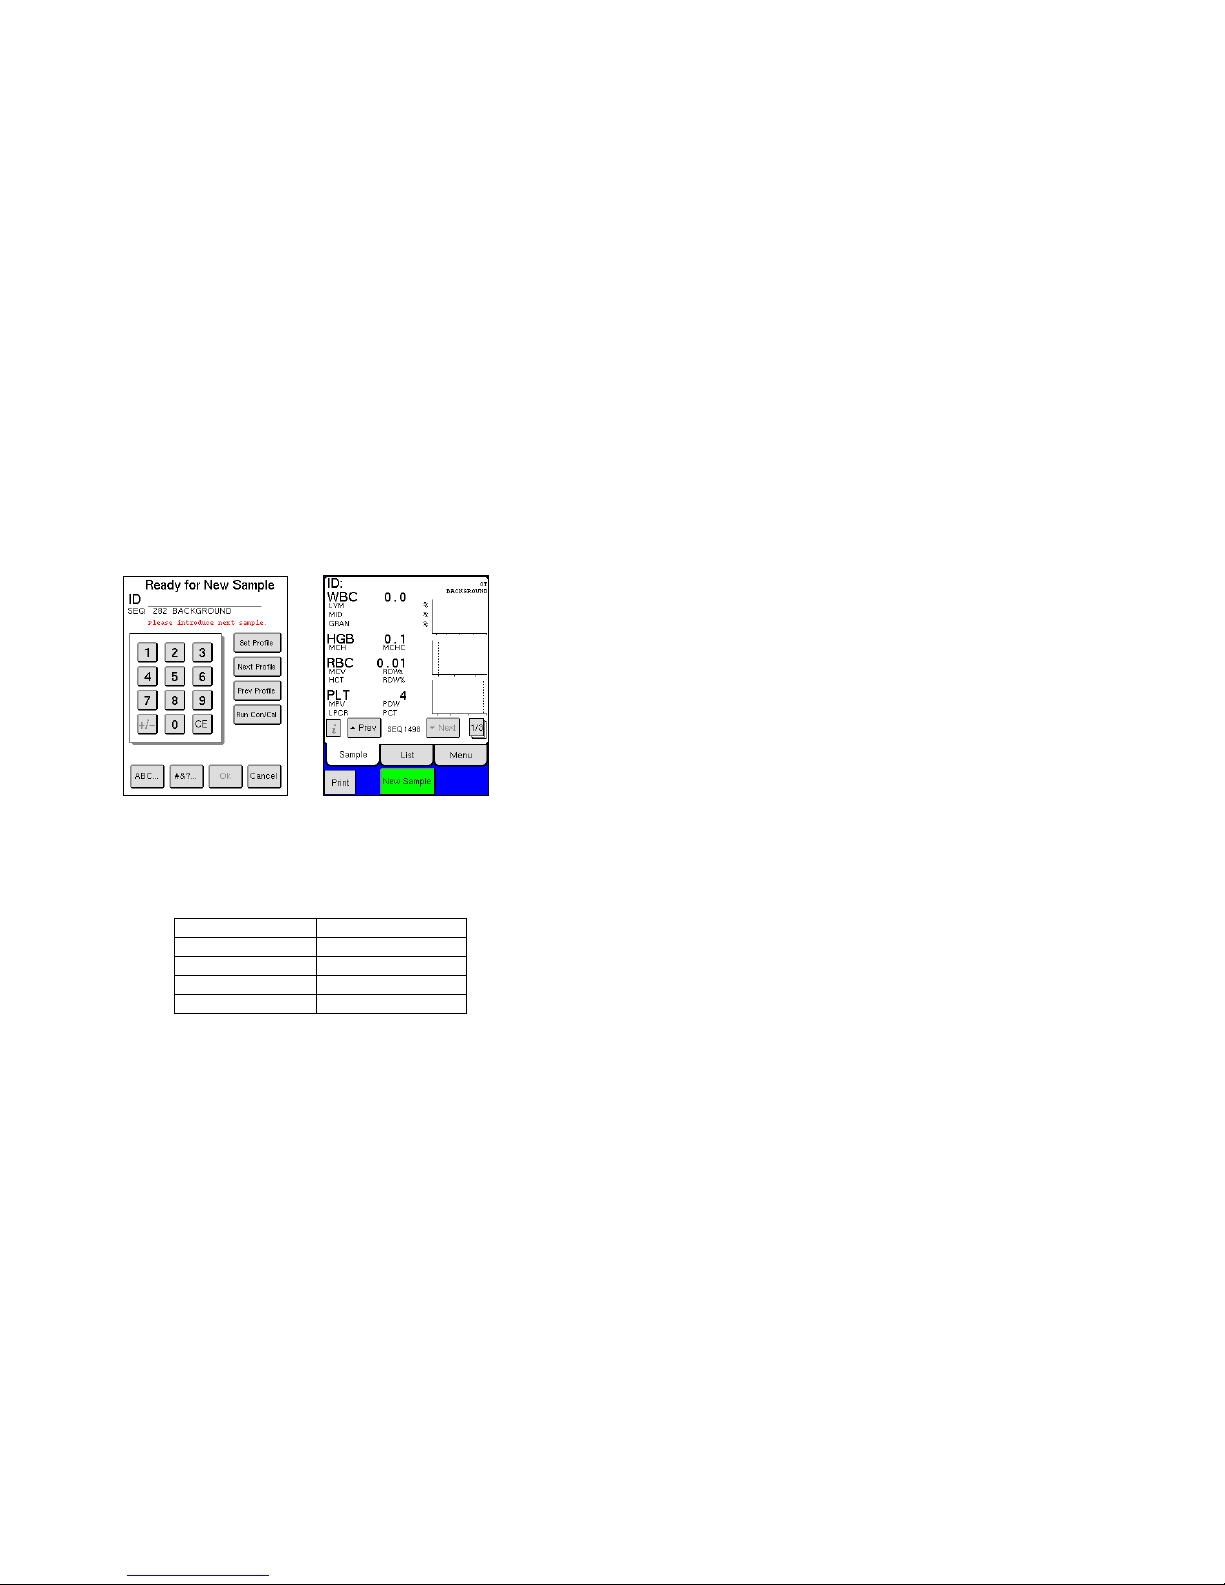
1. Perform a background check
It is recommended to run a background check at the beginning
of each day on the different analysis modes that will be used.
From the main screen press [NEW SAMPLE].
Press [NEXT PROFILE] or [PREV PROFILE] to scroll to
BACKGROUND.
Press the Start plate. The aspiration time is approximately 10
seconds. After ~ 10 seconds the analyzer will time out due to no
detection of blood, and continue its cycle.
Check that the background is not higher than the figures shown
below. Rerun sample if values are not acceptable.
Parameters Values accepted
RBC ≤ 0.01 (1012/ L)
WBC ≤ 0.2 (109/ L)
HGB ≤ 0.2 (g/ dL)
PLT ≤ 10 (109/ L)
2. Perform a quality control check
Good laboratory practice indicates that the performance of the
Medonic M-Series system is checked daily with certified blood
controls authorized by Boule. Comparing the analyzer results to
the known values on the Boule control assay sheet is a good
assurance that the system is functioning properly.
M-series Quick Reference Guide, art nr 1504436
13
D. Clot Prevention (cont’d)
From Main Menu press [ADVANCED], then
[MAINTENANCE] and then press [CLOT PREVENTION].
o For Cap Piercer: Place filled cleaner tube into cap piercer, same
as a normal sample analysis, close the door and continue to the
next step.
o For Sampling Device: Place filled cleaner tube into Position 1 on
wheel, lock wheel into place, and continue to the next step.
Hold the container (with cleaner) under the OT needle,
submerged in cleaner, press [OK] to confirm. Do not remove
container (with cleaner) for at least 5 seconds after aspiration
has stopped. (This is important as Cap Piercer and Sampling
Devices will take a few extra seconds to perform aspiration
before the OT begins to aspirate.)
The system will then perform the cleaning process for all
analysis modes simultaneously, and upon completion
instrument is ready for next analysis.
Perform a background check to verify all values are within
range. See Section C for more details.
E. Six (6) Month Cleaning Procedure
To increase the life of the analyzer’s internal tubing, the following
cleaning procedure is strongly recommended.
Press [ADVANCED] from Main menu, then press
[MAINTENANCE], and then press [CLEANING MENU] to
enter the Cleaning Menu.
Follow the instruction for the Boule Cleaning kit to clean the
analyzer. (Instructions for use are supplied with the Boule
Cleaning kit solutions).
The Boule Cleaning kit contains: Hypochlorite (2%),
Enzymatic Cleaner, and Detergent Cleaner
The Annual Cleaning procedure takes approximately one hour
and 15 minutes to complete.
F. LCD Display
When necessary, gently clean the display with a soft cloth, slightly
moistened with water and a mild soap. Dry carefully.
G. Maintenance
The maintenance should be performed every year or 20,000
samples by local distributor or authorized service technician.
M-series Quick Reference Guide, art nr 1504436
12
Maintenance Procedures
The majority of the analyzers cleaning procedures are automated to
keep the user maintenance to an absolute minimum.
A. Daily Cleaning
Clean the sample probe and probe rinse cup using a paper tissue
moistened with a 70% alcohol solution to remove any residual
blood and salt crystals.
B. Automatic Cleaning Mode
The Medonic M-Series system has been designed to clean internal
components on a daily basis. The system uses the diluent to flush
and clean all components that come into contact with blood when in
standby or power-off mode. This automatic daily cleaning increase
the longevity of the analyzer and decreases maintenance
procedures.
C. Monthly Cleaning Procedure
To insure the correct function of the instrument on a monthly basis,
the following cleaning procedure is strongly recommended. (This
procedure takes 10 minutes to complete.)
Fill a cup with 10 ml 2% hypochlorite (bleach), certified by Boule,
and one cup with 18 ml diluent. (Recommend use of dispense
function for obtaining diluent, see Section 5.5 in user manual.)
Aspirate the hypochlorite as a pre-diluted sample, and then repeat.
Run 2 blank samples by aspirating diluent as a pre-diluted sample.
Perform a background check, in pre-dilute mode, to verify all
values are within range. See Section C for more details.
D. Clot Prevention
This process will decrease the risk of debris material building up in
the instrument system. This should be performed at least once a
month or every 1000 samples. (This procedure will take 15 minutes
to complete.)
Fill a small container with 5 ml of Enzymatic Cleaner.
(Enzymatic Cleaner from the cleaning kit can be used.)
Note: If system has the optional Cap Piercer or Sampling
Device, fill a CLEAN standard 4.0 – 5.0 ml tube half full with
Enzymatic Cleaner.
M-series Quick Reference Guide, art nr 1504436
5
C. Manual Daily Performance Verification (cont’d)
Refer to the Blood Control Product Insert for complete
instructions for handling and use of blood control materials.
Never use an open vial longer than recommended by the
manufacturer or subject any vial to excessive heat or agitation.
Wipe the sample probe with a clean, dry tissue before each
control run. Not following this discipline might lead to
decreasing parameter values.
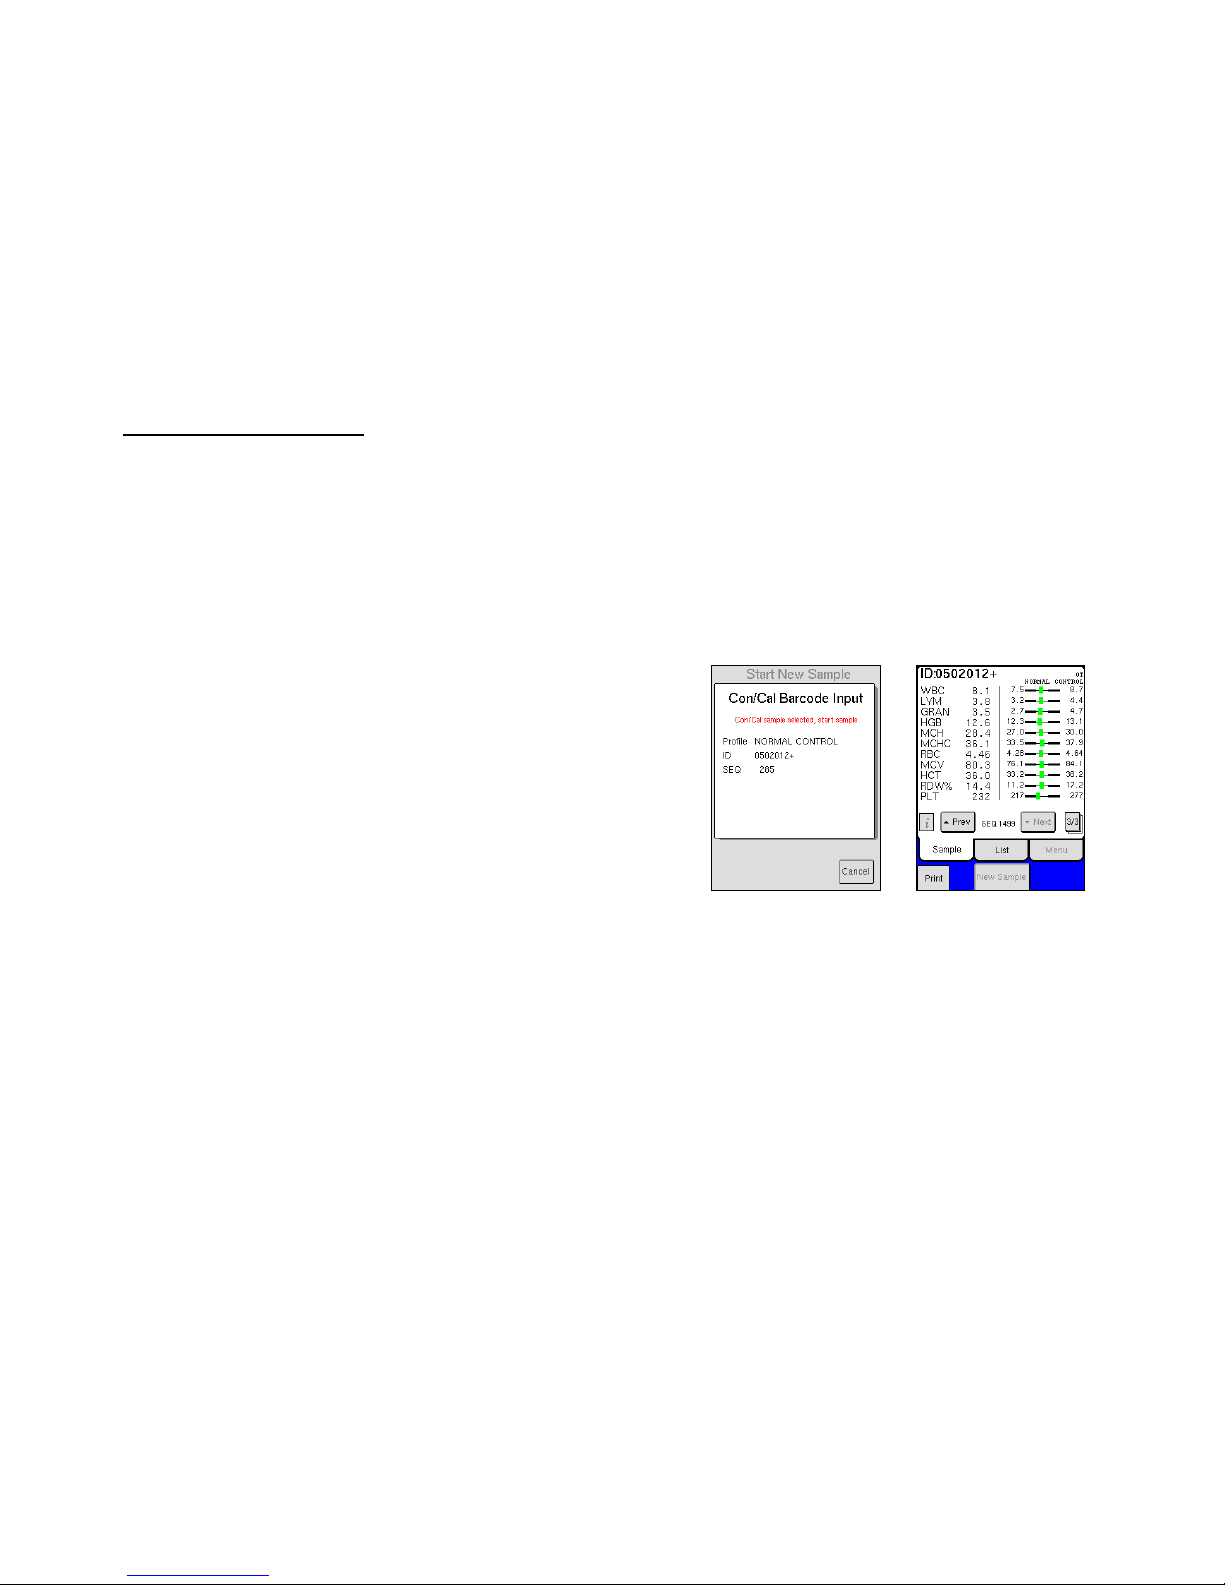
Choose either List, Sample, or Main Menu to begin control
analysis.
Using installed barcode reader, scan the Control ID from the
blood control vial label.
Aspirate the blood control and wait for the results. The Medonic
M-Series analyzer will identify this ID and match the results with
the previously defined assay values.
Compare Control results to assay values on results screen.
If control results are acceptable, the daily performance
verification is complete and system is now ready to accept patient
samples.
M-series Quick Reference Guide, art nr 1504436
6
D. Patient Sample Analysis
1. Sample analysis
Choose List, Sample, or Main menu to begin sample analysis.
Analyzer must be in one of these operation modes to aspirate.
From one of these screens press [NEW SAMPLE] or begin
sample aspiration, which automatically opens NEW SAMPLE
menu.
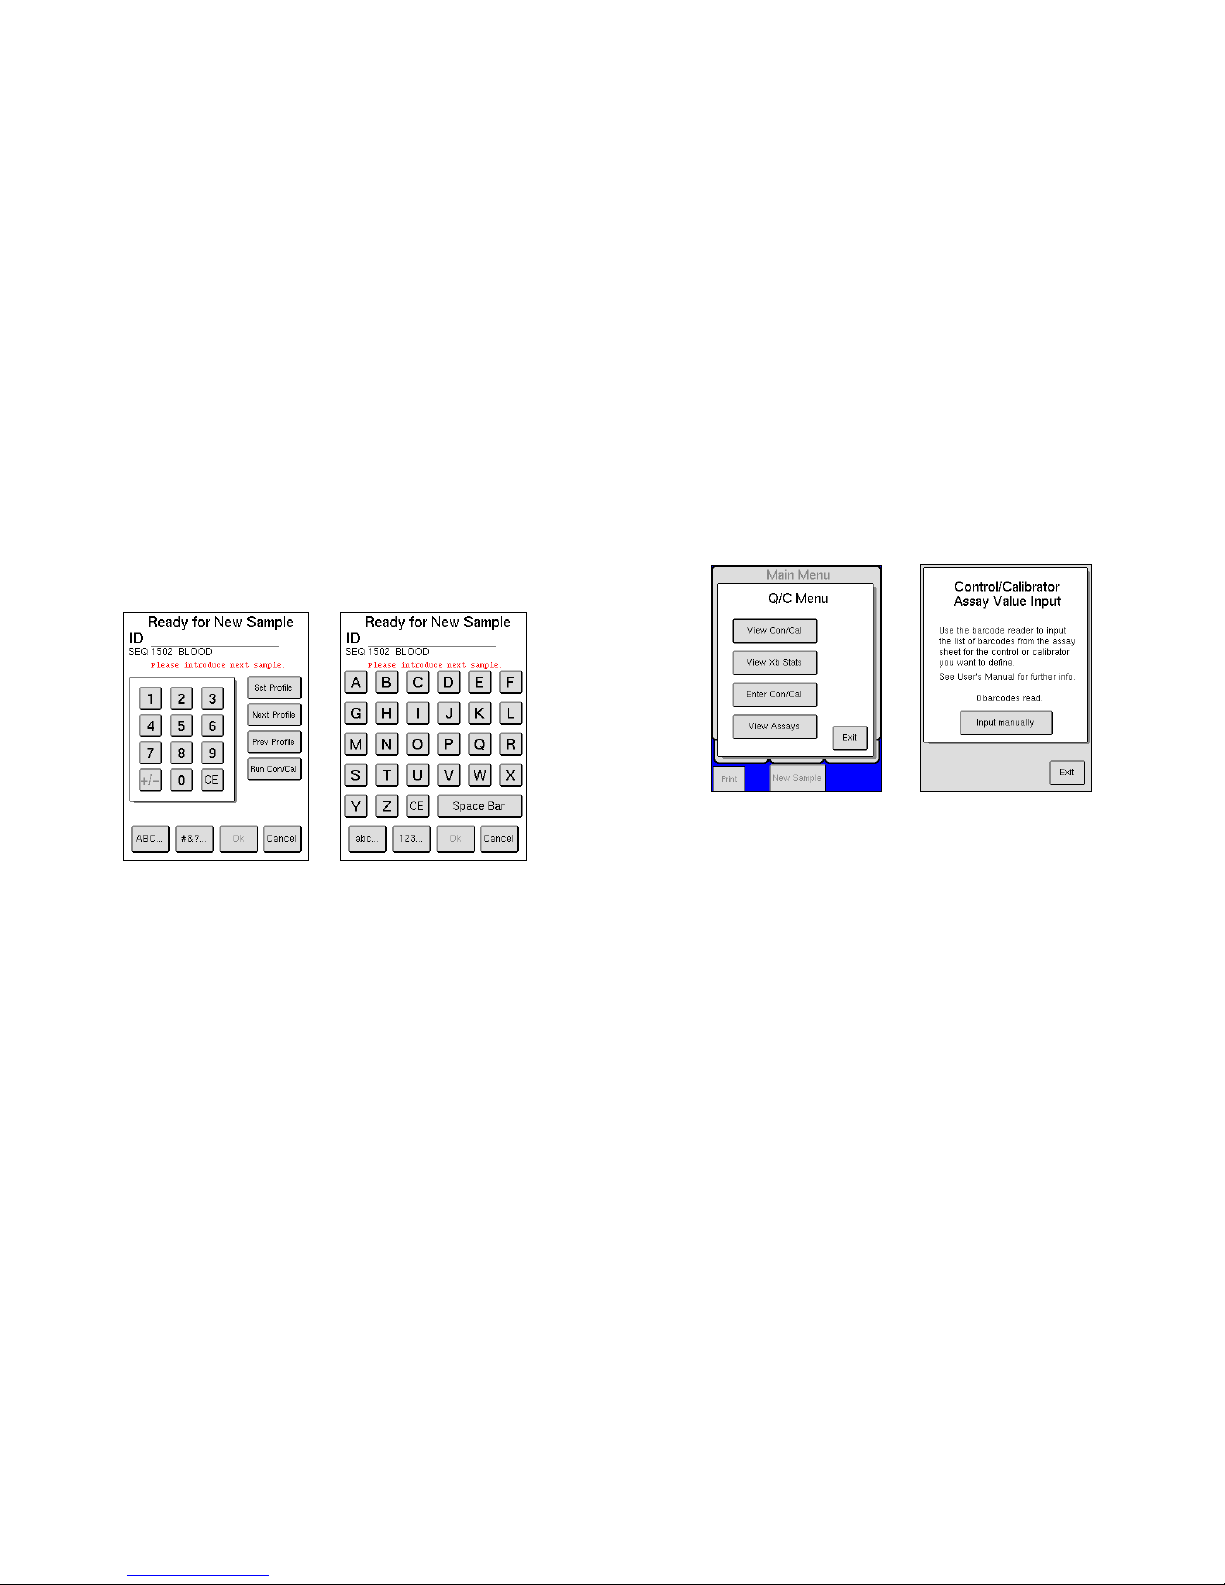
Press [NEXT PROFILE] or [PREV PROFILE] to scroll to
desired profile.
Press numerical keys to enter sample ID or scan in the ID
barcode from the sample tube. Touch the text key to move
between alpha and numeric ID screens.
Introduce the sample to the sample probe and press the Start
plate to analyze the sample.
Follow the instruction on the menu when to remove the sample
tube. The analyzer also gives an audible indication, a beep,
when the sample should be removed from the sample probe.
After 45 seconds results will be displayed on List or Sample
menu. For more information of results screens see next page.
When NEW SAMPLE button returns to green, operator can
begin analysis of next sample.
See Section 5 of User Manual for more details on pre-dilute,
Micro Pipette Adapter, Cap Piercing Device, and Sampling
device analysis modes.
M-series Quick Reference Guide, art nr 1504436
11
H. Activation of New lot of Blood Control
When a current lot of blood control is replaced by a new lot, follow
the instruction below to input Control Assay Values from the Assay
sheet.
Select [QC] from Main menu.
Select [ENTER CON/CAL].
Sequentially scan all the barcodes on the Control Assay Sheet.
Press and hold the ON button on the barcode reader each time a
barcode is scanned. More detailed instructions are present on
the assay sheet.
When all barcodes are entered a screen will display that the
control barcodes have been entered correctly and accepted.
Select [EXIT] to return to the Main menu.
This procedure enters all Control assay value ranges for the new lot
of control, which means the systems automatically recognizes the
control tube when it is scanned in and analyzed each day.
Note: Assay values for 12 different lots can be stored simultaneously.
When renewing the assay values, the previously scanned CON/CAL assay
values will be removed in a chronological order starting with the assay
values that were entered first.

M-series Quick Reference Guide, art nr 1504436
10
G. Changing Reagents
The interlocked reagent system displays indicator and warning
messages to alert the operator when reagents are running low and
need to be changed. When this occurs perform the following:
Select [MENU] to access the Main menu and then select
[REAGENT SETUP].
Select [ENTER NEW REAGENT].
Scan Barcode 1 and then Barcode 2 on the reagent container.
Press and hold the ON button on the barcode reader each time a
barcode is scanned.
When all barcodes are entered a screen will display that reagent
barcodes have been accepted.
Select [EXIT] to return to the Main menu.
Remove the cap and seal on the new reagent container.
Transfer the reagent level sensor from the used container to the
new reagent container.
The analyzer is now ready to resume operation or analyze
samples. No priming or fill cycle is necessary when putting on
a new reagent container, if indicator and warning messages are
followed.
M-series Quick Reference Guide, art nr 1504436
7
D. Patient Sample Analysis (cont’d)
2. Sample Result Screens
1. Select [PREVIOUS] or [NEXT] to navigate samples in list.
2. Select [SAMPLE] to display results of the sample highlighted
in the list below.
3. Select [SEARCH] to recall a list of results in memory based on
search criteria.
4. Select [MENU] to move the Main menu.
5. Select [NEW SAMPLE] to analyze more samples.
6. Select [ i ] to view system information messages.
7. Select [PRINT] to print sample results.
8. Select to see different views of the same sample.
9. Select [LIST] to move to the List menu.
1
2
3
4
5
6
7
8
9

M-series Quick Reference Guide, art nr 1504436
8
E. Locating Sample Records
To recall a sample or set of sample records, select [LIST] and
then [SEARCH] to go to search criteria.
A search may be performed using the following criteria:
Sample ID, Analysis sequence, Date range, and Profile type.
Select the criteria desired for the search and enter the criteria.
Select [EXIT] to return to the List menu and view the results of
the search.
From the List menu, it is possible to view results in Sample
menu, view statistics, print and/or send results.
To erase the results of a search and restore all samples to the
List and Sample menus, press [SELECT ALL] in the Select
Sample Criteria screen or analyze a new sample.
M-series Quick Reference Guide, art nr 1504436
9
F. End of workday system care
Clean the sample probe and probe rinse cup using a paper tissue
moistened with a 70% alcohol solution to remove any residual
blood and salt crystals.
The Medonic M-Series system has been designed to clean
internal components on a daily basis. After 12 hours of
inactivity, the system will initiate a self cleaning cycle using
diluent to flush and clean all components that come into contact
with blood. (The analyzer remains filled with the diluent until it
is powered back on or taken out of standby.) The analyzer can
be manually put into Standby by selecting [STANDBY] in the
Main menu.
Table of contents
Popular Medical Equipment manuals by other brands


Getinge
Getinge Arjohuntleigh Nimbus 3 Professional Instructions for use

Mettler Electronics
Mettler Electronics Sonicator 730 Maintenance manual

Pressalit Care
Pressalit Care R1100 Mounting instruction

Denas MS
Denas MS DENAS-T operating manual

bort medical
bort medical ActiveColor quick guide

AccuVein
AccuVein AV400 user manual


