MEGAMO KINETIC User manual
Las especificaciones técnicas están sujetas a cambio sin prefio aviso.
Las imágenes pueden no corresponder exactamente con las especificaciones técnicas.
Les spécifications techniques sont sujettes en échange sans un avis préalable.
Les images peuvent ne pas correspondre exactement aux spécifications techniques.
The technical specifications are subject to change without notice.
The images may not correspond exactly with the technical specifications.
Mosquerola, 61 - 63
17180 VILABLAREIX (Girona) Spain
Tel. (+34) 972 239 900
www.megamo.com
MANUAL DE USUARIO
MANUEL D’UTILISATEUR
USER’S MANUAL

WARRANTY
8.
WARRANTY, customer data to be sent to the factory via email by the partner.
VERY IMPORTANT !
data with his stamp so that the guarantee is valid.
The technical specifications are subject to change without prior notice.
Conforming to European Safety Standards .EN-15194 TNT Cycles, S.L.
17180 - Vilablareix
Girona (ESPAÑA)
NIF: B-17267758
Made by:
Model ______: ___________________ _____________________________________________________________
Frame num. _____: _______________ ____________________________________________________________
Battery num. _ _____: ____________ _________ ____________________________________________________
Name and surname ____: ________________ ___________________________________________________
E-Mail: _______________________________ _ _________________________________________________ _____
Date of purchase ____: _____________________ _______________________________________________
Phone ___ _____: _______________________ __________ _____________________________________________
Partner stamp:
ENG 43
ESPAÑOL .................................................................................................... 3
FRANÇAISE ................................................................................................. 17
ENGLISH ..................................................................................................... 31
GENERAL USE AND MAINTENANCE TIPS
7.
USE TIPS
This electric bicycle is designed to transport only one person in each use. Condition your
bicycle if you want to transport luggage and try not to exceed the maximum load for which it
was designed (120 kg).
The failure to respect safety advice or activities that go beyond its intended use, such as going
down steps, performing stunts or making improper repairs, will exempt both the manufacturer
and the distributor from all liability.
It is recommended to always wear the helmet on. In case of driving at night, be sure to connect
the lights, and if possible, also use a reflective band or vest.
Remember to periodically clean your bicycle. To do this, avoid the use of pressurized water, as
electronic components can get wet, which can cause malfunction and even personal injuries.
Carefully clean painted surfaces, plastic parts and electronic components. Never use abrasive
products such as seawater, saltpetre, etc.
BEFORE EACH USE
Before each use, you should check that the brakes are properly fastened and working properly.
The handlebar and the seatpost must be in the correct position and firmly fixed.
The wheels must have enough pressure and all the nuts and bolts must be tight. The battery
must have enough charge for the use that we are going to give it.
PERIODIC CONTROLS (EVERY 1-2 MONTHS)
These controls guarantee the perfect condition of the bicycle and optimal functioning.
1. .
2. Check that the front and rear brakes are fastened to the chassis and brake effectively.
3. Check the tire pressure and the depth of the tread.
4. Check that the tires are properly secured and have no loose or broken radio.
5. Check that the handlebar and the seat post are firmly inserted and firmly tightened.
6. Check that the cables are sufficiently greased and that they have no obstacles in their
travel.
7. Check that the batteries are sufficiently charged.
Check that the frame and fork welds are in good condition and show no signs of corrosion
ENG42 ESP 3
ÍNDICE
1. INTRODUCCIÓN ....................................................................................................................
2. DESCRIPCIÓN .......................................................................................................................
3. INFORMACIÓN TÉCNICA ......................................................................................................
4. COMPONENTES ELECTRÓNICOS ........................................................................................
5. MANTENIMIENTO DE LA BATERÍA ......................................................................................
6. DISPLAY ................................................................................................................................
6.1. INTRODUCCIÓN .......................................................................................................
6.1.1. Encendido y apagado ...................................................................................
6.2. CONFIGURACIÓN .....................................................................................................
6.2.1. Inicio de la configuración ...........................................................................
6.2.2. SET0: Establecer el modo de conducción .................................................
6.2.3. SET1: Restablecer TRIP1 ...........................................................................
6.2.4. SET2: Establecer el límite de velocidad máxima ......................................
6.2.5. SET3: Establecer el diámetro de rueda ......................................................
6.2.6. SET4: Establecer la unidad de velocidad ...................................................
6.3. OPERACIONES GENERALES ....................................................................................
6.3.1. Pantalla principal ........................................................................................
6.3.2. Seleeción del modo de asistencia PEDELEC .............................................
6.3.3. Iluminación de la pantalla ..........................................................................
6.3.4. Seleeción del modo de asistencia 6Km/h (modo «caminar») ..................
6.4. INFORMACIÓN EN PANTALLA ................................................................................
6.4.1. ODO .............................................................................................................
6.4.2. TRIP1 ...........................................................................................................
6.4.3. TRIP2 ...........................................................................................................
6.4.4. Indicador de tiempo de viaje ......................................................................
6.4.5. Capacidad de la batería ..............................................................................
6.4. INFORMACIÓN DE ERROR ......................................................................................
7. CONSEJOS DE USO Y MANTENIMIENTO GENERAL ...........................................................
8. GARANTÍA .............................................................................................................................
4
5
6
7
8
9
9
10
10
10
10
10
10
10
11
12
12
12
12
12
12
13
14
11
11
11
11
13
15

INTRODUCCIÓN
1.
Felicidades por la compra de su bicicleta eléctrica.
Esperamos que disfrute al máximo de ella y la incorpore como medio de transporte para sus
desplazamientos diarios. Al decidirse por usar una bicicleta eléctrica está ayudando a salva-
guardar nuestro medio ambiente, ya que está ahorrando en los recursos más preciados de
nuestro planeta y reduciendo la contaminación con carbono.
Las bicicletas eléctricas Megamo han sido diseñadas consiguiendo aunar en un producto
único los mejores componentes del mercado a un precio competitivo, aportándole la máxima
comodidad y seguridad en su uso.
Este manual contiene consejos prácticos que le ayudarán a disfrutar más aún de su bicicleta.
Léalo con atención antes de usar la bicicleta por primera vez.
Sobre la garantía.
1. Este documento se emite como garantía de calidad de la E-bike indicada y da derecho a la
reparación de cualquier posible defecto de origen, incluidas las piezas de recambio y mano
de obra durante un período de 2 años y 5 años para el cuadro a partir de la fecha de adqui-
sición.
2. La presente garantía se rige bajo la normativa Española, REAL DECRETO LEGISLATIVO
1/2007, de 16 de noviembre, por el que se aprueba el texto refundido de la Ley General para
la Defensa de los consumidores, usuarios y otras leyes complementarias.
3. La garantía no incluye las deficiencias que se produzcan a consecuencia del mal uso, negli-
gencia, golpes, manipulaciones indebidas y cualquier causa de fuerza mayor o ajena a su
utilización normal y correcta.
4. La garantía no cubre posibles desperfectos de pintura, cromados o acabados generales que
se produzcan por exposición o contacto con agentes nocivos como agua, agua marina,
salitre, sosas, ...
5. Quedan excluidas de esta garantía las operaciones de instalación, ajuste, puesta a punto,
limpieza, etc. Así como la reposición de piezas que por su propia naturaleza están sometidas
a desgaste por el uso y/o funcionamiento normal, tales como cámaras, cubiertas, frenos, etc.
6. Esta garantía carecerá de valor si no está debidamente cumplimentada y sellada. Así como
si se altera, modifica o sustituye alguno de sus datos.
La bicicleta ha sido diseñada y fabricada de acuerdo a la normativa europea EN 15194
Importante.
Es muy importante realizar revisiones periódicas del estado mecánico de la bicicleta. Un man-
tenimiento erróneo invalida su garantía. Asegura un mantenimiento frecuente de tu bicicleta
que garantice un perfecto funcionamiento y estado de la misma. Realiza este mantenimiento
en servicios profesionales recomendados por Megamo y/o en el lugar donde adquiriste tu
bicicleta.
ESP4
6.4.5.
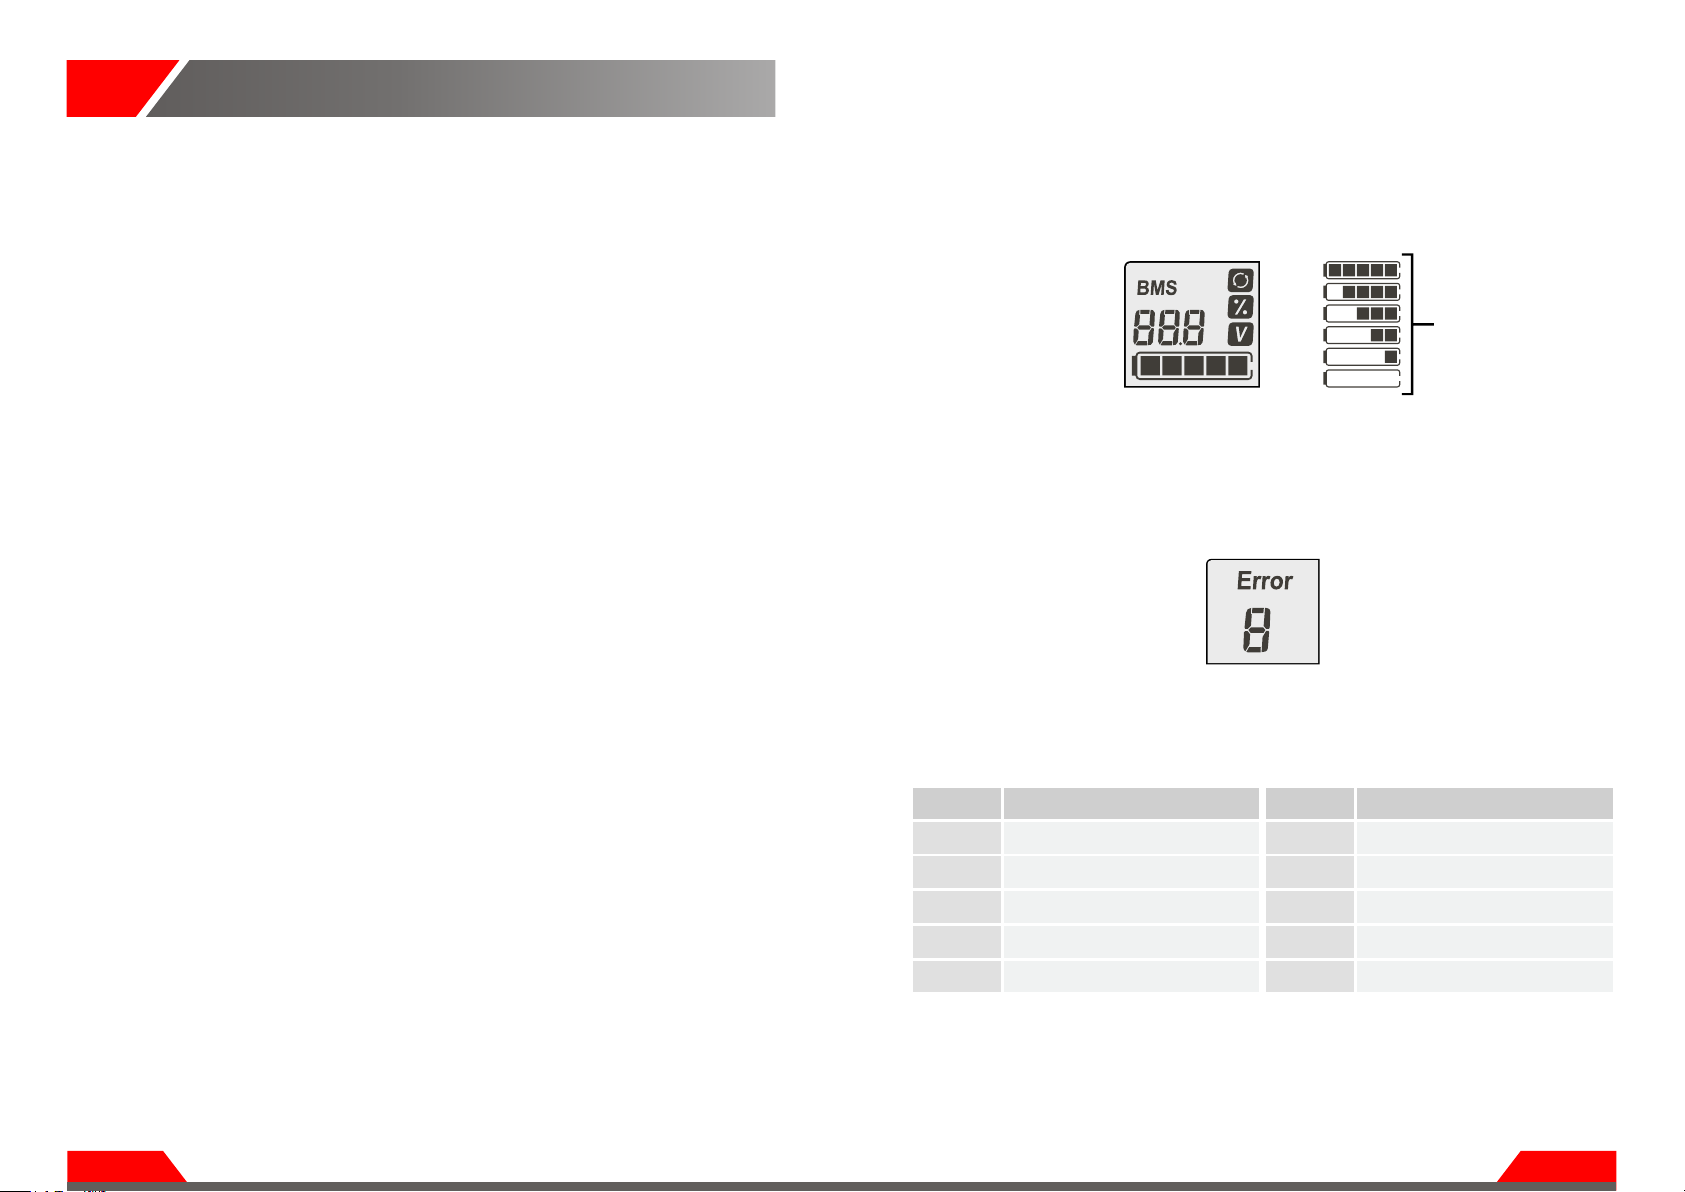
6.5. ERROR INFORMATION
Battery capacity.
When the battery capacity is high, the five segments of the level indicator will be on. As the
battery loses charge, the five segments of the indicator will go off successively, until the low
charge level is indicated. This status can be recognized by visualizing the blinking of the
indicator, and informs that the battery should be recharged immediately.
If there is a problem with the electronic control system, the screen will flash and show the error
code automatically.
Error code and its corresponding definition:
Battery level indicator Battery charge levels
Code Error definition
5Brake error.
6Low voltage.
7Engine stop .
8Error in the communication controller.
9Screen communication reception error.
Code Error definition
0Normal.
1General error or damaged MOS.
2Throttle error .
3Motor without phase position.
4Hall Error.
ENG 41

6.3.4. Selection of the assistance mode 6 km/h («walking» mode).
Press and hold DOWN constantly to enter the "walk" assistance mode. The bicycle will
maintain a constant speed of 6 km/h.
The moment you stop pressing DOWN , the "walk" assistance mode will stop and will go to
normal mode.
6.4. INFORMATION ON SCREEN
With the display in ON mode, press the SET button to change the display information
between ODO (total distance), TRIP1 (accumulated distance), TRIP2 (partial distance) and
TIME (time travel).
6.4.1. ODO (cumulative total distance).
ODO records the total distance traveled. The accumulated value can not be deleted.
6.4.2. TRIP1 (accumulated distance).
TRIP1 shows the total distance accumulated. The distance will accumulate until it is manually
restarted in the configuration interface SET1.
6.4.3. TRIP2 (partial distance).
TRIP2 shows the last distance traveled for 30 seconds after the screen is turned on. After this
period, restart automatically to start from 0.
6.4.4. Travel time indicator.
The travel time parameter is reset automatically after shutdown.
Mode indicator 6Km/h
ENG40
Travel time indicator
ESP 5
DESCRIPCIÓN - 27.5" / 29" KINETIC
2.
1. BATERÍA.
2. CONTROLADOR ELECTRÓNICO.
3. BLOQUEADOR BATERÍA (LADO IZQUIERDO).
4. MOTOR.
5. SENSOR ELECTRÓNICO (P.A.S.)
6. DISPLAY.
7. CARGA / BOTÓN ENCENDIDO Y APAGADO BATERIA.
6
7
1
5
2
3
4

INFORMACIÓN TÉCNICA
3.
Nos reservamos el derecho a modificar la información de este manual sin previo aviso, incluido las especificaciones,
modelos, colores y materiales.
Cuadro ALLOY 6061, FULL INTEGRATTED BATTERY, INTERNAL CABLE ROUTING
Horquilla SR SUNTOUR XCM HLO 100MM TRAVEL
Manetas cambio SHIMANO ALTUS 310
Manetas frenos SHIMANO HYDRAULIC 180 mm
Cambio trasero SHIMANO ALTUS M310 8s
Desviador SHIMANO ALTUS M310 3s
Bielas SHIMANO 361 42x32x22 T
Ruedas MEGAMO DOBLE WALL ALLOY DISC
Piñones SHIMANO HG31 11-34T
Motor BRUSHLESS 36V - 250W, WATER PROOF CABLE CONNECTOR
Batería LITHIUM , SAMSUNG CELLS BATTERIES, 36V - 11,6 Ah - 418 Wh
Autonomía 40 - 60 Km
Tiempo de carga 4 - 6 Horas
Velocidad máx. 25 Km/h
Display LED DISPLAY
ESP6
6.2.6. SET4: Set the speed unit.
Use the UP and DOWN buttons to set the desired parameter between miles per hour
(MPH) or kilometers per hour (KM/H).
Press and hold the SET button for 1 second to save and exit.
6.3. GENERAL OPERATIONS
6.3.1. Main screen.
The discharge current of the controller is represented in real time by means of 6 segments.
Each segment corresponds to 2A. The total of the 6 segments is equivalent to 12A.
6.3.2. PEDELEC assistance mode selection (PAS).
Press UP or DOWN to select between different assistance modes. The output power
range goes from level 1 to level 6. The default value is 1.
6.3.3. Screen lighting.
With the display on, press the OF/OFF button to activate the display illumination.
If the electric bicycle has a headlight, the controller will turn the headlight on and off at the
same time that the screen illumination is activated or deactivated.
Controller download segments
Screen illumination indicator
ENG 39
Pedelec assistance mode indicator
(PAS)

COMPONENTES ELECTRÓNICOS
4.
MOTOR, TIPO BRUSHLESS
Se encarga de transformar la energía eléctrica en energía mecánica.
El funcionamiento es siempre a través del pedaleo continuado, la ayuda obtenida va en función
del nivel de ayuda utilizada. Conjuntamente con el controlador electrónico, se encarga de des-
conectar el motor cuando éste alcanza los 25 Km/h.
CONTROLADOR ELECTRÓNICO
Dispositivo electrónico que gestiona el funcionamiento de los componentes electrónicos.
Principalmente del motor.
BATERÍA
Acumula la energía eléctrica y la suministra a los siguientes componentes electrónicos:
- Motor
- Controlador electrónico
- Display
SENSOR ELECTRÓNICO P.A.S.
La función básica es transmitir al controlador el movimiento continuado de las bielas para que
el motor se ponga en funcionamiento.
Es denominado sistema P.A.S (Sistema de Asistencia al Pedal). También envía información al
pedal.
EL MOTOR NO FUNCIONA
Asegurarse que la batería esté conectada y con carga. Si el motor continúa sin funcionar, revi-
sar que llegue alimentación al controlador y verificar que todas las conexiones externas estén
bien conectadas. Si a pesar de todas estas comprobaciones el motor sigue sin funcionar,
contactar con el Partner.
ESP 7
6.1.1. On and off.
Press and hold ON/OFF to start the display. The display will provide power for the controller.
Press and hold ON/OFF again to turn on the backlight.
In the On state, press and hold ON/OFF and the display will turn off.
If you do not use the bicycle for five minutes, the power supply will be cut off.
In the Off, display and controller state, they do not request battery power. Therefore, the energy
consumption is zero.
6.2. CONFIGURATION
6.2.1. Start of configuration.
6.2.2. SET0: Set driving mode.
There are three driving modes available: POWER, NORMAL and ECO.
Use the UP and DOWN buttons to select the driving mode you want to set by default.
Finally press the SET button
6.2.3. SET1: Reset TRIP1.
Press the DOWN button to reset TRIP1. The icon will flash and the mileage will be restored.
Finally press the SET button
6.2.4. SET2: Set the maximum speed limit.
Use the UP and DOWN buttons to set the desired maximum speed.
The maximum speed allowed is 25 km / h. If it exceeds this speed, the controller will stop
supplying power to the bicycle to guarantee the safety of the user.
6.2.5. SET3: Set the wheel diameter.
Use the UP and DOWN buttons to set the diameter of the wheel. It is important to select
the exact diameter to ensure accuracy in the measurement of speed and distance. Finally press
the SET button
Press and hold the SET button for 2 seconds to enter the confi guration interface. The SET
indicator will flash. Click on SET again to change between the 5 configuration parameters:
SET0, SET1, SET2, SET3 and SET4. To finish, press and hold the SET button.
.
.
Finally press the SET button.
.
Configuration interface
ENG38

ENG 37
DISPLAY
6.
6.1. INTRODUCTION
The display allows you to view the information regarding the status of the bicycle in real time
such as speed, assistance level, distance, battery charge level, etc.
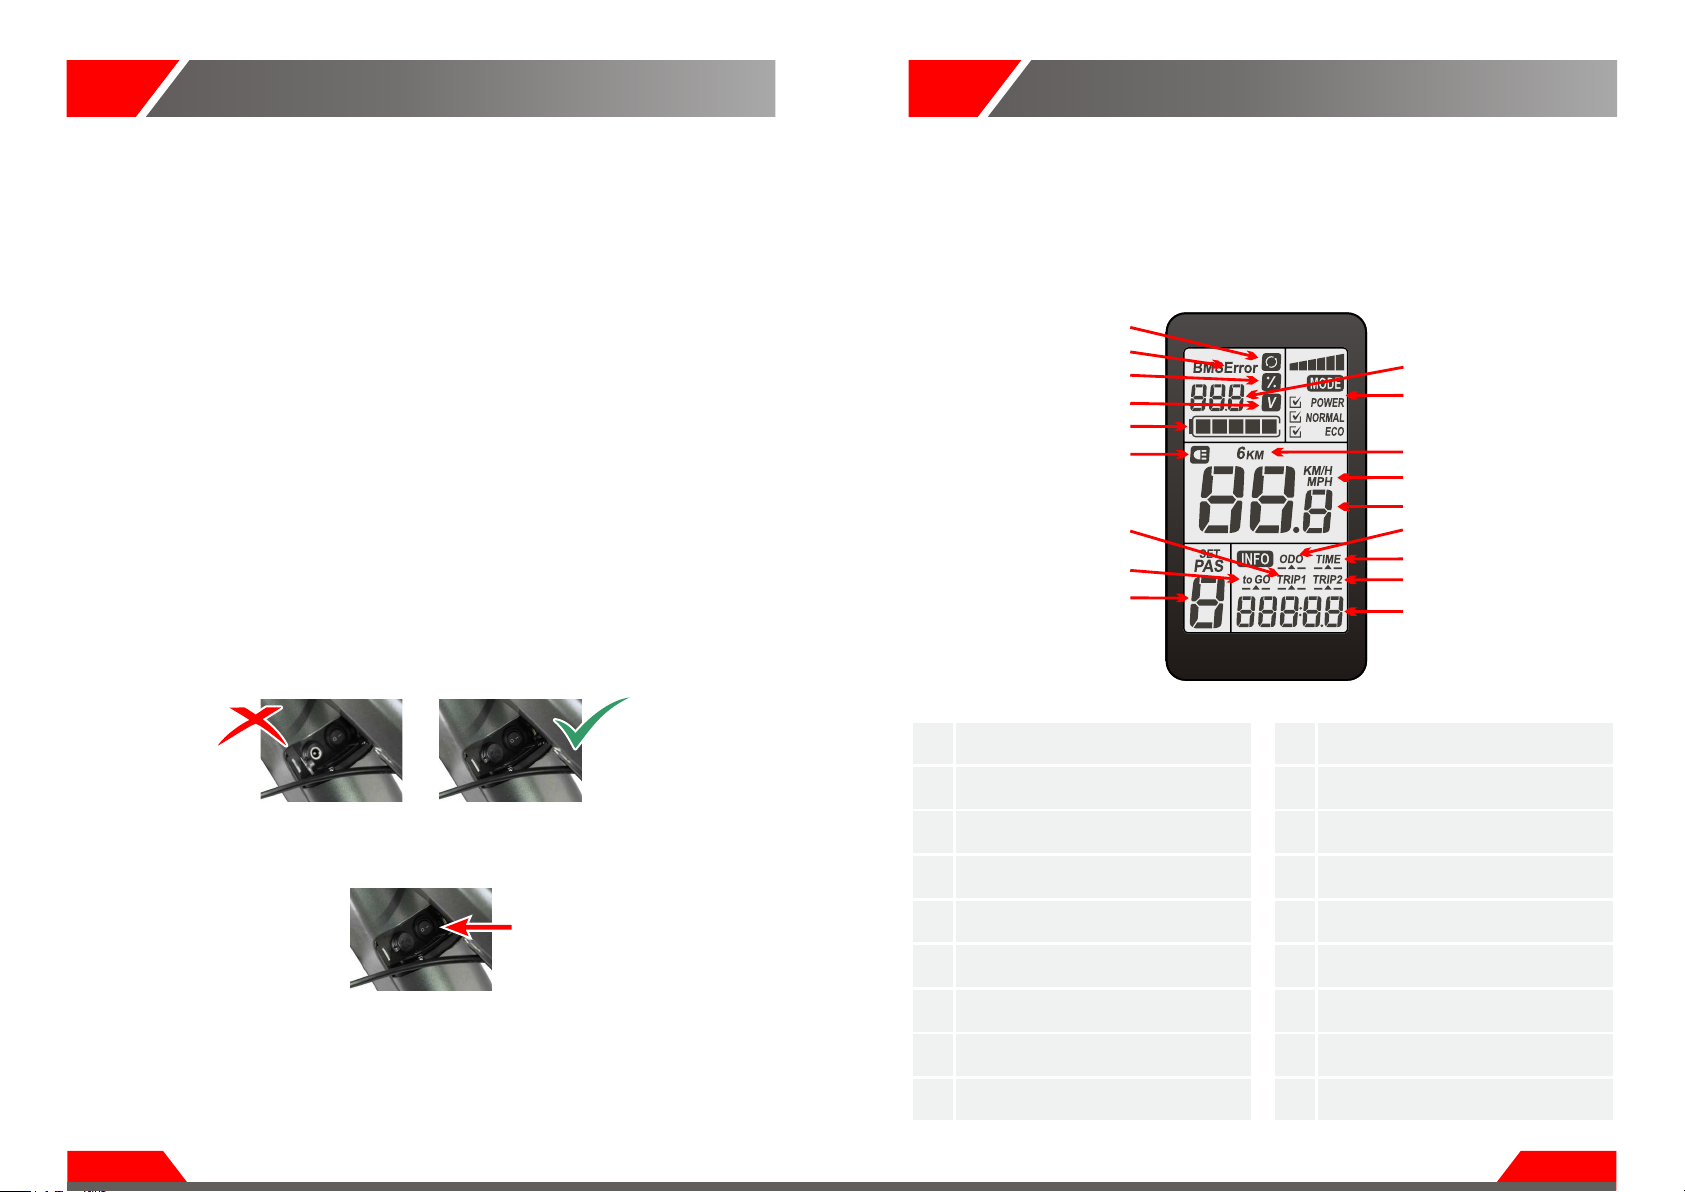
Detail of the information displayed on the LCD panel:
2
1
8
9
4
5
6
7
3
10
13
14
17
15
16
18
11
12
1. BATTERY INDICATOR.
2. DRIVING MODE.
3. ASSISTANT «WALK» MODE At 6 Km/H.
4. SPEED UNIT.
5. SPEED.
6. TOTAL DISTANCE.
7. TRAVEL TIME.
8. TRIP 2.
9. DISTANCE.
10. LEVEL OF ASSISTANCE.
11. REMAINING DISTANCE.
12. TRIP 1.
13. LIGHTING DISPLAY / LIGHTING.
14. LEVEL BATTERY CHARGE.
15. VOLTAGE BATTERY.
16. PERCENTAGE BATTERY CAPACITY.
17. ERROR SIGNAL.
18. BATTERY CHARGE CYCLES.
ESP8
MANTENIMIENTO DE LA BATERÍA
5.
BATERÍA
Para asegurar una vida útil correcta, haga una primera carga completa de 4 horas aproximada-
mente. Para realizar la carga, es aconsejable conectar primero la batería al cargador y después
a la toma de corriente.
Cargar la batería después de cada utilización, de este modo asegurará una vida útil más pro-
longada. No debe cargarse más de 6 horas, de lo contrario se puede deteriorar las caracterís-
ticas de la batería o del cargador. Utilice siempre el cargador suministrado.
Si la batería no da señal de carga después de cargarla, a
CARACTERÍSTICAS TÉCNICAS:
• Tipo Lithium con baterías Samsung
• Voltaje, 36V.
• Capacidad, 11,6 Ah.
• Nº de cargas, 400 al 100%.
• Tiempo de carga, 4 a 6 horas.
• Autonomía, 40 a 60 Km. dependiendo del uso y del nivel de ayuda utilizado.
PRESERVADO
En el caso de no utilizar la bicicleta, se recomienda hacer una carga completa como mínimo
cada 2 meses. De no hacerlo es muy posible que la batería se deteriore perdiendo así la
garantía.
segúrese de que todas las conexiones
son correctas y compruebe que el interruptor esté encendido. Si el problema persiste, contac-
tar con el Partner.
Para cargar la batería, conecte primero el cable en el conector situado debajo de la tapa de
protección. Posteriormente, conecte el cargador a la toma de corriente.
Una vez completada la carga, no olvide proteger el conector con el tapón antihumedad.
El encendido y apagado de la batería se efectúa mediante el interruptor situado al lado del
conector de carga.
Conector de carga sin el
tapón antihumedad.
Asegúrese que el conector
esté siempre protegido.
Interruptor de encendido y apagado.
DISPLAY
6.
6.1. INTRODUCCIÓN
El display permite visualizar la información referente al estado de la bicicleta en tiempo real
como la velocidad, el nivel de asistencia, la distancia, el nivel de carga de la bateria, etc.
Detalle de la información mostrada en el panel LCD:
2
1
8
9
4
5
6
7
3
10
13
14
17
15
16
18
11
12
1. INDICADOR BATERÍA.
2. MODO DE CONDUCCIÓN.
3. ASISTENTE MODO «CAMINAR» A 6 Km/H.
4. UNIDAD DE VELOCIDAD
5. VELOCIDAD
6. DISTANCIA TOTAL.
7. TIEMPO DE RECORRIDO.
8. TRIP 2
9. DISTANCIA.
10. NIVEL DE ASISTENCIA.
11. DISTANCIA RESTANTE.
12. TRIP 1.
13. ILUMINACIÓN PANTALLA / ALUMBRADO.
14. NIVEL CARGA BATERÍA.
15. VOLTAGE BATERÍA.
16. PORCENTAJE CAPACIDAD BATERÍA.
17. SEÑAL DE ERROR.
18. CICLOS DE CARGA BATERÍA.
ESP 9ENG36
BATTERY MAINTENANCE
5.
BATTERY
To ensure a correct life, make a first full charge of approximately 4 hours. To charge, it is advi-
sable to connect the battery first to the charger and then to the power outlet
TECHNICAL CHARACTERISTICS:
• Lithium type with Samsung batteries
• Voltage, 36V.
• Capacity, 11,6 Ah.
• Num. of charges, 400 to 100%.
• Charging time, 4 to 6 hours.
• Autonomy, 40 to 60 Km. Depending on the use and the level of help used.
PRESERVED
In the case of not using the bicycle, it is recommended to make a full charge at least every 2
months. Otherwise, it is very possible that the battery deteriorates, thus losing the guarantee.
.
Charge the battery after each use, in this way it will ensure a longer life. It should not be char-
ged for more than 6 hours, otherwise the characteristics of the battery or charger may deterio-
rate. Always use the supplied charger.
If the battery does not give a charge signal after charging, make sure all connections are
correct and check that the switch is on. If the problem persists, contact the Partner.
To charge the battery, first connect the cable to the connector under the protection cap.
Subsequently, connect the charger to the power outlet.
Once the charge is completed, do not forget to protect the connector with the anti-humidity
cap.
The battery is turned on and off by the switch located next to the char-ging connector.
Charge connector without the
anti-humidity cap.
Make sure the connector
always be protected.
Switch on and off.

ELECTRONIC COMPONENTS
4.
ENGINE, TYPE BRUSHLESS
.
ELECTRONIC CONTROLLER
Electronic device that manages the operation of electronic components.
Mainly of the engine.
BATTERY
Accumulate the electrical energy and supply it to the following electronic components:
- Engine
- Electronic coltroller
- Display
ELECTRONIC SENSOR P.A.S.
The basic function is to transmit to the controller the continuous movement of the connecting
rods so that the engine starts running.
It is called system P.A.S (Pedal Assistance System). It also sends information to pedal.
THE ENGINE DOES NOT WORK
Make sure the battery is connected and charged. If the motor still does not work, check that
power is supplied to the controller and verify that all external connections are properly
connected. If despite all these checks the engine still does not work, contact the Partner.
It is responsible for transforming electrical energy into mechanical energy.
The operation is always through continuous pedaling, the help obtained is based on the level of
help used. Together with the electronic controller, it is responsible for disconnecting the engine
when it reaches 25 km/h
ENG 35
6.1.1. Encendido y apagado.
Mantenga presionado ON/OFF para iniciar el display. El display proporcionará energía para
el controlador. Mantenga presionado nuevamente ON/OFF para encender la luz de fondo.
En el estado On, mantenga presionado ON/OFF y se apagará el display.
Si no emplea la bicicleta durante cinco minutos, se cortará el suministro de energía.
En el estado Off, display y controlador no solicitan energía a la batería. Por lo tanto, el consumo
de energía es nulo.
6.2. CONFIGURACIÓN
6.2.1. Inicio de la configuración
6.2.2. SET0: Establecer el modo de conducción.
Hay tres modos de conducción disponibles: POWER, NORMAL y ECO.
Utilize los botones UP y DOWN para seleccionar el modo de conducción que desea
establecer por defecto.
6.2.3. SET1: Restablecer TRIP1.
Pulse el botón DOWN para reiniciar TRIP1. El icono parpadeará y el kilometraje será res-
tablecido.
6.2.4. SET2: Establecer el límite de la velocidad máxima.
Utilize los botones UP y DOWN para establecer la velocidad máxima deseada.
La velocidad máxima permitida es de 25 Km/h. Si excede esta velocidad, el controlador dejará
de suministrar energía a la bicicleta para garantizar la seguridad del usuario.
6.2.5. SET3: Establecer el diámetro de rueda.
Utilize los botones UP y DOWN para establecer el diámetro de la rueda. Es importante
seleccionar el diámetro exacto para garantizar la precisión en la medición de la velocidad y la
distancia.
Mantenga presionado el botón SET durante 2 segundos para entrar en la interfaz de confi-
guración. El indicador SET parpadeará. Haga clic en SET de nuevo para cambiar entre los 5
parámetros de configuración: SET0, SET1, SET2, SET3 y SET4. Para finalizar, mantenga presio-
nado el botón SET .
Finalmente pulse el botón SET .
Finalmente pulse el botón SET .
Finalmente pulse el botón SET .
Finalmente pulse el botón SET .
Interfaz de configuración
ESP10

TECHNICAL INFORMATION
3.
We reserve the right to modify information on this manual without prior notice, inclu g specifications, models, colors
and materials.
Frame ALLOY 6061, FULL INTEGRATTED BATTERY, INTERNAL CABLE ROUTING
Fork SR SUNTOUR XCM HLO 100MM TRAVEL
Shifters SHIMANO ALTUS 310
Brakes SHIMANO HYDRAULIC 180 mm
Rear Derailleur SHIMANO ALTUS M310 8s
Derailleur SHIMANO ALTUS M310 3s
Crankset SHIMANO 361 42x32x22 T
Wheels MEGAMO DOBLE WALL ALLOY DISC
Cassette SHIMANO HG31 11-34T
Engine BRUSHLESS 36V - 250W, WATER PROOF CABLE CONNECTOR
Battery LITHIUM , SAMSUNG CELLS BATTERIES, 36V - 11,6 Ah - 418 Wh
Autonomy 40 - 60 Km
Charge time 4 - 6 Horas
Max. Speed 25 Km/h
Display LED DISPLAY
ENG34
6.2.6. SET4: Establecer la unidad de velocidad.
Utilize los botones UP y DOWN para establecer el parámetro deseado entre millas por
hora (MPH) o kilómetros por hora (KM/H).
Mantenga presionado el botón SET durante 1 segundo para guardar y salir.
6.3. OPERACIONES GENERALES
6.3.1. Pantalla principal.
Se representa la corriente de descarga del controlador en tiempo real mediante 6 segmentos.
Cada segmento corresponde a 2A. El total de los 6 segmentos equivale a 12A.
6.3.2. Selección del modo de asistencia PEDELEC (PAS).
Presione UP o DOWN para seleccionar entre los diferentes modos de asistencia. El
rango de potencia de salida va desde el nivel 1hasta el nivel 6. El valor predeterminado es 1.
6.3.3. Iluminación de la pantalla.
Con el display encendido, pulse el botón ON/OFF para activar la iluminación de la pantalla.
Si la bicicleta eléctrica tiene faro, el controlador encenderá y apagará el faro al mismo tiempo
que se active o desactive la iluminación de la pantalla.
Segmentos de descarga del controlador
Indicador de iluminación de pantalla
ESP 11
Indicador del modo de asistencia Pedelec
(PAS)
6.3.4. Selección del modo de asistencia 6 Km/h (modo «caminar»).
Mantenga presionado constantemente DOWN para entrar en el modo de asistencia «cami-
nar». La bicicleta mantendrá una velocidad constante de 6 Km/h.
En el momento que deje de presionar DOWN , el modo de asistencia «caminar» se detendrá
y pasará a modo normal.
6.4. INFORMACION EN PANTALLA
Con el display en modo ON, pulse el botón SET para cambiar la información de la pantalla
entre ODO (distancia total), TRIP1 (distancia acumulada), TRIP2 (distancia parcial) y TIME
(tiempo recorrido).
6.4.1. ODO (distancia total acumulada).
ODO registra la distancia total recorrida. El valor acumulado no se puede borrar.
6.4.2. TRIP1 (distancia acumulada).
TRIP1 muestra la distancia total acumulada. La distancia se acumulará hasta que se reinicie
manualmente en la interfaz de configuración SET1.
6.4.3. TRIP2 (distancia parcial).
TRIP2 muestra la última distancia recorrida durante 30 segundos después del encendido de la
pantalla. Transcurrido este periodo, reinicia automáticamente para empezar de 0.
6.4.4. Indicador de tiempo de viaje.
El parámetro de tiempo de viaje se restablece automáticamente después del apagado.
Indicador del modo 6Km/h
ESP12
Indicador de tiempo de viaje
ENG 33
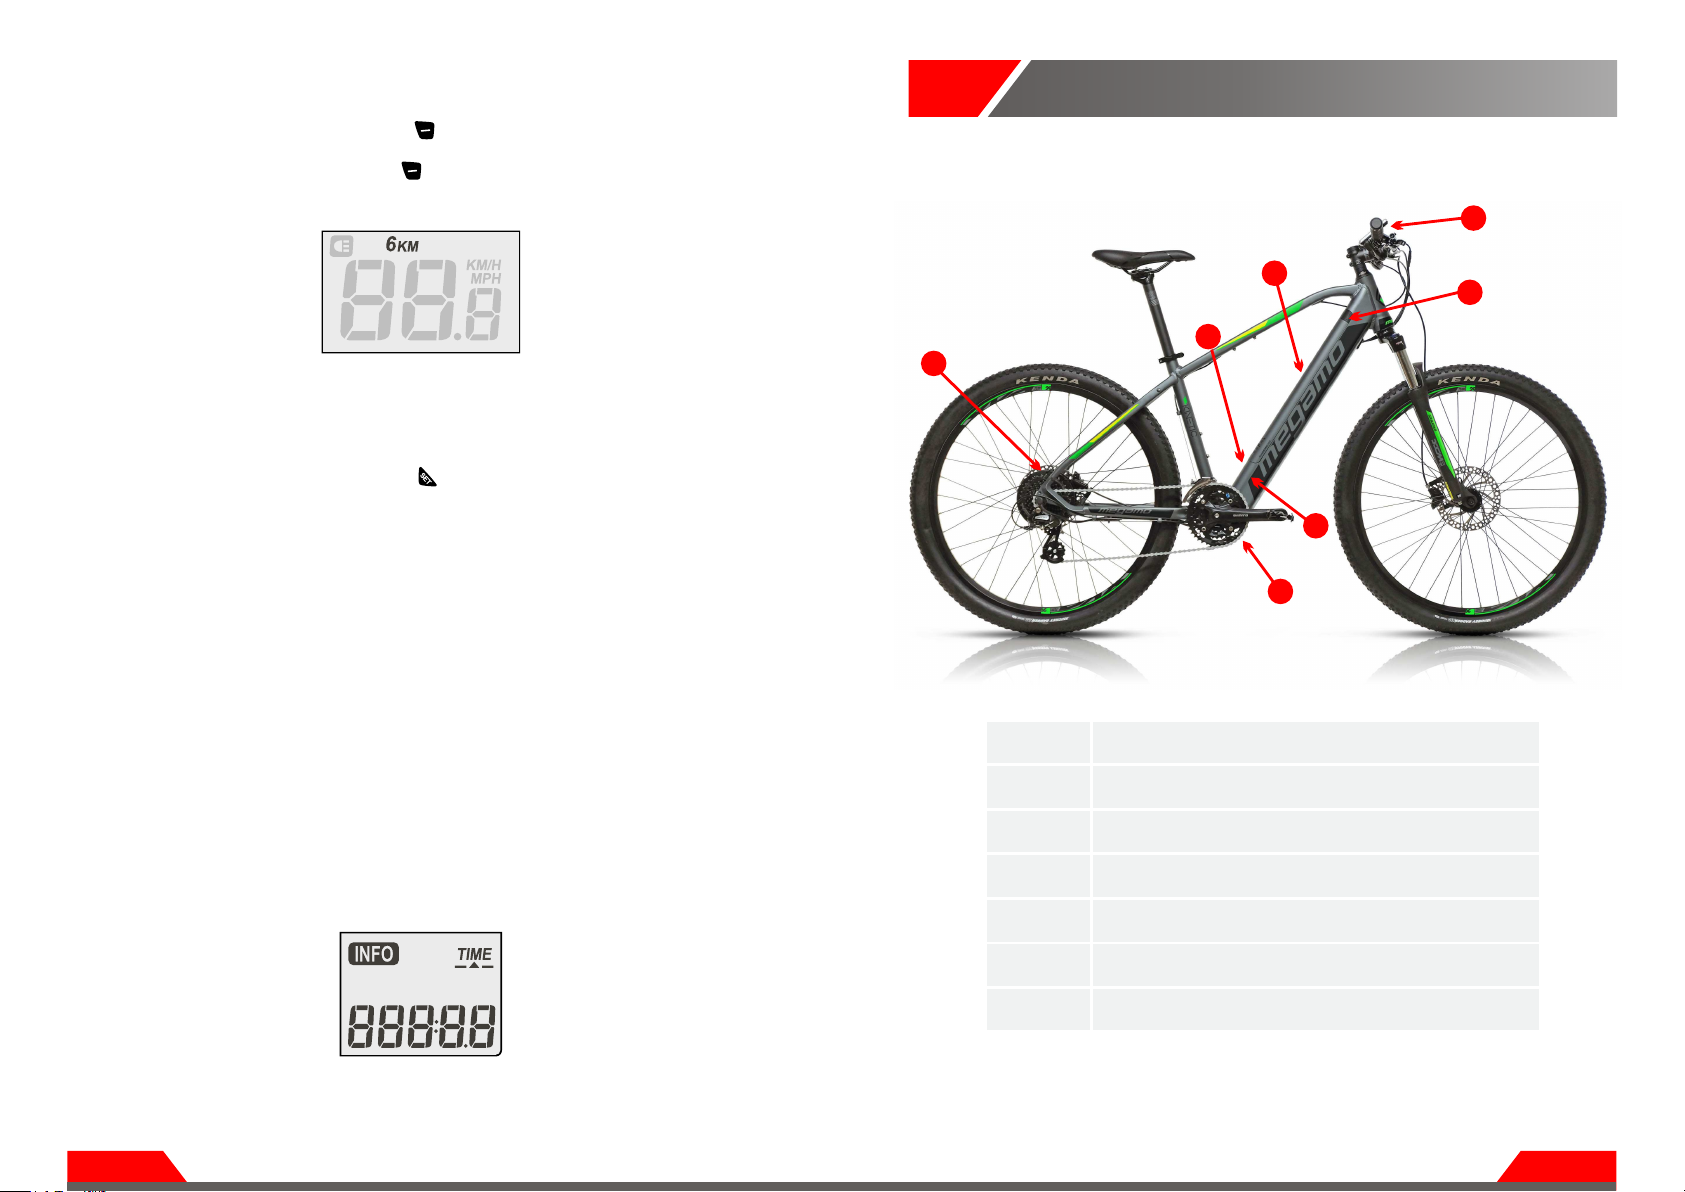
DESCRIPTION - 27.5" / 29" KINETIC
2.
1. BATTERY.
2. ELECTRONIC CONTROLLER.
3. BATTERY BLOCK (LEFT SIDE).
4. ENGINE.
5. ELECTRONIC SENSOR (P.A.S.)
6. DISPLAY.
7. CHARGE / BUTTON ON AND OFF BATTERY.
6
7
1
5
2
3
4
INTRODUCTION
1.
Congratulations on the purchase of your electric bicycle.
We hope you enjoy it to the fullest and incorporate it as a means of transportation for your
daily commuting. By deciding to use an electric bicycle you are helping to safeguard our en-
vironment, as it is saving on the most precious resources of our planet and reducing carbon
pollution.
Megamo electric bicycles have been designed to combine in a single product the best compo-
nents of the market at a competitive price, providing maximum comfort and safety in its use.
This manual contains practical tips that will help you to enjoy your bike even more. Read it
carefully before using the bicycle for the first time.
About the guarantee.
1. This document is issued as a guarantee of quality of the indicated E-bike gives the right to
repair any possible defect of origin, including spare parts and labor for a period of 2 yerars
and 5 years for the frame from the date of acquisition.
2. This guarantee is governed by Spanish regulations, REAL DECRETO LEGISLATIVO 1/2007,
of November 16, which approves the revised text of the General Law for the Defense of
consumers, users and other complementary laws.
3. The warranty does not include deficiencies that occur as a result of misuse, negligence, bea-
ting, undue manipulation and any cause of force majeure or unrelated to its normal and
correct use.
4. The warranty does not cover possible damage to paint, chrome or general finishes that are
produced by exposure or contact with harmful agents such as water, seawater, saltpeter, ...
5. Installation, adjustment, commissioning, cleaning, etc. operations are excluded from this
warranty. As well as the replacement of parts that by their very nature are subject to wear
and tear due to normal use and/or operation, such as cameras, covers, brakes, etc.
6. This guarantee will lack value if it is not properly completed and sealed. As well as if you alter,
modify or replace any of their data.
The bicycle has been designed and manufactured according to European standard EN 15194
Important.
It’s very important to periodically check the mechanical condition of the bicycle. Incorrect
maintenance invalidates your warranty. Ensures frequent maintenance of your bike that gua-
rantees a perfect operation and condition of it. Perform this maintenance in professional ser-
vices recommended by Megamo and/or in the place where you purchased your bicycle.
ENG32
6.4.5.
6.5. INFORMACIÓN DE ERROR
Capacidad de la batería.
Cuando la capacidad de la batería es alta, los cinco segmentos del indicador de nivel estarán
encendidos. A medida que la batería vaya perdiendo carga, los cinco segmentos del indicador
se irán apagando sucesivamente, hasta indicar el nivel de carga baja. Este estado se podrá
reconocer visualizando el parpadeo del indicador, e informa que la batería debe recargarse in-
mediatamente.
Si hay algún problema con el sistema de control electrónico, la pantalla parpadeará y mostrará
el código de error automáticamente.
Código de error y su correspondiente definición:
Código Definición del error
5Error de freno.
6Bajo voltaje.
7Parada del motor .
8Error en el controlador de comunicación.
9Error de recepción de comunicación de la pantalla.
Código Definición del error
0Normal.
1Error general o MOS dañado.
2Error del acelerador .
3Motor sin posición de fase.
4Error del Hall.
Indicador del nivel de batería Niveles carga batería
ESP 13

CONSEJOS DE USO Y MANTENIMIENTO GENERAL
7.
CONSEJOS DE USO
Esta bicicleta eléctrica está diseñada para transportar a una sola persona en cada uso.
Acondicione su bicicleta si desea transportar equipaje y procure no exceder la carga máxima
para la cual fué diseñada (120 kg).
El hecho de no respetar los consejos de seguridad, ni las actividades que vayan más allá de su
uso presvisto, tales como bajar por escalones, realizar acrobacias o hacer reparaciones inade-
cuadas, eximirán de toda responsabilidad tanto al fabricante como al distribuidor.
Se recomienda llevar siempre el casco puesto. En caso de circular de noche, asegúrese de co-
nectar las luces, y a ser posible, usar también banda o chaleco reflectante.
Recuerde efectuar una limpieza periódica de su bicicleta. Para ello evite el uso de agua a pre-
sión, ya que los componentes electrónicos pueden mojarse, pudiendo provocar un mal funcio-
namiento e incluso lesiones personales.
Limpiar cuidadosamente las superficies pintadas, las piezas de plástico y los componentes
electrónicos. No usar jamás productos abrasivos tales como agua marina, salitre, sosas, etc.
ANTES DE CADA USO
Antes de cada uso, debe comprobar que los frenos estén bien sujetos y funcionen adecuada-
mente. El manillar y la tija del sillín deben estar en la posición correcta y fijados firmemente.
Las ruedas deben tener suficiente presión y todas las tuercas y tornillos deben estar bien apre-
tados. La batería debe disponer de carga suficiente para el uso que le vayamos a dar.
CONTROLES PERIÓDICOS (CADA 1-2 MESES)
Estos controles garantizan el perfecto estado de la bicicleta y un funcionamiento óptimo.
1. Comporbar que las soldaduras del cuadro y la horquilla estén en buenas condiciones y no
presenten señales de corrosión.
2. Comprobar que los frenos delantero y trasero están sujetos al chasis y frenan con eficacia.
3. Comporbar la presión de los neumáticos y la profundidad de la banda de rodadura.
4. Comprobar que las llantas estén bien sujetas y no tengan ningún radio suelto o roto.
5. Comporbar que el manillar y la tija del sillín estén bien insertados y apretados con firmeza.
6. Comprobar que los cables estén suficientemente engrasados y que no tengan trabas en
su recorrido.
7. Comprobar que las baterías estén suficientemente cargadas.
ESP14 ENG 31
INDEX
1. INTRODUCTION ....................................................................................................................
2. DESCRIPTION .......................................................................................................................
3. TECHNICAL INFORMATION ..................................................................................................
4. ELECTRONIC COMPONENTS ...............................................................................................
5. BATTERY MAINTENANCE ....................................................................................................
6. DISPLAY ................................................................................................................................
6.1. INTRODUCTION .......................................................................................................
6.1.1. On and off ...................................................................................................
6.2. CONFIGURATION .....................................................................................................
6.2.1. Start of configuration .................................................................................
6.2.2. SET0: Set driving mode ..............................................................................
6.2.3. SET1: Reset TRIP1 ......................................................................................
6.2.4. SET2: Set the maximum speed limit ..........................................................
6.2.5. SET3: Set the wheel diameter ....................................................................
6.2.6. SET4: Set the speed unit ............................................................................
6.3. GENERAL OPERATIONS ..........................................................................................
6.3.1. Main screen .................................................................................................
6.3.2. PEDELEC assistance mode selection ........................................................
6.3.3. Screen lighting ............................................................................................
6.3.4. Selection of the assistance mode 6 km/h («walking» mode) ..................
6.4. INFORMATION ON SCREEN ....................................................................................
6.4.1. ODO .............................................................................................................
6.4.2. TRIP1 ...........................................................................................................
6.4.3. TRIP2 ...........................................................................................................
6.4.4. Travel time indicator ...................................................................................
6.4.5. Battery capacity ..........................................................................................
6.4. ERROR INFORMATION ............................................................................................
7. GENERAL USE AND MAINTENANCE TIPS ...........................................................................
8. WARRANTY ...........................................................................................................................
32
33
34
35
36
37
37
38
38
38
38
38
38
38
39
40
40
40
40
40
40
41
42
39
39
39
39
41
43
GARANTÍA
8.
GARANTÍA, datos del cliente para remitir a fábrica vía mail por el partner.
MUY IMPORTANTE !
requeridos con su sello para que la garantía sea válida.
Las especificaciones técnicas, están sujetas a cambio sin previo aviso.
Modelo ______: __________________ _____________________________________________________________
Nº de cuadro _____: ______________ ____________________________________________________________
Nº batería _ _____: _______________ _________ ____________________________________________________
Nombre y apellidos ____: ________________ ___________________________________________________
E-Mail: _______________________________ _ _________________________________________________ _____
Fecha de compra ____: _____________________ _______________________________________________
Teléfono ___ _____: _____________________ __________ _____________________________________________
Sello del Partner:
Conforme a las normas de Seguridad Europea .EN-15194 TNT Cycles, S.L.
17180 - Vilablareix
Girona (ESPAÑA)
NIF: B-17267758
Fabricado por:
ESP 15

GARANTIE
8.
GARANTIE, données client à envoyer à l'usine par courrier électronique par le partenaire.
TRÈS IMPORTANT !
copie de toutes les données requises avec son cachet pour que la garantie soit valable.
Les spécifications techniques sont sujettes à changement sans préavis.
Modèle ______: __________________ _____________________________________________________________
Nº de Tableau _____: ______________ ____________________________________________________________
Nº batterie _ _____: ______________ _________ ____________________________________________________
Nom et prénom ______ ____: ________________ ___________________________________________________
E-Mail: _______________________________ _ _________________________________________________ _____
Date d’achat ________ ____: ____ _________________ _______________________________________________
Téléphone ___ _____: ___________________ __________ _____________________________________________
Timbre du Partner:
Conforme aux normes européennes de sécurité EN-15194. TNT Cycles, S.L.
17180 - Vilablareix
Girona (ESPAÑA)
NIF: B-17267758
Fabriqué par:
FR 29

CONSEILS GÉNÉRAUX D'UTILISATION ET MAINTENANCE
7.
CONSEILS D'UTILISATION
Ce vélo électrique est conçu pour transporter une seule personne par utilisation. Conditionnez
votre vélo si vous souhaitez transporter des bagages et essayez de ne pas dépasser la charge
maximale pour laquelle il a été conçu (120 kg).
Le non-respect des consignes de sécurité ou des activités allant au-delà de l'utilisation
envisagée, telles que descendre des marches, effectuer des acrobaties ou effectuer des
réparations inappropriées, exonère le fabricant et le distributeur de toute responsabilité.
Il est recommandé de toujours porter le casque. En cas de conduite de nuit, assurez-vous de
connecter les phares et, si possible, utilisez également une bande réfléchissante ou un gilet.
N'oubliez pas de nettoyer périodiquement votre vélo. Pour ce faire, évitez d'utiliser de l'eau sous
pression, car les composants électroniques peuvent être mouillés, ce qui peut provoquer un
dysfonctionnement et même des blessures corporelles.
Nettoyer soigneusement les surfaces peintes, les pièces en plastique et les composants élec-
troniques. N'utilisez jamais de produits abrasifs tels que de l'eau de mer, du salpêtre, etc.
AVANT CHAQUE UTILISATION
Avant chaque utilisation, vous devez vérifier que les freins sont correctement serrés et fonc-
tionnent correctement. Le guidon et la tige de selle doivent être dans la bonne position et fer-
mement fixés. Les roues doivent avoir suffisamment de pression et tous les écrous et boulons
doivent être serrés. La batterie doit avoir suffisamment de charge pour l'utilisation que nous
allons lui donner.
CONTRÔLES PÉRIODIQUES (TOUS LES 1-2 MOIS)
Ces commandes garantissent le parfait état du vélo et son fonctionnement optimal.
1. Vérifiez que les soudures du cadre et de la fourche sont en bon état et ne présentent aucun
signe de corrosion.
2. Vérifiez que les freins avant et arrière sont bien fixés au châssis et freinent efficacement.
3. Vérifiez la pression des pneus et la profondeur de la bande de roulement.
4. Vérifiez que les pneus sont correctement fixés et que la radio n'est pas défectueuse.
5. Vérifiez que le guidon et la tige de selle sont fermement insérés et bien serrés.
6. Vérifier que les câbles sont suffisamment graissés et qu’ils ne présentent aucun obstacle
dans leur course.
7. Vérifiez que les piles sont suffisamment chargées.
FR28 FR 17
INDEX
1. INTRODUCTION ....................................................................................................................
2. DESCRIPTION .......................................................................................................................
3. INFORMATION TECHNIQUE .................................................................................................
4. COMPOSANTS ÉLECTRONIQUES ........................................................................................
5. MAINTENANCE DE LA BATTERIE .........................................................................................
6. DISPLAY ................................................................................................................................
6.1. INTRODUCTION .......................................................................................................
6.1.1. On et off ......................................................................................................
6.2. CONFIGURATION .....................................................................................................
6.2.1. Début de configuration ...............................................................................
6.2.2. SET0: Définir le mode de conduite .............................................................
6.2.3. SET1: Réinitialiser TRIP1 ............................................................................
6.2.4. SET2: Définir la limite de vitesse maximale ..............................................
6.2.5. SET3: Définir le diamètre de la roue ...........................................................
6.2.6. SET4: Définir l'unité de vitesse ...................................................................
6.3. OPERATIONS GENERALES ......................................................................................
6.3.1. Écran principal ............................................................................................
6.3.2. Sélection du mode d'assistance PEDELEC ...............................................
6.3.3. Éclairage de l'écran .....................................................................................
6.3.4. Sélection du mode d'assistance 6 km / h (mode «marche») ...................
6.4. INFORMATIONS SUR L'ÉCRAN ...............................................................................
6.4.1. ODO .............................................................................................................
6.4.2. TRIP1 ...........................................................................................................
6.4.3. TRIP2 ...........................................................................................................
6.4.4. Indicateur de temps de trajet .....................................................................
6.4.5. Capacité de la batterie ................................................................................
6.4. INFORMATIONS D'ERREUR .....................................................................................
7. CONSEILS GÉNÉRAUX D'UTILISATION ET MAINTENANCE ................................................
8. GARANTIE .............................................................................................................................
18
19
20
21
22
23
23
24
24
24
24
24
24
24
25
26
26
26
26
26
26
27
28
25
25
25
25
27
29

INTRODUCTION
1.
Félicitations pour l’achat de votre vélo électrique.
Nous espérons que vous en profiterez pleinement et que vous l'incorporerez comme moyen de
transport pour vos trajets quotidiens. En choisissant d'utiliser un vélo électrique, vous contri-
buez à la protection de notre environnement, car il permet d'économiser sur les ressources les
plus précieuses de notre planète et de réduire la pollution par le carbone.
Les vélos électriques Megamo ont été conçus pour combiner en un seul produit les meilleurs
composants du marché à un prix compétitif, offrant un maximum de confort et de sécurité lors
de son utilisation.
Ce manuel contient des conseils pratiques qui vous aideront à mieux profiter de votre vélo.
Lisez-le attentivement avant d'utiliser le vélo pour la première fois.
A propos de la garantie.
1. Ce document est émis à titre de garantie de qualité du vélo électrique et donne le droit de re-
parer tiyt défaut d’origine possible, pièces détachées et main d’oeuvre conpris, pour un pé-
ride de 2 abs et 5 ans pour le cadre de départ de la date d'acquisition.
2. Cette garantie est régie par la légistation espagnole, REAL DECRETO LEGISLATIVO 1/2007
du 16 nomvembre, que approuve le texte révisé de la loi générale sur la défense des con-
sommateurs, des utilisateurs et d’autres lois complémentaires.
3. La garantie n’inclut pas les défauts résultant d’une mauvaise utilisation, d’une négligence, de
coups, de manipulations indues et de toute autre cause de force majeure ou non liée à son
utilisation normale et correcte.
4. La garantie ne coouvre pas les dommages éventuels causés à la peinture, au chrome ou aux
finis généraux résultant de l’exposition oy du contact avec des agents nocifs tels que l’eau,
l’eau de mer, le salpêtre, des soudes, ...
5. Les opérations d’installation, de réglage, de mise en servie, de nettoyage, etc, sont exclues de
cette garantie. Ainsi que le remplacement de pièces qui, de par leur nature, son sujettes à
l’usure du fait d’une utilisation et / ou d’un fonctionnement normal, telles que des caméras,
des capots, des freins, etc.
6. Cette garantie n’aura aucune valeur si elle n’est pas correctement complétée et scellée. Ainsi
que si l’une de vos données est altérée, modifiée ou remplacée.
Le vélo a été conçu et fabriqué conformément à la norme européenne EN 15194
Important.
Il est très important de vérifier périodiquement l’état mécanique du vélo. Un entretien incorrect
invalide votre garantie. Assure un entretien fréquent de votre vélo qui en garantit un fonctionne-
ment et un état parfaits. Effectuez cet entretien dans le cadre des services professionnels reco-
mmandés par Megamo et / ou à l'endroit où vous avez acheté votre vélo.
FR18
6.4.5.
6.5. INFORMATIONS D'ERREUR
Capacité de la batterie.
Lorsque la capacité de la batterie est élevée, les cinq segments de l'indicateur de niveau sont
allumés. Au fur et à mesure que la batterie se décharge, les cinq segments de l'indicateur
s'éteignent successivement jusqu'à ce que le niveau de charge bas soit indiqué. Cet état peut
être reconnu en visualisant le clignotement de l'indicateur et en informant que la batterie doit
être rechargée immédiatement.
S'il y a un problème avec le système de contrôle électronique, l'écran clignotera et affichera
automatiquement le code d'erreur.
Code d'erreur et sa définition correspondante:
Code Définition d'erreur
5Erreur de frein.
6Basse tension.
7Arrêt du moteur.
8Erreur dans le contrôleur de communication.
9Erreur de réception de la communication avec l'écran.
Code Définition d'erreur
0Normal.
1Erreur générale ou MOS endommagé.
2Erreur d'accélérateur.
3Moteur sans position de phase.
4Erreur de Hall.
Indicateur de niveau de batterie Niveaux de charge de la
batterie
FR 27

6.3.4. Sélection du mode d'assistance 6 km / h (mode «marche»).
Appuyez et maintenez enfoncé DOWN pour entrer en mode d'assistance «Marche». Le vélo
maintiendra une vitesse constante de 6 km/h.
Dès que vous arrêtez d'appuyer sur DOWN , le mode d'assistance "marche" s'arrête et ira en
mode normal.
6.4. INFORMATIONS SUR L'ECRAN
Lorsque l’affichage est en mode ON, appuyez sur le bouton SET pour modifier les informa-
tions d’affichage entre ODO (distance totale), TRIP1 (distance cumulée), TRIP2 (distance
partielle) et TIME (temps de voyage).
6.4.1. ODO (distance totale cumulée).
ODO enregistre la distance totale parcourue. La valeur accumulée ne peut pas être supprimée.
6.4.2. TRIP1 (Distance accumulée).
TRIP1 indique la distance totale accumulée. La distance s’accumulera jusqu’à ce qu’elle soit
redémarrée manuellement dans l’interface de configuration SET1.
6.4.3. TRIP2 (distance partielle).
TRIP2 indique la dernière distance parcourue pendant 30 secondes après la mise en marche de
l'écran. Après cette période, redémarrez automatiquement pour recommencer à 0.
6.4.4. Indicateur de temps de trajet.
Le paramètre de temps de trajet est réinitialisé automatiquement après l'arrêt.
Indicateur de mode 6Km/h
FR26
Indicateur de temps de trajet
DESCRIPTION - 27.5" / 29" KINETIC
2.
1. BATTERIE.
2. CONTRÔLEUR ÉLECTRONIQUE.
3. BLOC DE BATTERIE (CÔTÉ GAUCHE).
4. MOTEUR.
5. CAPTEUR ÉLECTRONIQUE (P.A.S.)
6. DISPLAY.
7. CHARGE / BOUTON SUR ET HORS BATTERIE.
FR 19
6
7
1
5
2
3
4

INFORMATION TECHNIQUE
3.
Nous nous réservons le droit de modifier les informations de ce manuel sans préavis, y compris les spécifications, modèles,
couleurs et matériaux.
Cadre ALLOY 6061, FULL INTEGRATTED BATTERY, INTERNAL CABLE ROUTING
Fourchette SR SUNTOUR XCM HLO 100MM TRAVEL
Changement
Manches SHIMANO ALTUS 310
Freins SHIMANO HYDRAULIC 180 mm
Changeur Arrière SHIMANO ALTUS M310 8s
Dérrailleur SHIMANO ALTUS M310 3s
Pédalier SHIMANO 361 42x32x22 T
Roues MEGAMO DOBLE WALL ALLOY DISC
Pignon SHIMANO HG31 11-34T
Moteur BRUSHLESS 36V - 250W, WATER PROOF CABLE CONNECTOR
Batterie LITHIUM , SAMSUNG CELLS BATTERIES, 36V - 11,6 Ah - 418 Wh
Autonomie 40 - 60 Km
Temps de
chargement 4 - 6 Horas
Vitesse max. 25 Km/h
Display LED DISPLAY
FR20
6.2.6. SET4: Définir l'unité de vitesse.
Utilisez les boutons UP et DOWN pour régler le paramètre souhaité entre miles par heure
(MPH) ou kilomètres par heure (KM / H).
Appuyez et maintenez le bouton SET pendant 1 seconde pour enregistrer et quitter.
6.3. OPERATIONS GENERALES
6.3.1. Écran principal.
Le courant de décharge du contrôleur est représenté en temps réel au moyen de 6 segments.
Chaque segment correspond à 2A. Le total des 6 segments est équivalent à 12A.
6.3.2. Sélection du mode d'assistance PEDELEC (PAS).
Appuyez sur UP ou DOWN pour choisir entre les différents modes d'assistance. La plage
de puissance de sortie va du niveau 1 au niveau 6. La valeur par défaut est 1.
6.3.3. Éclairage de l'écran.
Lorsque l’affichage est en mode ON, appuyez sur le bouton ON/OFF pour activer l’éclairage
de l’écran.
Si le vélo électrique a un phare, le contrôleur allume et éteint le phare en même temps que
l’éclairage de l’écran est activé ou désactivé.
Segments de téléchargement du contrôleur
FR 25
Indicateur d'éclairage de l'écran
Indicateur de mode d'assistance Pedelec
(PAS)
Table of contents
Languages:
Other MEGAMO Bicycle manuals


