MEGASTEK GT99 User manual
GPS
Personal
Tracker
_______________________________________
___
User Manual
V-A1.4
GT99

2
Contents
1. Products Overview..................................................................... 3
2. For Your Safety......................................................................... 3
3. GT99 Characteristics.................................................................. 4
4. Getting Started......................................................................... 4
4.1. Hardware and Accessories..................................................... 5
4.2. View .................................................................................. 5
4.3. Functional Parts................................................................... 5
4.4. First Use............................................................................. 6
5. Change Password...................................................................... 7
6. Authorization............................................................................ 7
7. SMS ........................................................................................ 8
7.1. Track by SMS ...................................................................... 8
7.2. Track by Calling................................................................... 8
7.3. Track by Preset Interval........................................................ 8
8. Set SOS Phone Number ............................................................. 8
9. Google Map Link ....................................................................... 9
10. GPRS....................................................................................... 9
10.1. Track by GPRS..................................................................... 9
10.2. Set Device ID...................................................................... 9
10.3. Set APN............................................................................ 10
10.4. Set IP and Port.................................................................. 10
10.5. Set GPRS Interval.............................................................. 10
11. Speeding Alarm ...................................................................... 10
12. Geo-fence Alarm..................................................................... 11
13. Low-power-consumption Mode.................................................. 11
14. Beeper................................................................................... 12
15. Tracker Setup Software............................................................ 12
16. Problems & Solutions............................................................... 13
3
1. Products Overview
Thanks for purchasing our product!
GT99 has a low-power-consumption mode in which the tracker can work about
12 months(See page 12 for more information).
GT99 is a light-weight, easy-use, quick-tracking GPS personal tracker designed
for personal safety and target tracking.
Through GPS and GSM or GPRS communication, GT99 can get its position and
send the position data to your telephone or sever to be displayed on maps.
GT99 supports SOS button to send SMS alarm for rescue, and it can be
configured to report its location to the server base or mobile phone at preset
interval.
GT99 has the following features and functions:
◆Low-power-consumption mode
◆SMS and GPRS TCP/UDP communication
◆Support setting 3 authorized cell phone numbers
◆Track on demand
◆Track by time interval
◆Geo-fencing control
◆SOS button for immediate rescue and alarm
◆Speed limit alarm
◆Low battery alarm
2. For Your Safety
Read these simple guidelines. Not following them may be dangerous or illegal.
Switch on safely Do not switch on GT99 when wireless phone use is
danger.
prohibited or when it may cause interference or
Switch off in hospitals Follow any restrictions. Switch GT99 off near medical
equipment.
Switch off in aircraft Follow any restrictions. Wireless devices can cause
interference in aircraft.
Switch off when
refueling Do not use GT99 when at a refueling point. Do not
use near fuels or chemicals.
Switch off near Follow any restrictions. Do not use GT99 when

4
blasting blasting is in progress.
Qualified service Only qualified personnel can repair GT99.
Water resistance GT99 is not fully water resistant. Keep it dry. Use
waterproof-case if necessary.
3. GT99 Characteristics
Items Specification
Charging Voltage DC 4.2-5.5V/400mA (Mini USB port)
Internal Battery 1200 mAh battery (3.7V)
Dimension 80mm X 54mm X 21mm
Weight 80g (with battery)
Operating
Temperature -20°C to 55°C
Humidity 5% to 95% Non-condensing
GSM Module Quad Band GSM 850/900/1800/1900Mhz
GPS Chipset Latest GPS chipset
GPS Sensitivity -159 dB
GPS Frequency L1 1575.42MHz
C/A Code 1.023 MHz chip rate
Channels 20 channel all-in-view tracking
Position Accuracy < 15 M 2D RMS
Velocity Accuracy 0.1 M/S
Time Accuracy 1 us synchronized to GPS time
Reacquisition 0.1 ms
Hot Start 1 sec., average
Warm Start 35 sec., average
Cold Start 37 sec., average
Altitude Limit 18,000 meters (60,000 feet) max.
Velocity Limit 514 meters/second (1000 knots) max.
Acceleration Limit Less than 4g
Work Time 12 hours in normal mode
12 months in low-power-consumption mode
LED 2 LED lights to show GPS, GSM and other status.
Button SOS button for sending SMS
4. Getting Started
This section will describe how to set up your GT99.
5
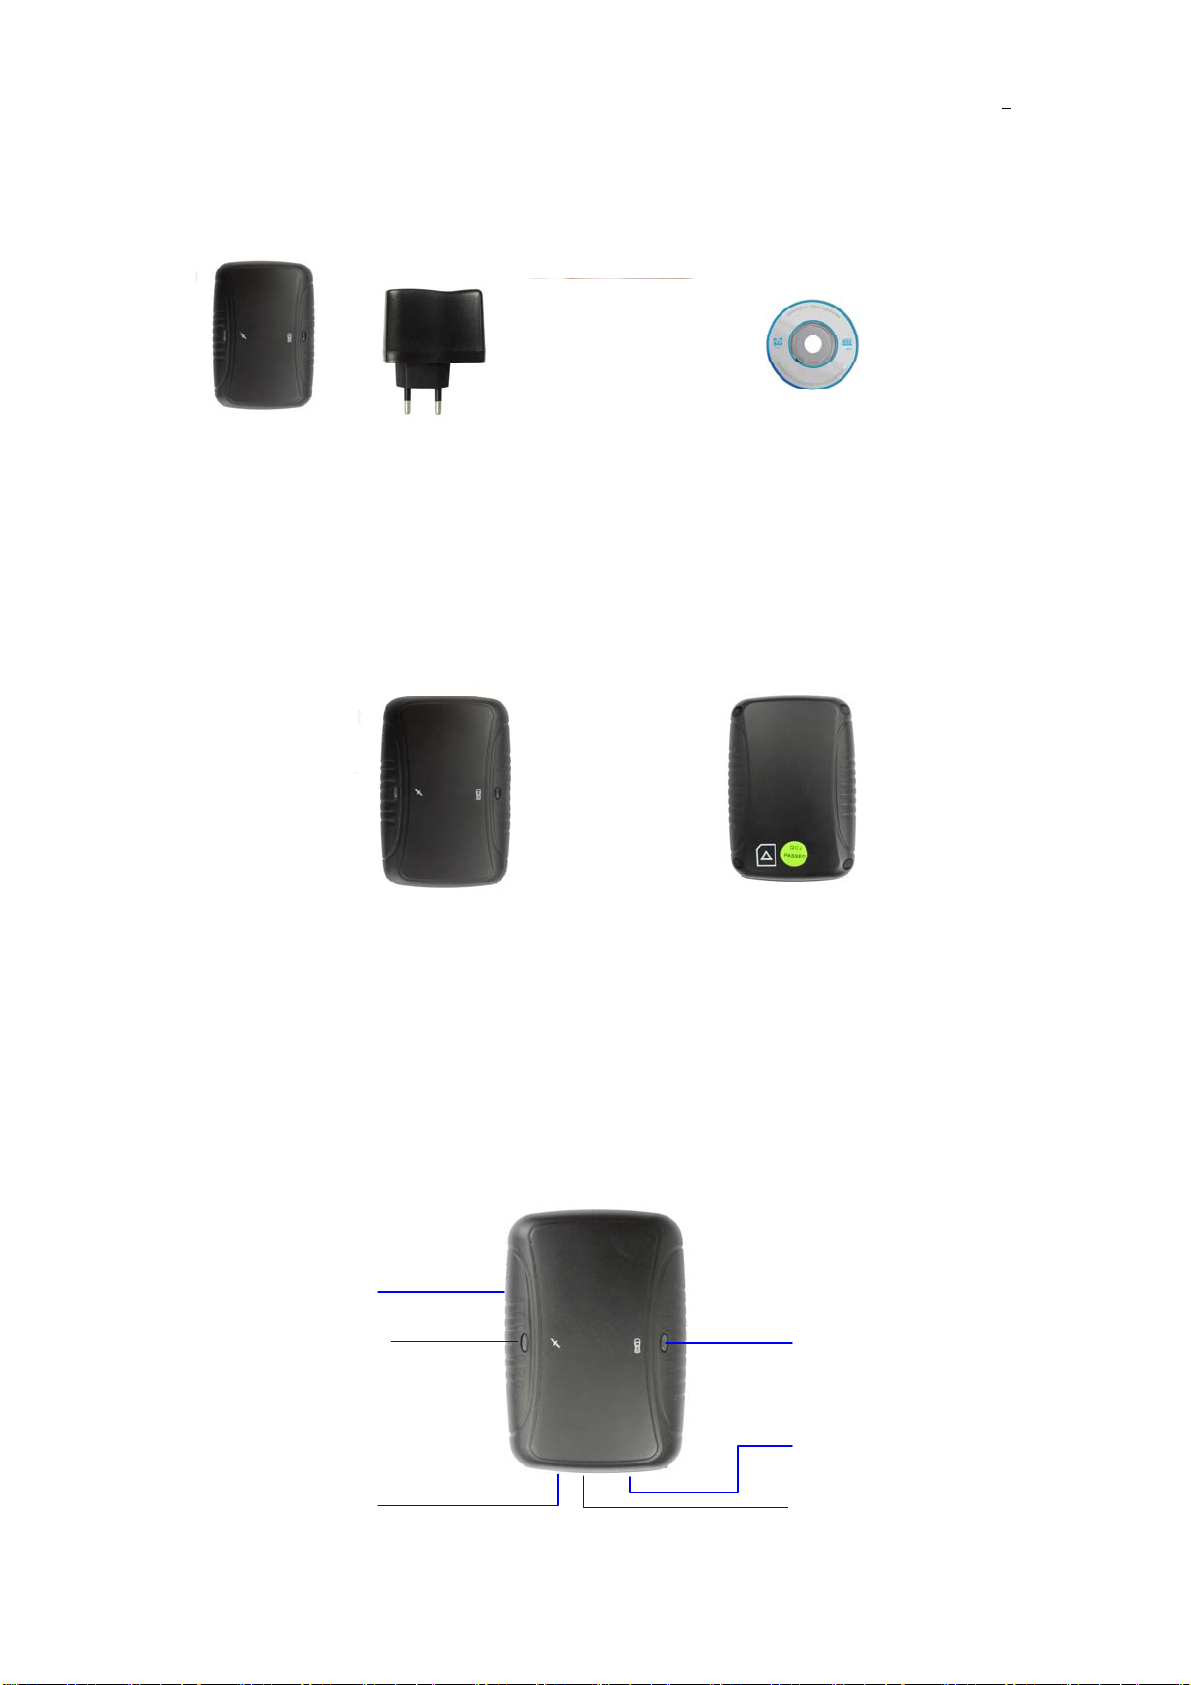
4.1. Hardware and Accessories
4.2. View
4.3. Functional Parts
n, one switch and two LEDs with different colors to indicate
tatus of the unit.
GT99 has one butto
s
Front View Back View
GT99 Wall-Charger
Special-USB-cable CD-Rom
Power ON/OFF Switch
GSM LED
Mini USB port
SIM Card Slot
GPS LED
SOS Button

6
Blue LED- GSM
0.3s on and 0.3s off GSM module initializing
Always on ’t register network/GSM module can
Unit is charging
Always off Unit is Sleeping/turned off
1s on and 3s off GSM module is registered network
0.1s on and 3s off twork
and GPRS function works well
GSM module is registered ne
Orange LED- GPS
0.3s on and 0.3s off GPS module initializing
Always off Unit is Sleeping/turned off
1s on and 3s off well, but GPSGPS module works
position is not fixed
0.1s on and 3s off rks well and GPS
position is fixed
GPS module wo
Switch
Power ON/OFF Switch To turn on/off GT99
Buttons
SOS Button o send a SMS to
authorized numbers.
Press it for 3 seconds t
Other Connectors
Mini USB Port irmware update,
configuration on PC
Used for charging, f
4.4. First Use
Please read this manual before using GT99.
re that your GT99 has a working SIM card
a phone to make sure it can send and
r
GT99, please make sure the SIM card
installed supports displaying caller ID.
r you can connect the tracker directly to computer by USB for
4.4.1 Ensu
installed.
- Check that the SIM card has not run out of credit (Test
the SIM card in
eceive SMS)
- Check that lock code of the SIM card is turned off.
- If you require the function of sending an SMS location report to the authorized
phone number when it makes a call to the
4.4.2 Charge the battery for at least 3 hours in power-off status using the wall
charger. O

7
charging.
(Note: Please turn off the device when charging!)
4.4.3 Push the Power On/Off button to the ON side and wait for about 20
s
G
- Check that the Blue LED (GSM) is flashing 1 second on and 3 seconds off.
- Check that the Orange LED (GPS) is flashing 0.1 second on and 3 seconds off.
5. Change Password
and: M******,00,######
ord.
efault password is 000000. Device will
ommand will
red if with wrong password.
w password. Password should be 6 digits.
M000000,00,123456
M123456,00,888888
6. Authorization
and: M000000,01,NO.,Phone Number,ABCDEFGH
phone numbers for receive SMS alarms.
to 3. . 16 digits
t for GT68/69/88/89)
: geofence alarm
econds. It is suggested that you be in an outer place where it can receive better
PS signal and the front side faces sky when you turn on the device.
Comm
Description: Change user’s passw
Note:
All commands are case-sensitive!
1. ****** is user’s password and the d
only accept commands from a user with the correct password. C
be igno
2. ###### is the ne
Example:
Comm
Description: Authorize
Note:
NO.: should be 1
Phone Number: Preset phone number. Max
A : SOS alarm
B: Help alarm (Jus
C: Call for SMS
D: SMS Tracking
E: Low battery alarm
F: No GPS signal alarm
G
H: Over speed alarm
(1: enable alarm, 0: disable alarm)

8
Example:
Preset the authorized phone number 13800000000, and just enable SOS alarm.
M000000,01,1,13800000000,10000000
7. SMS
nd: M000000,02
ply back a SMS with latest location to user sent this command.
Lat=22 23.61N Lng=114 22.56E,MMC:460,02,CellID:27B3,0E59,
1,03:30,SMS
Any authorized number makes a missed call to the tracker and the tracker will
y SMS.
tion: Set an interval for the tracker to continuously send its location by
is the interval in minute. (max. 65535)
turn off tracking by time
03,30
The tracker will send location back to authorized phone number every 30
minutes.
8. Set SOS Phone Number
tion:
7.1. Track by SMS
Comma
Description: Get the latest location
Note:
Tracker will re
Example:
M000000,02
You will receive a SMS look like:
Speed=0Km/hr,05/7/201
7.2. Track by Calling
report its longitude and latitude b
7.3. Track by Preset Interval
Command: M000000,03,XXXXX
Descrip
SMS to authorized phone number.
Note:
1. XXXXX
2. if XXXXX=0 to
Example:
M000000,
Command: M000000,06,1,Num.
Descrip

9
If press SOS button 3 seconds, tracker will dial the SOS phone number.
(max. 16 digits)
M000000,06,1,88888888
This command will set the SOS number as 8888888
9. Google Map Link
r and then you receive a SMS
ogle map http link. Click on the link then the location ca be shown
hone.
SMS with latitude and longitude.
es support this function.
Example:
M000000,10,1
10. GPRS
and: M000000,21,X nction.
le GPRS tracking via TCP
RS tracking via UDP
Example:
and: M000000,22,ID
evice ID
Example:
Note:
Num: SOS phone number
Example:
Command: M000000,10,X
Description: Send this command to the tracke
with Go
directly on Google Map on your mobile p
Note:
X=1: reply SMS with Google map link.
X=0: reply
Only smart phon
10.1. Track by GPRS
Comm
Description: Enable GPRS tracking fu
Note:
X=0, turn off GPRS tracking (default)
X=1, enab
X=2, enable GP
M000000,21,1
10.2. Set Device ID
Comm
Description: Set d
Note:
ID, max. 16 digits

10
M000000,22,123456789
and: M000000,23,APN,Username,Password
ername and
rd are required, just input APN only;
password should not over 64 characters.
Example:
and: M000000,24,IP,PORT
Port for tracker for GPRS communication.
ur server’s IP
Example: 1,6000
and: M000000,25,X
65535 in second (default 30 seconds)
M000000,25,60
The tracker will send every 60 seconds
11. Speeding Alarm
alarm. When the tracker speeds higher than the
alue, it will send an SMS to authorized phone number or send this alarm
preset value of speed in Km/hr (max. 200Km/hr)
XXX = 0, turn off this alarm.
10.3.Set APN
Comm
Description: Set APN details for the tracker
Note:
1. APN username and password are optional. If no APN us
passwo
2. APN + username +
M000000,23,CMNET
10.4. Set IP and Port
Comm
Description: Set IP and
Note:
1. IP is yo
2. Port: max. 65535
M000000,24,192.168.111.11
10.5. Set GPRS Interval
Comm
Description: Set the interval for sending GPRS packets.
Note:
X: should be 5 to
Example:
Command: M000000,05,XXX
Description: Turn on speeding
preset v
to server (if GPRS connected).
Note:
XXX is the
11
Example:
M000000,05,80
When the tracker’s speed is over 80Km/hr, speeding alarm will be sent out.
12. Geo-fence Alarm
alarm to the authorized phone number and send
rm to server via GPRS.
ngitude are in degree
n Km
M000000,32,2,office,12.12345,-45.12354,10
13. Low-power-consumption Mode
r will wake up for 10
every a specified time. X is the specified time.
er-consumption mode, should be 1 to 65535 in hour
t is 24 hours).
minutes every 1 hour (60 minutes), the following
Command: M000000,32,NO.,name,lat,lng,radius
Description: Turn on Geo-fence alarm. When the tracker moves in/out the
preset scope, it will send a SMS
this ala
Note:
1. NO. should be 1 or 2
2. Name: max. 10 characters
3. latitude and lo
4. radius i
Example:
M000000,32,1,school,22.12345,114.12345,10
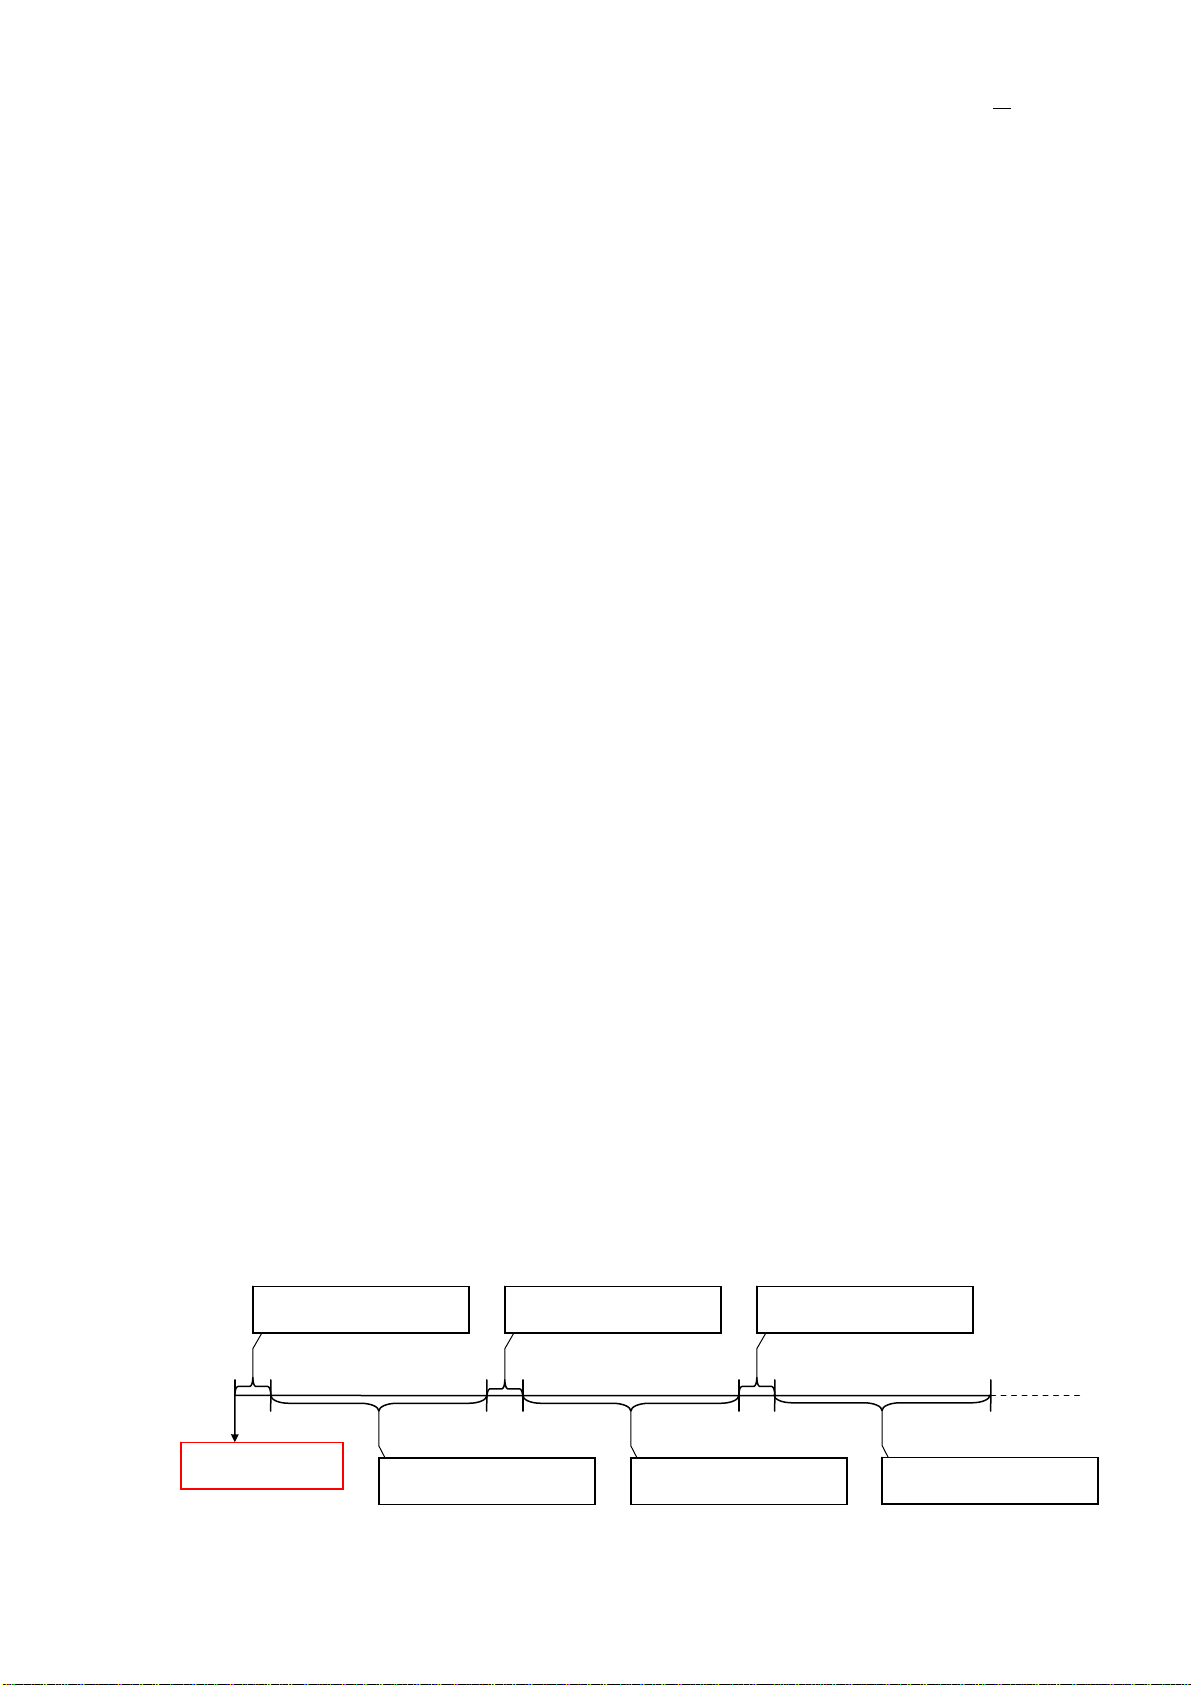
Command: M000000,13,X
Description: Enable/Disable low-power-consumption mode.
If you enable the low-power-consumption mode, tracke
minutes
Note:
1. X=0 to disable low-power-consumption mode.
2. X>0 to enable low-pow
(defaul
Example:
M000000,13,1
The tracker will wake up for 10
picture shows the principle:
Work for 10 minutes
Sleep for 60 minutes
Work for 10 minutes
Sleep for 60 minutes
Work for 10 minutes
Sleep for 60 minutes
Restart tracker

12
14. Beeper
Command: M000000,08,X
Description: If enable this function, when tracker get incoming call or detected
SOS or Help button pressed, it will goes beep beep beep.
Note:
X=1 to enable this function
X=0 to disable this function
Example:
M000000,08,1
M000000,08,0
15. Tracker Setup Software
The tracker can be configured by computer using the Tracker Setup Software.
Please refer to <GT99 Tracker Setup Software> for more information.
13
16. Problems & Solutions
Problem: Tracker will not turn on when pushing the power switch to On
side
Possible cause Resolution
Power switch was not pushed
properly
Check and make sure the power button is
pushed to ON side.
Battery needs charging Recharge battery for 3 hours
Problem: Tracker will not reply with SMS
Possible cause Resolution
Blue LED flash is always on Make sure the tracker located in a place with
GSM network.
Check the SIM card, reinsert it correctly and
firmly.
Replace the SIM card if necessary.
GSM network is slow Some GSM networks slow down during peak
time or when they have equipment
problems.
Wrong password in your SMS or
wrong SMS format
Write correct password or SMS format
Your phone number is not an
authorized number
Set no authorized number or Set your phone
number to be an authorized number.
The SIM card has run out of
credit
Replace or top up the SIM card
Battery is low Recharge the unit
Problem: Orange LED flash 1 second on and 1 second off
Possible cause Resolution

14
Unit does not have clear view of
the sky
Move the unit to a location where the sky is
visible. Tall buildings, trees, heavy rain, can
cause problems with the GPS reception.
Bad GPS reception Place the front side of tracker towards sky
Battery is low Recharge the unit
Problem: Unit Fails to Connect to Server via GPRS
Possible cause Resolution
SIM card in unit does not support
GPRS function
Enable SIM card GPRS function
GPRS function of unit is turned
off
Turn on GPRS function of unit
Incorrect IP address or PORT Get the right IP address and PORT and reset
to unit
GSM signal is weak Move the unit to a location with good GSM
reception
Table of contents
Other MEGASTEK GPS manuals


