Megxon TX6000 User manual
165mm+-2
122mm+-2
23
Table Of Contents Table Of Contents
Safety Notes ---------------------------------------------------------------
Overall Introduction --------------------------------------------------
Accessories -------------------------------------------------------------------
External View ---------------------------------------------------------------
Mode Dial (Working Mode) -----------------------------------------------
Focus Range -----------------------------------------------------------------
Icon Display -----------------------------------------------------------------
Icon Index Table ------------------------------------------------------------
Getting Ready ------------------------------------------------------------
Switch On or Off the Camera ---------------------------------------------
Loading the Batteries ------------------------------------------------------
Using an AC Adapter -------------------------------------------------------
Inserting an SD Card -------------------------------------------------------
Removing an SD Card ------------------------------------------------------
Attaching the Wrist Strap -------------------------------------------------
Getting Started ----------------------------------------------------------
Basic Photography ---------------------------------------------------------
Advanced Functionality Settings --------------------------------
Under Shooting Mode ( ) -----------------------------------------------
Setting Focus Range -------------------------------------------------------
Turning On or Off the TFT LCD Monitor --------------------------------
Setting Flash Mode --------------------------------------------------------
Setting Self-timer ----------------------------------------------------------
Setting Digital Zoom ------------------------------------------------------
Setting an Image Size (Resolution) ---------------------------------------
Setting Image Quality -----------------------------------------------------
Setting Voice Memo -------------------------------------------------------
Setting Exposure -----------------------------------------------------------
Setting White Balance -----------------------------------------------------
Under Playback Mode ( ) ----------------------------------------------
Exploring an Image --------------------------------------------------------
Displaying Image Information --------------------------------------------
Playback of a Movie Clip -------------------------------------------------
Thumbnail Images (Small Images) Display -----------------------------
Deleting Images ------------------------------------------------------------
Formatting the Built-inFlash Memory ------------------------------------
Formatting an SD Card-----------------------------------------------------
Setting Slide Show ---------------------------------------------------------
Setting Image Protection --------------------------------------------------
Printing Out Images without a PC ----------------------------------------
Under Movie Clip Mode ( ) ---------------------------------------------
Setting the RecordingTime of a Movie Clip -----------------------------
Under Setup Mode( ) ----------------------------------------------------
Setting Beep Sound --------------------------------------------------------
Setting AutoPower Off ----------------------------------------------------
Setting Date Stamp ---------------------------------------------------------
Setting Date Type ----------------------------------------------------------
Setting Date ----------------------------------------------------------------
Setting Quick View --------------------------------------------------------
Setting Language -----------------------------------------------------------
Default Setting -------------------------------------------------------------
PC Connection -----------------------------------------------------------
Installing the Camera's Driver -------------------------------------------
Under Microsoft Windows 98 / 98SE ------------------------------------
Under Microsoft Windows2000 ------------------------------------------
Under MicrosoftWindows ME /XP --------------------------------------
Under Mac 9.X or later ----------------------------------------------------
Installing Ulead Photo Explorer -----------------------------------------
Under Windows Operation System (Windows 98/98SE/2000/ME/XP)
Under Macintosh Operating System (Mac 9.X or later) ----------------
About Ulead Photo Explorer --------------------------------------------
Downloading the Image(s) ------------------------------------------------
Under Windows Operation System (Windows 98/98SE/2000/ME/XP)
Downloading Images from Removable Disk -------------------------------
Downloading Images through Ulead Photo Explorer -----------------------
Under Macintosh Operating System (Mac 9.X or later) ----------------
Downloading Images from Removable Disk -------------------------------
Downloading Images through Ulead Photo Explorer -----------------------
Appendix -------------------------------------------------------------------
Error Message Table -------------------------------------------------------
Specifications ---------------------------------------------------------------
04
05
05
06
07
07
08
09
10
10
10
11
11
12
12
13
13
14
14
14
14
14
15
16
16
17
18
19
20
21
21
22
22
23
24
24
25
25
26
27
28
28
29
29
29
30
30
31
31
32
32
33
33
33
35
37
37
38
38
42
44
52
52
52
52
53
53
53
54
54
54

165mm+-2
122mm+-2
5
4
Safty Notes Overall Introduction
Do not tryto open the camera by yourself which may causedamage to the
camera or electricshock.
Do not firethe flash in a close distance (less than 1meter) to humaneyes.
Keep the cameraaway from the reach of children or animals toprevent them
from swallowing thebatteries or small accessories.
Avoid using the camera if any formof liquid enters the camera. If it happens,
switch off thecamera and contactthe company thatyou bought this camera
from for help.
Do not operatethis camera with wet hands which may cause electricshock.
Do not placeor store the camera in a high temperature environmentwhich
may cause damageto the camera.
Do not mixto use different types of batteriesor new and old batteries.
Take outthe batteries toavoid electricity leakagewhich may damage the
camera when thecamera is not in use for a long period.
Unplug the camerafrom the adapter (if used) to avoid damage tothe camera
if the camerais not to be used in a long period.
It's normal thatthe temperature of the camera body rises after usingfor a long
period.
Accessories
Digital Camera CameraDriver 2xAA
& Ulead Software Batteries
Camera Pouch User Manual Quick StartGuide
USB Cable Wrist Strap
Alikaline
S
E
N
S
D
O
C
R
C
L
E
.
9
N
:
2
S
1
f
m
=
5
.
1
m
User
Manual
Quick
Start
Guide
S
E
N
S
D
O
C
R
C
L
E
.
9
N
:
2
S
1
f
m
=
5
.
1
m
S
E
N
S
D
O
C
R
C
L
E
.
9
N
:
2
S
1
f
m
=
5
.
1
m

165mm+-2
122mm+-2
67
Overall Introduction
Overall Introduction
Mode Dial(Working Mode)
Focus Range
Shooting Mode
Playback Mode
Movie Clip Mode
Setup Mode
( )
( )
( )
( )
Macro : 0.2m
Normal : infinity
( )
( ) 1.0m~
Menu Button
LED
Indicator
View Finder
Power Switch
TFT LCD
Monitor
Strap Eyelet
TFT LCD Button
Back
Up ( )Direction Button
Down ( )Direction Button
Left ( )Direction Button
Right ( )Direction Button
External View
Mode Dial
Shutter Button
Tripod SocketBattery/Memory
Card Cover
Lens Cover Lens Cover Switch
USB Connector
Focus Switch
DC In Connector
Flash
MIC
View Finder
Self-timer LED
Top
Front
Bottom
4X DIGITAL ZOOM
165mm+-2
122mm+-2
89
Icon Display Icon Index Table
Memory Card
Exposure
Digital Zoom
Focus Range
( )Macro
Date
Battery Status
( ) Battery full
( ) Battery half drained
( ) Battery drained
Image Size
( )3072x2048( By interpolation )
( )2304x1728
( )2048x1536
( )1600x1200
Image Quality
( ) Super fine
( ) Fine
( ) Normal
White Balance
( )Auto
( )Daylight
( )Sunset
( )Fluorescent
( )Tungsten
AUTO
Working Mode
( )Shooting mode
( )Playback mode
( )Movie clip mode
( )Setup mode
Working Mode
Focus Range
Flash Modes
Digital Zoom
Thumbnails
Self-timer
Movie Clip
Memory Card Inside
Battery Status
Image Size (Resolution)
Image Quality
White Balance
Exposure
Protected Image
Print (DPOF)
Voice Memo
Darkness Warning
X1
AUTO
+
+
-0
X4
Overall Introduction
Overall Introduction
Voice Memo
Flash Mode
( )Auto flash
( )Auto flash with
red-eye reduction
( )Night Scene
( )Fill-in flash
( )Flash off
0006
2003/10/30
+
X4
X1
+0.5
165mm+-2
122mm+-2
10 11
Switch On or Off the Camera
Loading the Batteries
Using an ACAdapter
Inserting an SD Card
Getting Ready Getting Ready
Batteries may losepower if kept inside the camera for a longtime without
using. Please removethe batteries while the camera is not in use.
Do not usemanganese batteries since they cannot supply sufficient power to
support the camera'soperation.
Batteries may notwork normally under 0 .
It's normal thatthe temperature of the camera body goes up afterbeing in use
for a longperiod.
Long time useis suggested to use an AC adapter.
In order toavoid any damage caused by bad quality ACadapters, please
contact the originalcompany, selling you the camera.
1. Check ifthe camera is switch off .
2. Make surethe AC adapter is 3.3V/2.0A.
3. Connect theAC adapter connector with the DC In socketon the camera.
4. Connect theadapter itself with the power outlet
5. Switch onthe camera.
1. Switch offthe camera.
2. Open theBattery / Memory Card Cover.
3. Insert theSD card into the card slot and press itdown until aclick sound
happens
4. Close theBattery / Memory Card Cover.
Slide the "POWER"switch sideways and
hold it awhileto switch on the camera.
Repeat the actionabove to switch off the
camera.
1. Check ifthe camera is switched off.
2. Slide theBattery / Memory Card Cover out to open it.
3. Load 2x AAbatteries into thebattery chamber, following the
polarity indications.
4. Close theBattery / Memory Card Cover.
Note
The below symbolsare the indication of the battery status on theTFT LCD
Monitor.
( ):Batterypower is full.
( ):Battery poweris half drained. Have new batteriesready.
( ):Battery poweris drained. Replace the batteries youare using now.
Note
To ensurethe normal operationof this digitalcamera, please use high quality
alkaline batteries.
Note
165mm+-2
122mm+-2
12 13
Basic Photography
1.Open the lenscover.
2.Switch on thepower.
3.Set theMode Dial at Shooting Mode ( ) for still image or Movie Clip
Mode ( ) for video recording.
4.The settingof the focus range for still image capture is required as follows
Macro ( ) : 0.2m
Normal ( ):1.0m~infinity
5.Refer tothe next section -- Advanced Functionality Settings (page14)toset
up the featuresyou prefer.
6.Hold stilland press down the Shutter Button.
7.The LEDIndicator starts blinking right after the Shutter Button is released.
8.Once theLED Indicator stops blinking, you are ready to take another shot.
Note
A messageof "LENS COVER" blinking on the TFT LCD Monitor as a
warning is toremind you of opening the lens cover first.
Note
A messageof "Low Light!" appearing on the TFT LCD Monitor as a warning
is to remindyou that the image that you are going to capture is undera low
light environment. To compose agood quality image,it is strongly
recommended to goto the Flash Mode to select Auto Flashor Fill-in Flashto
supply more lightsources.
Getting Ready Getting Started
Note
If a newSD card is used, you are required to formatit first. Please refer to
page 24 fordetails.
Note
With abuilt-in flash memory, the image(s) can be storedeither in itor in
memory card. Onlyif the memory card is inserted, the images willbe stored
in the memorycard rather than the built-in flash memory. Onthe other hand,
the images willbe stored in the built-in flash memory only ifa memory card
is not inserted.
1. Check ifthe camera is switched off.
2. Open theBattery / Memory Card Cover.
3. Press downthe SD card and the card will jump up.
4. Close theBattery / Memory Card Cover.
Attaching the Wrist Strap
112233
11
44
22
55
33
Removing an SD Card
165mm+-2
122mm+-2
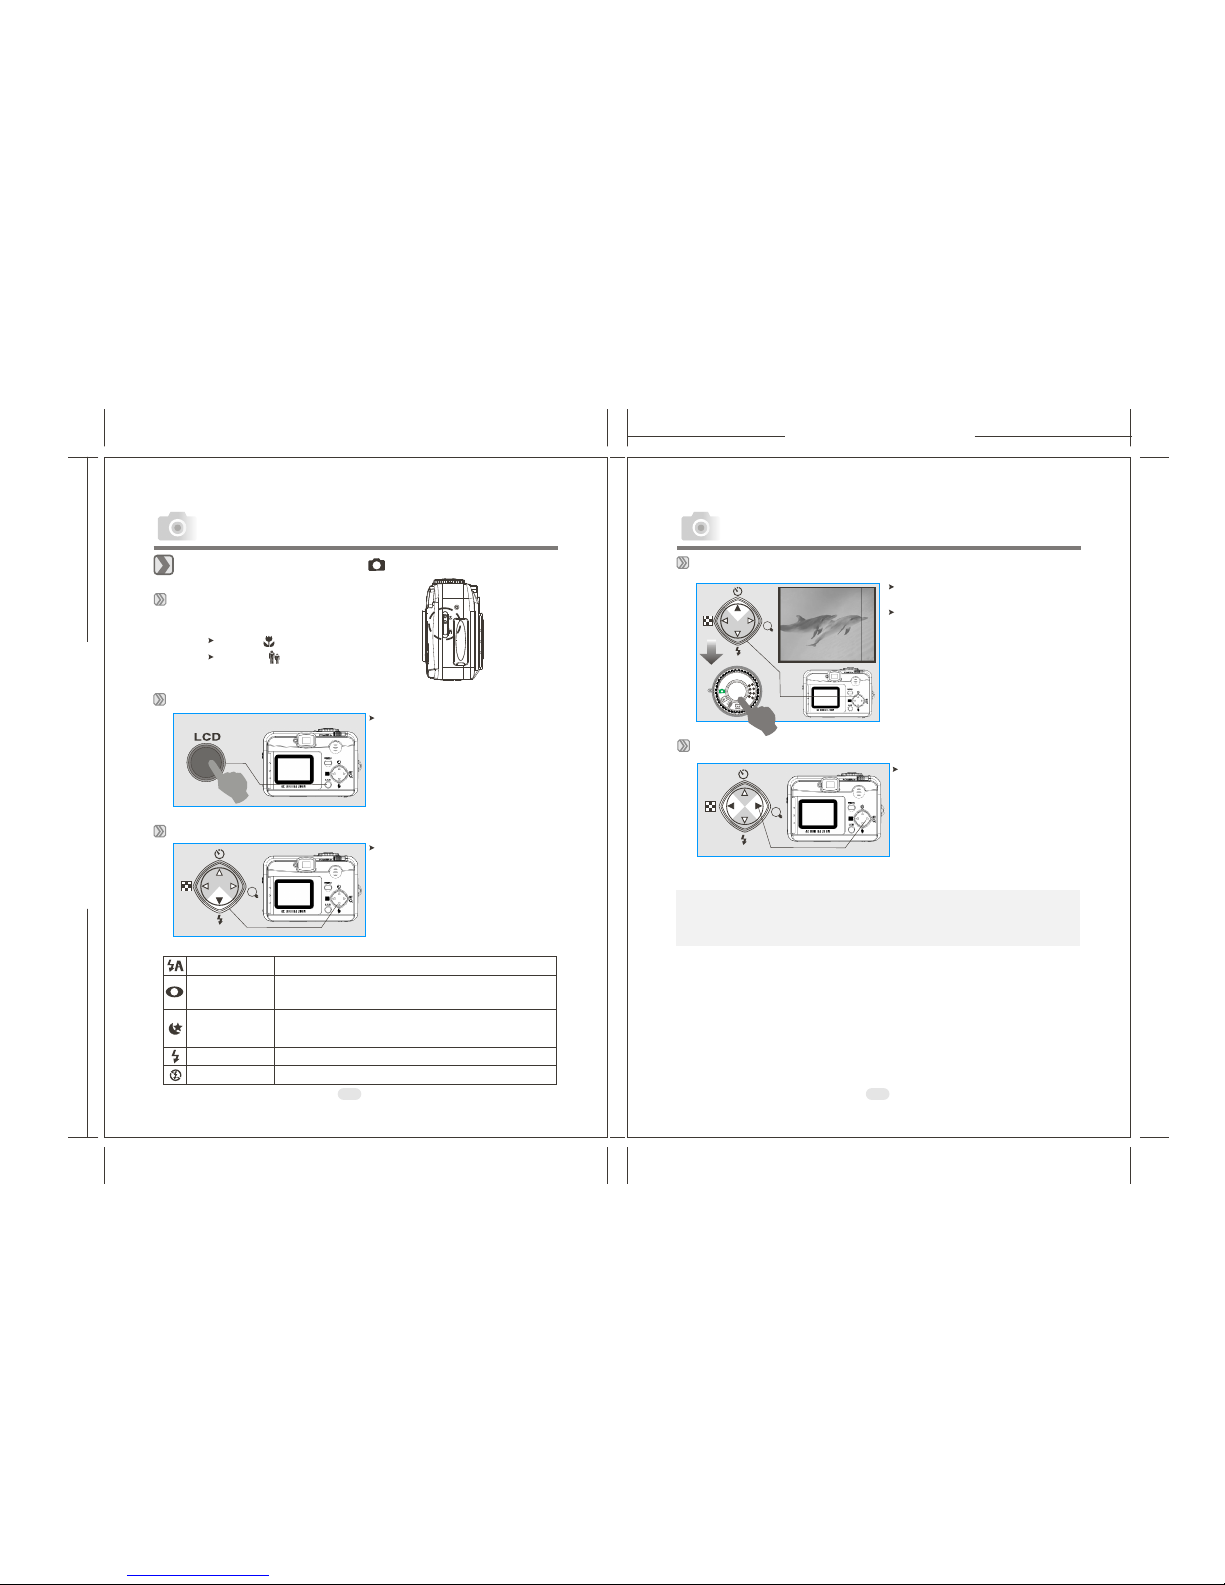
Under Shooting Mode ( )
Setting Focus Range
Turning On or Off the TFT LCDMonitor (Preset: On)
Setting Flash Mode(Preset: Auto Flash)
Advanced Functionality Settings Advanced Functionality Settings
Setting Self-timer (Preset:Off)
The self-timer starts with the
10 seconds.
countdown for
The self-timer will be automatically
cancelled once the shoot is done.
Setting Digital Zoom
The zoom bar, appearing on the left
on the TFTLCD monitor,shows the
current digital zoomposition.
Note
Generally speaking, thedigital-zoom image quality, compared with
non-digital-zoom, always decreasessharpness.
9
SET
SET
SET
Macro : 0.2m
Normal
( )
( ): 1.0m~infinity
The flash fires automaticallyas required under shootingmode.
To avoidthe subject's eyes appearred in the picture,use this
mode can effectivelyminimize the likelihood ofthe red-eye effect.
The flash will flashand the exposure timeis set to 1/4second so
that the subject inthe foreground and thebackground are properly
exposed.
The mode will enable the flash to fire in any circumstances.
The mode will disable the flash to fire in any circumstances.
Auto Flash
Auto Flash with
Red-eye Reduction
Night Scene
Fill-in Flash
Flash Off
Youcan change the icon display
on the TFTLCD Monitor,turn it
off, and turnit on again by pressing
the LCD buttonin order.
Youcan change the flash mode
shown below accordingto the
environment.
Setting Digital Zoom( 4X continuously)
14 15

165mm+-2
122mm+-2
17
16
Setting Image Size(Preset:2304 x 1728)
Note
Four resolutions providedcan be selected as follows:
( ) 3072x2048(XL)(By interpolation)
( ) 2304x1728(L)
( ) 2048x1536(M)
( ) 1600x1200(S)
Note
Youcan easily check whether the setting is changed ornot by the resolution
icon display onthe right side of the LCD screen. If not,please repeat the
above steps.
334444
11
EXIT:MENU CHANGE:
STILL IMAGE 1/2
IMAGE SIZE
QUALITY
VOICE MEMO 10 SEC
EXPOSURE 0.0
11
EXIT:MENU CHANGE:
IMAGE SIZE
QUALITY
VOICE MEMO 10 SEC
EXPOSURE 0.0
2222
33
Setting Image Quality(Preset: Fine Quality)
Note
Three levels ofimage quality can be selected as follows:
( ) SuperFine
( ) Fine
( ) Normal
Note
The better theimage quality is set, the less the number ofimages can be
stored in thebuilt-in flash memory or the memory card.
11
33
Step :To enter thesetting mode
Step :To select andconfirm the option
EXIT:MENU CHANGE:
STILL IMAGE 1/2
IMAGE SIZE
QUALITY
VOICE MEMO 10 SEC
EXPOSURE 0.0
IMAGE SIZE
VOICE MEMO 10 SEC
EXPOSURE 0.0
QUALITY
EXIT:MENU SET: EXIT:MENU SET:
STILL IMAGE 1/2 STILL IMAGE 1/2
IMAGE SIZE
2304X1728(L)
2048X1536(M)
1600X1200(S)
3072X2048(XL)
IMAGE SIZE
2304X1728(L)
2048X1536(M)
1600X1200(S)
3072X2048(XL)
QUALITY
FINE
NORMAL
SUPER FINE
EXIT:MENU SET:
QUALITY
FINE
NORMAL
SUPER FINE
EXIT:MENU SET:
STILL IMAGE 1/2
STILL IMAGE 1/2
STILL IMAGE 1/2 STILL IMAGE 1/2
EXIT:MENU CHANGE:
22
44
Step :To select andenter the option
Step :To escape thesetting
11
33
Step :To enter thesetting mode
Step :To select andconfirm the option
22
44
Step :To select andenter the option
Step :To escape thesetting
Advanced Functionality Settings Advanced Functionality Settings

165mm+-2
122mm+-2
18 19
+
Setting Exposure (Preset: )
0
Note
The higher thevalue is, the brighter the image will be.
-
3344
1122
EXIT:MENU CHANGE:
IMAGE SIZE
QUALITY
VOICE MEMO 10 SEC
EXPOSURE 0.0
EXIT:MENU SET: EXIT:MENU SET:
EXPOSURE
+0.0
EXPOSURE
+0.0
11
3322
44
Step :To enter thesetting mode
Step :To select andconfirm the
option
STILL IMAGE 1/2
STILL IMAGE 1/2 STILL IMAGE 1/2
Step :To select andenter the option
Step :To escape thesetting
Setting Voice Memo (Preset: 10 SEC)
3344
1122
EXIT:MENU SET: EXIT:MENU SET:
VOICE MEMO
10 SEC
VOICE MEMO
10 SEC
11
3322
44
Step :To enter thesetting mode
Step :To select andconfirm the
option
STILL IMAGE 1/2 STILL IMAGE 1/2
Step :To select andenter the option
Step :To escape thesetting
EXIT:MENU CHANGE:
IMAGE SIZE
QUALITY
VOICE MEMO 10 SEC
EXPOSURE 0.0
STILL IMAGE 1/2
EXIT:MENU CHANGE:
IMAGE SIZE
QUALITY
VOICE MEMO 10 SEC
EXPOSURE 0.0
STILL IMAGE 1/2
EXIT:MENU CHANGE:
IMAGE SIZE
QUALITY
EXPOSURE 0.0
VOICE MEMO 10 SEC
STILL IMAGE 1/2
Note
With theVoice Memo, youcan view the icon ( )on the TFTLCD Monitor.
Note
With theVoice Memo, theaudio is stored in WAV file format.So you can
download both ofthe image in JPG and the Voice Memo inWAV on PC.
Advanced Functionality Settings Advanced Functionality Settings
165mm+-2
122mm+-2
20 21
Advanced Functionality Setting
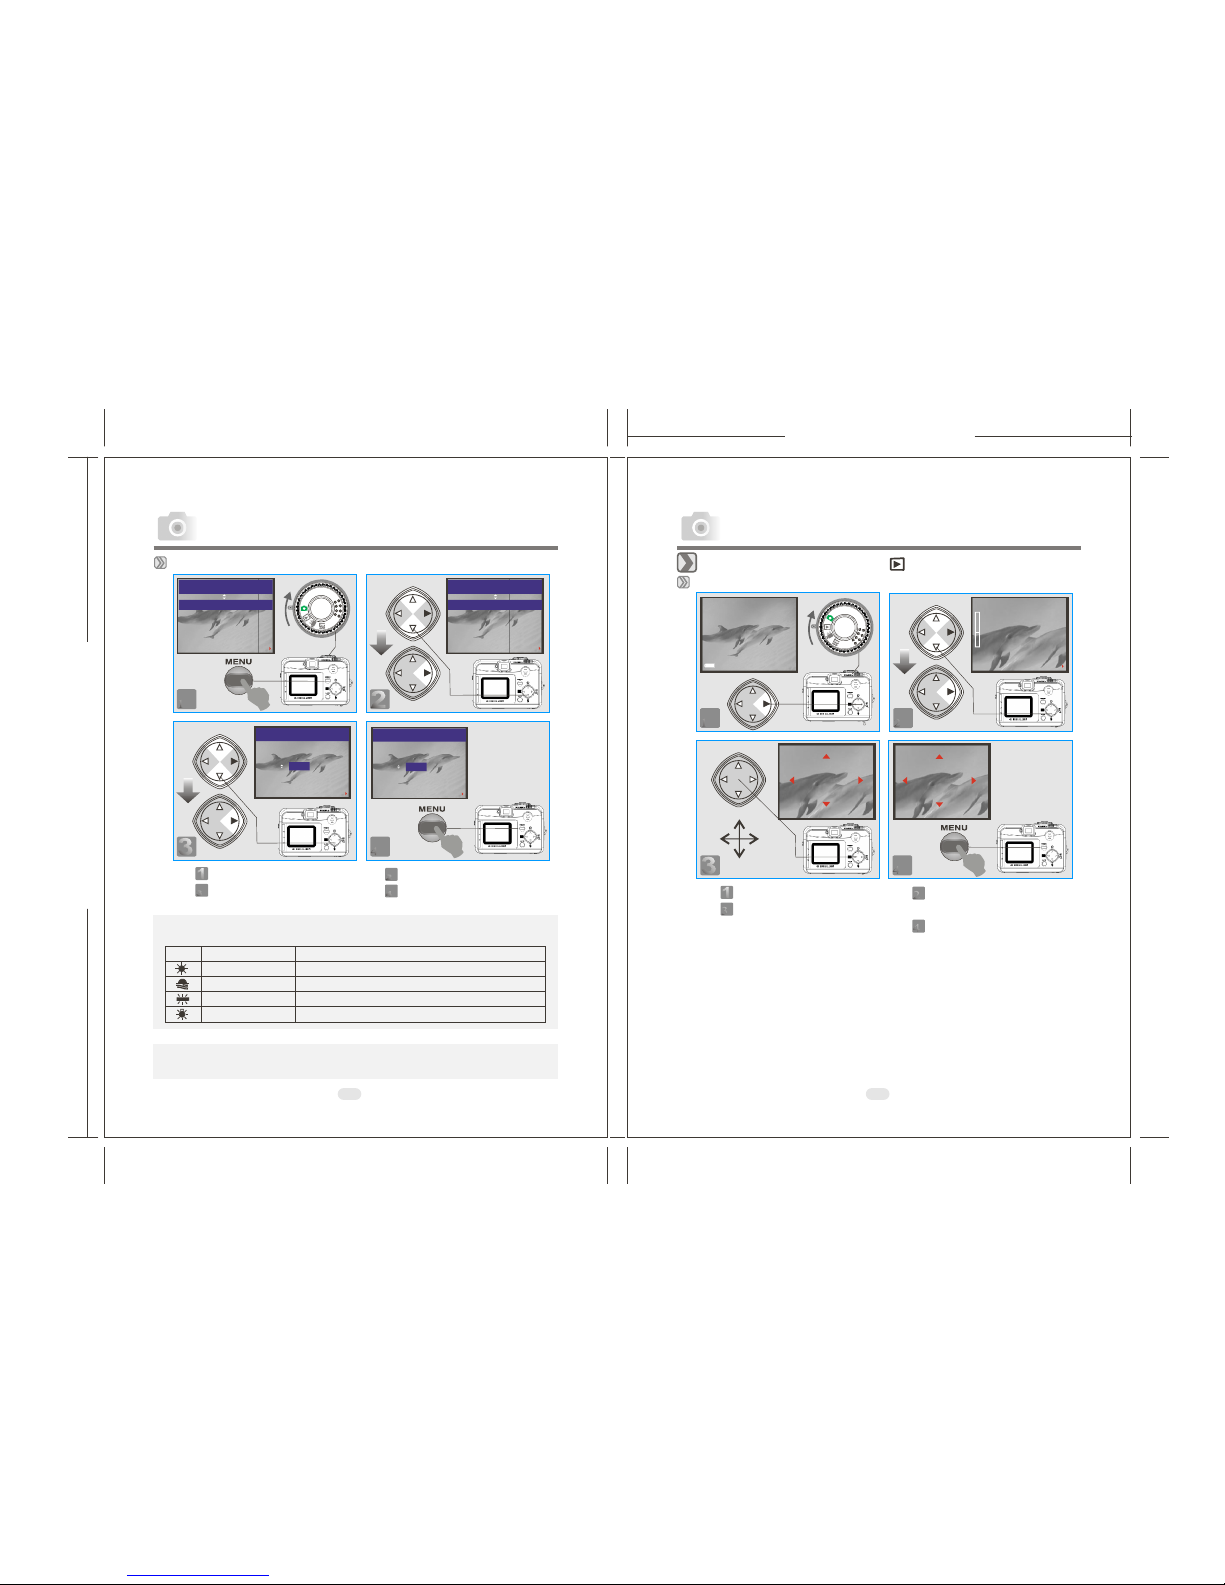
Under Playback Mode( )
Exploring an Image
3344
1122
11
33
22
44
Step :To enter thesetting mode
Step :To explorethe image
Step :To zoom in/outand enter the
option
Step :To escape thesetting
100-0002 100-0002
x4
x1
EXIT:MENU SET:
Advanced Functionality Setting
Setting WhiteBalance (Preset: Auto)
Five White Balancemodes can beselected as follows:
It is suggestedto stay AUTO mode forbeginners.
Auto Adjusting the whitebalance automatically
Daylight Under stronglight environment
Sunset Undersunset light environment
Fluorescent Underfluorescent light environment
Tungsten Undertungsten light environment
3344
11
EXIT:MENU CHANGE:
WHITE BALANCE AUTO
22
EXIT:MENU SET:
WHITE BALANCE
AUTO
EXIT:MENU SET:
WHITE BALANCE
AUTO
AUTO
11
33
22
44
Step :To enter thesetting mode
Step :To select andconfirm the
option
STILL IMAGE 2/2
STILL IMAGE 2/2 STILL IMAGE 2/2
Step :To select andenter the option
Step :To escape thesetting
EXIT:MENU CHANGE:
WHITE BALANCE AUTO
STILL IMAGE 2/2
Note
100-0002
EXIT:MENU
100-0002
EXIT:MENU
Note
Advanced Functionality Settings Advanced Functionality Settings

165mm+-2
122mm+-2
22 23
Displaying an ImageInformation
Note
Press Up ( ) and Down( ) DirectionButton to search for the movie clip
you record andpress Right ( ) Direction Button to see the movie clip.
( )
Playback of aMovie Clip
Note
Youcan press Right Direction Button topause the playback and repress
to cancel it.
Thumbnail Images (SmallImages) Display
Note
Press Up ( ) and Down( ) DirectionButton to search for the images or
movie clips andpress Right ( ) Direction Button to see themovie clip.
Note
The appearance oficon of ( ) represents a movie clip, not a still image.
Note
The appearance oficon of ( ) represents a still image with voice memo.
11
11
22
22
100-0002
100-0002
100-0002
100-0002
SIZE: 2048x1536
DATE: 2003/01/27
TIME: 17:16:56
FLASH: FIRED
100-0002
Advanced Functionality Settings Advanced Functionality Settings
165mm+-2
122mm+-2
24 25
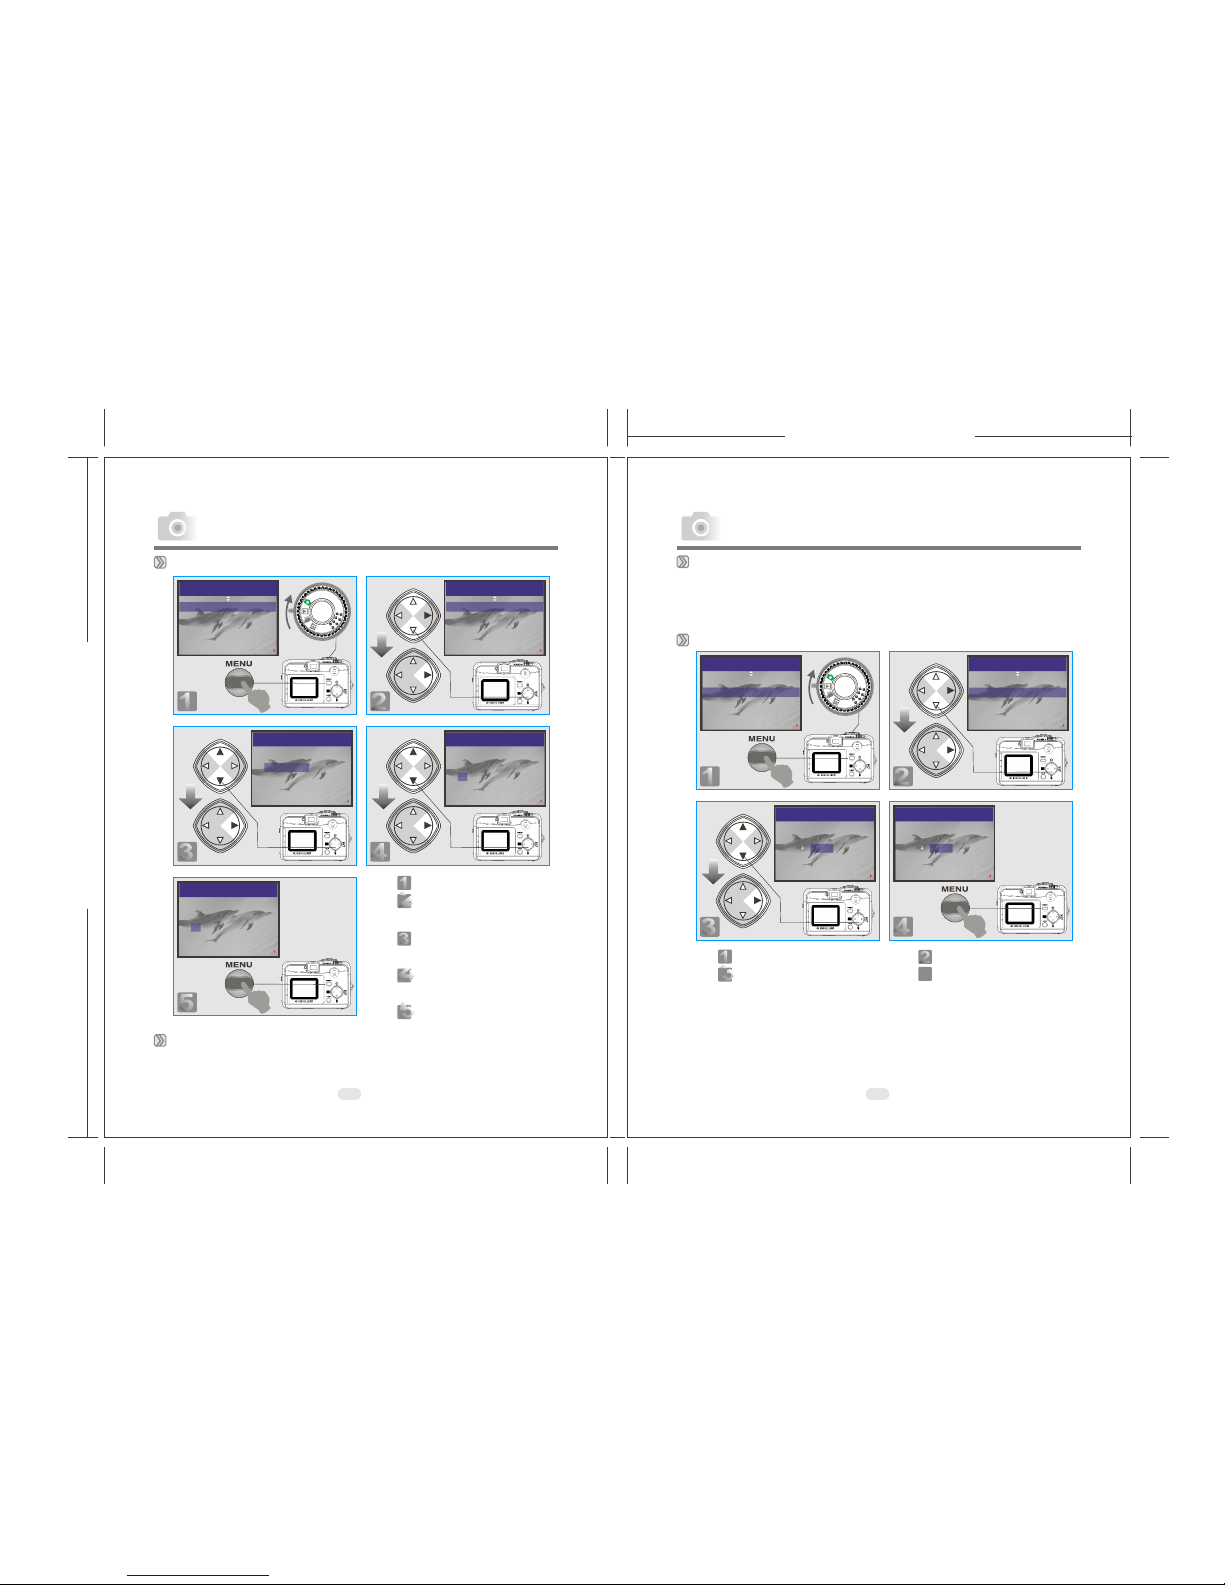
Deleting Image(s)
Setting Slide Show(Preset: 1 SEC)
11
EXIT:MENU CHANGE:
DELETE
SLIDE SHOW 1 SEC
PROTECT LOCK
PRINT XO
PLAY
22
EXIT:MENU CHANGE:
DELETE
SLIDE SHOW 1 SEC
PROTECT LOCK
PRINT XO
PLAY
33
PLAY
DELETE
DELETE ALL
FORMAT
DELETE IMAGE
EXIT:MENU SET:
11
22
44
55
Step :To enter the setting mode
Step :To select and enter the
option
Step :To select and enter the
option
Step :To select and confirm the
option
Step :To escape the setting
44
PLAY
DELETE
DELETE IMAGE
YES
NO
EXIT:MENU SET:
55
PLAY
DELETE
DELETE IMAGE
YES
NO
EXIT:MENU SET:
33
11
EXIT:MENU CHANGE:
DELETE
PROTECT LOCK
PRINT XO
SLIDE SHOW 1 SEC
PLAY
22
EXIT:MENU CHANGE:
DELETE
PROTECT LOCK
PRINT XO
SLIDE SHOW 1 SEC
PLAY
33
PLAY
EXIT:MENU SET:
SLIDE SHOW
1 SEC
44
PLAY
EXIT:MENU SET:
SLIDE SHOW
1 SEC
11
33
Step :To enter thesetting mode
Step :To select andconfirm the option
22
44
Step :To select andenter the option
Step :To escape thesetting
Advanced Functionality Settings Advanced Functionality Settings
Formatting the Built-inFlash Memory
Please make sureno memory card is inserted.
Refer to page24 and follow the steps, selecting "FORMAT"in step 3 , "YES"
in step 4.
Formatting an SDCard
Please inset anSD Card in advance.
Follow the abovesteps, selecting "FORMAT" in step 3, "YES" in step 4.

165mm+-2
122mm+-2
Setting Image Protection
11
EXIT:MENU CHANGE:
DELETE
SLIDE SHOW 1 SEC
PRINT XO
PROTECT LOCK
PLAY
3344
26 27
22
EXIT:MENU CHANGE:
DELETE
SLIDE SHOW 1 SEC
PRINT XO
PROTECT LOCK
PLAY
PLAY
EXIT:MENU SET:
PROTECT
UNLOCK
LOCK
PLAY
EXIT:MENU SET:
PROTECT
UNLOCK
LOCK
11
EXIT:MENU CHANGE:
DELETE
SLIDE SHOW 1 SEC
PROTECT LOCK
PRINT XO
PLAY
3344
22
EXIT:MENU CHANGE:
DELETE
SLIDE SHOW 1 SEC
PROTECT LOCK
PRINT XO
PLAY
Note
After the abovesteps are done, please check if the ( )is shown onthe right
side of theTFT LCD screen. If it is not shown please repeat the above steps.
For cancelling this"PROTECT" function, please repeat the steps above and
select "UNLOCK" inthe step 3 instead.
Printing Out Imageswithout a PC(Preset: X0)
Note
After the abovesteps are done, please check if the ( ) is shown on the left
down corner.If it is not shown, please repeat the steps.
Youcannot see the "PRINT" function on the TFT LCD Monitor ifa memory
card is notinserted.
11
33
Step :To enter thesetting mode
Step :To select andconfirm the option
22
44
Step :To select andenter the option
Step :To escape thesetting
11
33
Step :To enter thesetting mode
Step :To select andconfirm the option
22
44
Step :To select andenter the option
Step :To escape thesetting
PLAY
EXIT:MENU SET:
PRINT
XO
PLAY
EXIT:MENU SET:
PRINT
XO
Advanced Functionality Settings Advanced Functionality Settings

165mm+-2
122mm+-2
28 29
Under Movie Clip Mode( )(Preset :10 SEC) Under Setup Mode ( )
Setting the RecordingTime of a Movie Clip
Note
1. Once theShutter Button is pressed, the camerawill start andend the
recording automatically accordingto the time you select.
2. If "Manual" is selected, pressthe Shutter Button to start therecording or
press the ShutterButton again to stop the recording.
Note
The TFTLCD Monitor willshow "Low Light!" as a warning to remind you
that the videothat you are going to record is in alow light environment.
11
22
33
Step :To enter the setting mode
Step :To select and confirm the
option
Step :To escape the setting
11
EXIT:MENU SET:
MOVIE CLIP
TIME
20 SEC
30 SEC
MANUAL
10 SEC
22
EXIT:MENU SET:
MOVIE CLIP
TIME
20 SEC
30 SEC
MANUAL
10 SEC
33
EXIT:MENU SET:
MOVIE CLIP
TIME
20 SEC
30 SEC
MANUAL
10 SEC
Setting Auto Power Off (Preset : 2Minutes)
Setting Beep Sound(Preset : On)
11
22
33
Step :To enter the setting mode
Step :To select and enter the option
Step :To select and confirm the option
Step :To escape the setting
11
SETUP 1 / 2
BEEP ON
POWER OFF 2 MIN
DATE STAMP ON
DATE TYPE YMD
CHANGE:
22
SETUP 1 / 2
BEEP ON
POWER OFF 2 MIN
DATE STAMP ON
DATE TYPE YMD
CHANGE:
33
SETUP 1 / 2
BEEP
YES
ON
SET:EXIT:MENU
44
11
11
22
33
Step :To enter the setting mode
Step :To select and enter the option
Step :To select and confirm the option
Step :To escape the setting
SETUP 1 / 2
BEEP ON
DATE STAMP ON
DATE TYPE YMD
POWER OFF 2 MIN
CHANGE:
22
33
SETUP 1 / 2
POWER OFF
1 MIN
SET:EXIT:MENU
44
SETUP 1 / 2
BEEP ON
DATE STAMP ON
DATE TYPE YMD
POWER OFF 2 MIN
CHANGE:
Advanced Functionality Settings Advanced Functionality Settings
Table of contents
Other Megxon Digital Camera manuals


Megxon
Megxon TX2 User manual

Megxon
Megxon X34 User manual

Megxon
Megxon S500 User manual

Megxon
Megxon X31 User manual

Megxon
Megxon TX520 User manual

Megxon
Megxon MegaCam TX400 User manual

Megxon
Megxon X34 User manual

Megxon
Megxon TX4000 User manual

Megxon
Megxon TX3000 User manual

Megxon
Megxon TX410 User manual


