MELAG MELAflash User manual

Dear doctor:
Thank you very much for the trust you have demonstrated by purchasing this unit.
In 1951, MELAG began as a medium-sized family-run enterprise to specialise in the manufacture of
sterilization equipment for medical practices. In the meantime our company has grown into one of the
world's leading producers of sterilization equipment. Verification of it success has been the sale of
more than 450,000 MELAG units worldwide, attesting to the high quality of our sterilizers, which are
exclusively made in Germany.
Please read this Operating Manual before you start operation of the CF Card Printer.
The instructions contain important information and safety precautions.
MELAG - General Management and employees
Operating Manual
CF Card Printer
MELAflash

Safety instructions
To operate the CF Card Reader, pay attention to the safety instructions
given below and in the individual chapters of this Operating Manual.
■Do not open the housing of the CF Card Printer. Improper opening
and repair could impair the electrical safety and pose danger to the
user.
■
Only connect devices to the CF Card Printer which were intended for
use with this printer.
■
Only operate the CF Card Printer with the plug-in power supply unit
included in the scope of delivery.
■
No fluids may get into the interior of the CF Card Printer. Electrical
shocks or a short circuit could result.
■
Do not place the CF Card Printer directly on the autoclave. The
autoclave becomes hot during operation. Non-compliance could
impair the function and lead to damage of the plastic housing of the
CF Card Printer.
To these instructions
Symbol
Meaning
Explanation
Be sure to
observe
Indicates situations which might lead to damage of the
MELAnet Box if not complied.
Important
information
Indicates important information.
Example of font type
Meaning
Explanation
Batch output
Software citation
Words or phrases appearing on the ?display of the
autoclave are marked as software citations.
Chapter 6 – Logging
Cross-reference
Reference to another text section within this Operating
Manual.
Figure 1/(5)
Cross-reference
Reference to a detail in a figure – in the example, to
Part No. 5 in Figure 1.
Symbols on the unit
The symbol of the struck out trashcan identifies a device that may not be
disposed with domestic waste. An appropriate and competent disposal
must be carried out by the marketing party.
With the designation of an apparatus with this symbol, the manufacturer
furthermore declare
s that he satisfies all requirements of the law
concerning the release, withdrawal and environmentally compatible
disposal of electric and electronic appliances.

CONTENTS
Scope of delivery................................................................................................................................................... 3
Chapter 1 – Performance Description ................................................................................................................. 4
Proper use............................................................................................................................................................... 4
You can connect the following autoclaves to the MELAflash CF Card Printer......................................................... 4
Chapter 2 – Device Description............................................................................................................................ 4
MELAflash CF Card Printer Views........................................................................................................................... 4
LED Status Displays................................................................................................................................................ 5
CF card capacity...................................................................................................................................................... 5
Chapter 3 – Initial start-up .................................................................................................................................... 6
Connect MELAflash................................................................................................................................................. 6
Insert the MELAflash CF card.................................................................................................................................. 6
Format MELAflash CF card ..................................................................................................................................... 6
Initialise the MELAflash CF Card Printer on the autoclave...................................................................................... 7
Chapter 4 – Logging.............................................................................................................................................. 9
Subsequent log output............................................................................................................................................. 9
Filing structure and filenames.................................................................................................................................. 9
Open logs with MELAview..................................................................................................................................... 10
Open and save logs with standard programs on the PC ....................................................................................... 10
Chapter 5 – Update.............................................................................................................................................. 12
Chapter 6 – Error conditions .............................................................................................................................. 13
Technical Specifications..................................................................................................................................... 14
Appendix – Accessories ..................................................................................................................................... 14
Scope of delivery
MELAflash CF card Printer
MELAflash CF card
MELAflash Card Reader
Operating Manual
Plug-in power supply with 5 Volt

Chapter 1 – Performance Description MELAflash CF Card Printer
4
Chapter 1 – Performance Description
Proper use
The MELAflash CF Card Printer serves for storage of sterilization logs on
the MELA
flash CF card, which can be read out over the standard
accessory MELA
flash Card Reader on the practice computer.
You can connect the following autoclaves to
the
MELAflash CF Card Printer
Vacuklav®23 B+/ 24 B+/ 24 B/L+/ 30 B+/ 31 B+
as of software version 3.34
Euroklav®23 VS+/ 29 VS+ as of software version 3.34
Vacuklav®23-B/ 24-B /24-B/L/ 30-B/ 31-B as of software version 3.16
Euroklav®23V-S/ 29V-S/ 23-S/ 29-S as of software version 3.16
Cliniklav®25 as of software version 3.16
MELAtronic®15EN/17EN/23EN as of software version 3.22
Chapter 2 – Device Description
MELAflash CF Card Printer Views
(1)
(2)
(3)
(4)
(5)
Serial cable
for connection to the a
utoclave
Plug
-in power supply cable
for power supply
(5 V, max. 6 Watt)
Format
button
to format the
CF card
Status
displays
shown by red
(data) or green (power) illumination of the
LEDs
MELA
flash CF card
Fig. 1: Device views

Chapter 2 – Device Description MELAflash CF-Card-Schreiber
5
LED Status Displays
Power
green LED
Data
red LED
Status
Measures
●
●
01
●
lights up
CF Card Printer
ready for operation
Insert CF card
02
●
●
Access to the CF card
(batch output, formatting)
Do NOT remove the CF card
(otherwise loss of data!)
light up simultaneously
03
☼
blinks
CF card is almost full
Have new CF card ready, or copy the data
from the CF card to the practice computer
and then delete the data from the CF card
after copying.
04
☼
☼
CF card is full
Have new CF card ready or copy data on
this CF card to another data medium
blink together
05 ●
lights up
☼
blinks rapidly
Ready for formatting
(only 5 seconds)
Insert CF card within 5 seconds and only
remove when red LED goes out!
06 ☼☼
incorrect log
press the format button briefly
alternate blinking
07 ☼
incorrect CF card
(e.g. wrong format) or
defective CF card
format or exchange CF card
exchange CF card
blinks rapidly
CF card capacity
Warning!
Despite the high memory capacity of the CF card, we recommend
that you regularly back up the logs at least once a week on the
computer.
CF card almost full
If the CF card can only save less than three more 300 sterilization logs,
the green power LED begins to blink with brief interrupti
ons.
As soon as possible, save the sterilization logs on the CF card by
copying them to your computer with the delivered card reader device.
You can continue to save sterilization logs on the CF card until reaching
the maximum number of logs which can be s
tored on the card.
CF card full
If the CF card is full, no more sterilization logs can be saved on it.
In this case, the green power LED and the red data LED blink together
with brief interruptions.
Save the sterilization logs stored on the CF card by copying them to
your computer with the delivered card reader device.

Chapter 3 – Initial start-up MELAflash CF Card Printer
6
Chapter 3 – Initial start-up
Connect
MELAflash
For the power supply, connect the cable of the delivered plug-in
power supply unit to the right-hand socket (see 4, Fig. 1/(1) ,
of the CF
Card Printer.
Plug the power plug into the socket.
The power LED lights up green.
Connect the RS232 interface of the serial cable to the serial data
connection of the autoclave.
We recommend you to tightly screw both the knurled screws on the
serial connection to avoid them from getting loose or inadvertently
being pulled out.
Notice!
For more detailed i
nformation about connecting the serial cable, consult
the Operating Manual
.
Insert the
MELAflash CF card
Insert the delivered MELAflash CF card into the slot on the front of the
MELAflash CF Card Printer.
Warning!
Make sure the card is facing the right direction and do not use force to
insert it into the slot.
If you do not observe this precaution, the CF card or the CF Card Printer
can be damaged.
Warning!
Only remove the MELAflash CF card from the CF Card Printer when the
red data LED is not lit up.
If you pull the CF card out of the CF Card Printer while the red data LED
is still lit up, data saved on the card can be lost.
Format
MELAflash CF card
At delivery the CF card is already formatted, i.e. you can use it
immediately.
If it should nevertheless
ever be necessary to format the CF card, always
do so with the CF Card Printer. It formats the CF card in the format the
device requires (FAT16).
Insert the CF card into the slot as far as you can before it makes
contact with the limit stop, but is faced in the right direction in the slot.
Keep the "format" button pressed down (about 7 sec) until the red
data LED begins to blink repeatedly.
This signifies that the CF Card Printer is in formatting mode for a short
time (about 5 sec).
While the red data LED is blinking, insert the MELAflash CF card
completely into the slot of the MELAflash CF Card Printer until the
limit stop.

Chapter 3 – Initial start-up MELAflash CF-Card-Schreiber
7
The CF card will now be formatted. The red data LED lights up
steadily during the formatting process.
When the formatting is completed, the red data LED goes out.
Warning!
All saved data on the CF card is deleted during formatting.
Initialise the
MELAflash CF Card Printer on
the autoclave
In order to be able to save sterilization logs on the MELAflash CF Card via
the
CF Card Printer, you have to set the MELAflash CF Card Printer as
output medium on the autoclave
.
The settings you make depend on which device s
oftware is installed on
your autoclave
.
Settings for the
autoclave software version
up to
V3.34
Switch on the power at the autoclave and wait until the display shows
the initial state.
Select the setup menu Function by simultaneously briefly pressing
the (+) and (–) KEYS.
The display shows Function: Print .
Press the (P) KEY to select the submenu Print – Data transfer.
Again press the (P) KEY. The display shows Data transfer – no
printer, if a printer has not yet been set.
Navigate with the (+) KEY until the display shows Data transfer –
external PC.
Press the (P) KEY to confirm the selection. The display returns to the
men Print – Data transfer.
Press the (S) KEY twice to exit the menu and return to the initial state.
In order to save
the sterilization logs on the CF card directly after the end
of a s
terilization program, you must activate the opti
on on the autoclave for
immediate printout
.
Set immediate printout of the
logs
Select the Setup Menu Function by short simultaneous pressing of
the (+) and (-) KEY. The display shows Function: Print.
Press the (P) KEY. The menu Print – Data transfer is displayed.
Navigate with the (+) or (-) KEY until the submenu displays
Immediate
printout Yes/ No.
If the option is set to NO, press the (P) KEY to switch from
Immediate
Print NO to YES.
In order to exit the menu, likewise press the (S) KEY.
The MELAflash CF Card Printer is now ready for operation and
sterilization logs can be saved on the CF card.
Settings for the
autoclave software version
as of V4.06
Switch the autoclave on with the power switch.
Select the Setup Menu Function by short simultaneous pressing of
the (+) and (-) KEYS. The display shows Function: Last Batch No.
Navigate with the (+) or (-) KEY in the Menu Function
, until the display
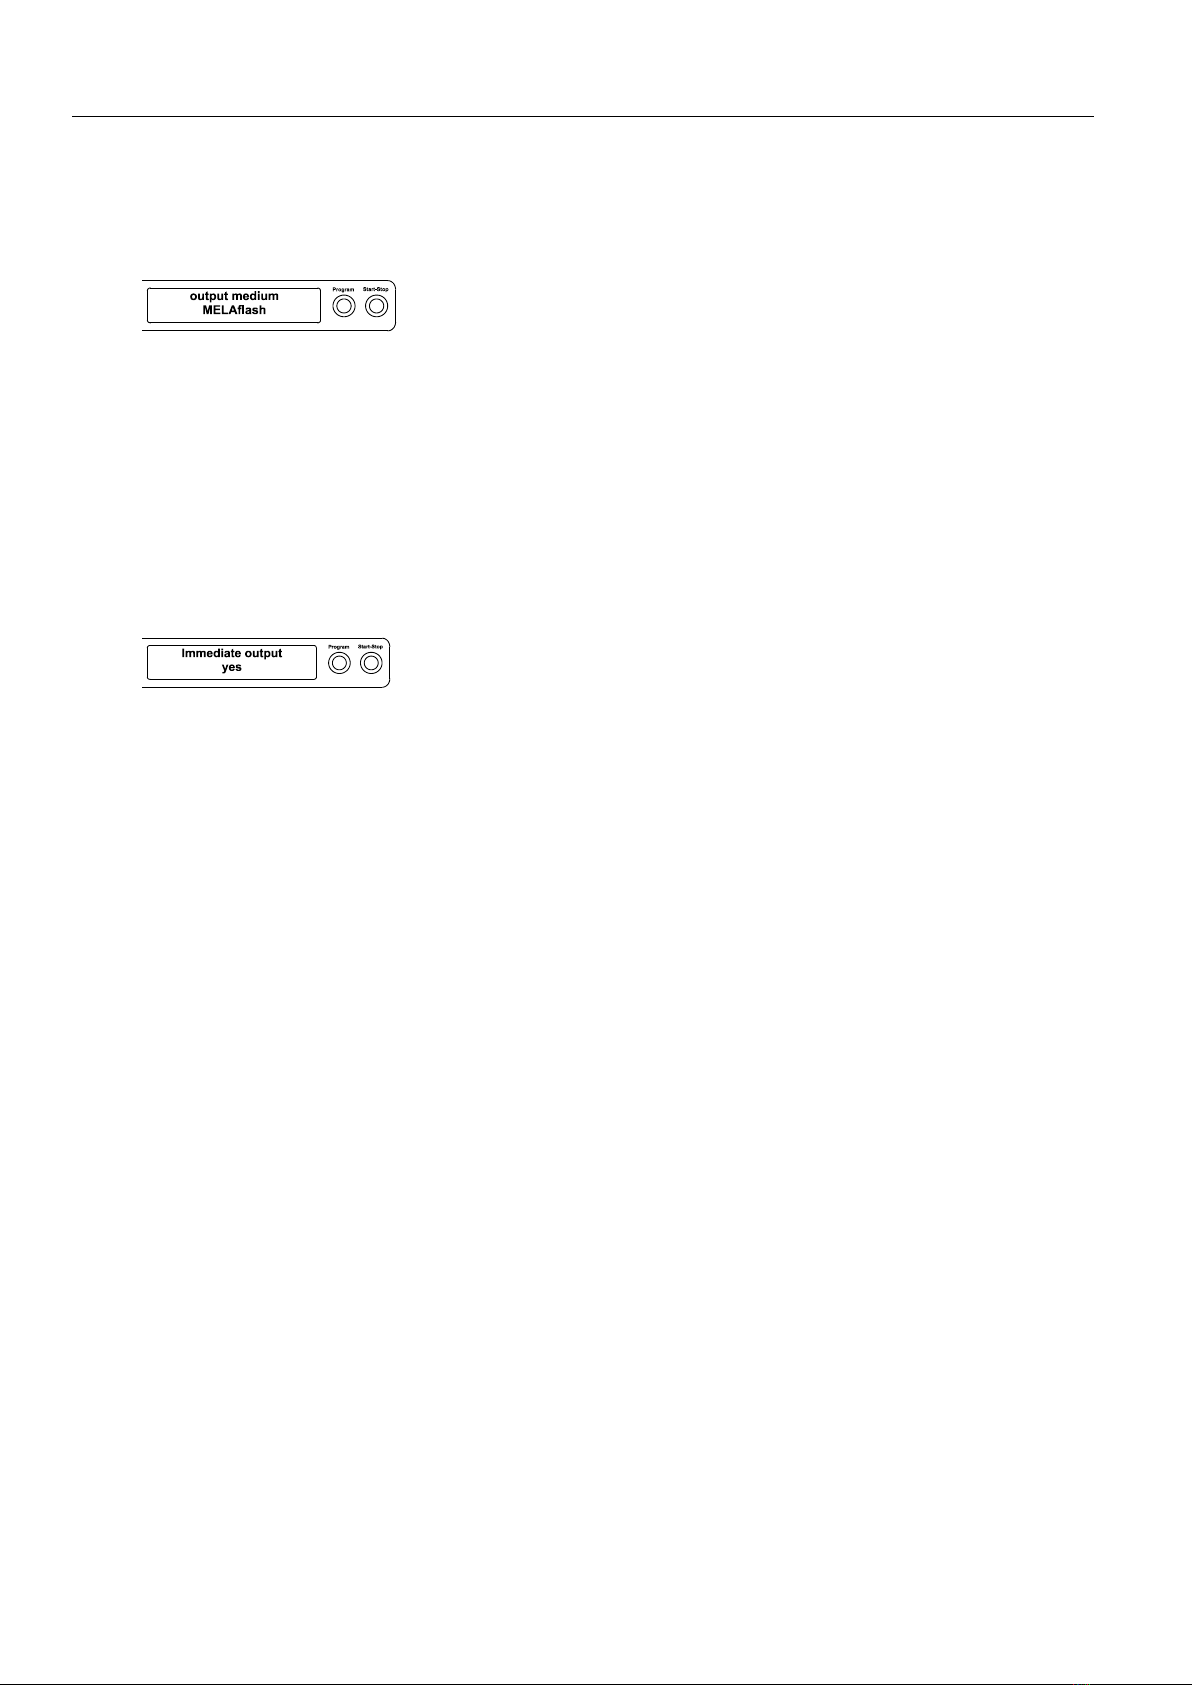
shows Function: Batch Output.
Press (P) to select the submenu
Batch output – Output medium

Chapter 3 – Initial start-up MELAflash CF Card Printer
8
Press the (P)
KEY
again. The display shows
Output medium – No output medium, in case no out medium was
yet selected.
Navigate with the (+) or (-) KEY to where MELAflash is displayed as
output medium.
For confirmation press (P). The display changes back to the menu
Batch output – output medium.
Press the (S) KEY twice to exit the menu and return to the initial state.
In order for sterilization logs to be stored on the CF card directly after the
sterilization program is completed, you have to activ
ate the option for
immediate output on the autoclave.
Set immediate output of the
logs
Select the SETUP Menu Function by short simultaneous pressing of
the (+) and (-) KEYS. The display shows the function: Last Batch
No.
Navigate with the (+) or (-) KEY to where the display shows
Function: Batch Output as output medium and press the (P)
KEY.
Navigate with the (+) or (-) KEY until the submenu displays
Immediate
printout NO/ YES.
If the option is set to NO, press the (P) KEY to switch from
Immediate
Print NO to YES.
In order to exit the menu, press the (S) KEY twice.
The MELAflash CF Card Printer is now ready for operation and
sterilization log
s can be saved on the CF card.

Chapter 4 – Logging
9
Chapter 4 – Logging
Warning!
Follow the following instructions for using a CF card:
■Never insert the CF card into the card slot with force.
■Never draw the CF card out from the card slot during a write and
read access procedure. The red LED lights up during the write and
read access procedure.
Non-observance can result in data loss, damage to the CF card and/or
the autoclave and/or the CF Card Printer. The card can become
unusable.
Subsequent log output
You also have the option of outputting the logs subsequently to the CF
card and independent of the time wh
en the program ends. You can
choose whether selected or all stored logs (up to 40 logs) should be
outputted.
Output selected logs
You can access these functions over the Setup Menu Function*.
You can choose between:
Print/last cycle output
Print/output stored cycles
*For more detailed information on the operating menu, consult the
Operating Manual of your autoclave.
Filing structure a
nd filenames
Folder structure
The storage of files on the CF card as well as the created folder structure
is orga
nised as follows:
The folder name of the uppermost level consists of 5 characters and
contains encoded in the name: the year of manufacture, the type of unit
and the autoclave's Manufacturing Number. On the level below, the
folders are named by month and y
ear.
If necessary, an additional folder
ERROR and/or UNKNOWN is created.
Here the faulty logs (
ERROR) or non-recognised logs (UNKNOWN) are
stored separately.
Filename structure
The first five characters of the file names of the saved logs correspond to
t
he folder name of the uppermost level.
The characters 6
- 8 of the filename consist of the day and the day batch
of the corresponding log:
The day of the year can take values from 1 to 366. The day batch can
take values from 1 to 127.
Thus every log rec
eives a unique filename within the time period of one
calendar year. Logs of different calendar years can receive the identical
file names but are stored in separate directories.

Chapter 4 – Logging
10
Meaning of the file
extensions of the
sterilization logs
PRO
Logfile (successful)
STA
Status log
STR
Malfunction log
LEG
legend log
STB
Standby malfunction log
DEM
Demo log
LOG
System log
DES
Demo malfunction
RECOMMENDATION
To avoid inadvertent data loss, we recommend the regular backup of the
sterilization
logs on the CF card onto the medical practice PC (e.g.
weekly)
.
Open logs with MELAview
MELAview 2
for displaying, editing and
printing log files
The program MELAview 2 is for simple viewing, editing, and printing of
MELAG sterilization logs. Th
is program is a kind of log browser.
You can also display log lists with MELAview. You can sort the
sterilization logs in ascending or descending order, filter over selection
fields and print the logs direct from MELA
view. You can purchase
MELA
view 2 from your MELAG dealer.
MELAview 2
Demo version
Before you decide to purchase MELAview 2, MELAG offers you the
opportunity of testing the program without charge.
On the delivered CF Card
there is a demo version of MELAview so that
you can look at the func
tions of MELAview using fictive sterilization logs
as examples.
Please notice that the program will be deleted in case of
formatting the CF card
.
Your MELAG dealer can
also provide you with a demo version on CD
ROM
.
Save preferred path
In order to rapidly open preferred folders for sterilization logs, it is possible
to save the respective path as a favourite.
Open and save logs with s
tandard
programs
on the
PC
The sterilization logs are in ASCII format and can be read with simple text
editors or oth
er standard programs of any operating system. The
extensions of the logfiles which you copy to the PC with the Card Reader
make it initially impossible for a PC to open such files the first time you
attempt to do so.
You must first once allocate every possible file extension e.g. to the Text
Editor of Windows as program. Subsequently you can open the
sterilization logs simply by double
-clicking on the file with the left mouse
button.
In order to open the log Text Editor of Windows, proceed as follows:

Chapter 4 – Logging
11
Open the directory on your PC where
the logfiles are stored.
Double-click on the logfile.
If the respective file extension is
unknown, the dialog window depicted on
the left opens up:
Choose "Select program from a list"
and confirm with OK (A).
A separate dialogue window opens up.
Look for the Editor (B) in the listed
programs and select it.
Make sure that the checkmark is set to
"Always open this file type with the
selected program" (C). That is important
so that the Editor can recognise future
logfiles with the same file extension.
Confirm with OK. From now on you can
always open the logfiles simply by
double-clicking.
A.
B.
C.

Chapter 5 – Update
12
Chapter 5 – Update
Update as of MELAflash
Software version 2.000
Performing updates on the MELAflash CF card printer is possible from
version 2.000.
The software version currently installed in the MELA
flash CF card printer
is listed on the end of the log print
-out:
In order to perform an update, proceed as follows:
Save the update file (11352.MOT) in the main directory of an empty
CF card (FAT16).
Switch-off the CF card printer, i.e. unplug from the mains and insert
the CF card.
Re-plug the CF card printer into the mains.
The update will start automatically. The LED illuminates during the
update.
After comple
tion of the update procedure, a LOG file will be written on the
CF card containing the result. If the update has been performed
successfully, the current software version is written in the LOG file.
Example of a LOG-file
-------------------------------------------------
Update Logfile
-------------------------------------------------
New version firmware
V2.002A
Nov 11 2010 13:18:16
-------------------------------------------------
Result
No Error
-------------------------------------------------
Legend for LOG-file
The following outcomes in the LOG file are possible:
Result
Description
No Error
The update was performed successfully.
Wrong file
The update file does not contain a MELAflash update file
Update file corrupted
The update file could not be opened because the file or file system is
damaged.
MOT chks error
The update file (file format) is damaged or invalid
Version not found
No information about the current software version was found in the
update file.
Unknown error
Unknown error

Chapter 6 – Error conditions
13
Chapter 6 – Error conditions
Before saving the data, the MELAflash CF Card Printer verifies the log
data transferred from the autoclave
.
Unknown log file
If a log file is not recognised, the system creates a directory UNKNOWN
on the CF
card.
Moreover, the red data LED and the green power LED steadily blink
alternately (
see Table, row 06 on p. 5, LED Status Displays).
To reset the error condition, press briefly on the "Format" button on the top
of the MELA
flash CF Card Printer (see p. 4, Fig. 1/(3)).
Faulty log file
If there is an error in the data transmission from the autoclave to the CF
Card Printer, i.e. while a logfile is
being saved on the CF card, the system
creates the directory
ERROR.
Here the red data LED and the green power LED also steadily blink
alternately (
see Table, row 06 on p. 5, LED Status Displays).
To reset the error condition, press briefly on the "Format" button on the top
of the MELA
flash CF Card Printer (see 4, Fig. 1/(3)).
CF card incorrectly
formatted
If the CF card is incorrectly formatted, this is indicated by a steady red
blinking of the red data LED (
see Table, row 07 on p. 5, LED Status
Displays
).
Reformat the CF card in the CF Card Printer (see 6, Format
MELAflash CF card).
CF card defect
If the CF Card Printer detects a defect in the inserted CF card, this is
indicated by a steady red blinking of the red data LED (
see table, row 07
on p.
5, LED Status Displays).
In this case replace the defect CF card with a new one.

Technical Specifications
14
Technical Specifications
Description
MELAflash CF card Printer
Device dimensions (WxDxH)
7,5 x 11,5 x 2,3 cm
Power supply (unit)
5 Volt (max. 6 Watt)
Suitable storage media
Compact-Flash Card (CF-Card)
Appendix – Accessories
Article
Order No.
plug-in power supply for MELAflash CF card Printer
30403
MELAflash Card Reader
01048
MELAflash CF Card
01043
Further information on the documentation and release is provided in the
download area of the MELAG website under the key term
Laws & Ordinances.
MELAG Medical Technology
Geneststraße 6-10
E-Mail: info@melag.de
Rev.: 1 – 11/1213
10829 Berlin, Germany
www.melag.de
Doc.: BA_GB_MELAflash_v1.doc
Other manuals for MELAflash
1
Table of contents
Other MELAG Printer manuals