MERCATOR ikuu SDC8G User manual

SMART VIDEO DOORBELL
QUICK START GUIDE
SDC8G www.ikuu.com.au

2
This smart video doorbell is designed for use in homes, apartments, oices, garages
and sheds. It’s easy to set up and operate, giving you and your family the security and
peace of mind that you deserve.
You can monitor your video doorbell remotely through the Mercator Ikuü app, which
can be downloaded for free from the Apple App Store and Google Play Store.
1 x Smart Video Doorbell
1 x Indoor Chime
1 x 16GB Micro SD Card*
1 x 5V DC Adaptor (for pairing and indoor chime unit)
1 x 12V DC Adaptor (for doorbell power supply)
1 x USB Cable
1 x Quick Start Guide
1 x Mounting Tools and Screws
*Class 10 required
(Max. 128GB card supported)
Introduction
Contents

3
External Power Ports
Connect supplied cable
from 12V DC adaptor
Reset Button
Use the pin to hold for
5 seconds to reboot
and clear all settings
to factory defaults.
This will allow you
to connect with a
dierent Wi-Fi network
if required.
Speaker
Two way audio
Grub Screw
Location
Grub Screw Location
USB Port
Power with supplied
cable and 5V DC
adaptor
Micro SD Card Slot
Rolling storage
micro SD card
16GB included
(Max.128GB card
supported)
Status Light
RED Solid Light:
indicates the device
has been reset and
is unpaired
RED Blinking Light:
waiting for Wi-Fi
connection
(Pairing Mode)
BLUE Blinking Light:
During pairing or lost
Wi-Fi connection
BLUE Solid Light:
Video Doorbell is
running correctly
Ring Button
Press to activate
doorbell
Camera Lens
1080p HD, with
130° angle of view
Microphone
Light Sensor/
Infrared LEDs
Detects low light
and turns on the
infrared lights which
allow the camera
to capture both day
and night images.
Identification

4
1. Download the Mercator Ikuü app.
2. Tap ‘create new account’ or ‘log in to account’.
3. Follow the in-app prompts and tap ‘OK’.
Log in to the
Mercator Ikuü
app.
Note: Ensure your
Video Doorbell is
in pairing mode.
The LED should
be flashing red.
If it isn’t, use the
reset pin to press
and hold the reset
button on the
back of the unit
for 5 seconds and
wait for the Video
Doorbell to restart.
1
Tap the icon
and select
‘Add Device’.
2
Connect Your Video Doorbell to the App
Set Up the App

5
Connect Your Video Doorbell to the App (cont.)
Select
‘Doorbell’ from
the sidebar,
and then tap
the Video
Doorbell icon.
3
When the
prompt
appears, tap
‘next step’.
4
Enter your
Wi-Fi name and
password, then
tap ‘Confirm’.
5
When the
prompt
appears, tap
‘Continue’.
6

6
Place the
camera eye
over the QR
code to scan
(holding the
camera 15cm
away from your
mobile screen).
When you hear
the prompt,
tap ‘I Heard a
Prompt’.
7
The app
will begin
connecting
to your video
doorbell.
When it
reaches 100%,
you will be
taken to the
product’s
settings page.
8
Update the
name of
the device
(optional), then
tap ‘Done’.
9
The Video
Doorbell feed
will open, and
you will be
prompted to
allow access to
your device’s
microphone.
Tap ‘OK’ to
continue. Your
Video Doorbell
is now
connected and
ready for use.
10
Connect Your Video Doorbell to the App (cont.)

7
Doorbell Functions
Take a photo of the live video feed, which will be saved to the
photo album.
Speak through the doorbell speaker via your phone
microphone.
Take a video of the live video feed, which will be saved to the photo
album. 24/7 recording and event recording available.
Review camera footage from the SD card (if installed).
Adjust motion detection settings.
View previously saved photos and video recordings. You can download
these to your local mobile device.
Adjust the date when reviewing playback.

8
Pairing Your Indoor Chime Unit
1. In a location near your door and with good Wi-Fi coverage, power on your indoor
chime unit with either a standard USB-A port or the provided DC power adaptor.
The status light will blink red to indicate that the chime is ready for pairing.
2. To put the chime in pairing mode, push the reset button once (located at the
rear of the chime unit). The status light will blink continuously. Ensure that it is
blinking for at least 5 seconds before completing step 3.
3. In the app, navigate to settings > bell settings > bind. The status light will
stop blinking and remain solid blue to indicate that the chime is paired. Aer
successfully pairing the indoor chime unit, you can adjust the ringtone
and volume.
Note: If your chime unit is showing as paired, but makes no sound when the doorbell
is pressed, try unbinding the chime unit and binding it again. Ensure that the status
light indicator is blinking slowly and continuously before tapping ‘bind’ in the app.
If there is still no sound when the doorbell is pressed, try moving it closer to the video
doorbell unit.

9
Installation Instructions
Before choosing your location, check the Wi-Fi strength/coverage in that area.
WARNING: Do not connect both power supplies together at anytime.
IMPORTANT: Mount the doorbell under eave and avoid placing it in direct sunlight
and extreme weather. Do not mount the doorbell unit on metal or near metal door
frames, security door, or proximity any metal door furniture as this might aect the
functionality of the doorbell.
Please note: The below image shows the doorbell angle view. Install it in a suitable
location with Wi-Fi coverage (Fig.01).
Wi-Fi Coverage
FIG. 01

10
Note:
• This doorbell requires a network device (e.g. wireless/non-wireless router, network switch etc.)
that is connected to the internet for setup and use. This network device is not supplied with
this kit.
• This doorbell might experience network, motion command and live transmission delay issues.
This is normal, due to the connected network, 3G/4G mobile network, server overflow or internet
upstream speed, download speed and video resolution. To reduce delay, it is recommended to
reduce the video quality, or contact your mobile/network service provider.
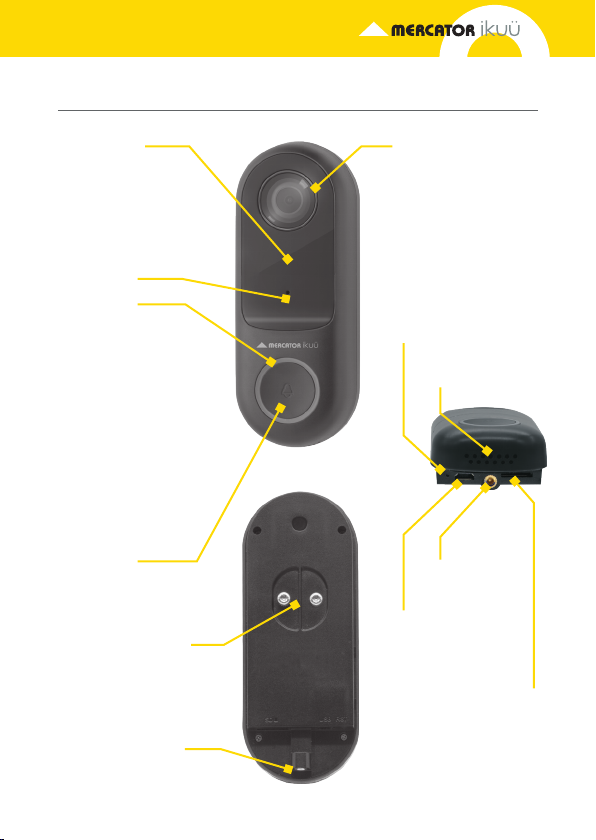
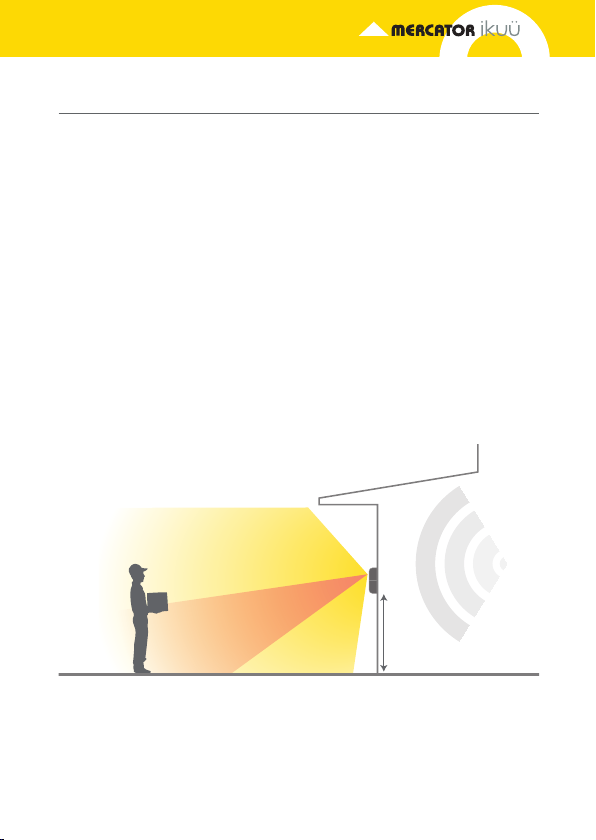
There are two mounting methods to
choose from. Note: The angled wall
mount requires the flat wall mount for
installation.
1. Position 12V DC power adaptor to
an outlet as close to your mounting
location as possible. Do not plug in
your adaptor.
2. Route adaptor wire with extension
cord to doorbell location. Do not
connect to the doorbell.
3. Mark screw position using
bracket. Pass 12V DC adaptor with
extension cord through middle of
the brackets (Fig.02)
4. a) Angled Wall Mount
Using both mounts, secure to
mounting surface with supplied
screws and wall plugs (Fig.02)
b) Flat Wall Mount
Install as described above without
angled wall mount.
5. Connect 12V DC adaptor with
extension cord to the two terminals
at the back of the doorbell Fig.03.
6. Install the doorbell to the bracket
using supplied grub screw Fig.04.
7. Plug in 12V DC adaptor and your
doorbell is ready for use.
Flat Wall
Mount
Terminals
Rear of
Doorbell
Angle Wall
Mount
Wall
Plugs
Mounting
Screws
DC
Adaptor
Wire
Adaptor
Wires
Grub
Screw
FIG. 02
FIG. 03
FIG. 04

11
For guides on using these features in the app and to see our broad range of smart products, visit
www.ikuu.com.au
You can speak to our customer service team directly via phone on 1300 552 255 (AU) or
0800 003 329 (NZ), or via email at customercare@mercator.com.au
Rooms
Separate your products within the app for easy control based on their location.
Scenes
Control multiple products from any room at the same time.
Automation
Create triggers that allow products to complete actions automatically. These triggers
can be based on time, sensors, or even other products.
Routines
Use Mercator Ikuü with other household products to create simple voice commands
that trigger customised actions based on your daily activities.
Timers
Use a range of a scheduling and countdown timers that trigger actions.
Alerts
Manage the kinds of alerts you receive from your products (e.g. security products).
Sharing
Share access of your products with others.
In-App Customer Service
Talk to our customer service team directly through the app if you have any issues.
Want more from your products? The Mercator Ikuü app can help you
to customise your smart products any way you like. Detailed guides on
these features can be found at www.ikuu.com.au.
App Features

12
Warranty
Mercator guarantees this product against defects of materials and workmanship
for a period of 36 months from the date of purchase provided the product is used
for its proper purpose, in accordance with Mercator’s recommendations and
within such voltage and current limits as are specified by Mercator in relation
to the product. Mercator will at its own option and cost make good, or replace
this product with the same or similar product and return it to you, or provide
a credit for any product manufactured or supplied by it, which proves to be
defective within the limits set out above provided that no repairs, alterations
or modifications to the product have been undertaken or attempted by anyone,
other than Mercator or its authorized agents. Should you wish to make a claim
under this guarantee, the product and proof of purchase must be returned pre-
paid by you to the place of purchase.
This guarantee is in addition to and does not take away from any other rights and
remedies you may have under any relevant law.
Our goods come with guarantees that cannot be excluded under the Australian
Consumer Law. You are entitled to a replacement or refund for a major failure
and for compensation for any other reasonably foreseeable loss or damage. You
are also entitled to have the goods repaired or replaced if the goods fail to be of
acceptable quality and the failure does not amount to a major failure.
Please retain your proof of purchase for all warranty claims.
For all Sales & Warranty enquiries
Mercator (ACN 005 946 958)
Building 3, 31-41 Joseph Street,
Blackburn North, Victoria, 3130
P.O. Box 1065, Blackburn North LPO
Blackburn North, 3130
For sales and product information telephone
Customer Service: 1300 552 255
MRIN005181/2
Table of contents