Merlin myQ 827AU User manual

myQ®REMOTE LED LIGHT
Model 827AU
NOTE: The Remote Control supplied with your Remote LED Light is preprogrammed by the factory to the button shown in figure 1.
Installation
The myQ®Remote LED Light is designed to plug directly into a standard 240V outlet and not permanently wired. Consider installing close to an existing power outlet. Nominal
lumens is 1500, avoid directly looking at the lens when illuminated.
NOTE: If installing light on lasterboard and a ceiling joist cannot be located, use wall anchors provided. No pilot hole is required for wall anchors.
1. Drill pilot holes 6-1/8" (15.6 cm) apart if mounting to joist. OR Screw in wall anchors 6-1/8" (15.6 cm) apart if mounting to lasterboard.
2. Determine the length of power cord needed to reach the nearest 240V outlet. Wind any excess cord around cord retainer on the top side of the light base. Route the cord
through the channel so the light mounts flush.
3. Open the light lens.
4. Mount the light with the screws provided.
5. Close the light lens.
6. Plug in the light to the 240V outlet.
NOTE: The LED light is very bright and will blink while programming. DO NOT stare at the light while on a ladder.
To reduce the risk of SEVERE INJURY or DEATH:
• DO NOT alter the plug.
• Light is intended for indoor ceiling or wall mount applications ONLY.
Screws
Light Lens
Drywall
Anchors
6-1/8" (15.6 cm)
Cord Retainer
Channel
Channel
Wall Anchor (screw-in) (2) Screw # 6G x 25mm (2)
Pre-programmed
Button
Hardware Provided
Installation
Figure 1
Operation
Once the mains power is turned ON, the light can only be activated using Security+2.0 Remote Controls or the Merlin myQ®Internet app. A Security+ 2.0 Remote Control is
supplied with this kit.
If paired with a myQ® garage door opener the myQ®Remote LED Light can also automatically turn ON or OFF in simultaneously with the garage door opener’s internal light to boost
the illumination of the garage.
NOTE: Wireless Wall Controls will not operate this device.
Programming
PROGRAM AN ADDITIONAL SECURITY+ 2.0®REMOTE CONTROL TO
THE myQ® REMOTE LED LIGHT
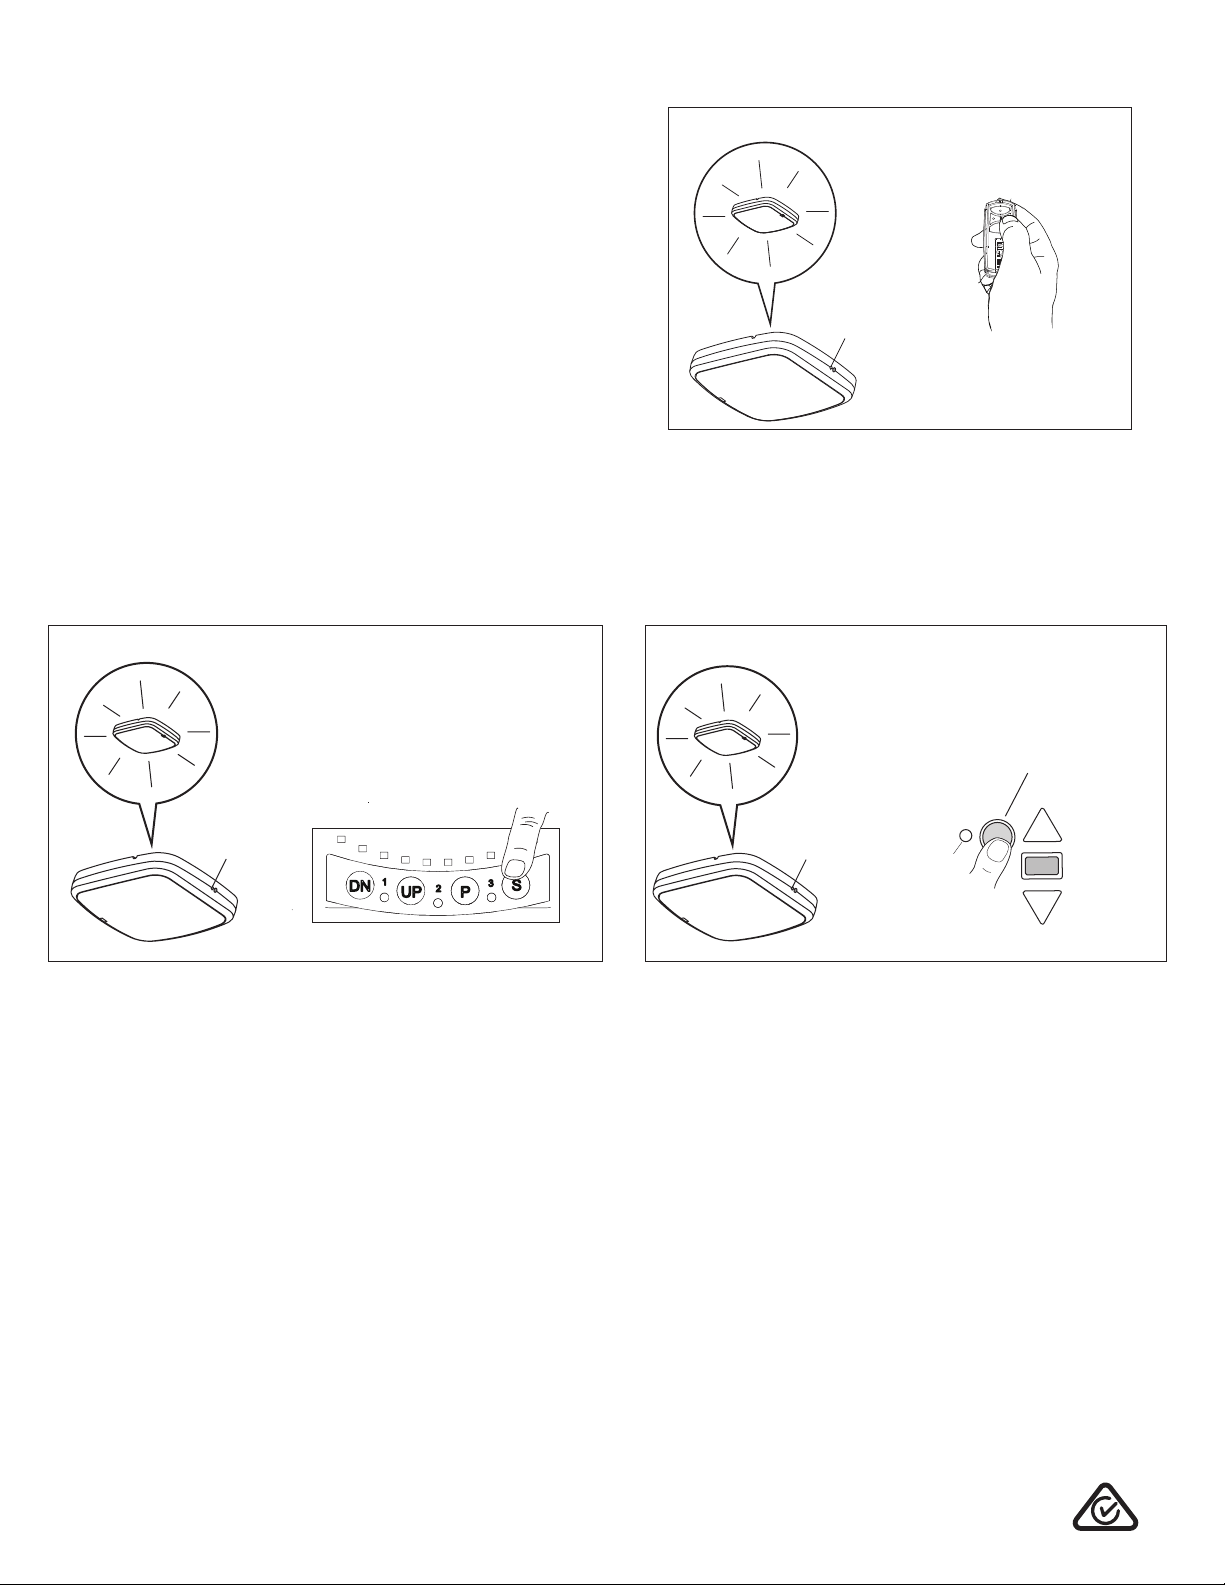
1. Press the LEARN button on the Remote LED Light until the green LED comes ON.
2. Press the button on the remote control (figure 2) that you wish to operate the light.
3. The code has been programmed when the Remote LED Light blinks once.
To program the light with other accessories, refer to the manual for your accessory.
LEARN Button LEARN Button 880LMW
O
Learn Button
LEARN Button LEARN Button 880LMW
OU
LEARN Button LEARN Button 880LMW
OR
LEARN Button
© 2019, Chamberlain Group. Inc All Rights Reserved
Chamberlain Australia Pty Ltd
PO Box 1446
Lane Cove NSW 1595
gomerlin.com.au
Ph: 1800 638 234
Chamberlain New Zealand Ltd
PO Box 100-221
AUCKLAND 0745
gomerlin.co.nz
Ph: 0800 653 667
114A5258B
Maintenance
• Unplug the light before cleaning.
• Use a lightly dampened cloth for cleaning.
• DO NOT use liquid cleaners on the light lens.
ADD THE myQ® REMOTE LED LIGHT TO myQ®ACCOUNT
Up to 10 myQ®devices can be paired to the myQ®Gateway or the Wi-Fi garage door opener’s internal Gateway. These devices include any combination of myQ®garage door
openers, Wi-Fi garage door openers or myQ®Remote LED Lights.
NOTE: An active myQ® account with a connected myQ® Gateway is required for activating the myQ®feature. A myQ®Gateway is not provided with this unit.
1. Login to the myQ®app and add the myQ®Remote LED Light.
2. Press the LEARN button on the light until the green LED comes ON.
TO ERASE ALL PROGRAMMING FROM THE myQ®REMOTE LED LIGHT
1. Press and hold the LEARN button until the green LED turns off (6-10 seconds). All programming is now erased.
PROGRAM A myQ® GARAGE DOOR OPENER LIGHT TO THE myQ®
REMOTE LED LIGHT
1. Press the LEARN button on the Remote LED Light until the green LED comes ON.
2. Press the “S” (figure 3 - Roller Door Garage Door Openers) or “Learn” (figure 4 -
Sectional Garage Door Openers) button on the myQ®garage door opener that you
wish to operate the light.
3. The code has been programmed when the remote light blinks once.
To program the light with other accessories, refer to the manual for your accessory.
Yellow “Learn” Button
on the Garage Door Opener
Learn Button
IndicatorLED
DN UP P S
123
Learn Button
“S” Button on the
Garage Door Opener
Figure 2
Figure 3 Figure 4
Popular Lantern manuals by other brands

smart & green
smart & green BULBLITE3 Instruction

Home Decorators Collection
Home Decorators Collection HB7251MA-292 Use and care guide

Vaughan
Vaughan Hawley installation guide

Brandson Equipment
Brandson Equipment 301790 instruction sheet

Fusion
Fusion 16979 quick start guide

Coleman
Coleman 8D TWIN LED user guide


BEGA
BEGA 8915 Instructions for use

Areti
Areti Structure instruction manual

Martin Professional
Martin Professional MAC 2000 Profile II user manual

luceco
luceco LED3EP80 Installation & operating instructions

Prior Scientific
Prior Scientific Lumen 1600 LED quick start guide

PL&T
PL&T PLT-11668 installation instructions