manuals.online logo
Brands
  1. Home
  2. •
  3. Brands
  4. •
  5. PL&T
  6. •
  7. Lantern
  8. •
  9. PL&T PLT-11668 User manual

PL&T PLT-11668 User manual

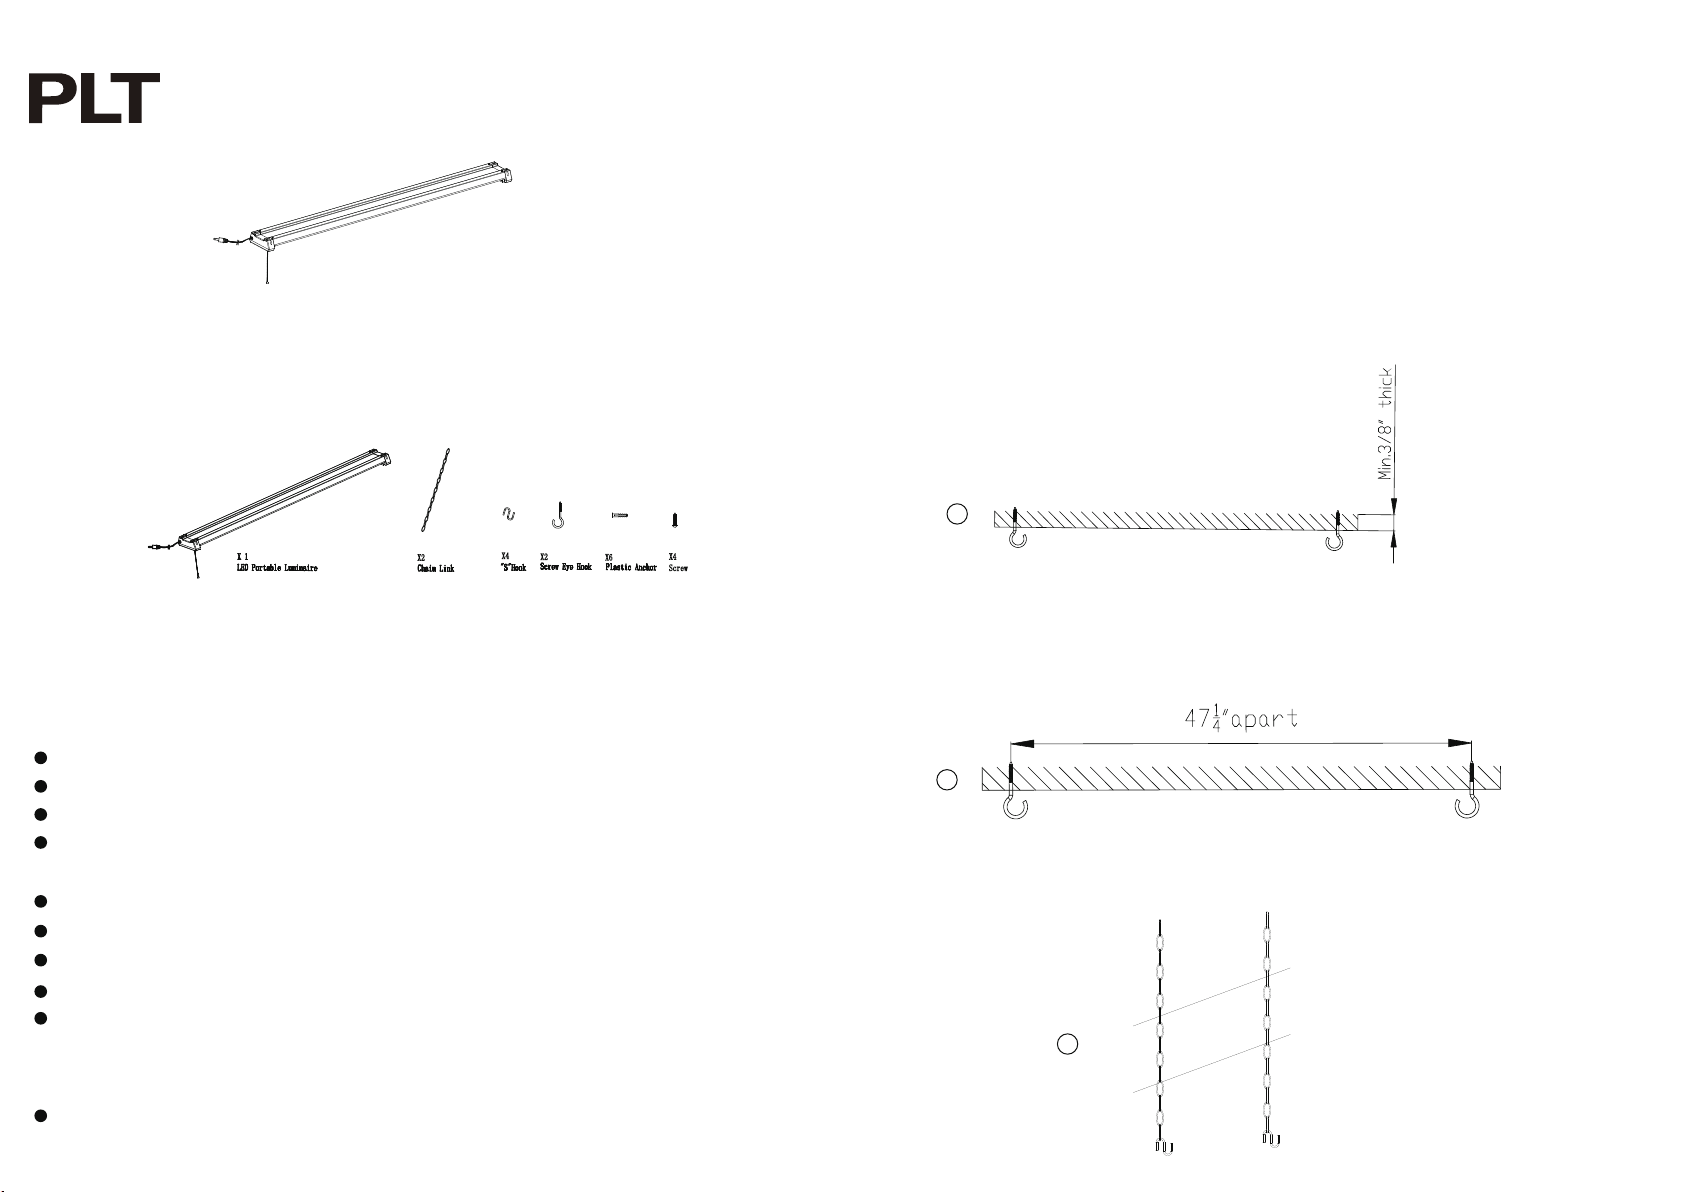
LED Portable Luminaire
READ ALL THE INSTRUCTIONS AND SAVE THIS INSTRUCTION SHEET. NOT READING
THE INSTRUCTIONS MAY CAUSE RISK OF FIRE OR PERSONAL INJURY.
2.To install onto a plaster board surface, plaster board requires minimum 3/8” thick.
STYLE 1
SUSPENSION
INSTALLATION INSTRUCTIONS:
1. Mounting surface must be capable of supporting the fixture. If the surface is made of
plaster board, we recommend that you use minimum #8 screw eye hooks with plastic
anchors (included) or expansion bolts (not included). If installed onto a plaster board surface,
We recommend minimum 3/8” thick.
NOTE:
1. This fixture complies with Part 15 of the FCC rules. Operation is subject to the following
two conditions: (1) this device may not cause harmful interference, and (2) this device must
accept any interference received, including interference that may cause undesired operation.
2. Install one “S” hook into each end of the chain, then crimp the “S” hook end which is
attached to the chain with pliers.(Leave one side open from the “S” hook) Repeat step for
the second chain provided.
3.Install one “s” hook into each end of the chain, then crimp the “S” hook end which is attached to the
chain with pliers.(Leave one side open from the “S” hook) Repeat step for the second chain provided.
X4
X2 X6
X2 X4
Screw
2
3
1
&
Shoplight Installation Instructions
Rated:120V-60Hz 40W
4 UNITS MAXIMUM
PACKAGE CONTENTS
CAUTION: To reduce the risk of fire, electric shock or injury to people:
Turn off the switch and circuit breaker before installing this LED lamp.
Suitable for dry locations.
Not for use with dimmers.
Install directly beneath a ceiling-mounted receptacle.
Use only insulated staples or plastic ties to secure the cord.
The power cord is 4.9 feet long
Not intended for recessed installation or in ceiling.
Do not install directly over a heat source (stove, etc.)
Use safety precautions. Safety eye glasses and gloves are recommended.
Installation should not be made on a radiant-heating ceiling.
Injury to people and damage to the lamp and/or mounting surface may
result if the lamp is pulled from the surface. To reduce the likelihood of
such injury or damage, mount only on a mechanically sound surface.
Do not alter the plug or power supply cord in any way or try to install
this product in any other method besides methods shown on this sheet.
4.Install the “S” hook from one end of the chain into the end cap of the LED lamp, then
crimp the hooks end with pliers. Repeat same step for the opposite side.
5. Install the LED lamp with chains, one end at a time onto each screw eye hook. Once
installed, crimp each of the “S” hooks end with pliers. Please noted the on/off pull chain
is 9.8 inches long.
6. Plug the power supply cord into the electrical outlet.
4
5
6
STYLE 2 SURFACE MOUNT INSTALLATION INSTRUCTIONS:
1. Mounting surface must be capable of supporting the fixture. If the surface is made of plaster board, we
recommend that you use minimum #8 screw eye hooks with plastic anchors (included) or expansion bolts
(not included). If installed onto a plaster board surface, We recommend minimum 3/8” thick.
3. Lift fixture up to screws and slide to one side to secure into place. Screw size:ST4X30.
4. Plug the power supply cord into the electrical outlet.
LINKING MULTIPLE SHOPLIGHTS
2. Install the 4 plastic anchors 46 1/2” apart and 3.189” apart, then screw into each anchor.
Spacing between ceiling and cap nut should be at least 1/3”.
Link up 4 shoplights togetherConnect to additional shoplightConnect to Power Outlet

Other PL&T Lantern manuals

PL&T Shoplight With Sensor User manual

PL&T

PL&T Shoplight With Sensor User manual

Popular Lantern manuals by other brands

HQ TORCH-L-CAMP01 manual

HQ

HQ TORCH-L-CAMP01 manual

RAB Lighting SHARK-2FT installation instructions

RAB Lighting

RAB Lighting SHARK-2FT installation instructions

BEKA Schreder ZIYA Series manual

BEKA Schreder

BEKA Schreder ZIYA Series manual

OVO LANTERN mooni user manual

OVO LANTERN

OVO LANTERN mooni user manual

Tamlite CITY RL CTR330 Installation & operating instructions

Tamlite

Tamlite CITY RL CTR330 Installation & operating instructions

DSPro PBT3430-1 operating instructions

DSPro

DSPro PBT3430-1 operating instructions

Nature Power 21030 user manual

Nature Power

Nature Power 21030 user manual

StreamLight Super Siege operating instructions

StreamLight

StreamLight Super Siege operating instructions

IKEA STORHAGA manual

IKEA

IKEA STORHAGA manual

TILLYTEC Mini uni user manual

TILLYTEC

TILLYTEC Mini uni user manual

Keri JS-PRO-2209U user manual

Keri

Keri JS-PRO-2209U user manual

Touch Of ECO TWINKLELIGHT instruction manual

Touch Of ECO

Touch Of ECO TWINKLELIGHT instruction manual

Gama Sonic BAYTOWN GS-106FPW instruction manual

Gama Sonic

Gama Sonic BAYTOWN GS-106FPW instruction manual

MOOD SOL-CIL743 Installation and operating instructions

MOOD

MOOD SOL-CIL743 Installation and operating instructions

iGuzzini QUID SMALL manual

iGuzzini

iGuzzini QUID SMALL manual

Altman Pegasus 6 quick start guide

Altman

Altman Pegasus 6 quick start guide

Velleman SOL22 user manual

Velleman

Velleman SOL22 user manual

Meyer Nightspot BRGBW-LED Mounting instructions

Meyer

Meyer Nightspot BRGBW-LED Mounting instructions

manuals.online logo
manuals.online logoBrands
  • About & Mission
  • Contact us
  • Privacy Policy
  • Terms and Conditions

Copyright 2025 Manuals.Online. All Rights Reserved.