Prismatibro Prisma Light Ellie User manual
Ellie
MOUNTING & INSTALLATION
MANUAL

2
Prisma Light | prismatibro.se
SYMBOLS
Constant
ON or OFF
Prisma Moonlight • Stepless lowering or raising
of the light during one period of the day.
Remote • Remote control for Prisma Light Ellie.
You need a unique 5-didigt customer PIN-code.
Detect • Control with motion for a single
Prisma Light Ellie or a complete site (installation).
Android-app • Install a site, adjust the settings,
look at the status, get dierent measurments.
You need a personal 15-digit PIN-code.
Dashboard • Measurements from the sites
are available through a dashboard.
Maintenance
High Voltage
Risk of electric shock.

3
prismatibro.se | Prisma Light
CONTENT
Product facts...............................................................................................................................................................................................................................4
Mechanical installation...................................................................................................................................................................5
Electric installation...........................................................................................................................................................................................6
Deployment and use
Prisma Light Ellie Constant............................................................................................................................................7
Prisma Light Ellie Remote...................................................................................................................................................7
Prisma Light Ellie Detect..................................................................................................................................................12
Remote control..................................................................................................................................................................................................................8
Gateway, installation
Light cabinet............................................................................................................................................................................................................... 10
Light pole................................................................................................................................................................................................................................11
Android-app: Prisma Conguration
Download, install........................................................................................................................................................................................12
Connect to dongle.................................................................................................................................................................................12
Site, create............................................................................................................................................................................................................................14
Adjust one luminaire or an entire site.............................................................................18
Troubleshooting......................................................................................................................................................Back cover
Service and maintenance....................................................................................................Back cover
Warranty..................................................................................................................................................................................................Back cover
Recycling and packaging......................................................................................................Back cover
Support, contact information............................................................................Back cover

4
Prisma Light | prismatibro.se
Prisma Light Ellie
is a luminaire produced in
Sweden with LED-technology.
Area of use
Outdoors: Parks, walkings
paths, bicycle lanes, parking
lots, near houses.
Mounting height
Maximum 5 meters
Weight
5,7 kg
Measurements
Height 499 mm
Width Ø 382 mm
PRODUCT FACTS
P
r
i
s
m
a
L
i
g
h
t
E
l
li
e
s
e
e
n
f
r
o
m
a
b
o
v
e

5
prismatibro.se | Prisma Light
MECHANICAL INSTALLATION
8 Nm
Sensor
Pole mounting
Prisma Light Ellie will be
mounted on a straight pole.
Get the cable through the
pole. Put the luminaire on top.
Note round label
on the top!
The sensor should be
pointing towards the road
to ensure the right light
image on the ground.
See the direction of the arrow.
The label should be taken o
after mounting.
Torque for the three screws
are: 8Nm +/- 2 Nm.
P
r
i
s
m
a
L
i
g
h
t
E
l
li
e
s
e
e
n
f
r
o
m
a
b
o
v
e

6
Prisma Light | prismatibro.se
ELECTRICAL INSTALLATION
Only 230 V
• Prisma Light Ellie Constant
• Prisma Light Ellie Remote
• Prisma Light Ellie Detect
The luminaire should not be mounted or demounted with power on.
Supply voltage 230 V AC, 50 Hz.
Wattage 5-20 W depending on model
1. Connect the luminaire to the wires in the pole.
2. Ready to turn on the power

7
prismatibro.se | Prisma Light
ELECTRICAL INSTALLATION
DEPLOYMENT AND USE
Prisma Light Ellie Constant
• The luminaire is equiped with a driver with a xed level. The setting will be
made at the factory and can olnly be changed in the factory in Tibro.
Prisma Light Ellie Remote
DEPLOYMENT
• Power on to the luminaire.
• Prisma Light Ellie should now have
the factory setting that the customer
wanted when ordered.
• Prisma Light Ellie have a PCB with
built in IR-communication.
Prisma
USE
• The settings are made with a remote
control. Instructions on next page.
Manual can also be downloaded
from: www.prismatibro.se
BUILT IN FUNCTIONS
Prisma Light Ellie Remote contains the possibility to control and change
the settings regarding power and also Prisma Moonlight.
CHANGE POWER
The power for Prisma Light Ellie Remote can be set on an optional
level in steps of 1 W, from 5 W and upwards.
PRISMA MOONLIGHT
More than just a night reduction. Lower or increase the power
during an optional period of the night.
Example: Lower from 20 to 12 W between 23 (11 pm) and 05 (5 am)
Or: Increase from 14 to 18 W from 22 (10 pm) to 01 (1 am)
Or: Something else!
CONTROL EVERY LUMINAIRE
Each luminaire is controlled individually and therefore have
unique settings.
REMOTE
The settings can be changed with a Remote – instructions
on next page.
SECURITY
5 digit PIN-code combined with a customized Remote.
FACTORY SETTINGS
All customers get the questions regarding which settings the
luminaries should have when being delivered. These settings
can later be changed with a Remote.
Prisma Light Remote
Made in Tibro · Version 1805
1
WATT
3
2
START LEVEL
STOP
DIM
CITY DETECT
RETURN
4 65
7 98
0
On O
OK

8
Prisma Light | prismatibro.se
REMOTE
ESTABLISH CONNECTION Point the remote upwards
towards the center of the luminiare. Press
The luminiare responds with a twinkle.
UNLOCK + PIN-code, 5 digits.
Response: twinkle, twinkle
ON/OFF Response: Light up or turns o.
The setting can´t be saved.
PRISMA + Time, 2 digits (e.g. 23) +
MOONLIGHT Response: Twinkle, twinkle
START* The setting is saved.
PRISMA + Hours, 2 digits (e.g. 06) +
MOONLIGHT Respons: Twinkle, Twinkle
STOPP* The setting is saved.
DIMMING LEVEL + Power, 2 digits (e.g. 05) +
Reponse: Twinkle, twinkle.
The setting is saved.
POWER + Power, 2 digits (e.g. 20) +
Response: Twinkle, Twinkle
The setting is saved.

DAY 1
Prisma Light Ellie program itself by
the experience of the day 1.
No Prisma Moonlight.
FOLLOWING DAYS
Prisma Light Ellie remembers the
previous days. Prisma Moonlight
according to the settings above.
* Hours
The time specied for the START and
STOP is approximate and is subject to
day’s darkest moment regardless of
summer and winter.
Day’s darkest moment is at midnight
during the period of winter time, e.g
START 23, STOPP 04.
Prisma Light Remote
Made in Tibro · Version 1805
1
WATT
3
2
START LEVEL
STOP
DIM
CITY DETECT
RETURN
4 65
7 98
0
On O
OK
UNLOCK
Open upp the luminarie, to be
able to change the settings.
Requires PIN code that can be
obtained through
support@prismatibro.se
ON/OFF
Switch on or o the luminaire.
NIVÅ (Level)
The power during Prisma Moon-
light.
STOPP (Stop)
Hours until Prisma Moonlight is
stopped.
START
The time when Prisma Moonlight
starts.
WATT (Power)
The ordinary power.

10
Prisma Light | prismatibro.se
GATEWAY INSTALLATION
Light cabinet
The gateway should be installed within 30 meters from the closest
Detect-luminaire.
The gateway will communicate wirelessly with the luminaries.
The installation should be done by the manufactorer or by someone
educated by the manufactorer.
* The installer should contact the producer of the light cabinet to get
the correct instruction about making holes in the light cabinet.
1Drill a hole for the power cable, Ø 20 mm*
2Rubber gasket:
Add the rubber gasket to the backside of the Gateway.
3Connect the power cable to the backside of the Gateway:
Press down the coupling ring, and keep turning the ring
(clock wise) until you feel a
”click”. Now the connector
is locked.
4Mount the Gateway to
the light cabinet - use
the supplied screws.
1
4
3
2

11
prismatibro.se | Prisma Light
1
2
5
43
GATEWAY INSTALLATION
GATEWAY INSTALLATION
Light pole
The gateway should be installed within 30 meters from the closest
Detect-luminaire.
The gateway will communicate wirelessly with the luminaries.
The installation should be done by the manufactorer or by someone
educated by the manufactorer.
1Drill a hole, Ø 20 mm, for the power cable on the light pole
at prefered height.
2Use the pole adaptor to drill the two mounting holes with a
Ø 3,5mm drill.
3Mount the adaptor:
Use the supplied screws
4Connect the power cable to backside of the Gateway:
Press down the coupling ring, and keep turning the ring (clock wise)
until you feel a ”click”. Now the connector is locked.
5Mount the Gateway:
Use the supplied screws.
12
Prisma Light | prismatibro.se
ANDROID-APP
Installation
Download the app from Google Play
Name: ”Prisma Conguration”
Internt-access needed.
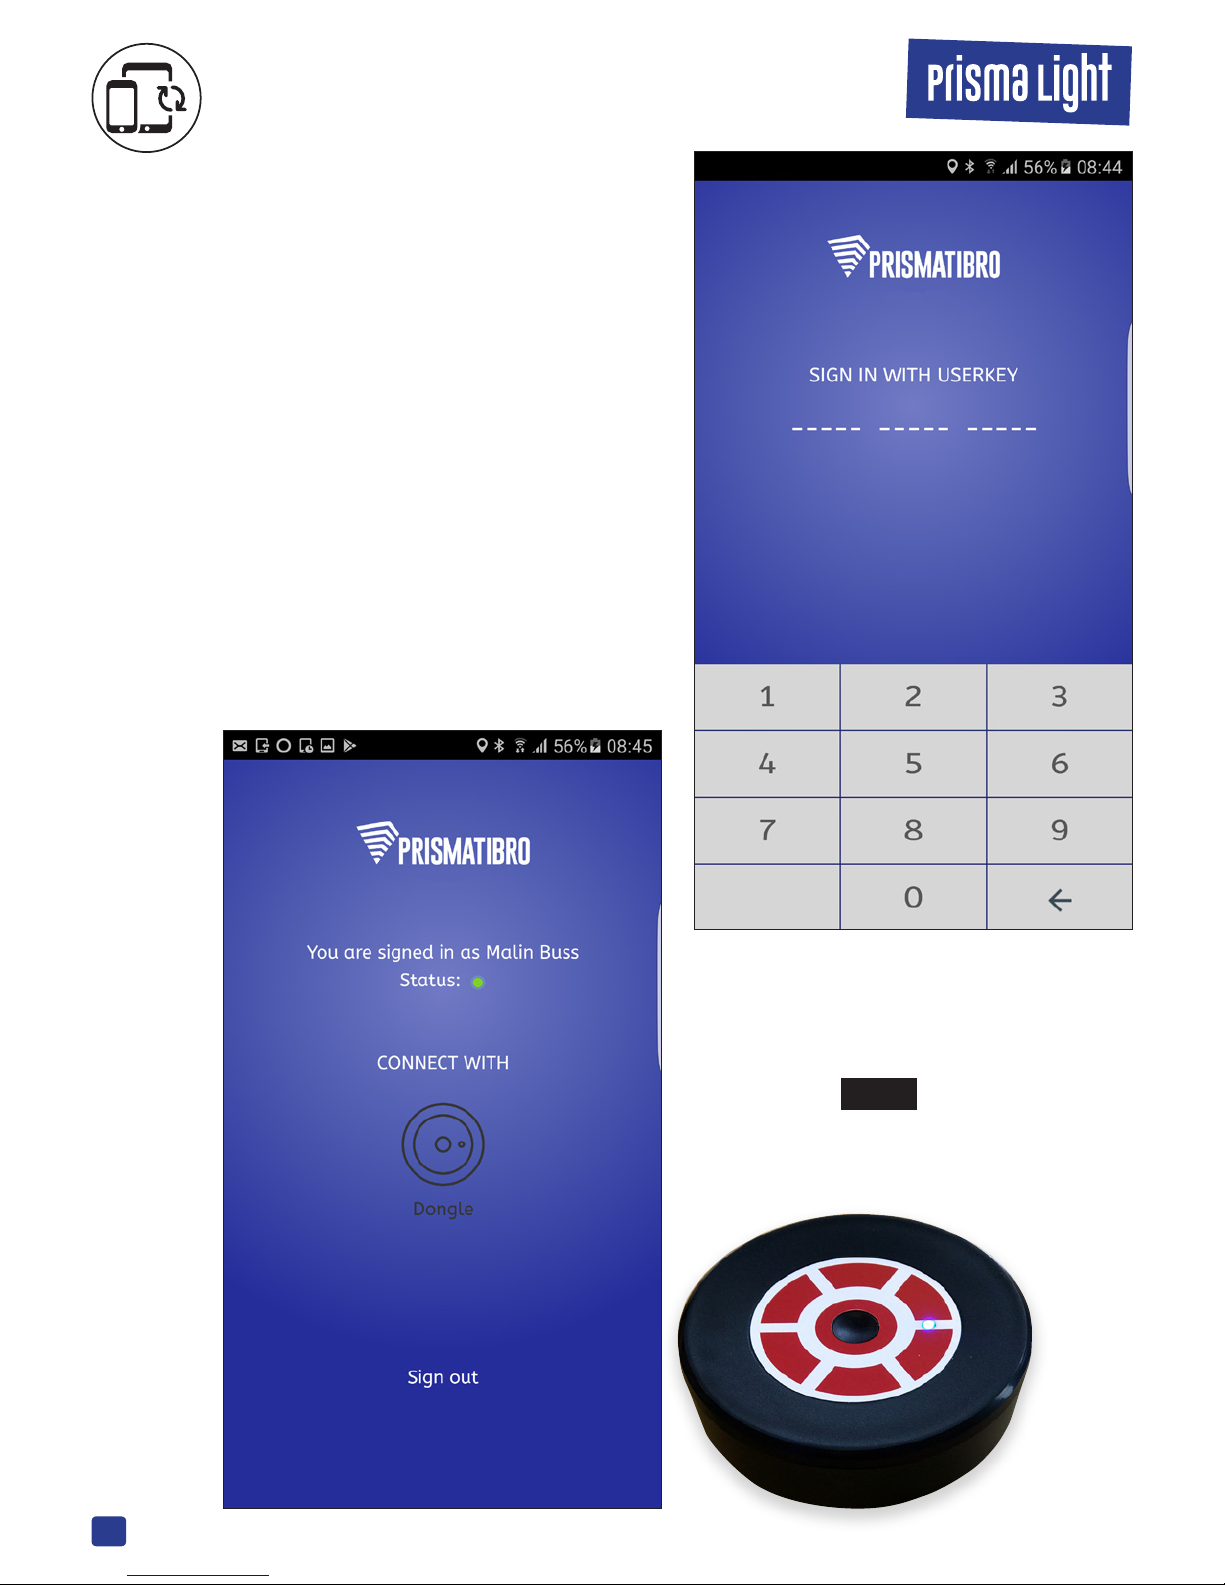
Login
The password is personal.
Call Prisma Tibro +46 504-400 40
Following details are necessary to
create a login:
• First name, Last name
• Phone number
• E-mail
• Company name
• End customer
• Project
Start dongle
Press the button, release when it
turns white. It will then go from red
to green to white to blue. When it
turns blue it is ready to use.
13
prismatibro.se | Prisma Light
ANDROID-APP
ANDROID-APP
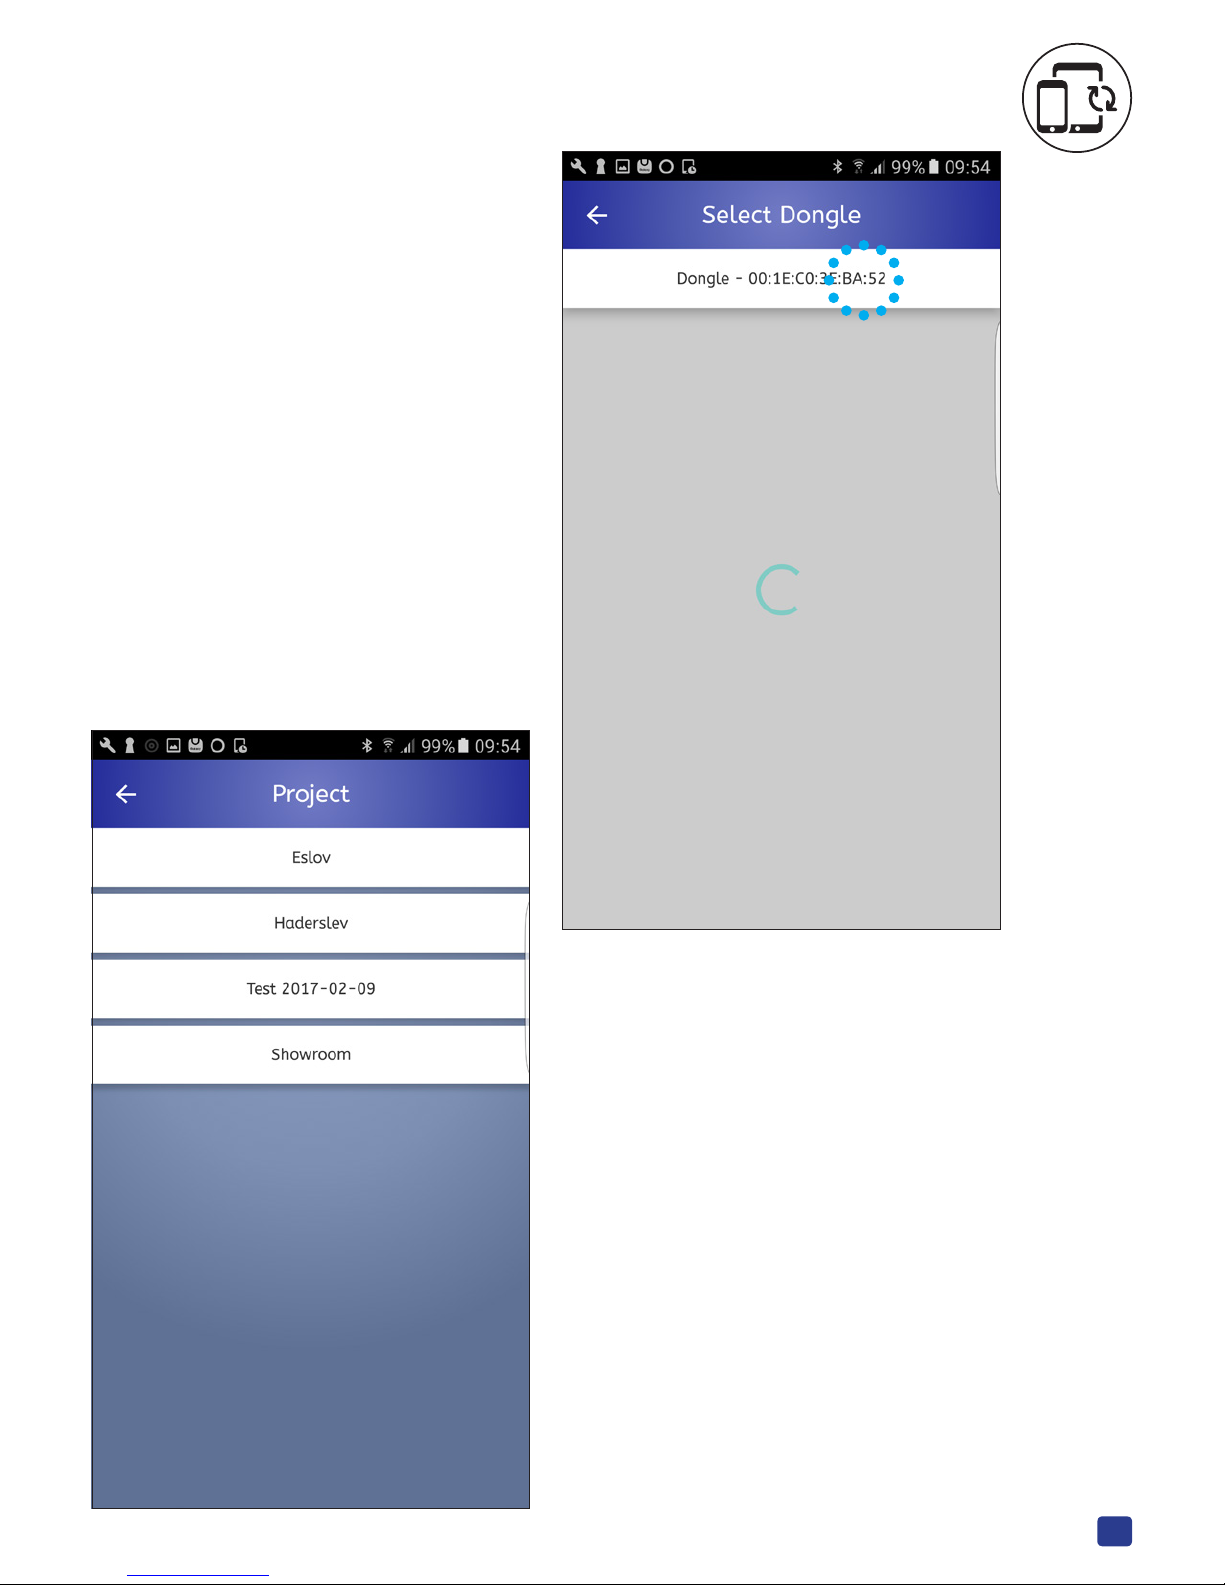
Select dongle
If there are several IDs to choose
from it depends on the fact that
there are other dongles closeby.
Look at the last four numbers on
the backside of the dongle to
identify Yours.
In this example: BA:52
Select project
Often You have access to a lot
of projects.
Choose the project in the list
that You want to look at this
time.
In this example:
Showroom
14
Prisma Light | prismatibro.se
ANDROID-APP
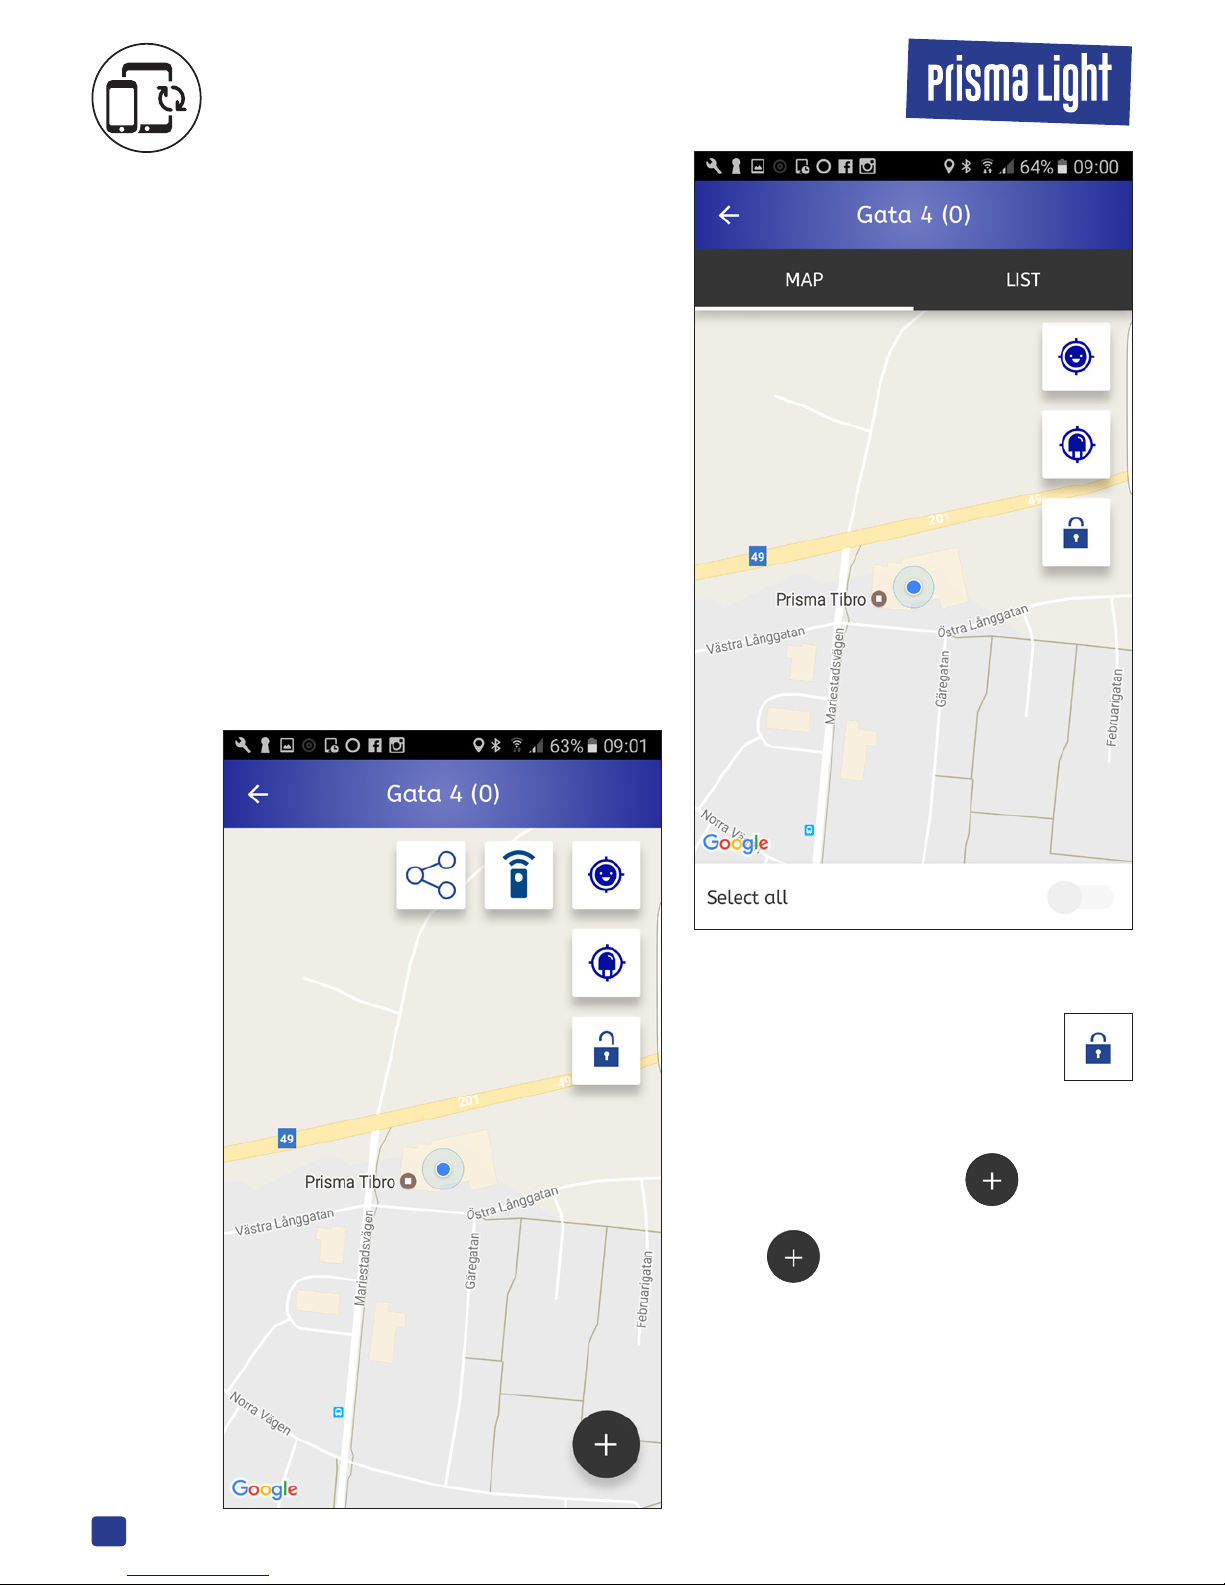
Create site
1.
”Name the site” is the rst thing You
need to do. Type the namn, probably
the village name or the name of the
area.
In this case we choose to call it
”Gata 4”
NOTE!
The installation need to have
power on.
2.
Add luminaries to the site:
Press on the ”lock”.
3.
When it is unlocked a
will be shown.
Press to add luminaire.

15
prismatibro.se | Prisma Light
ANDROID-APP
ANDROID-APP
Create site
4.
A list show the luminaries available.
The one You are standing closest to
will probably be at the top of the list.
But to be sure:
This can be conrmed if You press on
that one in the list. The luminaire will
start to twinkle.
Add the luminiare to the site by
pressing ”Add”.
”Add”will be shown in the top right
corner after You selected a luminaire.
5.
When You press ”Add” a mark will
show up on the map. Mark it with a
light click and then a longer push
to make it jump. Now You can
adjust the placement of the
luminaire.
Repeat item 4 and 5 until all
lumniaries are added to the site.
All luminaries that are added to the
site will disapear from the list. If the
area is big You might have to move
to get contact with all luminaries.
16
Prisma Light | prismatibro.se
ANDROID-APP
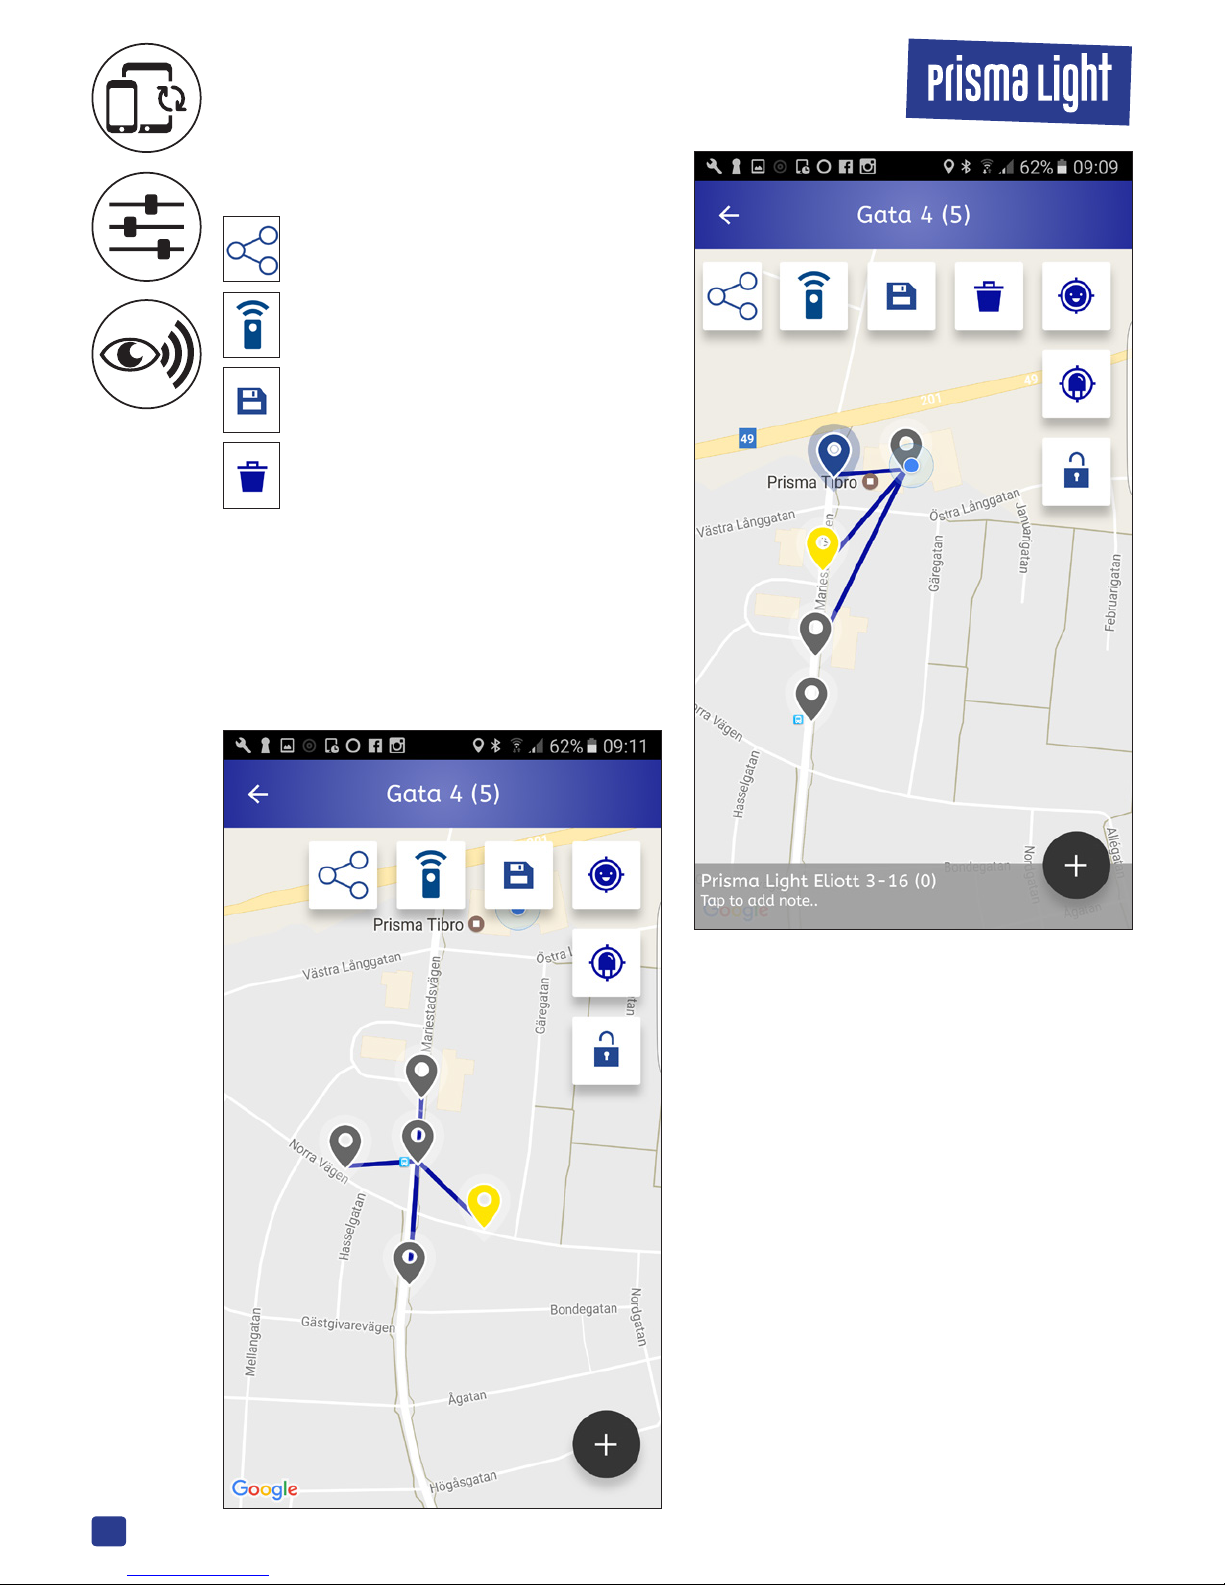
Create site
Create links automatically
Send link
Remember to press ”Save”
Remove marked luminaire

17
prismatibro.se | Prisma Light
End create site
It is possible to create a link on Your
own for example when You come to
an intersection.
Important:
Don’t create a loop
Finally: Press the ”Lock”
ANDROID-APP
ANDROID-APP

18
Prisma Light | prismatibro.se
ANDROID-APP
Select site
Log in using your personal PIN
NNNNN-NNNNN-NNNNN
You will see a list of all projects You
have access to. Choose a project
- in our case Showroom.
Then pick a site. Site is a name of a
group of lumniaries.
The maximum number of luminaries
in a site is 250 luminaries. But we
recommend to divide larger areas in
to smaller ones.
Select by pressing the name of site
You want to work with. A map of that
site will show, picture below.
Symbols
Prisma Light Ellie
Wireless link
Unlock to make changes
Your position
Zoom in site
Gateway
19
prismatibro.se | Prisma Light
ANDROID-APP
ANDROID-APP
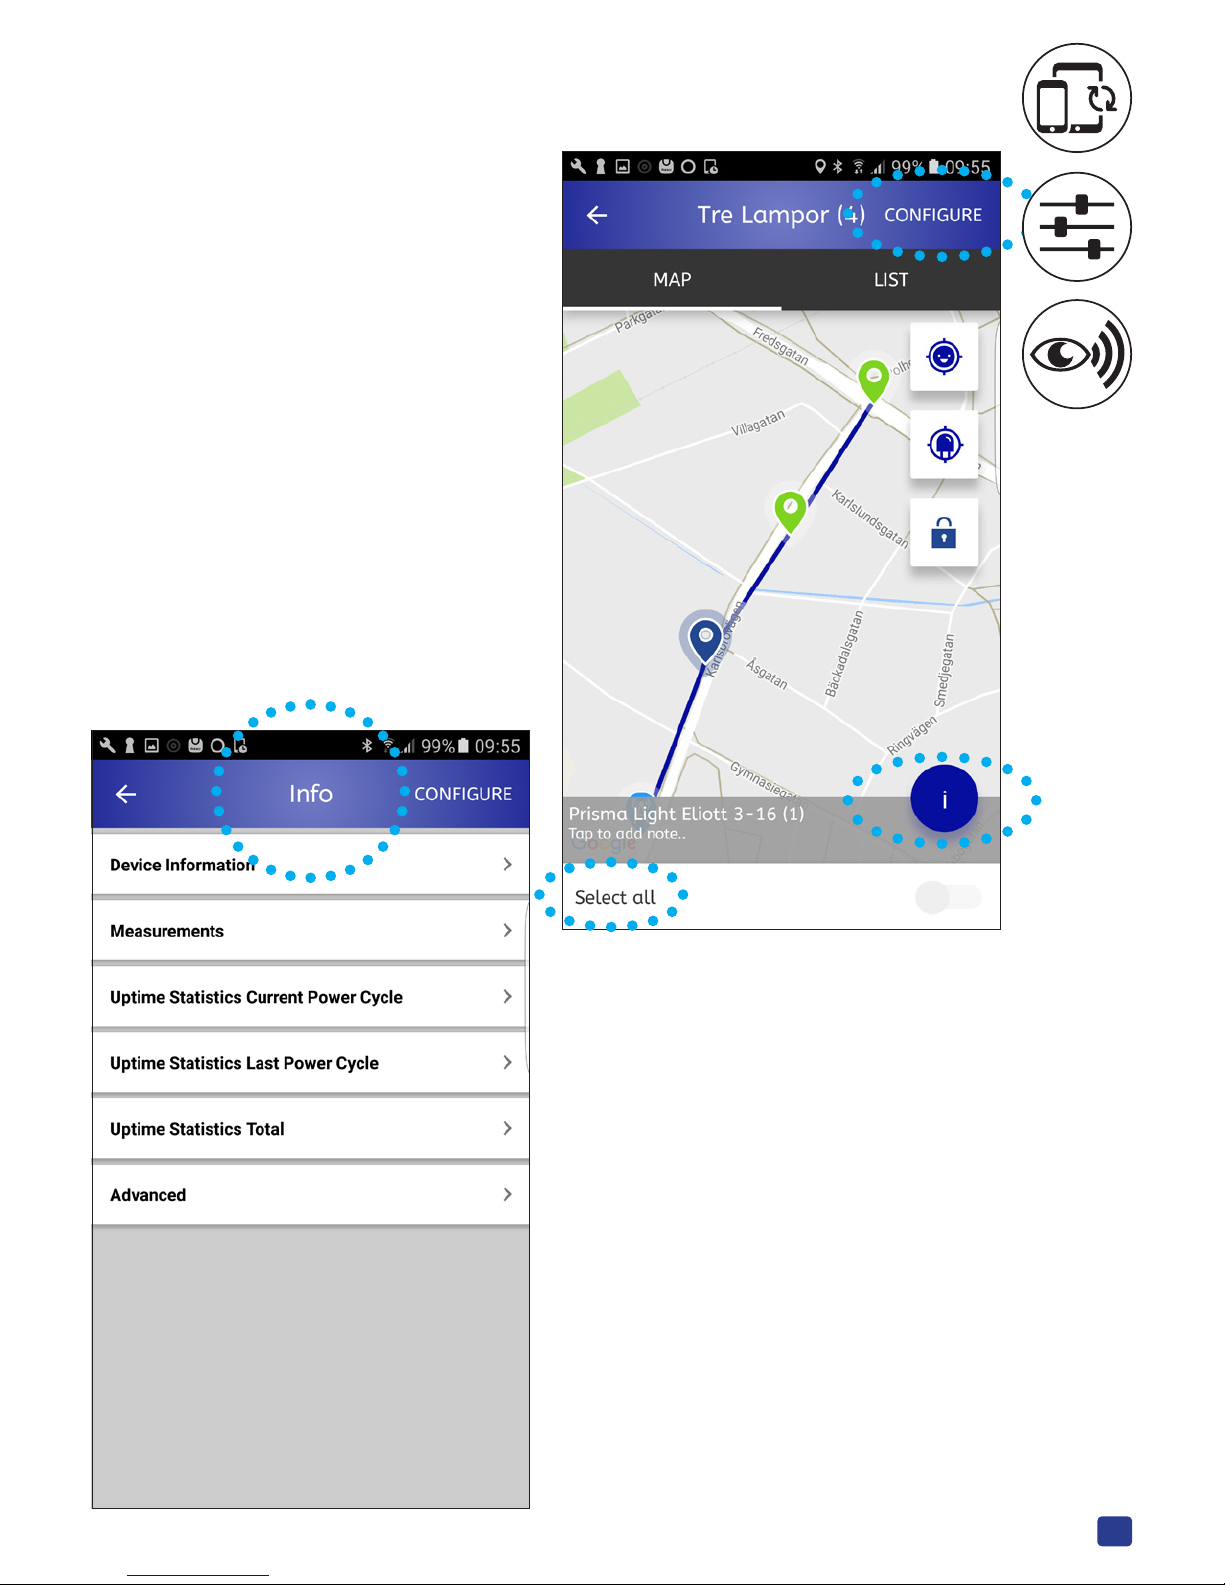
Congure
Press on a green symbol if You want
to adjust a single luminaire.
The symbol will turn blue . The
luminaire will also twinkle to say that
it is ready.
More info
A click in the circle with the ”i”will
show the picture below.
Select all
”Select all”can be used to
congure, not to show
information.
20
Prisma Light | prismatibro.se
ANDROID-APP
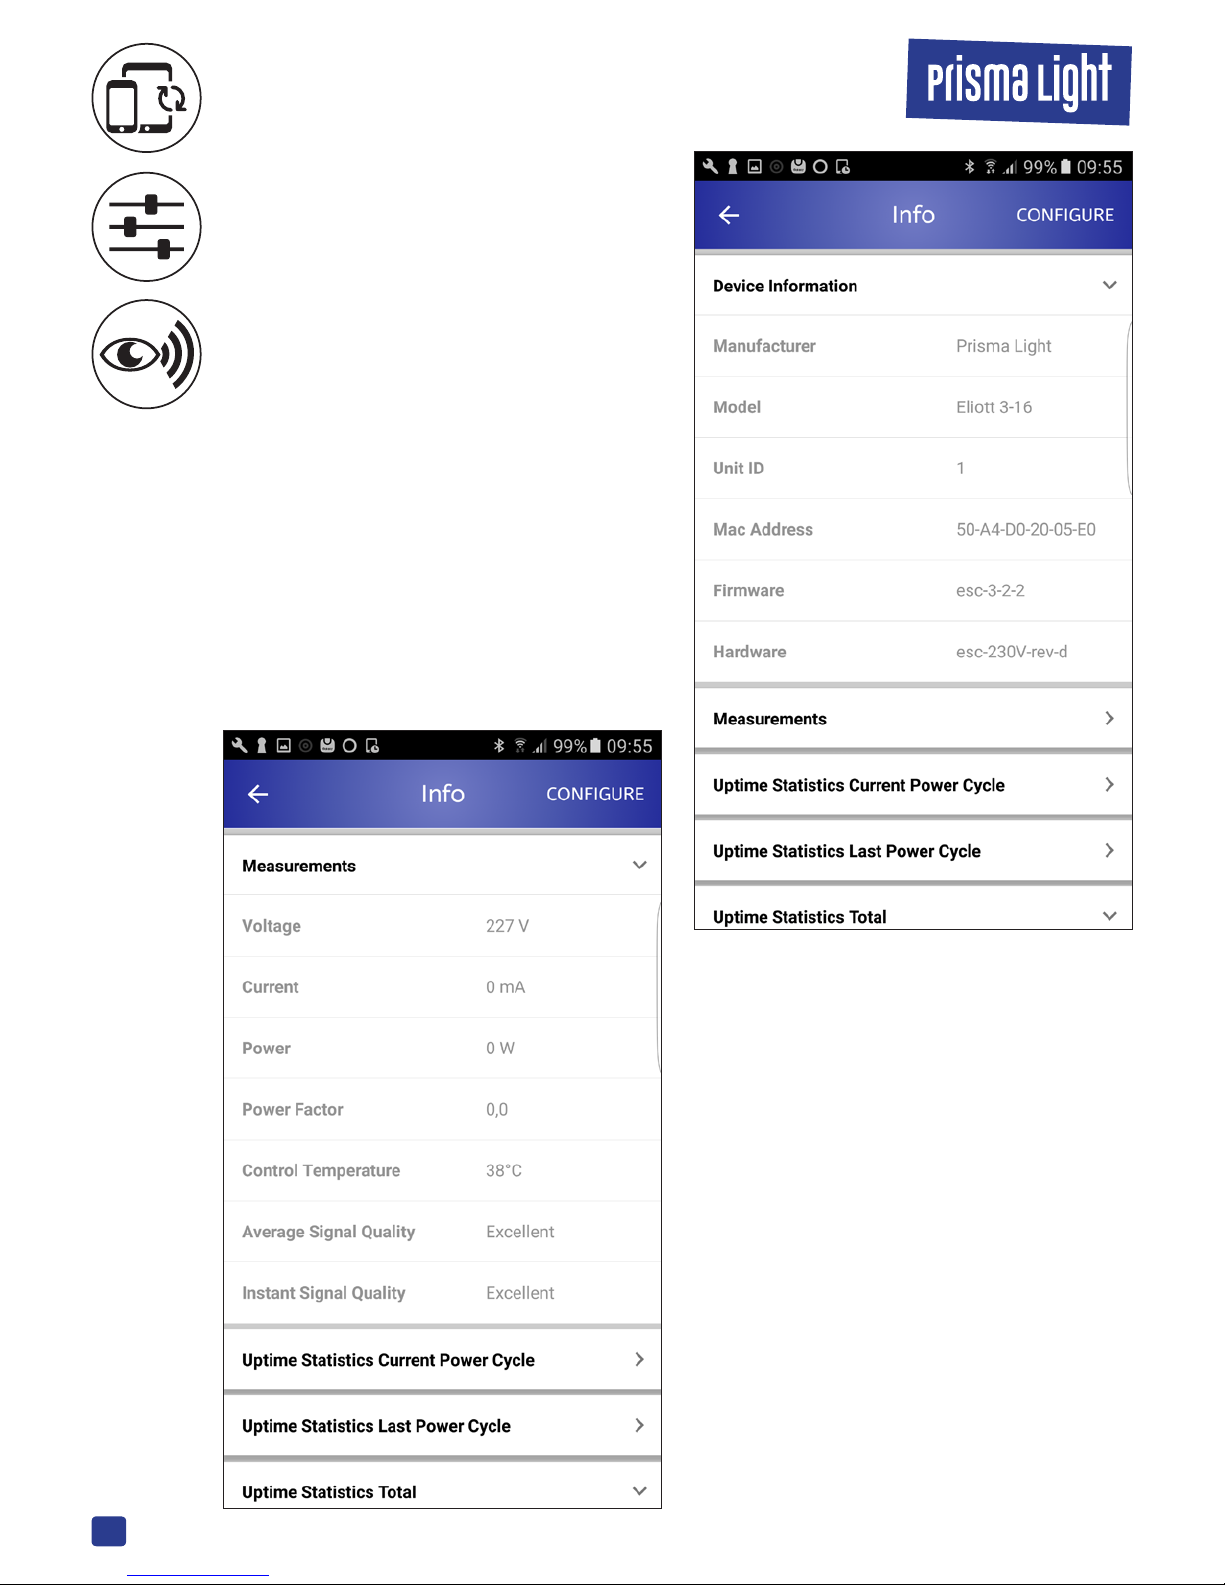
About the luminaire
• Manufacturer
• Model
• ID-number
• Mac-adress
• Software
• Hardware
Measurements
• Voltage
• Current
• Power
• Power factor
• Temperatur
Note: High temperature because
this luminaire is mounted indoors.
• Average Signal Quality
• Instant Signal Quality
Other manuals for Prisma Light Ellie
1
Table of contents
Other Prismatibro Lantern manuals


Popular Lantern manuals by other brands

livin flame
livin flame Scoop User instruction

1TAC
1TAC TC1200 user manual

GE
GE QUNA Roadway Series Installation, use and maintenance manual

Brinkmann
Brinkmann ROUND LANTERN Owners manual assembly and operating instructions

Humanscale
Humanscale Horizon 2.0 Assembly instructions

BEGA
BEGA 84 164 Instructions for use


Principal LED
Principal LED STREET WRAP FLEX SIDE-BEND Product guide

Knightsbridge
Knightsbridge LEDM08B Installation and maintenance manual

ML
ML Knightsbridge HBL Series Installation and maintenance manual

Squareled
Squareled Lumino 200W LED Fresnel RGBW manual

OTFRID
OTFRID Solar Street Light Series manual

BRIGHT
BRIGHT SunBell 2.0 Y Training manual