Mesa WS-608P Manual

After using, turn the select shift to the original place. Press the water switch.
at last power off.
Set the sole-massage to a suitable place, and turn the select shift to sole-
massage, then press the water switch. Test the water temperature and begin
massage. Press the water switch again and stop.
(1)Press the water switch, turn the select shift, pour " ".
(2)Water level should be 10-20mm higher than the sprayer.
(3)Pouring enough water, press" atmosphere ",the engine works, and begins to
spouting. During massage, turn on the " air conditioning ".
(4)Press the " atmosphere ",when stop.
(5)After showering, turn on the "draining switch "to drain water.
water
14、turn off the tap
12、bath-massage
13、sole-massage
ATTENTION
1. Please install and operate this product according to this manual.
2. Please fix reliable earth line and electric leakage protection device.
3. Please install general switch for power supply and water supply.
4. People with hypertension or drunk are not allowed to have sauna steam bath.
5. Children should have sauna steam bath under adult's instruction.
6. Please don't pour corrosive liquid into this sauna steam room.
8. Pay attention to the steam sprayer and water tank drainage, they are in high
temperature while working.
9. please be ware of the step and never put finger into the door gap in case of
accident.
10. Never knock the room with hard and heavy materials, in case of damage.
11. never smoke in the room in case of fire.
12. clean up the room after finish taking shower, in case of slippery surface.
13. when there is plastic strip is worn-out, please replace it as soon as possible in
case of water leaking.
14. clean the bottom bathtub with toothpaste if there is some dirt.
15. please keep the bottom clean, in case of some waste stuck into the drainage.
16. never hang heavy things up the handle.
17. We don't take the responsibility for those damage caused by illegal operations.
18. Please dispose of this product according to native law when it is out of use.
19. Please contact our dealer for help if you have any problems.
MODEL : WS-608P
Install manual
Steam bathroom
Do not dispose this product as unsorted municipal
waste. Collection of such waste separately for special
treatment is necessary.
1.Check if all the parts complete.
2.Set all the parts to right places, and make balance.
3.Set the parts according to the diagram.
4.After step3,power on and test.
INSTALL GUIDE
11、taking shower and water-massage
SHIFT VALVE
RIGHT
LEFT
COOL WARM
WATER SWITCH
RIGHT
LEFT
COOL
Press the water switch, and pour water. Get a suitable
temperature. According to your need, choose the shower
function.The function of the select shift (from right to
left)is movable shower bath,big acupuncture water-
massage,small acupuncture watermassage,waterfall,and
sole-massage shower bath,acupuncture water
massage,roof shower bath,movable shower bath,turn the
shift and select what you need.
THE TECHNIQUE PARAMETER OF THE PRODUCTS
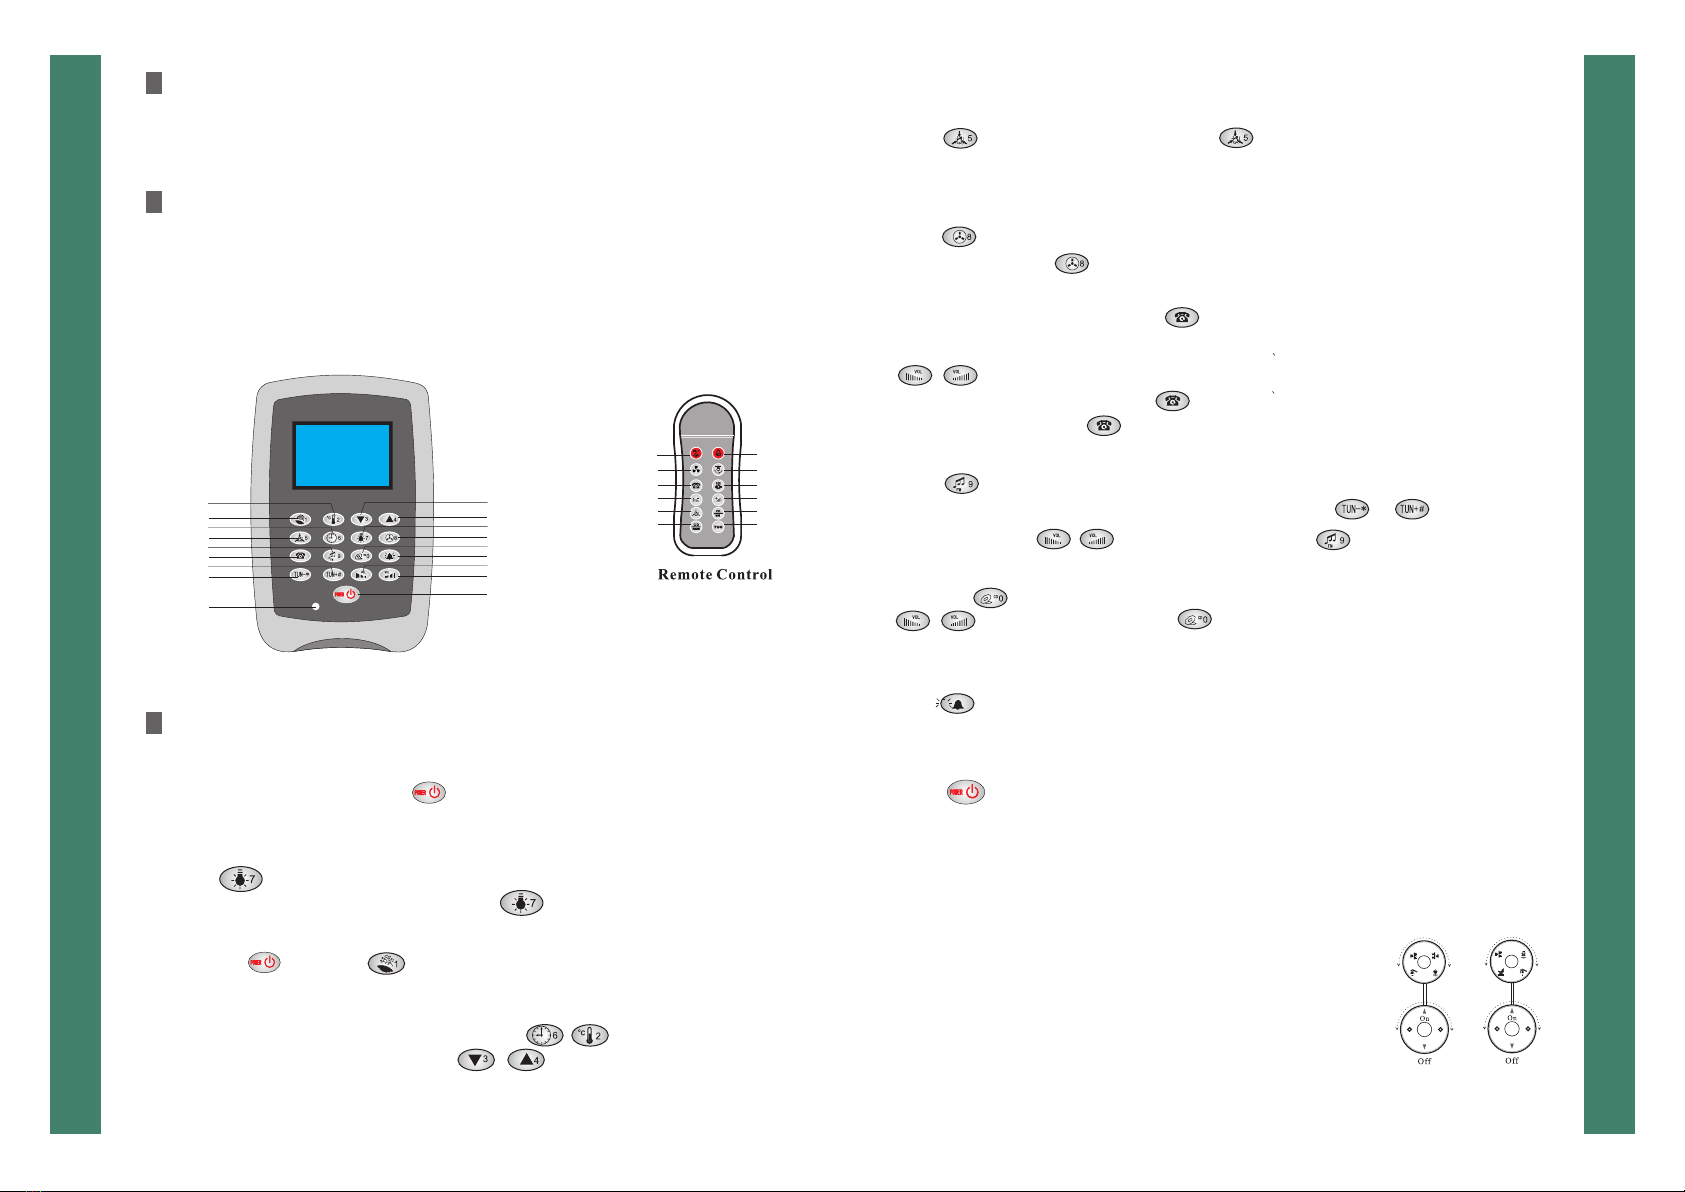
Connect to the power, press , and the top lamp is on. The screen shows all
the patterns in 2 seconds and begin to test. Resume in 3-6 seconds.
Press ,the top lamp and wall lamp turn on. The screen shows a lamp
pattern. If you want to turn it off, press again.
(1) Press then press ,the screen shows a steam pattern
and begin to work, and water pour into the system. After about 1 minute,
steam comes out. If running short of water, it will supply automatically.
(2) Time and temperature selection: Press , to select the time or
temperature function. Then press , to set the time or temperature.
The time arrange is 5-60minutes . The arrange of temperature
is 30-60℃.
CONTROL PANEL
3、steam
2、lamp
1、power on
OPERATION METHOD
Press , the screen shuts off.The system drains for 3 minutes, and the
screen shows 3 minutes count backwards. Finally, power off the main
power source.
Press .the warning voice comes out from the loudspeaker.press again
and stop.
10、power off
9、warning
(1) Press , the music comes out. The screen shows a"CD" pattern. Press
, to set the volume. Press again and stop.
(2) you should connect the CD player, if choosing this function.
8、CD
pattern, then dial. After getting through, speak towards the mic. Press
, to set the volume.
(2) when the bell ringing, press .
(3) After dialing, press .
Press , and begin to disinfect. Press again and stop. If disinfecting
for 10min, it will stop automatically.
Note:the ozone sterilization can not use at the same time.
6、telephone
5、fan
4、ozone disinfection
(1) Make a telephone call: Press ,the screen shows a telephone
Press , choose the radio function. The screen shows a radio pattern,
and the voice comes out from the loudspeaker, press or to set the
frequency. Press , to set the volume. Press again and turn off.
7、radio
Press , the fan begin to work. The screen shows a fan pattern, if you
want to stop, press again.
Time/temperature down
Time/temperature up
Temperature
Steam
Time
Ozone
FM Radio
Telephone
Frequency up
Frequency down
ON/OFF
Flash
Fan
Lamp
CD
Warning bell
VoLume up
VoLume down
Z
Power Warning bell
Lamp
Steam
Volume up
Time and temperature
Frequency
Fan
Telephone
Volume down
Sterilization
CD and radio
1.control remote with functions of water-
proof and damp-proof.
2.usage of control remote are similarity
with computer panel's function 1 to 12.
3.the effect of usage distance will be 5
meter.
at throw it heavily'don,Please put the remote control c.٤
refully.
1.Volta ge:AC220V-240V 5 0Hz/60Hz
2.Water V olatge:0. 1~0.2Mpa
3.Power o f steam generato r:3000W
4.Power o g water pump:1HP
5.SIZ E:1600x1 600x2250 mm
19
23
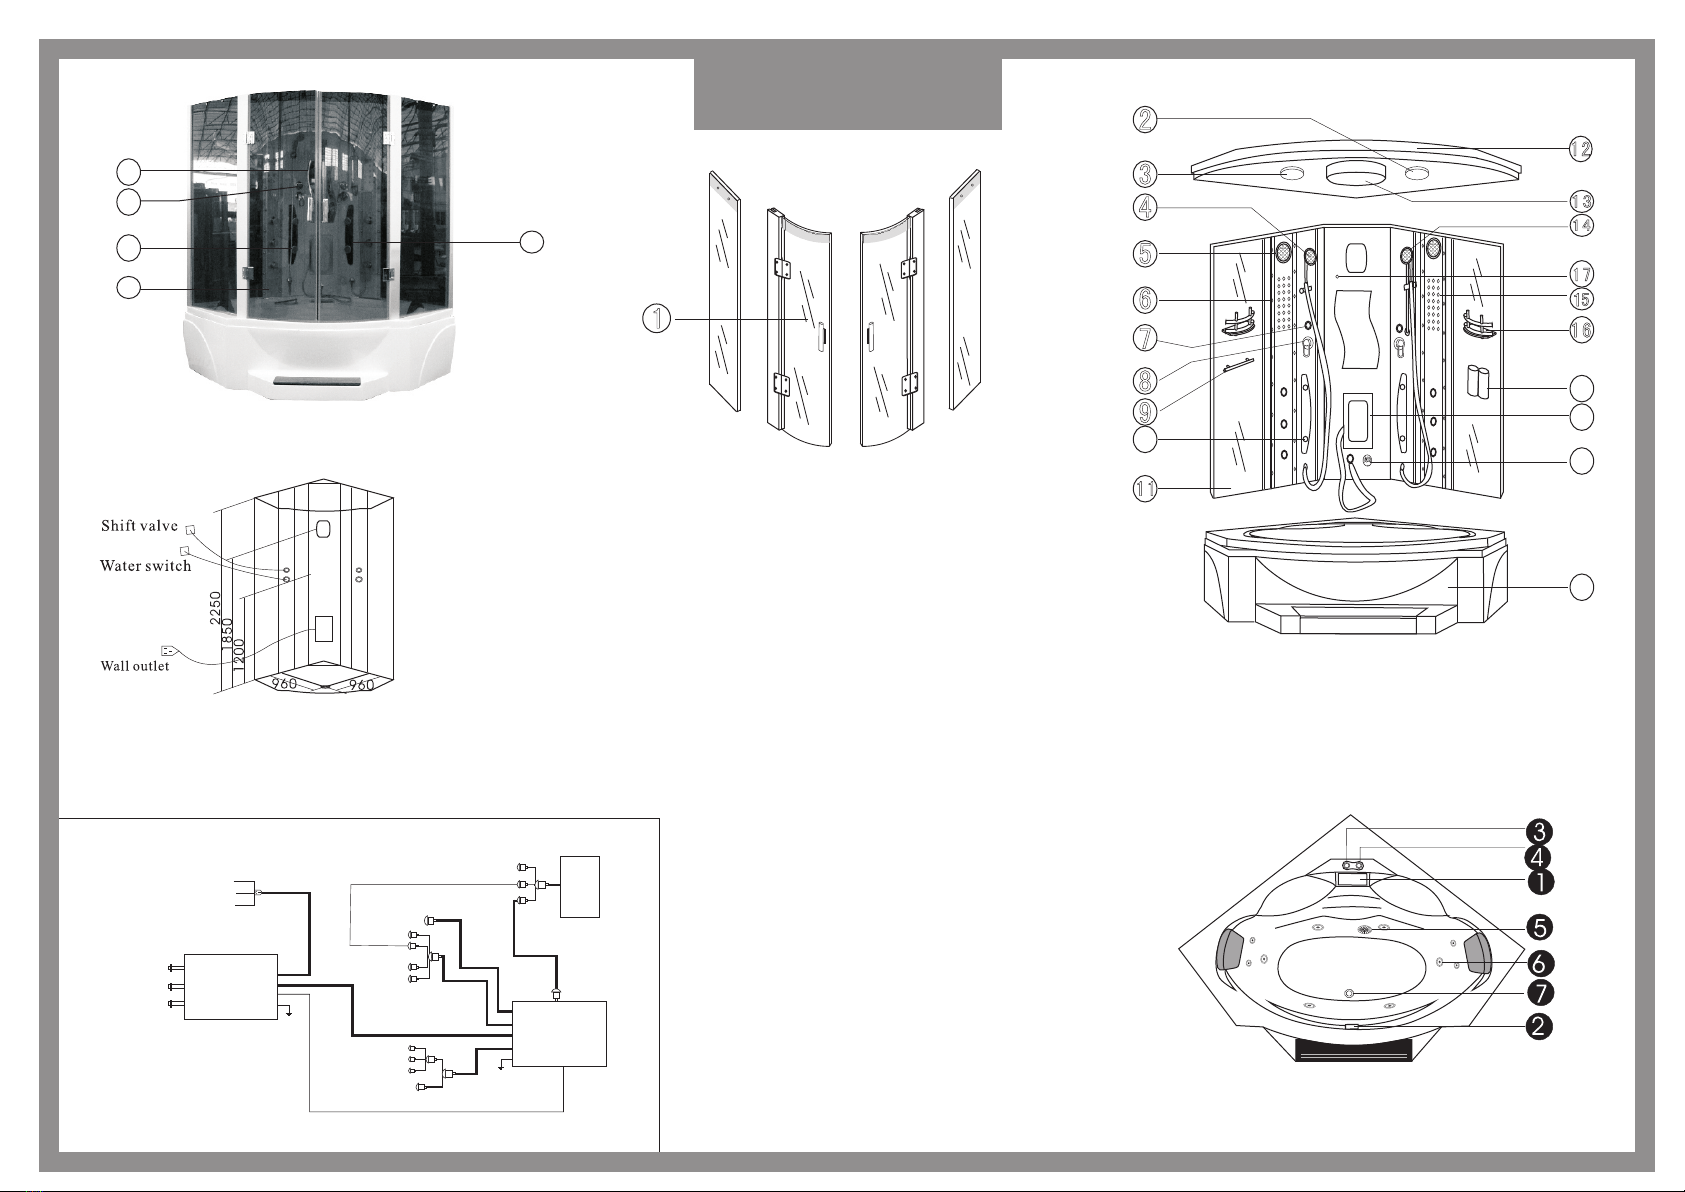
13、roof lamp
14、moveable shower
15、decorated lamp
16、handdrail
17、temperature sensor
18、soap box
19、foot massage
20、berb box
21、bottom bathtub
22、control panel
23、water switch/mixer
24、nozzle
1、waterfall
2、drainage switch
3、water pump swich
4、air conditioning
5、water in
6、water jet
7、drainage
25
22
18
24
20
21
26
1 0
Wall outlet
Steam out
Water in
Drainage
Microphone
CD in
Antenna
Phone
Temperature needle
Back light
Power source
Fan
Top light
Ozone
Speaker Earth line
Electric box
Earth line
PC control
Steam Engine
Electric circuit sketch
Brown(L)
Blue(N)
Twin Line(E)
Please install the earth line safely by professional technician.
1、glass door
2、exhaust fan
3、ozone
4、moveable shower
5、speaker
6、decorated lamp
7、water switch/mixer
8、cold/hot water switch
9、towel shelf
10、nozzle
11、body
12、body roof
25、waist -shaped board
26、waist -shaped board
CONSTRUCTION SKETCH
SIZE:1600X1600X2250mm

1.When install the glass door onto the bottom tub or the roof, must first fix the plastic strip on the aluminum
column of the glass door. If the length of the plastic strip is inappropriate, may voluntarily cut and press the plastic
strip according to the aluminum column section shape, then locks the screw.
2.During the process of installation,it is unecessary to stick with silicon glue for the moveable door,but other parts
which the body of room connection should be use silicon glue in order to avoid water leaking and steam leaking.
600
650
650
1600
SIZE:1600X1600X2250mm
1600
2250
Other Mesa Shower Cabin manuals


