manuals.online logo
Brands
  1. Home
  2. •
  3. Brands
  4. •
  5. Messner
  6. •
  7. Water Pump
  8. •
  9. Messner eco-Tec2 4500 User manual

Messner eco-Tec2 4500 User manual

eco-Tec2 4500
eco-Tec2 7500
eco-Tec2 10000
eco-Tec2 13000
eco-Tec2 16000
eco-Tec2 20000
eco-Tec2 plus 10000
eco-Tec2 plus 15000
eco-Tec2 plus 20000
eco-Tec2 plus 25000
Tec2 : Edition 6
1 2
eco-Tec2
4500
eco-Tec2
7500
eco-Tec2
10000
eco-Tec2
13000
eco-Tec2
16000
eco-Tec2
20000
82
4.900
l/min
l/h
122
7.300
l/min
l/h
183
11.000
l/min
l/h
210
12.600
l/min
l/h
257
15.400
l/min
l/h
327
19.600
l/min
l/h
3,1 m 4,0 m 5,4 m 5,5 m 5,8 m 5,5 m
48 W 75 W 110 W 140 W 190 W 205 W
230 V / 50 Hz 230 V / 50 Hz 230 V / 50 Hz 230 V / 50 Hz 230 V / 50 Hz 230 V / 50 Hz
230 x 145 x 192 230 x 145 x 192 245 x 145 x 192 245 x 145 x 192 245 x 145 x 192 260 x 145 x 192
G 1¼˝- A G 1¼˝- A G 1½˝- A G 1½˝- A G 1½˝- A G 2˝- A
Ø 32/40 Ø 32/40 Ø 40/50 Ø 40/50 Ø 40/50 Ø 50/63
Art.-No. 156 / 005020 156 / 005021 156 / 005022 156 / 005023 156 / 005024 156 / 005025
eco-Tec2 plus
10000
eco-Tec2 plus
15000
eco-Tec2 plus
20000
eco-Tec2 plus
25000
165
9.900
l/min
l/h
245
14.700
l/min
l/h
300
18.000
l/min
l/h
403
24.200
l/min
l/h
2,4 m 3,2 m 3,6 m 3,8 m
60 W 105 W 155 W 190 W
230 V / 50 Hz 230 V / 50 Hz 230 V / 50 Hz 230 V / 50 Hz
245 x 145 x 192 260 x 145 x 195 260 x 145 x 195 260 x 145 x 195
G 1½˝- A G 2˝- A G 2˝- A G 2˝- A
Ø 40/50 Ø 50/63 Ø 50/63 Ø 50/63
Art.-No. 156 / 005026 156 / 005027 156 / 005028 156 / 005029
3
min. 25 cm
max. 2 m min. 25 cm
max. 2 m
min. 2 m
min. 2 m
min. 2 m
eco-Tec2 20000
eco-Tec2 plus 15000
eco-Tec2 plus 20000
eco-Tec2 plus 25000
17
12
13 19
18
10
21
1
2
16
15
1 2
3 4
5
20
4
Please read the instructions thoroughly before using the pump! Otherwise you may not use it!
This appliance is not suitable for use by persons (including children) with limited physical, sensory or mental
capabilities or lacking experience and/or knowledge, except if they are supervised by a person responsible
for their safety or have been instructed in the use of the appliance.
Children should be supervised in order to make sure that they do not play with the appliance.
Construction
These modern, powerful pumps are equipped with a single-phase alternating-current motor (canned motor
with capacitor). The motor is waterproof encapsulated in synthetic resin (IP68) and provided with an
overload protection.
Please refer to the type plate for technical specifications or the table on page 2 + 3.
Use
These pumps are designed for the transport of water, for the operation of filter systems,water displays,
waterfalls, etc., as well as for oxygenating and circulating the water.
Area of application: garden ponds, fishponds, outdoor and patio fountains! (see fig. 1 + 2)
-Attention! Use in garden ponds and their protected zone is permitted only if the installation is
performed in compliance with the applicable regulations. Please consult a licensed electrician.
-Before performing any work on the pump, the fountain, or the pond, disconnect the mains
plug. Do not operate the pump if people are in the water! (disconnect the pump from the power
source)
Area of application: swimming pond or swimming pool (if people are in the water)! (see fig. 3 + 4)
Attention! Here operation of the pump is permitted only if the pump is permanently installed outside
of the water at least 2 m or more away from the pool.
The following measures must be undertaken: (see fig. 3)
- Build a shaft with pedestal for the pump, at least 2 m away from the edge of the water.
- Protect the shaft with a cover.
- To protect the pump from flooding build a drain for the shaft.
- Attach the pump to the pedestal with screws.
- Install a “M” metal socket in the suction line, toward the pump, to connect to the equipotential bonding
of the swimming pond/swimming pool system!
- Please consult a licensed electrician. Also refer to “Non submersible use” and “Safety Measures.”
Safety measures
- Before use: Check whether mains lead and plug are intact.
- Mains voltage and kind of current have to conform to the information on the type plate.
-The pump may only be connected to a proper earthing-contact type socket through a residual
current device (RCD, 30 mA).
-The connection box should be located in a water-protected area and at least 2 m away from the
edge of the water (see fig. 1 + 2).
- Always keep the plug dry.
-Important! If the mains lead or the motor housing are damaged, the pump cannot be used anymore.
It cannot be repaired since the lead is permanently encapsulated in the motor housing.
- Do never hang up or transport the pump by the mains lead.
Start-up (see fig. 1 - 4)
Important! Do not let the pump run „dry“. This could cause damages to the appliance.
- Immerse the pump completely in your pond. This causes the pump body to be filled with water.
- A minimum water depth of 25 cm is required for underwater operation to avoid the pump taking in air.
- The maximum depth for submerged operation of the
2 m pump is 2 m!
- The water temperature may not exceed 35°C.
- The pump must be protected from frost.
- The pump is switched on by putting the plug in the socket.
- To prevent the pump becoming unnecessarily dirty, place it above the sludge deposits in your pond, in a
firm and horizontal position (on a stone slab)!
- A range of accessories may be fitted onto the threaded connections of the pump.
- For intake protection in clear water select a pre-filter Art.-No. 168 / 009137 - 168 / 009140 or
168 / 009050 from our line of accessories (catalog).
- The pressure duct can be mounted on top or on the side depending on the particulary implementation!
To do this loosen the screws (20) and turn the entire pump (10) to the desired position.
- Suitable fountain jets can be found in our range of accessoires (catalog).
GB
5
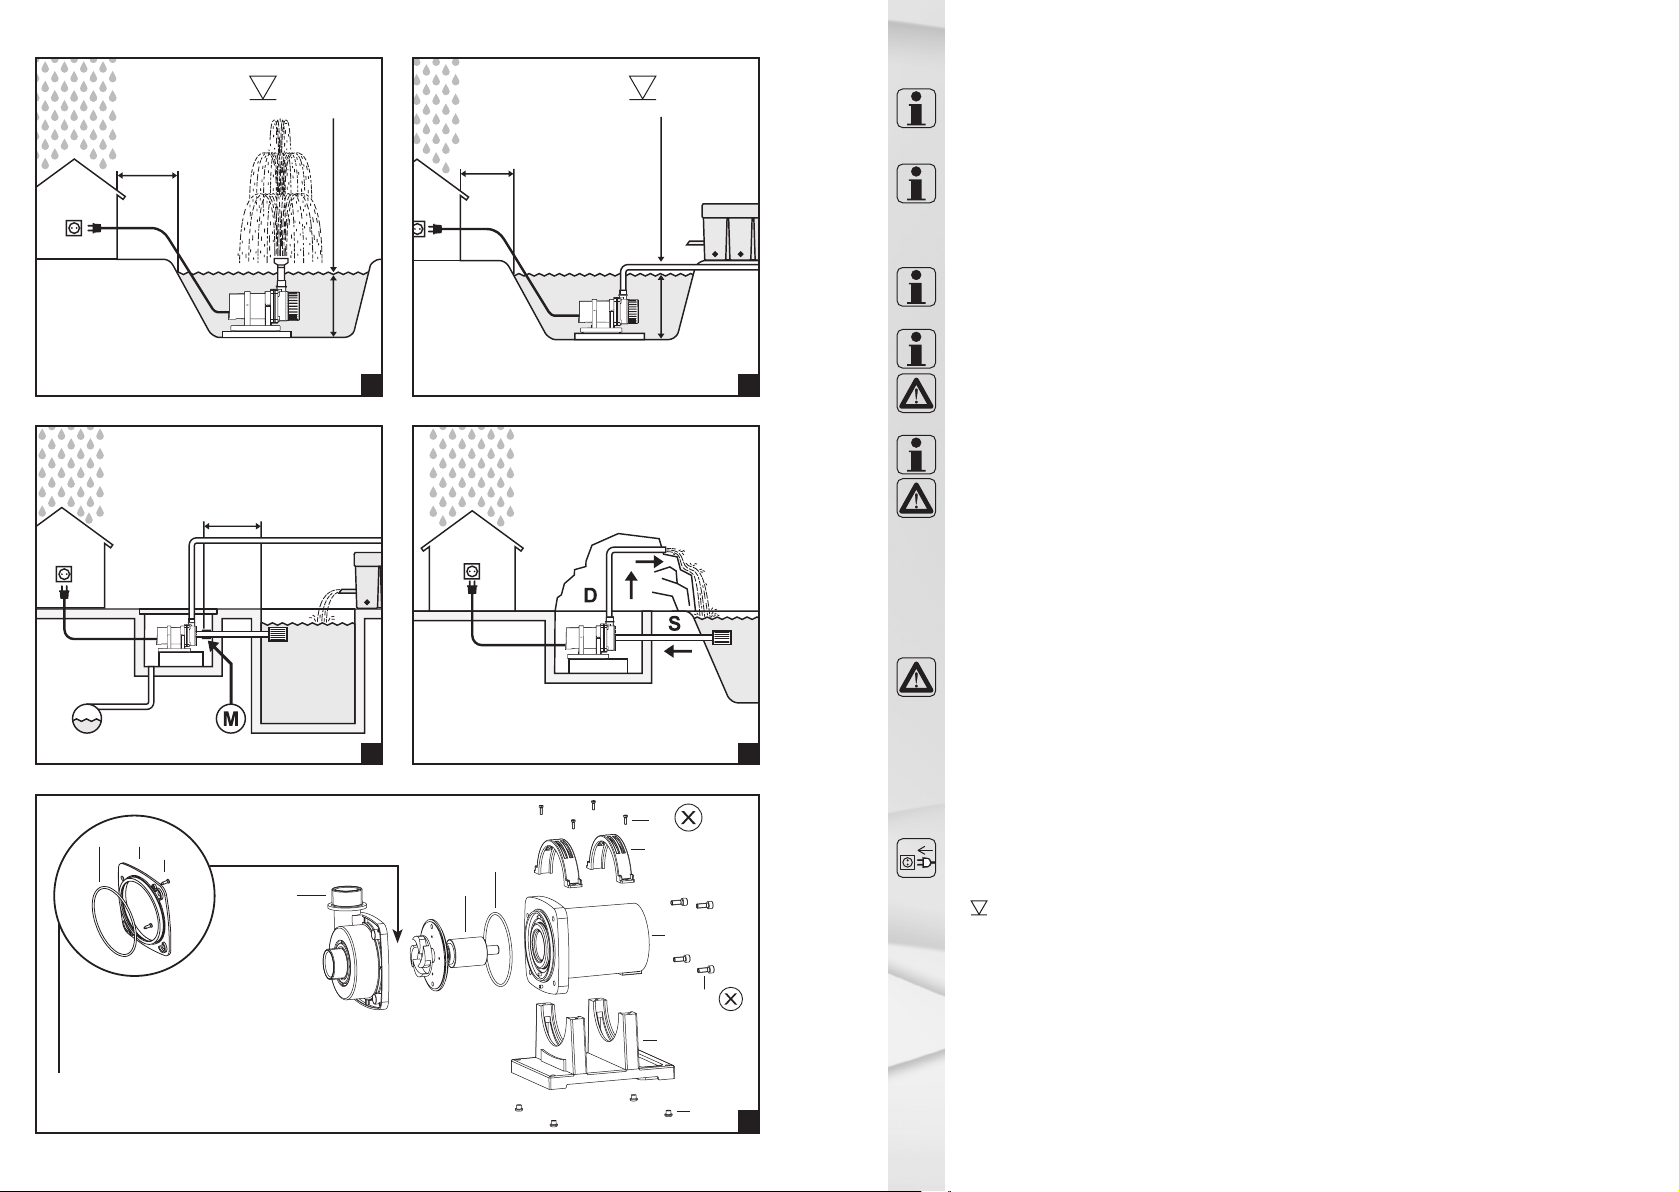
“Non submersible use” (see fig. 3 + 4)
The pump can be used in a nonsubmerged type application.
- Position the pump below the surface of the water, at the side of the pond so that the water can flow into
the pump (not self-priming).
- Connect suction hose (S) and pressure hose (D) to the pump. Connection should be watertight.
- Suction hose and pump must be filled with water before switching-on.
-TIP! To prevent the pump becoming clogged, provide the suction hose with a pre filter
Art.-No. 168 / 009137 - 168 / 009140 or 168 / 009050 covered in our range of accessories.
Overload protection
In case the pump is becoming overheated the built-in thermal overload trip switches it off.
The pump must cool down.
The pump will not start automatically without the necessary controlling when it is cool.
Check the following operating conditions:
- Is there a sufficient water supply?
- Has the filter become clogged?
- Has dirt entered the pump housing (Follow the cleaning instructions below)?
- Have hoses or jets become clogged?
- Has the pump cooled down?
As soon as you have solved the problems, you can switch on the pump again by pulling the plug out of the
socket and putting it in again after a short time (1 min.)
Dismantling (see fig. 5)
1. Follow the safety measures. Disconnect pump from mains!
2. Loosen the 4 screws (18).
3. Pull apart pump housing (12) and motor housing (10) .
4. Remove rotor assembly (15) from motor housing (10). Take care of the O-ring (16) on the motor
housing (10).
5. Clean all parts with clear water and a soft sponge. Note! In case of massive calcination please use
Messner decalcifier for pumps Art.-No. 168 / 009115.
Assembly (see fig. 5)
1. Push the O-ring (16) onto the starting point on the motor housing (10).
2. Carefully slide the rotor assembly (15) into the motor housing (10) and twist the bearing cover so that
the two holes fit onto the pins on the motor housing (10).
3. Check whether the rotor assembly can be rotated easily.
4. Check the position of the O-ring (16) on the motor housing (10).
5. Put the pump housing (12) on the motor housing (10) and attach it firmly and evenly with the
4 screws (18) .
Maintenance
In order to prolong the service life of your pump significantly and to keep it in sound operating condition, it is
recommended to carry out maintenance and cleanup regularly.
This can be done by everyone, quickly and easily. See „Dismantling/Assembly“
Servicing intervals
- In the beginning check proper performance of your pump every day. If necessary, clean the filters.
- Since servicing intervals (complete cleaning) will vary depending on the level of pond pollution, repeat the
periodic service to your pump in accordance with the pollution of the pond water .
Should you determine that there are damaged or worn parts, replace them. See „Spare parts“
Important! When used in calcareous water, the rotor assembly (15) and the stainless steel can split
tube in the motor housing (10) should be cleaned at regular intervals.
Pump care in wintertime
Protect your pump from freezing-up!
Take the pump out of your pond in autumn.
Clean the pump completely according to the instructions.
During the winter months store the pump in a tank filled with water to prevent the bearings from drying out.
Store the tank in a frostproof room.
6
Spare parts
To order spare parts, please indicate the pump type, the designation and the Art.-No. from the table below
(see also fig. 5).
Item Designation Art.-No. Number
1 Pump stand 104 / 003506 1
2 Clip 104 / 003505 2
104 / 003279 112 Pump housing G 1¼˝
Pump housing G 1½˝ 104 / 003280 1
104 / 003570 1
104 / 003409 1
104 / 003508 1
104 / 004627 1
Pump housing
G 1½˝ - Ø 35
Pump housing G 2˝
Pump housing
G 2˝ - Ø 45
Pump housing
G 2˝ - Ø 109
13 Connection flange 104 / 003410 1
Pump Type
eco-Tec2 4500 - 20000
eco-Tec2 plus 10000 - 25000
eco-Tec2 4500 - 20000
eco-Tec2 plus 10000 - 25000
eco-Tec2 4500, eco-Tec2 7500
eco-Tec2 10000, eco-Tec2 13000
eco-Tec2 16000
eco-Tec2 plus 10000
eco-Tec2 20000
eco-Tec2 plus 15000
eco-Tec2 plus 20000
eco-Tec2 plus 25000
eco-Tec2 20000
eco-Tec2 plus 15000, eco-Tec2 plus 20000
eco-Tec2 plus 25000 104 / 004612 1
C3 G 2˝
Connection flange
C3 Ø 109
15 Rotor assembly 168 / 009156 1
168 / 009157 1
eco-Tec2 4500
eco-Tec2 7500
eco-Tec2 10000 168 / 009158 1
168 / 009159 1
168 / 009160 1
eco-Tec2 13000
eco-Tec2 16000
eco-Tec2 20000 168 / 009161 1
168 / 009162 1
168 / 009163 1
168 / 009164 1
Rotor assembly
Rotor assembly
Rotor assembly
Rotor assembly
Rotor assembly
Rotor assembly
Rotor assembly
Rotor assembly
Rotor assembly
eco-Tec2 plus 10000
eco-Tec2 plus 15000
eco-Tec2 plus 20000
eco-Tec2 plus 25000 168 / 009175 1
16 O-ring 96 x 3 112 / 000030 1
112 / 000047 1
112 / 000069 1
114 / 000048 4
114 / 000079 4
114 / 000078 2
114 / 000042 4
114 / 000172 4
eco-Tec2 4500 - 20000
eco-Tec2 plus 10000 - 25000
eco-Tec2 20000
eco-Tec2 plus 15000, eco-Tec2 plus 20000
eco-Tec2 plus 25000
eco-Tec2 4500 - 16000
eco-Tec2 plus 10000
eco-Tec2 20000, eco-Tec2 plus 15000
eco-Tec2 plus 20000, eco-Tec2 plus 25000
eco-Tec2 20000
eco-Tec2 plus 15000 - 25000
eco-Tec2 4500 - 20000
eco-Tec2 plus 10000 - 25000
eco-Tec2 4500 - 20000
eco-Tec2 plus 10000 - 25000
17 O-ring 105 x 3
O-Ring 105 x 2,5
18 Screw M 6 x 16
Screw M 6 x 20
19 Screw Ø 3,5 x 13
20 Screw Ø 3,9 x 16
21 Rubber buffer
Guarantee conditions
This pump comes with a 72-month guarantee that is effective from the date of delivery. The invoice will be
the proof of the date. In case of damages due to defects in material or manufacturing, we shall either do a
free repair during the guarantee period or replace the damaged part, the choice being ours’.
Damages that occur due to installation and operating errors, lime deposits, insufficient care, frost action,
normal wear and tear or improper repair attempts will not come under this guarantee. The guarantee will
not be valid in case of modifications to the pump, e.g. cutting off the line connection or the line cord. We
will not accept responsibility for consequential damages resulting from breakdown of the pump or improper
operation.
When making use of the guarantee, please send us the pump, along with the corresponding invoice, free of
charge via the specialist dealer who sold you the pump.
Waste disposal
waste disposal of electronic devices by the user in private households of the EU
It is not allowed to dispose the product along with the regular waste disposal, instead it has to be collected
separately. It is your responsibility to dispose and recycle the device in a proper place and protect the
environment through this. More information, where to dispose your devices can be obtained at the local
departments.
130 / 004143 · 11/19
Stamp and Signature of Dealer / Date of purchase
_________________________________________________________________________
_________________________________________________________________________
© Meßner GmbH & Co. KG · Gewerbegebiet Echternhagen 7 · D - 32689 Kalletal

Other manuals for eco-Tec2 4500

1

This manual suits for next models

9

Other Messner Water Pump manuals

Messner MultiSystem M 20000 User manual

Messner

Messner MultiSystem M 20000 User manual

Messner system-Tec 1000 User manual

Messner

Messner system-Tec 1000 User manual

Messner eco-Tec2 4500 User manual

Messner

Messner eco-Tec2 4500 User manual

Messner system-N 3000 User manual

Messner

Messner system-N 3000 User manual

Messner power-Tec2 6000 User manual

Messner

Messner power-Tec2 6000 User manual

Messner power-X2 6000 User manual

Messner

Messner power-X2 6000 User manual

Messner MultiSystem MPF 3000 User manual

Messner

Messner MultiSystem MPF 3000 User manual

Messner system-N 3400 User manual

Messner

Messner system-N 3400 User manual

Messner eco-X2 4500 User manual

Messner

Messner eco-X2 4500 User manual

Messner eco-X2 10000 User manual

Messner

Messner eco-X2 10000 User manual

Messner eco-X2 4500 User manual

Messner

Messner eco-X2 4500 User manual

Popular Water Pump manuals by other brands

Zehnder Pumpen EP Series operating instructions

Zehnder Pumpen

Zehnder Pumpen EP Series operating instructions

Walrus TQ200 Replacing

Walrus

Walrus TQ200 Replacing

WORMS Sumo BHV401S Instructions for use

WORMS

WORMS Sumo BHV401S Instructions for use

Aspen Pumps Mini Blanc manual

Aspen Pumps

Aspen Pumps Mini Blanc manual

Dupla MARIN SPP 1.200 Operating	 instruction

Dupla MARIN

Dupla MARIN SPP 1.200 Operating instruction

Franklin Electric SP25A manual

Franklin Electric

Franklin Electric SP25A manual

APV W+10/8 operating manual

APV

APV W+10/8 operating manual

Lincoln 1296 manual

Lincoln

Lincoln 1296 manual

Bredel APEX 10 Original instructions

Bredel

Bredel APEX 10 Original instructions

Pfeiffer Vacuum TPH 1201 P operating instructions

Pfeiffer Vacuum

Pfeiffer Vacuum TPH 1201 P operating instructions

Graco High-Flo Instructions-parts list

Graco

Graco High-Flo Instructions-parts list

Makita EPH1000 instruction manual

Makita

Makita EPH1000 instruction manual

Becker VT 4.2 operating instructions

Becker

Becker VT 4.2 operating instructions

BUSCH COBRA NC 0500 B instruction manual

BUSCH

BUSCH COBRA NC 0500 B instruction manual

IBO MAGI 2 25-80/180 manual

IBO

IBO MAGI 2 25-80/180 manual

Sealey TP9424.V2 instructions

Sealey

Sealey TP9424.V2 instructions

Wilo HiMulti 3 P Series Installation and operating instructions

Wilo

Wilo HiMulti 3 P Series Installation and operating instructions

Becker SV 700 operating instructions

Becker

Becker SV 700 operating instructions

manuals.online logo
manuals.online logoBrands
  • About & Mission
  • Contact us
  • Privacy Policy
  • Terms and Conditions

Copyright 2025 Manuals.Online. All Rights Reserved.