MetriCorr Slimline VL100 User manual

Toerringvej 7 Roedovre 2610 Denmark - Tel. +45 9244 8080 info@metricorr.com
Slimline series
VL100 & MasterLink
Operation Manual
Document: 101513-02
Contents

MetriCorr VL100 & MasterLink Operation Manual 2 | 45
1Scope................................................................................................................ 4
2VL100 & MasterLink Unit.................................................................................. 5
2.1 VL100 & MasterLink –with optional COM/Ethernet............................................................5
2.2 VL100 & MasterLink –compact ............................................................................................6
2.3 VL100 & MasterLink w/lithium battery.................................................................................7
2.4 VL100 & MasterLink –Specifications & Accessories.............................................................8
3Configuration ................................................................................................... 9
3.1 Switch on & Initial Communication.......................................................................................9
3.2 WebService - general ..........................................................................................................10
3.2.1 Setup of VL100 & MasterLink in Webservice .............................................................................. 12
3.2.2 Communication interval.............................................................................................................. 14
3.2.3 Sample interval & Start time ....................................................................................................... 15
3.2.4 Intensive measurements ............................................................................................................. 16
3.2.5 Assigning sensors/components to the VL100 ............................................................................. 17
3.2.6 Creating “POT sensors” ............................................................................................................... 17
4Installation ..................................................................................................... 19
4.1 Solar Junction Box Installation ............................................................................................19
4.2 Big Fink Installation .............................................................................................................24
4.3 Big Fink Solar Solution.........................................................................................................29
4.4 Battery Hat Solution............................................................................................................30
5Your Data –Simple WEBservice Instructions................................................... 31
5.1 View & Download Logged Data...........................................................................................31
5.2 Unit Pipeline & Location Assignment..................................................................................32
5.3 Alerts ...................................................................................................................................33
5.4 Reports ................................................................................................................................33
6Satellite –communication .............................................................................. 35
6.1 Satellite modem & placement ............................................................................................36
6.2 Power & LED indicators.......................................................................................................36
6.3 Webservice Subscription.....................................................................................................37
6.4 Setup in Webservice............................................................................................................38
6.4.1 Example: 25h interval measurement campaign.......................................................................... 39

MetriCorr VL100 & MasterLink Operation Manual 3 | 45
6.4.2 Example: 24h interval measurement campaign.......................................................................... 40
6.5 App & Data for satellite connected MasterLinks ................................................................40
Appendix 1: Junction Box Mounting Guide........................................................... 41
Appendix 2: Solar Charger Instructions ................................................................ 42
Revision
Date
Comments
Prepared
Review
Approval
201
2021-10-11
Based on “102272-00 ICL-C operating Manual UK”.
New VL100 elements added in section 1, 2 and 3.
Added section 6. Satellite - communication
RCH
LBT
FGA
LBT
101
2021-01-03
Major update, new pictures and Webservice updated
LBT
FGa
CVA
Draft R001
2020-11-08
Operation Guide ICL-C & MasterLink.
Already reviewed by LBT and FGa.
This version is based on the previous ICL &
MasterLink operation guide by FrB, 2018-11-14.
RCH
LBT
FGa

MetriCorr VL100 & MasterLink Operation Manual 4 | 45
1Scope
This document is a guideline for setup and operation of the datalogger model ”VL100 & MasterLink”from
MetriCorr’s Slimline series of remote monitoring equipment. The VL100 datalogger has two terminals
“Pipe” and “Ref” for voltage measurements. Hereafter referred to as “unit”.
The VL100 datalogger can be ordered with several options:
1. COM port (required for satellite connection, see section 6.)
2. Ethernet port
3. Compact housing
4. Lithium battery
The MetriCorr remote monitoring system uses an online WebService, where all the data from site are
uploaded and stored. The unit consists of a MasterLink module and an ICL-C module, where both modules
are configured and controlled from WebService.
Before you start:
•If you want to link your new unit to an existing MetriCorr WebService account, please email
-Account Name (existing or new) you wish the unit(s) to be assigned to.
-User email address (for new users to log in to existing or new accounts)
-MasterLink Serial Number(s) you wish to link to the account
•If you are a new customer or setting up a NEW account, please also provide details of a Primary
contact person for data & administration communication with MetriCorr.
1. Name & title / position
2. Email address
3. Telephone number
Once you have confirmation that the units have been assigned to the account as requested (together with
login details if you have requested a new account or user), you are ready to start.
IMPORTANT: Do not disassemble the unit. If the unit is malfunctioning, please contact MetriCorr.

MetriCorr VL100 & MasterLink Operation Manual 5 | 45
2VL100 & MasterLink Unit
2.1 VL100 & MasterLink –with optional COM/Ethernet
The Slimline VL100 measurement module is fitted into a standard slimline housing, which allows for an
optional COM or Ethernet board in the MasterLink module.
Figure 1. VL100 & MasterLink without battery, as shipped
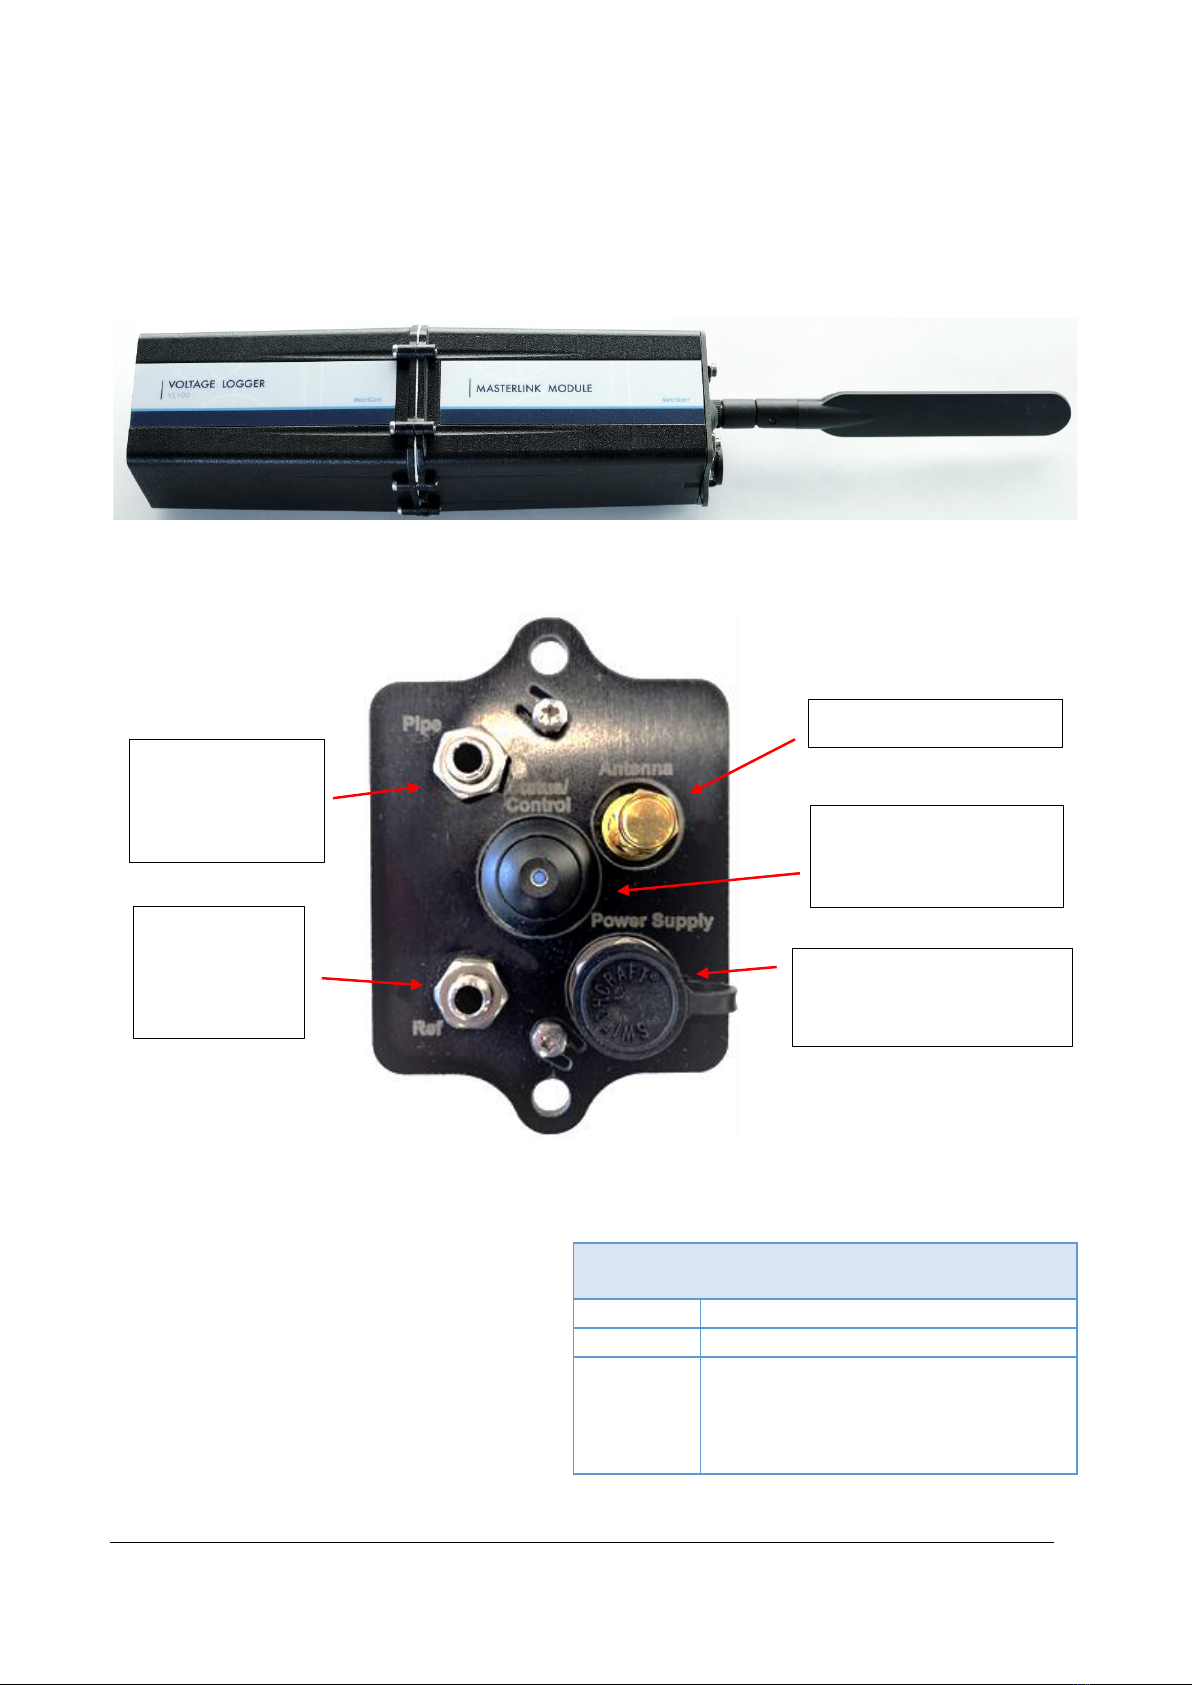
Figure 2. VL100 & MasterLink module connectors & control
A: Antenna
connection
B: Status/control
button & LED
indicator
C: Power supply connector
(with protective cap)
D: Pipe/structure
connection
E: Reference
electrode
connection
F(optional): Ethernet
connection (only blinded
hole shown)
G(optional): COM
port (ODU connector
with protective cap)

MetriCorr VL100 & MasterLink Operation Manual 6 | 45
2.2 VL100 & MasterLink –compact
The Slimline VL100 measurement module is included in the same housing as the MasterLink. All connectors
are placed on the top of the module. (No connectors or buttons on the bottom)
Figure 3. VL100 & MasterLink, compact version without battery, as shipped
Figure 4. VL100 & MasterLink, compact version without battery, connectors & control
A: Antenna connection
B: Status/control
button & LED indicator
E: Reference
electrode
connection
D: Pipe/structure
connection
C: Power supply connector
(with protective cap)
MetriCorr VL100 & MasterLink Operation Manual 7 | 45
2.3 VL100 & MasterLink w/lithium battery
The Slimline VL100 measurement module is included in the same housing as the MasterLink. A lithium
battery is placed in the bottom half of the enclosure. All connectors are placed on the top of the module.
(No connectors or buttons on the bottom)
Figure 5. VL100 & MasterLink without battery, as shipped
The battery lifetime greatly depends on the
measurement campaign indicated in the battery
specifications.
Please contact MetriCorr if the Lithium battery
has to be replaced.
VL100 –Battery specifications
Battery type
Lithium Thionyl
Capacity
26Ah @ 3.6V, 92Wh
Lifetime
+2 years @ 6 logs/hour, daily transmission
+3 years @ 1 log/hour, daily transmission
+3 years @ 6 logs/hour, weekly transmission
+10 years @ 1 log/hour, weekly transmission
Figure 6. VL100 & MasterLink,
compact version without
battery, connectors & control
A: Antenna connection
B: Status/control
button & LED indicator
D: Pipe/structure
connection
E: Reference
electrode
connection
C: Power supply connector
(with protective cap)

MetriCorr VL100 & MasterLink Operation Manual 8 | 45
2.4 VL100 & MasterLink –Specifications & Accessories
Table 1. VL100 - Specifications
Table 1. MasterLink - Specifications
Standard accessories:
-Antenna LTE with 1m wire and adhesive pad
-Protective caps for connectors
-Power cable with DC connector
-Yellow wire 1m, 4mm banana connectors
-Black wire 1m, 4mm banana connectors
VL100 –Specifications
Input Resistance
+10 MΩ
Input range (voltage)
± 100 V
Resolution (voltage)
1 mV
DC accuracy (voltage)
± 1 mV ± 0.3% reading
AC accuracy (voltage)
± 1 mV ± 1% reading
AC Resolution (voltage)
1 mV
AC accuracy (current)
± 1 mV ± 1% reading
MasterLink –Specifications
Battery Lifetime
+3 years @ 1h logging intervals
and weekly transmissions
Casing
IP65
Humidity
0-100% RH condensing
conditions
Operating conditions
-40 °C to +85 °C
Storage capacity
+200 000 readings
Logging intervals
(Normal mode)
10 min → ∞, recommended 1
hour
Logging interval
(Campaign mode)
1 sec in pre-defined time
intervals

MetriCorr VL100 & MasterLink Operation Manual 9 | 45
3Configuration
3.1 Switch on & Initial Communication
Once connected to the antenna and battery, push the 'Status/Control' button ('E' in Figure 3) and release
(<0.5s). This will indicate the unit's current status/mode with a series of flashes on the LED built into the
button. Please refer to the LED flash patterns below.
*The device is Off. 5 short (0.5 milliseconds) flashes per second for 5
seconds. This signal is triggered by a short (<0.5s) push on the push-
button.
Figure 7. LED flash indication
Mode / status
Description
Waiting
The device is active and waiting for the next measurement to be performed.
Short (50 milliseconds) flash every 8 seconds
Measuring
The device is performing a measurement.
Longer flash (0.5 seconds) repeated every second.
Searching
The device is searching for a network.
1 short (0.5 milliseconds) flash repeated every second.
Transmitting
The device is transmitting data to the WebService.
3 short (0.5 milliseconds) consecutive flashes repeated every second.
Off
The device is Off.
5 short (0.5 milliseconds) flashes per second for 5 seconds.

MetriCorr VL100 & MasterLink Operation Manual 10 | 45
3.2 WebService - general
Log on to https://data-metricorr.com using the username and password sent to you as per Section 1. For
data safety, it is recommended that your assigned password should be changed on your first login. This can
be done in the 'Profile' menu. You should also 'Logout' when you have completed your session.
Click on “DATA” in the top menu and press on “POT – Potential”. The landing page is shown below:
In webservice, the VL100 module needs a “Sensor” to store the measured data.
By default, webservice creates a sensor with the title “P-“ followed by the same serial number as for the
VL100 module. I.e. “P-AN02792688”.
It is possible to create more sensors in webservice, where each of them holds data. I.e. this is useful, if you
have installed several physical sensors (voltage measurement points) down a pipeline and you want to
collect data manually using a VL100 as a handheld instrument and MetriCorr’s “Logger app”.

MetriCorr VL100 & MasterLink Operation Manual 11 | 45
In the top menu, click "RMU" -> "MASTERLINKS" to show the page "Your defined MasterLinks":
"Your Defined MasterLinks" can be any of the following types: ICL, VL100 or ICL_C
An overview of the columns in the" Your defined Masterlink" table above is described in Error! Reference s
ource not found. below:
Parameter
Data (example)
Comment
MobileID
AL02840255
MasterLink Serial number
SW version
1.3.267,1.3.267,1.3.267
Software version (MasterLink, Bluetooth, ICL-C module)
Battery
/
Not fitted with battery
Net info
3G/Poor/-101dBm/TDC
Network connection/signal strength/host or “Via satellite”
Received Time (UTC)
25-Aug-2021 5:33:55
UTC time stamp of LAST communication/data transfer
Next wakeup (UTC)
25-Aug-2021 6:33:19
UTC time stamp of NEXT communication attempt
Status
OK, 1 logger lines received
" OK" indicates that communication went well.
" 1 logger lines received" inform amount of data received
since last communication session.
Lattitude
55.695061
Geographic coordinate [degrees]
Longitude
12.431020
Geographic coordinate [degrees]
Time
13:38:55
UTC time stamp for geographic coordinate
Connected Device
VL100
Indicate type of logger, in example: ICL, VL-100 or ICL-C
Serial number
AN02792653
Serial number of VL100e
Channel 1 SN
LBT-POT1
Serial number of POT-sensor (Component)
Options
Setup
Link to the Setup page
History
Link to the History page
VL100 serial number
POT sensor serial number
Setup link

MetriCorr VL100 & MasterLink Operation Manual 12 | 45
Table 2. Your defined MasterLinks –parameter description
The 'Received Time' should be approximately that of when the unit was powered up. Status should be 'OK.'
After the unit has started communication (refer to" Figure 7. LED flash indication" flash pattern, 3rd row), it
could take a few moments for the WebService to update. Refresh your browser page if it does not appear
within 1 minute.
Should the unit not display on the MasterLink page, restart the unit to force new communication.
3.2.1 Setup of VL100 & MasterLink in Webservice
There’s basically three ways for a MasterLink to communicate/transfer data to webservice:
1. GSM/LTE Described in this section
2. Satellite See section 6.4
3. RMU App See “App Operation Manual”
On the setup page in WEBService, the user shall specify the interval between measurements. Optionally,
the VL100-MasterLink can be setup for a weekly "Intensive mode" campaign.
On the" Your defined Masterlink" page, click on the “Setup” link. (See the previous page).
Now the Setup page is shown on the next page.

MetriCorr VL100 & MasterLink Operation Manual 13 | 45
In the following sections, the setup page will be described in detail.

MetriCorr VL100 & MasterLink Operation Manual 14 | 45
3.2.2 Communication interval
Two parameters set the interval between MasterLink communication (wake up) with WebService:
1. Sleep(OK) hours. As long as communication is successful, the MasterLink goes to sleep for example,
168 hours before the next wake-up, where communication and data transfer are established again.
2. Sleep(Fail) hours. If communication fails, the MasterLink try to establish communication with a
different interval. (I.e. 4 hours)
For battery operation, it is recommended to set the unit for a 4h sleep interval in case of a communication
error (Sleep (FAIL) hours), and a 24h (once daily) for normal operation (Sleep (OK) hours) in order to
preserve battery life.
The existing settings are shown under 'Latest Registration'. For a new unit this will be blank.
Installation mode.
After the initial power-up, 'Installation mode' will be activated. Communication frequency will be forced
automatic to 1h. This stated will automatically be disabled after three days and returned to recommended
normal operation.
Communication frequency can be configurated as desired. It is recommended to specify a 4h sleep time, in
case of a communication error (Sleep (FAIL)) and a 24h (once daily) for normal operation (Sleep (OK)) to
preserve battery life.
Latitude & Longitude coordinates.
You can also request the unit's position (estimated latitude, longitude by GNSS) by checking the 'Get
Position' box. The retrieved data will be displayed in the 'MasterLink' table on next scheduled 'wake up'.

MetriCorr VL100 & MasterLink Operation Manual 15 | 45
3.2.3 Sample interval & Start time
The time between each measurement of ER probe, Line Current Sensor and Pipe-Ref voltage are specified
as Sample interval, which can be set by the user according to the part of the Setup page shown below:
Start time, HH:MM (UTC) sets the time of the first sample to be measured.
Sample interval (min) sets the interval for the next sample to be measured. The unit will continue to
perform measurements with this interval until the user stops it.
The 'Latest Registration' text shows when the next measurement is currently due to occur. All
updates will be performed at this time. This can be 'forced' by physically restarting the MasterLink.
Remember to 'Save request' beforehand.

MetriCorr VL100 & MasterLink Operation Manual 16 | 45
3.2.4 Intensive measurements
Intensive measurements can be enabled by marking any of the seven “Enable boxes” shown in the
screenshot below:
Intensive measurement frequency (Seconds)
Type in the interval between each measurement into this field.
Period Intensive measurements (UTC Time)
There are seven individual periods available. Each of the periods specifies a measurement to be repeated
on weekly basics; all setup is in UTC Time.
For example, three periods are enabled in the weekly schedule.
1. Every Monday, starting at 10:15 AM, for a period of 2 hours
2. Every Wednesday, starting 8:45 PM, for a period of 4 hours
3. Every Thursday, starting 3:00 AM, for a period of 30 min

MetriCorr VL100 & MasterLink Operation Manual 17 | 45
3.2.5 Assigning sensors/components to the VL100
The VL100 has one channel (Channel 1) that can measure a “POT sensor”, also referred to as “Component”.
A “POT sensor” is basically a voltage measurement point, which can be permanently connected to a VL100
or connected to a VL100, ICL or ICL-C for occasional measurements.
At the bottom of the setup page, you can assign a POT sensor from the drop-down menu.
3.2.6 Creating “POT sensors”
When you establish a connection from your VL100 & Masterlink to webservice, a POT sensor (component)
will automatically be created with the serial number “P-ANXXXXXXXX”. It is possible to change the name
(S/N) of any “POT sensor” by pressing “Edit”. You can also create a new “POT sensor” manually by click
“Component” -> “POT sensor”:

MetriCorr VL100 & MasterLink Operation Manual 18 | 45
The landing page gives an overview of the “POT sensors” you’ve defined:
Click “Create Sensor”:
Type in the name/serial number in the field “SerialNo”. I.e. “PipeSection_02_34”.
You can also add a comment in the field below.
Press “Submit” to store your new sensor.
”Pipeline” and ”Tag (location)”
Finally, you can assign a “Pipeline” name and “Tag (location” to each of your defined “POT sensors”.

MetriCorr VL100 & MasterLink Operation Manual 19 | 45
4Installation
This section covers the installation of the Slimline units for different applications listed here:
1. Solar Junction box (Solar panel and Lead-acid battery 12V/12Ah)
2. Solar junction box (Satellite modem, solar panel and Lead-acid battery 12V/12Ah), see section 7.
3. Big Fink (External power required)
4. Big Fink Solar solution (Solar panel and Lead-acid battery 12V/2Ah)
5. Big Fink Battery Hat (Lithium Thionyl battery 7.2V/42Ah)
The accessories required as well as the assembly are described in the relevant sections, below.
4.1 Solar Junction Box Installation
The junction box itself can be installed on a stable wooden pole, metal tube, or test station pipe such as a
big fink. The mounting should be carried out according to the mounting sketch present in Appendix 1. To
the best possible extent, it is important to mount the junction box such that it is not shadowed (in any
season) as the solar panel needs direct sun to recharge the battery effectively. A back-up battery for three
months of operation (without solar charging) at 1-hour measurement intervals and weekly uploads is
supplied with the junction box.
Once the junction box is securely mounted in place, the onsite installation/set up of the RMU can
commence.

MetriCorr VL100 & MasterLink Operation Manual 20 | 45
VL100 module
Figure 8: Interior of Solar Junction Box as Battery and solar connected.
This manual suits for next models
1
Table of contents
Other MetriCorr Data Logger manuals


