Meyer Formula Owner's manual

6990633 (1-13) Printed in U.S.A. © Bobcat Company 2013
FORMULA MIXER
Models F585 • F700
Mechanical Truck Mount
Owner / Operator’s Manual
& Parts Book
2018 Model Year & Later
PB-MIXER-TR-MECH
1 / 2020

Meyer Manufacturing Corporation - 2 -
1.0 IMPORTANT INFORMATION
The mixer serial number plate is located on the front left hand side of the mixing tub.
Please enter the model, serial number and additional information in the space provided for future reference.
Always use your serial number when requesting information or when ordering parts.
HOW TO READ YOUR SERIAL NUMBER
Meyer Manufacturing Corporation
674 W. Business Cty Rd A
Dorchester, WI 54425
Phone: 1-800-325-9103
Fax: 715-654-5513
Email: sales@meyermfg.com
Website: www.meyermfg.com
Model No.
Mixer Serial No.
Date of Purchase
Dealership
Dealership Phone No.
Mixer Body
Serial Number
Model Year / Vertical Mixer / Model / Sequence Of Build
VM 0700 201
18
MIXER
EXAMPLE: 18VM0700201

1-800-325-9103
Formula Mixer Check List - 3 - www.meyermfg.com
2.0 PRE-DELIVERY & DELIVERY CHECK LIST
This Pre-Delivery & Delivery Check List must be gone through by the Selling Party and the Customer to validate the
Owner’s Registration Form.
Meyer Manufacturing Corporation
Phone: 715-654-5132 • Toll-Free: 1-800-325-9103 • P.O. Box 405 • Dorchester, WI 54425
PB Mixer Check List
All shields and guards are in place and securely
fastened.
All PTO shields turn freely.
All bolts and other fasteners are secure and tight.
All mechanisms operate trouble free.
All grease fittings have been lubricated, gear
boxes filled to proper levels, and all roller chains
are oiled. See “Lubrication” section of this
manual.
All decals are in place and legible.
All stop/tail/turn lights work properly.
PRE-DELIVERY CHECK LIST
After the New Meyer Mixer has been completely set-up,
check to be certain it is in correct running order before
delivering it to the customer.
The following is a list of points to inspect:
Check off each item as you have made the proper
adjustments and found the item operating
satisfactorily. Any adjustments made, MUST be
according to specifications defined in this manual.
DELIVERY CHECK LIST
The following check list is an important reminder of
valuable information that MUST be passed on to the
customer at the time the unit is delivered.
Check off each item as you explain it to the
customer.
Explain to the customer that pre-delivery check
list was fully completed.
Give customer the Owner & Operator’s Manual.
Instruct to read and completely understand its
contents BEFORE attempting to operate the
mixer.
Explain and review with customer the New Meyer
mixer manufacturer’s warranty.
Show the customer where to find the serial
number on the implement.
Explain and review with the customer “Safety
Precautions” section of this manual.
Explain and review with customer the proper
“Start-up and Operating Procedures” sections of
this manual.
Explain and review with customer the
recommended loading and unloading
procedures.
Demonstrate the start-up and shutdown controls.
Explain that regular lubrication and proper
adjustments are required for continued proper
operation and long life of the mixer. Review with
the customer the “Lubrication” and “Adjustments”
sections of this manual.
Fully complete this “PRE-DELIVERY &
DELIVERY CHECK LIST” with the customer.

Meyer Manufacturing Corporation - 4 - Formula Mixer Check List
Meyer Manufacturing Corporation
674 W. Business Cty Rd A
Dorchester, WI 54425
Phone: 1-800-325-9103
Fax: 715-654-5513
Email: sales@meyermfg.com
Website: www.meyermfg.com

1-800-325-9103
PB-MIXER-TR-MECH - 5 - www.meyermfg.com
3.0 INTRODUCTION
Congratulations on your purchase of a new Meyer farm equipment product. Undoubtedly you have given
much consideration to your purchase and we’re proud that you have selected Meyer. Pride in craftsmanship,
engineering and customer service have made Meyer products the finest in the farm equipment industry today.
There is no substitute for quality. That is why thousands of people like you have purchased Meyer farm
equipment. They felt it was the best equipment to serve their farming needs, now and in years to come. We
ask that you follow our policy of “safety first”, and we strongly suggest that you read through the Operator’s
& Parts manual before operating your Meyer farm equipment. Meyer Manufacturing Corporation wants to
thank you for not compromising quality. We are determined to offer excellence in customer service as well as
provide you with the very best value for your dollar.
Sincerely,
All Employees of
MEYER MANUFACTURING CORPORATION
When the PTO is referred to, it means power takeoff from the truck.
This manual is to be used in conjunction with your truck/chassis manual.
The formula mixer may be referred to as mixer, implement, equipment or machine in this manual.
Manufacturer’s Statement: Meyer Manufacturing Corporation reserves the right to make improvements in design, or
changes in specifications at any time, without incurring any obligation to owners of units previously sold. This supersedes
all previous published instructions.
IMPORTANT: You are urged to study this manual and follow the instructions carefully. Your efforts will be
repaid in better operation and service as well as a savings in time and repair expense. Failure to read this
manual and understand the machine could lead to serious injury. If you do not understand instructions in
this manual, contact either your dealer or Meyer Manufacturing Corp. at Dorchester, WI 54425.
WARRANTY: At the front of this manual is the Owner’s Registration Form. Be sure your dealer has
completed this form and promptly forwarded a copy to Meyer Manufacturing to validate the manufacturer’s
warranty. The product model and serial number are recorded on this form and on the inside of the front
cover for proper identification of your Meyer equipment by your dealer and the manufacturer when
ordering repair parts. The serial number is stamped in the front left-hand side of the mixing tub.

Meyer Manufacturing Corporation - 6 - PB-MIXER-TR-MECH
FEATURES
OPTIONS
DESCRIPTION F585 F700
Twin Mixing Augers STD STD
Replaceable Scrapers STD STD
Hardened Knives STD STD
Hay Stops STD STD
Ladder STD STD
Torque Disconnect PTO’s STD STD
2-Speed (Electric Shift) STD STD
Straight Drive STD STD
Heavy -Duty Gearboxes STD STD
DESCRIPTION F585 F700
Side Discharge Door Right/Left OPT OPT
Rear Discharge Door OPT OPT
Slide Tray OPT OPT
Magnets OPT OPT
Hay-Retention Ring OPT OPT
Capacity Belt Extension OPT OPT
Hardened Knives (Additional) OPT OPT
Tank Liner OPT OPT
Baffle Liner OPT OPT

1-800-325-9103
PB-MIXER-TR-MECH - 7 - www.meyermfg.com
TABLE OF CONTENTS
1.0 IMPORTANT INFORMATION . . . . . . . . . . . . . . . . . . . . . . . . . . . . . . . . . . . . . . . . . . . . . . . . . . .2
2.0 PRE-DELIVERY & DELIVERY CHECK LIST . . . . . . . . . . . . . . . . . . . . . . . . . . . . . . . . . . . . . . . 3
3.0 INTRODUCTION . . . . . . . . . . . . . . . . . . . . . . . . . . . . . . . . . . . . . . . . . . . . . . . . . . . . . . . . . . . . . 5
4.0 MANUFACTURER’S WARRANTY . . . . . . . . . . . . . . . . . . . . . . . . . . . . . . . . . . . . . . . . . . . . . . 11
5.0 SAFETY . . . . . . . . . . . . . . . . . . . . . . . . . . . . . . . . . . . . . . . . . . . . . . . . . . . . . . . . . . . . . . . . . . 13
5.1 SAFETY PRECAUTIONS . . . . . . . . . . . . . . . . . . . . . . . . . . . . . . . . . . . . . . . . . . . . . . . . 14
5.2 SAFETY SIGNS . . . . . . . . . . . . . . . . . . . . . . . . . . . . . . . . . . . . . . . . . . . . . . . . . . . . . . . .16
5.3 SHUTOFF & LOCKOUT POWER . . . . . . . . . . . . . . . . . . . . . . . . . . . . . . . . . . . . . . . . . . 20
5.3.1 Shutoff & Lockout Power Recommendations . . . . . . . . . . . . . . . . . . . . . . . . . . . . . 20
6.0 PRE-OPERATION . . . . . . . . . . . . . . . . . . . . . . . . . . . . . . . . . . . . . . . . . . . . . . . . . . . . . . . . . . . 21
6.1 STATIC INSPECTION . . . . . . . . . . . . . . . . . . . . . . . . . . . . . . . . . . . . . . . . . . . . . . . . . . . 21
6.2 TRUCK MOUNT SPECIFICATIONS . . . . . . . . . . . . . . . . . . . . . . . . . . . . . . . . . . . . . . . . 22
6.3 PTO DRIVELINE . . . . . . . . . . . . . . . . . . . . . . . . . . . . . . . . . . . . . . . . . . . . . . . . . . . . . . .22
6.4 START-UP AND SHUT-DOWN . . . . . . . . . . . . . . . . . . . . . . . . . . . . . . . . . . . . . . . . . . . . 22
6.4.1 Start-Up . . . . . . . . . . . . . . . . . . . . . . . . . . . . . . . . . . . . . . . . . . . . . . . . . . . . . . . . .22
6.4.2 Shut-Down . . . . . . . . . . . . . . . . . . . . . . . . . . . . . . . . . . . . . . . . . . . . . . . . . . . . . . .23
6.5 OPERATIONAL CHECKS . . . . . . . . . . . . . . . . . . . . . . . . . . . . . . . . . . . . . . . . . . . . . . . .23
6.5.1 Controls . . . . . . . . . . . . . . . . . . . . . . . . . . . . . . . . . . . . . . . . . . . . . . . . . . . . . . . . .24
6.6 TRANSPORTING . . . . . . . . . . . . . . . . . . . . . . . . . . . . . . . . . . . . . . . . . . . . . . . . . . . . . . .25
6.6.1 Brake Information . . . . . . . . . . . . . . . . . . . . . . . . . . . . . . . . . . . . . . . . . . . . . . . . . . 25
6.7 OPTIONAL EQUIPMENT . . . . . . . . . . . . . . . . . . . . . . . . . . . . . . . . . . . . . . . . . . . . . . . . . 26
6.7.1 Digital Scale Indicator . . . . . . . . . . . . . . . . . . . . . . . . . . . . . . . . . . . . . . . . . . . . . . 26
7.0 OPERATION . . . . . . . . . . . . . . . . . . . . . . . . . . . . . . . . . . . . . . . . . . . . . . . . . . . . . . . . . . . . . . 27
7.1 GENERAL . . . . . . . . . . . . . . . . . . . . . . . . . . . . . . . . . . . . . . . . . . . . . . . . . . . . . . . . . . . . 27
7.1.1 Cutout Clutch . . . . . . . . . . . . . . . . . . . . . . . . . . . . . . . . . . . . . . . . . . . . . . . . . . . . .28
7.1.2 Material . . . . . . . . . . . . . . . . . . . . . . . . . . . . . . . . . . . . . . . . . . . . . . . . . . . . . . . . .28
7.2 LOADING . . . . . . . . . . . . . . . . . . . . . . . . . . . . . . . . . . . . . . . . . . . . . . . . . . . . . . . . . . . . . 29
7.2.1 Loading Steps . . . . . . . . . . . . . . . . . . . . . . . . . . . . . . . . . . . . . . . . . . . . . . . . . . . . 30
7.3 MIXING . . . . . . . . . . . . . . . . . . . . . . . . . . . . . . . . . . . . . . . . . . . . . . . . . . . . . . . . . . . . . . 30
7.4 UNLOADING . . . . . . . . . . . . . . . . . . . . . . . . . . . . . . . . . . . . . . . . . . . . . . . . . . . . . . . . . . 31
7.5 MIXER TROUBLESHOOTING GUIDE . . . . . . . . . . . . . . . . . . . . . . . . . . . . . . . . . . . . . . 32

Meyer Manufacturing Corporation - 8 - PB-MIXER-TR-MECH
8.0 MAINTENANCE . . . . . . . . . . . . . . . . . . . . . . . . . . . . . . . . . . . . . . . . . . . . . . . . . . . . . . . . . . . .33
8.1 LUBRICATION . . . . . . . . . . . . . . . . . . . . . . . . . . . . . . . . . . . . . . . . . . . . . . . . . . . . . . . . .33
8.1.1 Daily or every 8-10 loads: . . . . . . . . . . . . . . . . . . . . . . . . . . . . . . . . . . . . . . . . . . .33
8.1.2 Monthly: . . . . . . . . . . . . . . . . . . . . . . . . . . . . . . . . . . . . . . . . . . . . . . . . . . . . . . . . .34
8.1.3 Every 40 hours: . . . . . . . . . . . . . . . . . . . . . . . . . . . . . . . . . . . . . . . . . . . . . . . . . . .34
8.1.4 50 hours: . . . . . . . . . . . . . . . . . . . . . . . . . . . . . . . . . . . . . . . . . . . . . . . . . . . . . . . .34
8.1.5 Annually or Every 500 hours (Whichever Is First): . . . . . . . . . . . . . . . . . . . . . . . . .35
8.1.6 Annually or Every 2000 hours (Whichever Is First): . . . . . . . . . . . . . . . . . . . . . . . .36
8.1.7 Every 5000 hours . . . . . . . . . . . . . . . . . . . . . . . . . . . . . . . . . . . . . . . . . . . . . . . . . .36
8.1.8 Gearbox Oil Change . . . . . . . . . . . . . . . . . . . . . . . . . . . . . . . . . . . . . . . . . . . . . . .37
8.1.8.1 Planetary Gearbox . . . . . . . . . . . . . . . . . . . . . . . . . . . . . . . . . . . . . . . . . . . . . . .37
8.1.8.2 2-Speed Gearbox . . . . . . . . . . . . . . . . . . . . . . . . . . . . . . . . . . . . . . . . . . . . . . . .38
8.1.8.3 Superior & Benzi Front Driveline Gearbox . . . . . . . . . . . . . . . . . . . . . . . . . . . . .38
8.2 ADJUSTMENTS . . . . . . . . . . . . . . . . . . . . . . . . . . . . . . . . . . . . . . . . . . . . . . . . . . . . . . . .39
8.2.1 Auger Scraper Bar . . . . . . . . . . . . . . . . . . . . . . . . . . . . . . . . . . . . . . . . . . . . . . . . .39
8.2.2 Auger Timing . . . . . . . . . . . . . . . . . . . . . . . . . . . . . . . . . . . . . . . . . . . . . . . . . . . . .39
8.2.3 PTO Cutout Clutch Connection . . . . . . . . . . . . . . . . . . . . . . . . . . . . . . . . . . . . . . .39
8.2.4 Knives . . . . . . . . . . . . . . . . . . . . . . . . . . . . . . . . . . . . . . . . . . . . . . . . . . . . . . . . . .40
8.2.4.1 Knife Removal . . . . . . . . . . . . . . . . . . . . . . . . . . . . . . . . . . . . . . . . . . . . . . . . . . .40
8.2.4.2 Adding Knives . . . . . . . . . . . . . . . . . . . . . . . . . . . . . . . . . . . . . . . . . . . . . . . . . . .40
8.2.4.3 Knife Placement . . . . . . . . . . . . . . . . . . . . . . . . . . . . . . . . . . . . . . . . . . . . . . . . .40
8.2.4.4 Knife Position . . . . . . . . . . . . . . . . . . . . . . . . . . . . . . . . . . . . . . . . . . . . . . . . . . .40
8.2.4.5 Replacing Damaged or Worn Knives . . . . . . . . . . . . . . . . . . . . . . . . . . . . . . . . .40
8.2.5 Hay Stop Adjustment . . . . . . . . . . . . . . . . . . . . . . . . . . . . . . . . . . . . . . . . . . . . . .41
8.2.5.1 Hay Stop Lock Bolt . . . . . . . . . . . . . . . . . . . . . . . . . . . . . . . . . . . . . . . . . . . . . . .41
8.3 STORING THE MIXER . . . . . . . . . . . . . . . . . . . . . . . . . . . . . . . . . . . . . . . . . . . . . . . . . .42
8.4 RETURNING THE MIXER TO SERVICE . . . . . . . . . . . . . . . . . . . . . . . . . . . . . . . . . . . . .42
8.5 REPLACEMENT PARTS . . . . . . . . . . . . . . . . . . . . . . . . . . . . . . . . . . . . . . . . . . . . . . . . .43
9.0 PARTS . . . . . . . . . . . . . . . . . . . . . . . . . . . . . . . . . . . . . . . . . . . . . . . . . . . . . . . . . . . . . . . . . . .45
ELECTRICAL . . . . . . . . . . . . . . . . . . . . . . . . . . . . . . . . . . . . . . . . . . . . . . . . . . . . . . . . . . . . . .45
TAIL LIGHTS . . . . . . . . . . . . . . . . . . . . . . . . . . . . . . . . . . . . . . . . . . . . . . . . . . . . . . . . . .45
SCALE SYSTEM . . . . . . . . . . . . . . . . . . . . . . . . . . . . . . . . . . . . . . . . . . . . . . . . . . . . . . .46
2-SPEED ELECTRICAL SYSTEM PRIOR TO SN 18VM(0585235, 0700212) . . . . . . . .48
2-SPEED ELECTRICAL SYSTEM SN 18VM(0585235, 0700212) & LATER . . . . . . . . .50
HYDRAULIC POWER PACK . . . . . . . . . . . . . . . . . . . . . . . . . . . . . . . . . . . . . . . . . . . . . .52
HYDRAULIC POWER PACK TO VALVE BANK . . . . . . . . . . . . . . . . . . . . . . . . . . . . . . . . . . .53
MIXER . . . . . . . . . . . . . . . . . . . . . . . . . . . . . . . . . . . . . . . . . . . . . . . . . . . . . . . . . . . . . . . . . . .54
REAR BUMPER . . . . . . . . . . . . . . . . . . . . . . . . . . . . . . . . . . . . . . . . . . . . . . . . . . . . . . . . . . . .56
DOOR . . . . . . . . . . . . . . . . . . . . . . . . . . . . . . . . . . . . . . . . . . . . . . . . . . . . . . . . . . . . . . . . . . . .58
OPTIONAL REAR OR REAR SIDE DOOR HYDRAULIC SCHEMATIC . . . . . . . . . . . . . . . . .60

1-800-325-9103
PB-MIXER-TR-MECH - 9 - www.meyermfg.com
DOOR HYDRAULIC SCHEMATIC
LEFT DOOR . . . . . . . . . . . . . . . . . . . . . . . . . . . . . . . . . . . . . . . . . . . . . . . . . . . . . . . . . . . . . . . 61
AUGER . . . . . . . . . . . . . . . . . . . . . . . . . . . . . . . . . . . . . . . . . . . . . . . . . . . . . . . . . . . . . . . . . . 62
DRIVELINE . . . . . . . . . . . . . . . . . . . . . . . . . . . . . . . . . . . . . . . . . . . . . . . . . . . . . . . . . . . . . . . 64
RIGHT SIDE PTO GEARBOX DRIVELINE MOUNT . . . . . . . . . . . . . . . . . . . . . . . . . . . . . . . . 66
LEFT SIDE PTO GEARBOX DRIVELINE MOUNT . . . . . . . . . . . . . . . . . . . . . . . . . . . . . . . . . 68
LOWER GEARBOX PRIOR TO SN 18VM0585230 . . . . . . . . . . . . . . . . . . . . . . . . . . . . . . . . 70
UPPER GEARBOX PRIOR TO SN 18VM0585230 . . . . . . . . . . . . . . . . . . . . . . . . . . . . . . . . .71
LOWER GEARBOX SN 18VM(0585230, 0700212) & LATER . . . . . . . . . . . . . . . . . . . . . . . . 72
UPPER GEARBOX SN 18VM(0585230, 0700212) & LATER . . . . . . . . . . . . . . . . . . . . . . . . . 74
1800 SERIES PLANETARY (119-18-13.92-1) . . . . . . . . . . . . . . . . . . . . . . . . . . . . . . . . . . . . . 76
HOSE FITTING HYDRAULIC SYSTEM . . . . . . . . . . . . . . . . . . . . . . . . . . . . . . . . . . . . . . . . . 78
OPTIONAL EQUIPMENT . . . . . . . . . . . . . . . . . . . . . . . . . . . . . . . . . . . . . . . . . . . . . . . . . . . . . 80
HAY RETAINING RING . . . . . . . . . . . . . . . . . . . . . . . . . . . . . . . . . . . . . . . . . . . . . . . . . .80
8” CAPACITY EXTENSION . . . . . . . . . . . . . . . . . . . . . . . . . . . . . . . . . . . . . . . . . . . . . . . 81
SIDE DISCHARGE SLIDE TRAY . . . . . . . . . . . . . . . . . . . . . . . . . . . . . . . . . . . . . . . . . . 82
SLIDE TRAY HYDRAULIC SCHEMATIC . . . . . . . . . . . . . . . . . . . . . . . . . . . . . . . . . . . . 84
DUAL SLIDE TRAY HYDRAULIC SCHEMATIC . . . . . . . . . . . . . . . . . . . . . . . . . . . . . . . 85
REMOTE SCALE MOUNT . . . . . . . . . . . . . . . . . . . . . . . . . . . . . . . . . . . . . . . . . . . . . . . . 86
TANK MAGNET . . . . . . . . . . . . . . . . . . . . . . . . . . . . . . . . . . . . . . . . . . . . . . . . . . . . . . . . 88
10.0 SPECIFICATIONS . . . . . . . . . . . . . . . . . . . . . . . . . . . . . . . . . . . . . . . . . . . . . . . . . . . . . . . . . 89
10.1 MODELS F585, F700 . . . . . . . . . . . . . . . . . . . . . . . . . . . . . . . . . . . . . . . . . . . . . . . . . . . 89
MAINTENANCE RECORD . . . . . . . . . . . . . . . . . . . . . . . . . . . . . . . . . . . . . . . . . . . . . . . . . . . . . . . .91

Meyer Manufacturing Corporation - 10 - PB-MIXER-TR-MECH

1-800-325-9103
PB-MIXER-TR-MECH - 11 - www.meyermfg.com
4.0 MANUFACTURER’S WARRANTY
MEYER FORMULA MIXER 4/2014
I. The “Owner’s Registration Form” must be completed in full and promptly returned to Meyer Mfg. Corp. for this
warranty to become both valid and effective. All warranties on New Meyer Mixers shall apply only to the
original retail customer from an authorized Meyer Mfg. Corp. dealership.
II. This warranty shall not apply to any Meyer Mixer which has been subjected to misuse, negligence, alteration,
accident, incorrect operating procedures, has been used for an application not designed for or pre-authorized
by Meyer in writing, has had the serial numbers altered, or which shall have been repaired with parts other
than those obtained through Meyer Mfg. Corp. Meyer is not responsible for the following: Depreciation or
damage caused by normal wear, lack of reasonable and proper maintenance, failure to follow the operator's
manual recommendations or normal maintenance parts and service. Meyer is not responsible for rental of
replacement equipment during warranty repairs, damage to a power unit (including but not limited to a truck
or tractor), loss of earnings due to equipment down time, or damage to equipment while in transit to or from
the factory or dealer.
III. Meyer Mfg. Corp. warrants New Meyer Mixer to be free from defects in material and workmanship under
recommended use and maintenance service, as stated in the operator’s and parts manuals, as follows:
A. Meyer Mfg. Corp. will repair or replace F.O.B. Dorchester, WI, as Meyer Mfg. Corp. elects, any
part of a new Meyer Mixer which is defective in material or workmanship:
i. Without charge for either parts or labor during the first (1) year from purchase date to the
original retail customer.
B. In addition to the above basic warranty, Meyer Mfg. Corp. will repair or replace F.O.B. Dorchester,
WI as Meyer Mfg. Corp. elects:
i. Any part of the following which is defective in material or workmanship (not neglect to
recommended use and service) with a “pro-rated” charge for parts only (not labor) during
the stated time period from date of purchase to the original retail customer. 1st year
100%, 2nd year 100%, 3rd year 50%, 4th year 25%, 5th year 10%
a. The Formula Mixer Planetary Gearbox. Meyer Part # 119-18-13.92-1.
IV. COMMERCIAL USE: Coverage as in paragraph III.A.i. only, except warranty coverage is for (90) days for parts
and labor to the original commercial retail customer.
V. Repairs eligible for labor warranty must be made by Meyer Mfg. Corp. or an authorized Meyer dealership. The
original retail customer is responsible for any service call and/or transportation of the mixer to the dealership or
the factory for warranty service.
VI. Except as stated above, Meyer Mfg. Corp. shall not be liable for injuries or damages of any kind or nature,
direct, consequential, or contingent, to persons or property. This warranty does not extend to loss of crop or for
any other reasons.
VII. No person is authorized to give any other warranties or to assume any other obligation on Meyer Mfg. Corp.’s.
behalf unless made or assumed in writing by Meyer Mfg. Corp. This warranty is the sole and exclusive warranty
which is applicable in connection with the manufacture and sale of this product and Meyer Mfg. Corp.’s
responsibility is limited accordingly.
Purchased Product Warranty:
This warranty does not apply to component parts not manufactured by Meyer such as but not limited to wheels, tires,
tubes, PTO shafts, clutches, hydraulic cylinders, scales, etc.

Meyer Manufacturing Corporation - 12 - PB-MIXER-TR-MECH

1-800-325-9103
PB-MIXER-TR-MECH - 13 - www.meyermfg.com
5.0 SAFETY
Meyer Mfg. Corp. equipment is manufactured with operator safety in mind. Located on the equipment are various safety
signs to aid in operation and warn of hazardous areas. Pay close attention to all safety signs on the equipment.
Carefully follow the operating and maintenance instructions in this manual and all applicable safety laws. Failure to follow
all safety procedures may result in serious injury or death.
Before attempting to operate this equipment, read and study the following safety information. In addition, make
sure that every individual who operates or works with the equipment, whether family member or employee, is
familiar with these safety precautions.
Meyer Mfg. Corp. provides guards for exposed moving parts for the operator’s protection; however, some areas
cannot be guarded or shielded in order to assure proper operation. The operator’s manual and safety signs on
the equipment itself warn you of hazards and must be read and observed closely!
Danger, Warning, Caution, and instructional decals and plates are placed on the equipment to protect anyone working on
or around this equipment, as well as the components of the equipment. All personnel operating or maintaining this
equipment must familiarize themselves with all Danger, Warning, Caution, and instructional decals and plates.
This symbol is used to call attention to instructions
concerning personal safety. Be sure to observe and
follow these instructions. Take time to be careful!
The signal word DANGER on the machine and in the manual identifies
a hazardous situation which, if not avoided, WILL result in death or
serious injury.
The signal word WARNING on the machine and in the manual
indicates a potentially hazardous situation which, if not avoided,
COULD result in death or serious injury.
The signal word CAUTION on the machine and in the manual indicates
a potentially hazardous situation which, if not avoided, MAY result in
minor or moderate injury. It may also be used to alert against unsafe
practices.
This notice identifies procedures which must be followed to avoid
damage to the machine.

Meyer Manufacturing Corporation - 14 - PB-MIXER-TR-MECH
5.1 SAFETY PRECAUTIONS
• The truck/chassis owner's operator's manual should be used in conjunction with this manual.
• DO NOT allow anyone to operate, service, inspect or otherwise handle this equipment until all operators have read
and understood all of the instructional materials in this Operator’s And Parts Manual and have been properly trained
in its intended usage.
• For an operator to be qualified, he or she must not use drugs or alcohol which impair alertness or coordination while
working. An operator who is taking prescription drugs must get medical advice to determine if he or she can safely
operate a machine and the equipment.
• Make sure all personnel can READ and UNDERSTAND all safety signs.
• DO NOT allow minors (children) or inexperienced persons to operate this equipment.
• DO NOT operate until all shields and guards are in place and securely fastened.
• DO NOT step up on any part of the equipment that is not designated as a ladder or viewing platform at any time.
• DO NOT adjust, clean or lubricate while the equipment is in motion.
• Inspect when first delivered and regularly thereafter; that all connections and bolts are tight and secure before
operating.
• Know how to stop operation of the equipment before starting it!
• Make certain everyone is clear of the equipment before applying power.
• Keep hands, feet and clothing away from moving parts. Loose or floppy clothing should not be worn by the operator.
• Observe all applicable traffic laws when transporting on public roadways (where legal to do so). Check local laws for
all highway lighting and marking requirements.
• Shut off and lock out power before adjusting, servicing, maintaining or clearing an obstruction from this machine. (See
5.3 SHUTOFF & LOCKOUT POWER on page 20.)
• Always enter curves or drive up or down hills at a low speed and at a gradual steering angle.
• Never allow riders on either truck or equipment.
• Keep truck in a lower gear at all times when traveling down steep grades.
• Stay away from overhead power lines. Electrocution can occur without direct contact.
• Use only properly rated undercarriage and tires.
All individuals who will operate this equipment must read
and completely understand this Operator’s And Parts
Manual. Operator must have instructions before operating
the machine. Untrained operators can cause injury or death.

1-800-325-9103
PB-MIXER-TR-MECH - 15 - www.meyermfg.com
Safety Precautions For Truck Mounted Units:
• Comply with state and local laws governing highway safety and movement of machinery on roadways.
Safety Precautions For Hydraulic System:
• Check hydraulic tubes, hoses and fittings for damage and leakage. Never use hands to check for leaks. Hydraulic
tubes and hoses must be properly routed and have adequate support and secure clamps. Tighten or replace any parts
that show leakage.
• Always clean fluid spills. Do not use gasoline or diesel fuel for cleaning parts. Use commercial nonflammable solvents.

Meyer Manufacturing Corporation - 16 - PB-MIXER-TR-MECH
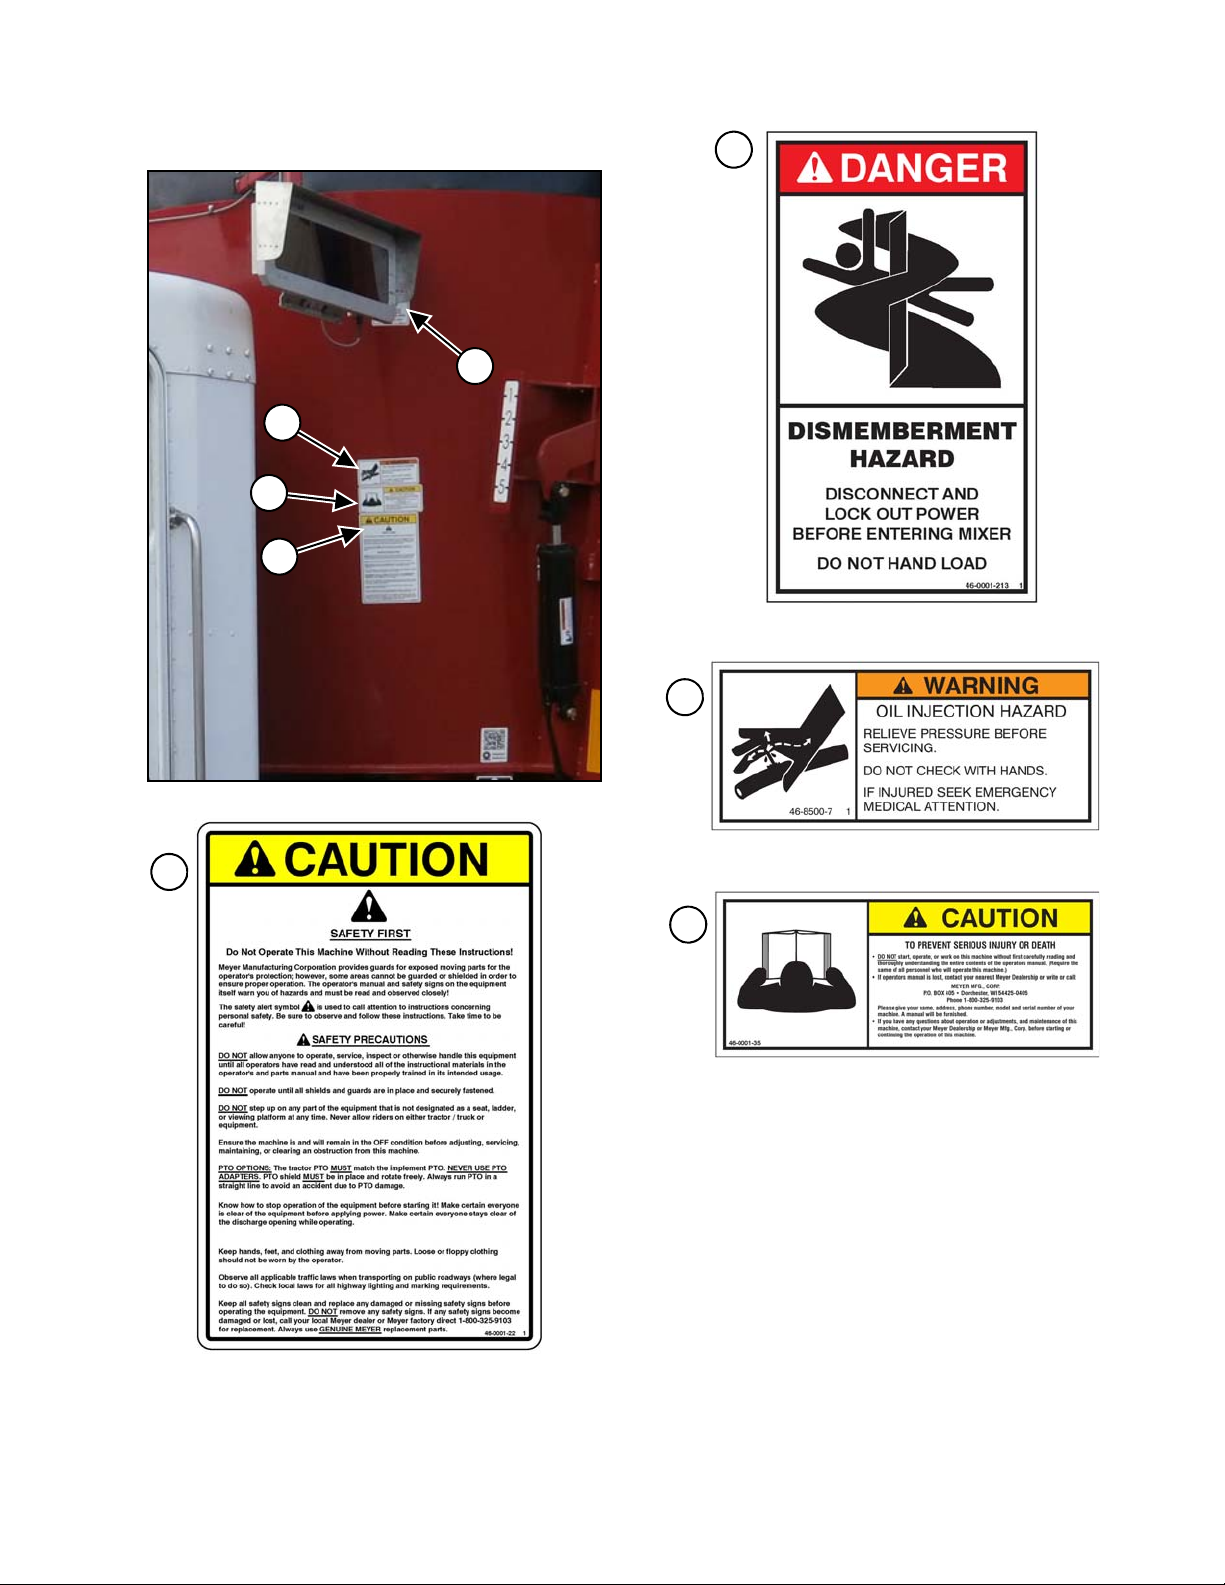
5.2 SAFETY SIGNS
Read all safety signs on the equipment and in this manual. Keep all
safety signs clean and replace any damaged or missing safety signs
before operating the equipment. Do Not remove any safety signs.
Safety signs are for operator protection and information.
FRONT OF MIXER
PART NO. 46-0001-211
1
1
1-800-325-9103
PB-MIXER-TR-MECH - 17 - www.meyermfg.com
FRONT OF MIXER
1
2
3
4
PART NO. 46-0001-213
1
PART NO. 46-8500-7
2
3
PART NO. 46-0001-35
4
PART NO. 46-0001-22
Meyer Manufacturing Corporation - 18 - PB-MIXER-TR-MECH
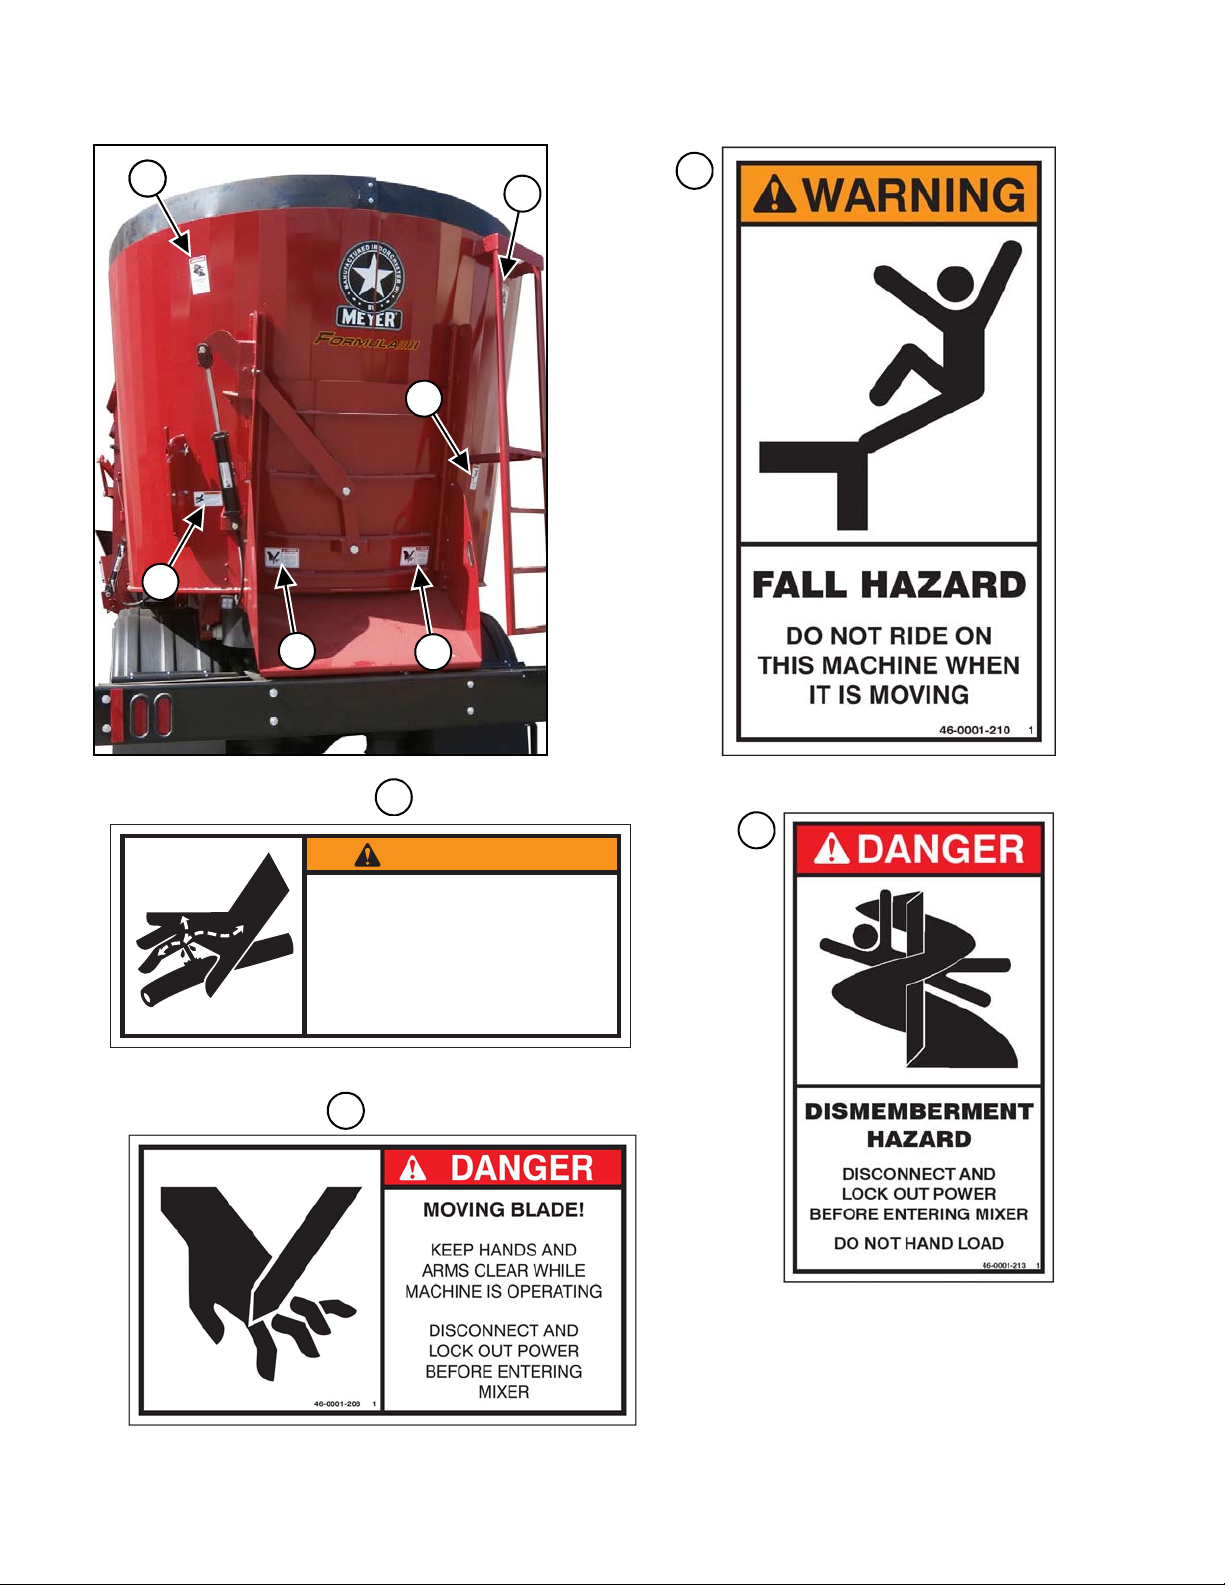
REAR OF MIXER
1
2
33
4 4
PART NO. 46-0001-210
1
PART NO. 46-0001-213
3
WARNING
OIL INJECTION HAZARD
RELIEVE PRESSURE BEFORE
SERVICING.
DO NOT CHECK WITH HANDS.
IF INJURED SEEK EMERGENCY
MEDICAL ATTENTION.
46-8500-7 1
PART NO. 46-8500-7
2
4
PART NO. 46-0001-208

1-800-325-9103
PB-MIXER-TR-MECH - 19 - www.meyermfg.com
1
PART NO. 46-0001-211
1
UNDER MIXER
PART NO. 46-0001-212
(Located under mixing tub)
(Located under mixer belting)

Meyer Manufacturing Corporation - 20 - PB-MIXER-TR-MECH
5.3 SHUTOFF & LOCKOUT POWER
5.3.1 Shutoff & Lockout Power Recommendations
1. Think, Plan and Check
a. Think through the entire procedure and identify all the steps that are required.
b. Plan what personnel will be involved, what needs to be shut down, what guards / shields need to be removed, and
how the equipment will be restarted.
c. Check the machine over to verify all power sources and stored energy have been identified including engines,
hydraulic and pneumatic systems, springs and accumulators, and suspended loads.
2. Communicate - Let everyone involved, including those working on or around this machine, that work is being done
which involves keeping this machine safely “OFF”.
3. Power Sources
a. LOCKOUT - Shut off engines and take the key, or physically lock the start/on switch or control. Disconnect any
power sources which are meant to be disconnected (i.e. electrical, hydraulic, and PTO of pull-type units).
b. TAGOUT - Place a tag on the machine noting the reason for the power source being tagged out and what work is
being done. This is particularly important if the power source is not within your sight and/or will need to be isolated
for a longer period of time.
4. Stored Energy - Neutralize all stored energy from its power source. Ensure that this machine is level, set the parking
brake, and chock the wheels. Disconnect electricity, block moveable parts, release or block spring energy, release
pressure from hydraulic and pneumatic lines, and lower suspended parts to a resting position.
5. Test - Do a complete test and personally double check all of the above steps to verify that all of the power sources are
actually disconnected and locked out.
6. Restore Power - When the work has been completed, follow the same basic procedures, ensuring that all individuals
working on or around this machine are safely clear of the machine before locks and tags are removed and power is
restored.
It is important that everyone who works on this equipment is properly trained to help ensure that they are
familiar with this procedure and that they follow the steps outlined above. THIS MANUAL WILL REMIND YOU
WHEN TO SHUTOFF & LOCKOUT POWER.
Any individual that will be adjusting, servicing, maintaining, or
clearing an obstruction from this machine needs to ensure that this
machine stays safely “OFF” until the adjustment, service, or
maintenance has been completed, or when the obstruction has been
cleared, and that all guards, shields, and covers have been restored
to their original position. The safety of all individuals working on or
around this machine, including family members, are affected. The
following procedure will be referred to throughout this manual, so be
familiar with the following steps.
This manual suits for next models
2
Table of contents
Other Meyer Mixer manuals


Popular Mixer manuals by other brands


Assistent ORIGINAL
Assistent ORIGINAL 920 900 023 instructions

Hans Grohe
Hans Grohe Ecostat Comfort HQ Instructions for use/assembly instructions

Saturn
Saturn ST-FP1022 manual

Behringer
Behringer Europower PMP1680S user manual

Varimixer
Varimixer AR100 VL-1L operating instructions

Bravetti
Bravetti 300 WATT POWER MIXER EP545 Use and care instructions


