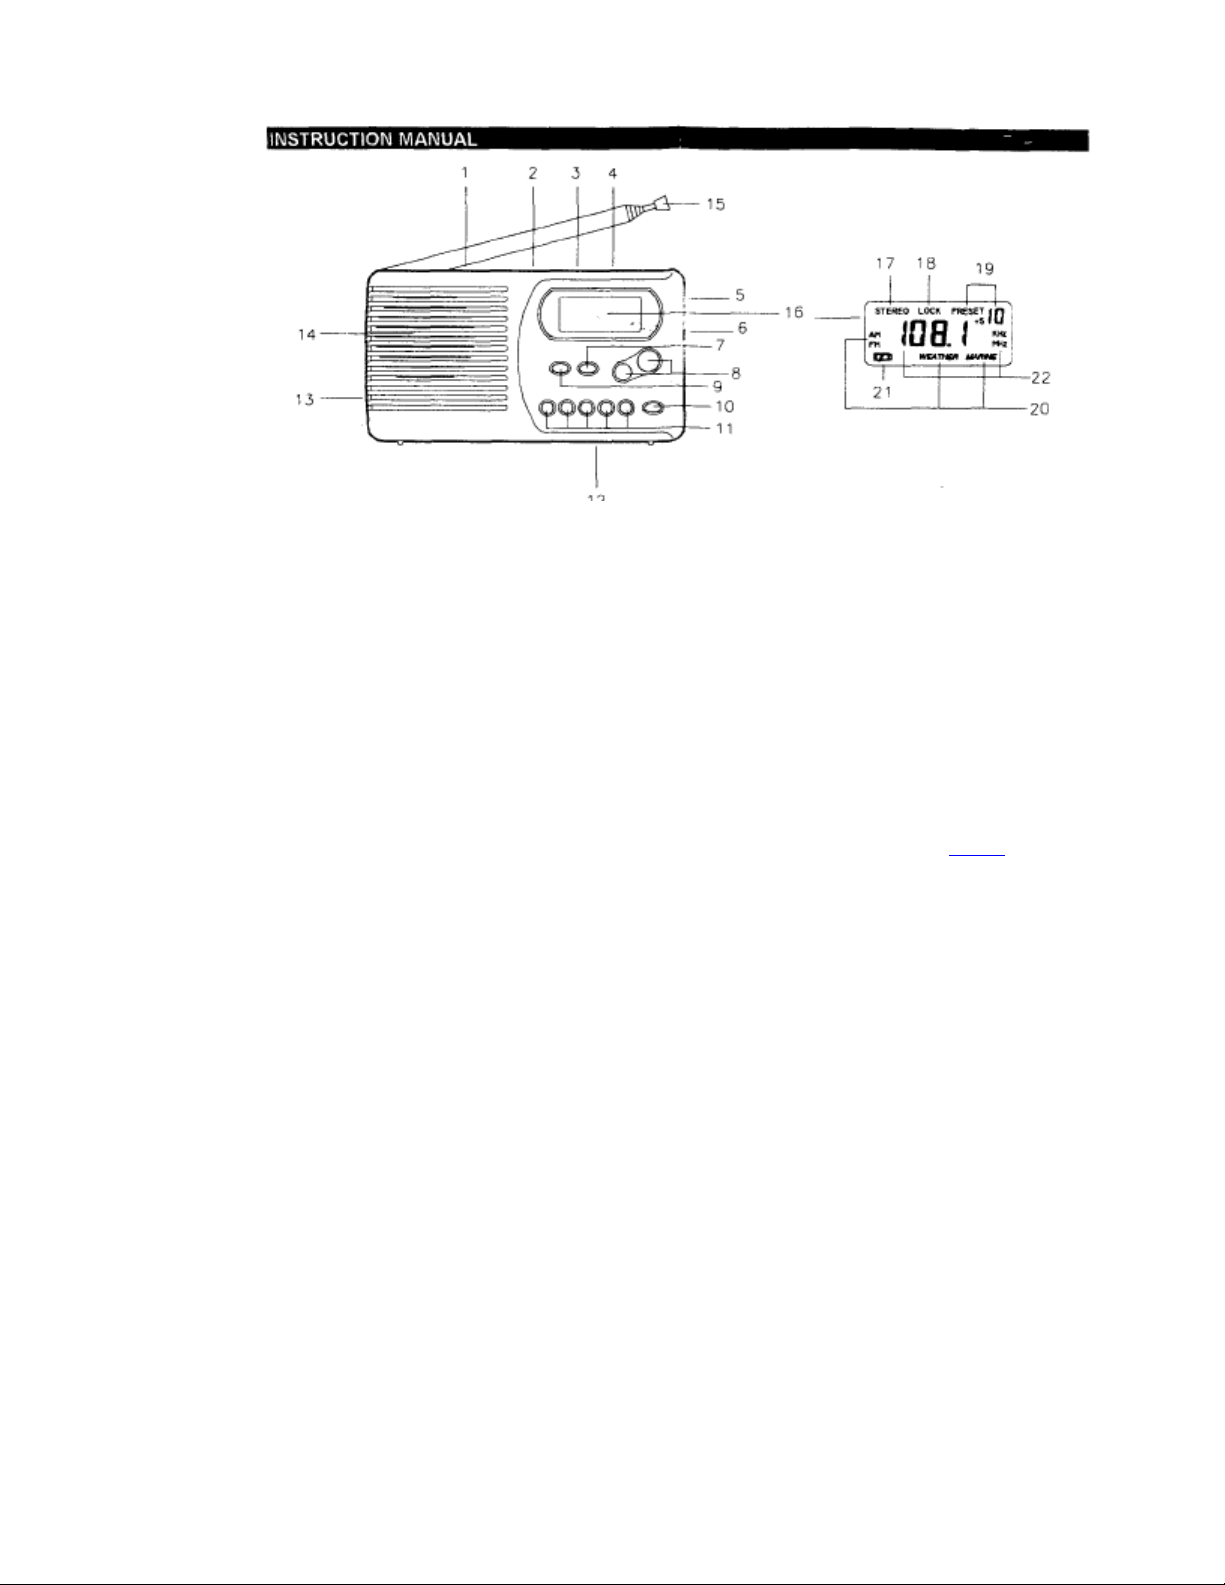
2 KEYLOCK
3. FM MONO/STEREO
4. EAR / SPEAKER SELECTOR 5.
PHONE JACK 6. VOLUME
CONTROL
8. TUNING BUTTONS 9.
MEMORY BUTTONS 10. "+5'
BUTTON
11 STATION PRESET BUTTONS
12. BATTERY COMPARTMENT
19. MEMORY INDICATOR 20.
BAND INDICATOR
(AM/FM WEATHER/MARINE) 21.
LOW BATTERY INDICATOR 22.
RADIO FREQUENCY DISPLAY
14. SPEAKER
15. TELESCOPIC ANTENNA
16. LCD DISPLAY
17. FM STEREO INDICATOR
mpartment cover (12) at the back of the unit and insert
two 'AA'(R6/UM3) dry cells. Take care that the calls are oriented for correct
polarity.
•Do not mix old and new batteries.
•Do not mix akaine, standard (Carbon-zinc) or rechargeable (nickelcadmium)
batteries.
•If the law Battery Indicator (21) appear on the LCD Display (16) and
flashing during operation, the batteries should be replaced.
EXTERNAL AC ADAPTOR (NOT INCLUDED)
This unit can be powered by an AC outlet. Be careful to use an AC adapter which is correc
matched to the radio The radio requires a DC input of 3V
Adapter can be purchased separately.
OPERATION
1. Set the power ON/OFF switch (1) to ON' position.
2. Select the AM, FM,Weather or Marine band by pressing the Band Button (7).
The AM, FM, Weather and Marine bands are cycle selected each time when
the Band Button (7) is pressed.
3. Set the EAR/SPK switch (4) to 'EAR" or'SPK' position as desire. Insert
the headphone plug into the Phone Jack (5) if EAR position is selected.
4. Press the Tuning Button (8)
-Higher frequency (AM/FM band) or Weather/Marine channel
(Weather/Marine band) can be selected by pressing the 'UP" button and
lower frequency or Weather/Marine channel by' DOWN" button. -In AM or FM band
mode, pressing either UP or Down button for more than 1 seconds
activates the automatic tuning mode and stops automatically when a broadcasting
band is just searched. " Using the'+ or' ' button to adjust the best reception
frequency of the broadcasting if necessary
The automatic tuning will continue to scan a specific band even after the
search reaches either of the band edges (max. frequency or min frequency)
Once the search reaches max. frequency, it will return to min.
continue to search upwards. Press the Tuning Button (8) again to select the
desired band.
5 Adjust the Volume Control (6) to the desired level.
6. Set the FM MONO/STEREO' switch (3) at your choice. In case FM
band being selected and listening with earphone.
PRESET TUNING
Once the desired broadcasting stations, Weather or Marine channels are
stored in the Preset Buttons (11). They can easily be recalled AM/FM station
up to 10 can be stored in memory at each and 5 each Weather/Marine
channel as well
Setting station frequency, Weather or Marine channel into the memory by
preset buttons perform the following in sequence. Tune in a desired station
frequency or select a Weather/Marine channel according to the normal tuning
procedure. Then press the "MEMO* button (9). Memory Indicator (19) will appear on
the Display (16) and blinks. Store the desired frequency or Weather/Marine channel
1 to 5 on Preset Buttons (11), store AM/FM channel 6 to 10 on pressing '+5"
Button (10) and then pressing Preset Buttons (11). The memory indicator light
goes off 15 seconds later
Calling the stored frequencies or Weather/Marine channels 1 -5 by pressing
to 5 Preset Button (111) and 6
-10 (AM/FM) by pressing '-5' Button (10)
-5 Preset Button (11).
MEMORY BACKUP OF STORED STATIONS
Once the batteries are law,
the Low Battery Indicator (21) will appear on the
LCD Display (16) and flashing. Switch the On/Off switch (1) to Off position,
then you have 1 minute to change the new batteries.
CAUTION
If the batteries have been removed for more than 1 minute, you may need to
reprogram al the radio station. -
KEY LOCK -
When the 'KEY LOCK' switch (2) set to the lock position. AI the buttons
be inhibited. The 'KEY LOCK' Indicator (18) will appear on the Display (16).
release the key lock function by set the' KEY LOCK" switch to the un-lock position.
NOTES
When listening to FM programs or Weather, Marine channels, to insure
maximum tuner sensitivity, keep the Telescopic Antenna (15) to a maximum
length. -Try
to determine the Telescopic Antenna (15) position which provides the best
sensitivity.
The AM Band has a built-in ferrite bar antenna. You may find you can
improve AM reception by rotating the set or bringing it closer to a window.
SPECIFICATION
Frequency Range
Europe '.AM 522 -1629 kHz / 9kHz step
FM 87 3 -108.1 MHz / 50kHz step
Weather Channel 00 -09 Marine
Channel 01 -28, 37,'39
60 -74, 77 -88
USA AM 520 -1720 kHz / 10kHz step FM 87.3
-108.1 MHz / 100kHz step Weather
Channel 00 -09 Marine Channel 01 -28
60 -74, 77 -88
Antenna AM -Ferrite Bar Antenna
FM/Weather/Marine -Telescopic Rod Antenna
10% THD Earphone 15mW + 15mW
Output Power Speaker 80mW
Battery 3VDC (1.5V x 2)
*AA*/R6/UM3
Accessory Stereo Dynamic Headphones
( 1 Pair)
Specification and product designs are subject to change without notice