MHTeam DH2-I-55 User manual

DH1-70; DH1-100 – DH2-I-55; DH2-I-85
Instruction Manual
Manuel d’Instruction
Manual de instrucciones
Manuale d’istruzione
GB Direct and Indirect-fired Diesel/Kerosene Heaters
FR Générateurs d’air chaud à Gasoil/Kérosène
ES Calefactores Diesel y Keroseno
IT Generatori di aria calda a Gasolio/Kerosene

GB
Introduction
Thank you for choosing a MHTeam product. Read this manual carefully before using the unit and save it for future
reference.
Disclaimer
MHTeam reserves the right to make alterations to specifications, quantities, dimensions etc. for production or other
reasons, subsequent to publication.
While we believe the information is accurate and complete, we make no warranty or representation for any particular
purposes. The information is offered in good faith and with the understanding that any use of the units or accessories
in breach of the directions and warnings in this document is at the sole discretion and risk of the user.
Disposal guidelines (EU)
Do not dispose of this product with general household waste. This product must be disposed according to the laws
governing Waste Electrical and Electronic Equipment. If required, contact your local authorities for information
regarding the available disposal facilities.
ERP standards 2016/2281
This product is suitable for external and occasional use only.

1. General Safety Rules
READ INSTRUCTIONS CAREFULLY. READ AND FOLLOW ALL INSTRUCTIONS. PLACE
INSTRUCTIONS IN A SAFE PLACE FOR FUTURE REFERENCE. DO NOT ALLOW ANYONE
WHO HAS NOT READ THESE INSTRUCTIONS TO ASSEMBLE, LIGHT, ADJUST OR
OPERATE THE HEATER.
IF THE INFORMATION IN THIS MANUAL IS NOT FOLLOWED EXACTLY, A FIRE OR
EXPLOSION MAY RESULT CAUSING PROPERTY DAMAGE, PERSONAL INJURY OR LOSS OF
LIFE.
SERVICE MUST BE PERFORMED BY A QUALIFIED SERVICE AGENCY.
UNVENTED PORTABLE HEATERS USE AIR (OXYGEN) FROM THE AREA IN WHICH IT IS
USED. ADEQUATE COMBUSTION AND VENTILATION AIR MUST BE PROVIDED. REFER
TO INSTRUCTIONS.
WARNING
DO NOT STORE OR USE GASOLINE OR OTHER FLAMMABLE VAPORS AND LIQUIDS IN
THE VICINITY OF THIS OR ANY OTHER APPLIANCE.
WARNING
FIRE, BURN, INHALATION, AND EXPLOSION HAZARD. KEEP SOLID COMBUSTIBLES,
SUCH AS BUILDING MATERIALS, PAPER OR CARDBOARD, A SAFE DISTANCE AWAY FROM
THE HEATER AS RECOMMENDED BY THE INSTRUCTIONS. NEVER USE THE HEATER
IN SPACES WHICH DO OR MAY CONTAIN VOLATILE OR AIRBORNE COMBUSTIBLES, OR
PRODUCTS SUCH AS GASOLINE, SOLVENTS, PAINT THINNER, DUST PARTICLES OR
UNKNOWN CHEMICALS.
WARNING
DIRECT-FIRED HEATERS MAY CAUSE CARBON MONOXIDE (CO) POISONING WHEN
INCORRECTLY USED, E.G INDOORS WITHOUT ADEQUATE AIR CIRCULATION, OR IF
NOT PROPERLY WORKING. CO POISONING MAY LEAD TO DEATH.
GENERAL HAZARD WARNING
FAILURE TO COMPLY WITH THE PRECAUTIONS AND INSTRUCTIONS PROVIDED WITH
THIS HEATER, CAN RESULT IN DEATH, SERIOUS BODILY INJURY AND PROPERTY LOSS
OR DAMAGE FROM HAZARDS OF FIRE, EXPLOSION, BURN, ASPHYXIATION, CARBON
MONOXIDE POISONING, AND/OR ELECTRICAL SHOCK. ONLY PERSONS WHO CAN
UNDERSTAND AND FOLLOW THE INSTRUCTIONS SHOULD USE OR SERVICE THIS
HEATER. IF YOU NEED ASSISTANCE OR HEATER INFORMATION SUCH AS AN
INSTRUCTIONS MANUAL, LABELS, ETC. CONTACT THE MANUFACTURER.
WARNING
NOT FOR HOME OR RECREATIONAL VEHICLE USE
WARNING
YOUR SAFETY IS IMPORTANT TO YOU AND TO OTHERS,
SO PLEASE READ THESE INSTRUCTIONS BEFORE YOU OPERATE THIS HEATER
THE ELECTRICAL SYSTEM TO WHICH THE APPLIANCE IS CONNECTED MUST
COMPLY WITH CURRENT LEGISLATION. INSTALLATION REQUIRES A RESIDUAL
CURRENT CIRCUIT BREAKER (RCCB) IN THE MAIN ELECTRICAL DISTRIBUTION
BOARD.
UNPLUG THE APPLIANCE BEFORE PERFORMING ANY MAINTENANCE
OPERATIONS.
ALWAYS CHECK THE POWER CABLE BEFORE USING THE APPLIANCE. IT MUST NOT
BE BENT, TAUT, STRETCHED, CRUSHED OR ANY WAY DAMAGED.
THE POWER CABLE MUST BE REPLACED BY QUALIFIED PERSONNEL ONLY. USE AN
ORIGINAL POWER CABLE ONLY WITH A 3-PIN APPROVED PLUG.
THE FRONT OUTLET IS VERY HOT DURING OPERATION. DO NOT TOUCH! BURN
DANGER.
2. Product Description
Diesel or Kerosene direct-fired mobile/portable space heater with open combustion chamber and indirect fired
mobile/portable space heater with close combustion chamber
3. Technical Specifications
Model DH2-I-55 DH2-I-85 DH1-70 DH1-100
Heat Input* [kW] [Hs] 52.5 82,9 67.9 97.2
Air Flow Rating [m³/h] 2500 3900 2200 2700
Fuel Type Diesel - Kerosene
Diesel - Kerosene
Diesel - Kerosene
Diesel - Kerosene
Fuel consumption [l/h] 4.8 7.7 6.3 9.0
Fuel Nozzle size 1.00 gph-60° 1.50 gph-80° 1.35 gph-60° 1.75 gph-60°
Voltage [V] 230V 50Hz 230V 50Hz 230V 50Hz 230V 50Hz
Electrical Power rating [W] 720 900 580 700
Pump Pressure Setting [bar] 12.0 12.0 11.0 12.5
Current Rating [A] 3.2 3.9 2.6 3,1
Fuse Rating T6.00 A T6.00 A T6.00 A T6.00 A
Air collar setting [notch] 3 4 - 8
Dimensions
Net Weight (kg) 58.0 78 43.0 58
Length (mm) 1385 1650 1200 1470
Width (mm) 600 690 600 690
Height (mm) 785 1040 755 830
Tank Capacity (l) 55 110 55 110
Operating range (h) ~11 ~14 ~9 ~12
Standard Accessories
Fuel gauge yes yes yes yes
Handle 1 1 1 1
Ambient thermostat built-in built-in built-in built-in
Malfunction detection signal
built-in built-in built-in built-in
*Based on dedicated setting for standard condition (atmospheric pressure 1020 hPa and Temperature 20 °C).
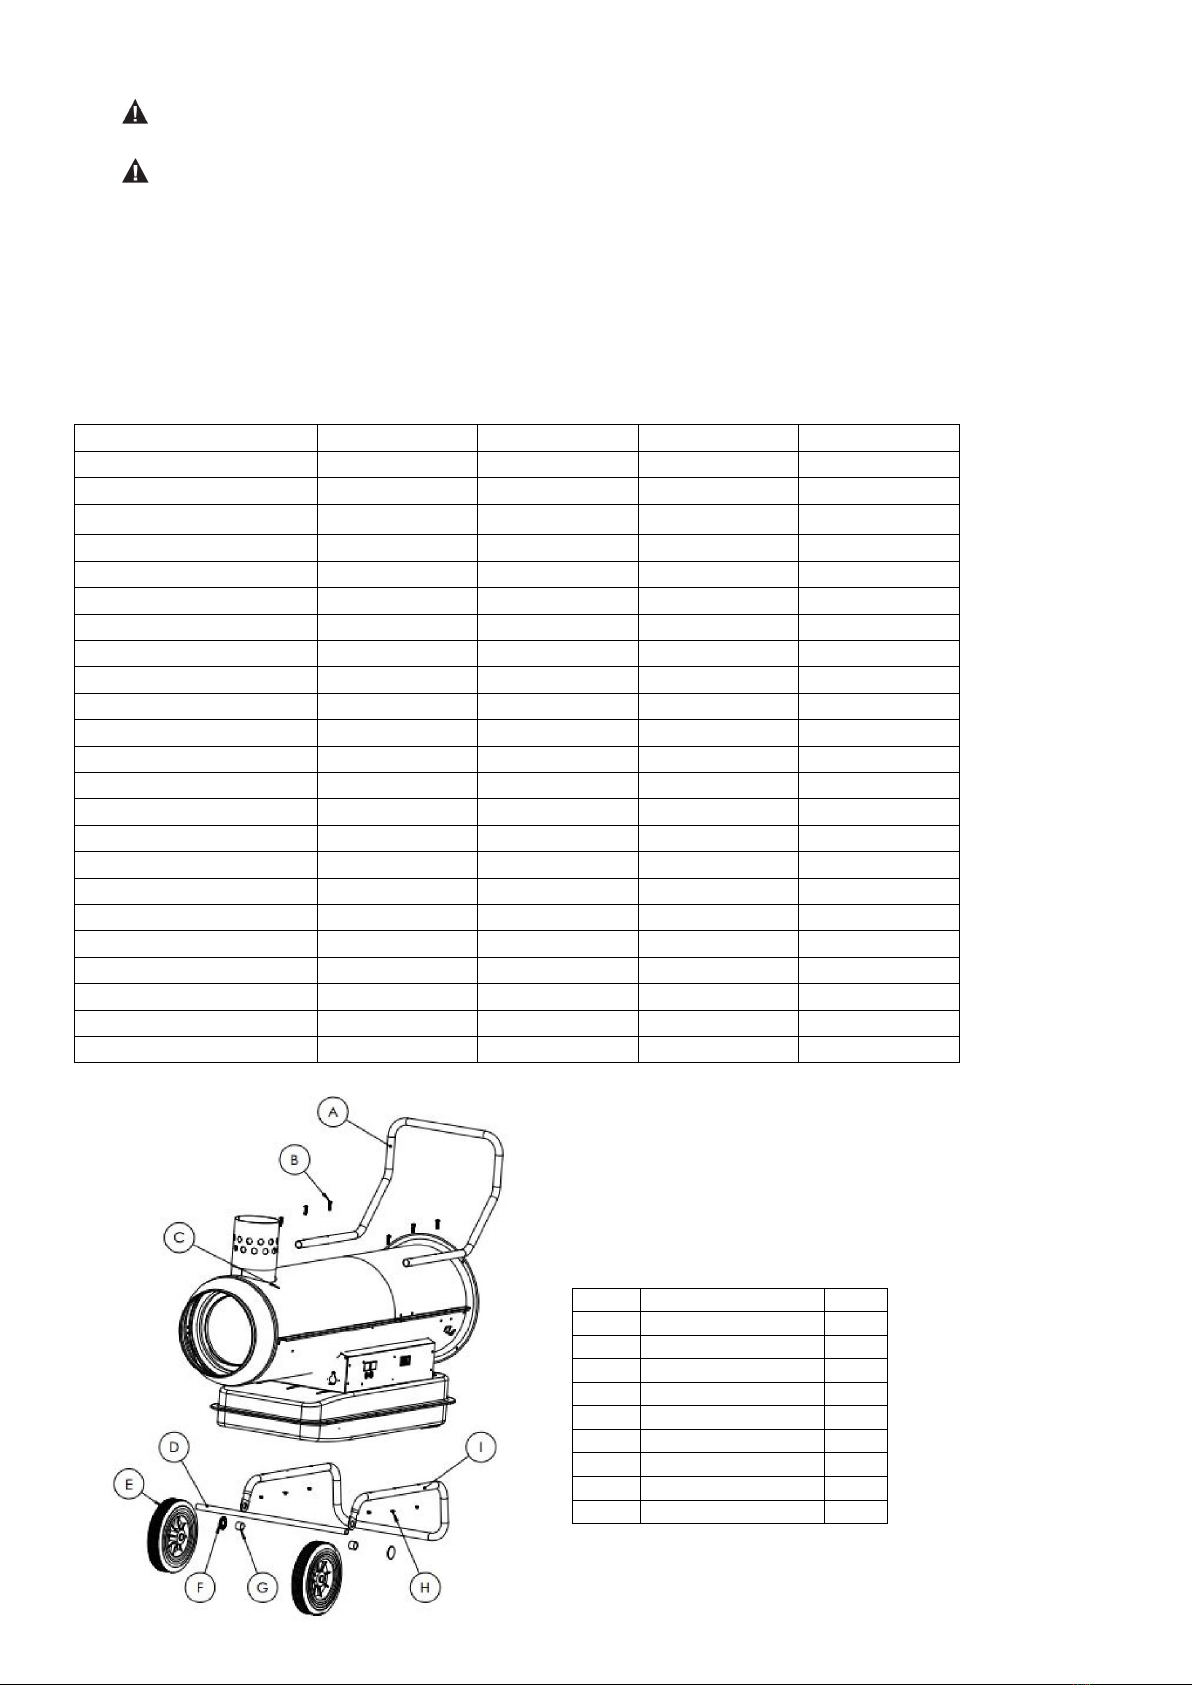
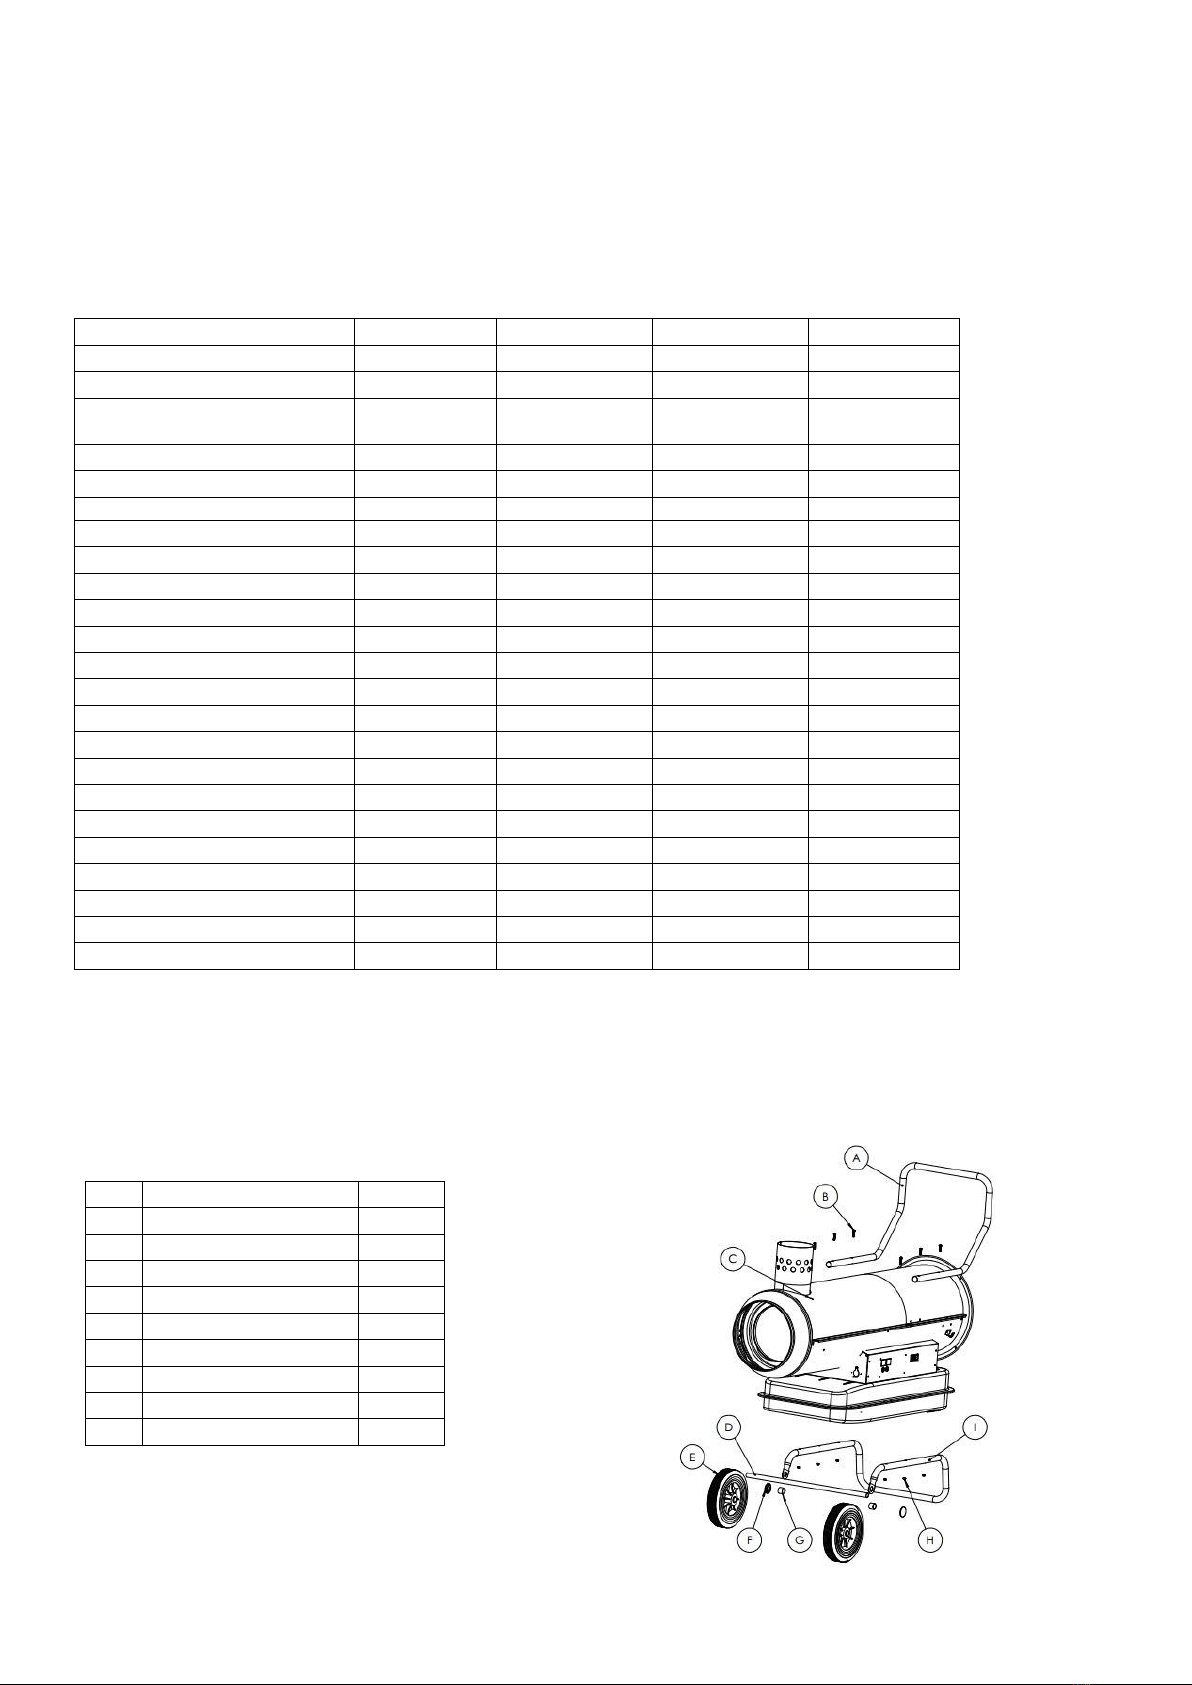
4. Assembling Instructions
Extract the heater from its carton. If the unit is anyhow
damaged, do not use it and contact your dealer.
The following accessories are supplied in the shipping
carton.
Pos. Description Qty
A Handle 1
B Screw M5 6
C Heater body 1
D Wheel shaft 1
E Wheel 2
F Spring washer 2
G Spacer 2
H Nut M5 6
I Feet pipe 1
Fig.1

To assemble the heater, proceed as follows (see Fig. 1):
1、insert the wheel shaft D to the corresponding hole of feet pipe I, insert the spacers G and slide the wheels E over
the wheel shaft D, fix wheels by using spring washers F on each side of the shaft.
2、Put the heater body on the feet pipe assembly, make sure the holes of handle A point towards the corresponding
holes on the feet pipe respectively.
3、Using the screws B, and nuts H to fix the feet pipe assembly and handle to the tank.
5. Installation Instructions
Position the heater on a flat, level, non-flammable, solid surface.
The exhaust gases are very harmful for people and animals when released in a closed space without
ventilation.
Indirect-fired heaters while used in indoor installation, must be connected to an exhaust pipe to
vent the products of combustion outside. To maintain an adeguate Oxygen rate, a minimum of 80
m3/h airflow from outside must be ensured.
Direct-fired heaters are intended for use in outdoor open areas or in indoor well ventilated areas.
For indoor use, provide permanent ventilation openings of at least 25 cm²/kW, equally distributed
between floor and high level, with a minimum of 250 cm².
DH1-70 DH1-100
Minimum Opening Size 1700 cm² 2500 cm²
Only install the heater in normal upright position.
Do not place the heater near walls, corners or low ceilings.
Do not place the heater below a socket outlet.
Do not place the heater on moving vehicles or where it can tip over.
Keep the heater away from flammable, combustible, explosive or corrosive materials.
Keep the heater away from curtains or similar materials that could block the air inlet and outlet.
Never block or restrict the air inlet and outlet for any reason.
Keep the power cable away from heat sources, sharp edges, cutting and moving parts.
Do not expose directly to the weather or to excessive humidity.
Do not place the heater in the immediate surroundings of a bath, shower or swimming pool.
Follow general and special fire safety regulations in force in all fields of applications. In any case
ensure the following minimum safety clearances from materials or objects in the surroundings of
the heater:
Side: 1 m
Air inlet side: 1 m
Top: 1.5 m
Hot air outlet side: 3 m
Floor: 0 m
Floors and ceilings must be made of fireproof materials in the place where the heater is operated.
Do not connect direct-fired heaters to air ducts.
6. Instructions for Use
6.1. Start-up
Fill tank with clean fuel. Only use Diesel or Kerosene.
The fuel gauge on top of the tank allows to check fuel level
Connect the power cord plug to a 230 V 50 Hz earthed
electrical supply system.
Earthing is mandatory.
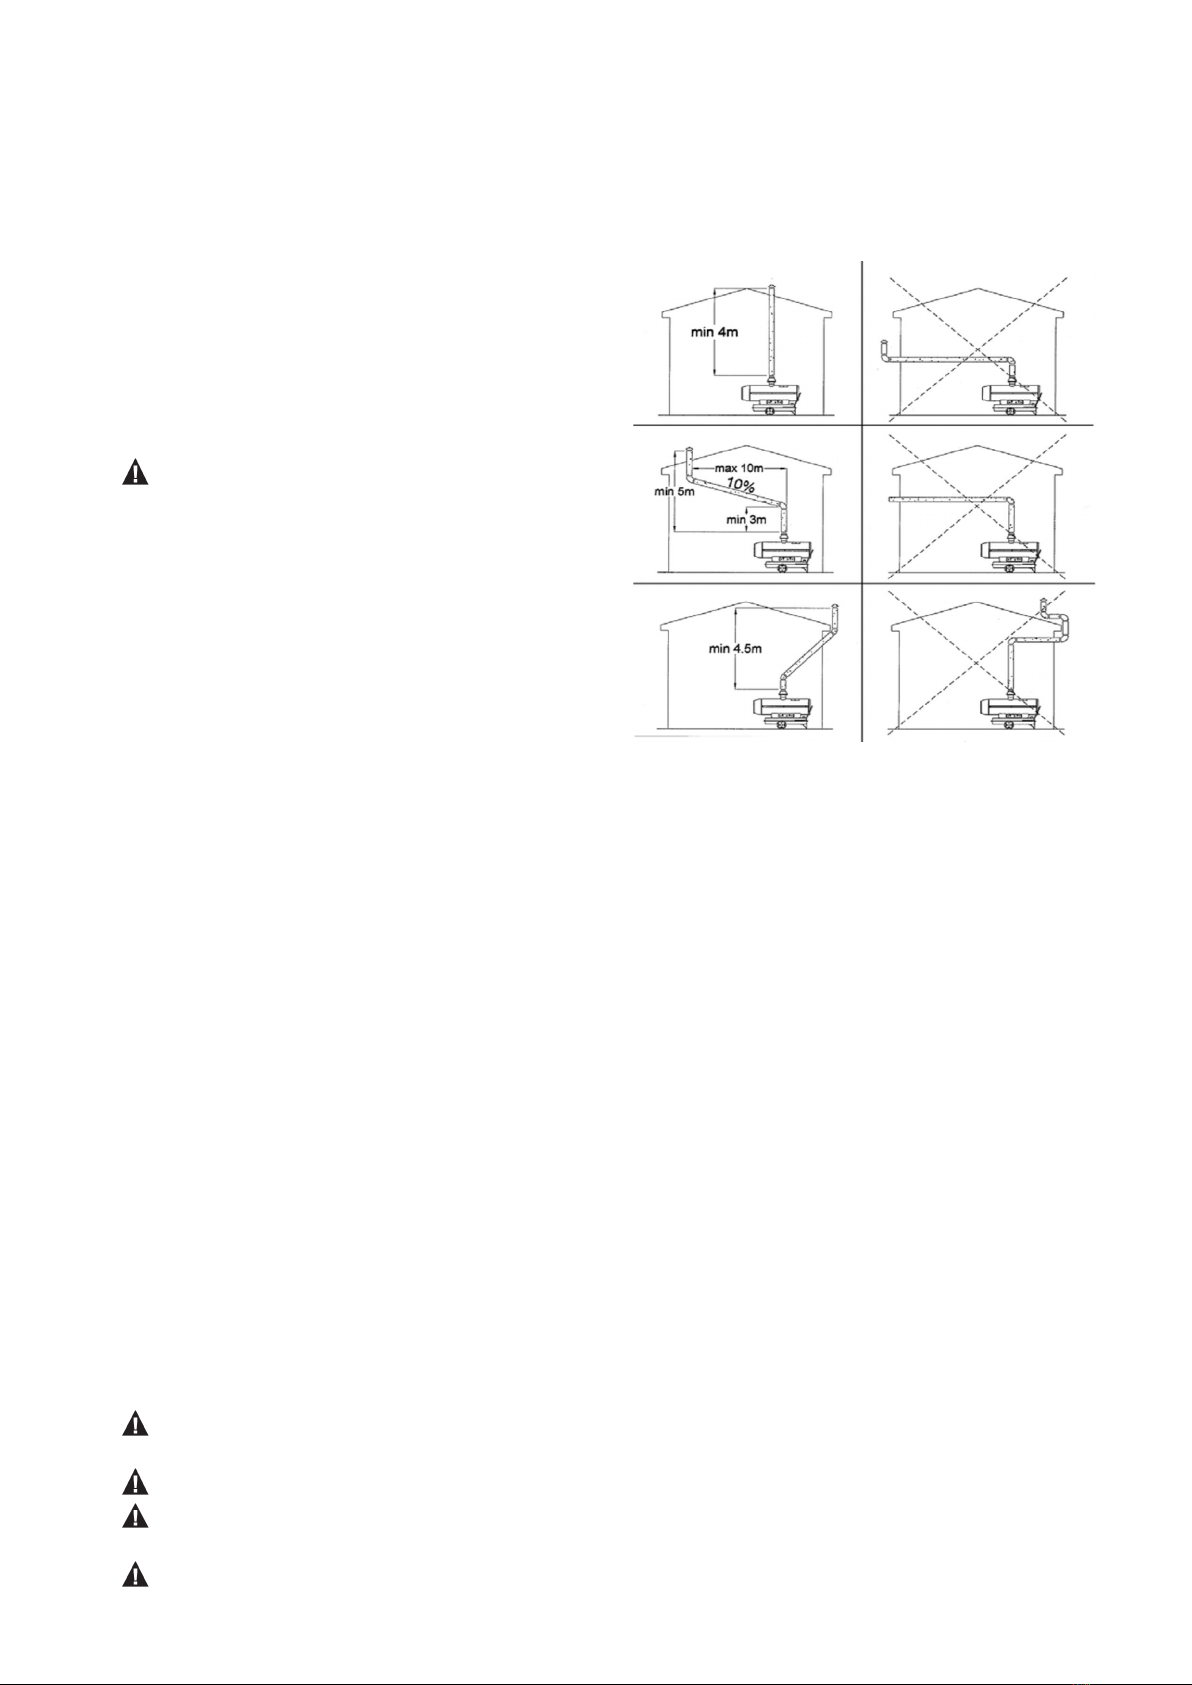
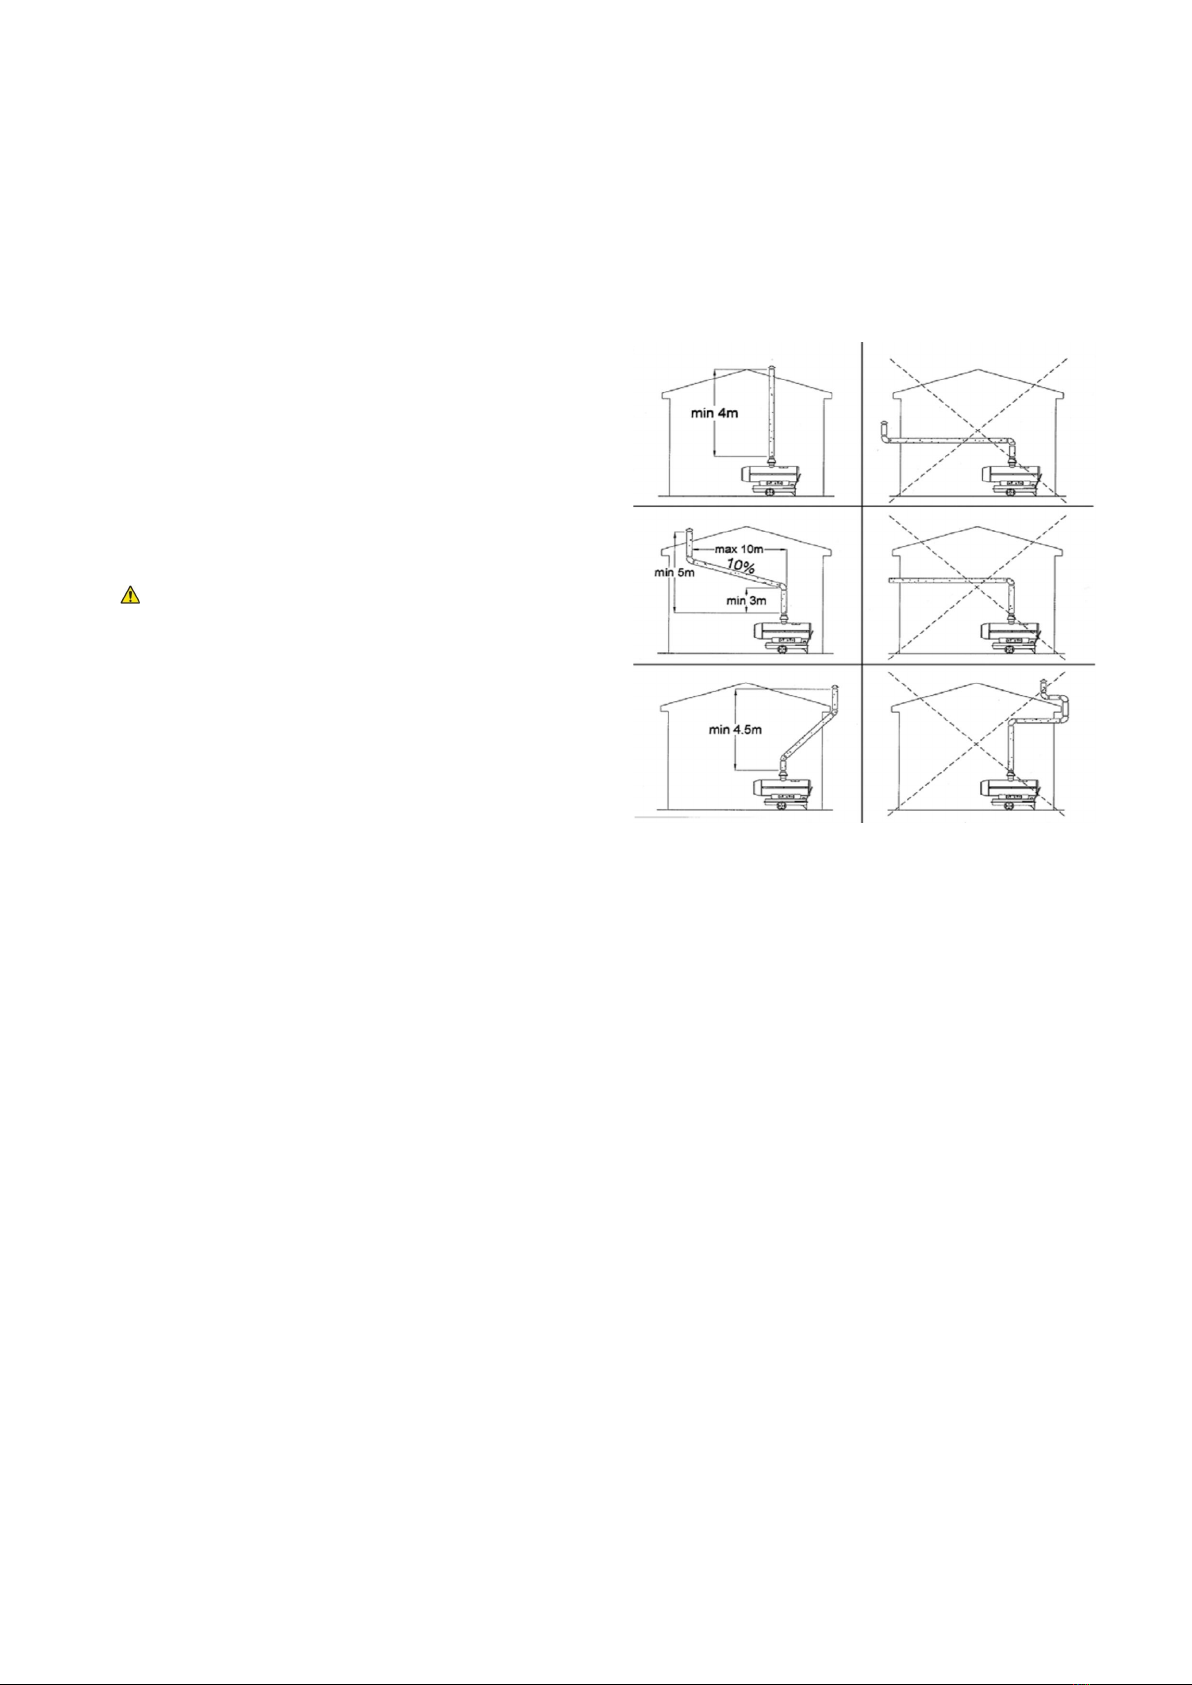
For indirect fired heaters: connect the heater to a
chimney or to an exhaust duct. To get a proper
draught in the chimney the exhaust gas path must
rise. Avoid any elbows and bends in the first part
of the exhaust ducts for at least 3 m.
When complete “start-up” above, the left display window shows “--”, the right display window shows ambient
temperature value.
Push the power switch to “on” position, now left display shows the last setting temperature.
If the ambient temperature is lower than setting, after waiting few seconds for pre-ventilation, the heater starts.
If the ambient temperature is higher than setting temperature, push thermostat control button to set desired
temperature, after waiting few seconds for pre-ventilation, the heater starts.
VENTILATION MODE: Simultaneously pressing the setting buttons of the room temperature, the flame goes out
and the device continues to function as a fan.
ABNORMAL OPERATION: in case of malfunction (flame failure, reduced air flow, bad combustion, etc.) the
heater stops, the LOCK-OUT MODE code will be showed on the display window-see troubleshooting.
6.2. Manual reset/restart
If the heater is in lock-out mode, check and remove the cause of lock-out before restarting the heater. To reset, turn
the ON/OFF switch to 0 and then (after few sec) again to I. In case of repeated malfunction, call technical service.
Turning the thermostat control knob will NOT reset the heater.
6.3. Shut-down
Move switch to "OFF" (O) position. The post-ventilation phase will cool down the combustion chamber for 90
seconds. Unplug the unit when not used for a long time.
Never disconnect the heater from mains to stop it while in operation. Always allow the cooling
sequence to be completed, otherwise the residual heat could damage internal components.
Do not cover the heater. Do not block the air inlet and outlet.
The heater outlet is very hot during operation and after use. Do not touch! Use personal protecting
equipment if needed.
Children should be supervised to ensure that they do not play with the appliance.
The appliance is not intended for use by persons (including children) with reduced physical,
sensory or mental capabilities, or lack of experience and knowledge.
Unplug the heater before moving it. Never pull the cable to unplug or move the unit.
Do not leave the heater unattended when in use.
Never use the appliance with wet hands or when either the heater or the power cable is wet.
If the supply cable is damaged, it must be replaced by the manufacturer, by a service agent or a
similar qualified person.
7. Cleaning, Maintenance and Storage
Regularly wipe the enclosure using a soft sponge or cloth. For very dirty parts, use a sponge wetted with lukewarm
water and a mild detergent, then dry using a clean cloth.
Keep air inlet and fan free from dust and dirt. To clean inner parts, gently blow compressed air through air inlet.
Regularly inspect the power cable: if worn, cracked or damaged have it replaced by technical service.
Before storing the heater, make sure it is perfectly cool and dry. Cover the unit with a plastic bag, put it in its packing
box and store it in a dry, ventilated place.
Before starting any maintenance task, shut down, unplug and let the heater cool down for at least
15 minutes.
Do not attempt any electrical repair yourself. If the heater needs service or repair, contact a
qualified technician.
Do not use a faulty unit unless a qualified technician has inspected and repaired it.
When cleaning, make sure that water does not enter the unit.
Do not open the enclosure to clean the inner parts. Do not spray water into the heater.
Never use solvents, gasoline, toluene and similar aggressive chemicals to clean the heater.
The following checks BY QUALIFIED PERSONNEL ONLY are recommended before every seasonal use:
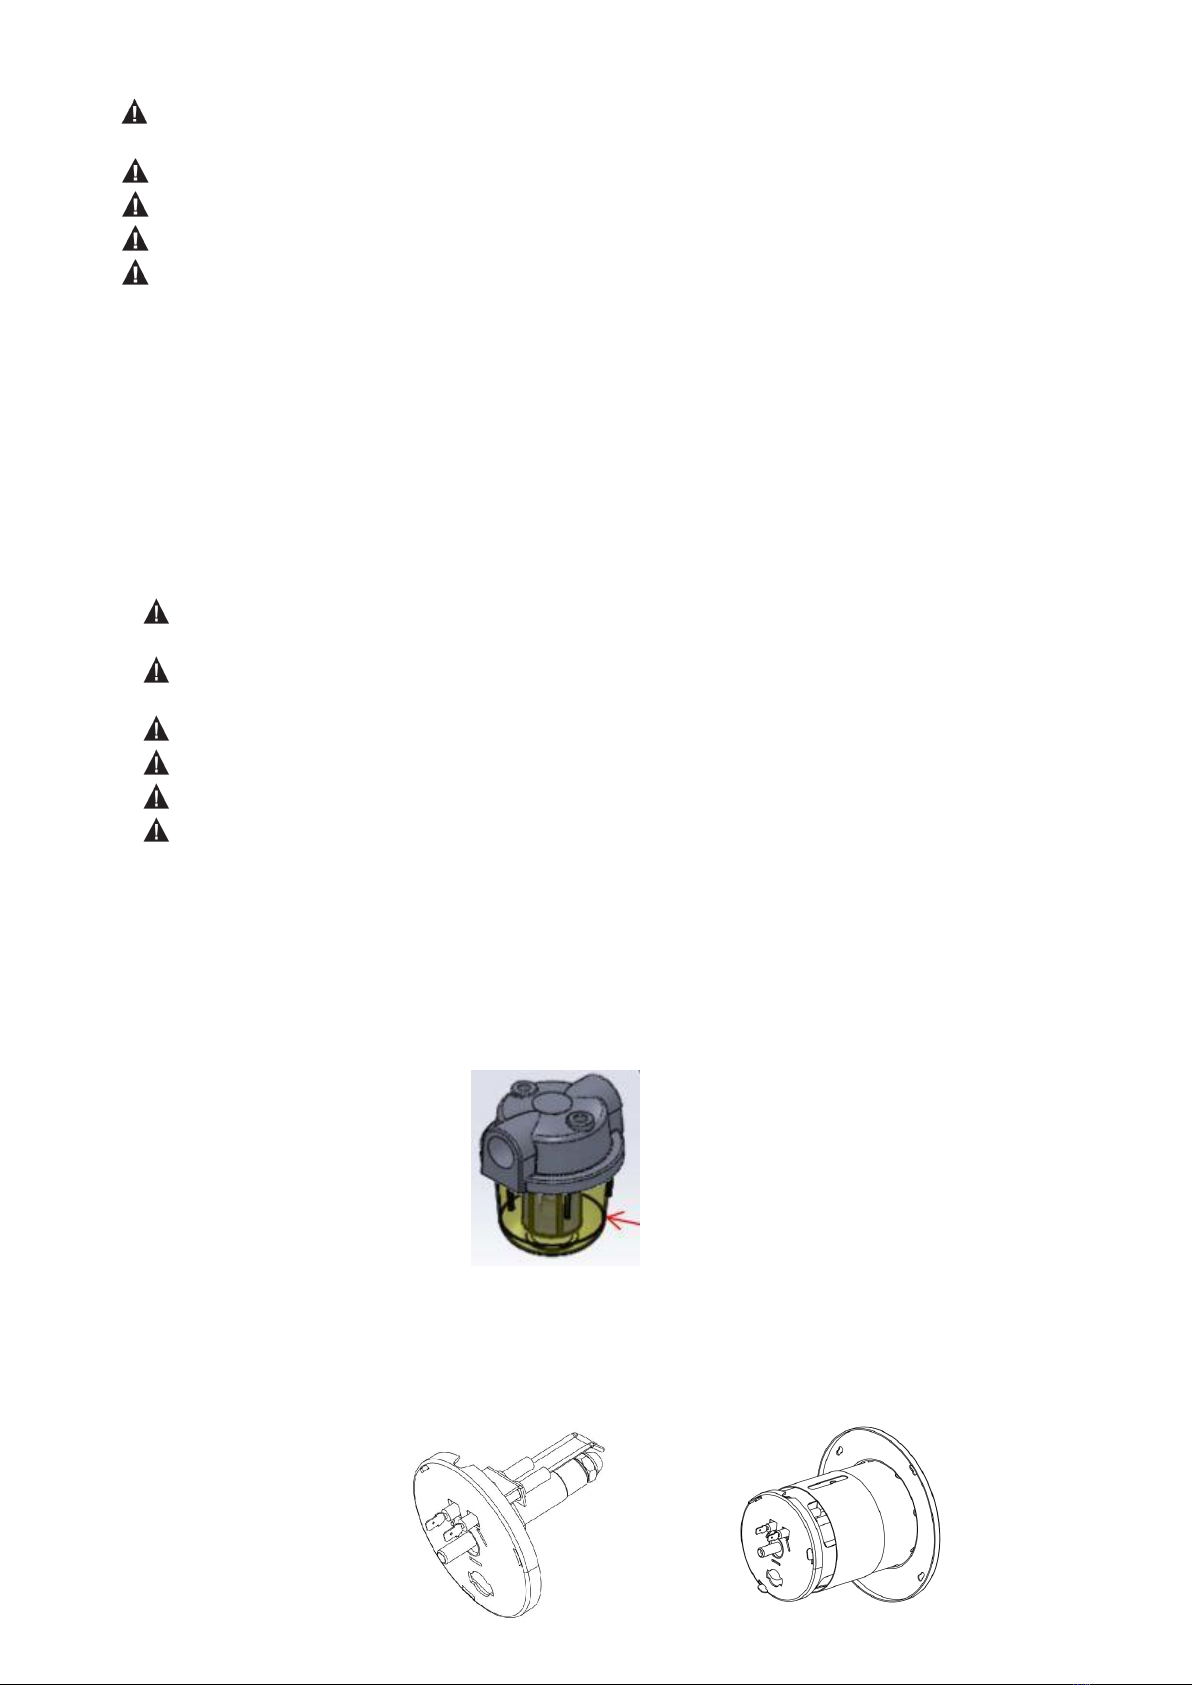
Fuel Filters
Removing the side panel you get access to fuel filter. Clean fuel filters by unscrewing the filter tray (clockwise)
Remove the filter cartridge and wash it with petrol or replace it if necessary. Check seal O-ring and replace it if
necessary. Reassemble the tray (Fig.2). The fuel filter installed on the gear pump should be cleaned or replaced if
necessary by unscrewing cap.
Fig. 2
Extract the burner head(Fig.3)
Fig.3
Filter tray
Swirl disc
Clean the whirl disc using a brush and then blow compressed air on it. To get good combustion the air flow
openings in the whirl disc should be perfectly clean and free.
Nozzle
Carefully unscrew nozzle from nozzle fitting. Blow compressed air through nozzle orifice to free it from dirt. Replace
nozzle if necessary.
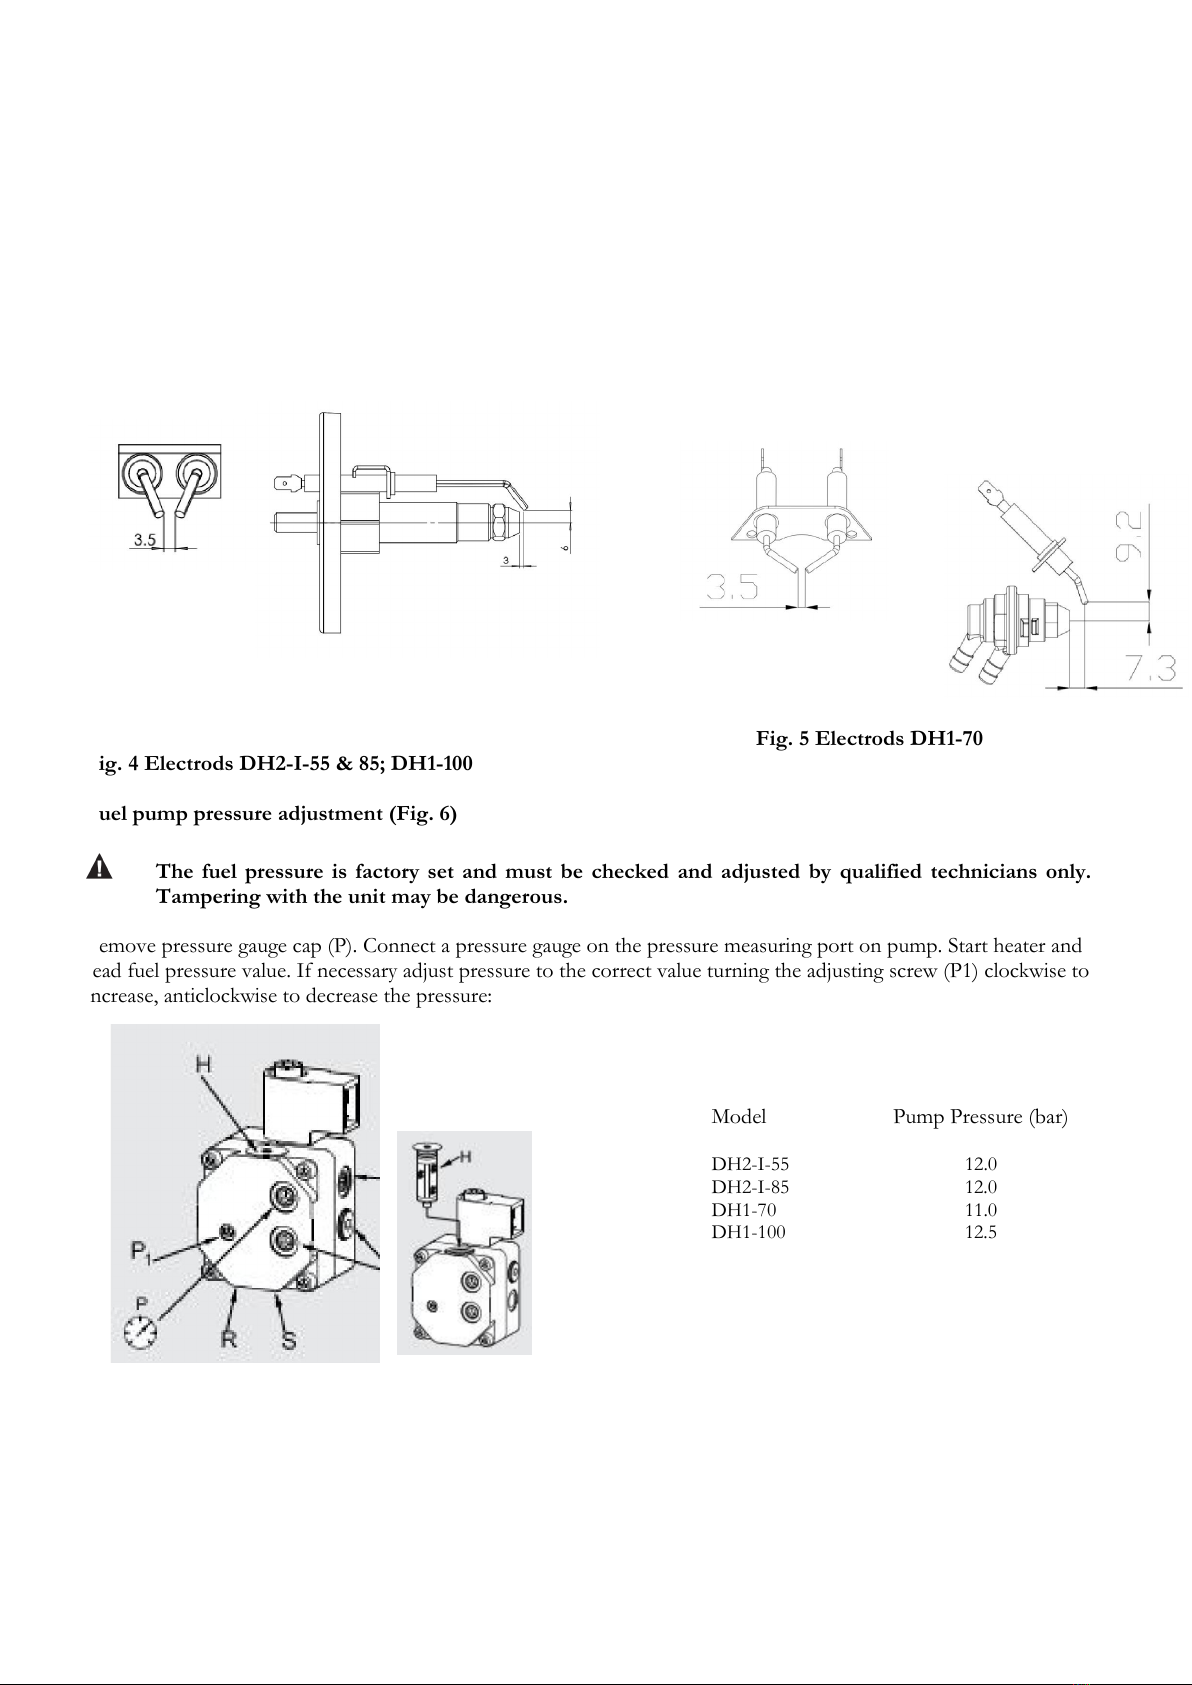
Ignition Electrodes
Clean, adjust and if necessary replace ignition electrode. For electrode gap see Fig. 4-5 (dimensions in mm).
Fig. 5 Electrods DH1-70
Fig. 4 Electrods DH2-I-55 & 85; DH1-100
Fuel pump pressure adjustment (Fig. 6)
The fuel pressure is factory set and must be checked and adjusted by qualified technicians only.
Tampering with the unit may be dangerous.
Remove pressure gauge cap (P). Connect a pressure gauge on the pressure measuring port on pump. Start heater and
read fuel pressure value. If necessary adjust pressure to the correct value turning the adjusting screw (P1) clockwise to
increase, anticlockwise to decrease the pressure:
Fig.6
Air collar adjustment (Fig. 7)
The air collar position is factory set and must be checked and adjusted by qualified technicians only.
Tampering with the unit may be dangerous.
Model Pump Pressure (bar)
DH2-I-55
DH2-I-85
12.0
12.0
DH1-70
DH1-100
11.0
12.5

HIGH ALTITUDE ISTALLATION: Due to lower oxygen rate with reference to high altitude installation on sea
level, it may be necessary to increase air rate by opening the air collar (Fig. 7), or to reduce the setting pressure on fuel
pump (Fig. 6). This setting adjustment can be necessary to prevent excessive smoke emission due to lack of Oxygen.
Fig.7
Electrical
Inspect cables, electrical parts and connections.
8. Wiring Diagram
9. Troubleshooting
PROBLEM
CAUSE REMEDY
Motor does not start
No power or low voltage
Faulty or damaged power cord
Faulty motor/capacitor
Lock-out of appliance due to previous
overheating
Check power line and voltage*
Check fuse and replace if necessary*
Check and replace if needed*
Check and if necessary replace*
Detect the cause of overheating
Shut the appliance down
Check air inlet and outlet
Wait some minutes and restart the appliance
Motor runs, but the
heater does not ignite
and locks out after a
short time
Empty fuel tank, dirty or wrong fuel
Ignition fault, dirty or incorrect electrods
position
Remove wrong or dirty fuel
Fill the tank with clean Diesel or kerosene
Check and clean electrods*
Fuel filter clogged Clean or replace fuel filter*
Burner nozzle clogged Clean nozzle blowing compressed air, replace if
necessary*
Fuel viscosity increased at low temperature Mix Diesel with 10-20% kerosene
Heater starts but
combustion is not
good
Insufficient airflow into combustion
chamber
Wrong fuel pressure
Leaks in fuel line
Check air inlet, fan*, motor* and air collar
position, adjust it if necessary.
Check fuel pressure, adjust it if needed*
Check and fix fuel leaks*
Heater stops during
operation
The room temperature set on room
thermostat has been reached
Normal operation
To start turn the temperature control knob
clockwise on a higher setting
Heater stops during
operation
Flame failure
Bad combustion
Reduced airflow
Overheating
Check and remove the cause(s) of malfunction
To reset, turn On/Off switch to 0
and then to I
Call technical service if the problem persists
E1 displayed on the
screen
E2 displayed on the
screen
E3 displayed on the
screen
The photocell can’t read the flame signal
Ambient temperature probe is broken or
not properly connected
Overheating thermostat is stopping the
heater
Check and remove the cause(s) of malfunction
To reset, turn On/Off switch to 0 and then
to I
Call technical service if the problem persists

FR
Introduction
Merci d’avoir choisi un générateur d’air chaud MHTeam. Lisez svp attentivement ce manuel avant d’utiliser votre
appareil, et conservez-le en lieu sûr pour pouvoir vous y référer ultérieurement.
Avertissement
MHTeam S.r.l. se réserve le droit de modifier les caractéristiques, quantités, dimensions, etc. de ses produits, pour des
motifs techniques ou autres, après cet impression.
Tandis que nous croyons que les informations soient précises et complètes, nous ne donnons aucune garantie ou
assurances au n'importe quel titre. Les informations sont données en bonne foi, étant entendu que toute utilisation
des appareils et des accessoires non conforme aux instructions et aux avertissements se fait aux risques et périls de
l’utilisateur. Bien que nous nous soyons efforcés de fournir des informations complètes et exactes, elles ne
constituent en aucun cas une garantie.
Consigne de mise au rebut (EU)
Ne jetez pas ce produit avec les déchets ménagers ordinaires. Il doit être mis au rebut conformément aux lois relatives
aux appareils électriques et équipements électroniques usagés. Si nécessaire, contactez vos autorités locales pour plus
d’informations sur les sites de dépôt disponibles.
Normes ERP 2016/2281
Ce produit ne convient qu'à un usage externe et occasionnel.
1. Informations générales de sécurité
LIRE ATTENTIVEMENT LES AVVERTISSEMENTS. LIRE ET SUIVRE LES INSTRUCTIONS.
CONSERVEZ LE PRESENT MANUEL D’INSTRUCTIONS EN LIEU SUR POUR TOUTE
CONSULTATION FUTURE. NE PERMETTRE A PERSONNE N’AYANT LU CES
INSTRUCTIONS D’UTILISER L’APPAREIL.
LE NON-RESPECT DES INSTRUCTIONS CONTENUES DANS LE PRESENT MANUEL PEUT
DONNER LIEU A UN INCENDIE OU A UNE EXPLOSION ENTRAINANT DES DOMMAGES
AUX CHOSES, DES BLESSURES PERSONNELLE OU LA MORT.
L’ASSISTANCE DOIT ÊTRE EXÉCUTÉE PAR UNE AGENCE DE SERVICE QUALIFIÉE.
LES GENERATEURS D’AIR CHAUD A COMBUSTION DIRECTE EXPLOITENT L’AIR
(OXYGENE) CONTENU DANS L’ATMOSPHERE DANS LAQUELLE ILS SONT UTILISES.
FOURNIR UNE QUANTITE D’AIR APPROPRIEE POUR LA VENTILATION ET LA
COMBUSTION. SE REFERER AUX INSTRUCTIONS.
AVVERTISSEMENT
NE PAS STOCKER NI UTILISER D’ESSENCE OU AUTRES SUBSTANCES INFLAMMABLES A
PROXIMITE DE CET APPAREIL OU D’AUTRES APPAREILS.
AVVERTISSEMENT
RISQUE D’INCENDIE, DE BRULURES, D’INHALATION DE FUMEES TOXIQUES. GARDER
LES SUBSTANCES INFLAMMABLES SOLIDES TELLES QUE LES MATERIAUX DE
CONSTRUCTION, LE PAPIER OU LE CARTON A UNE DISTANCE DE SECURITE DE
L’APPAREIL TEL QU’IL EST RECOMMANDE DANS LE PRESENT MANUEL. NE PAS
UTILISER L’APPAREIL DANS DES LOCAUX CONTENANT OU SUSCEPTIBLES DE
CONTENIR DES SUBSTANCES INFLAMMABLES VOLATILES OU DISPERSEES DANS L’AIR,
OU DES PRODUITS TEL QUE DE L’ESSENCE, DES SOLVANTS, DES DILUANTS POUR
PEINTURE, DES POUDRES OU DES SUBSTANCES CHIMIQUES INCONNUES.
AVVERTISSEMENT
LES GENERATEURS DIRECTS PEUVENT CAUSER L’EMPOISONNEMENT A MOXOXYDE
DE CARBONE (CO) QUAND UTILISES DANS UNE MANIERE INCORRECTE, PAR
EXEMPLE : A L’INTERIEUR SANS CIRCULATION D’AIR ADEQUATE, OU EN MARCHANT
NON CORRECTEMENT, EMPOISONNEMENT DE CO PEUT MENER A LA MORT.
AVVERTISSEMENT DE DANGER GENERAL
LE NON-RESPECT DES PRECAUTIONS ET DES INSTRUCTIONS FOURNIES AVEC
L’APPAREIL PEUT CAUSER LA MORT, DES BLESSURES PERSONNELLES GRAVES, LA
PERTE DE BIENS OUR DES DOMMAGES DERIVANT DE RISQUES D’INCENDIE, DE
BRULURES, D’ASPHYXIE, D’INTOXICATION AU MONOXYDE DE CARBONE, ET/OU
D’ELECTROCUTION, SEUL UN PERSONNEL EN MESURE DE COMPRENDRE ET
APPLIQUER LES INSTRUCTIONS DANS LE PRESENT MANUEL PEUT UTLISER
L’APPAREIL.
POUR TOUTE ASSISTANCE OU INFORMATION CONCERNANT L’APPAREIL, LES
MANUELS D’INSTRUCTIONS, LES ÉTIQUETTES, ETC., CONTACTER LE FABRICANT.
AVVERTISSEMENT
L’APPAREIL N’EST PAS DESTINE A UN USAGE DOMESTRIQUE OU DANS DES VEHICULES
DE LOISIRS.
AVVERTISSEMENT
VOTRE SECURITE EST IMPORTANTE POUR VOUS ET POUR LES AUTRES, VEUILLEZ
DONC LIRE TRES ATTENTIVEMENT CES INSTRUCTIONS AVANT D’ULITISER CE
GENERATEUR D’AIR CHAUD.
L’INSTALLATION ELECTRIQUE A LAQUELLE L’APPAREIL EST RACCORDE DOIT
ETRE CONFORME AUX LOIS ET AUX NORMES EN VIGEUR DANS LA PAYS DE
DESTINATION. L'INSTALLATION EXIGE UN DISJONCTEUR A COURANT RESIDUEL
(RCCB) DANS LE TABLEAU DE DISTRIBUTION ÉLECTRIQUE PRINCIPAL.
DEBRANCHEZ L'APPAREIL AVANT D'EXÉCUTER N'IMPORTE QUELLES OPÉRATIONS
DE MAINTIEN.
VÉRIFIEZ TOUJOURS LE CABLE ELECTRIQUE AVANT L'UTILISATION DE
L'APPAREIL. IL NE DOIT PAS ETRE PLIE, TENDU, ECRASE OU N'IMPORTE QUELLE
FAÇON ENDOMMAGE.
LE CABLE ELECTRIQUE DOIT ETRE REMPLACE SEULEMENT PAR PERSONNEL
QUALIFIE. UTILISEZ SEULEMENT UN CABLE ELECTRIQUE ORIGINAL AVEC UNE
PRISE DE COURANT APPROUVÉE A 3 POLES.
CERTAIN PARTIES DE L’APPAREIL DEVIENNENT TRES CHAUDES PENDANT ET
APRES LE FONCTIONNEMENT. NE PAS TOUCHER ! DANGER DE BRULURE !
2. Description du produit
Générateur d’air chaud portable/mobile à gasoil ou à kérosène, à combustion directe avec chambre de combustion
ouverte et à combustion indirecte avec chambre de combustion fermée.
3. Données techniques
*Sur la base de réglage spécifique pour condition standard (pression atmosphérique 1020 hPa et Température 20 °C).
4. Instructions de montage
Déballer l’appareil. Si l’appareil est abîmé, ne pas l’utiliser et contacter immédiatement le revendeur.
Les accessoires suivants sont fournis dans l’emballage.
Pos.
Description Q.té
A Poignée 1
B Vis M5 6
C Corps du Générateur 1
D Essieu 1
E Roue 2
F Rondelle élastique 2
G Entretoise 2
H Vis M5 6
I Pied de support 1
Fig.1
Modèle DH2-I-55 DH2-I-85 DH1-70 DH1-100
Puissance thermique* [kW] [Hs] 52.5 82,9 67.9 97.2
Débit d’air [m³/h] 2500 3900 2200 2700
Combustible Gasoil -
Kérosène
Diesel -
Kerosene
Diesel -
Kerosene
Diesel -
Kerosene
Consommation [l/h] 4.8 7.7 6.3 9.0
Type buse 1.00 gph-60° 1.50 gph-80° 1.35 gph-60° 1.75 gph-60°
Tension [V] 230V 50Hz 230V 50Hz 230V 50Hz 230V 50Hz
Puissance électrique [W] 720W 900 580 700
Pression de pompe [bar] 12.0 12.0 11.0 12.5
Courant [A] 3.2 3.9 2.6 3,1
Fusible T6.00A T6.00 A T6.00 A T6.00 A
Réglage air [notch] 3 4 - 8
Dimensions
Poids net [kg] 58.0 78 43.0 58
Longueur [mm] 1385 1650 1200 1470
Largeur [mm] 600 690 600 690
Hauteur [mm] 785 1040 755 830
Capacité réservoir [l] 55 110 55 110
Autonomie [h] ~11 ~14 ~9 ~12
Équipement standard
Indication niveau oui yes yes yes
Poignée 1 1 1 1
Thermostat d’ambiance intégré built-in built-in built-in
Indicateur de mode/erreur intégré built-in built-in built-in
Pour monter l’appareil, procéder comme suit (voir Fig. 1):
1、Assembler l’essieu D au trou correspondant du pied de support I, glisser la roue E sur l’essieu D, insérer
l'entretoises G, fixer les roues avec les rondelles sur chaque côté du essieu.
2、Mettre le corps du générateur sur le pied de support, faisant attention que les trous de la poignée A soient
respectivement directes au correspondants trous sur le pied de support.
3、A l’aide des vis B et écrou H fixer le pied de support et la poignée au réservoir.
5. Installation
Placer l’appareil sur une surface solide, plane et nivelée, non inflammable, dans une position droite et
horizontale.
Les gaz d'échappement sont très nuisibles pour les personnes et les animaux s’ils sont libérés dans
un espace fermé sans ventilation.
Les générateurs d’air chaud à combustion indirects, quand ils sont utilisés à l’intérieur, ils doivent
être connectés à un conduit d’échappement pour décharger les produits de combustion à
l’extérieur. Pour maintenir un taux d’Oxygène adéquate, un minimum de 80 flux d’air m3/h de
l'extérieur doit être assuré.
Les générateurs d’air chaud à combustion directe sont destinés à un usage en extérieur (outdoor
use) ou à l’intérieur de locaux bien ventilés. Pour une utilisation dans des locaux, il faut prévoir des
ouvertures de ventilation continues ayant un air minimal de 25 cm²/kW de puissance thermique,
équitablement distribuées en haut et en bas.
DH1-70 DH1-100
Minimum d’Ouverture 1750 cm² 2500 cm²
Placer l’appareil sur position verticale normale.
Ne placer pas l’appareil à proximité des murs, des coins ou des plafonds bas.
Ne placer pas le générateur d’air chaud au-dessous d'une sortie de prise électrique.
Ne placer pas l'appareil de chauffage sur des véhicules se déplaçant ou où il peut basculer.
Tenir l’appareil loin de matériaux inflammables, combustibles, explosifs ou corrosifs.
Tenir l’appareil loin de rideaux ou autres matériels similaires susceptibles d’obstruer la bouche d’entrée ou de
sortie de l’air et/ou de causer des incendies. Jamais bloquer ou réduire l’entrée et la sortie de l’air pour
n’importe quelle raison.
Garder le cordon d’alimentation loin de sources de chaleur, d’arêtes aiguës, de parties coupantes ou en
mouvement.
Ne pas exposer directement l’appareil aux intempéries ou à une humidité excessive.
Ne pas placer à proximité de piscines, salles de bains ou douches.
Se conformer scrupuleusement à toutes les normes contre les incendies générales et locales en vigueur.
Garantir en tout cas les distances de sécurité minimales suivantes de tout objet ou matériaux se trouvant dans
la zone de l’appareil PENDANT et APRÈS le fonctionnement :
Latérales: 1 m
Entrée air: 1 m
Supérieure: 1.5 m
Sortie air chaud: 3 m
Sol: 0 m
Les sols et les plafonds dans l’endroit où l’appareil de chauffage est utilisé doivent être faits de
matériels ignifugés.
Ne raccorder pas les appareils à combustion directe à des conduits de canalisation de l’air.
6. Instructions d’utilisation
6.1. Mise en marche.
Remplir complètement le réservoir avec du combustible
propre. Utiliser uniquement du gasoil ou du kérosène.
La jauge de carburant sur la sommité du réservoir permet de
vérifier le niveau du carburant.
Brancher le cordon d’alimentation à une prise de terre 230 V
50 Hz.
Le raccordement à la terre est obligatoire!
Pour les générateurs à combustion indirecte: joindre
l'appareil à une cheminée ou à un conduit
d'échappement. Pour obtenir un tirage d'air
approprié dans la cheminée, le chemin de gaz
d'échappement doit monter. Évitez n'importe quels
coudes et courbures dans la première partie des
conduits d'échappement au moins pour 3 m.
Quand la mise en marche est terminée, le panneau de gauche affiche les informations suivantes “--”, le panneau de
droite affiche le valeur de la température ambiante.
Tourner l’interrupteur su la position « ON », maintenant le panneau de gauche affiche le dernier réglage de la
température.
Si la température ambiante est inférieure à celui de l'arrangement, après avoir attendu quelques secondes pour la pré-
ventilation, l'appareil de chauffage se mit en marche.
MODE VENTILATION : Appuyer simultanément sur les boutons du réglage de la température ambiante, la flamme
s'éteint et l'appareil continue à fonctionner comme un ventilateur.
OPÉRATION ANORMALE: en cas de mauvais fonctionnement (l'échec de flamme, l'écoulement d'air réduit, la
mauvaise combustion, etc.) les arrêts d'appareil de chauffage, le code de MODE DE LOCK-OUT sera montré sur
l'affichage, voir le diagnostic des pannes.
6.2. Réinitialisation (réarmement manuel)
Si l’appareil s’arrête pendant le fonctionnement et se met en sécurité (mode lock-out), trouver et éliminer la/les
cause(s) du blocage avant de remettre l’appareil en marche.
Pour réarmer l’appareil, placer l’interrupteur ON/OFF sur 0 puis (après quelques seconds) à nouveau sur I. En cas
d’anomalies de fonctionnement répétées, contacter le service d’assistance technique.
Le tournage du bouton de commande du thermostat ne remettra pas le générateur d’air chaud en marche.

6.3. Arrêt
Placer l’interrupteur sur O (OFF). La phase de post-ventilation refroidira la chambre de combustion pendant 90
secondes. Débrancher l’appareil s’il n’est pas utilisé pendant une longue période.
Ne débranchez jamais l'appareil de chauffage pour l'arrêter en cours de fonctionnement. Permettez
toujours à l’opération rafraîchissant d'être complétée, autrement la chaleur résiduelle pourrait
endommager des composants internes.
Ne couvrir pas l'appareil de chauffage. Ne bloquez pas l'arrivée et la sortie d’air.
La sortie d’air de l’appareil de chauffage est très chaude pendant l'opération et après l'utilisation.
Ne touchez pas! Utilisez l'équipement de protection personnel si nécessaire.
Les enfants devraient être surveillés pour assurer qu'ils ne jouent pas avec l'appareil.
L'appareil n'est pas destiné à l'utilisation par des personnes (incluant des enfants) avec des
capacités physiques, sensorielles ou mentales réduites, ou le manque d'expérience et la
connaissance.
Déconnecter l'appareil de chauffage avant le déplacement de cela. Ne tirez jamais le câble pour
déconnecter ou déplacer l'unité.
Ne laisser pas l'appareil de chauffage sans surveillance en cours de fonctionnement.
N'utilisez jamais l'appareil avec les mains humides ou quand l'appareil de chauffage ou le câble
électrique est humide.
Si le câble de provision est endommagé, il doit être remplacé par le fabricant, ou par une personne
qualifiée.
7. Nettoyage, entretien et stockage
Nettoyer régulièrement l’enveloppe extérieure à l’aide d’un chiffon doux ou d’une éponge. Pour les parties les plus sales, utiliser
une éponge imbibée d’eau tiède et un détergent neutre, puis essuyer avec un chiffon propre.
Laisser toujours la bouche d’entrée d’air et le ventilateur parfaitement libres de poussière et de saleté. Pour nettoyer les parties
internes, insuffler de l’air comprimé à travers la bouche d’aspiration de l’air.
Inspectez régulièrement le câble électrique : si porté, fêlé ou endommagé fait le remplacer par le service technique.
Avant de ranger l’appareil à la fin de son utilisation, veiller à ce qu’il soit complètement froid. Conserver l’appareil à l’intérieur,
dans un endroit propre et sec
Avant de commencer toute opération de nettoyage ou d’entretien, éteindre l’appareil, débrancher
la fiche et laisser refroidir l’appareil pendant 15 minutes minimum.
Ne pas effectuer d’interventions de réparation si l’on n’est pas qualifié pour le faire. Pour toute
assistance ou réparation, contacter un technicien qualifié.
Ne pas utiliser un appareil défectueux n’ayant pas été préalablement contrôlé et réparé par un
technicien qualifié.
Pendant le nettoyage, s’assurer que l’eau ne pénètre pas à l’intérieur de l’appareil.
Ne pas utiliser de solvants, essence, toluène ou autres substances chimiques agressives pour
nettoyer l’appareil.
On recommande les contrôle suivants FAITS EXCLUSIVEMENT PAR LE PERSONNEL QUALIFIÉ avant
chaque utilisation saisonnière:
Filtres de Carburant
Enlever le panneau de côté pour accéder au filtre du gasoil. Pour nettoyer le filtre de carburant diviser le plateau de
filtre (en tournant dans le sens des aiguilles d'une montre). Enlevez la cartouche du filtre et lavez-la avec l'essence ou
remplacez-la si nécessaire. Vérifiez l'O-anneau et remplacez-le si nécessaire. Rassemblez le plateau (Fig.2). Le filtre
de carburant installé sur la pompe pourra être nettoyé ou remplacé si nécessaire en dévissant le bouchon.
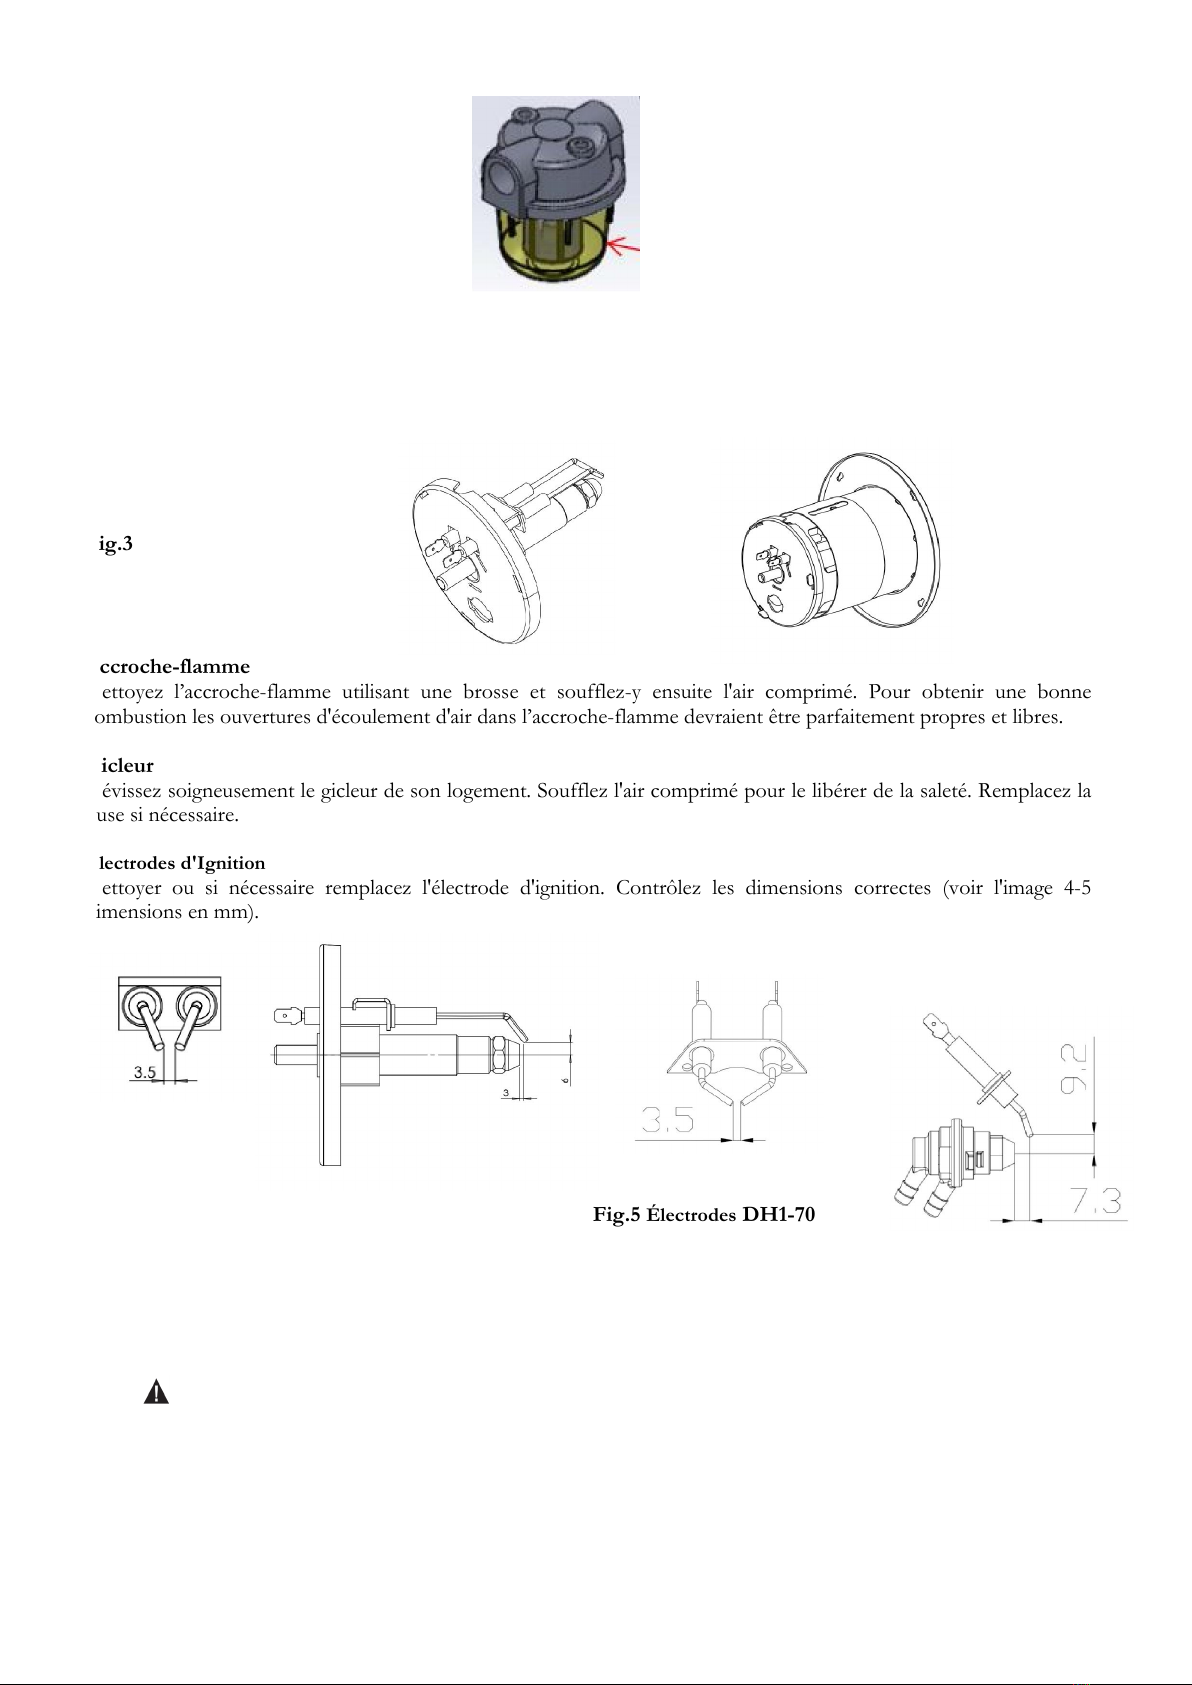
Fig. 2
Extrayez la tête du brûleur(Fig.3)
Fig.3
Accroche-flamme
Nettoyez l’accroche-flamme utilisant une brosse et soufflez-y ensuite l'air comprimé. Pour obtenir une bonne
combustion les ouvertures d'écoulement d'air dans l’accroche-flamme devraient être parfaitement propres et libres.
Gicleur
Dévissez soigneusement le gicleur de son logement. Soufflez l'air comprimé pour le libérer de la saleté. Remplacez la
buse si nécessaire.
Électrodes d'Ignition
Nettoyer ou si nécessaire remplacez l'électrode d'ignition. Contrôlez les dimensions correctes (voir l'image 4-5
dimensions en mm).
Fig.5 Électrodes DH1-70
Fig. 4 Électrodes DH2-I-55 & 85; DH1-100
Ajustement de pression de la pompe d'alimentation (Fig. 6)
La pompe est réglée dans l’usine, la pression doit être vérifié seulement par des techniciens
qualifiés. La manipulation de l'unité peut être dangereuse. La pression non correcte endommage
l’appareil et cause une combustion incorrecte.
Enlevez le bouchon (P) de manomètre (P), connectez le manomètre. Allumer-vous l'appareil de chauffage et lit la
valeur de pression de carburant. Si nécessaire ajustez la pression à la valeur correcte tournant la vis de réglage ( le trou
de conduit aérien au milieu de vis de réglage) (P1) dans le sens des aiguilles d'une montre pour augmenter, en sens
inverse des aiguilles d'une montre diminuer la pression:
Plateau de filtre

Fig.6
Tube d’ajustement d’air. (Fig. 7)
Le tube d’ajustement d’air est positionné ans l’usine et doit être vérifiée et ajustée par des techniciens
qualifiés seulement. Une régulation incorrecte peut causer une combustion imparfaite avec émission de
monoxyde de carbone (CO).
ISTALLATION EN HAUTE ALTITUDE: A cause de la diminution de la densité de l’air et, par conséquence, de la
quantité d’oxygène, il peut être nécessaire réduire la pression de la pompe d’alimentation au fin de maintenir une
bonne combustion.
Fig.7
Electricité
Faire inspecter les câbles, les composants et les connexions électriques par personnel qualifié.
8. Schéma électrique
Modèle Pression de pompe (bar)
DH2-I-55 12.0
DH2-I-85
DH1-70
DH1-100
12.0
11.0
12.5

9. Guide à la résolution des problèmes
PROBLÈME
CAUSES POSSIBLES SOLUTION
Le moteur ne
démarre pas
Erreur E2 sur l’écran
Absence de tension ou tension incorrecte
Fusible brulé
Cordon d’alimentation défectueux ou mal
branché
Moteur/condensateur défectueux
Blocage de sécurité de l’appareil en raison de
surchauffe précédente
Détecteur température ambiante est casse
ou déconnecté
Contrôler la tension et le réseau électrique
Contrôler le fusible et remplacer-le si nécessaire
Contrôler le câble et le branchement,
remplacer-le si nécessaire
Contrôlez moteur et condensateur
Détectez la cause de surchauffe
Fermez l'appareil et remettre en marche
Contrôlez le détecteur de température
Le moteur tourne, la
flamme ne s’allume
pas et juste après
l’appareil se met en
sécurité
Absence de combustible, ou combustible
incorrect ou sale
Éliminer le combustible sale/incorrect
Remplir le réservoir de gasoil ou de kérosène
propre
Filtre à gasoil encrassé
Problème d’étanchéité sur la ligne
d’alimentation du combustible
Nettoyer ou remplacer le filtre à gasoil
Contrôler les tuyaux, serrer les raccords, les
remplacer éventuellement
La buse encrassée
Nettoyer la buse à l’air comprimé, remplacer-la
éventuellement
Augmentation de la viscosité du gasoil à
basse température
Utiliser gasoil ou kérosène pour basse
températures. Mélangez avec 10-20% kérosène.
L’appareil s’arrête
pendant le
fonctionnement
La température ambiante a atteint la valeur
souhaitée
Fonctionnement normal.
Pour démarrer, tourner le bouton de régulation
de température dans le sens des aiguilles d'une
montre sur un arrangement plus haut.
L’appareil s’arrête
pendant le
fonctionnement
Absence flamme
Mauvaise combustion
Débit d’air réduit
Surchauffe
Identifier et corriger les éventuelles anomalies
Si le problème persiste, contacter l’assistance
technique
Erreur E1 sur l'écran
Erreur E2 sur l'écran
Erreur E2 sur l'écran
La photocellule ne peut pas lire le signal de
flamme
La sonde ambiante de température est
cassée ou non correctement connectée
Le thermostat d’appareil pour éviter
surchauffe
Identifier et corriger les éventuelles anomalies
Effectuer le réarmement en éteignant et en
remettant l’appareil en marche.
ES
Introducción
Gracias por elegir un calefactor MHTeam. Lea atentamente este manual antes de utilizar la unidad y guárdelo para
consultarlo en el futuro.
Exención de responsabilidad
MHTeam se reserva el derecho a realizar modificaciones en las especificaciones, cantidades, dimensiones, etc.,
después de la publicación por razones de producción u otras.
Si bien estamos convencidos de que la información es correcta y completa, no ofrecemos garantía ni seguro para
ningún fin particular. La información proporcionada se entrega de buena fe y el usuario deberá ser consciente de que
utilizar las unidades o accesorios de forma contraria a como se dispone en las indicaciones y avisos del presente
documento será responsabilidad exclusiva del usuario, quien deberá asumir los riesgos que de ello se deriven.
Instrucciones de eliminación (EU)
No tire este producto a la basura. Este producto debe eliminarse de acuerdo con la legislación que regula los residuos
de aparatos eléctricos y electrónicos. Si es necesario, póngase en contacto con las autoridades locales para pedirles
información relativa a las instalaciones de eliminación disponibles.
Normas ERP 2016/2281
Este producto es adecuado sólo para uso externo y ocasional.
This manual suits for next models
3
Table of contents
Languages:
Other MHTeam Heater manuals


