Mi STYTJ01ZHM User manual

Mi Robot Vacuum-Mop User Manual · 01
Manual de usuario - Mi Robot Vacuum-Mop · 21
Mi Robot Vacuum-Mop: mode d’emploi · 45
Manuale Utente Mi Robot Vacuum-Mop · 69
Руководство пользователя Робота-пылесоса с функцией влажной уборки Mi · 93
Mi 물걸레 로봇청소기 1C 사용 설명서 · 117
Mi ﻦﻣ تﻮﺑوﺮﻟا ﺔﻴﺋﺎﺑﺮﻬﻜﻟا ﺔﺴﻨﻜﻤﻟاو ﺔﺤــﺴﻤﻤﻟا مﺪﺨﺘــﺴﻣ ﻞﻴﻟد · 165
Odkurzacz z mopem Mi Robot — Instrukcja obsługi · 141
For further information, please go to www.mi.com
Manufactured for: Xiaomi Communications Co., Ltd.
Manufactured by: Dreame Technology (Tianjin) Limited
(a Mi Ecosystem company)
Address: Room 2112-1-1, South District, Finance and Trade Center, No.6975 Yazhou Road, Dongjiang Bonded Port Area, Tianjin Pilot Free Trade Zone, Tianjin, China
Para más información, visite la página web www.mi.com.
Fabricado para: Xiaomi Communications Co., Ltd.
Fabricado por: Dreame Technology (Tianjin) Limited
(una compañía de Mi Ecosystem)
Dirección: Room 2112-1-1, South District, Finance and Trade Center, No.6975 Yazhou Road, Dongjiang Bonded Port Area, Tianjin Pilot Free Trade Zone, Tianjin, China
Per ulteriori informazioni, visitare il sito www.mi.com
Fabbricato per: Xiaomi Communications Co., Ltd.
Fabbricato da: Dreame Technology (Tianjin) Limited
(una società Mi Ecosystem)
Indirizzo: Room 2112-1-1, South District, Finance and Trade Center, No.6975 Yazhou Road, Dongjiang Bonded Port Area, Tianjin Pilot Free Trade Zone, Tianjin, Cina
Pour en savoir plus, rendez-vous sur le site www.mi.com.
Fabriqué pour: Xiaomi Communications Co., Ltd.
Fabricant: Dreame Technology (Tianjin) Limited
(une société MiEcosystem)
Adresse: Room 2112-1-1, South District, Finance and Trade Center, No.6975 Yazhou Road, Dongjiang Bonded Port Area, Tianjin Pilot Free Trade Zone, Tianjin, Chine
Дополнительную информацию см. на веб-сайте www.mi.com.
Изготовлено для: Сяоми Техкоммуникации Ко., Лтд.(Китай)
Изготовитель: Dreame Technology (Tianjin) Limited
(компания MiEcosystem)
Адрес: Room 2112-1-1, South District, Finance and Trade Center, No.6975 Yazhou Road, Dongjiang Bonded Port Area, Tianjin Pilot Free Trade Zone, Tianjin, China (Тяньцзинь, Китай)
A/S가 필요하시면 구매처나 현지 공식 A/S센터로 연락하거나 www.mi.com/kr/에 방문하여 확인하십시오.
의뢰업체: Xiaomi Communications Co., Ltd.
제조업체: Dreame Technology (Tianjin) Limited
(Mi 에코시스템 컴퍼니)
주소: Room 2112-1-1, South District, Finance and Trade Center, No.6975 Yazhou Road, Dongjiang Bonded Port Area, Tianjin Pilot Free Trade Zone, Tianjin, China
Więcej informacji: www.mi.com
Wyprodukowano dla: Xiaomi Communications Co., Ltd.
Producent: Dreame Technology (Tianjin) Limited
(spółka Mi Ecosystem)
Adres: Room 2112-1-1, South District, Finance and Trade Center, No.6975 Yazhou Road, Dongjiang Bonded Port Area, Tianjin Pilot Free Trade Zone, Tianjin, Chiny
www.mi.com
Xiaomi Communications Co., Ltd.
Dreame Technology (Tianjin) Limited
(Mi Ecosystem)
ﻊﻗﻮﻣ ﻰﻟإ لﺎﻘﺘﻧﻻا ﻰﺟﺮﻳ ،تﺎﻣﻮﻠﻌﻤﻟا ﻦــﻣ ﺪــﻳﺰﻤﻠﻟ
ﺎﻬﻟ ﻊّﻨﺼﻤﻟا ﺔﻬﺠﻟا
:
ﺔﻌّﻨﺼﻤﻟا ﺔﻬﺠﻟا:
Room 2112-1-1, South District, Finance and Trade Center, No.6975 Yazhou Road, Dongjiang Bonded Port Area, Tianjin Pilot Free Trade Zone
ﻦﻴﺼﻟا ،ﻦﻴﺠﻧﺎﻴﺗ ,ناﻮﻨﻌﻟا:
تﺎﻛﺮﺷ ىﺪﺣإ

Thank you for choosing the Mi Robot Vacuum-Mop!
Read this manual carefully before use, and retain it for future reference.
The Mi Robot Vacuum-Mop is an intelligent all-in-one cleaner designed for ultimate convenience and cleaning efficiency. Equipped with
high-precision motion sensors and an innovative visual navigation system, the Mi Robot Vacuum-Mop quickly maps out its surroundings and
generates cleaning routes as it goes. Thanks to the intuitive obstacle detection and high wheel clearance design, it can easily navigate complex
home layouts. Once a cleaning task completed, the Mi Robot Vacuum-Mop automatically returns to the charging dock, delivering a hassle-free
experience from start to finish. Using its high-powered suction and electronically-controlled water mopping system, the Mi Robot Vacuum-Mop
cleans by sweeping in front and mopping in back for amazing results every time. The Mi Home/Xiaomi Home app also makes it easy to view your
cleaning map, schedule a cleaning, and switch between cleaning modes, allowing you to clean your entire home at the touch of a buon. Thank you
for choosing the Mi Robot Vacuum-Mop, and welcome to the future of smart living!
Hereby,Dreame Technology (Tianjin) Limited declares that the radio equipment type STYTJ01ZHM is in compliance with Directive 2014/53/EU. The
full text of the EU declaration of conformity is available at the following internet address:
hp://www.mi.com/global/service/support/declaration.html
Safety Information
Usage
Restrictions
This product is for floor cleaning in a home environment only. Do not use it outdoors, on non-floor surfaces, or in a commercial or industrial
seing.
Do not use the vacuum-mop in an area suspended above ground level without a protective barrier.
Do not use the vacuum-mop at an ambient temperature above 40°C or below 0°C or on a floor with liquids or sticky substances.
Pick up any cables from the floor before using the vacuum-mop to prevent it from dragging them while cleaning.
Remove fragile or small items from the floor to prevent the vacuum-mop from bumping into and damaging them.
This product can be used by children aged from 8 years and above and persons with physical, sensory, intellectual deficiencies, or limited
experience or knowledge under the supervision of a parent or guardian to ensure safe operation and to avoid any risk of hazards. Cleaning
and maintenance shall not be made by children without supervision.
Children shall not play with this product. Ensure children and pets are kept at a safe distance from the vacuum-mop while it is operating.
Keep the brush cleaning tool out of reach of children.
Do not place children, pets, or any item on top of the vacuum-mop regardless of whether it is stationary or moving.
Keep hair, fingers, and other body parts away from the suction opening of the vacuum-mops.
Do not use the vacuum-mop to clean any burning substances.
Do not vacuum up hard or sharp objects.
Make sure the vacuum-mop is turned off and the charging dock is unplugged before cleaning or performing maintenance.
Do not wipe any part of this product using a wet cloth or any liquids.
Please use this product in accordance with the instructions in the User Manual. Users are responsible for any loss or damage arising from
improper use of this product.
Baeries and
Charging
Do not use any third-party baery, charger, or charging dock. Use only with CDZ1902 supply unit.
Do not aempt to disassemble, repair, or modify the baery or charging dock on your own.
Do not place the charging dock near a heat source.
Do not use a wet cloth or wet hands to wipe or clean the dock's charging contacts.
Do not improperly dispose of old baeries. Unneeded baeries should be discarded at an appropriate recycling facility.
If the power cord becomes damaged or broken, stop using it immediately and contact aer-sales service.
Make sure the vacuum-mop is turned off when being transported and kept in its original packaging if possible.
If the vacuum-mop will not be used for an extended period, fully charge it, then turn it off and store in a cool, dry place. Recharge the
vacuum-mop at least once every 3 months to avoid over-discharging the baery.
This product contains baeries that can only be replaced by qualified technicians or aer-sales service.
Only for navigation and positioning purposes, the camera of the vacuum-mop will collect individuals in the surroundings within the range of the
viewing angles when it is cleaning. Please be assured that all your personal information will be protected by the data encryption technology.
1 2
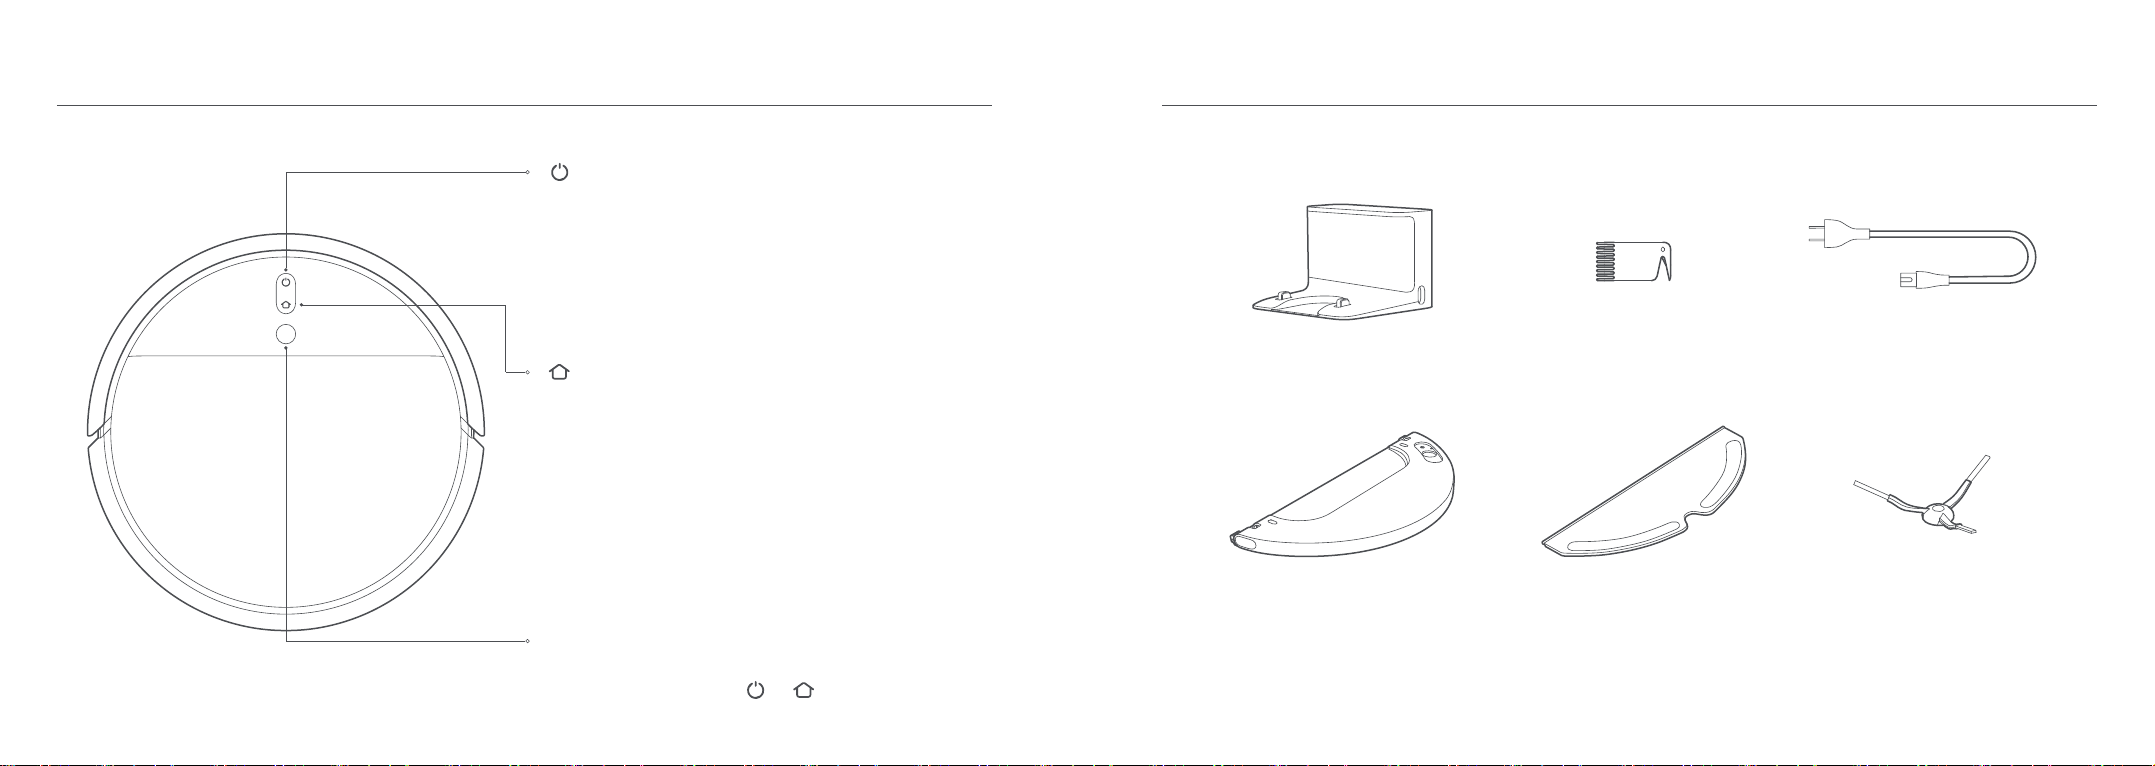
Water Tank Mop Pad Side Brush
Power CordCleaning ToolCharging Dock
Simultaneously press and hold and for 3 seconds
Product Overview
Power/Clean Buon
Power on/off: Press and hold for 3 seconds
Clean: Press to start cleaning aer the vacuum-mop is powered on
Status Indicator
White: Cleaning, or cleanup is completed
Blinking white: Cleaning paused
Blinking blue: Connecting to network
Blinking orange: Error
Spot/Dock Buon
Press to send vacuum-mop back to charging dock
Press and hold for 3 seconds to start Spot Clean mode
Status Indicator
Blinking white: Returning to dock to charge (normal baery)
Blinking orange: Returning to dock to charge (low baery)
Pulsing white: Charging (normal baery)
Pulsing orange: Charging (low baery)
White: Charging completed
Reset Wi-Fi:
Visual Navigation Sensor
Note: Press any buon to pause while the vacuum-mop is cleaning,
returning to dock, or in Spot Clean mode.
AccessoriesVacuum-Mop
3 4
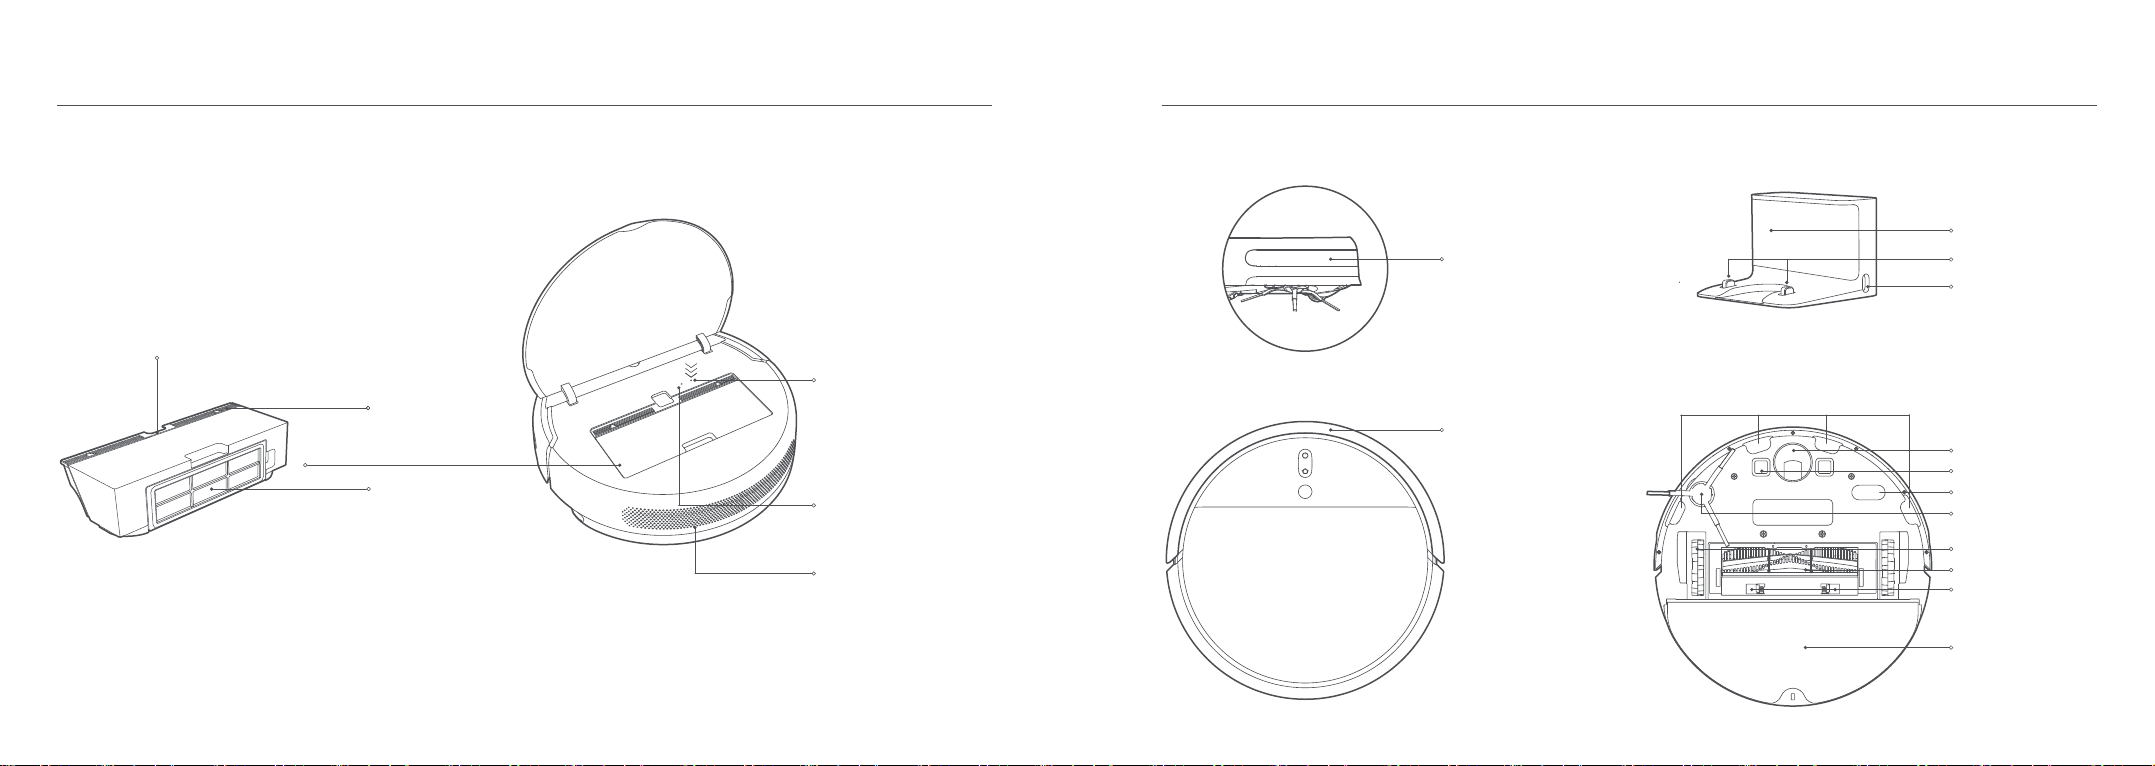
Product Overview
Bin Cover
Wi-Fi Indicator
Blinking slowly: To be
connected
Blinking quickly: Connecting
On: Wi-Fi connected
Air Outlet/Speaker
Bin Clip
Filter
Reset Buon:
Press and hold to restore
factory seings
Infrared Deceleration
Sensor
Signaling Area
Power Port
Cliff Sensor
Omnidirectional Wheel
Charging Contacts
Movement Sensor
Side Brush
Main Wheels
Main Brush
Water Tank
Charging Contacts
Collision Buffer
Brush Guard Clips
Dust Bin Vacuum-Mop Vacuum-mop and Sensors Charging Dock
5 6

Note: Certain types of floor cleaners or disinfectants may
clog the tank filter. Please exercise caution when selecting
which product to use.
Note: When the vacuum-mop is charging or not in use, remove the mopping module, pour out all
remaining water in the tank, and clean the mop pad to prevent mildew or lingering odors.
c. Install the mopping module: Align the mopping module as indicated
by the arrow, then slide it into the back of the vacuum until it clicks
into place.
b. Fill the water tank: Open the water tank
lid, fill the tank with water, then securely
close the lid.
Aer the vacuum-mop finishes cleaning and returns to the charging
dock, press the side clips of the mopping module inward and pull to
remove the module.
6. Remove the Mopping Module
Press and hold the buon ,When the power indicator lights up,
place the vacuum-mop onto the charging dock to recharge.
Installation
2. Turn on and charge the vacuum-mop
Battery Level Indicator
White: Battery level is more than 15%
Orange: Battery level is less than 15%
> 0.5 m
> 1.5 m
> 0.5 m
Note: Only use the mopping module when someone is at
home. To prevent the vacuum from entering carpeted areas,
objects may be used.
Note: The mop pad should be cleaned aer every 30 minutes of use to ensure adequate water flow
and cleaning effectiveness.
a. Install the mop pad: Dampen the mop
pad and wring out excess water. Slide the
pad all the way into the slot of the water
tank until it is securely in place.
Once the power indicator of the vacuum-mop changes from pulsing
white to solid white, it is fully charged. Press the buon , or you can
use the Mi Home/Xiaomi Home app to start cleaning.
4. Install the mopping module 5. Start Cleaning
This product works with Mi Home/Xiaomi Home app *. Control your
device, and interact it and other smart home devices with Mi
Home/Xiaomi Home app. Scan the QR code to download and install
the app. You will be directed to the connection setup page if the app is
installed already. Or search "Mi Home/Xiaomi Home" in the app Store
to download and install it. Open Mi Home / Xiaomi Home app, tap "+"
on the upper right, and then follow prompts to add your device.
* The app is referred to as Xiaomi Home app in Europe (except for Russia). The name of the app
displayed on your device should be taken as the default.
Note: The version of the app might have been updated, please follow the instructions based on the
current app version.
3. Connecting with Mi Home/Xiaomi Home App1. Place the charging dock on the level ground
against wall and connect to a power outlet
Note: Make sure there is a distance of 0.5 meters or more on either side of the charging dock, and
more than 1.5 meters in front of it. Connect the power cord to the charging dock and tidy up any
loose cord to prevent it from geing tangled up by the vacuum-mop, which could accidentally
move or unplug the charging dock.
Note: If the vacuum-mop is unable to turn on due to low baery, place it directly onto the charging
dock to recharge. When there is a connection loss between your phone and the
vacuum-mop due to the router reconfiguration, wrong password or so,
please open the cover of the vacuum-mop so that you can see the
Wi-Fi indicator. Simultaneously press and hold the buons and
until you hear a voice saying "Waiting for the network configuration".
Once the Wi-Fi indicator is slowly blinking, the Wi-Fi has been
successfully reset.
Reset Wi-Fi
7 8

How to Use
Adding Water or Cleaning Mop Pad During Cleaning
Note: The vacuum-mop will automatically enter sleep mode aer encountering an error if no
action is taken within 10 minutes. If the vacuum-mop has an error, placing it onto the charging
dock will end the current cleaning task.
Note: The vacuum-mop will not enter sleep mode until it is fully charged.
If you need to add more water to the vacuum-mop or clean the mop
pad during a cleaning task, press any buon to pause the
vacuum-mop, then remove the mopping module. Aer adding water
or cleaning the mop pad, reaach the mopping module, then press
the buon to resume the cleaning task.
Scheduled Cleaning
You can schedule cleaning time in the Mi Home/Xiaomi Home app. The
vacuum-mop will automatically start cleaning at the designated time
and then return to the charging dock to recharge when the cleaning is
done.
Cleaning Mode
Four cleaning modes are available in the Mi Home/Xiaomi Home app:
Quiet, Standard, Strong and Turbo. The default mode is Standard.
Do Not Disturb Mode
Do Not Disturb mode prevents the vacuum from automatically
starting cleaning tasks, and the power indicator remains off. You can
enable Do Not Disturb or modify its hours in the app.
Fault Status
If the vacuum-mop encounters an error during operation, the power
indicator will blink orange and you will hear a voice alert. To check for
a solution, please refer to "Troubleshooting".
Sleep Mode
The vacuum-mop will automatically enter sleep mode aer 10 minutes
of inactivity, then the power and charging indicators will go off. To
wake up the vacuum-mop, press any buon.
Note: The vacuum-mop cannot be turned off while charging.
Note: When the vacuum-mop is paused, placing it onto the charging dock will end the current
cleaning task. If you need to continue cleaning, try to start the vacuum-mop in the same position
where it was paused.
Note: Activating Spot Clean mode will end the current cleaning task of the vacuum-mop.
Press and hold the buon to turn on the vacuum-mop. Once the
power indicator turns solid white, the vacuum-mop is in standby mode.
To turn off the vacuum-mop, press and hold the buon while the
vacuum-mop is stationary. Turning off the vacuum-mop will end the
current cleaning task.
Press any buon to pause the vacuum-mop during cleaning.
To resume cleaning, press the buon . Press the buon to end
the current cleaning task and the vacuum-mop will go back to the
charging dock.
Upon activation, the vacuum-mop will
methodically clean each room in an S-shape
paern, then finish by cleaning along edges
and walls to ensure a thorough job. When
the vacuum-mop is done cleaning, it will
automatically return to the charging dock to
recharge.
When the vacuum-mop is in standby mode
or paused, press and hold the buon for
3 seconds to start Spot Clean mode. In this
mode, it will clean a square-shaped area of
1.5 ×1.5 meters directly around the
vacuum-mop. When the spot cleaning is
done, the vacuum-mop will automatically
return to its original location and shut off.
Note: The vacuum-mop cannot start cleaning if the baery level is low. Please recharge it before
cleaning.
If the vacuum-mop starts running low on baery during a cleaning task, it will automatically return
to the charging dock to recharge. Once the vacuum-mop is fully recharged, it will resume cleaning
where it le off.
Please tidy up any cables on the floor before cleaning (including the charging dock power cable) to
prevent the vacuum-mop from geing caught on them, which could accidentally shut off electrical
appliances or cause damage to objects or cables.
By default, if the vacuum-mop completes a cleaning task in less than 10 minutes, it will clean the
area a second time.
Pulsing orange: Baery level is less than 15%. Pulsing white: Baery level is more than 15%.
Note: The vacuum-mop will automatically return to its original cleaning position if it cannot locate
the charging dock. If this happens, please manually place the vacuum-mop onto the charging dock.
Press the buon to start cleaning.
Press any buon to pause during cleaning.
Turn On/Off
Cleaning
Pausing
Cleaning Methods
1.5m
1.5m
Auto mode: The vacuum-mop will automatically return to the charging
dock to recharge aer it finishes cleaning.
Manual mode: When the vacuum-mop is paused, press the buon
to send it back to the charging dock.
The indicator of the buon is pulsing when the vacuum-mop is
charging.
Charging
9 10

Routine Maintenance
Dust Bin and Filter
Note: Weekly cleaning is recommended.
1. Open the vacuum-mop cover, then pinch the bin clips to remove the
dust bin.
Cleaning the Washable Filter
Note: Biweekly cleaning is recommended.
1. Open the bin cover at the positions marked with arrows.
Note: Only clean water should be used to clean the filter. Do not use detergent.
Do not aempt to clean the filter with a brush or finger.
2. Add clean water to the dust bin, and close the bin cover, then shake
the bin back and forth, finally pour out the water. Repeat these steps
until the filter is clean.
2. Open the bin cover as indicated by the diagram.
Using the Brush Cleaning Tool
Main Brush Guard
Clips
Main Brush
Main Brush
Bearings
>0.5m
>1.5m
>0.5m
Note: Do not place the charging dock in an area with direct sunlight or where other objects could
block its signaling area, as this may hinder the vacuum-mop from returning to the charging dock.
Charging Dock
Place the charging dock on the level ground against a wall. Before
plugging the charging dock into a power outlet, make sure there is a
distance of 0.5 meters or more on either side of the charging dock. To
ensure you can well connect to the vacuum-mop with your phone,
make sure the vacuum-mop and charging dock are in the range of
Wi-Fi.
Main Brush
1. Flip the vacuum-mop over and pinch the clips to remove the main
brush guard.
2. Li the main brush out of the vacuum-mop, then clean the brush
bearings.
3. Use the included brush cleaning tool to remove any hairs tangled on
the brush.
4. Reinsert the main brush, then put the guard back on and press on it
until the clips lock into place.
Note: It is recommended to clean the main brush weekly and replaced
every 6 to 12 months.
11 12
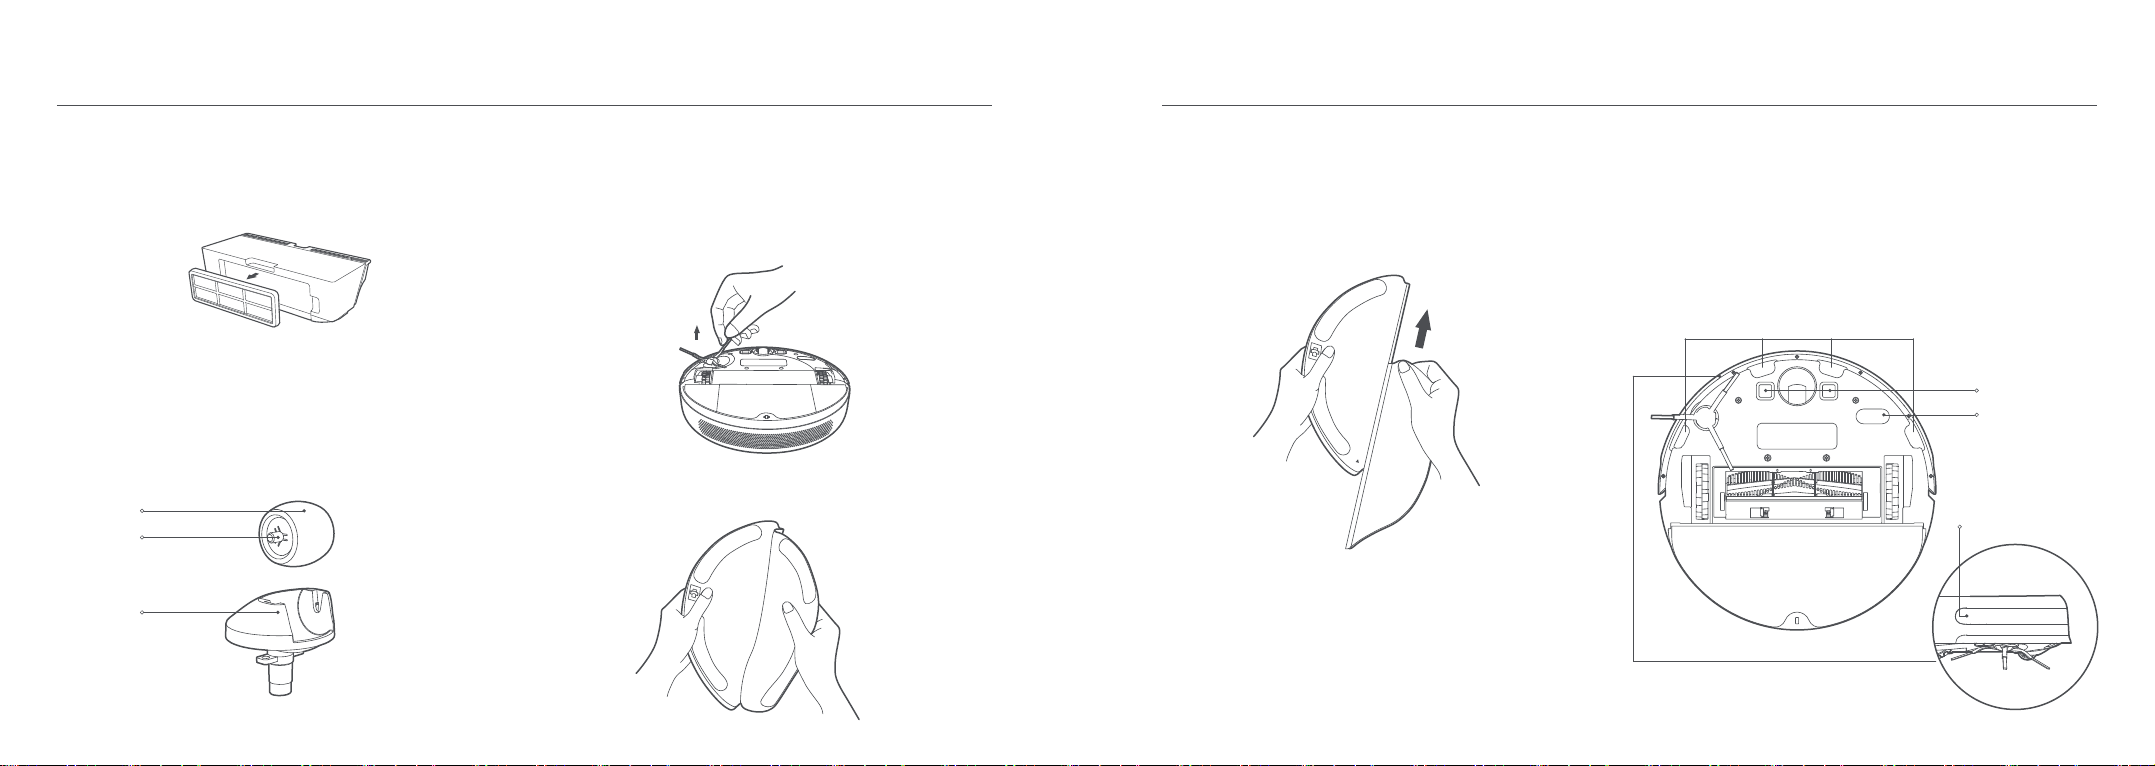
Routine Maintenance
Wheel
Axle
Holder
Side Brush
Note: It is recommended to clean the side brush monthly and replace every 3 to 6 months.
1. Flip the vacuum-mop over, then gently pull out the side brush as
shown in the diagram below to clean it.
2. Reinstall the side brush.
Mop Pad
Note: The mop pad should be cleaned aer each use.
1. Pull the mop pad off of the mopping module to remove it.
Omnidirectional Wheel
Note: The wheel can be cleaned with water and reinstalled aer drying.
1. Flip the vacuum-mop over and pull out the omnidirectional wheel.
2. Remove hair, dirt, and other debris from the wheel and axle.
3. Reinsert the wheel and press it firmly back into place.
Note: Filter must be fully dry before use (allow at least 24 hours).
3. Remove the filter as shown in the diagram, forcefully shake it to
remove excess water, then place it aside to dry before reinstalling it.
Cliff Sensor
Charging Contacts
Movement Sensor
Infrared Deceleration
Sensor
Vacuum-Mop Sensors
Use a so cloth to clean all sensors in the vacuum-mop, including:
· The four cliff sensors on the boom.
· The infrared deceleration sensor on the front.
· The charging contacts on the boom.
· The movement sensor on the boom.
Note: Remove the pad from the mopping module before cleaning it, and make sure dirty water
does not flow back into the water outlet to avoid clogging. Do not press too hard on the mop pad,
as this can hinder its performance. Pad should be cleaned before each use. It is recommended to
change the mop pad every 3 to 6 months.
2. Clean and dry the mop pad.
13 14

Battery
Note: If the vacuum-mop is not used for an extended period, turn it off and put it away. To prevent
damage from over-discharging, the vacuum-mop should be recharged at least once every three
months.
The vacuum-mop contains a high-performance lithium-ion baery
pack. Please ensure that it remains well-charged during daily use to
maintain optimal baery performance.
Updating the Firmware
You can update the firmware via the app. Before updating, make sure
the vacuum-mop is on the charging dock and has at least 15% baery
le.
The power indicator of the vacuum-mop will blink quickly between
white and orange alternately while its firmware is being updated.
Charging Dock
Clean the contacts of the charging dock with a so cloth.
System Restarting
If the vacuum-mop stops responding or cannot be turned off, press
and hold down the buon for 6 seconds to forcefully turn it off.
Then press and hold the buon for 3 seconds to turn the
vacuum-mop on.
Restoring Factory Settings
If system restarting does not work, use a pin to press the reset buon
until you hear a voice say "Restoring factory seings". This will reset
the vacuum-mop to its original factory seings.
Fault
Error 1: Please clean and gently tap the bumper.
Solution
If the vacuum-mop encounters an error during operation, the power indicator will blink orange and you will hear a voice alert. To check for a solution,
please refer to the table below.
If the collision buffer is stuck, gently tap it to remove foreign objects. If it does
not work, move the vacuum-mop to a new area and reactivate it.
Error 2: Please place the vacuum-mop on the level
ground and reactivate it.
Error 3: Please clean the cliff sensor, place the vacuum
on level ground, and reactivate it.
A wheel is off the ground. Place the vacuum-mop on the level ground and
reactivate it.
Part of the vacuum is off the ground. Place the vacuum on level ground and
reactivate it. This error may also occur if the cliff sensor is dirty. To rule out this
possibility, clean the cliff sensor.
Error 4: Please remove the main brush and clean the
bristles and bearings.
A foreign object might be caught in the main brush. Remove the brush and
clean its bristles and bearings.
Error 6: Please check whether any objects are wrapped
around the main wheels, then move the vacuum-mop
to a new location and reactivate it.
A foreign object might be caught in one of the main wheels. Clean the wheels,
then reactivate the vacuum-mop.
Error 7: Please clear any obstacles around the
vacuum-mop.
The vacuum-mop may be caught or stuck. Clear away any obstructions around it.
Error 8: Please reinstall the dust bin and filter. Make sure the dust bin and filter are installed correctly. If the error persists, try
replacing the filter.
Error 5: Please remove and clean the side brush. A foreign object might be caught in the side brush. Remove the side brush and
clean it.
Troubleshooting
15 16

Problem Type
Vacuum-mop does not turn on
Vacuum-mop does not recharge
Vacuum-mop does not return to
charging dock
Vacuum-mop is malfunctioning
Vacuum-mop makes a strange noise
Vacuum-mop no longer cleans efficiently
or leaves dust behind
Vacuum-mop cannot connect to Wi-Fi
Solution
Baery level is low. Recharge the vacuum-mop at the charging dock, then try again.
The ambient temperature is too low (below 0°C) or too high (above 50°C). The operating
temperature of the vacuum-mop is 0°C to 40°C.
The charging dock is not receiving power. Please confirm that both ends of the power
cord are plugged in correctly.
Poor contact. Clean the charging contacts of the charging dock and the vacuum-mop.
There are too many obstructions around the charging dock. Place the charging dock in
a more open area.
Please clean the dock's signaling area.
A foreign object might be caught in the main brush, side brush, or one of the main
wheels. Stop the vacuum-mop and remove any debris.
The dust bin is full. Please clean it.
The filter is blocked. Please clean it.
A foreign object is caught in the main brush. Please clean it.
Wi-Fi signal is weak. Make sure the vacuum-mop is in an area with good Wi-Fi coverage.
There is something wrong with the Wi-Fi connection. Reset the Wi-Fi and download the
latest version of the Mi Home/Xiaomi Home app, then try reconnecting.
Turn off the vacuum-mop and then reactivate it.
FAQ
The vacuum-mop is too close to a virtual wall. Move the vacuum-mop to a new
location, then reactivate it.
Error 10: Charging error. Try cleaning the charging
contacts.
Error 9: Strong magnetic field detected. Reactivate the
vacuum-mop away from any virtual walls.
If the problem still persists, please contact aer-sales service for assistance.
Error 11: Please wait until the baery temperature
returns to normal, then resume use.
Wipe the charging contacts on both the dock and the vacuum-mop with a dry
cloth.
The temperature of the baery is too high or too low. Wait for the temperature
to return to normal, then resume use.
Error 12: A restricted area or virtual wall was detected.
Move the vacuum-mop away from this area. Move the vacuum-mop away from the area with barrier tape, then reactivate it.
Error 14: Internal error. Try reseing the system. The vacuum-mopcannot continue to operate due to an internal error. Try
reseingthesystem.
Error 13: Please clean the visual navigation sensor. Wipe the visual navigation sensor, then reactivate the vacuum-mop.
17 18
Specifications
Model
Dimensions
Baery
Net Weight
Wireless Connectivity
Rated Voltage
Rated Power
STYTJ01ZHM
353×350×81.5 mm
14.4 V /2400 mAh(Rated Capacity)
3.6 kg
Wi-Fi IEEE 802.11b/g/n 2.4 GHz
14.4 V
40 W
Dimensions
Rated Input
Model
Rated Output
130×126×93 mm
100-240 V ~ 50/60 Hz 0.5 A
19.8 V 1 A
CDZ1902
Vacuum-Mop
WEEE Information
Charging Dock
Problem Type
Vacuum-mop does not perform scheduled
cleaning
Does the vacuum-mop need to be fully
charged for 16 hours the first three
times it is used?
No water comes out of the mopping
module, or only a lile bit comes out
Too much water comes out of the
mopping module
Vacuum-mop doesn't resume cleaning
aer charging
Does leaving the vacuum-mop on the
charging dock consume power if it's
already charged?
Vacuum-mop doesn't return to charging
dock aer being moved
Solution
Vacuum-mop has low baery. Scheduled cleaning will not start unless the vacuum-mop
has at least 15% baery le.
Leaving the vacuum-mop on the charging dock aer it's fully charged consumes very
lile electricity and helps maintain optimal baery performance.
Lithium baeries do not suffer from memory effects, so it is not necessary to wait 16
hours aer fully charging the vacuum-mop before using it.
Make sure the water tank lid is securely closed.
Make sure the vacuum-mop is not set to Do Not Disturb mode, which will prevent it
from resuming cleaning.
The vacuum-mop does not resume cleaning when it is manually recharged or placed
onto the charging dock.
Moving the vacuum-mop may cause it to re-position itself or re-map its surroundings. If
the vacuum-mop is too far from the charging dock, it might not be able to automatically
return on its own, in which case you need to manually place the vacuum-mop onto the
charging dock.
Confirm that the water tank is filled with water, and clean the mop pad if necessary.
Make sure the mop pad is installed correctly according to the user manual.
All products bearing this symbol are waste electrical and electronic equipment (WEEE as in directive 2012/19/EU) which should not be
mixed with unsorted household waste. Instead, you should protect human health and the environment by handing over your waste
equipment to a designated collection point for the recycling of waste electrical and electronic equipment, appointed by the
government or local authorities. Correct disposal and recycling will help prevent potential negative consequences to the environment
and human health. Please contact the installer or local authorities for more information about the location as well as terms and
conditions of such collection points.
19 20

Gracias por elegir Mi Robot Vacuum Mop.
Lea detenidamente este manual antes de usar el producto y consérvelo para futuras consultas.
Mi Robot Vacuum-Mop es un limpiador inteligente todo en uno diseñado para lograr la mayor comodidad y eficiencia de limpieza. Equipado con
sensores de movimiento de alta precisión y un innovador sistema de navegación visual, Mi Robot Vacuum-Mop traza rápidamente su entorno y
genera rutas de limpieza a medida que avanza. Gracias a su intuitivo sistema de detección de obstáculos y a su diseño, con una gran distancia entre
sus ruedas, puede navegar fácilmente a través de complejas disposiciones en el hogar. Cuando realiza una tarea de limpieza, Mi Robot Vacuum-Mop
regresa automáticamente a la base de carga, lo que otorga al usuario una experiencia sin complicaciones durante todo el proceso de limpieza.
Utilizando su sistema de aspiración de alta potencia y su sistema de fregado con agua, controlado electrónicamente, Mi Robot Vacuum-Mop barre
por delante y friega por detrás para obtener resultados asombrosos todas las veces. La aplicación Mi Home/Xiaomi Home también hace que sea fácil
ver la zona de limpieza, programar limpiezas y cambiar los modos de limpieza, lo que le permite limpiar toda su casa con solo pulsar un botón.
Gracias por elegir Mi Robot Vacuum-Mop y bienvenidos al futuro de la vida inteligente.
21 22
Por la presente,Dreame Technology (Tianjin) Limited declara que el tipo de equipo radioeléctrico STYTJ01ZHM cumple con la Directiva 2014/53/UE.
Encontrará el texto completo de la declaración de conformidad de la UE en esta dirección de Internet:
hp://www.mi.com/global/service/support/declaration.html

Restablecer Wi-Fi:
Sensor de navegación visual
Descripción General del Producto
Botón de encendido/limpieza
Botón de encendido/apagado: Mantener pulsado 3 segundos
Indicador de estado
Blanco: Limpiando o limpieza completada
Blanco intermitente: Limpieza pausada
Azul intermitente: Conectando a la red
Naranja intermitente: Errorr
Botón de manchas/base
Pulsar para enviar el aspirador con mopa de vuelta a la base de carga
Indicador de estado
Blanco intermitente: Volviendo a la base de carga (batería normal)
Naranja intermitente: Volviendo a la base de carga (batería baja)
Blanco palpitando: Cargando (batería normal)
Naranja palpitando: Cargando (batería Baja)
Blanco: Carga completada
Nota: Pulse cualquier botón para detener el aspirador con mopa
mientras esté limpiando, volviendo a la base o en el modo Limpieza de
manchas.
Mantenga pulsados y durante 3 segundos
Mantener pulsado 3 segundo para iniciar el modo Limpieza de
manchas
Limpieza: Pulsar para iniciar la limpieza después de encender el
aspirador con mopa
Aspirador con mopa
23 24

Indicador del Wi-Fi
Encendido: Wi-Fi conectado
Salida de aire/altavoz
Pinza del depósito de basura
Filtro
Depósito de basura Aspirador con mopa
Descripción General del Producto
Depósito de agua Almohadilla de la mopa Cepillo lateral
Cable de alimentaciónHerramienta de limpiezaCargador
Accesorios
Tapa del depósito
de basura Parpadea lentamente:
Esperando conexión
Parpadea rápidamente:
Conectando
Botón restaurar: Mantener
pulsado para restaurar los
ajustes de fábrica
25 26

Descripción General del Producto Instalación
Puerto de alimentación
Sensor de altura
Contactos de carga
Cepillo lateral
Ruedas principales
Cepillo principal
Depósito de agua
Contactos de carga
Sensor de
desaceleración infrarrojo
Amortiguador
de choque
Aspirador con mopa y sensores Cargador
Área de señalización
Rueda
omnidireccional
Sensor de movimiento
Pinzas del protector
del cepillo
Mantenga pulsado el botón . Cuando se encienda el indicador de
energía, coloque el aspirador con mopa en la base de carga para
cargarlo.
Indicador de nivel de batería
Blanco: El nivel de batería es superior
al 15%
Naranja: El nivel de batería es interior
al 15%
>0,5m
>1,5m
>0,5m
Este producto funciona con la aplicación Mi Home / Xiaomi Home*.
Controla tu dispositivo e interactúa con él y otros dispositivos
inteligentes del hogar con la aplicación Mi Home / Xiaomi Home.
Escanee el código QR para descargar e instalar la aplicación. Se le
dirigirá a la página de configuración de conexión si la aplicación ya
está instalada. O busque "Mi Home / Xiaomi Home" en la App Store
para descargarla e instalarla.
Abra la aplicación Mi Home / Xiaomi Home, pulse "+" en la parte
superior derecha y, a continuación, siga las instrucciones para añadir
el dispositivo.
* La aplicación se conoce como Xiaomi Home en Europa (excepto en Rusia). El nombre de la
aplicación que aparece en su dispositivo debe ser tomado como el predeterminado.
Nota: La versión de la aplicación puede haber sido actualizada, siga las instrucciones basadas en
la versión actual de la aplicación.
3. Conectar con la aplicación Mi Home /
Xiaomi Home
1. Coloque la base de carga a nivel del suelo y
contra la pared, y conéctelo a una toma de
corriente
2. Encienda y cargue el aspirador con mopa
Nota: Asegúrese de que haya una distancia de 0,5 metros o más a cada lado de la base de carga, y
de más de 1,5 metros por la parte delantera. Conecte el cable de alimentación a la base de carga y
recoja cualquier cable suelto para prevenir que se enrede en el aspirador con mopa, lo que podría
mover o desconectar involuntariamente la base de carga.
Nota: Si el aspirador con mopa no se enciende por tener poca batería, colóquelo directamente en
la base de carga para cargarlo.
Cuando se pierde la conexión entre su teléfono y el aspirador con
mopa debido a la reconfiguración del router o a una contraseña
incorrecta, abra la tapa del aspirador con mopa para que pueda ver el
indicador de Wi-Fi. Al mismo tiempo, mantenga pulsado los botones
y hasta que escuche una voz diciendo «Esperando configuración
de red». Cuando el indicador parpadee lentamente, el Wi-Fi se habrá
restablecido correctamente.
Restablecer Wi-Fi
27 28

Modo de usoInstalación
Nota: Algunos tipos de limpiadores de suelo o
desinfectantes pueden obstruir el filtro del depósito.
Extreme la precaución al elegir qué productos utilizar.
Nota: Cuando el aspirador con mopa esté cargándose o no esté en uso, extraiga el módulo de
fregado, saque el agua que quede en el depósito y limpie la almohadilla de la mopa para evitar el
moho y los olores persistentes.
c. Instalar el módulo de fregado: Alinee el módulo de fregado como lo
indica la flecha, deslícelo en la parte trasera del aspirador hasta que
haga clic en su sitio.
b. Rellenar el depósito de agua: Abra la tapa
del depósito de agua, rellene el depósito
con agua y cierre la tapa de forma segura.
Después de que el aspirador con mopa termine la limpieza y vuelva a la
base de carga, pulse las pinzas laterales del módulo de fregado y tire
para extraer el módulo.
6. Extraer el módulo de fregado
Nota: Utilice el módulo de fregado sólo cuando haya alguien
en casa. Para evitar que el aspirador entre en zonas
alfombradas,puede utilizar objetos.
Nota: La almohadilla de la mopa debería limpiarse a cada 30 minutos de uso para garantizar un
buen flujo de agua y efectividad en la limpieza.
a. Instale la almohadilla de la mopa:
Humedezca la almohadilla de la mopa y
escurra el exceso de agua. Deslice la
almohadilla hasta el fondo de la ranura del
depósito de agua hasta que quede bien
colocada.
Cuando el indicador de energía del aspirador con mopa cambie de
blanco palpitante a fijo, estará completamente cargado. Pulse el botón
, o puede utilizar la aplicación Mi Home/Xiaomi Home para
empezar la limpieza.
4. Instalar el módulo de fregado 5. Comenzar limpieza
Nota: El aspirador con mopa no se puede apagar mientras se esté cargando.
Mantenga pulsado el botón del aspirador con mopa. Cuando el
indicador de energía se ponga fijo en blanco, el aspirador con mopa
entrará en el modo de espera. Apague el aspirador con mopa, mantenga
pulsado el botón mientras el aspirador esté fijo. Apagar el aspirador
con mopa parará la tarea de limpieza actual.
Nota: El aspirador con mopa no puede comenzar a limpiar si el nivel de la batería es bajo.
Recárguelo antes de limpiar.
Si el aspirador con mopa empieza a quedarse sin batería durante una tarea de limpieza, volverá
automáticamente a la base de carga para recargarse. Cuando vuelva a estar completamente
cargado, reanudará la limpieza por donde lo dejó.
Recoja cualquier cable del suelo antes de la limpieza (incluyendo el cable de alimentación de la
base de carga) para evitar que el aspirador con mopa se enrede en ellos, lo que podría desconectar
accidentalmente los dispositivos eléctricos o dañar los objetos o cables.
Por defecto, si el aspirador con mopa completa una tarea de limpieza en menos de 10 minutos,
volverá a limpiar la zona una segunda vez.
Pulse el botón para comenzar a limpiar.
Pulse cualquier botón para hacer una pausa durante la limpieza.
Encender/apagar
Limpieza
Nota: Cuando el aspirador con mopa esté parado, colocarlo en la base de carga finalizará la tarea
de limpieza actual.
Si necesita que siga limpiando, intente iniciar el aspirador con mopa en la misma posición en la
que entró en pausa.
Pulse cualquier botón para pausar el aspirador con mopa durante la
limpieza.
Para reanudar la limpieza, pulse el botón . Pulse el botón para
finalizar la tarea de limpieza actual y el aspirador con mopa volverá a
la base de carga.
Pausar
Naranja palpitando: Nivel de batería inferior al 15%.
Blanco palpitando: Nivel de batería superior al 15%.
Nota: El aspirador con mopa volverá automáticamente a su posición de limpieza original si no
puede ubicar la base de carga. Si esto ocurre, coloque manualmente el aspirador con mopa en la
base de carga.
Cargando
Modo automático: El aspirador con mopa volverá automáticamente a la
base de carga para recargarse cuando finalice la limpieza.
Modo manual: Cuando el aspirador con mopa esté parado, pulse el botón
para enviarlo de vuelta a la base de carga.
El indicador del botón estará palpitando cuando el aspirador con
mopa se esté cargando.
29 30

Si necesita añadir más agua al aspirador con mopa o limpiar la mopa
durante una tarea de limpieza, pulse cualquier botón para poner en
pausa el aspirador con mopa y extraiga el módulo de fregado.
Después de añadir el agua o limpiar la almohadilla de la mopa, vuelva
a colocar el módulo de fregado y, a continuación, pulse el botón
para reanudar la tarea de limpieza.
> 0,5 m
> 1,5 m
> 0,5 m
Nota: No coloque la base de carga en una zona con luz solar directa o donde otros objetos puedan
bloquear su área de señalización, ya que podría impedir que el aspirador con mopa vuelva a la base
de carga.
Cargador
Coloque la base de carga a nivel de suelo y contra la pared. Antes de
conectar la base de carga a una toma de corriente, asegúrese de que
haya una distancia de 0,5 metros o más a los lados de la base. Para
asegurarse de que puede conectar correctamente el aspirador con
mopa a su teléfono, asegúrese de que el aspirador con mopa y la base
de carga estén dentro del rango del Wi-Fi.
Modo de uso
Limpieza programada
Puede programar la hora de la limpieza en la aplicación Mi
Home/Xiaomi Home. El aspirador con mopa empezará
automáticamente la limpieza en el momento indicado y luego volverá
a la base de carga para cargarse cuando haya terminado la limpieza.
Modo de limpieza
En la aplicación Mi Home/Xiaomi Home hay cuatro modos de limpieza
disponibles: Silencioso, Estándar, Fuerte y Turbo. El modo
predeterminado es el estándar.
Modo No molestar
El modo No molestar evita que el aspirador comience automática-
mente las tareas de limpieza y el indicador de energía permanecerá
apagado. Puede activar el modo No molestar o modificar sus horas
desde la aplicación.
Nota: Activar el modo Limpieza de manchas acabará con la tarea de limpieza actual del aspirador
con mopa.
Tras la activación, el aspirador con mopa
limpiará de forma metódica todas las
habitaciones siguiendo un patrón con forma
de S. A continuación, acabará de limpiar los
bordes y paredes para garantizar un buen
acabado. Cuando el aspirador con mopa
termine de limpiar, volverá
automáticamente a la base de carga.
Cuando el aspirador con mopa esté en modo
de espera o en pausa, mantenga pulsado el
botón durante 3 segundos para activar
el modo Limpieza de manchas. En este
modo, limpiará una zona cuadrada de 1,5 x
1,5 metros alrededor del aspirador con
mopa. Cuando termina la limpieza de las
manchas, el aspirador con mopa regresa
automáticamente a su ubicación original y
se apaga.
Métodos de limpieza
1,5 m
1,5 m
Nota: El aspirador con mopa activará automáticamente el modo suspensión si, después de
encontrar un error, no lleva a cabo ninguna acción en 10 minutos.
Si el aspirador con mopa sufre un error, colocarlo en la base de carga finalizará la tarea de limpieza
actual.
Nota: El aspirador con mopa no activará el modo suspensión hasta que esté completamente
cargado.
Estados de errores
Si el aspirador con mopa sufre un error durante su funcionamiento, el
indicador de energía parpadeará en color naranja y oirá una alerta de
voz. Para buscar una solución, consulte la sección «Solución de
problemas».
Modo Suspensión
El aspirador con mopa activará automáticamente el modo suspensión
tras 10 minutos de inactividad. A continuación, se apagarán los
indicadores de energía y de carga. Para volver a activar el aspirador
con mopa, pulse algún botón.
Añadir agua o limpiar la almohadilla de la mopa
durante la limpieza
31 32

Mantenimiento rutinario
Contenedor de polvo y filtro
Nota: Se recomienda hacer una limpieza a la semana.
1. Abra la tapa del aspirador con mopa, apriete las pinzas del
contenedor para retirar el contenedor de polvo.
Limpiar el filtro lavable
Nota: Se recomienda hacer una limpieza cada dos semanas.
1. Abra la cubierta del contenedor en la posición marcada con las
flechas.
Nota: Solo debe utilizar agua limpia para limpiar el filtro. No utilice detergente.
No intente limpiar el filtro con un cepillo ni con los dedos.
2. Añada agua limpia al contenedor de polvo y cierre la tapa del
mismo. Agite el contenedor varias veces y, finalmente, extraiga el
agua. Repita estos pasos hasta que el filtro quede limpio.
2. Abra la tapa del contenedor como lo indica el diagrama.
Nota: Recomendamos limpiar el cepillo principal todas las semanas y reemplazarlo cada 6 o 12
meses.
Cepillo principal
1. Dele la vuelta al aspirador con mopa y pulse las pinzas para quitar el
protector del cepillo principal.
2. Saque el cepillo principal del aspirador con mopa y limpie los
rodamientos.
3. Utilice la herramienta de limpieza de cepillo incluida para eliminar
los pelos enredados en el cepillo.
4. Vuelva a colocar el cepillo principal y, a continuación, ponga el
protector y presione hasta que las pinzas encajen en su lugar.
Utilizar la herramienta de limpieza del cepillo
Protector del cepillo
principal
Rodamiento del cepillo
principal
Clips
Cepillo principal
33 34

Mantenimiento rutinario
Rueda
Eje
Soporte
Cepillo lateral
Nota: Recomendamos limpiar el cepillo lateral todos los meses y reemplazarlo cada 3 o 6 meses.
2. Vuelva a instalar el cepillo lateral.
1. Dele la vuelva al aspirador con mopa y extraiga el cepillo lateral
como se muestra en el diagrama siguiente para limpiarlo.
Almohadilla de la mopa
Nota: Debe limpiar la almohadilla de la mopa después de cada uso.
1. Tire de la almohadilla de la mopa del módulo de fregado para extraerla.
Rueda omnidireccional
Nota: Puede limpiar la rueda con agua y volver a ponerla cuando esté seca.
1. Dele la vuelta al aspirador con mopa y retire la rueda
omnidireccional.
2. Quite los pelos, la suciedad y otros desechos de la rueda y el eje.
3. Vuelva a insertar la rueda y presiónela firmemente en su sitio.
Nota: El filtro debe estar totalmente seco antes de utilizarlo (espere unas 24 horas).
3. Extraiga el filtro como se muestra en el diagrama, agite
enérgicamente para extraer el exceso de agua y, a continuación, deje
que se seque antes de volver a instalarlo.
Sensor de altura
Contactos de carga
Sensores del aspirador con mopa
Use un paño suave para limpiar todos los sensores del aspirador con
mopa, incluyendo:
1. Los cuatro sensores de altura de la base.
2. El sensor de desaceleración infrarrojo de la parte frontal.
3. Los contactos de carga de la parte inferior.
4. El sensor de movimiento de la base.
Sensor de
movimiento
Sensor de
desaceleración
infrarrojo
Nota: Extraiga la almohadilla del módulo de fregado antes de limpiarla. Asegúrese de que el agua
sucia no vuelva a entrar por la salida de agua para que no se obstruya. No presione demasiado la
almohadilla de la mopa, ya que podría dificultar su funcionamiento. La almohadilla debería estar
limpia antes de cada uso. Recomendamos cambiarla cada 3 o 6 meses.
2. Limpiar y secar la almohadilla de la mopa.
35 36

Mantenimiento rutinario
Batería
Nota: Si el aspirador con mopa no se utiliza durante un largo periodo de tiempo, apáguelo y
guárdelo. Para evitar daños por descarga, debería recargar el aspirador con mopa una vez cada
tres meses.
El aspirador con mopa contiene una batería de iones de litio de alto
rendimiento. Asegúrese de que permanezca bien cargada durante el
uso diario para que mantenga un rendimiento óptimo.
Actualizar el firmware
Puede actualizar el firmware a través de la aplicación. Antes de
actualizar, asegúrese de que el aspirador con mopa esté en la base de
carga y tenga al menos un 15% de batería.
El indicador de energía del aspirador con mopa parpadeará
rápidamente y de forma alternativa en blanco y naranja mientras se
esté actualizando el firmware.
Cargador
Limpie los contactos del cargador con un paño suave.
Reinicio del sistema
Si el aspirador con mopa deja de responder o no se puede apagar,
mantenga pulsado el botón durante 6 segundos para forzar el
apagado. A continuación, mantenga pulsado el botón durante 3
segundos para encender el aspirador con mopa.
Restaurar los ajustes de fábrica
Si el reinicio del sistema no funciona, utilice un alfiler para pulsar el
botón de reinicio hasta que oiga un mensaje de voz diciendo
«Restaurando ajustes de fábrica». Esto hará que el aspirador con mopa
restaure sus ajustes de fábrica.
Error
Error 1: Limpie y golpee suavemente el amortiguador.
Solución
Si el aspirador con mopa encuentra un error durante su funcionamiento, el indicador de energía parpadeará en color naranja y oirá una alerta de voz.
Para buscar una solución, consulte la tabla siguiente.
Si el amortiguador de choque se atasca, golpéelo suavemente para sacar los
objetos extraños. Si esto no funciona, mueva el aspirador con mopa a una
nueva zona y reactívelo.
Error 2: Coloque el aspirador con mopa en el suelo y
reactívelo.
Error 3: Limpie el sensor de altura, coloque el aspirador
en el suelo y reactívelo.
Hay una rueda que no está en contacto con el suelo. Coloque el aspirador con
mopa en el suelo y reactívelo.
Parte del aspirador no está en el suelo. Coloque el aspirador en el suelo y
reactívelo. Este error también puede producirse si el sensor de altura está
sucio. Para que esto no ocurra, limpie el sensor de altura.
Error 4: Retire el cepillo principal y limpie las cerdas y
los rodamientos.
Puede que haya un objeto extraño en el cepillo principal. Retire el cepillo y
limpie sus cerdas y rodamientos.
Error 6: Compruebe si hay algún objeto enrollado en
las ruedas principales, mueva el aspirador con mopa a
una nueva zona y vuelva a activarlo.
Puede que haya algún objeto extraño en las ruedas principales. Limpie las
ruedas y vuelva a activar el aspirador con mopa.
Error 7: Quite los obstáculos alrededor del aspirador
con mopa.
El aspirador con mopa puede quedarse atrapado o atascado. Quite cualquier
obstáculo que haya a su alrededor.
Error 8: Vuelva a instalar el contenedor de polvo y el
filtro.
Asegúrese de que el contenedor de polvo y el filtro estén bien instalados. Si el
error persiste, intente reemplazar el filtro.
Error 5: Retire y limpie el cepillo lateral. Puede que haya un objeto extraño en el cepillo lateral. Retire dicho cepillo y
límpielo.
Resolución de problemas
37 38
Other manuals for STYTJ01ZHM
1
Table of contents
Languages:
Other Mi Vacuum Cleaner manuals


