Micro Direct MicroLab User manual

MicroLab
Operating Manual
Federal (USA) law restricts this device to sale by or on
the order of a physician or licensed practitioner.
MAN1300
085-73
Issue 1.6
February 2019
Micro Direct, Inc.
803 Webster Street
Lewiston, ME 04240
1-800-588-3381
www.mdspiro.com
Mail In Yellow Warranty Card
Receive 25 PFT Filters
FREE!!

Indications for Spirometry
Spirometry has been used extensively to measure lung function capability and to
recognize and treat many diseases associated with the impairment of healthy lung
functions. Spirometry today provides great insight into the status of any person’s
health.
Generally speaking, spirometry is a simple diagnostic tool used to define a subject’s
lung condition. The major indications for spirometry are:
✓Dyspnea (shortness of breath)
✓Exercise induced coughing
✓Chest tightness
✓Smokers over 45 years of age (NLHEP recommendations)
✓Obesity
✓Pre-operative testing
✓Occupational exposure to dust and/or chemicals
✓Ongoing assessment of patients receiving bronchodilator treatments
✓Determination and/or documentation of pulmonary disability
✓Asthma diagnosis
✓Pre-existing pulmonary disease
✓Frequent colds
✓Assessment of congestive heart failure
CPT Codes for Spirometry
94010 - Spirometry Complete
Includes graphic record total and timed vital capacity, expiratory flow rate
measurement (s) with or without maximal voluntary ventilation
94060 - Bronchodilation Responsiveness
Spirometry as in 94010, pre-and post-bronchodilator or exercise
94070 - Bronchospasm Provocation Evaluation
Multiple spirometric determinations after bronchodilator with spirometry as in
94010
94150 - Vital Capacity
Total (separate procedure)
94200 - Maximal Voluntary Ventilation
Maximum breath capacity
94375 - Flow Volume Loop
Respiratory Flow Volume Loop
95070 - Inhalation Bronchial Challenge Testing
(Not including necessary pulmonary function tests), with histamine, methacholine
or similar compounds.
94464 - Bronchodilator Administration
Demonstration and/or evaluation of patient utilization of an aerosol generator,
nebulizer and meter dose inhaler or IPPB device
Diagnosis and ICD-10-CM Codes on back cover

Contents
Introduction.........................................................................1
Contraindications................................................................1
Warning and Cautions........................................................2
Indication for Use................................................................2
Overview ............................................................................4
Getting Started ...................................................................5
Calibration Check (Verification).........................................14
Customization...................................................................17
Administration Mode.........................................................18
Paper Loading..................................................................19
Switching Off ....................................................................20
Charging Procedure..........................................................20
PC connection using SPCS..............................................20
Looking after your Spirometer...........................................21
Product Lifetime................................................................21
Cleaning Instructions........................................................21
External Surfaces of the Spirometer.................................21
Cleaning the Accessories .................................................22
Cleaning the Transducer...................................................22
Servicing...........................................................................23
Troubleshooting Information.............................................24
Safety Designation per IEC 60601-1.................................26
Electromagnetic Compatibility (EMC) to IEC 60601-1-2....27
Symbols............................................................................31
Specifications ...................................................................32
Spirometry Measurements................................................32
Consumables / Supporting Products.................................34
ICD-10 Codes for Spirometry............................................35

1
Introduction
The MicroLab is a mains/battery operated portable spirometer with the
unique combination of ease of use and sophistication. Ease of use is
assured using context sensitive help screens, accessed at a touch of a
button, that explain every MicroLab feature.
The MicroLab uses a Digital Volume Transducer, an extremely stable
form of volume transducer, which measures expired air directly at B.T.P.S
(Body Temperature and Pressure with Saturated water vapor) thus
avoiding the inaccuracies of temperature corrections. The transducer is
insensitive to the effects of condensation and temperature and avoids the
need for individual calibration prior to performing a test
Test results may be uploaded to a PC using the optional Spirometry PC
Software and patient details may be downloaded to the MicroLab.
Stored data may be printed to the integral thermal or uploaded to a PC
using the optional Spirometry PC Software (SPCS).
Contraindications
Contraindications: It is recommended that patients should
not be tested within one month of a myocardial infarction.
Conditions where suboptimal spirometry are likely:
•chest or abdominal pain
•oral or facial pain exacerbated by a mouthpiece
•stress incontinence
•dementia or confused state
Ref: ATS/ERS Task Force: Standardization of Lung
Function Testing. General considerations for lung function
testing.
M. Miller et al. Eur Resp J 2005:26. 153-161

2
Warning and Cautions
The following terms are used as follows in this manual
CAUTION: Possibility of injury or serious damage
WARNING: Conditions or practices that could result in personal injury
Note: Important information for avoiding damage to the instrument or
facilitating operation of the instrument.
Note: Patients below the age of four (4) may struggle to perform
spirometry correctly and reproducibly.
Note: The device should be used by trained and qualified personnel.
Indication for Use
The MicroLab spirometer is intended, for prescription use only, to
measure the maximal volume and flow of air that can be moved in and
out of a patient's lungs.
The system is intended for use with pediatric (4 to 17 years) and adult (18
to 99 years) patients in hospitals, physician offices, laboratories and
occupational health testing environments.
3
CAUTION: Read the manual before use.
WARNING: The instrument is not suitable for use in the presence of
explosive or flammable gases, flammable anesthetic mixtures or in
oxygen rich environments.
CAUTION: Mouthpieces are single patient use. If used on more than one
patient, there is a risk of cross-infection. Repeat use may degrade
materials and lead to an incorrect measurement.
CAUTION: Pulmonary filters are single patient use. If used on more than
one patient, there is a risk of cross-infection. Repeat use may increase air
resistance and lead to an incorrect measurement.
PLEASE NOTE: The product you have purchased should not
be disposed of as unsorted waste. Please utilize your local
recycling facility for the disposal of this product.
PLEASE NOTE: Degree of protection against Ingress of Water is IPX0.
WARNING: To avoid risk of electric shock, this equipment must only be
connected to a supply mains with protective earth.
WARNING: Do not connect devices that are not specified as part of the
system.
4
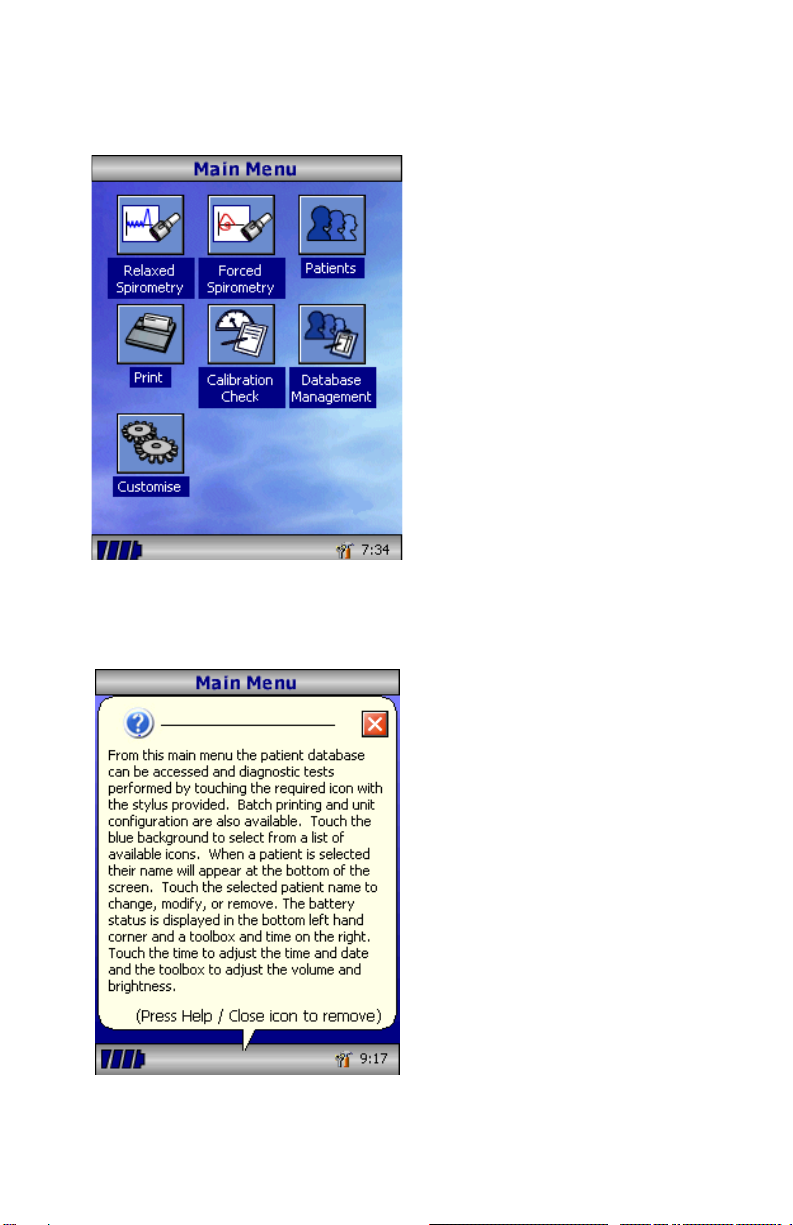
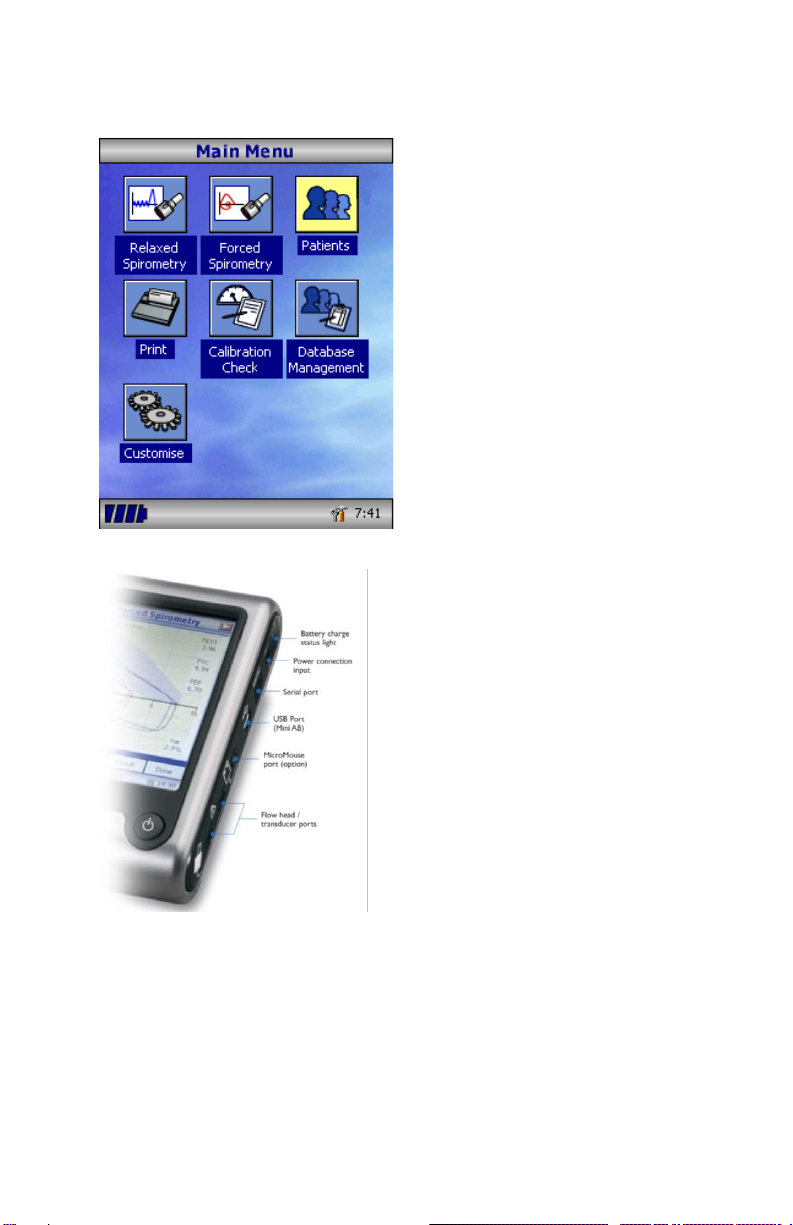
Overview
The MicroLab uses a touch screen
with icons representing each function
available. A stylus, housed in the left-
hand side of the unit, is provided for
icon screen activation.
Touch the displayed time to adjust
time and date. Touch the toolbox icon
to adjust volume and brightness.
Unused icons may be disabled by
touching the blue background and
selecting from the list displayed.
Four levels of battery charge are
indicated by the segmented battery
icon. When this icon turns red the
battery is nearly exhausted and the
batteries must be charged –see
Charging Procedure.
.
The complete functionality is described
on the help screen.
This is obtained by pressing the help
button (?).
Help text exists for every screen
viewed during the operation of the
MicroLab.
You are recommended to make full
use of the extensive Help screens
provided.
5
Getting Started
When performing a spirometry
test, the recommended workflow
is to enter the patient’s details, or
retrieve them from memory,
perform the required test and
then print and save the results.
Please ensure that the turbine
transducer is plugged in to either
of the two sockets on the right-
hand side of the instrument.

6
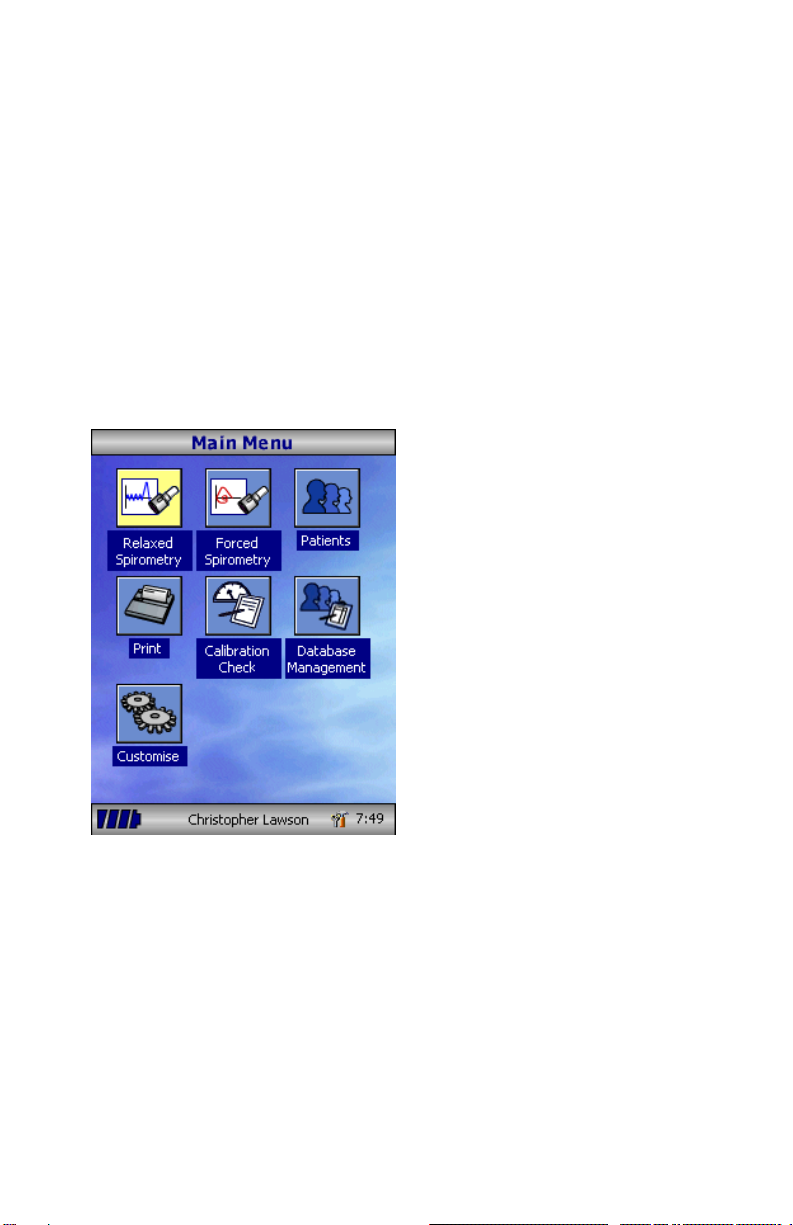
Select the ‘Patients’ icon to enter the
patient database.
The required patient may be selected
from the stored patient list.
If the patient details have not been
previously stored, select ‘Add’ to
enter the new patient’s details. The
patient details may also be
downloaded from the optional
Spirometry PC Software.
Once selected, the patient’s name
will appear at the bottom of the
screen.
Use the help button to obtain further
information.
To add a patient to the database, use
the on-screen keyboard to type a
unique patient ID and then touch the
enter key.
You will then be prompted for Last
Name, First Name, Sex, Ethnic
Origin, Height, Weight, date of Birth
and Factor.
A factor can be applied when testing
individuals of other ethnic origins who
would not normally be tested against
the countries set of predicted values.
The factor alters the predicted value
set on volume indices by the
percentage applied. If NHANES
predicted values are selected, then
the ethnic origin field should be
chosen but a factor correction is not
required.
7
The following factors are recommended when using ECCS normal
values:
Hong Kong Chinese 100%
Japanese American 89%
Polynesians 90%
North Indians and Pakistanis 90%
South Indians and those of African descent 87%
Ref: Lung Volumes and Forced Ventilatory Flows. P.H. Quanjet et al. Eur
Respir J, 1993, 6, Suppl. 16p5-40.
Once all the patient details are
added, the patient is added to the
database and the main menu is
displayed with the patient name
displayed at the bottom of the screen.
From the main menu select the
required test, by touching the icon
with the stylus.
If the displayed patient is not required
for testing, touch the patients name
and options to change or remove the
current patient will become available.
8
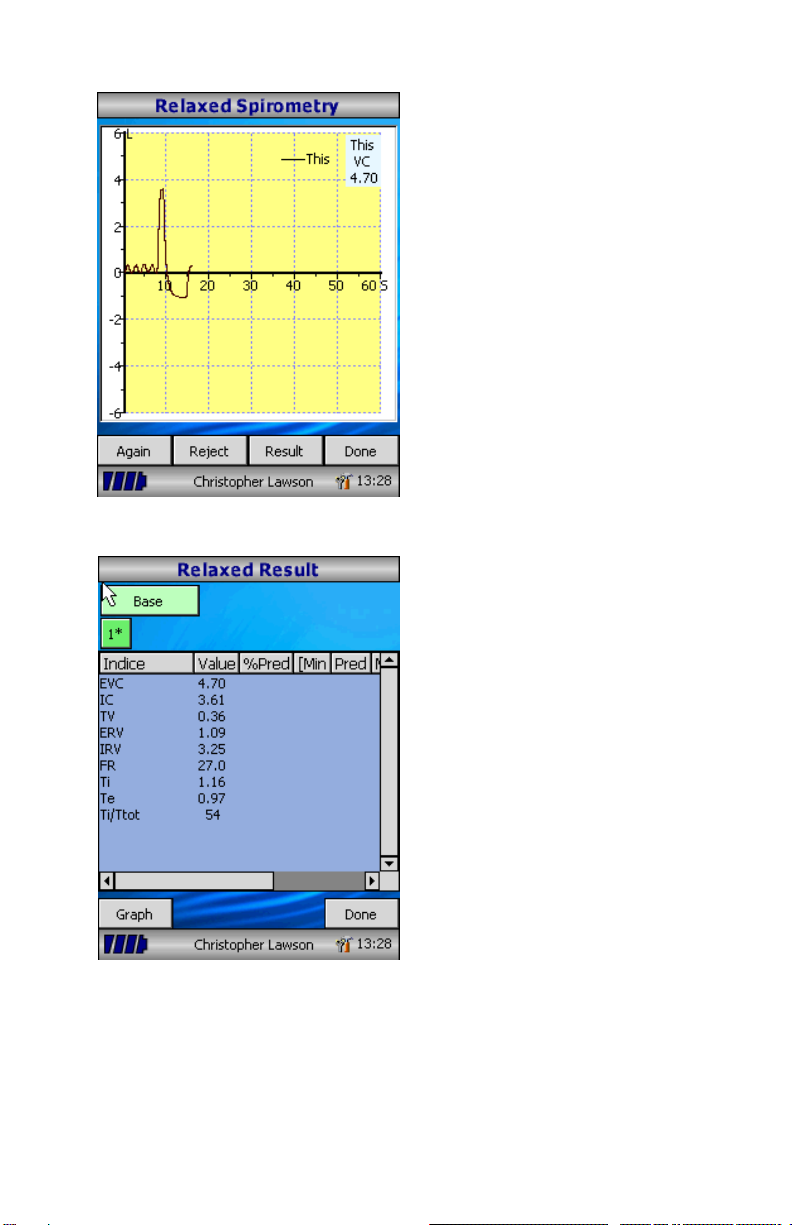
If Relaxed Spirometry is selected, a
volume/time graph will be displayed.
Note the unit may be customized to
perform a relaxed Vital Capacity with
tidal breathing or from a single
expiration or single inspiration.
When a maneuver has been obtained
select ‘Results’ to view the indices,
‘Again’ to repeat the maneuver,
‘Reject’ to delete the maneuver or
‘Done’ to end the test.
All the active indices are displayed for
any of the maneuvers selected
together with an option to review the
volume/ time curves. The active
indices listed can be changed by
using the customization option.
Select ‘Done’ to proceed to the
Spirometry Main Menu.

9
From this menu, the results of the test
may be viewed, saved, or printed and
notes may be added.
It is also possible to proceed to a
forced baseline spirometry test, or a
post medication relaxed spirometry
test.
Select ‘Exit’ when all the required
functions have been used.
If forced spirometry is selected the
default graph will be displayed.
This may be changed by touching
the arrows at the top of the screen.
Flow/Volume, Volume/time or child
incentive default displays may be
selected using the customize option
from the main menu.
When the spirometry maneuver has
been completed options to repeat
the test, reject the test, and view
results will be available.
At the end of the test options to
view results, save results, print
results, and to add notes will be
available from the spirometry main
menu.

10
Select the MVV icon to select this
mode of testing and the display will
instruct the patient to start
breathing hard to commence the
test.
It is recommended that the patient
perform 3 tidal breathing
maneuvers prior to performing hard
and fast rapid breathing (required
for the MVV maneuver).
The patient should be instructed to
tidal breath. The tidal breaths are
automatically detected prior to
commencing the MVV maneuver.
Once tidal breathing is complete,
the display will change and an
audible beep heard to instruct the
patient to start rapid, fast
breathing. The start button should
be touched using the stylus to start
registering the MVV maneuver.
11
The current maneuver will be
displayed in black. During the
maneuver, the breath rate (BR)
will be displayed in green if the
breath rate is acceptable (> 65
breaths per minute). If the breath
rate falls below this level, it will be
displayed in red to show the
operator that the patient needs to
be instructed to breathe harder
and faster during the maneuver.
After 12 seconds of hard, fast and
rapid breathing, the display will
show a green line indicating 12
seconds of the maneuver have
elapsed –the patient should be
encouraged to continue until the
display changes to signify the end
of the test. The MVV rate, the %
variation between maneuvers, the
breath rate and an ATS quality
warning for the maneuver will be
displayed.
Note: The patient’s effort is acceptable when patient made a maximum
effort indicated to the user by the breath rate being displayed in green (>
65 breaths per minute); and the maneuver lasted a full 12 seconds
indicated by a green line being displayed. The patient should ideally
continue until the test is automatically terminated at 15 seconds with no
interruption (i.e. did not cough)
12
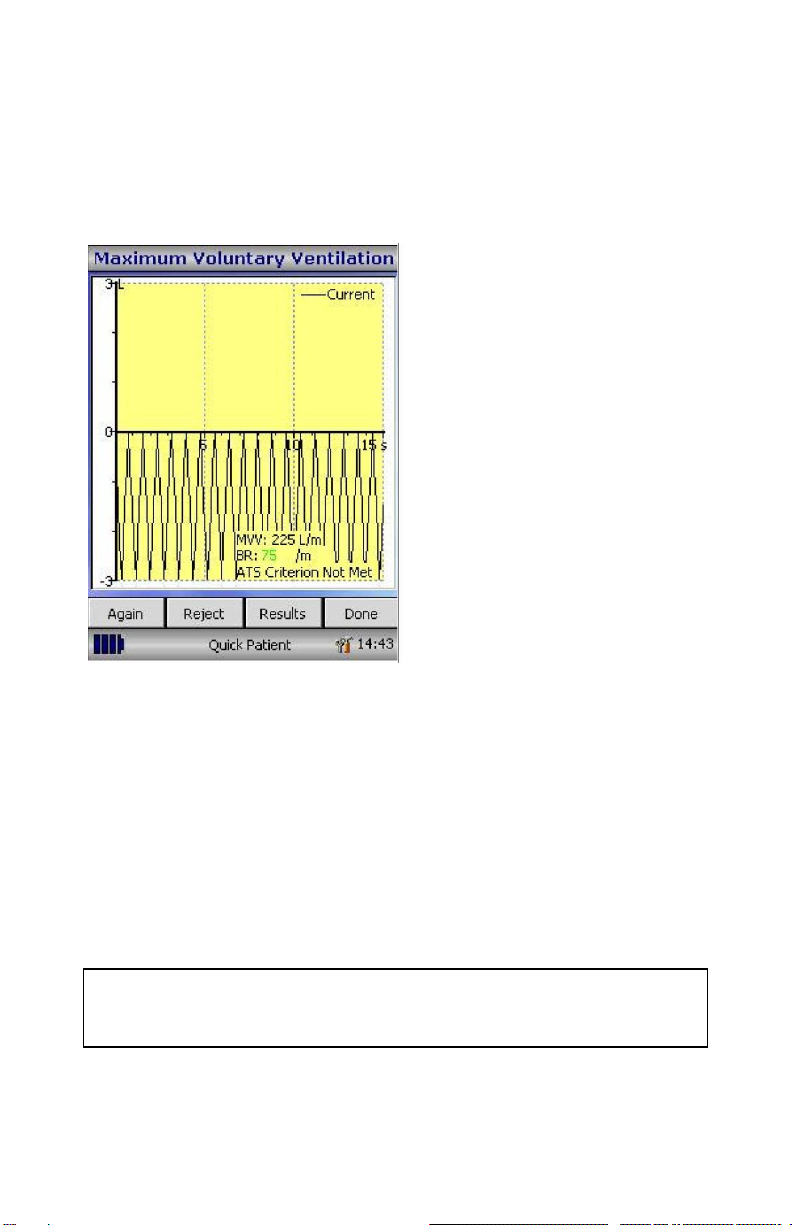
Once the test has finished, the
display will show current test
(shown in black –if more than one
maneuver has been performed,
the best maneuver will also be
displayed in blue) the MVV rate,
the % variation between
maneuvers, the breath rate and
the ATS quality warning for the
test session.
Select ‘Again’ to repeat the
maneuver, ‘Reject’ to reject the
current maneuver, ‘Results’ to
display a list of indices, the values
obtained, % predicted where
applicable and a quality statement
concerning the test session.
To meet the ATS quality criteria
for a good blow, the maneuver
should last 15 seconds with a
breath rate greater than 65
breaths per minute. The ATS
reproducibility criterion is two
maneuvers with a good blow and
the MVV variability between
maneuvers should not exceed
20%.
Note: The MVV test is an exhausting test. It should not be repeated
without a rest period. Some elderly or ill people cannot repeat this test
even after the rest period.

13
Select ‘Back’ to return to testing
and the current maneuver.
NOTE: If the breathing rate is
insufficient (less than 65 breaths
per minute) then the BR value will
be displayed in red –an MVV
value will be calculated and a
message displayed that the MVV
results was extrapolated from a
maneuver with a poor breath rate.
Once the number of maneuvers
has been completed and the test
session has finished, select ‘Done’
and the results with selected
indices will be displayed. Each
maneuver will be numbered and
the best maneuver highlighted
with an asterisk (*). Select
‘Graphs’ to view the graphs of the
currently selected maneuver and
best maneuver. Select ‘Set Best’
to manually select the best
maneuver. Select ‘Done’ to return
to the main MVV menu.

14
Once testing is complete the MVV
main menu will be displayed
Select the appropriate icon to
allow a Post 1 MVV test to be
performed, View Results, Print
Results, add notes for the patient’s
examination, Save the tests or Exit
to return to the main spirometer
menu.
Calibration Check (Verification)
The spirometer is calibrated to read in liters at Body Temperature,
Barometric Pressure Saturated with water vapor (BTPS).
The calibration should remain stable indefinitely, unless the transducer is
physically damaged, and the unit should not require re-calibration.
However, to ensure the correct functioning of the unit, it is recommended
that a calibration check (verification) is performed periodically and after
the transducer was removed for cleaning.
15
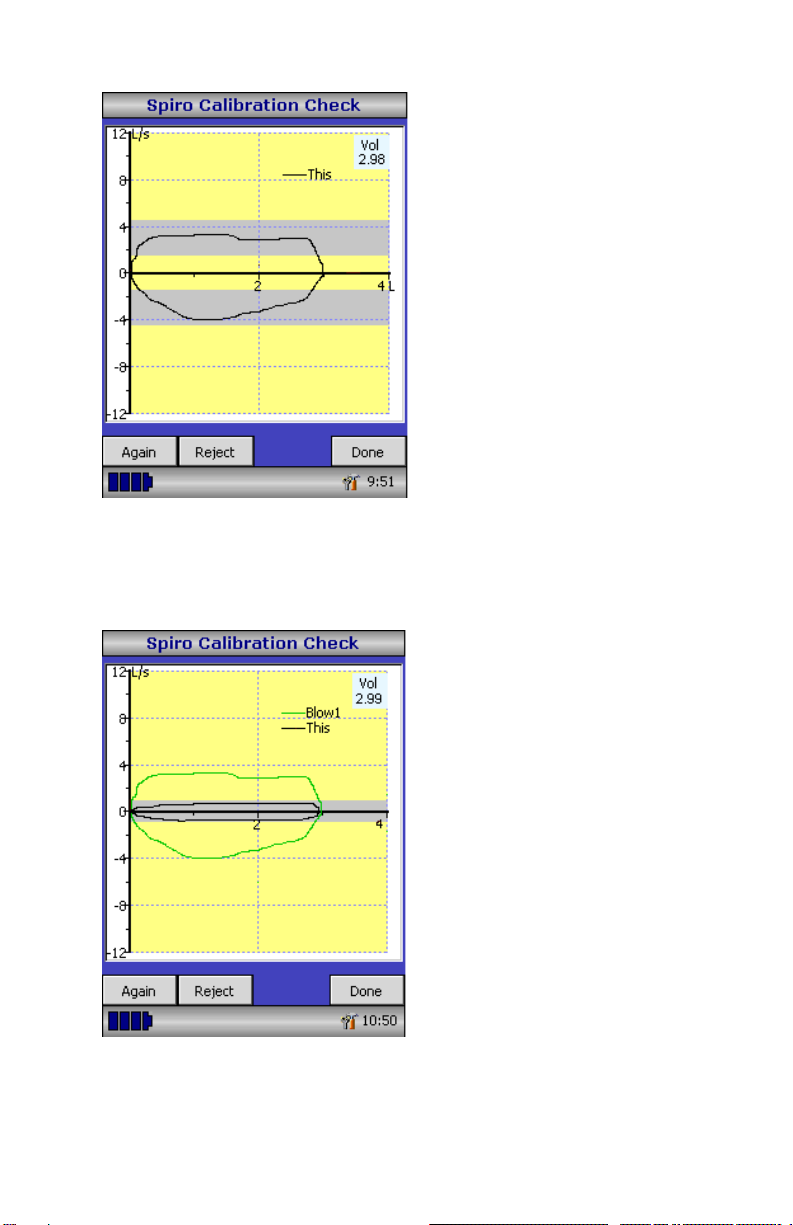
Connect a 3-liter syringe to the
transducer with the minimum of
adapters and empty by pushing the
handle fully in.
Note: It is recommended that the
transducer is disinfected prior to a
calibration check (verification) or a
SpiroSafe filter is used during the
procedure.
Select ‘Calibration Check’ from the
main menu and then select ‘Check
Calibration’.
Fill the syringe by pulling the
handle at a constant rate until the
end stop is reached and then
immediately empty the syringe
completely. Try to maintain a flow
rate that keeps the trace within the
grey bands on the display.
Select ‘Reject’ to retry the
calibration check (verification) at
the required flow rate.
Select ‘Again’ to repeat the
calibration check (verification) at a
low flow rate.
Select ‘Again’ to repeat the
calibration check (verification) at a
high flow rate.
When a calibration check
(verification) at all three flow rates
has been completed select ‘Done’
to view the calibration check
(verification) report screen.

16
The calibration error for expiration
and inspiration at each flow rate
are displayed. The calibration
error should be less than 3.5%. If
a greater error is shown, repeat
the procedure ensuring that the
syringe is emptied and filled in a
smooth manner without jerking the
handle. If an error greater than
3.5% is still shown, inspect the
turbine transducer and clean if
necessary.

17
Customization
The ‘Customize’ option from the main menu may be used to configure
many of the features of your MicroLab and are divided into system,
spirometry options and MVV options.
System options allow you to configure the following:
Language
Height and weight units
Date format
Date separator
Personalized printout heading
Spirometry options allow you to configure the following:
Relaxed spirometry mode (with or without tidal breathing)
Predicted value sets
Predicted area or line display
Display default
Incentive display type
Printed graphs
Best test criteria
Interpretation and Lung Age indication
Dyspnea score and smoking status
Daily calibration reminder
Manual temperature adjustment
Indices selection
MVV options allow you to configure the following:
Choice of predicted values
Display ambient temperature during MVV test
Include graph of MVV maneuver in the final printout
Note: that when the language is selected, the height and weight units,
date format, and date separator will be automatically changed. However,
this automatic selection may be overridden manually.
Table of contents
Other Micro Direct Medical Equipment manuals


Popular Medical Equipment manuals by other brands


DJO Global
DJO Global Aircast VenaFlow Elite S manual

College Park
College Park venture Technical instructions

Dräger Medical
Dräger Medical NeoFlow ADDENDUM TO OPERATING INSTRUCTIONS

Westmed
Westmed Circulaire II Hybrid manual

ulrich medical
ulrich medical golden gate CS 3715 Assembly and disassembly instructions with special cleaning instructions

3M
3M Elipar DeepCure-L manual