Micro Direct Micro I User manual

Micro I Diagnostic Spirometer
Operating Manual
Federal (USA) law restricts this device to sale by or on the
order of a physician or licensed practitioner.
Micro Direct, Inc.
803 Webster Street
Lewiston, ME 04240
1-800-588-3381
www.mdspiro.com
122-14
Issue 1.8 MD
February 2019

CONTENTS
Introduction................................................................................1
Package Contents......................................................................2
Contraindications, Warnings and Cautions.................................3
Intended Use..............................................................................5
Environment...............................................................................5
Getting Started...........................................................................5
Configuration..............................................................................6
Micro I PC Software...................................................................6
Operation.................................................................................11
Main Menu Overview ...............................................................11
Quick Exam..............................................................................12
Exam with Predicted Values..................................................... 13
Post BD Exam..........................................................................17
NLHEP Mode...........................................................................17
NLHEP Quality Checks............................................................18
NLHEP QC Grades..................................................................19
NLHEP Interpretation...............................................................19
Switching Off............................................................................19
Maintenance ............................................................................20
Battery Management................................................................20
Battery Replacement................................................................ 21
Calibration Check.....................................................................23
Cleaning Instructions................................................................ 24
Cleaning the Transducer..........................................................24
Servicing..................................................................................25
Product Lifetime.......................................................................25
Troubleshooting Information.....................................................25
Safety Designation per IEC 60601-1........................................ 26
Electromagnetic Compatibility (EMC) to IEC 60601-1-2...........27
Symbols................................................................................... 31
Specifications of the Micro I ..................................................... 33
Accessories..............................................................................34
Customer Contact Information .................................................34

1
Introduction
The Micro I is a compact, rechargeable battery operated and fully
portable diagnostic spirometer. It is accurate to the requirements
of the ATS/ERS TASK FORCE: STANDARDIZATION OF LUNG
FUNCTION TESTING 2005. Its ergonomic and user-friendly
design allows diagnostic spirometry measurements, including
predicted values and automatic interpretation, to be made quickly
and simply.
The Micro I features include:
✓Measures FEV1, FVC(FEV6), FEV1/FVC, FEV1/FEV6,
PEF, FEF25, FEF75 and FEF25-75
✓Fully configurable using software supplied
✓ECCS, Asian, NHANES III Kainu (2016) Finnish, Quanjer
GLI (2012) or Quanjer GLI (2012) + ECCS predicted
values
✓Variation from norm as a percentage or Z-score
✓NLHEP, NICE or the ATS/ERS interpretation
✓Spirometry maneuver quality checks
✓Post bronchodilator comparison
✓NLHEP compliant mode
✓Upload of the last patient tested for report generation
either to be printed directly or saved as a PDF document
and printed or stored in the patient’s electronic medical
records.
The spirometer uses a digital volume transducer, an extremely
stable form of volume transducer, which measures expired air
directly at B.T.P.S. (Body Temperature and Pressure with
Saturated water vapor) thus avoiding the inaccuracies of
temperature corrections. This transducer is insensitive to the
effects of condensation and temperature and avoids the need for
individual calibration prior to performing a test.

2
Micro Direct can supply spirometers to fulfil all your diagnostic and
monitoring spirometry needs.
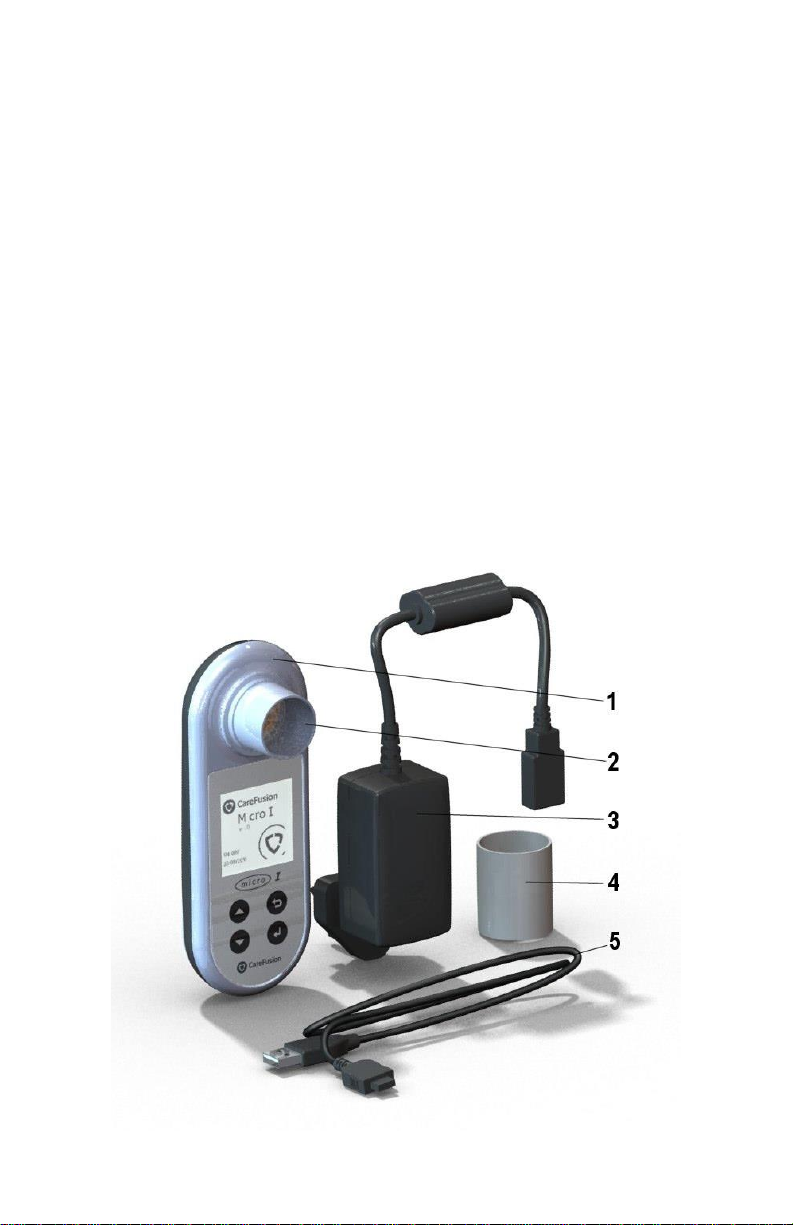
Package Contents
The Micro I is packaged in a convenient carrying case and comes
complete with the following items:
1Micro I Spirometer
2 Digital Volume Transducer with disposable cardboard
mouthpieces and instruction manual.
3Universal power supply (PSU1017 5VDC 1.2A)
4 Cardboard mouthpiece adapter
5 USB/charging cable

3
Contraindications, Warnings and Cautions
Contraindications: It is recommended that patients should not be
tested within one month of a myocardial infarction.
Conditions where suboptimal spirometry are likely:
•chest or abdominal pain
•oral or facial pain exacerbated by a mouthpiece
•stress incontinence
•dementia or confused state
Ref: ATS/ERS Task Force: Standardization of Lung Function
Testing. General considerations for lung function testing.
M. Miller et al. Eur Resp J 2005:26. 153-161
The following terms are used as follows in this manual:
Caution: Possibility of injury or serious damage
Warning: Conditions or practices that could result in personal
injury.
Please Note: Important information for avoiding damage to the
instrument or facilitating operation of the instrument.
Note: The device should only be used by trained and qualified
personnel.

4
WARNING: The instrument is not suitable for use in the
presence of explosive or flammable gases, flammable
anesthetic mixtures or in oxygen rich environments.
WARNING: With any other use as described in cleaning
instructions, the volume transducer, mouthpiece adapter and
the pediatric adapter must be cleaned between patients.
WARNING: Use of portable phones or other radio frequency
(RF) emitting equipment near the system may cause
unexpected or adverse operation.
CAUTION: Mouthpieces are single patient use. If used on
more than one patient, there is a risk of cross-infection.
Repeat use may degrade materials and lead to an incorrect
measurement.
CAUTION: Pulmonary filters are single patient use. If used
on more than one patient, there is a risk of cross-infection.
Repeat use may also increase air resistance and lead to an
incorrect measurement.
CAUTION: Do not allow the patient to handle the spirometer
when connected to either the power supply for charging or to
a PC when configuring the unit.
WARNING: The user must not touch any voltage-carrying
parts and the patient at the same time.
PLEASE NOTE: Degree of protection against Ingress of
Water is IPX0.
CAUTION: Read the manual before use
PLEASE NOTE: The product you have
purchased should not be disposed of as unsorted
waste. Please utilize your local recycling facility
for the disposal of this product.

5
Intended Use
The Micro I Spirometer is intended to measure the maximal
volume and flow of air that can be moved out of a patient’s lungs.
The system is intended for use with pediatric and adult patients
over the age of 3 years in hospitals, physician offices, laboratories
and occupational testing environments.
Environment
Please observe the following precautions:
✓Avoid exposing the Micro I to direct sunlight.
✓Avoid operating the spirometer in dusty conditions or near
heating appliances or radiators.
✓Do not keep the spirometer in a damp place or expose it to
extreme temperatures.
✓Do not direct the transducer holder towards a strong light
source while operating the spirometer.
Getting Started
It is recommended that the Micro I spirometer be fully charged
before use. The power supply is provided with separate UK, USA
and European plugs. Connect the required plug to the power
supply and plug into an electrical outlet. Connect the Micro I to the
power supply using the USB/charging cable and the charging
symbol will appear on the screen.
Fully charge for a minimum of five (5) hours when used for
the first time.
NOTE: When disconnecting the USB cable from the Micro I,
make sure to squeeze both sides of the jack to unlock the
cable from the unit.
Remove the protective film from the display screen before use.

6
Configuration
When the unit is first turned on, it may be configured for your
region. This will set the language, height and weight units, date
format and predicted values set appropriate for your region. It will
also configure the indices to be displayed and whether a percent
predicted, or Z-score is to be used to show variation from the
norm. However, all these setting may be customized using the PC
software supplied.
Turn the unit on by pressing the on/off button located at the top of
the device and the following will be displayed:
Use the up and down arrow keys to highlight the required country
and then press ‘Enter’ ( ). This procedure is only required
when the unit is first switched on and the selection will be stored
for future use.
It is recommended that the PC software be used to adjust these
settings, if required. Connect Micro I to the PC using the USB
cable supplied. Run the software and turn on the Micro I. The PC
software will detect when the Micro I is connected. Follow the
onscreen instructions to configure your unit.
Micro I PC Software
This software allows you to customize the settings on your Micro I
spirometer and allows full spirometry reports containing patient
demographics, indices and flow volume and volume time graphs
to be generated and saved as a PDF file or printed. Once

7
successfully installed, comprehensive help is available through the
Help menu when using the application.
System Requirements
Micro I PC Software requires certain hardware and software
components in order to run properly.
PC Requirements
An IBM-compatible PC is required with hardware that meets or
exceeds the following minimum requirements.
Processor: 800 MHz or above
RAM: 256 MB
Free Disk Space: 50 MB
Video: 800x600, 256 colors. It is recommended that a resolution
of at least 1280x1024 be used to enable the full benefits of the
multi-window interface.
At least one free USB port.
Operating System Requirements
Micro I PC Software will run on the following operating systems:
Windows 7 32/64 bit
Windows 8.1 64 bit
Windows 10 64 bit
Installing Micro I PC Software
Before you begin, please ensure your computer meets the
minimum system requirements and the user installing the software
has administrative user rights.
Close any other applications that are running.

8
Insert the installation CD into your CD-Rom drive.
The setup program should launch automatically, displaying the
welcome dialog box, click ‘Next’ to continue. If the setup program
does not launch automatically use Windows Explorer to manually
select the CD drive, then open the file named Micro I PC
Software.exe.
The license agreement will be displayed. Please read the
complete document and ensure you understand fully before
accepting the terms of the license. Click ‘Next’ to continue.
The select destination location dialog box will be displayed
showing the directory where the Micro I PC Software will be
installed. The default location is:
C:\Program Files\Vyaire\Micro I PC Software
To change this location, select ‘Browse’.
Click ‘Next’ to display the Select program manager group dialog
box. This will be the location where the Micro I PC Software
launch icon will be placed under the Start Menu. Either a new
location can be entered, or an existing location used.
Click ‘Next’ to display the installation option dialog box containing
the following option:
Add Micro I PC Software icon to the desktop.
Click ‘Next’ to start copying the files to your system.
Once the files have finished copying to your system, you will be
advised that the Micro I PC Software has been successfully
installed and it would be advisable to restart your PC before using
the application. Click ‘Finish’ to complete the installation process.

9
Running Micro I PC Software
Connect your Micro I to a USB port on the PC using the cable
provided. The Micro I will take power from the USB port on the
PC. Please be advised that the Micro I requires a high current
USB port and if connected to a lower power USB port the device
will turn itself off and fail to respond to any key presses until
disconnected. Low power USB ports are commonly found on
keyboards and unpowered USB hubs and should not be used.
While connected to the PC, the Micro I will display:
Do not allow the patient to handle the spirometer during this
procedure.
The Micro I PC software will automatically be launched when a
Micro I unit is connected to the PC, the first screen will show:

10
From this screen you can enter an ID and the patient’s name to
generate a report. The patient options allow the last results to be
uploaded from the Micro I and print preview of the report can be
view in preparation of printing or alternatively a PDF of the report
can be generated for saving to a specified location.
Please note: The patient ID can contain a maximum of 20
characters.
Please note: If Quanjer-GLI (2012) predicted values are selected,
the number of indices are limited to those of the published set, it is
also not possible on the printed report to have a predicted area on
the flow volume or volume time graphs.
In the Actions section the user has the choice of two options either
change the device settings or adjust the Micro I internal clock.
When the settings option is used, the display will change to:
By selecting the ‘Custom’ option at the top of the screen, all of the
Micro I features may be tailored to your specific requirements.

11
NOTE: When disconnecting the USB cable from the Micro I,
make sure to squeeze both sides of the jack to unlock the
cable from the unit.
Operation
The Micro I is designed to suit a range of applications from the
very simplest spirometry test where only a few indices are
required to be displayed to more complex operation where
deviation from the norm, bronchodilator response and
interpretation of results are required.
The main menu is displayed after the initial configuration and
subsequently when the unit is turned on:
Main Menu Overview
Quick Exam
Use this function to take an immediate spirometry measurement
with no predicted values or interpretation.
Exam with Predicted
This function requires the entry of the patient’s demographics so
that predicted values and interpretation may be calculated and
displayed.
Post BD Exam
This function allows the post bronchodilator response to be
measured. The response is measured with respect to the
previously measured baseline obtained using either the Quick
Exam or the Exam with Predicted options. The last recorded

12
baseline examination is automatically stored when the unit is
turned off and will be available for a post bronchodilator
comparison when the unit is turned on.
Last Results
This option is used to view the results of the last stored
examination.
Settings
This option allows the user to adjust various settings including
date, time and language and to perform a calibration check.
Quick Exam
After selecting this option, the display will change to:
The Micro I may be used with a SpiroSafe filter or a MicroCheck
disposable cardboard mouthpiece with the adapter supplied.
Insert mouthpiece or SpiroSafe filter into the mouthpiece holder of
the spirometer.
Instruct the patient to inhale as deeply as possible, seal their lips
around the mouthpiece and exhale as hard, as fast and as long as
possible until no more air can be exhaled.
The spirometry results for that blow are then displayed together
with the maneuver quality check based upon ATS/ERS guidelines:

13
Further indices, if configured and the best results from a sequence
of blows may be displayed by pressing the down key.
Each maneuver is quality checked for a slow start, abrupt end,
short blow, poor effort or cough according to ATS/ERS 2005
guidelines.
Please note the percentage of predicted value and the
interpretation is not available for the Quick Exam option.
Press ‘Enter’ ( ) to display:
To repeat the test, select ‘Blow Again’ and press ‘Enter’ ( ).
Exam with Predicted Values
When this option is selected, the following is displayed:
The date of the birth displayed will be the last patient tested (in the
case of a new unit, the last test performed was a calibration test),
select ‘No’ to enter the date of the birth of the patient to be tested
or ‘Yes’ to confirm the date of birth is correct.
If ‘No’ is selected, the screen will change to allow the correct date
of birth to be entered. Use the up and down keys to enter the date

14
of birth and press ‘Enter’ ( ) key after each correct entry has
been made.
If ‘Yes’ is selected and the date of birth is correct, the patient
details screen will be displayed.
The up and down keys should also be used to adjust the patient’s
age and then press ‘Enter’ ( ). Repeat for gender, height (will be
configured to accept height in inches) and racial origin. If a
mistake is made, simply touch the ‘Back’ () key to go back to the
previous entry.
The racial origin selected applies a percentage drop to the
volumetric predicted values to be applied for the patient.
These ethnic corrections for ECCS are as follows:
Press ‘Enter’ () when the required correction has been selected.

15
If NHANES III or Quanjer-GLI (2012) predicted values are used,
the ethnic origin will be used according to the author’s equations.
Please note the Micro I may be configured to accept height in
centimeters.
If a mistake is made, simply touch the back key to go back to the
previous entry.
When all the patient data has been entered, the following screen
will be displayed, and a spirometry test may be performed:
After performing a test, the results are displayed:
Each maneuver is quality checked for a slow start, abrupt end,
short blow, poor effort or cough according to ATS/ERS 2005
guidelines. An asterisk (*) at the end of the line denotes a result
below the lower limit of normality.
If additional indices were chosen during configuration, press the
down key to view these.

16
When a sequence of blows is recorded, the results and the quality
check refer to the current blow but the interpretation is based upon
the best result of the sequence.
Use the down arrow to see further indices, if configured, and the
best results from a sequence of blows:
At any time when the results are displayed another spirometer test
may be performed by touching the ‘Enter’ ( ) key. If the enter key
is touched accidently, simply press the back ()key to return to
the results screen.
The Micro I may be configured to display the Z score instead of
the percentage of predicted values where data from the predicted
value sets are available:
The Z score is the number of standard deviations that the results
are above (positive Z score) or below (negative Z score) the
predicted value.

17
Post BD Exam
Once satisfactory baseline tests have been recorded, a post
bronchodilator examination may be performed by selecting the
Post BD Exam option from the main menu. When these tests are
performed, the percentage of predicted value is replaced by the
percentage change from the best baseline result for each index:
Using the down key will display the other indices and the best
results as with the baseline blows.
NLHEP Mode
This mode of operation is obtained by selecting the USA (NLHEP)
option from the configuration menu when the unit is first turned on
or subsequently from the settings option on the main menu.
In this mode the functionality of the Micro I becomes fully
compliant with the National Lung Health Education Program
requirements.
Only FEV1, FEV6and FEV1/FEV6are displayed and stored,
quality checks are applied to every maneuver and a quality
grading score for the test session is displayed:

18
NLHEP Quality Checks
For the interpretation to be displayed, a maneuver must pass a set
of enhanced quality checks. After the patient has performed a
poor-quality maneuver, one of the three following messages will
appear:
Message
Criteria
Recommended action
Don’t
hesitate
Back-extrapolated
volume (BEV)
greater than 150 ml
The patient should blast out
the air more quickly and
evenly and without hesitation
at the beginning of the
maneuver
Blast out
faster
Time until peak
flow (PEFT) greater
than 120 msec
The patient must exhale more
explosively at the beginning of
the maneuver
Blow out
longer
Expiration time less
than 6 seconds or
volume
accumulation has
not dropped below
100 ml per 0.5
seconds
The patient stopped exhaling
too early. The patient must
exhale until their lungs are
completely empty.
Once an acceptable maneuver has been performed, the following
consistency checks will also be applied to subsequent maneuvers
Blast out
harder
Peak flow not
reproducible. The
best previous
maneuvers do not
match within 1.0
L/sec indicating
that the patient is
giving an
inconsistent effort
The patient must give their
maximum effort for each
maneuver
Deeper
breath
FEV1 or FEV6 not
reproducible.
Difference with
respect to best test
greater than 150 ml
The patient must inhale until
their lungs are completely full
before each maneuver
Table of contents
Other Micro Direct Medical Equipment manuals
Popular Medical Equipment manuals by other brands

Otto Bock
Otto Bock C-Leg 4 Certification course complete

CUSTOM ULTRASONICS
CUSTOM ULTRASONICS 25000 Operator's manual

Verathon
Verathon GlideScope Operation & maintenance manual

Bio Compression Systems
Bio Compression Systems SC-3004-DL-230 operating instructions

GCE
GCE S 400 Instructions for use

Halyard
Halyard MIC Instructions for use