microbeau Spektra Xion S User manual

USER MANUAL
Cartridge Machine
2018

INDEX
Machine Overview
The Grip
The Body
The Give Knob
Adjust the Give
Replacing the Give Knob
The MotorBolt System
Changing the Stroke Wheel
Detaching the MotorBolt
RCA Connection
Connecting your Machine
Adjusting Needle Depth
Additional Information
3
4
5
6
7
8
9
10
11
12
13
14
15 -16

3
USER MANUAL
RCA Connectivity
Powerful 6W
MotorBolt system
specically designed
to meet the demands
of tattooing
Ratcheted, adjustable
needle depth system
Give Knob dial allows
adjustment of needle
strike recoil
Convenient,
interchangeable
stroke suits different
styles of tattooing
Ergonomic grip design
for tattooing
MACHINE OVERVIEW
THE
SPEKTRA
XION S
Changing Tattooing
Forever
The rst pen-style machine
providing artists full control
of parameters to unleash their
creative vision. Compatible with
most power supplies on the
market, the Spektra Xion S is
a one tool solution for all your
tattooing needs.

4
USER MANUAL
Autoclavable Ergonomic Grip design Compatible with most “membrane” needle
cartridges on the market
Spektra Xion S Grip
THE GRIP
THE GRIP
The Spektra Xion S offers an
ergonomic Grip design
that allows artists a control of the
machine never before possible.
The standard Grip tapers from
32mm to 25mm. Other grip
options may be available.
The Grip is crafted from a solid
rod of 6061 T6 aircraft grade
aluminum.
This polished and anodized
grip is safe to be sterilized
under steam, in an autoclave
or sprayed with cold sanitation
solutions.

5
USER MANUAL
Spektra Xion S Body
THE BODY
THE BODY
The Body is the core of
the machine where the
reciprocating and give systems
are housed. Constructed from
a solid rod of 6061 T6 aircraft
grade aluminum, this module
should be sanitized by wiping it
with cold sterilization solutions
only. Caution: Do not introduce
any liquids inside the system.
Ratcheted Disk System
Give Knob System
Hex Drive Pin
O-Ring
Stabilizing Friction O-Rings
Xion S Body
Body isometric view Body posterior view

6
USER MANUAL
GIVE KNOB
Give Knob side viewGive Knob front view
Spektra Xion S Give Knob
This dial, located at the tip
of the body, adjusts your
needle strike from hard to soft.
Note that this mechanism only
spins about one turn (270° or
about 11 clicks) generating
give travel of the driving
element (see page 8 for
information on sanitizing).
THE GIVE KNOB
Give Knob

7
USER MANUAL
ADJUST THE GIVE
ADJUST THE GIVE
Remove the Grip by
turning counter
clockwise until it comes off
completely.
An “<H” and “S>” (Hard /
Soft) indicate the direction of
rotation to achieve softer or
harder strike.
When adjusting the Give,
gently press inwards while
turning the Give Knob Dial.
This will ensure that you are
clicked into a setting and
never in between “clicks”.
You should always notice
a slight radial play once in
setting.
Always ensure that you
are “Clicked-in” to avoid
interference between Give
Knob and Hex Drive Pin.
Turning the Give Knob
in the arrow’s direction
decreases the Give
Turning the Give Knob in the arrow’s
direction increases the Give or locks it
completely. Always back one click from
maximum settings

8
USER MANUAL
HOW TO
REMOVE
THE GIVE
KNOB
To remove the Give Knob
use a plastic wedge, and
carefully insert in between the
Give Knob and Body to gently
pry open. DO NOT use metallic
tools! To replace the Give Knob,
REPLACING THE GIVE KNOB
place it in position ensuring
the hex orice matches Hex
Pin Drive. Apply slight pressure
until it clicks into place. Rotate
in both directions to ensure
proper functionality.
2
At this stage you can also sanitize the Hex
Drive Pin by wiping it with cold sterilization.
Avoid fluids entering the housing
1
Use a plastic prying tool, pry
gently and pull out Give Knob

9
USER MANUAL
MOTORBOLT
SYSTEM
This detachable module
houses the motor, cam and
RCA connection. Once removed,
artists can replace stroke
displacement by interchanging
provided Stroke Wheels.
Spektra Xion S MotorBolt system
THE MOTORBOLT SYSTEM
Stroke Wheel
Motor Shaft
MotorBolt System
MotorBolt housing

10
USER MANUAL
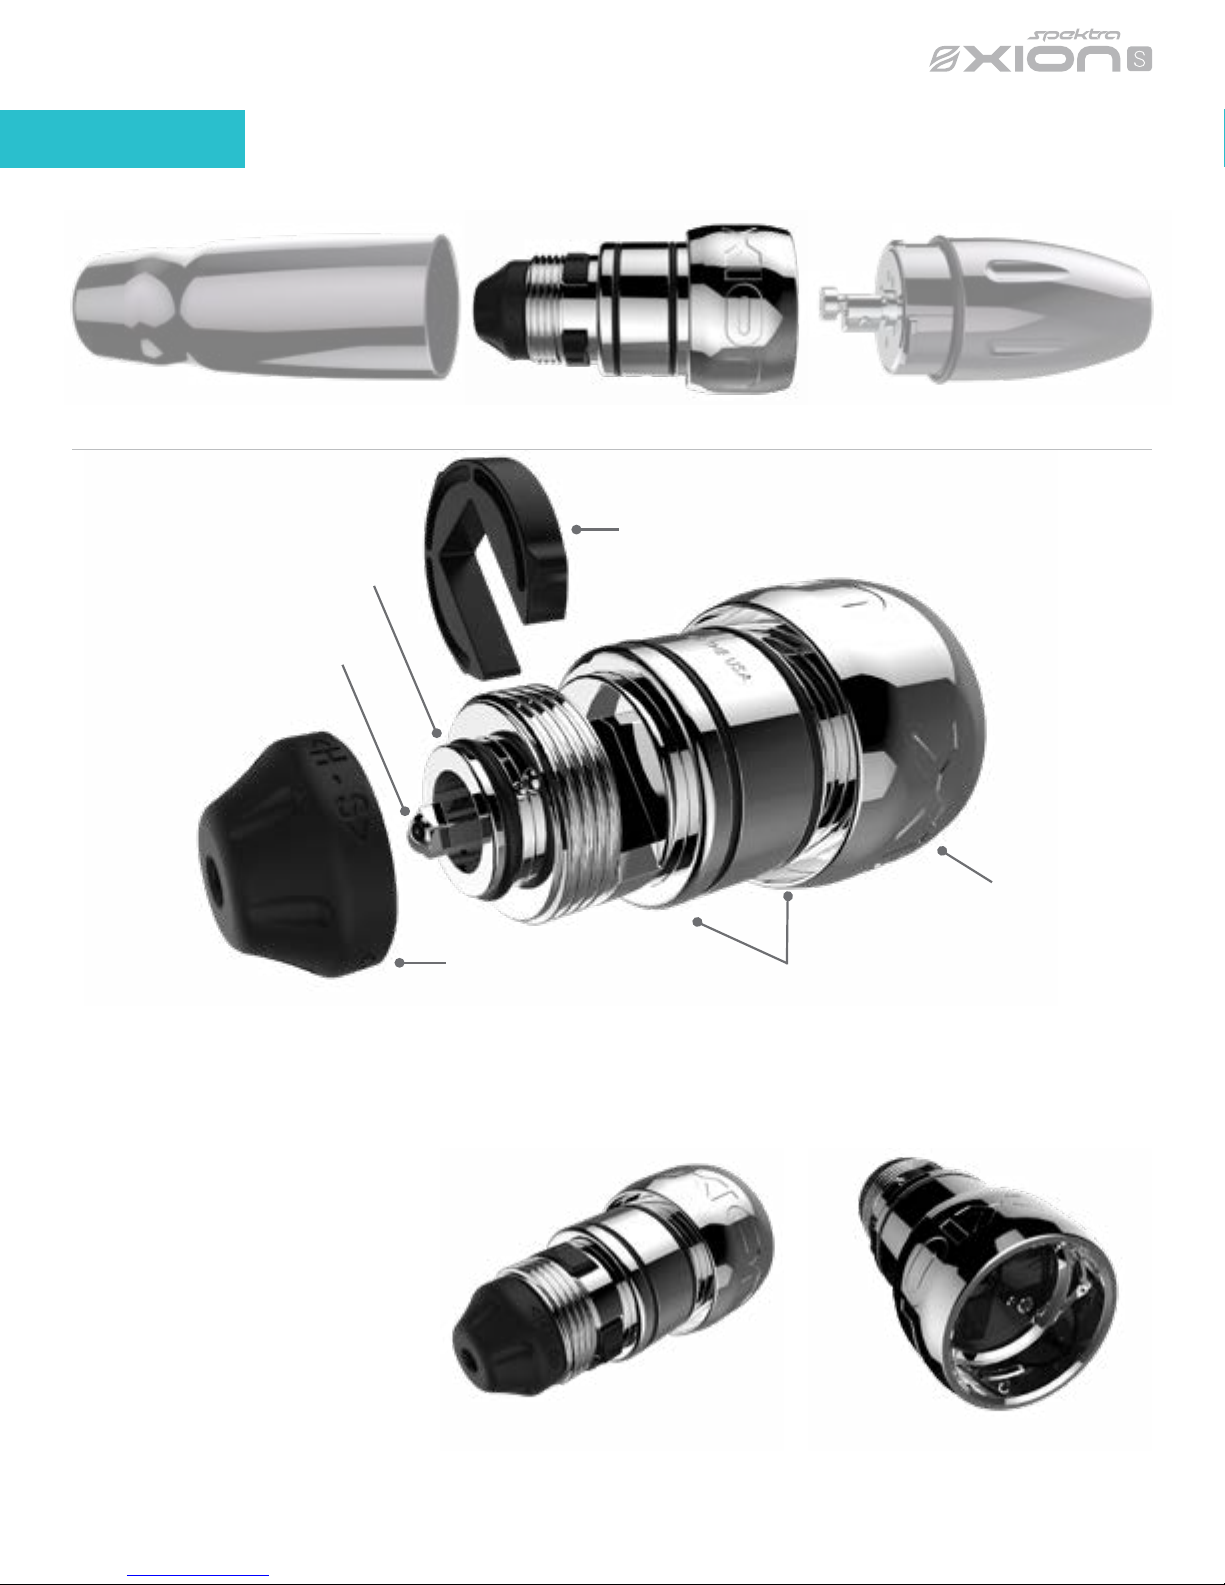
CHANGING THE STROKE WHEEL
Remove the MotorBolt by
pushing in while turning it
counter clockwise and pulling
out.
Replacing Stroke:
Use the tools enclosed in the
Xion S box:
A-Insert 0.05” Allen Key in
the screw that secures Stroke
Wheel with Motor Shaft and
loosen (DO NOT remove). Pull
up to remove the Stroke Wheel.
B-Locate the spare Stroke
Wheel in the box and ensure
that the screw is loose enough
to allow the shaft to t.
Ensure that the Stroke Wheel
tops off with stop washer
located around the shaft.
This avoids the stroke from
colliding with internal parts
of the body when re-attaching
the MotorBolt.
Insert the thinner 0.05” Allen Key
in set screw that secures Stroke
Wheel with Motor Shaft and
loosen. Do not remove screw
Pull out to remove
the Stroke Wheel
2
1

11
USER MANUAL
DETACHING THE MOTORBOLT
To detach your MotorBolt,
ensure you have a rm
grip on the Body and Grip. Turn
the MotorBolt in a clockwise
direction and pull out.
To attach the motor, push in
while ensuring the Stroke Wheel
is engaged with the internal
element. Do not apply force
until you feel your Stroke Wheel
has engaged with the internal
element.
If needed, rotate the motor
slightly until the stroke nds
its course. When this happens,
note that the motor is almost
all the way in, topping off with
the O-Ring around it and the
rim of the body’s opening.
Before securing the MotorBolt,
re-attach by pushing in with
pressure and twisting the
motor 1/8 of a turn to lock the
MotorBolt.
Get a rm grip and turn the body
as shown with the Grip.
Twist the MotorBolt as
shown and remove

12
USER MANUAL
RCA CONNECTION
RCA
CONNECTION
This connecting terminal
is compatible with most
RCA cables on the market. For
consistent connection and
machine longevity, premium
RCA cables are preferred.
RCA Connector
Gold-Plated Premium Darklab Straight RCA Cord

13
USER MANUAL
CONNECTING YOUR MACHINE
HOW TO
CONNECT
YOUR
MACHINE
Insert the RCA into the back
of the MotorBolt. Connect
to a Power Supply. Most of
the RCA connector jack is
concealed by the MotorBolt
housing.
Notice that most tattoo
power supplies will take 1/4”
mono jacks. However if your
Plug the RCA cord into the
Xion S RCA connector Best connection Improper connection
1
unit uses 1/8” or 3.5mm
jack (similar to headphone
jacks) you will need to use a
reduction from 1/4” female to
3.5 jack or simply get a cable
that goes from male RCA to
3.5mm male jack. Check our
website for alternate cable
options.

14
USER MANUAL
ADJUSTING
NEEDLE
DEPTH
To adjust needle depth,
hold the machine body
and MotorBolt while turning
the grip. A counter clockwise
turn decreases depth, while a
clockwise turn increases depth
(also known as needle hang).
Each time you turn the grip,
you can feel the tactile
feedback of the ratcheting
mechanism. Each “Click”
displaces your needle 0.2mm
and allows you to set your
needle precisely, eliminating
involuntary turning while
tattooing.
ADJUSTING NEEDLE DEPTH
Turning the Grip in the opposite
direction decreases needle depth
Turning the Grip in the direction
shown increases needle depth
Increases needle depth Decreases needle depth

15
USER MANUAL
VOLTAGE PARAMETERS
While voltage is a parameter that will vary from artist to artist, it is safe to say that this machine
will operate at a minimum voltage of around 4 Volts with a maximum voltage of 9.5 Volts.
Depending on the type of needle conguration or brand you use, feel free to adjust the voltage to
obtain the desired performance.
Note: Exceeding 10.2 Volts is not recommended.
ACCEPTED NEEDLES
Use only Cartridge needles with internal membrane. This will avoid accidental contamination inside
your machine. Fluids such as ink, water or oil will void warranty of the device and may require
replacement of internal parts.
MAINTENANCE
• The machine is basically maintenance-free.
• Xion S is sold pre-lubricated from factory.
• Prevent any type of external elements entering the machine as these will disrupt the
motion of components and contaminate lubrication.
• The grip of the machine is autoclavable. Use only steam autoclaves at temperatures not higher
than 270° Fahrenheit or 132.222° Celsius. Add a hint of ointment or PTFE grease around
internal opening of grip for optimal functionality after autoclaving. Refer to page 5 for additional
information.
• Machine Body and MotorBolt can be sanitized from the outside with cold sterilization products.
• Never spray the surface directly to prevent fluids from entering the machine. Always use pads or
disposable paper towels to apply sterilization products.
• The mechanism relies on a return spring. DO NOT disassemble machine.
WARRANTY
• All the housing components (Grip, Machine Body and the Motor Housing) are covered by a
lifetime warranty.
• Internal parts are subject to wear and tear. The motor itself will be covered by a 1 year warranty
from the date of purchase.
• Motor warranty is void if motor shows signs of being dropped, internal fluids enter the motor
and/or motor shows signs of being tampered with in any way.
ADDITIONAL INFORMATION

16
USER MANUAL
BARRIER PROTECTING YOUR MACHINE
Although the grip is autoclavable, we strongly suggest you barrier-protect your machine. For a visual
demonstration of many barrier protection methods, please visit our YouTube channel at YouTube.
com/microbeauintl.
HANDY TIPS
The following tips will help you get the most out of your Spektra Xion S and avoid potential issues:
• Always place the machine on a safe area. Dropping the machine can cause damage to the
magnets, bearings and brushes of the motor.
• Use only cartridges with membrane to avoid contamination.
• Do not exceed the suggested voltage.
• Always use power supplies with at least 1Amp of current supply.
• Rinse your needle frequently to avoid pigment drying up and slowing down your cartridges. When
rinsing your needle, ensure to dip only the tip of the cartridge to avoid back flow.
• Inspect your needles prior to use.
• Use only quality cables. A good connection will ensure consistent performance.
• Avoid scratching the surface of the embodiments.
• Use only FDA-approved cold sterilization solutions for disinfection.
• Do not lubricate machine unless instructed otherwise.
• Store your machine in a secure place.
SERVICING YOUR MACHINE
Just like any mechanical device subject to use, Microbeau Intl. strongly suggests that you service
your product at least once a year to guarantee that a proper diagnosis of all working parts is
conducted. This safeguards the optimal condition of all working parts including internal machine
clean up and fresh lubrication. Routine servicing will ensure that your machine remains functioning
like the very rst day. Service is subject to a fee.
For additional tips and tutorials, please visit Youtube.com/microbeauintl
ADDITIONAL INFORMATION
Table of contents
Other microbeau Personal Care Product manuals