Microgem PDQeX User manual

Product Manual
PDQeX Nucleic Acid Extractor
prepGEM
forensicGEM
phytoGEM

Contents
Contents
02
Introduction to the PDQeX
Page 3
Process Overview
Page 4
Contact
Page 16
Device Set-up
Page 5
Loading and Unloading
Pages 6-8
Settings
Page 9
Date and Time
Page 10
UV Treatment
Pages 10-11
Pre-defined Programs
Page 12
Custom Programs
Page 13
Error Messages
Page 14
Cleaning, Sterilization, and Maintenance
Page 15

03
Introduction to the PDQeX
PDQeX Nucleic Acid Extractor
The simplicity and minimal sample manipulation requirement of the PDQeX make it an
attractive option for obtaining DNA samples.
Jo-Ann Stanton, PhD
Department of Anatomy, University of Otago
New Zealand
Perfect for a wide range of sample types including:
Plant material
Animal tissue
Forensic evidence and human ID
Bacteria
Viruses
Insects
Sample capacity
For use with
Interface
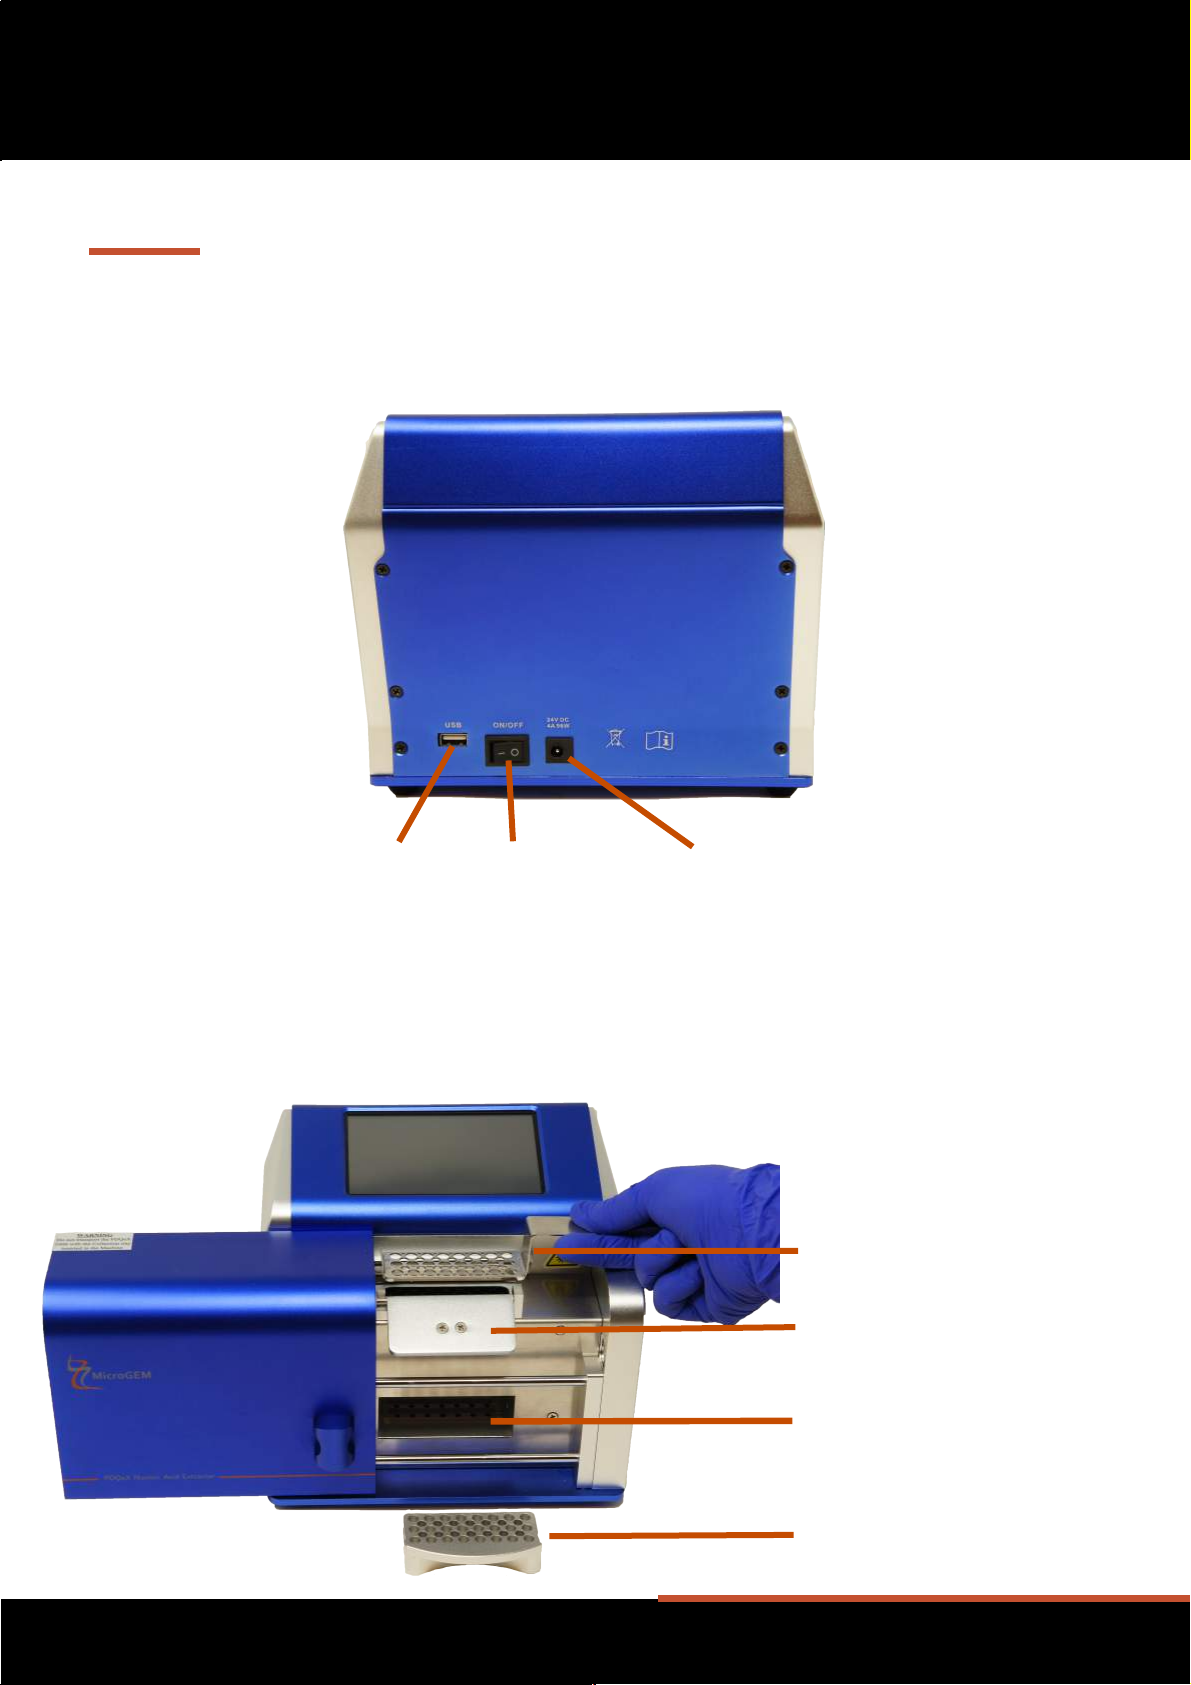
Voltage (24 V DC adapter included)
Power
Thermal profiles
Programmable thermal range
Dimensions
Weight
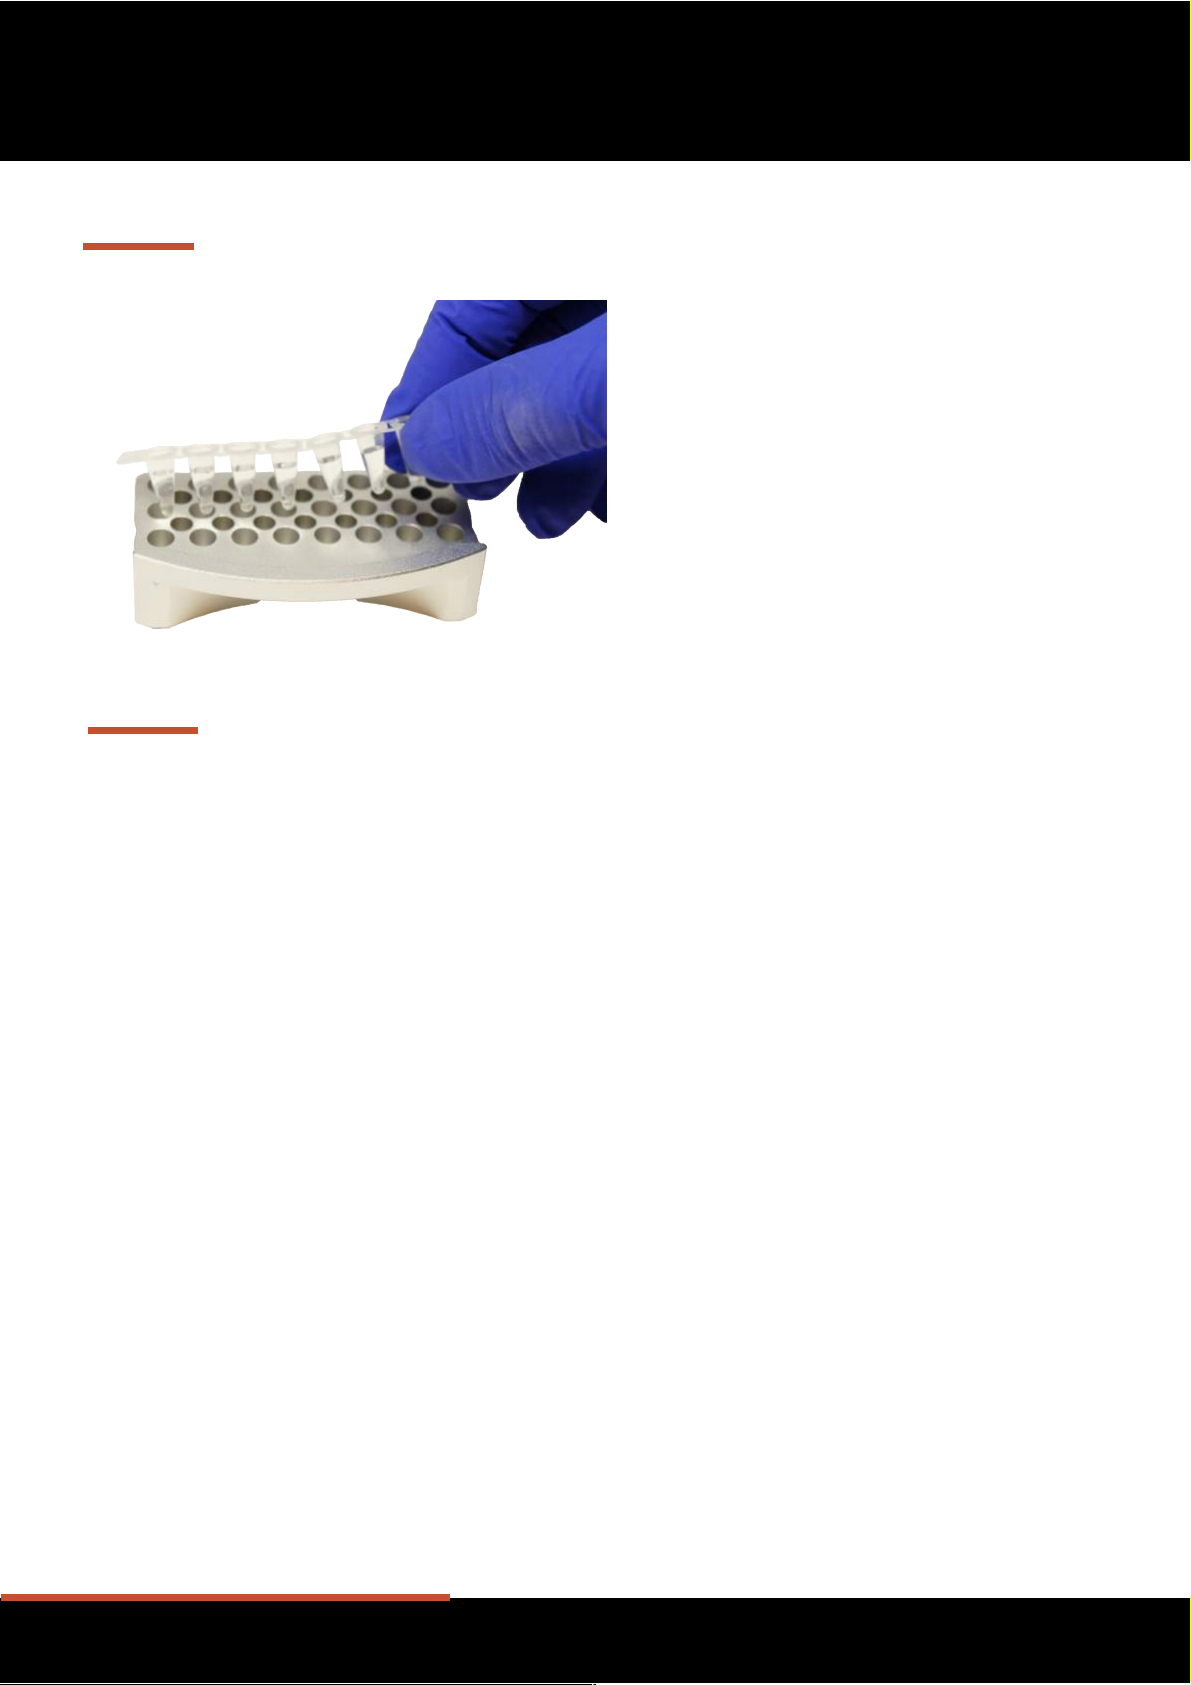
24 samples, standard 96 well spacing
24 PDQeX cartridges (200 μL)
5" touch screen (color)
100-240 VAC, 2A, 50/60 Hz
96 watts at peak draw
Pre-installed and user programmable
34-120°C
22 x 18 x 18.5 cm (L x W x H) (8.5" x 7" x 7.25")
4.8 kg (10.6 lbs)
PDQeX Extraction Reagents consist of a cocktail of
thermophilicproteinaseandmesophiliccellwalldegrading
enzymes that systematically lyse cells, destroy nucleases,
digest proteins, and release nucleic acids. Each reagent kit
is specially formulated for specific sample types.
PDQeX Extractor Cartridges, made from thermo-
responsive polymers, pump extracted DNA through the
purification matrix while removing cell debris and
inhibitors.
Specifications
MicroGEM's PDQeX Nucleic Acid Extractor brings together
powerful enzymes with an innovative extractor cartridge and
purification matrix. The temperature-driven single-tube system
produces extracts in significantly less time (minutes, not hours)
than other extraction methods.

04
Process Overview
Process Overview
Step 1: Sample preparation
This multi-stage process takes place inside the extractor cartridge.
1. The cells are lysed by a cocktail of enzymes. This cocktail varies for different substrates. For example, the
lysisof leaf tissue requiresa complex mixture of hydrolases and a specific programon the PDQeX toactivate
them.
2. Atemperatureregimeniscarried out by the PDQeX for different enzymes atdifferenttemperatures.Thefinal
temperature inactivates the enzyme leaving a lysate containing DNA, cell debris, and denatured protein.
3. On completion of the extraction, the extractor cartridge forces the extract through a special column. The
columns are tailored to each sample type and designed to remove anything that may inhibit Taq DNA
polymerase or enzymes used in most other downstream processes.
4. The samples are ejected into PCR tubes in a standard format (8 strips or 3x8 strips).
Step 2: Cell lysis, DNA extraction and purification
Sample preparation prior to extraction varies from sample to sample. Refer to each kit 's Quick Start Guide for
specific sample preparation guidelines.
Step 3: Quantification
TheDNAisnowreadyforquantification.Becausetheheatstepdenatures the DNA, do notuseODorfluorescent
dye methods. The best method for quantification is qPCR. With normalized samples, quantification is not
always required and the DNA can be used directly.

05
Device Set-up
Operating Instructions
Device set-up
Connect the PDQeX to the power supply and switch on. Only use the power supply provided with the PDQeX.
WARNING: The PDQeX should be installed with easy access to disconnect from the
power supply.
USB port
On/Off
24V power input socket
Back of the PDQeX
Front of the PDQeX
Cartridge lifting tool
Hinged flap to secure cartridges
Drawer for collection tube rack
Collection tube rack
Do not place the PDQeX close to a RF transmitter. A low power transmitter, such as a cordless or mobile phone,
should be at least 2M from the PDQeX. A powerful transmitter, such as a commercial TV or radio broadcast
antenna, should be at least 25M away.
The USB port is for software upgrades only and is not to be used for other purposes.

06
Loading and Unloading
Operating Instructions
Loading and unloading the PDQeX
The door of the PDQeX slides horizontally
left and right. The door will lock during
operation or UV decontamination.
Before inserting any cartridges into the
block, ensure the lifting tool is in place,
making it easier to remove spent
cartridges after the run is complete.
Pull out the collection tube rack and place
0.2 ml PCR tubes firmly into the rack.
The rack will accommodate up to three 8-
strip PCR tubes.
Remember where you have placed the
collectiontubes. You willneed to placethe
cartridges in the same position in the
cartridge block.
Replace the rack into its slot in the PDQeX
and firmly push into place.

07
Loading and Unloading
Operating Instructions
Load your sample into the PDQeX
extractor cartridge.
This part of the procedure differs
dependingonthesampletype.Thesample
may be in suspension, a solid or a disk of
storage card.
Insert the cap into the cartridge.
Load the cartridges into the holes of the
cartridge tray in the same position where
you placed the collection tubes.
When all the cartridges are loaded, lower
the hinged flap onto the caps of the
cartridges and close the sliding door.
Make sure the cartridge positions in the
cartridge tray correspond to the collection
tubes below - otherwise you will
contaminate the device.
WARNING: The lower end of the PDQeX cartridge is designed to fit inside the collector
tube. If it is above the upper lip of the tube, there is a risk of cross contamination. This
problem may occur when lower profile collection plates or tubes are used.
ContactMicroGEMat[email protected]ifyouneedacollectiondrawertailoredfortheprofile
of your tubes.

08
Loading and Unloading
Operating Instructions
Loading and unloading the PDQeX
After running the device, the DNA will be in
the collection tubes.
First remove the PDQeX extractor
cartridges and dispose. Slide out the
drawer.
Remove and cap the collection tubes and
store at -20°C.
The door of the device will lock while the block is hot.
For sequential runs, make sure the block temperature has fallen below the first temperature used in your
program.
Carefully remove tubes to prevent contamination of the block.
Tubes cannot be re-used if you abort a run.
Notes

09
Running Your Program: Settings
Operating Instructions
The home screen provides three options:
1. System settings
2. UV treatment (sterilization)
3. Extraction
To the left of the screen is a map to help
navigate the program.
Thesystemsettings windowallows youto:
1. Set date and time
2. Obtain more information
3. Reset to factory defaults
Future releases will allow you to pick your
preferred language.
Running your program
ThePDQeX is controlled by a touch-screen. The following sectionprovidesanoverviewtohelpnavigatethrough
the controls.
1. Home Screen
2. System Settings
2.1 Factory Reset
The device arrives with a number of pre-
installed programs. A factory reset
restores the programs if lost.
However,if you choose to reset, all custom
programswillberemovedandthedateand
time will need to be reset.

10
Running Your Program: Date and Time
Operating Instructions
2.2 Date and Time
Setthe dateandtime usingthekeypadand
press Save.
2.3 QR Code
Thelast system option provides a QR Code
to access more information from the
MicroGEM website.
3. UV Treatment
The PDQeX is fitted with four UV strip lights to reduce DNA contamination. Three lights are situated below the
collection tube drawer. The drawer should be removed before treatment to allow the light to access the lower
side of the heating block. The other light is above the heating block. During UV treatment, the sliding door will
be locked.
WARNING: Do not operate the UV light without closing the door. Avoid looking directly
at the UV light.
The UV treatment will only remove superficial contamination. For more serious spills,
clean the inside of the device using a cotton swab soaked in 1% bleach. Follow this by
swabbing with 80% ethanol.

11
Running Your Program: UV Treatment
Operating Instructions
Press 'UV Treatment' on the home screen.
The procedure takes 30 minutes and can
be interrupted at any time.
Press Interrupt to stop the UV treatment.
After interrupting the program, press
Return to go back to the home screen.
After the treatment is complete, press
Return to go back to the home screen.

12
Running Your Program: Pre-defined
Operating Instructions
4. Running Pre-defined Programs on the PDQeX
On the home screen, press Extract.
Select the program you want to run.
The temperature regimen will be shown.
Press Start.
The PDQeX will switch to a display
showing the progress of the program.
At any time, the program can be
terminated but the samples and tubes
cannot be reused.
Once the run is complete, a prompt will
appear to return to the extraction screen.

13
Running Your Program: Custom
Operating Instructions
From the home screen, press Extract.
Insteadofchoosing one of thepre-defined
programs, it is possible to create a custom
program. This can be useful for optimizing
the PDQeX for specfic sample types.
Press the + button.
Click on the dashed line at the top of the
screen (*-----------*) and give the
custom program a name. A program
cannot be saved without a name.
Press on the temperature/time symbols
( -- ) to add temperature and time values.
5. Writing a Custom Program on the PDQeX
Use the number keypad to enter
temperature (C°) and time (minutes)
values.
PressSave.Youmustaddafinalcoolstep
before the program can be saved.
When you have completed all the entries
and saved the program, proceed with the
steps in section 4.

14
Running Your Program: Error Messages
Operating Instructions
6. Error Messages
The PDQeX has a sensor at the back of the
collection tube drawer. If the drawer is not
in place or is crooked, the device will not
run.
This prevents DNA from being
contaminated.
Make sure the sliding door is fully closed
before running the PDQeX.
The block is hot and could burn fingers.
This message is a reminder that the same
tubes cannot be run twice if a run has been
aborted.
A few common mistakes may be detected by the device.

15
Cleaning, Sterilization, Inspection, and Maintenance
Collectiontraysandcartridgeholdersshouldbecleanedandsterilizedinaccordancewithlaboratoryprocedure.
The UV treatment option on the control screen gives a 30-minute UV light exposure (see pages 10-11).
In the event of gross contamination of the heating block or device, clean with a cotton swab and wipe with 0.5%
bleach followed by a thorough removal of the bleach with water-dampened swabs and wipes.
Aluminum parts of this device should not be soaked in virkon or bleach. Extended use of chemical agents such
as these will corrode the parts.
The following label may be displayed on the device:
The PDQeX has been designed to require no operator maintenance.
Cleaning and Sterilization
WARNING: Do not get liquids inside the device.
If bleach must be used, be sure ALL of it is removed.
Safety Label
Hazard Symbol
English
Francais
UV
WARNING: Avoid looking
directly at the UV light
AVERTISSEMENT: Évitez
de regarder directement à
la lumière UV
Inspection and Maintenance
Disposal of Waste
Used PDQeX cartridge tubes should be disposed as hazardous waste in accordance with laboratory protocols.

China
New Zealand
United States
United Kingdom
© 2019 MicroGEM. All Rights Reserved.
All trademarks are the property of their respective owners. forensicGEM*, phytoGEM*, prepGEM, RNAGEM,
and MicroGEM are trademarks in use by the MicroGEM group.
* Registered with the United States Patent and Trademark Office.
MicroGEM is committed to minimal packaging and a vibrant, sustainable world.
For information regarding device compliance with various agency standards, contact [email protected].
Other manuals for PDQeX
1
Table of contents
Other Microgem Laboratory Equipment manuals