MICROLIT E-BURETTE User manual

E-Burette
PRODUCT GUIDE
Experience
the Power of
Precision in
your daily
laboratory
routine.

What is Burette
Types of Burette
Technical Specifications of Burette
Components of a Burette
How to use a Burette?
Cleaning, Maintenance and Storage of a Burette
Applications of a Burette
Choosing the right Burette
Calibration of a Burette
When is burette calibration required?
Burette Troubleshooting
.........................................................................................................01
........................................................................................................02
........................................................................04
........................................................................................05
..............................................................................................08
...............................................12
........................................................................................14
.....................................................................................14
...........................................................................................17
..................................................................18
.........................................................................................19
Content

What is a Burette?
Burette is an essential laboratory instrument, commonly used in the titration
process for quantitative analysis in many industrial chemical tests where
solutions of known concentration are used to find the concentration of
unknown solutions.
01

Types of Burette:
There are three types of burette:
VOLUMETRIC BURETTE
02
A volumetric burette is made of glass or plastic material, with a
volume scale printed on the burette wall. It has a stopcock at the
end of the instrument and a valve to control the flow of liquid.
The barrel of a stopcock is made of glass or plastic. Burettes are
usually fixed with a clamp in an iron stand. Normally, volumetric burette
can be classified as:
On a liquid burette, it
has a long graduated
glass tube with a
stopcock at the bottom
to control the flow of
liquid. Gravity causes
fluid to flow when the
valve is opened. The
exact amount of liquid
can be determined by
reading the volume
marked on the glass
tube.
In a gas burette, the stopcock is given at the upper side of the burette.
The tube of the burette is filled with a fluid, such as water, mercury or
other kinds of liquid and is attached to a reservoir of fluid at the bottom
of the tube. The gas is collected by displacing the fluid from the burette
and the volume of the gas is measured by the volume of the displaced
fluid.
Liquid burette
Gas burette
a.
b.

03
PISTON OR DIGITAL BURETTE:
A piston or digital burette is based on a syringe
design wherein the barrel and plunger can be
made of glass or plastic. For alkali solutions, the
barrel and plunger may be made of polyethylene
or another resistant plastic material. The barrel is
placed in a fixed position and the plunger is
moved incrementally by rotating the wheel by
hand or by means of a step motor.
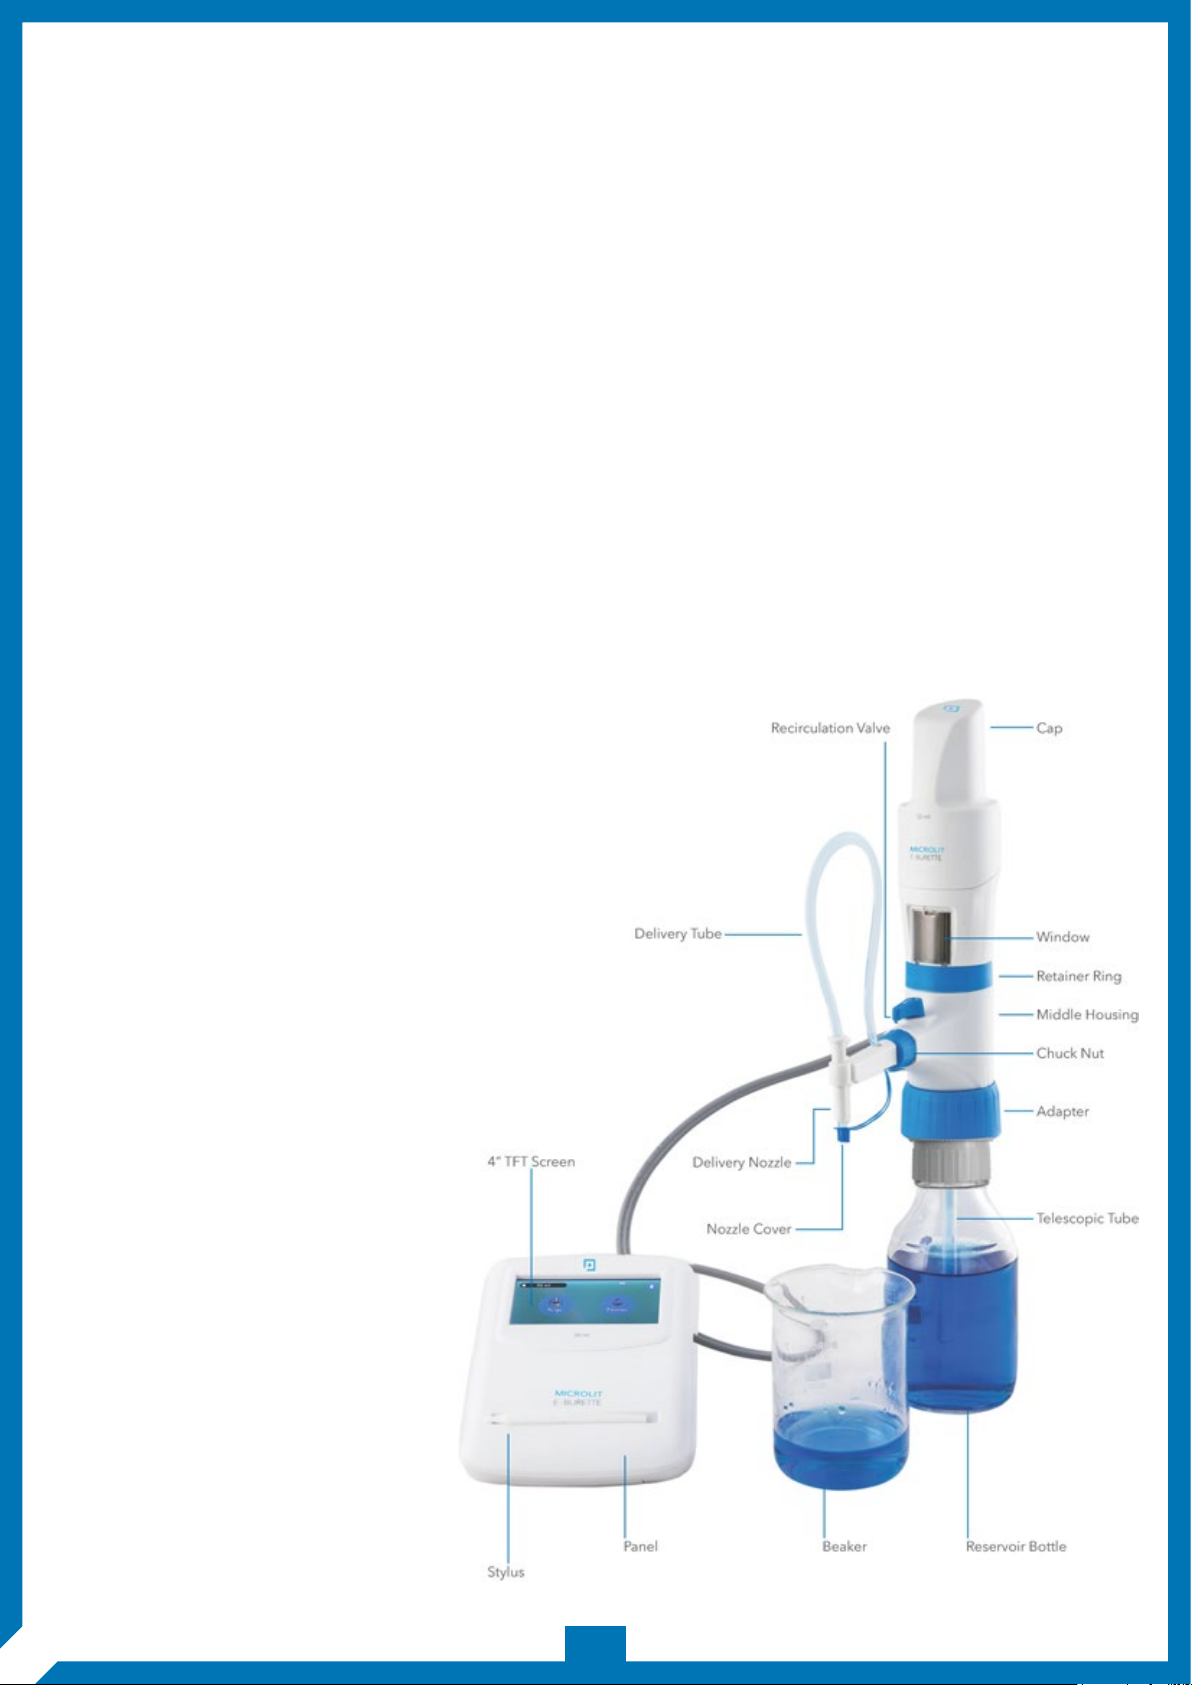
The Electronic Burette or E-Burette has
an electronic display, electronic control
panel and motor controlled piston
movements that eliminate all problems
of the digital burette which dispense
manually. The accuracy of electronic
burette is higher than a digital burette
due to motor controlled dispensing. This
motorized system eliminates human
errors in the titration/dispensing
process, making the titration more
precise.
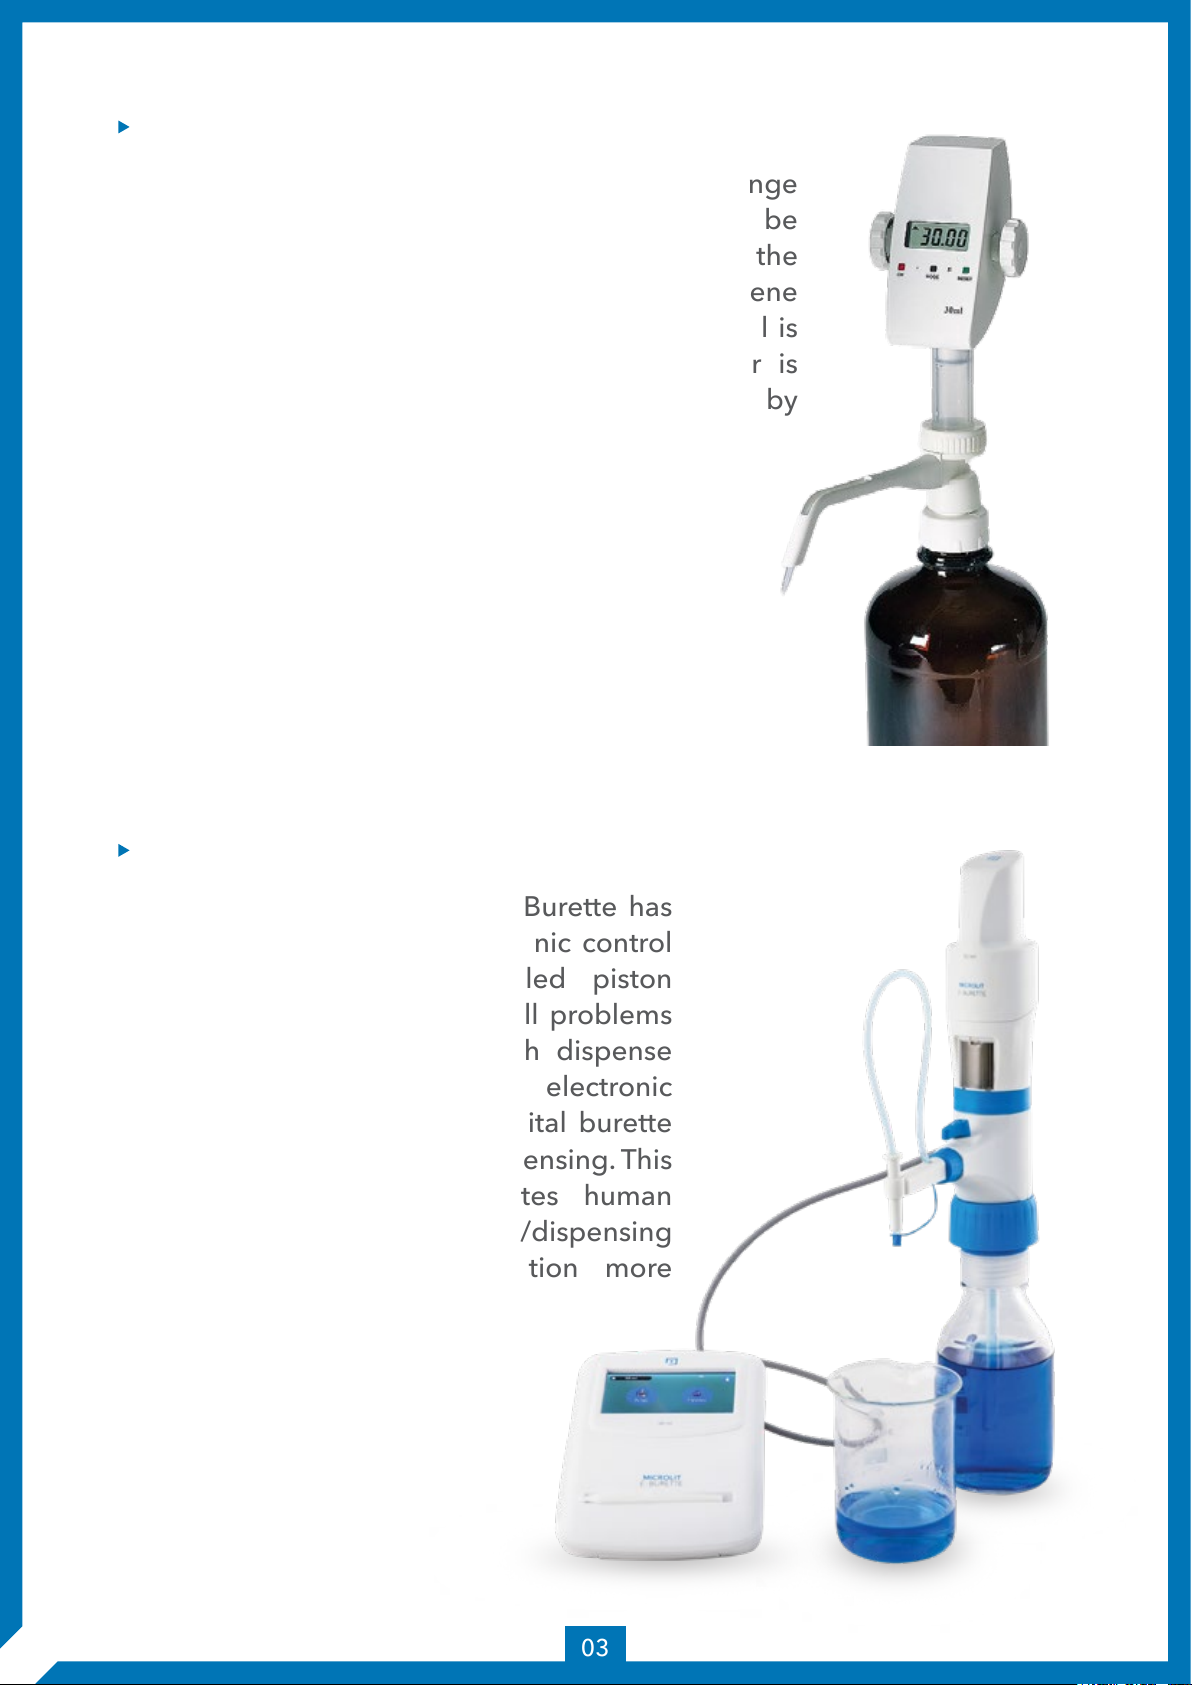
The volume is shown on a digital
display given at the top of the
burette. A high-precision syringe can
be used to deliver a very precise
amount of liquid. A motorized digital
burette can be controlled by a
computer.
ELECTRONIC BURETTE

Technical Specifications of Burette
04
An Electronic Burette comes in different sizes and the most popular volume
ranges are 10ml, 25ml and 50ml in capacity. The technical specification of
these burettes are listed below along with their permissible error limits as
specified in the DIN EN ISO 8655-3.
CAPACITY
(ml)
INCREMENT
(ml)
ACCURACY
(±%)
ACCURACY
(±ml)
CV
(±%)
CV
(±ml)
10
25
50
0.005
0.01
0.01
0.01
0.0175
0.025
0.1
0.05
0.05
0.01
0.0125
0.025
0.1
0.07
0.05

05
Components of a Burette
COMPONENTS OF VOLUMETRIC BURETTE:
Volumetric or glass burette consists of a graduated glass tube with a
stopcock at one end. The precise liquid dispensed can be determined
by volume marking given on the glass tube surface. A Tip is given at the
other end of the glass burette which is used to dispense liquid precisely.
The Stopcock helps to control the flow of liquid by rotating it clockwise
or anti-clockwise.
COMPONENTS OF ELECTRONIC BURETTE:
E-Burette is an electronic device that delivers accurate and convenient
titration while reducing the risk of accidental chemical contact. It
includes some advanced components that reduce manual operation
with high work efficiency. Some major components of E-burette are:
Recirculation Valve:a.
It prevents the loss of reagents during purging by re-directing them into
the mounted bottle.
Delivery Tube:b.
Delivery tube provides the facility to deliver the reagent beyond the
reservoir.
Inspection Window:c.
The transparent acrylic window can be replaced with an amber colored
window for the use of chemicals. These chemicals such as iodine,
potassium permanganate and silver nitrate solutions are sensitive and
can react in light. To protect these chemicals from such reactions, an
amber-colored window is used that can be easily changed.
Delivery nozzle:d.
Delivery nozzle provides a high degree of flexibility in both the
horizontal and vertical directions, facilitating easy dispensing according
to different laboratory conditions.

06
TFT Screen:e.
A user-friendly TFT touchscreen guides quick and accurate titrations and
displays numeric data up to the second decimal. It is easily operated
with Stylus.
Telescopic tube:f.
The telescopic tube is used to draw up the liquid from the reagent bottle
to e-burette. It can be adjusted in length according to a variety of bottle
sizes.
Adaptor:g.
E-burette comes with different standard sizes of adapter that
comfortably fit most laboratory reagent bottles. The standard sizes of
adapters are 28mm, 32mm, 38mm, 40mm and 45mm.
Stylus:h.
It is a sleek hand-held instrument like
pen used to operate the control panel
with ease.
Control Panel:i.
E-Burette comes with a
powerful control panel that is
used to perform functions like
automatically re-fill without
changing the reading, perform
a zero reset (via. tare). switch
the instrument off etc.
Middle Housing:j.
It consists of a
piston mechanism
inside the burette.

07
COMPONENTS OF DIGITAL BURETTE:
Digital burette is different from e-burette, although many components have
the same functionality. Recirculation Valve, Delivery Tube, Inspection
Window, Telescopic tube and Adapters have the same functionality as
Electronic Burette. The digital burette only has an electrical display but the
piston movement is manual which can be operated manually using a
wheel.
A digital display allows the user to note the volume of the liquid dispensed
out of the burette. This feature eliminates meniscus reading errors. A hand
wheel gives you the facility to set the amount of dispensed liquid by
rotating it clockwise or anti-clockwise.
Various buttons including ON/OFF button, CLEAR/Selection button and
Pause Button are available at upper housing of the digital burette that helps
to control the dispensing process.

How to use a Burette?
08
The main steps to use an Electronic burette are given below:
Open the battery panel at the back of the control panel.
Connect the battery connector to the panel wire by inserting the battery
connector into the panel, and then close the panel.
Press the ON/OFF button. The screen will display “Welcome”.
CONNECTING THE BATTERIES
Adjust the length of telescopic tube according to reservoir bottle length.
Fix the telescopic tube at the bottom of the burette. Fix it from the
wider end.
Choose the correct adapter according to the reservoir bottle and fix it by
screwing it in a clockwise direction.
Mount the instrument on a reservoir bottle by screwing it with gentle
hand torque.
SETTING UP

09
Connect the cable from the instrument housing to the port at the back
of the control panel.
If the charging is required, insert the charging pin at the back of the
control panel and connect the power cord. Battery indicator will
show the charging.
Now E-burette is now ready to be switched on.
Switch on the instrument using the ON/OFF switch at the back of the
control panel.
When it boots, the instrument will warn the user to switch the knob to
recirculation mode.
After turning the knob to recirculation mode, click the tick mark on the
control panel screen when ready.
Instrument will reset automatically, now it is ready to use.
OPERATING THE INSTRUMENT

E-burette is commonly used in the titration process to determine the
concentration of an unknown solution. Typically, titrant (known solution) is
added from a burette to a known volume of analyte (unknown solution)
until the reaction is complete. An indicator is used to find the endpoint of
the titration.
10
Click the purging mode from the home screen on the control panel.
The screen on the control panel will warn the user to turn the knob
to recirculation mode.
Turn the knob to recirculation mode and click the tick mark on the
control panel screen when ready.
The digital burette will purge automatically. If the instrument is still
not properly purged, repeat the purging process again till no large
air bubble is visible below the piston.
BEFORE STARTING USING THE DIGITAL BURETTE,
IT IS RECOMMENDED TO ENSURE BUBBLE FREE DISPENSING:
Remove the cap from the discharge tube.
Click on the titration mode on the home screen. The screen on the
control panel will warn the user to turn the knob to titration mode.
Turn the knob clockwise to set at titration mode and click the tick
mark on the screen of the control panel when ready.
ONCE THE E-BURETTE IS PROPERLY SETUP,
FOLLOW THE STEPS BELOW TO PERFORM THE TITRATION PROCESS.

11
Place the discharge tube orifice against the inner wall of a suitably
receiving vessel.
Now fill the barrel from the titration screen by clicking the fill button.
By pressing the stop button, the filling volume can be stopped as
and when you need to.
Microlit E-burette offers the free dispensing speeds are provided,
including dropwise dispensing that allows the user to get accurate
end point of the titration:
The user interface is very responsive and the dispensing starts by
clicking the appropriate button on the control panel and stops
immediately when the touch is removed.
Press the TARE button to reset to Zero and repeat the process.
BURETTE MODEL MODE SPEED
Fast
Medium
Dropwise
Fast
Medium
Dropwise
Fast
Medium
Dropwise
3.8ml/sec
1.3ml/sec
10ul/click
2.1ml/sec
0.7ml/sec
10ul/click
1.2ml/sec
0.2ml/sec
5ul/click
50 ml
10 ml
25 ml

The maintenance of electronic burette is an important routine in any
chemical laboratory. Adopting a proper maintenance schedule can reduce
the cost of purchasing new equipment. Cleaning the e-burette takes time
and practice, otherwise the equipment may deteriorate. Therefore it is
necessary to handle the burette carefully while cleaning.
The instrument must be cleaned in the following situations to ensure the
correct operations and test results:
NOTE: The piston cylinder, valves, telescoping filling tube and titration
tube may contain the reagent. The necessary safety steps must be taken
before cleaning the instrument.
12
4
Cleaning, Maintenance and
Storage of a Burette
Immediately, if the piston become harder
than normal use
Before changing the reagent
Prior to long-term storage
Prior to dismantling the instrument
Regularly when using crystallizing liquids
If the liquid has accumulated
in the screw cap of the
titration tube

13
STANDARD CLEANING OF BURETTE:
Whenever cleaning is required, run the burette under distilled water.
a.
c.
e.
b.
d.
f.
Fill the barrel completely with distilled water and press the fast dispense
button to dispense the water completely.
Place a suitable receiving vessel below the opening of the discharge
tube and rinse the instrument several times by completely filling and
emptying it.
Set the valve to recirculation and rinse the instrument several times by
completely filling and emptying it.
This process can optionally be repeated with a suitable cleaning agent.
Unscrew the chuck nut by rotating it in anticlockwise direction and pull
out the delivery pipe. Clean the delivery pipe with deionized water and
assemble it again.
Next, rinse the burette again with deionized water.
INTENSIVE CLEANING OF BURETTE:
The dispensing cylinder, valve, telescoping filling tube and titrating tube
are filled with reagent. For this reason, always perform a standard
cleaning before dismantling the instrument. In order to avoid confusion
about the components, do not dismantle more than one instrument at a
time. A calibration and any necessary adjustment, must be carried out
after dismantling or replacement of a piston/cylinder assembly.
Note: Use rubbing alcohol on a cloth or cotton to clean the external
body.
Proper storage of digital burette is as important as cleaning and
calibrating the instrument. The digital burette and its all accessories
must be stored in a clean, cool and dry place. The storage temperature
should be ranging from –20 °C to +50 °C (from –4 °F to 122 °F) is advised
with relative humidity between 5% and 95%. Another point to be
remembered is that the instrument should be stored in an upright
position as recommended by the manufacturer.

14
Applications of a Burette
Burette is commonly used in the titration process for quantitative analysis in
many industrial chemical testing where a solution of known concentration
is used to find the concentration of an unknown solution. The process of
titration is widely used in various industrial applications listed below:
Pharmaceutical industry: Purity analysis, Content analysis,
Precipitation titration, pH-stat titration
Wine industry Automotive industry
Food and Beverage industry Cosmetic industry
Choosing the right Burette
Choosing the best burette for your application can be a challenging task as
the liquid handling market has a variety of options. Before selecting a
burette for your lab, it is necessary to consider a few questions:
Is the burette able to handle your typical volume range of liquid
required for titration?
Does the burette provide different speeds for dispensing for
proper titration?
Is it operated manually or automatically?
Is the accuracy and precision in reading offered by the burette in
accordance with the ISO standards?

15
The above points ensure correct burette procurement that will work for a
long time and improve titration activities in your laboratory.
Microlit’s E-Burette is an advanced laboratory instrument designed
keeping ergonomics and smooth operation in mind. The E-burette
provides sophisticated features and functionality such as touch screen
enabled control panel with graphical user interface (GUI), motor-controlled
piston movement and three dispensing speeds to perform accurate
titrations.
3 PRE-SET DISPENSING SPEEDS
Microlit E-burette offers the 3 calibrated pre-set speeds that allow the
user to work at the desired speed while avoiding manual error.
The dropwise dispensing option in the Microlit’s E-Burette allows the
user to choose this mode when they are about to reach the end-point of
the titration process. The dispense droplet can be as small as 5.0ul and
record a highly accurate end-point of the titration.
TFT TOUCH SCREEN CONTROL PANEL
The TFT touchscreen of the control panel helps the user to perform
quick, easy and accurate measurements and displays numerical data up
to two decimal points. The user needs a Stylus and keeps it pressed
against the screen to perform dispensing and lift it to stop.
The touchscreen feature
also omits any parallax
error which normally
occurs in glass burettes
when it is not viewed
from a perpendicular
position.

16
MOTOR CONTROLLED PISTON MOVEMENT
Dispensing is done manually in
glass and digital burettes leading
to inaccurate results. However the
Microlit’s E-burette has a motor
controlled piston speed that
allows laboratory personnel to
work efficiently as it does not
need to oversee the delivery
process at every moment. 3
Pre-set speeds reduce human
effort as well as errors which
makes it the most efficient lab
instrument for liquid handling.

17
A gravimetric testing based recalibration of the burette is recommended
every 6-12 months depending on the following factors:
Frequency of use Changes in environmental conditions
The viscosity of the media
For Microlit E-Burette, gravimetric volume testing according to DIN EN ISO
8655-3 should be performed as follows:
Calculation of accuracy
(A %) and coefficient of
variation (CV %) are
calculated according to
the formulas for statistical
control.
Click the settings icon on the bottom right of the control panel
home screen.
From the settings menu, choose calibration.
Fill the nominal volume of double-distilled deionized water by clicking
the FILL button on the calibration screen of the operating panel.
Dispense the filled liquid by clicking on the DISPENSE button on the
calibration screen of the control panel.
Measure the dispensed liquid on a balance and enter the value in mg
using the provided electronic keyboard. Click the tick mark to proceed.
CAL label will start appearing on the top of the screen.
Repeat the procedure until the nominal volume is achieved on the
electronic balance.
Callibration of Burette
CALCULATION
OF A BURETTE
READING

18
In order to maintain the quality of titration results, the burette must be in
good condition and properly calibrated. Generally, the interval at which a
burette needs to be calibrated depends on several factors:
Regulations and standards published by organizations such as the FDA and
ASTM International provide minimum requirements to ensure the quality of
laboratory testing results. Regulations specify that all laboratory
instruments used in sampling & productions including pipette/burette
must be routinely calibrated at suitable intervals.
In the same series, the Clinical and laboratory standards institute (CSLI) has
provided the guidelines for pipette/ burette that specifies these
instruments must be calibrated every 3 to 6 months. And a minimum of two
volumes must be tested with 10 replicas at both nominal and lowest
settings.
Establishing an appropriate calibration frequency minimizes the chances of
incorrect liquid delivery in the laboratory and ensures traceability,
accountability and confidence in the results.
When is burette calibration
required?
Frequency of burette use
Type of liquid dispensed by the burette
Long period of non-usage
Handling and care of burette
Titration applications that require superior accuracy also demand more
frequent calibration
Other manuals for E-BURETTE
1
Table of contents
Other MICROLIT Laboratory Equipment manuals
Popular Laboratory Equipment manuals by other brands

IKA
IKA KS 130 basic operating instructions

Four E's Scientific
Four E's Scientific OHS-20D Customer support information

Velp Scientifica
Velp Scientifica MULTI-TX5 instruction manual

BTX
BTX ECM 830 user manual

IKA
IKA Oven 125 basic dry operating instructions

Fisher Scientific
Fisher Scientific 15-460-2Q Installation and operation manual

PerkinElmer
PerkinElmer Lambda Series Getting started guide

3D Histech
3D Histech iSaCS user guide

elink
elink LNK-INJ-48-95W quick start guide

PerkinElmer
PerkinElmer RamanStation 400 Series Getting started guide

PerkinElmer
PerkinElmer LS 55 user guide

Isotech
Isotech LIBRA 785 User maintenance manual/handbook