MICROPURE 3600 User manual

©2007 Dust Free® • All rights reserved. • 213348-00 Rev. 1B 2/07
Model 3600
Ultraviolet Light System
Model 3600 #09950
GENERAL
This product is designed to help disinfect the inter-
nal surfaces of heating, ventilation, and air condi-
tioning systems. Bacteria and viruses that are in
the air stream that passes through the system will
also be reduced. The result is an improved level
of indoor air quality for occupants and improved
system hygiene.
The MicroPure® UV system emits ultraviolet(UVC)
radiation at a frequency of 254 nanometers, which
has been proven effective in damaging the DNA of
microorganisms such as viruses, bacteria, yeast
and molds. This process either destroys the micro-
organism or neutralizes its ability to reproduce.
FEATURES
• Reduces or prevents mold growth on HVAC
coils, allowing them to operate at peak effi-
ciency. Also significantly reduces bacteria,
viruses, fungi, and yeasts in the ductwork.
• High Output, long life UVC bulbs.
• Low maintenance and reduced costs.
INCLUDED INSIDE BOX
• MicroPure®ultraviolet light system
• UV bulb
• Mounting ring
• Mounting screws
• Mounting template
• Installation & operation manual
• UV warning label for duct
• Ductboard mounting ring
TOOLS REQUIRED FOR INSTALLATION
• Electric drill
• Phillips screw bit or screwdriver
• 2" drill bit or holecutter
• Eye protection
BEFORE INSTALLING
• Read all instructions carefully. Failure to do
so could damage the equipment or cause
harm to yourself or others.
• Acknowledge all warnings.
• Only qualified technicians should perform
the installation.
Installation & Operation Manual
PO Box 519
Royse City, TX 75189
PH: 1-972-635-9565
Http://www.dustfree.com
E246425

MICROPURE®MODEL 3600 INSTALLATION & OPERATION MANUAL
2
Dimensions
3.6"L x 3.6"W x 3.4"H
16" UV bulb
Weight:
Less than 2 lbs.
Electrical:
120V/60Hz. 0.85 Amps. 36 Watts. 6-ft power cord.
Listings:
Underwriters Laboratories. Category Code
ABQK (Accessories, Air Duct Mounted) UL
Standards: UL 153, UL 1598, and UL 1995.
The health aspects associated with the use of this product and its
ability to aid in disinfection of environmental air have not been investi-
gated by UL.
U.S. Patent Nos. 5,334,347, 5,817,276, 6,245,293, 6,267,924,
6,280,686, 6,313,470, 6,627,000, 6,539,727, 6,932,494, 6,550,257.
Specifications subject to change without notice.
Fig. 1 Unit dimensions.

MICROPURE®MODEL 3600 INSTALLATION & OPERATION MANUAL
3
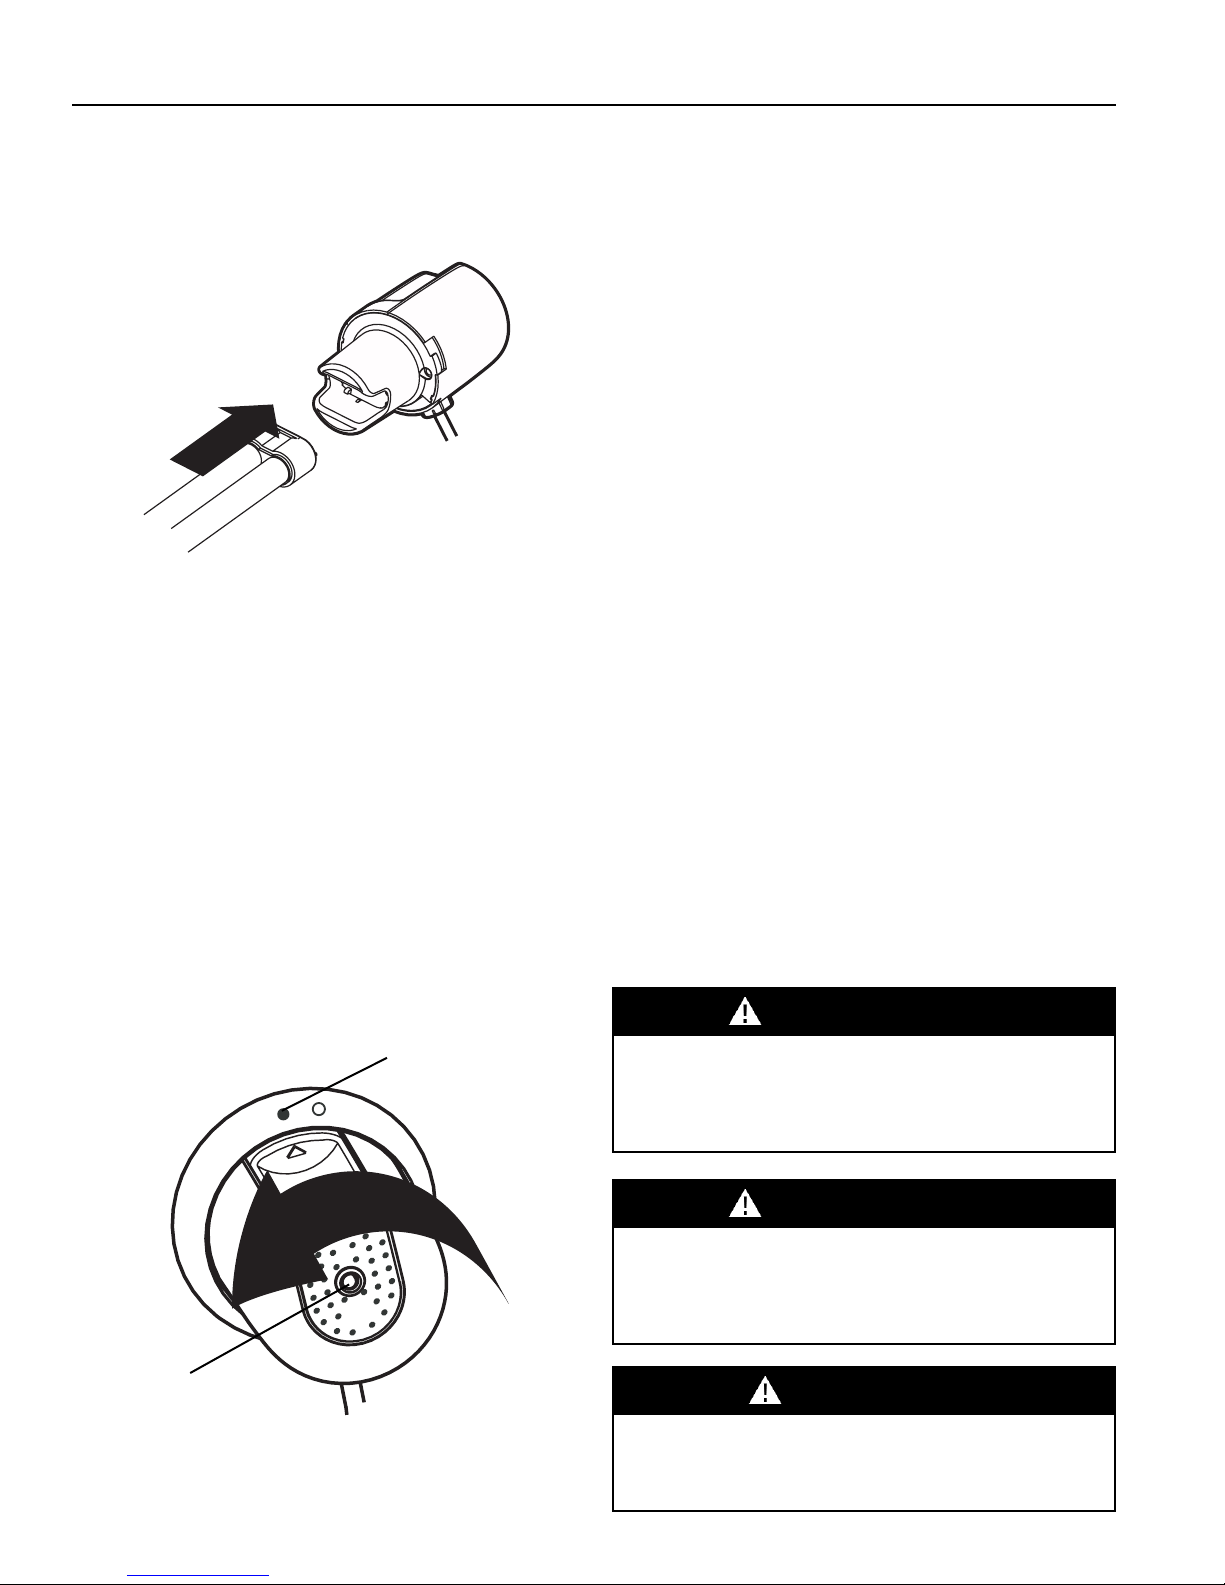
INSTALL THE MOUNTING RING
1. Apply the supplied mounting template to
the duct surface, centering the lamp hole on
the duct.
2. Use a holecutter to make a 2" hole in the
duct. Remove any burrs.
3. Position the mounting ring on the template,
make sure that the hole in the ring is aligning
with the cut hole in the duct and that the
locked symbol on the ring is facing up.
Note: For ductboard installations install the
ductboard ring as described before
installing the mounting ring.
4. Attach the ring to the duct by driving the
three supplied self-drilling screws into the duct
through the screw holes in the rings. Make
sure that the screw heads are fully seated in
the mounting ring and no part of the screws
protrude over the seating surface.
UVC Light Hazard.
UVC light can cause temporary or permanent loss of
vision, and sunburn. To prevent exposure, do not
install device in any applications that allows UVC
light to be visible after installation.
WARNING
SPECIAL INSTALLATION NOTES
• Do not install in closet return grille applications.
• Do not install in outdoor applications.
• Do not expose wiring or plastic parts to UV-C light.
• Do not install where UV-C light can be seen
after installation.
• Do not install beneath a humidifier.
• If the UV device is installed near an air filter or
flex duct, check with the filter or flex duct
manufacturer for UV-C resistance properties.
•If the UV device is installed on the inlet side
(return air side) of a coil, make sure that the
HVAC system is configured such that the
blower is located between the return air filter
and the inlet side (return air side) of the coil,
such as would be found in a traditional up-
flow, or horizontal furnace with the coil
placed after the heat exchanger.
• If the desired UV installation location is
intended to irradiate an air filter, to neutralize
the microbiological matter on the air filter
surface, such as would be found in the
return air drop of a basement application or
in the return plenum of a horizontal system
in an attic; take precautions as described in
note above, and make sure the UV fixture is
placed on the return side of the filter. DO
NOT INSTALL THE UV FIXTURE ON EITHER
SIDE OF THE FILTER IN HALL / CLOSET
RETURN AIR APPLICATIONS. (See ATTEN-
TION! Warning sheet #212945-00).
UVC Light May Degrade Plastic and Rubber.
Shield exposed plastic drain pans, wire insula-
tion, flex duct, or other plastic/rubber compo-
nents from UVC light.
CAUTION
DUCTBOARD MOUNTING ONLY (Fig.2)
For ductboard installations, a ductboard
mounting ring is provided. Align the pre-drilled
holes in the ductboard ring with the screw
alignment holes on the template. Secure the
ductboard ring to the surface by screwing the
four long screws(provided) into the surface at
the notches in the ring. The head of the screw
will hold the ring in place.
Fig. 2 Installing the optional ductboard ring.

MICROPURE®MODEL 3600 INSTALLATION & OPERATION MANUAL
4
UVC Light Hazard.
UVC light can cause temporary or permanent loss of
vision, and sunburn. Take precautions to protect eyes
and skin from direct exposure.
WARNING
Fire Hazard. Do not exceed voltage rating.
Severe damage to device and/or fire could
result. Verify proper power with voltage meter.
DANGER
INSTALL THE UNIT (Fig.4)
1. Insert the unit into the mounting ring with
the arrow symbol pointing toward the
"unlocked" symbol on the mounting ring.
2. Rotate the UV system counter-clockwise to
the "locked" position. (See Fig.4)
3. Connect the power cord to 120V power and
verify the lamp is lit by checking that the LED
is on.
4. Apply the included HVAC maintenance
label to the duct in a high visibility location to
alert future service technicians to the presence
of UV light.
OPERATION
Under normal conditions the unit should be
operated continuously to extend the life of the
bulb, and to increase the effectiveness in dis-
infecting the location selected.
Fig. 4 Insert unit into mounting ring and rotate into place.
Rotate unit counter-
clockwise to "locked"
position.
LED illuminates when
unit is connected to
power and lamp is on.
INSTALL THE LAMP (Fig.3)
Install the lamp by firmly pressing it into the
unit. Use a cleaning cloth and alcohol to
remove dirt and fingerprints.
Fig. 3 Insert lamp into unit.
Mercury Hazard. Do Not Break.
Each UVC bulb contains a small amount of Mercury.
May cause redness or irritation. Use proper disposal
techniques in case of breakage.
WARNING

MICROPURE®MODEL 3600 INSTALLATION & OPERATION MANUAL
5
Replacement Parts Part No.
UVC Bulb - 16" 09951 / 36001
For information on the dealer in your area call: 1-972-635-9565.
Visit us at http://www.dustfree.com
PROPER CLEAN-UP TECHNIQUE IN CASE OF
BULB BREAKAGE
GWear protective gloves, eyewear and mask.
GSweep the broken glass and debris into a plastic
bag, seal the bag, and dispose of properly.
Contact your local waste management office for
proper disposal.
GDo not use a vacuum cleaner. Do not
incinerate.
BULB DISPOSAL
Dispose of your spent UVC bulbs at your local
recycling center. You may also send your
spent bulbs in the same container you
received your replacement bulbs to:
Dust Free® Bulb Reclamation
1112 Industrial Drive
Royse City, TX 75189
Mercury Hazard. Do Not Break.
Each UVC bulb contains a small amount of Mercury.
May cause redness or irritation. Use proper disposal
techniques in case of breakage.
WARNING
BULB REPLACEMENT(Annually)
The bulb should be replaced annually even if it
appears to be operating normally. UVC energy
production diminishes over time.
1. Disconnect power and allow lamp to cool
for 15 minutes.
2. Rotate the unit clockwise until the arrow on
the knob is aligned with the "unlocked" symbol
and remove.
3. Hold the unit firmly and slowly pull the lamp
straight out from the unit.
4. Obtain replacement lamp and firmly press
into unit. Note: If applicable, the notch in the
lamp must align with the notch in the unit.
5. Insert the unit into the mounting ring and
rotate counter-clockwise to the "locked" posi-
tion.
6. Reconnect power.
7. Verify that LED light is on.
Clean bulb(s) prior to installation.
Failure to remove dirt and fingerprints from
the bulb(s) could shorten their lifespan.
CAUTION
Burn Hazard.
During replacement, allow bulbs to cool 10 minutes
before removing them. Personal injury may result.
WARNING


MICROPURE®MODEL 3600 INSTALLATION & OPERATION MANUAL
EQUIPMENT WARRANTY
Dust Free®, LP warrants this UV-C system to be free from defects in materials and workmanship under normal use and service,
for three (3) years. This warranty does not cover UV-C bulb(s), which carry a one (1) year warranty from the date of installation.
This warranty does not cover cosmetic damage, damage due to acts of God, damage as a result of handling or shipment, negli-
gence, misuse, connection to improper voltage, improper maintenance, or abuse. This warranty is void if defect(s) result from fail-
ure to have this unit installed by a qualified, properly licensed, heating and air conditioning contractor in compliance with all local
building and construction codes.
Dust Free®, LP's exclusive obligation under this warranty shall be to supply, without charge, a replacement for any covered com-
ponent of the UV-C system which is found to be defective within the parameters defined herein. Dust Free®, LP reserves the right
to replace or repair the defective part or component.
Dust Free®, LP SHALL NOT BE LIABLE FOR ANY LOSS OR DAMAGE OF ANY KIND, INCLUDING ANY INCIDENTAL OR CONSE-
QUENTIAL DAMAGES RESULTING, DIRECTLY OR INDIRECTLY, FROM ANY BREACH OF WARRANTY, EXPRESS OR IMPLIED,
OR ANY OTHER FAILURE OF THIS PRODUCT. (Some states do not allow the exclusion or limitation of incidental or consequen-
tial damages, so this limitation may not apply to you.) THE WARRANTIES SET FORTH HEREIN ARE EXCLUSIVE AND Dust
Free®, LP EXPRESSLY DISCLAIMS ALL OTHER WARRANTIES, WHETHER WRITTEN OR ORAL, IMPLIED OR STATUTORY,
INCLUDING BUT NOT LIMITED TO ANY WARRANTIES OF MERCHANTABILITY, WORKMANSHIP, OR FITNESS FOR A PARTICU-
LAR USE. If the limited warranty is void due to failure to use a qualified contractor all disclaimers of implied warranties shall be
effective upon installation.
How to make a warranty claim or have questions answered:
Should you have a warranty claim or questions about the warranty policy, contact the distributor or dealer from which you pur-
chased the product. Proof of original purchase and proof of identity that the original purchasing party is filing the claim is required
in order to initiate a warranty claim. Defective parts must be returned no later than thirty (30) days after the failure to the installing
contractor together with the model number, serial number, and date of installation. All service and removal must be performed by
a licensed HVAC contractor. You must pay shipping charges and all other costs of warranty service. Warranty is only valid the
United States and Canada.
THIS WARRANTY SHALL NOT OBLIGATE THE MANUFACTURER FOR ANY LABOR COSTS AND SHALL NOT APPLY TO
DEFECTS IN WORKMANSHIP OR MATERIALS FURNISHED BY THE INSTALLING CONTRACTOR AS CONTRASTED TO
DEFECTS IN THE GERMICIDAL LIGHT ITSELF.
NOTE: Do not return any products or parts to the factory without a factory issued Return Authorization number issued by the Dust
Free®, LP customer service department.
In the event you have any questions concerning the use and care of this product or this warranty which have not been answered
to your satisfaction by the distributor or dealer, please call or write the factory.
Warranty Registration Form
Please complete the form below and mail to: Dust Free®, LP, PO Box 519, Royse City, TX 75189
Table of contents
Popular Lighting Equipment manuals by other brands

Eliminator Lighting
Eliminator Lighting Trio Par LED RG manual

Anslut
Anslut 423-288 installation instructions

Aladdin
Aladdin BI-FABRIC 4 user manual

GENI
GENI Mojo Spin Master MJS-1 Product user guide

Zodiac
Zodiac Easy Connect Instructions for installation and use

Vision & Control
Vision & Control LDLF60x180-R633/UDC Instructions for use