Microsoft Hub 2S User manual

Setup Guide · Guide de conÀguration · Guía de conÀguración
1-139217.indd 1 06.03.19 04:02

aka.ms/Hub2SUnbox
Scan for unboxing video
Scanner pour voir la vidéo de déballage
Buscar video de desempaquetado
1-139217.indd 2 06.03.19 04:02

4
2
1
4
5
8
9
11
2
1
1
6
11
3
3810 11
5 7 9
10
6
USB-C
USB-A
AC power
Alimentation c.a.
Alimentación de CA
DC power
Alimentation c.c.
Alimentación de CC
Ethernet
USB-C (supports
DisplayPort in)
USB-C (prend en charge
entrée DisplayPort)
USB-C (admite entrada
DisplayPort)
7HDMI in
Entrée HDMI
Entrada HDMI
Mini DisplayPort out
Sortie du Mini DisplayPort
Salida Mini DisplayPort
Source
Fuente
Volume
Volumen
Power
Alimentation
Encendido/apagado
1-139217.indd 3 06.03.19 04:02

Set up your mount Àrst.
Leave your Surface Hub in the box
until the mount is set up and
mounting hardware is applied.
Mount is not included.
Your mount is sold separately.
123 4
Attach hardware to the Surface Hub.
Mounting hardware and speciÀc
instructions are found in the box for
your mount.
Remove the instructional label before
mounting.
Get someone to help you lift and
mount your Surface Hub.
Make sure to hold and lift the Surface
Hub from the bottom.
Attach accessories and power on. Install accessories and
attach power cable as shown. See guides on the screen cling.
Remove cling wrap from the screen. Press the power button
to power on.
Setup your Surface Hub 2S
1-139217.indd 4 06.03.19 04:02

Accessories & more
Pen Camera Learn more
Your pen comes ready to use. Attach the camera to the USB-C port in the middle of the top of
the screen.
To replace the AAA battery, pull off the top button and insert battery
as shown. The indicator light will turn red when the battery is low.
The indicator will light when the camera is in use.
Move the lens cap to the front to protect the lens when the camera
is not in use.
To remove the camera, pull up and forward. There is a magnetic
tether that prevents the camera from being knocked off or pulled
off backwards.
Unboxing and setup
Using Microsoft Whiteboard
Connect and share
Sign-in and access content
And more...
aka.ms/Hub2SResources
For important safety
information, see the Safety &
Regulatory Guide.
Replaceable
pen tip
Eraser and
top button
Lens cover
USB-C plug
Indicator LED
Magnetic tether
Right-click and select button Indicator LED
1-139217.indd 5 06.03.19 04:02

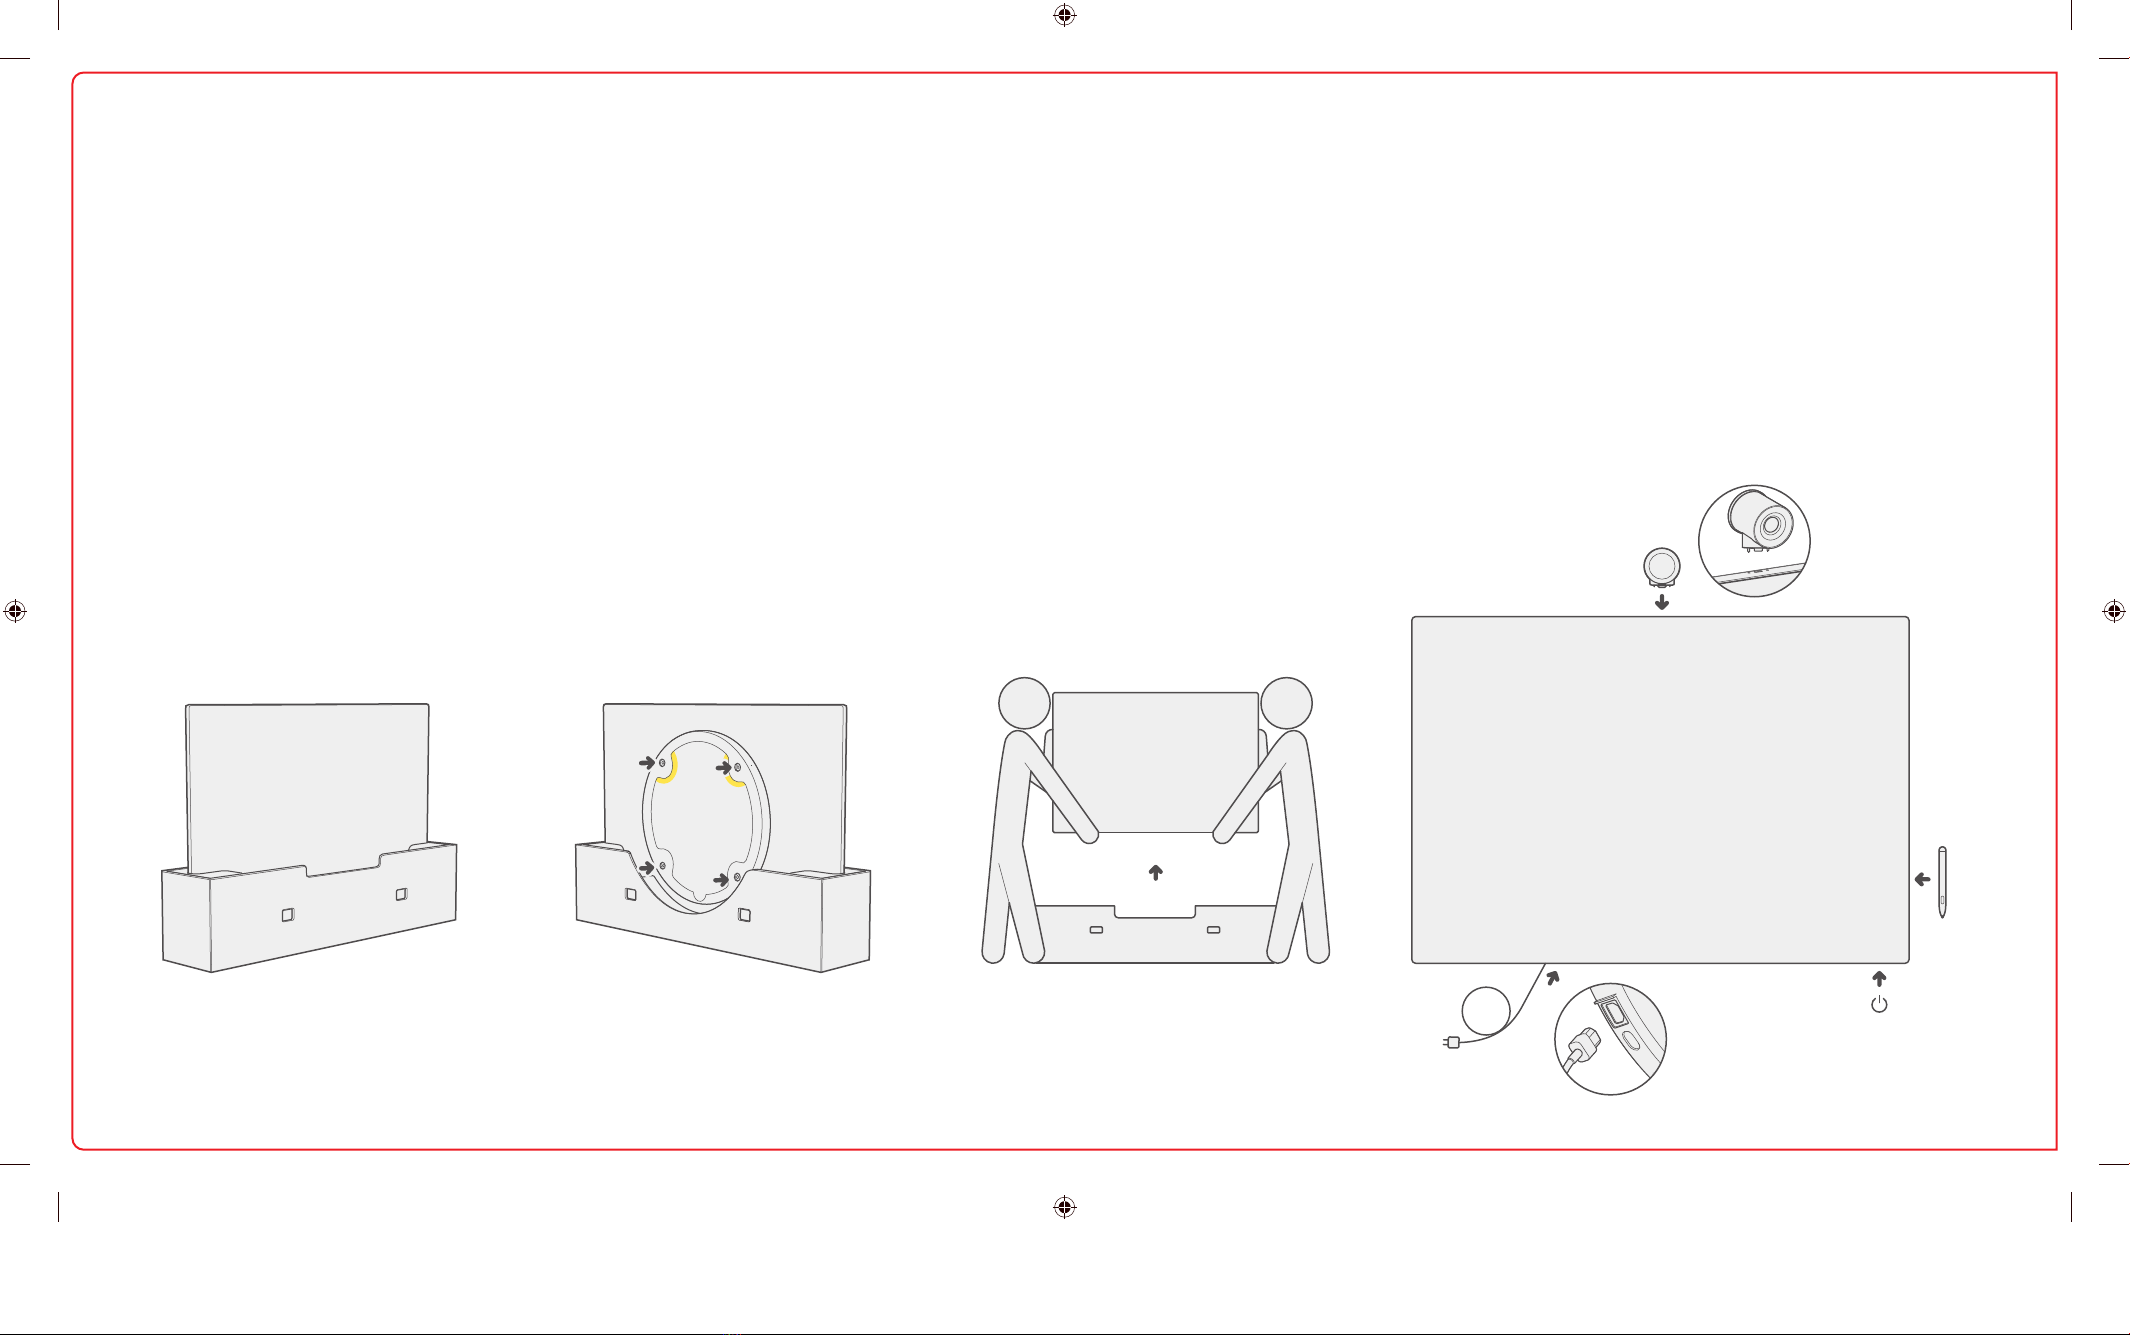
Préparez tout d’abord le support.
Laissez votre Surface Hub dans la
boîte jusqu’à ce que le support soit
prêt et que la quincaillerie de Àxation
soit installée.
Le support n’est pas inclus.
Votre support est vendu séparément.
123 4
Installez la quincaillerie sur le Surface
Hub.
La quincaillerie de Àxation ainsi que
les instructions spéciÀques se trouvent
dans la boîte de votre support.
Retirez l’étiquette contenant des
instructions avant l’installation.
Demandez l’aide de quelqu’un pour
vous aider à soulever et à installer
votre Surface Hub.
Assurez-vous de tenir et de soulever le
Surface Hub par le bas.
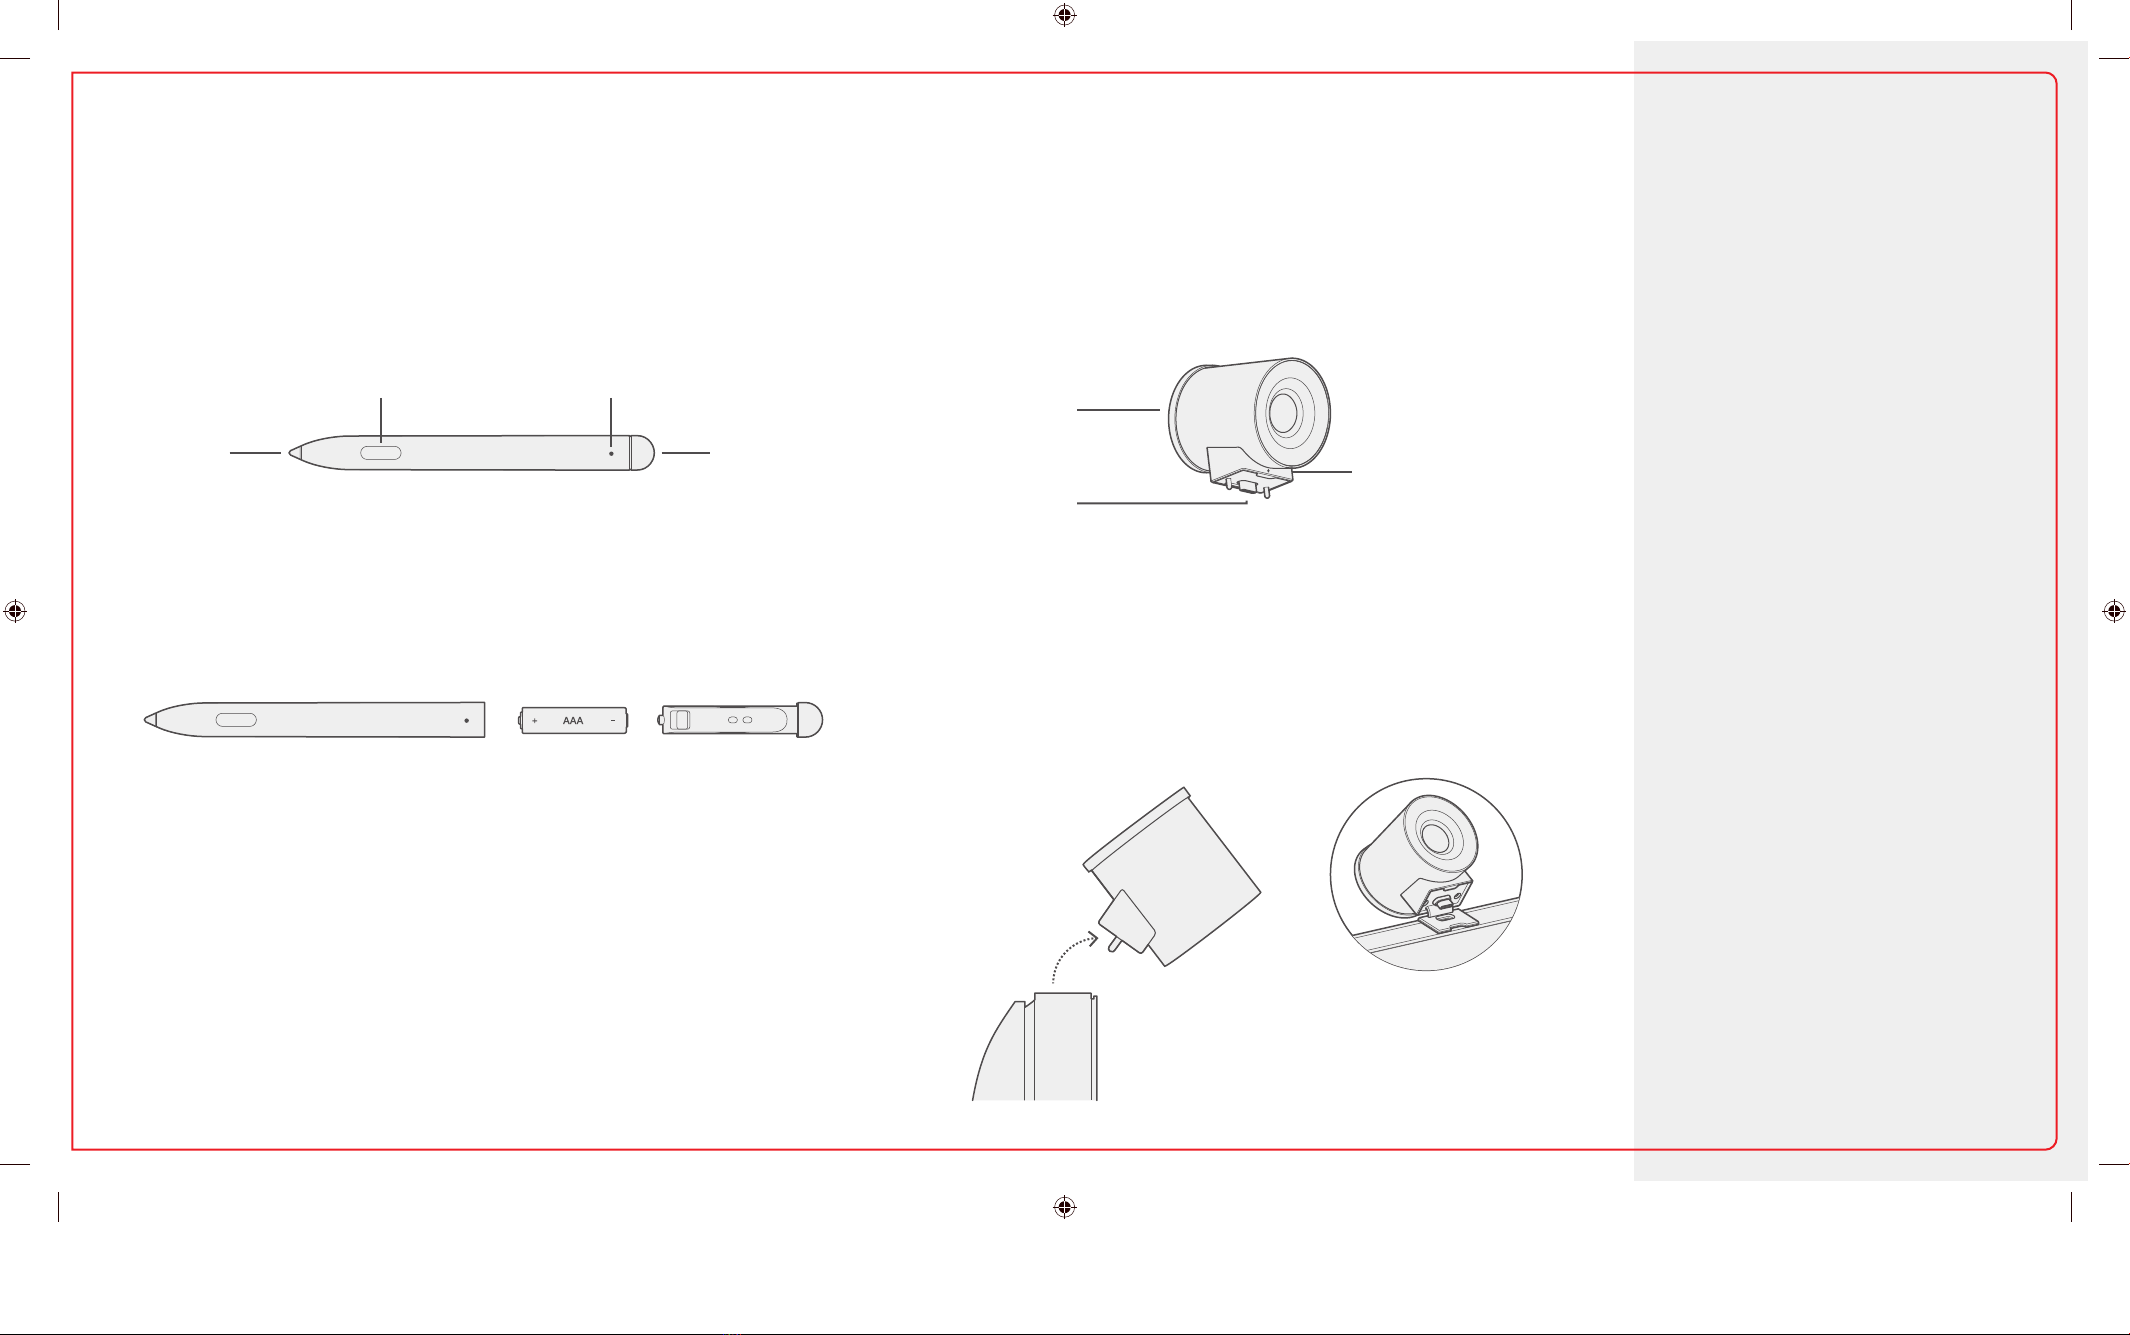
Installez les accessoires et mettez l’appareil sous tension.
Installez les accessoires et le câble d’alimentation comme
sur l’illustration. Reportez-vous aux guides sur la pellicule
appliquée sur l’écran.
Retirez la pellicule à l’écran. Appuyez sur le bouton
d’alimentation pour mettre l’appareil sous tension.
ConÀgurez votre Surface Hub 2S
1-139217.indd 6 06.03.19 04:02

Accessoires et plus
Stylet Caméra En savoir plus
Votre stylet est déjà prêt à être utilisé. Fixez la caméra sur le port USB-C au milieu sur le dessus de
l’écran.
Pour remplacer la pile AAA, tirez sur le bouton du haut et insérez la
pile comme sur l’illustration. Le voyant deviendra rouge lorsque la pile
est faible.
Le voyant s’allumera lorsque la caméra est en fonction.
Déplacez le capuchon de la lentille à l’avant pour protéger la lentille
lorsque la caméra n’est pas en fonction.
Tirez la caméra vers le haut et l’avant pour la retirer. Une Àxation
magnétique empêche la caméra d’être accrochée ou tirée vers
l’arrière.
Déballage et conÀguration
Utilisation du tableau blanc
collaboratif Microsoft
Connecter et partager
Connexion et accès au
contenu
Et plus encore...
aka.ms/Hub2SResources
Pour consulter les importantes
informations de sécurité,
reportez-vous au Guide de
sécurité et réglementaire.
Pointe de
remplacement
du stylet
Gomme à
effacer et
bouton du
haut
Couvercle de la lentille
Prise USB-C
Voyant DEL
Fixation magnétique
Bouton clic de droite et sélection Voyant DEL
1-139217.indd 7 06.03.19 04:02

Primero conÀgura el soporte.
Deja Surface Hub en su caja hasta que
el soporte se haya instalado y se haya
aplicado el cerraje de montaje.
El soporte no está incluido.
El soporte se vende por separado.
123 4
Conecta el cerraje a Surface Hub.
El cerraje de montaje y las instrucciones
correspondientes se encuentran en la
caja del soporte.
Quita la etiqueta de instrucciones antes
de realizar el montaje.
Con la ayuda de otra persona, levanta
y monta Surface Hub.
Asegúrate de sostener y levantar
Surface Hub desde la parte inferior.
Conecta los accesorios y enciende el dispositivo. Instala
los accesorios y conecta el cable de alimentación tal como se
muestra. Consulta las guías en el Àlm plástico transparente de
la pantalla.
Quita el Àlm plástico transparente de la pantalla. Presiona el
botón de inicio/apagado para encender el dispositivo.
ConÀgura tu Surface Hub 2S
1-139217.indd 8 06.03.19 04:02

Accesorios y más
Lápiz Cámara Más información
El lápiz se envía listo para usar. Conecta la cámara al puerto USB-C del centro superior de la
pantalla.
Para reemplazar la pila AAA, extrae el botón superior e inserta la pila,
tal como se muestra. La luz del indicador se iluminará en rojo cuando la
batería se esté agotando.
El indicador se iluminará cuando la cámara está en uso.
Mueve la tapa del objetivo a la parte frontal para proteger el
dispositivo cuando la cámara no esté en uso.
Para quitar la cámara, tira hacia arriba y adelante. Hay un conector
magnético que impide que la cámara se caiga o se tire hacia atrás.
Desempaquetar e instalar
Usar Microsoft Whiteboard
Conectar y compartir
Iniciar sesión y acceder a
contenido
Y mucho más...
aka.ms/Hub2SResources
Para obtener información
importante sobre seguridad,
consulta la Guía de seguridad
y reglamentos.
Punta de
lápiz
reemplazable
Borrador
y botón
superior
Tapa del objetivo
Conector USB-C
Indicador LED
Conector magnético
Haz clic derecho y selecciona el botón Indicador LED
1-139217.indd 9 06.03.19 04:02

1-139217.indd 10 06.03.19 04:02

1-139217.indd 11 06.03.19 04:02

X22-01710-01
support.microsoft.com
©2019 Microsoft
1-139217.indd 12 06.03.19 04:02
Table of contents
Languages: