MID WEST PRODUCTS B-369NT User manual

©2019 Mid West Products, Inc. -1- Form No. M1-1726
26” DELUXE PUSH PAVEMENT/LEAF/LAWN SWEEPER
MODEL B-369NT
No Tools Required Owner’s Manual and Parts List
SAVE THIS MANUAL
You will need this Manual for the Safety Instructions, Assembly Instructions and Parts List. Put it in a
safe, dry place for future reference.
Additional Information/Link to PDF Copy of this Manual:

©2019 Mid West Products, Inc. -2- Form No. M1-1726
1. Lay all parts on a flat surface, and follow these few
simple instructions.
2. Set Chassis (36) on its Wheels and swing Support
Stand (31) to rear until ends of Stand are against stops
in Chassis End Plates. It is not necessary to loosen
Nuts (12). See Figure 3.
3. Remove Wing Nuts (6) and Hook Bolts (14) from the
Steering Handle (30). Slip reduced ends with holes of
Side Handle Tubes (33) into ends of Steering Handle
Tube (30). Line up hole in each end and reinsert Hook
Bolts (14) through Tubes. Secure with Wing Nuts (6).
See Figures 1 and 2 for correct position of all parts.
NOTE: Make certain Hook Bolts point to rear of
sweeper.
4. Now, remove Wing Nuts (6) from the bottom ends of
the Side Handle Tubes (33). Slip bottom ends of Side
Handle Tubes (33) inside Chassis (36) See Figure 8.
Make certain the Thumb Screws (28) go through the
hole in the formed pocket. Reattach the Wing Nuts (6)
onto the Thumb Screws (28) now protruding through
the outside of the Chassis (36).
5. Hang Hamper (35) inside Handle Assembly with rear
Hamper Rod (32) in Hooks (14). Place front Hamper
Rod (32) in slots “Y” of Chassis End Plates. See
Figures 2 and 4.
Fasten Hangers (5) on Side Handles. Tilt Hanger in—slide
and twist out over tube. See Figure 6.
All “right” and “left” directions should be considered
as from your position behind the Lawn Sweeper
CHASSIS (36)
(The correct positioning of the Handle Tubes as you are
looking into the Brush Assembly of the Chassis)
FIG. 8
Left Side Handle Right Side Handle
Tube Tube
ASSEMBLY

©2019 Mid West Products, Inc. -3- Form No. M1-1726
Your Lawn Sweeper box contains the following items: 1- Chassis, 1- Steering Handle Assembly, 2-
Side Handle Assemblies (R.H & L.H.), 1- Manual, & 1- Hamper Assembly.
Key
Part No.
Description
Qty
Key
Part No.
Description
Qty
1
L-127
5/16-18 X 1-1/2 Hex Hd. Cp. Sc.
2
22
L-6102
Bumper Tube
1
2
L-262
5/8 Type "E" Retaining Ring
2
23
L-6151
Spring Adjustment
1
3
L-279
5/16-18 X 1/2 Hex Hd. Sc.
6
24
L-6157
Pinion Gear
2
6
X-1152
1/4-20 Wing Nut
4
25
L-6190B
Caster Wheel
2
7
L-5485
3/8-24 Pilot Nut
2
26
1-1060
Brush Strip
3
8
L-5486M
3/8-24 Lock Nut (Spec.)
2
27
1-1080
Flange Bearing
2
9
X-1041
1/2 Push On
2
28
X-1182
1/4-20 X 1-1/4 Bolt
2
11
X-1043
Brush Holder Spring
9
29
1-1287
Rubber Cap
4
12
X-1107
5/16-18 Center Lock Nut
8
30
1-1354
Steering Handle
1
13
X-1348
5/16" Push On Cap
2
31
1-1336
Carriage Tube
1
14
X-1360
Hook Bolt
2
32
1-1344
Hamper Rod
2
15
L-5464
10" Plastic Wheel
2
33
1-2274
Side Handle Tube R.H.
1
16
1-1418E
10” Ribbed Tire
2
NI
1-2275
Side Handle Tube L.H.
1
18
L-5472
Wheel Bushing
4
34
1A-1311
Caster Bracket Assembly
2
19
1-2399
Wheel Shield
2
35
1A-1815
Hamper Assembly
1
20
L-5480
Pinion Pawl
6
36
1A-2277
Shield Assembly
1
21
L-5496
Wheel Stud Axle
2
NI = Not Illustrated, Included
PARTS DIAGRAM & LIST

©2019 Mid West Products, Inc. -4- Form No. M1-1726
1. BRUSH HEIGHT ADJUSTMENT: You can sweep both
lawn and paved areas by a simple adjustment of the
Brush. To raise Brush to sweep your lawn, merely
squeeze Brush Control and push down on front of
Bumper Tube. At the same time, with the other hand,
pull up on right corner of Chassis. To lower Brush, just
reverse above instructions. See Figure 5. Whenever
sweeper seems to push hard, merely raise Brush one
notch higher. For best operation on lawns the Brush
should merely flick the top of grass blades.
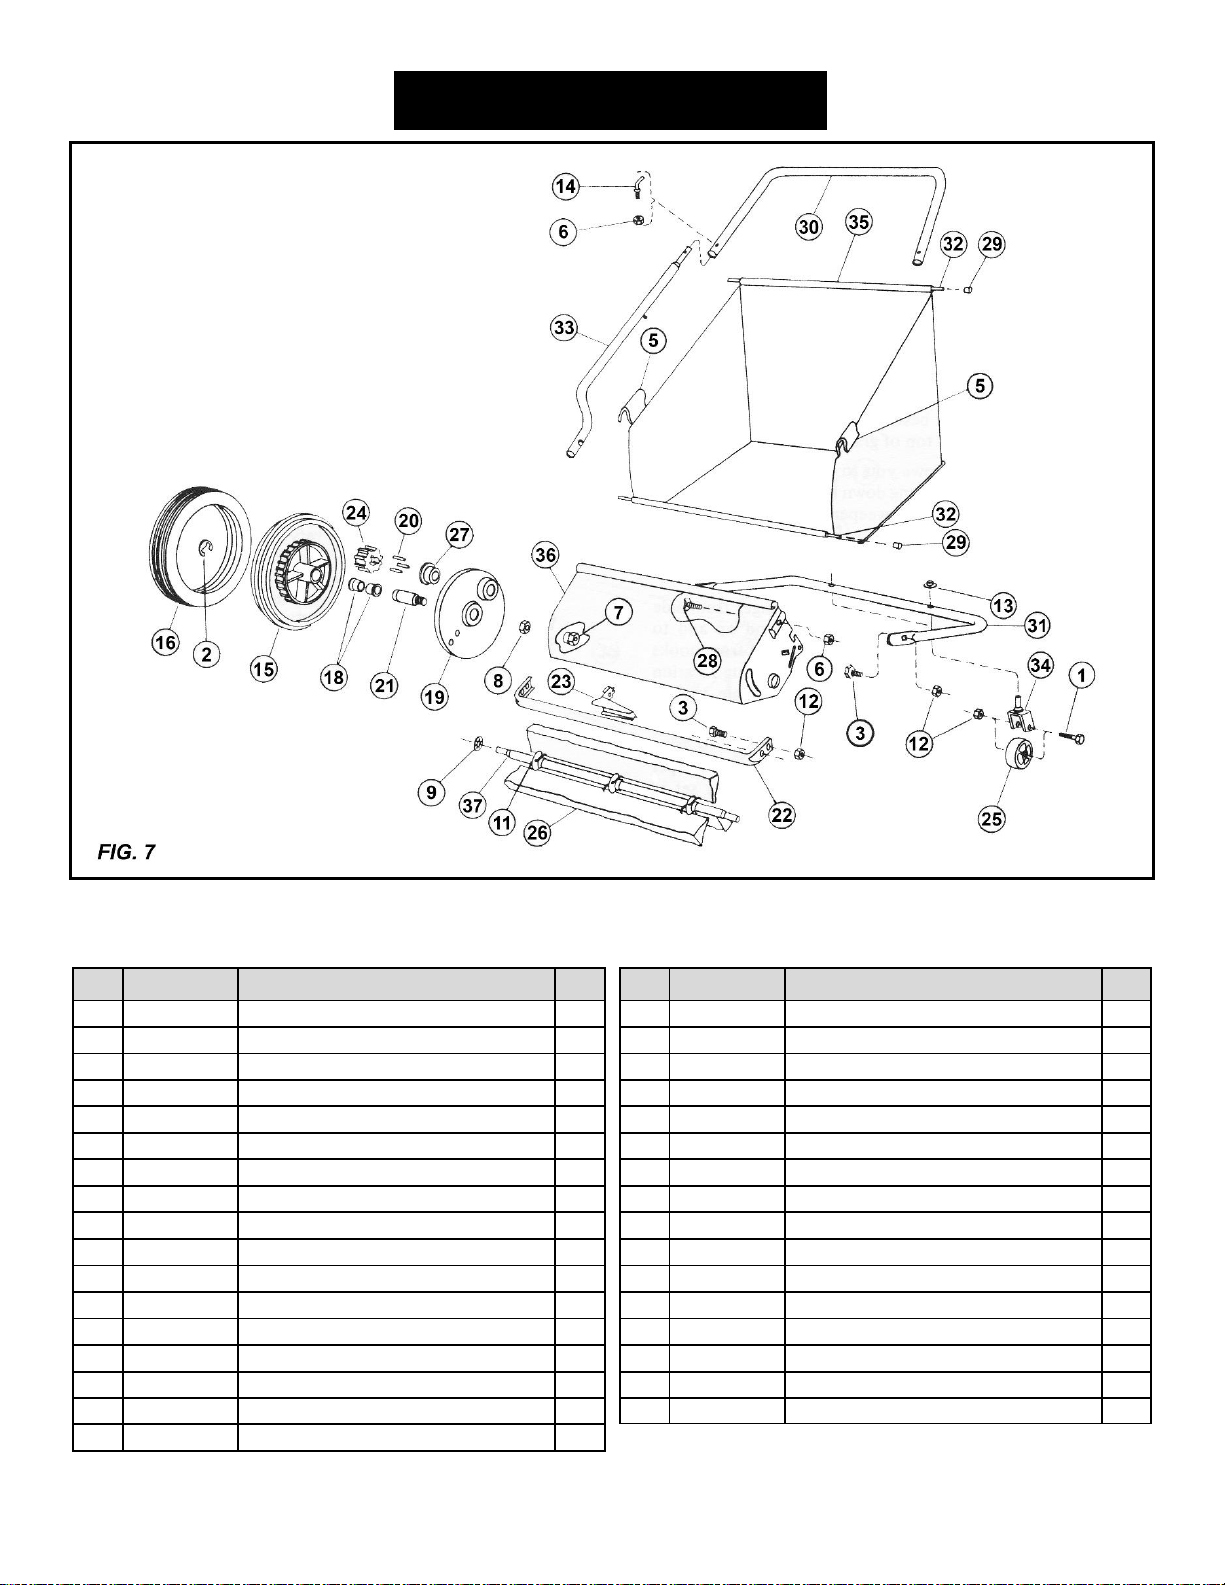
2. DUMPING SWEEPER: Release Hamper Hanger from
Side Hamper Tubes. Then, lift front Hamper Rod up
and to rear of sweeper. Now, remove rear Hamper Rod
from Hooks (14) and lift Hamper from sweeper. If
dumping location is far from sweeping area, it may be
desirable to pile several Hamper loads of debris on a
tarpaulin for faster removal to dumping location.
3. STORAGE: Just fold Stand forward under Chassis.
Hamper will fold itself when sweeper is hung on wall or
set in corner against wall for compact winter storage.
4. NO LUBRICATION REQUIRED: Brush Axle Bearings
are lubricated and sealed during factory assembly. No
other lubrication is necessary. DO NOT OIL OR
GREASE GEARS IN WHEELS. If oil or grease is
applied to these parts the Brush will not rotate. Then it
is necessary to re-move Wheel and wipe parts clean.
5. When servicing or replacing the Pinion or Pawl Pins
please refer to the PINION & PAWL INSTALLATION
Figure. Right (R) and Left (L) notations on the Pinion
Gears are from your position behind the Lawn
Sweeper.
6. Your Lawn Sweeper is precision manufactured by
experienced craftsmen, using the very finest in tools
and materials. Although it is ruggedly constructed, do
not subject it to misuse. CAUTION: DO NOT PUSH
SWEEPER TOO CLOSE TO FIRE –the Brushes will
burn. BE SURE TO WIPE OFF YOUR LAWN
SWEEPER AFTER EACH USE. Store in a dry place
out of direct sunlight. Don’t permit the sweeper to stand
in the hot sun unless it is in actual use.
You will find many work-saving uses for your Lawn
Sweeper. Use it in the early Spring to give your lawn a good
healthful scrubbing. Use it throughout the Spring and
Summer both before and after mowing. Sweeping before
mowing stands up the grass for a clean, even mowing –
and protects your mower from sticks, stones, or nuts which
might damage the blades of your mower. After mowing,
your Lawn Sweeper will whisk away unsightly grass
clippings –leaving your lawn velvety smooth.
OPERATION
GUARANTEE
The merchandise you have purchased from us has been carefully engineered and manufactured under
Mid West Products rigid quality standards and should give you satisfactory, dependable operation.
However, like all mechanical merchandise, it may occasionally require adjustment or maintenance.
Should you need technical assistance, please contact MID WEST PRODUCTS.
INSTRUCTIONS FOR ORDERING PARTS
(Minimum Parts Order Charge $20.00)
1. Address all parts orders or correspondence regarding customer service to one of the following:
Parts Dept.
Phone:
(937) 337-3641
Mid West Products, Inc.
P.O. Box 301
E-mail:
Parts@Mid-West-Products-Inc.com
Phillipsburg, OH 45354
Website:
www.Mid-West-Products-Inc.com
2. Write your name and address plainly (print or type).
3. Explain where and how to ship.
4. Give model number of unit.
5. Give part number from parts list, as well as a description, including color, of the part and the quantity you need.
6. Inspect all shipments you receive. If any parts are damaged or missing, file a claim with the carrier before accepting.
7. If you are returning parts, be sure to include WITH THE SHIPMENT a list of the parts with your name and address.
8. All orders for repair and replacement parts will be shipped when paid with Master Card, Visa, or personal
check/money order. Prices subject to change without notice.

©2019 Mid West Products, Inc. -5- Form No. M1-1726
WOODEN UTILITY CARTS —GC-20 OR GC-26
It has a gate that lifts out to unload bulky loads like mulch, soil, gravel, firewood or waste
and also allow it to carry longer items. Once you have one, you’ll wonder what you ever
did without it!
The Standard-Duty Utility Cart has two 20” Pneumatic Wheels and a cargo capacity of 6.5
cubic feet or up to 300 pounds.
The Heavy-Duty Utility Cart has two 26” Pneumatic Wheels and a cargo capacity of 11.3
cubic feet or up to 400 pounds.
VEGETABLE GARDEN ROW SEED PLANTER —GSF-31M
➢ALL-IN-ONE item that can simultaneously Plant and Fertilize Seeds as well as Mark
Rows.
➢It only weighs 14 lbs. and NO TOOLS are REQUIRED for Assembly.
➢Attached Pouch for extra seed, notes, gloves, and other needed items.
➢High Strength Powder Coated Steel Frame and Seed Tube.
➢The unit is Rear-Wheel Belt Driven for Positive, Even Seeding and No Messy Chain to
pull the seeds out of the ground.
➢Includes 6 Different Seed Plates for 31 Common Variations in Seed Sizes.
HIGH WHEEL CULTIVATOR —HWC-243A
•24” Steel Wheel For Easy Handling
•Special Selection of 3 Tools (Mol-board Plow, Reversible Shovel, Welded Five-Tine
Cultivator)
•Slotted Foot For Plow Attachments Enables Easy Adjustment of Cutting Depth and
Angle
•Handle Folds Easily For Storage or Transportation
“TRACTOR SEAT ON WHEELS”/HANDY CADDY —GC-400R
Sit comfortably on the sturdy four-wheeled Handy Caddy to do any of the jobs that
usually require stooping, squatting, or kneeling. The 360° Swivel Seat allows freedom
of movement while working in the garden or the greenhouse. Tools and supplies are
held within easy reach in the handy Shelf below the Seat. Tasks, such as at your
planter’s bench or in the actual garden becomes easier and fun! At a weight of 34
pounds, this item is durable, easy to use, comfortable, and ….yes….EASY on the
KNEES! It has many wonderful uses, just use your imagination!!! It is the ULTIMATE
HELPER! Get up off your aching knees and onto a “Tractor Seat on Wheels”today!
OTHER LAWN & GARDEN TOOLS FROM
MID WEST PRODUCTS, INC.
Table of contents
Other MID WEST PRODUCTS Lawn Sweeper manuals

MID WEST PRODUCTS
MID WEST PRODUCTS MH-481 User manual

MID WEST PRODUCTS
MID WEST PRODUCTS HDT-38B User manual

MID WEST PRODUCTS
MID WEST PRODUCTS B-319NT User manual

MID WEST PRODUCTS
MID WEST PRODUCTS B-319SSNT User manual

MID WEST PRODUCTS
MID WEST PRODUCTS B-319 User manual

MID WEST PRODUCTS
MID WEST PRODUCTS MH-4451 User manual