MID WEST PRODUCTS MH-4451 User manual

©2017 Mid West Products, Inc. -1- Form No. M1-1604
45” TRAILING PAVEMENT/LEAF/LAWN SWEEPER
MODEL MH-4451
Owner’s Manual and Parts List
SAVE THIS MANUAL
You will need this manual for the safety instructions, assembly instructions and parts list. Put it in a
safe, dry place for future reference.

©2017 Mid West Products, Inc. -2- Form No. M1-1604
Your new Trailing Lawn Sweeper is precision
manufactured using the finest in tools and
materials. Although it is ruggedly constructed,
do not subject it to misuse. CAUTION: DO NOT
PULL YOUR UNIT TOO CLOSE TO A FIRE –
the Brushes and Hamper will burn. Be sure to
wipe off your unit after each use. Store unit in a
dry place out of direct sunlight. Do not permit
the Lawn Sweeper to stand in the hot sun unless
it is in actual use.
You will find many work saving uses for your
Lawn Sweeper. Use it in early Spring to give
your lawn a good healthful scrubbing. Use it
throughout the Spring and Summer both before
and after mowing.
Sweeping before mowing stands up grass for a
clean, even cut - and protect your Mower from
sticks, stones, or nuts, which might damage the
blades of your Mower. After mowing, your
Lawn Sweeper will whisk away unsightly grass
clippings –leaving your lawn velvety smooth.
This Lawn Sweeper was in perfect condition
when it was shipped to you. If any damage is
found when it is unpacked, save the carton and
immediately request the delivery carrier to make
an inspection report.
Your Lawn Sweeper comes mostly assembled on the pallet. The Hitch Assembly and Height
Adjustment Handle may need attached:
PARTS LIST OF MH-4451
HITCH ASSEMBLY
MANUAL
HEIGHT ADJUSTMENT HANDLE
WIND APRON

©2017 Mid West Products, Inc. -3- Form No. M1-1604
Assembly
Remove all Sweeper Parts from Carton. All “Right” and “Left” directions are in reference to position
behind the Lawn Sweeper.
Tools required for assembly: Two (2) 7/16” – 1/2" Combination Wrench, one (1) Adjustable Wrench,
and one (1) Pliers. Lay out all Parts, have Tools handy, and follow these few Instructions:
Step 1: Install Adjustment Tube (7) to Chassis. Insert Adjustment Tube through rectangular hole of
Adjustment Bracket. Fasten the Adjustment Tube with Bolt (55) and Nut (11). (Note –Bolt (55) and
Nut (11) are already slightly tightened on the Chassis.) Pull Spring (33) and Retainer Tube (34) forward
until the Spring is secure in the notched location of the Adjustment Bracket.
Step 2: Install Hitch Tube Assembly by removing Pilot Nuts (60), which are already slightly tightened
on the Chassis. Install Hitch Tube Assembly on Bolts (61) and Secure with Pilot Nuts (60). (See Image:
Below –Left)
Step 3: Take Wind Apron (65) and fasten Velcro to both Side Hamper Tubes (42). Fasten the other
Velcro strap to the rear of the Hamper Pivot Brackets (44). (See Image: Above –Right)

©2017 Mid West Products, Inc. -4- Form No. M1-1604
OPERATION
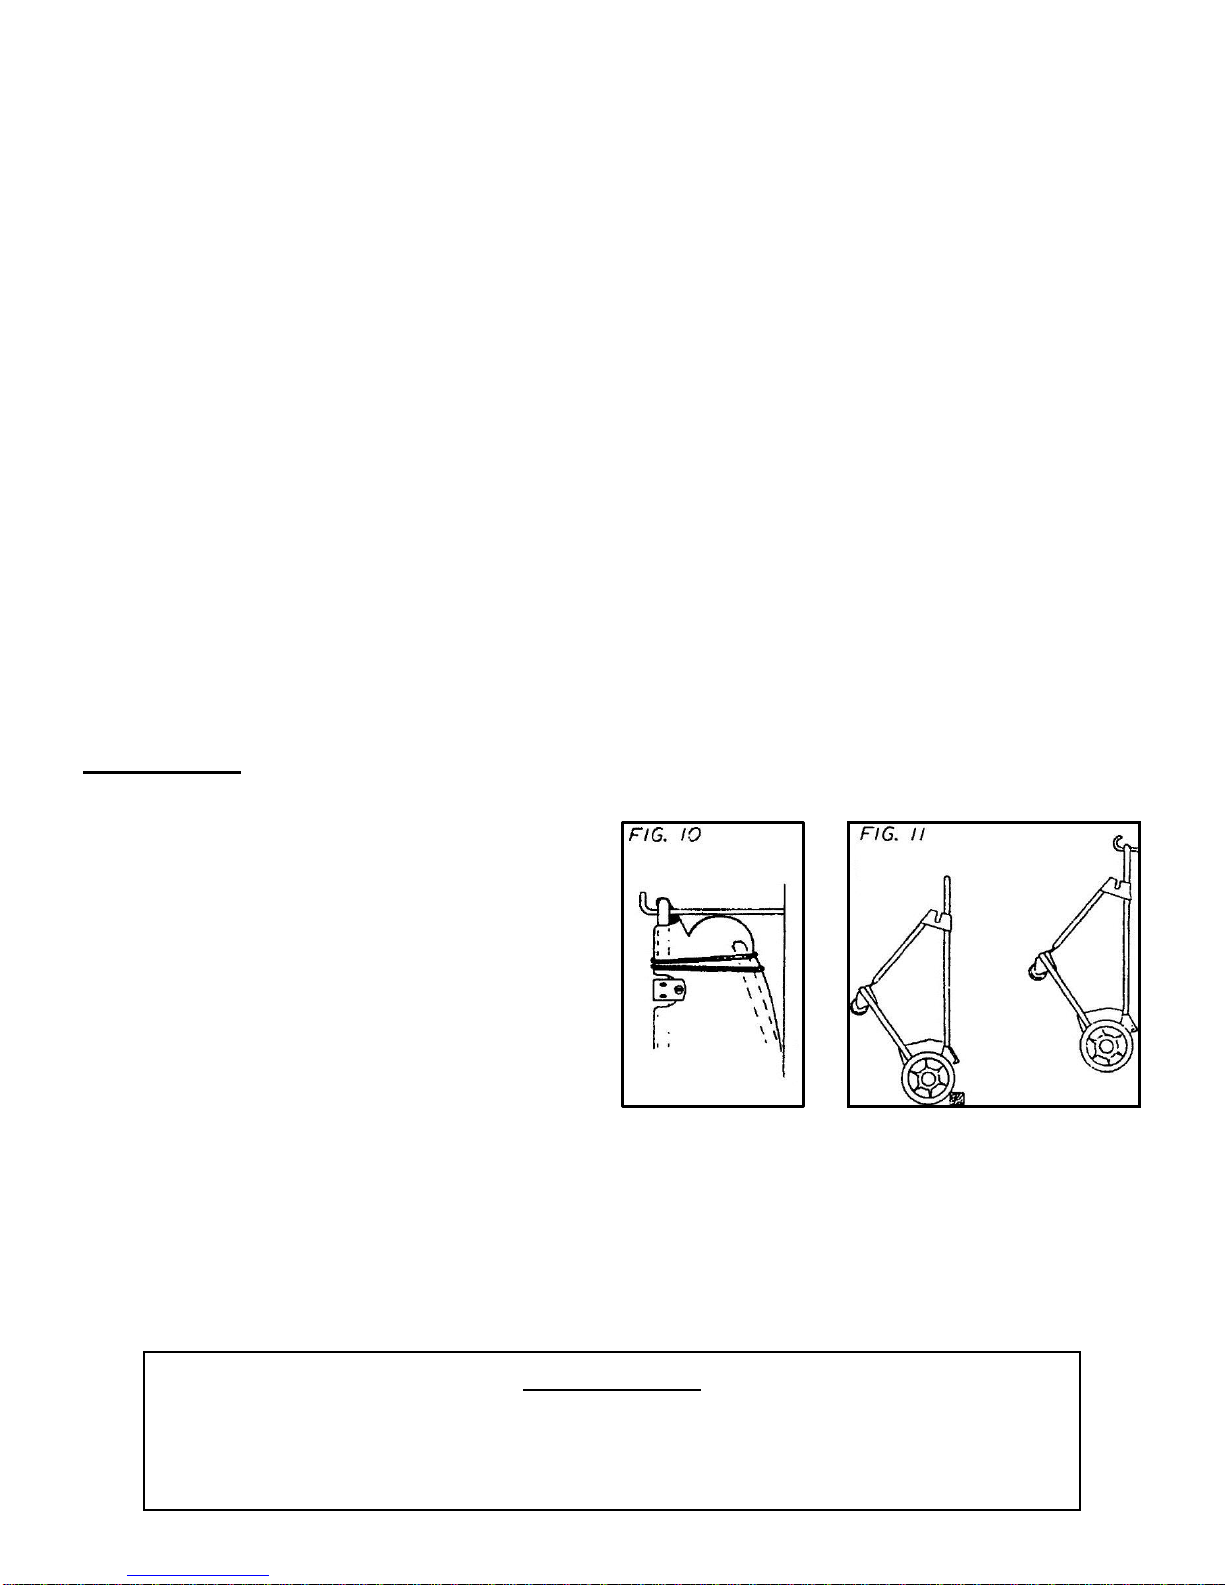
1. BRUSH ADJUSTMENT: Your new trailing
sweeper is equipped with a handy, “from the
rider/tractor seat,” brush adjustment. To
raise, push Tube (7) back and down until
desired sweeping height is attained. To lower,
push Tube (7) back and pull up to desired
sweeping height. See Fig. 4. For best results,
brush should merely flick tops of grass blades.
Brushes should be raised when
transporting to and from sweeping area.
2. SWEEPING SPEED: For best results,
rider/tractor should travel at a 3 to 5 M.P.H.
range.
3. DUMPING: Exclusive rear dump action with
Lift-Out Hamper feature. To dump, merely
pull on nylon rope until hamper turns over
dumping debris. Return hamper slowly to its
original position by keeping pressure on rope.
MAINTENANCE
LUBRICATION
1. Remove Wheel by removing plastic Hubcap
and Snap Ring. Apply RETINAX LC
(Available from Mid West Products –937-
337-3641) grease to Wheel Gear and Pinion
Gear. NOTE: Apply grease to the center of
Pinion Gear. Lubricate at beginning of each
season and every 20 hours of use, or more
often as conditions dictate. See Fig. 6.
2. Remove Pinion Gear grease Pawl with
RETINAX LC
3. When installing Pinion and Pawl refer to Fig 8
for correct position.
4. Grease Wheel Axle at beginning of season
and before each use thereafter.
5. Apply SAE #20 oil or equivalent to Brush Axle
Bearings twice a season.
6. Oil Hamper Pivot Pins occasionally to prevent
rust and insure easy dumping.
BRUSH REPLACEMENT
Place Brush Strips in slots of Brush Disc so
shorter supporting bristles are away from Brush
sweeping rotation. Secure at each Disc with three
Holder Springs. Feed Spring thru hole of Disc.
Place upper point into bristles with point next to
Disc. With pliers, grasp Springs, turn and raise
upward so lower point is secured on backing of
second Brush. Tap each end of Spring with pliers
to make certain that the points are completely
down into bristles. See Fig. 7.

©2017 Mid West Products, Inc. -5- Form No. M1-1604
PARTS DRAWING

©2017 Mid West Products, Inc. -6- Form No. M1-1604
Key
Part No.
Qty
Description
Key
Part No.
Qty
Description
1
1A-3299
1
Chassis Assembly
31
1-3307
1
Top Pivot Stand Tube
2
1A-3297
1
Brush Axle & Disc Assembly
33
1-1465
1
Spring
3
1-3305
6
Brush Strip
34
1-1474
1
Spring Tube
4
X-1043
18
Brush Spring
35
1-B2318
2
Frame Pivot Bracket
5
L-262
4
5/8 "E" Type Ret. Ring
36
1-C2329L
1
Vert. Pivot Tube LH
6
1A-3298
1
Bumper Assembly
NI
1-C2329R
1
Vert. Pivot Tube RH
7
1D-2372
1
Height Adj. Handle
37
1A-3301
1
Hamper Assembly
8
1-2399
2
Wheel Shield
38
1-3302
1
Tie Rod
9
L-5497A
2
Flange Bearing
39
1-3309
1
Bottom Hamper "U" Tube
10
L-279
4
5/16-18 X 1/2 HHCS
40
1-C2315
2
Bottom Hamper Side Tube
11
X-1107
15
5/16-18 Lock Nut
41
1-3311
1
Top Hamper "U" Tube
12
L-5749
2
Stub Axle
42
1-D2316
2
Top Side Hamper Tube
13
L-307
4
5/16-18 X 5/8 HHCS
43
1-A2505
2
Support Rod
14
L-5486M
2
3/8-24 Lock Nut
44
1A-3290
2
Hamper Pivot Bracket Ass'y
15
L-5485
2
3/8-24 Pilot Nut
45
X-1182
2
1/4-20 X 1 ¼ HHCS
16
L-5761H
2
Pinion Pawl
49
1-2087
1
Dump Rope 11 Ft.
17
L-5753
2
Pinion Gear
50
X-1439
2
3/8-16 X 4-1/2 HHCS
18
L-5750A
2
10" Die Cast Wheel
51
15-1017
2
Sleeve
19
1-1418E
2
10” Lug Base Tire
52
1-1633
2
Caster Roller
21
L-279
2
5/16 –18 x ½ HHCS
53
X-1199
2
3/8-16 Lock Nut
22
1-C2327
2
Pivot Stand Brace
54
1-1522B
1
Hand Grip
23
1-C2336
2
Pivot Stand Tube
55
X-1027
1
5/16-18 X 1-3/4 HHCS
24
X-1182
8
1/4-20 X 1 ¼ HHCS
56
L-64A
2
1/2" Flat Washer
25
L-303
10
1/4-20 Lock Nut
57
1-3312
2
Hitch Tube
26
1A-2355
2
Caster Plate Assembly
58
X-1545
2
5/16-18 X 2-1/4 HHCS
27
1-B2473
2
Caster Bracket
59
1-2828
2
Hitch Tongue
28
X-1258
2
1/2-13 X 1-1/4 HHCS
60
L-5552
2
5/16-18 Pilot Nut
29
X-1353
2
1/2-13 Lock Nut
61
L-59
2
5/16-18 X 3/4 HHCS
30
1-C2328
2
Pivot Support Tube
65
1A-3300
1
Wind Apron
NI
1-1850
1
Adjustment Decal
NI=Furnished, Not Illustrated
PARTS LIST

©2017 Mid West Products, Inc. -7- Form No. M1-1604
PLEASE DO NOT RETURN THIS MERCHANDISE TO THE STORE. CALL US AND WE WILL
TAKE CARE OF ANY PROBLEMS YOU MIGHT HAVE WITH THIS PRODUCT.
STORAGE
1. Clean hamper to remove clippings and debris
2. Wipe dirt and grease from chassis. Repaint
any scratched areas and coat metal parts with
oil to prevent rust.
3. Store sweeper in a dry area out of direct
sunlight.
4. Check sweeper parts for wear. Replace parts
as necessary.
5. Remove hamper support tubes. Fold bottom
hamper tubes upward and wrap dump rope
around hamper. Tie securely. Store folded
hamper on wall-mounted hooks. See fig. 10.
Remove brush height adjustment handle and
hitch assembly.
6. Block sweeper wheels and lean against wall
or hang unit from wall hooks. See fig. 11.
IN THE FALL: Sweep REGULARLY when the leaves are dropping…don’t wait until they’re all
down… you’ll get better sweeping action if your lawn is cut short.
INSTRUCTIONS FOR ORDERING PARTS
(Minimum Parts Order Charge $20.00)
1. Address all parts orders or correspondence regarding customer service to one of the following:
Parts Dept.
Mid West Products, Inc.
Phone:
(937) 337-3641
P.O. Box 301
Fax:
(937) 337-0755
Phillipsburg, OH 45354
E-mail:
2. Write your name and address plainly (print or type).
3. Explain where and how to ship.
4. Give model number of unit.
5. Give part number from parts list, as well as a description, including color, of the part and the quantity
you need.
6. Inspect all shipments you receive. If any parts are damaged or missing, file a claim with the carrier
before accepting.
7. If you are returning parts, be sure to include WITH THE SHIPMENT a list of the parts with your
name and address.
8. All orders for repair and replacement parts will be shipped when paid with Master Card, Visa, or
personal check/money order. Prices subject to change without notice.
GUARANTEE
The merchandise you have purchased from us has been carefully engineered and manufactured under
Mid West Products rigid quality standards and should give you satisfactory, dependable operation.
However, like all mechanical merchandise, it may occasionally require adjustment or maintenance.
Should you need technical assistance, please contact MID WEST PRODUCTS.
Table of contents
Other MID WEST PRODUCTS Lawn Sweeper manuals

MID WEST PRODUCTS
MID WEST PRODUCTS MH-481 User manual

MID WEST PRODUCTS
MID WEST PRODUCTS B-319 User manual

MID WEST PRODUCTS
MID WEST PRODUCTS B-319SSNT User manual

MID WEST PRODUCTS
MID WEST PRODUCTS B-369NT User manual

MID WEST PRODUCTS
MID WEST PRODUCTS B-319NT User manual

MID WEST PRODUCTS
MID WEST PRODUCTS HDT-38B User manual