Midea KL15TTGIW User manual

Read This Manual
Use all instructions and explanations of
the installation before use. Follow the
instructions carefully. Keep the operation
instructions handy for later use. If the
application is sold or passed on then ensure
that the new owner always receives those
operation instructions.
OWNER’S MANUAL
Twin Tub Washing Machine
KL15TTGIW

CONTENTS
SAFETY INSTRUCTIONS
Safety precautions ....................................................
INSTALLATION
Product description ..................................................
Unpacking the washing machine ...............................
Installation area ......................................................
Change the position of the drain hose .........................
.
OPERATIONS
Control panel ...........................................................
Preparation before washing ......................................
Washing...................................................................
Rinse.......................................................................
Spin..........................................................................
Refer to the following table to select spinning time.....
Reference of laundry quantity corresponding to different capacities...
Laundry volume and detergent dosage reference..........
Special functions.......................................................
Maintenances
Cleaning and Care .....................................................
Cleaning the cabinet..................................................
Cleaning the inlet filter...............................................
Anti-freezing protection............................................
Operation when objects are dropped into the outside of the spin tub.....
Trouble shooting........................................................
Technical specifications.............................................
2
6
6
7
7
8
8
8
9
9
9
9
10
11
12
12
12
12
13
13
14
17
Energy efficiency test program............................................

2
SAFETY INSTRUCTIONS
Safety Precaution
For your safety, the information in this manual must be followed
to minimize the risk of fire or explosion, electric shock, or to
prevent property damage, personal injury or loss of life.
This appliance is not intended for use by persons (including children) with reduced physical,
or mental capabilities, or lack of experience and knowledge, unless they have been given
supervision or instruction concerning use of the appliance by a person responsible for their safety.
Children should be supervised to ensure that they do not play with the appliance.
sensory
If the supply cord is damaged, it must be replaced by the manufacturer, its service
agent or similarly qualified persons in order to avoid a hazard.
The new hose-sets supplied with the appliance are to be used and that old hose-sets should not
be reused.
The openings must not be obstructed by a carpet.
This appliance is intended to be used in household and similar applications such as:
− staff kitchen areas in shops, offices and other working environments;
− farm houses;
− by clients in hotels, motels and other residential type environments;
− bed and breakfast type environments;
− areas for communal use in blocks of flats or in launderettes.

SAFETY INSTRUCTIONS
Wash rated
capacity
Maximum
Water Pressure
Model
Spin rated
capacity
3
15.0 kg 7.0kg
0.6MPa
KL15TTGIW

SAFETY INSTRUCTIONS
!Warning!
This combination of symbol and signal word indicates a potentially
dangerous situation which may result in death or serious injuries
unless it’s avoided.
Caution!
This combination of symbol and signal word indicates a potentially
dangerous situation which may result in slight or minor injuries
or damage to property and the environment.
Note!
Explanation of the symbols:
4
This combination of symbol and signal word indicates a potentially
dangerous situation which may result in slight or minor injuries.

SAFETY INSTRUCTIONS
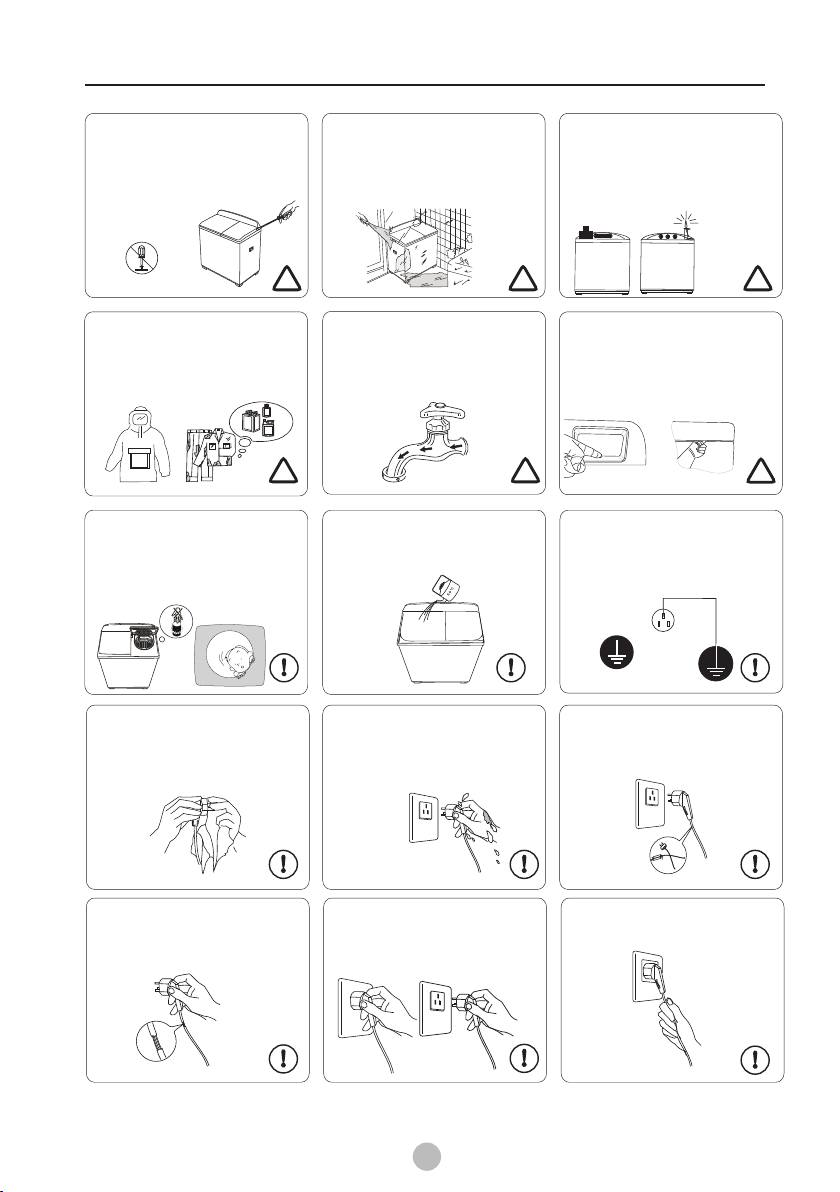
Do not install the machine in damp or rainy
environment to avoid electric shock, fire,
machine failure, or deformation. Do not spray water directly to the machine.
Do not dismantle the machine by
yourself.
Forbid dismantling
Do not place inflammable materials
like burning candle, mosquito incense,
cigaret etc. or heating source like electric
stove, calorifier etc. on the machine.
Do not let baby sit on it or place heavy
things on it.
To avoid electric shock resulting from
electric leakage, please connect
grounding wire of the plug properly.
Grounding
Wipe off dirty and dust on the plug
often to prevent poor contact with
power supply.
+
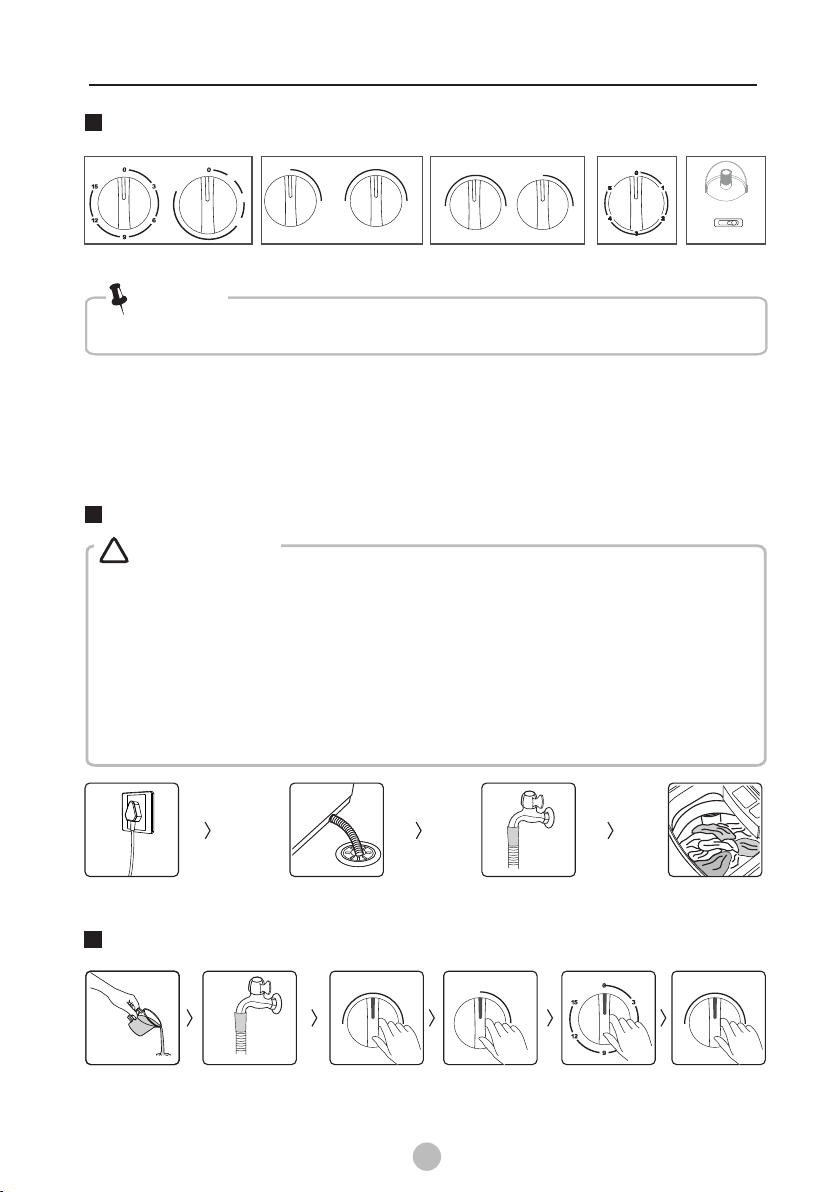
Make sure that the water inlet hose
is connected and the tap is opened
before washing.
Do not exceed the max. water level to
avoid water over flowing and machine
failure.
Do not let baby climb to the machine
or play near running tub to avoid
accident.
Do not put hands into the tub before
it stopping running.
If use warm water, the water
temperature should not exceed 50℃.
Do not replace power cord by yourself.
Do not pull the cord when unplug
the plug.
wat erpr oof
Insert the plug tightly when use.
Unplug the plug from socket after use.
Do not wash clothes that are stained
with kerosene, petrol, alcohol, and
other flammable substance.
Do not wash down-filled coat, raincoat
or similar clothes.
Do not insert or unplug the plug with
wet hands to avoid electric shock.
This appliance is for indoor use only.
If the supply cord is damaged, it must
be replaced by the manufacturer, its
service agent or similarly qualified
persons in order to avoid a hazard.
! ! !
!!
!
5
Do not put finger into leaking hole on
control panel in case of any harm.
Do not put finger into rotation shaft
position on control panel in case of
any harm.

INSTALLATION
Product DescriptionProduct Description
• The product line chart is for reference only, please refer to real product as standard.
Note!
Drain hose
Accessories
manual
Or
Inner spin cover Water inlet hose
Control panel
Wash cover
Lint filter
Pulsator
Base
Spin cover
Cabinet
Safety cover
Frame
Wash tub
Power plug
Unpacking the washing machineUnpacking the washing machine
1. Remove the cardboard box and styrofoam packing.
2. Lift the washing machine and remove the base packing.
3. Remove the tape securing the power supply cord and drain hose.
4. Remove the inlet hose from the drum.
•
•
Packaging material (e.g. Films, Styrofoam) can be dangerous for children.
There is a risk of suffocation ! Keep all packaging well away from children.
Warning!
!
6

Installation area
Before installing the machine, the location characterized
follows shall be selected:
1.Rigid, dry, level surface
2.Sufficient ventilation
3.Keep far away from the heat resources such as coal or gas.
as
and Avoid direct sunlight
, Room temperature is above 0 C
• wandering!
•
Stability is important to prevent the product from
Make sure that the product should not stand on the power cord.
Warning!
!
INSTALLATION
w
w
W> 20mm
Change the position of the drain hose
Front
Drain hose
According to the installation site, the drain hose can also be at the wash
side of the machine . The method is as follows:
The ex-factory installation position of the drain hose is located the spin side .
installed
at
1,Unplug the power cord and empty water in the drain hose
completely.
2,Spread a piece of soft cloth on the floor (e.g. a blanket)
and place the washing machine on it gently.
Take the drain hose out from the buckle at the spin side,
put it into the buckle at the wash side.
Hang up the drain hose kit.
3,
and
4,
Blanket
There are two ways to place the end of drain hose:
•
• Position drain hose properly ,otherwise damage might result of water leakage.
Do not kink or protract the drain hose.
• If drain hose is too long, do not force it into machine as it will cause abnormal noises.
Trough
Hose
Retainer
Bind
Min.86cm
Max.100cm
Warning!
!Warning!
!
water trough
Under3m
Under 15cm
Min.86cm
100cm
Max.
1.For lower drain system
2.For upper drain system
7

Preparation Before Washing
Wash timer: be used to select required washing time.
Spin timer: be used to select required spinning time.
●
●
● Wash-Drain selector: For washing or rinsing, select “ Normal”or“ Heavy”. For
draining ,select “Drain”
● Water inlet: be used to inject water..
• The product line chart is for reference only, please refer to real product as standard.
Note!
Drain
Open tap
Plug in
Add detergent
Washing
load and Close door
Put down the drain
Choose washing
program
Choose washing
time
Choose washing
function
Arrived after the water
level, close the tap
Open the door
•
The maximum gradient of the supporting surface for the washing machine should not exceed 2º.
•Do not tear down electrical wires and components in the machine by yourself.
•There are holes on the base for ventilation. These holes should not be blocked by
foreign objects (carpets, etc.).
•Never connect the grounding wire with the live wire, or it may lead to an electric shock.
•Check that there are no objects such as coins, hairpins, mud or sand in the pocket.
•Strings should be knotted in advance to prevent entanglement.
•Clothes can be classified for washing according to the texture, dirty degree and color.
•For small pieces (e.g.,stockings) or fluffy clothes, put them into a nylon net for washing.
Warning!
!
• The product line chart is for reference only, please refer to real product as standard.
Note!
OPERATIONS
Spin timer
Wash timer Drain selector
Soak
35
15
10
5
Was h inlet se lect or
Water inlet selector
Washing Spinning
HeavyHeavy
Heavy
NormalNormal
Normal
Wash-Drain SelectorWash-Drain Selector
Control Panel
Rinse Drain
Wash
Wash selector
Drain
Drain Drain
Wash/Rinse
Rinse Rinse
Wash Wash
or
soft
8
or

-7-
OPERATIONS
Spin
Spin cover
Safety cover
Shake out the laundry and
put them into the spin tub.
Put the inner spin cover on .
Confirm the inner spin cover is placed
horizontally.
the laundry Close the safety cover
and the spin cover.
Correct Incorrect
spin cover
Spin tub
Refer to the following table to select spinning time.
About 50
seconds
About 1
minute
About 1-2
minutes
About 2-3
minutes
About 3-4
minutes
About 5
minutes
Spin time
Washing
materials Silk Light clothes
(fiber/blended)
Knitwear
(fiber)
Underwear
(cotton)
Slipover
(cotton/linen)
Toweling coverlet
(cotton)
Reference of laundry quantity corresponding to
different capacities
Open tap
Rinse
Drain
Choose washing
program
Choose washing
time
Choose washing
function
Arrived after the water
level, close the tap
Heavy
Normal
Drain Drain
Rinse Rinse
Wash Wash
9
2.0kg Capacity about 4 pcs. about 3 pcs. about 2 pcs. about 1 pcs.
3.0kg Capacity about 6 pcs. about 4 pcs. about 3 pcs. about 1 pcs.
3.6kg Capacity about 7 pcs. about 5 pcs. about 4 pcs. about 2 pcs.
5.0kg Capacity about 10 pcs. about 7 pcs. about 5 pcs. about 3 pcs.
6.0kg Capacity about 12 pcs. about 9 pcs. about 6 pcs. about 3 pcs.
7.0kg Capacity about 14 pcs. about 10 pcs. about 7 pcs. about 4 pcs.
7.5kg Capacity about 15 pcs. about 11 pcs. about 8 pcs. about 4 pcs.
8.5kg Capacity about 17 pcs. about 13 pcs. about 9 pcs. about 5 pcs.
10.0kg Capacity about 20 pcs. about 15 pcs. about 11 pcs. about 6 pcs.
4.6kg Capacity about 9 pcs. about 6 pcs. about 5 pcs. about 2 pcs.
12.0kg Capacity about 24 pcs. about 18 pcs. about 13 pcs. about 7 pcs.
14.0kg Capacity about 28 pcs. about 22 pcs. about 17 pcs. about 9 pcs.
12.0kg Capacity about 24 pcs. about 18 pcs. about 13 pcs. about 7 pcs.
8.0kg Capacity about 16 pcs. about 12 pcs. about 8 pcs. about 5 pcs.
Capacity
Laundry
...... ...... ...... ...... ......
Jacket
about 1600 g
Shirt
about 500 g
Uniform
about 650 g
Jeans
about 900 g
5.5kg Capacity about 11 pcs. about 8 pcs. about 6 pcs. about 3 pcs.
13.0kg Capacity about 26 pcs. about 20 pcs. about 15 pcs. about 8 pcs.
15.0kg Capacity about 30 pcs. about 24 pcs. about 19 pcs. about 10 pcs.
16.0kg Capacity about 32 pcs. about 26 pcs. about 21 pcs. about 11pcs.

OPERATIONS
Laundry Volume and Detergent Dosage Reference
10
Synthetics,silk,
Delicate fabrics
High
Normal 3-5 About 65
Water
level
Fabric type Laundry
capacity(kg)Water flow Wash time
(minutes)
Detergent
amount(g)
Cotton or linen
Heavy soils
0-8.0
8.0-15.0
0-8.0
8.0-15.0
4.5-8.0
0-4.5 Low
Mid
Mid
High
Mid Heavy
Normal
10-35(soak 20)
10
7-10
7
3About 42
About 87
About 65
About 87
About 65

OPERATIONS
Wash timer
Soak
35
15
10
5
Work time
about 5 about 5 about 5
Total: 35 (mins)
about 1.5 about 1.5 about 2
Static time
For seriously stained clothes, soak wash is useful to achieve better wash result.
15-35 minutes of the wash timer is for soak wash:(illustrate as follows)
35 15
(unit:)mins
Special features
Function of the buzzer is to alarm finish of washing, and it is helpful to control
wash process. Buzzer will alarm the completion of washing.
Soak function
For machines having the function only
Buzzer function
11

• Before your maintenance starts, please unplug the machine and close the tap.
Proper maintenance on the washing machine can extend its
working life. The surface can be cleaned with diluted
non-abrasive neutral detergents when necessary. If there is
any water overflow, use the wet cloth to wipe it off immediately.
No sharp items are allowed.
Formic acid and its diluted solvents or equivalent are forbidden, such as
solvents or chemical products,etc.
•
alcohol,
Warning!
!
Note!
Cleaning And Care
• Inlet filter must be cleaned if there is less water.
Note!
Lint filter clean
MAINTENANCES
1.
2.
3.
4.
Press the button head, and pull the lint filter out.
Turn the filter net inside out, and rinse it in water.
After inserting the claw, press the button to insert it into place.
A sound of “ba” means proper installation.
Button head
Claw
Anti-freezing Protection
To prevent from freezing:
If the water is frozen, please take the following steps:
hose completely.
Lay the drain hose and turn the drain selector knob to the "Drain”position to empty
the water in the tub.
1. water
inlet
2.
Turn off the water tap, remove the water inlet hose and empty water in the
.Keep about 2 liters of warm water below 50℃ in the wash
tub for about 10 minutes and then lay the drain hose and
turn the wash drain selector knob to the "Drain”position
to empty the water .
1
2
.Put the water inlet hose into warm water of about 50℃.
Cleaning And Care
Cleaning the Inlet Filter
Cleaning the cabinet
12

Cabinet
Frame
Operation When Objects Are Dropped Into the
Outside of the Spin Tub
1.Remove all screws on the frame with a screw driver and
loosen the connector of the brake belt .
2.Pull up the frame with both hands and turn it backwards.
3.Take out the clothes dropped into the outside of the spin tub.
4.Fasten the connector of the brake belt ,Press the frame to
reset and tighten screws.
3.Fit the water inlet hose and turn on the water tap to
confirm water filling and draining work properly.
MAINTENANCES
If the Following Symptoms Occur, Please Disconnect The Power Plug And Perform
The Following Checks:
Check that the power supply is in good condition.
Check that the power plug is inserted properly.
●
●
● Check that the wash timer knob or the spin timer knob is not
in the "0" position.
Check that the drain hose is not laid too high.
Check that the drain hose is not frozen.
Check that the drain hose is not blocked by foreign matter.
●
●
●
Check that there are no coins or any other foreign objects
dropped into the wash tub.
●
Check that the washing machine is placed on flat, stable floor.
Check that clothes are evenly distributed in the spin tub.
Check that there are no washing materials or foaming debris
dropped into the outside of the spin tub.
●
●
●
The washing
machine does
not work.
The drain hose
does not work.
There is abnormal
noise during washing.
There is abnormal
noise and violent
vibration during
spinning.
Symptom Reason
13
Trouble Shooting

wash:15 min. Spin:5 min.
Maximum Water Pressure
Power Supply
0.6MPa230V~,50Hz
Maximum Time
Dimension
W*D*H mm)(
Pump Rated
Power
Washing Capacity
Model
Wash Spin Wash Spin
Water volume
Net
Weight
H:/M:/L:(L)
Rated Power
MAINTENANCES
Technical Specifications
16
KL15TTGIW
902*537*998
30.0kg
15.0 kg 7.0kg 450W 180W
H1:92 H:87
M:65 L:42
Table of contents
Other Midea Washer manuals

Midea
Midea MF100W60/W-MV User manual

Midea
Midea FP-90LST060GMTL-N User manual

Midea
Midea MLV45N1BWWC Manual

Midea
Midea LUNAR 01 User manual

Midea
Midea MA100W75 User manual

Midea
Midea MAE50-S1102 User manual

Midea
Midea MTW70 User manual

Midea
Midea MTE150-P2004S User manual

Midea
Midea MA500W150 Series User manual

Midea
Midea Sicily Glory G01 User manual

Midea
Midea MLH52N5AWW Manual

Midea
Midea MF10EW70B User manual

Midea
Midea FP-90LTL085GETM-N1 User manual

Midea
Midea MFW-801S User manual

Midea
Midea MLV47R5BWW Manual

Midea
Midea MA200W130 Series User manual

Midea
Midea 360111 User manual

Midea
Midea MLTW44A4BWW Manual

Midea
Midea MTWM80 User manual

Midea
Midea MWD-40P User manual