Midtronics GRX-5100 L Setup guide

NiMH Battery Rescue Charging with the GRX-5100
Quick Training Guide – QT015A
Click the ENTER button to view the Quick Training Guide.
This Quick Training Guide provides an overview of the components and operation of the High Voltage
Battery Service Unit (GRX-5100) and the HEV Workstation for performing rescue charging of NiMH
batteries in Toyota hybrid vehicles. Prepared only for technicians that are Toyota Hybrid System certified.
CAUTIONS:
• Always wear the appropriate Personal Protective Equipment (PPE) provided in the HEV Workstation
when working with High Voltage.
• Always use the safing procedures detailed in the repair information for the specific hybrid model you
are working with.
ENTER
©Toyota Motor Sales, U.S.A., Inc., December 16, 2015
GRX-5100 Cable Connections
Click the tabs at the top and side to view each section
Charging ProcessHEV Workstation
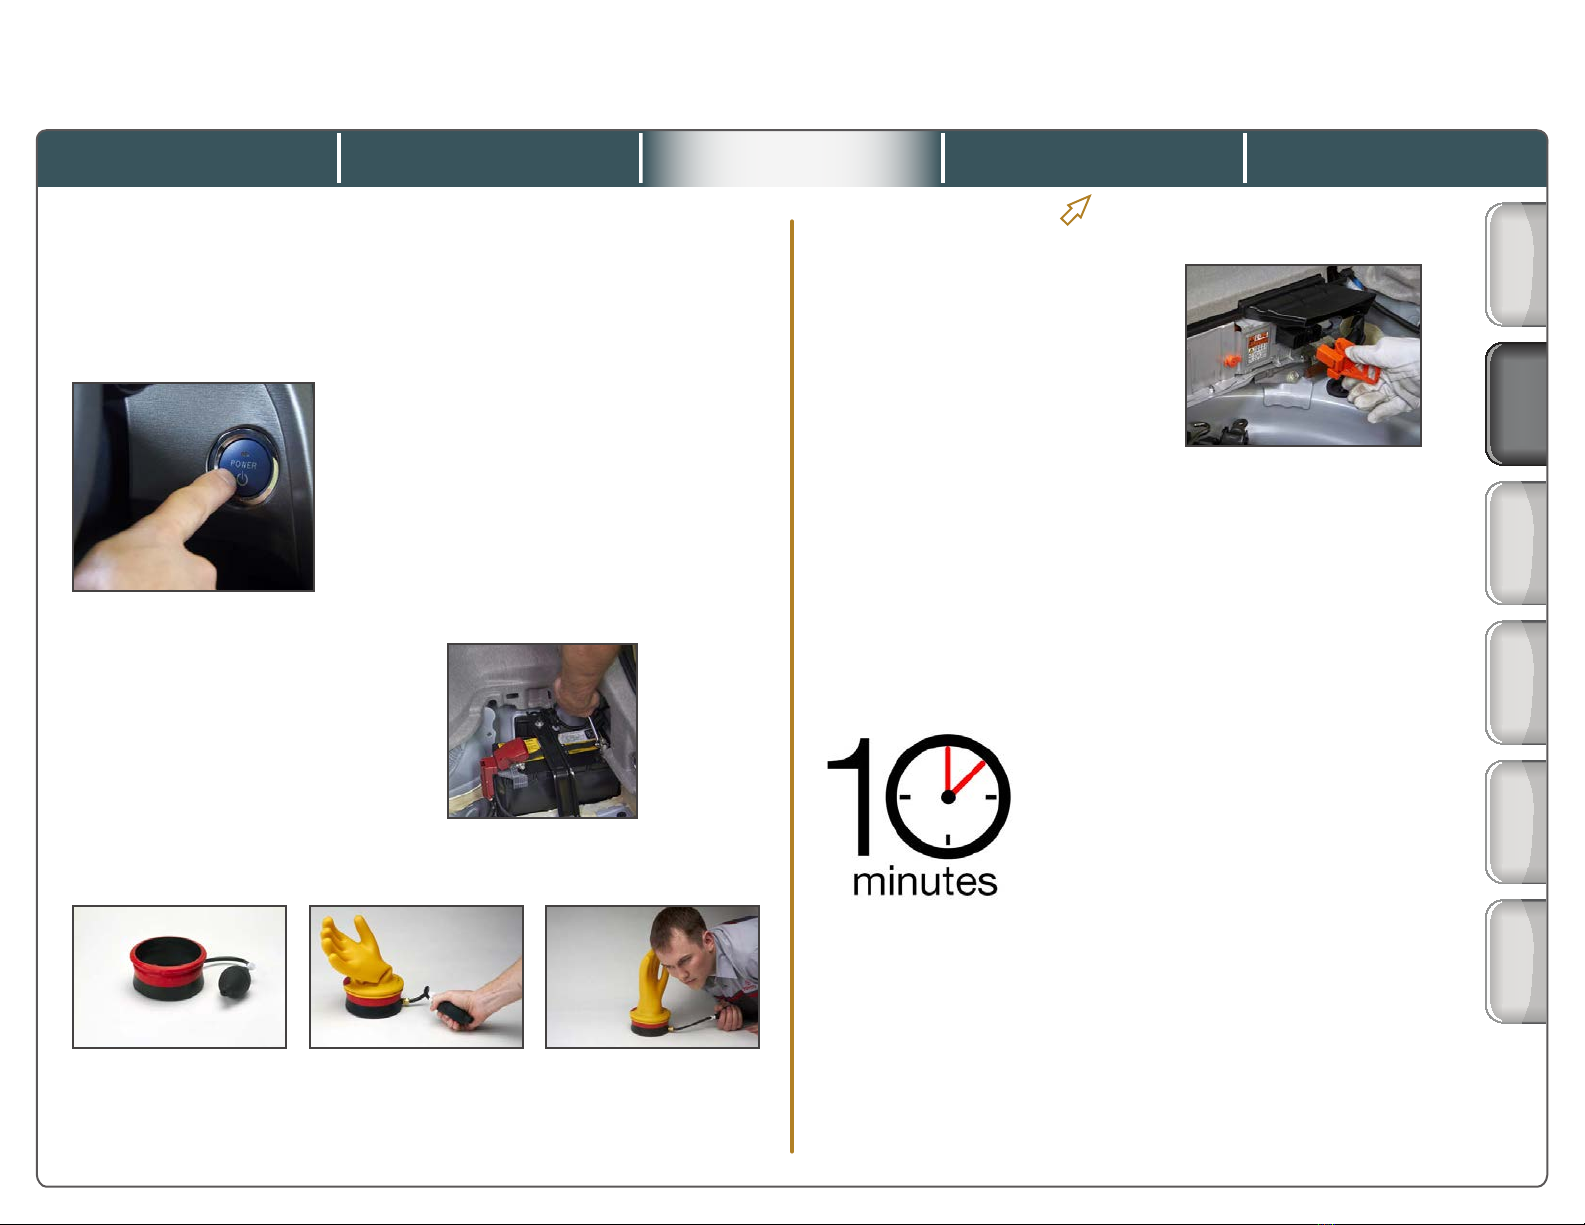
• When the vehicle is in READY
mode, the engine may not be
running but it can start at any
time, without warning
• Secure the smart key at least
10 feet away from the vehicle
for additional safety
• Do not use gloves if after the testing due date, or
if more than six-months after the date of issue
• Keep the removed
service plug in your
pocket (or other secure
location) to prevent other technicians from
accidentally reconnecting it while you are
working on the high-voltage components
• Refer to the Repair Manual for the vehicle
you’re servicing for the specic location and
procedure for removing the service plug grip
Before Servicing
1. Turn the vehicle power switch OFF, and remove the
key from the interior detection area for the entry and
start system.
2. Disconnect the cable
from the auxiliary battery
negative terminal.
4. Wearing insulated
gloves, remove the
service plug grip.
6. Check the voltage at the designated inspection
points in the inverter (0V check).
3. Check the insulated gloves.
5. Wait for 10 minutes or more
to discharge the high-voltage
capacitor inside the inverter
assembly.
Battery
Condition
Before
Servicing
Process
Overview
Screens:
Part 1
Battery Charge
Active Test
Toyota NiMH Battery Rescue Charging with the GRX-5100
Quick Training Guide QT015A
Screens:
Part 2
2001-2009
Prius
11 of 21
©Toyota Motor Sales, U.S.A., Inc., December 16, 2015
GRX-5100 Cable Connections
Click the tabs at the top and side to view each section
Charging ProcessHEV Workstation
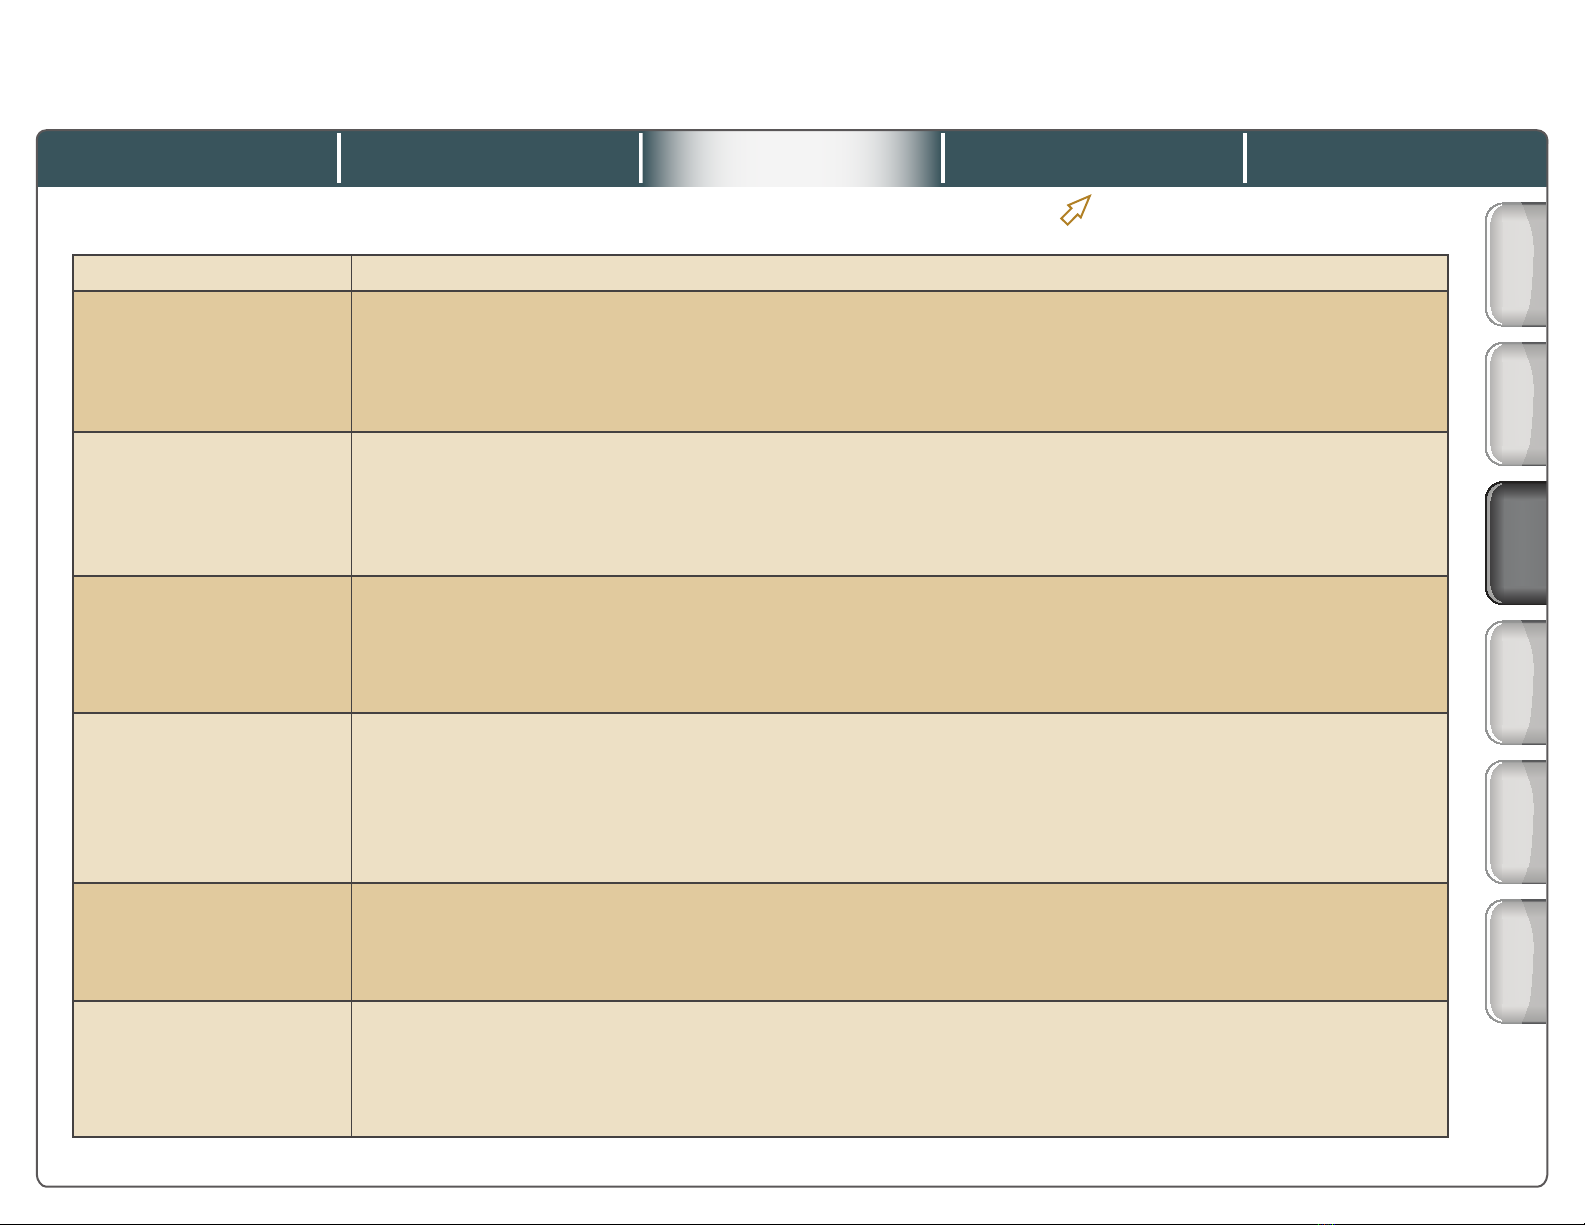
Charging Process Overview
Preparation • Check HV battery condition and check DTCs
Prepare to Connect
GRX-5100
• Disconnect the 12V battery and remove the service plug grip
• Remove components necessary to access the inverter and frame wire per repair instructions
• After 10 minutes, measure inverter terminal voltage (0V check)
• Disconnect the frame wire from the inverter
• Measure the resistance between the frame wire connector housing and body ground
Connect GRX-5100
• Power up the GRX-5100
• Connect the green HV (EV) bonding cable to the vehicle
• Connect the low voltage cable to the GRX-5100
• Connect the high voltage cables to the vehicle, fuse box, and GRX-5100
• Install the interlock cover, if required
Perform HV
Battery Charging
• Install the service plug grip and re-connect the 12V battery
• Power up the vehicle
• Start the Battery Charge Active Test
• Monitor battery voltage until charging is complete
• Turn the vehicle power switch OFF and turn off the GRX-5100
Disconnect GRX-5100
• Disconnect the GRX-5100 power cord and remove the negative battery terminal of the auxiliary battery
• Remove the service plug grip
• Disconnect the high voltage cable, then the low voltage cable from the GRX-5100
• Remove the interlock cover (if installed)
• Disconnect the high voltage cable from the vehicle
• Disconnect the green HV (EV) bonding cable from the vehicle
Prepare to READY ON
the Vehicle
• Connect the frame wire to the inverter
• As instructed in the Repair Manual, re-install other components as necessary to READY ON the vehicle
• Install the service plug grip
• Connect the negative cable of the auxiliary battery
Check HV Battery
• Check if the engine starts
• If the engine does not start, perform HV battery charging again
• If the engine starts, return the vehicle to its original condition, then start the engine and leave it idling in
P until the engine stops (self-charging is complete)
• Check for DTCs
Battery
Condition
Before
Servicing
Process
Overview
Screens:
Part 1
Battery Charge
Active Test
©Toyota Motor Sales, U.S.A., Inc., December 16, 2015
Toyota NiMH Battery Rescue Charging with the GRX-5100
Quick Training Guide QT015A
Screens:
Part 2
2001-2009
Prius
12 of 21

GRX-5100 Cable Connections
Click the tabs at the top and side to view each section
Charging ProcessHEV Workstation
1. Main Menu – Use the left
and right arrow keys on
the control panel to scroll
through the menu choices
until “Rescue Charge” is
highlighted, then press the button
under “Select.”
2. Warning – Conrm you are
wearing appropriate personal
protective equipment by
pressing the button under
“Yes.” Always refer to the
repair information for the specic Toyota
hybrid model you are working with.
3. Warning – Conrm you are
following appropriate repair
procedures by pressing the
button under “Next.”
4. Warning – Conrm that you
have removed the service
plug grip by pressing the
button under “Yes.”
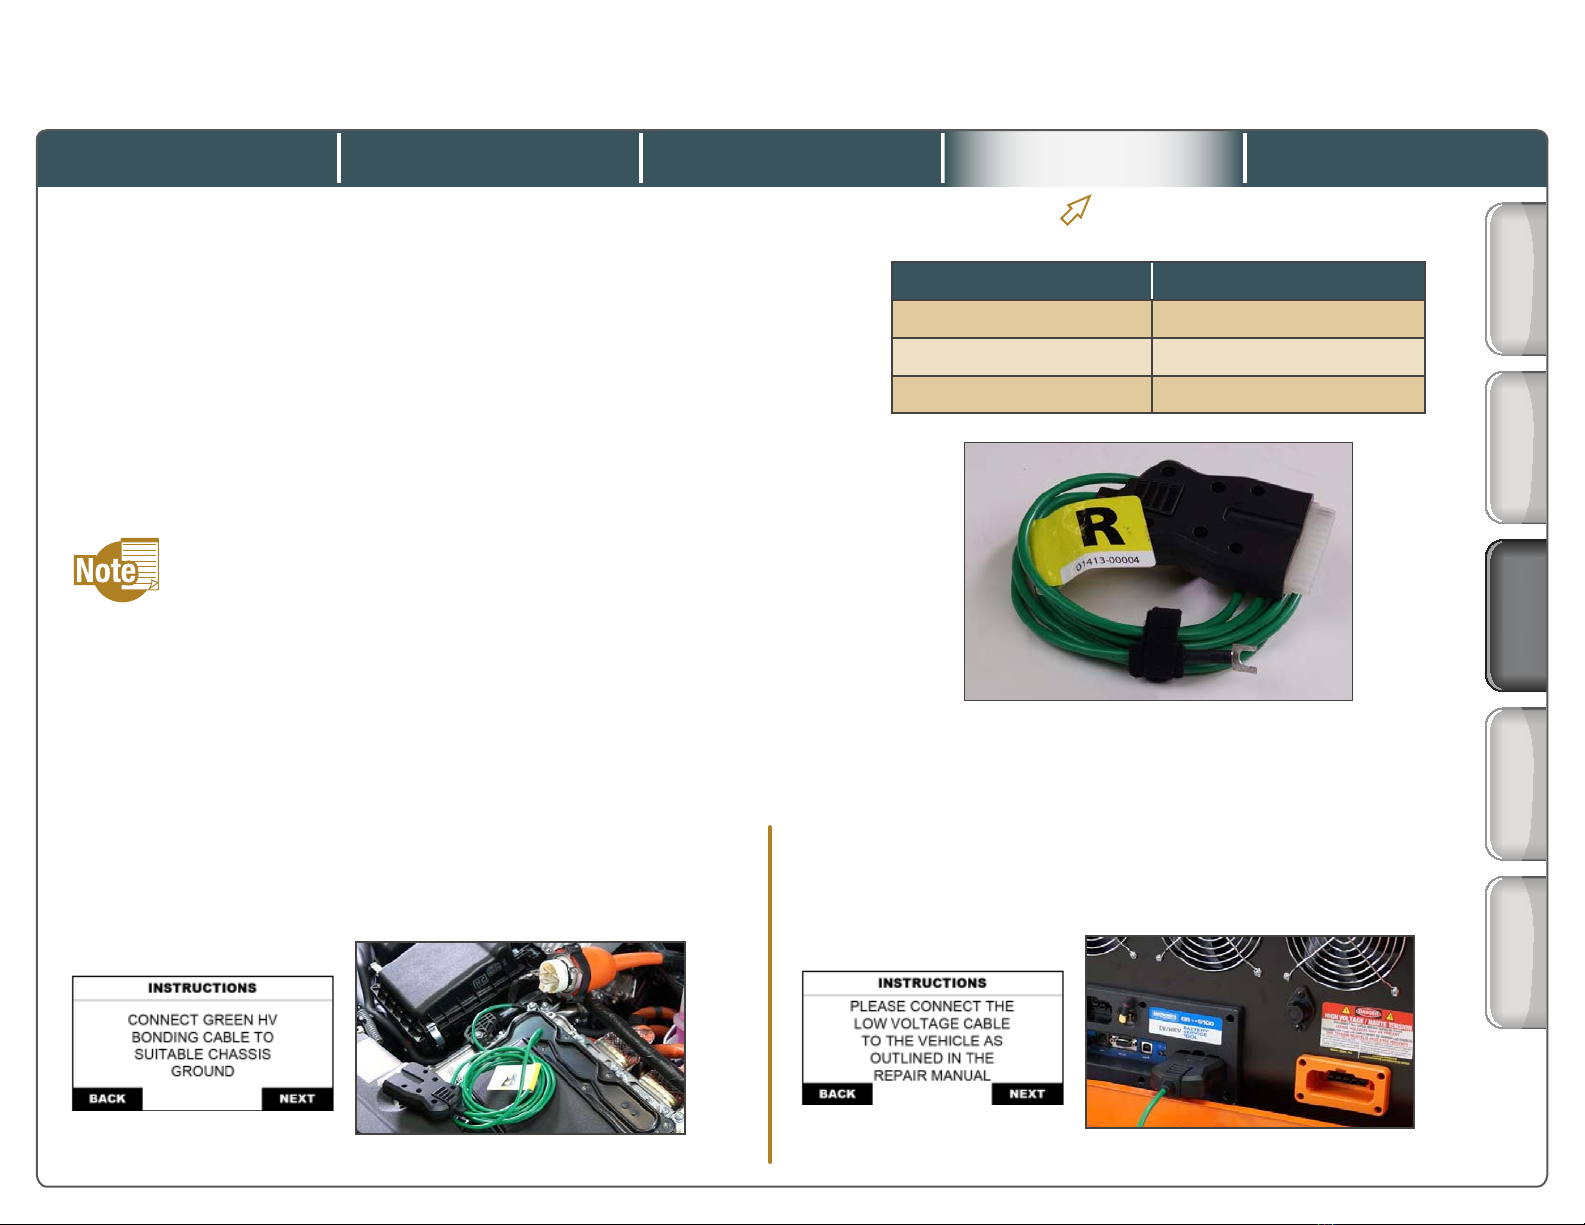
5. Instructions – Connect the
green HV (EV) bonding cable
to the vehicle per the repair
instructions, and then press
the button under “Next.”
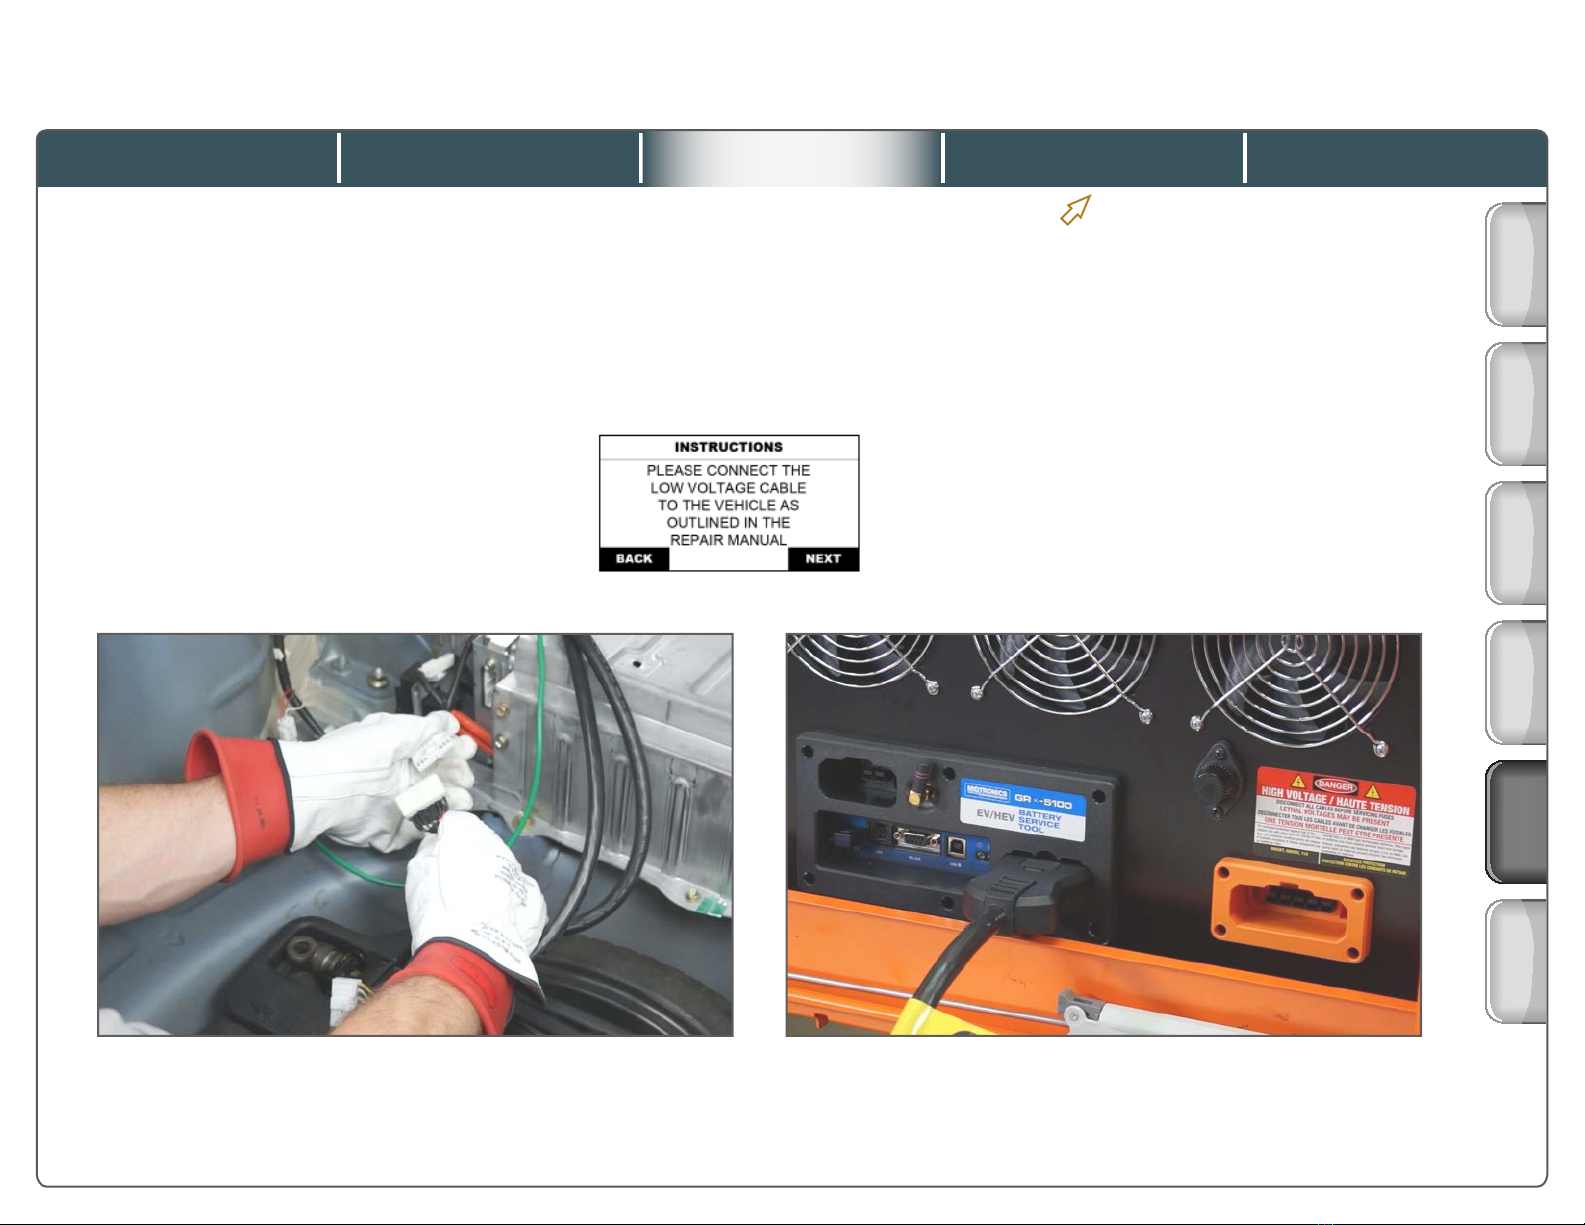
6. Instructions – The only
wire in the low voltage
cable (Cable “R”) is the
green bonding wire that was
connected to the vehicle in
Screens, Part 1
These are the screens on the GRX-5100 control panel that you will see when performing a rescue charge.
Battery
Condition
Before
Servicing
Process
Overview
Screens:
Part 1
7. Instructions – Connect the
vehicle-specic high voltage
cable between the vehicle
and the high voltage fuse
box. Then connect the
universal cable between the fuse box and the
GRX-5100. When the high voltage cables are
connected, press the button under “Next.”
the previous step. Therefore, it is only necessary
to now connect the low voltage cable to the GRX-
5100, and then press the button under “Next.”
(See “2001-2009 Pruis” tab for exceptions.)
Battery Charge
Active Test
Toyota NiMH Battery Rescue Charging with the GRX-5100
Quick Training Guide QT015A
Screens:
Part 2
2001-2009
Prius
13 of 21
©Toyota Motor Sales, U.S.A., Inc., December 16, 2015
2001 – 2009 Pruis
Step 6 of the charging process for the 2001-2003 Pruis and the 2004-2009 Pruis
differs slightly from other Toyota hybrid models.
For these Pruis models, the low voltage cable includes not only the green EV
bonding cable, but also a communications cable that connects to the battery ECU.
Therefore, when this screen appears,
connect the low voltage cable as
instructed in the Repair Manual, then
connect the other end to the GRX-5100.
GRX-5100 Cable Connections
Click the tabs at the top and side to view each section
Charging ProcessHEV Workstation
2004 – 2009 Pruis shown
Battery
Condition
Before
Servicing
Process
Overview
Battery Charge
Active Test
Toyota NiMH Battery Rescue Charging with the GRX-5100
Quick Training Guide QT015A
Screens:
Part 2
2001-2009
Prius
Screens:
Part 1
14 of 21
©Toyota Motor Sales, U.S.A., Inc., December 16, 2015

GRX-5100 Cable Connections
Click the tabs at the top and side to view each section
Charging ProcessHEV Workstation
Screens, Part 2
These are the screens on the GRX-5100 control panel that you will see when performing a rescue charge.
Battery
Condition
Before
Servicing
Process
Overview
Screens:
Part 1
Screens:
Part 2
8. Self-Test – Wait while the
GRX-5100 performs an
internal self test.
9. Instructions – Install the
service plug grip, connect
the negative terminal of
the auxiliary battery and
connect a GR8 in power
supply mode. Turn the vehicle power
switch ON and then press the button
under “Next.”
Charge – Wait while the
GRX-5100 performs an HV
bonding test.
Charge – Connect the
Techstream to DLC3 and
navigate to the Battery
Charge Active Test. Turn
the Active Test ON, and
then press the button under “Next” within 30
seconds. Observe the Data List to verify that
SMRB and SMRG are ON.
If you miss the 30-second window, charging
will abort. You will need to cycle the ignition,
and exit and restart Techstream to begin the
procedure again.
Charge – Wait while the
GRX-5100 prepares to
begin charging.
Charge – As charging is
taking place, monitor the
battery voltage.
11.
12.
13.
10.
Battery Charge
Active Test
Toyota NiMH Battery Rescue Charging with the GRX-5100
Quick Training Guide QT015A
2001-2009
Prius
15 of 21
©Toyota Motor Sales, U.S.A., Inc., December 16, 2015
GRX-5100
Click the tabs at the top and side to view each section
HEV Workstation Cable ConnectionsCharging Process
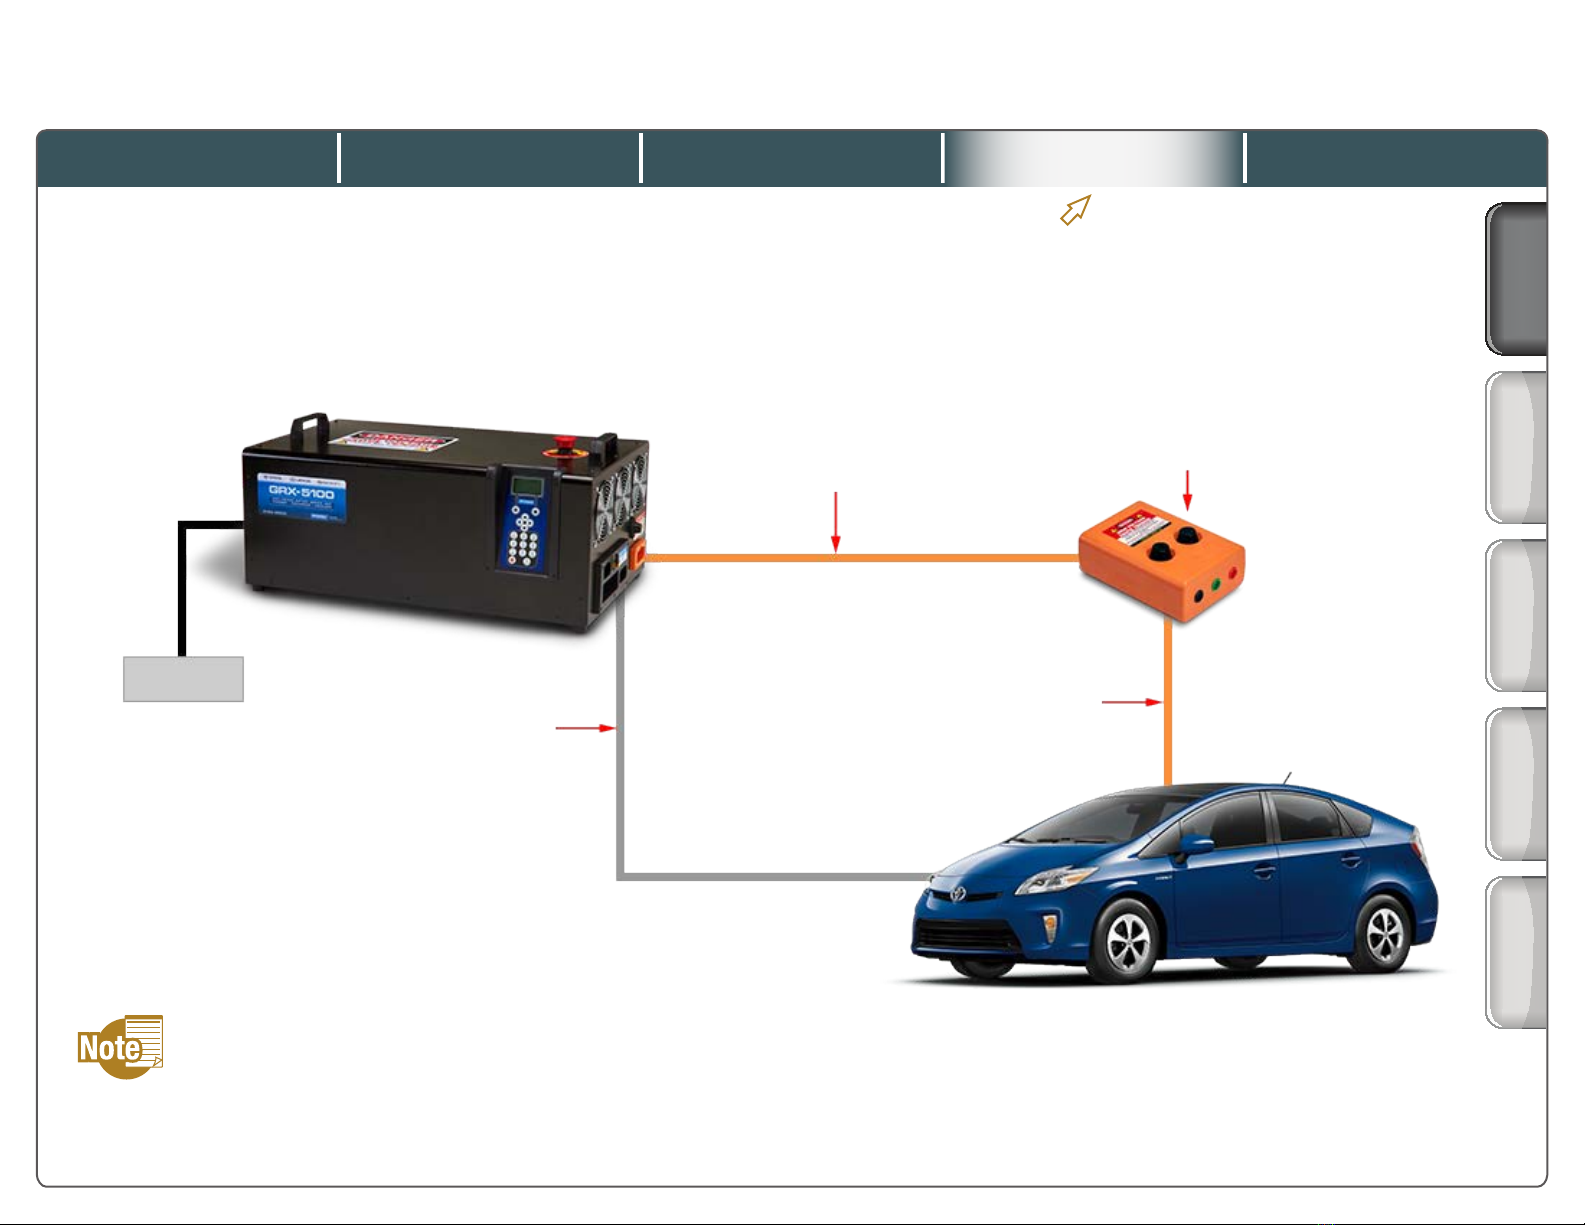
Universal high voltage
cable (Cable “V”)
High voltage
fuse box
Model specic
low voltage cable
(“See Low Voltage
Cables” tab)
Model specic
high voltage cable
(“See High Voltage
Cables” tab)
120V AC
Cabling Overview
This is an overview of the cable connections for rescue
charging. Note that the high voltage cable that connects
to the vehicle is model-specic.
Cabling
Overview
Verify Frame
Wire Ground
Low Voltage
Cable
High Voltage
Cables
Interlock
Cover
The locations of the cable connections to the vehicle
vary by vehicle model. Refer to the repair information
for the vehicle you’re servicing for details on how to
connect the cables to the vehicle.
Battery Charge
Active Test
Toyota NiMH Battery Rescue Charging with the GRX-5100
Quick Training Guide QT015A
16 of 21
©Toyota Motor Sales, U.S.A., Inc., December 16, 2015

GRX-5100
Click the tabs at the top and side to view each section
HEV Workstation Cable ConnectionsCharging Process
Verify Frame Wire Ground
After disconnecting the frame wire and
before connecting cables, the Repair Manual
instructs you to measure the resistance
between the ground connection on the frame
wire and body ground. If the shield line of
the frame wire is not securely connected to
body ground, the error message “Battery not
detected” or “HV bonding test failed” may
appear, and the GRX-5100 will not operate.
If the resistance is greater than 1 Ω, follow
the inspection procedure outlined in the
Repair Manual.
Verify Frame
Wire Ground
Low Voltage
Cable
High Voltage
Cables
Cabling
Overview
Battery Charge
Active Test
Toyota NiMH Battery Rescue Charging with the GRX-5100
Quick Training Guide QT015A
Interlock
Cover
17 of 21
©Toyota Motor Sales, U.S.A., Inc., December 16, 2015
GRX-5100
Click the tabs at the top and side to view each section
HEV Workstation Cable ConnectionsCharging Process
When this screen appears, follow the Repair Manual
instructions for connecting the EV (HV) bonding cable
(and low voltage cable, if applicable) to the vehicle.
When this screen appears, connect the low
voltage cable (green HV (EV) bonding cable)
to the GRX-5100.
Low voltage cable “R” is used
for most Toyota hybrid models.
Low Voltage Cable
In the Repair Manual, the instructions for connecting cables
between the vehicle and the THS charger refer to connecting
an EV bonding cable (green wire) and also connecting a low
voltage cable.
When using the GRX-5100 on Toyota hybrid vehicles, however,
the low voltage cable and the green HV (EV) bonding cable are
one and the same – cable “R”.
Because 2001-2009 Prius models continue to use an green HV
(EV) bonding cable AND a low voltage cable, the instructions on
the GRX-5100 control panel refer to connecting the green HV (EV)
bonding cable rst, then connecting the low voltage cable next.
The bonding cable is essentially a ground wire used for
detecting electrical leakage. The Repair Manual refers to it as
the “EV bonding cable,” whereas the GRX-5100 screen refers
to it as the “HV bonding cable.” They are the same cable.
Verify Frame
Wire Ground
Low Voltage
Cable
High Voltage
Cables
Cabling
Overview
Battery Charge
Active Test
Toyota NiMH Battery Rescue Charging with the GRX-5100
Quick Training Guide QT015A
Low Voltage Cable Use for:
PPrius (‘01-’03)
QPrius (‘04-’09)
R All other hybrid models
Interlock
Cover
18 of 21
©Toyota Motor Sales, U.S.A., Inc., December 16, 2015

GRX-5100
Click the tabs at the top and side to view each section
HEV Workstation Cable ConnectionsCharging Process
When this
screen appears:
1. Following Repair
Manual instructions,
connect the vehicle-
specic high voltage
cable to the vehicle.
2. Connect the vehicle-
specic high voltage
cable to the high
voltage fuse box.
3. Connect the
universal cable (Cable
“V”) to the high
voltage fuse box.
4. Connect Cable “V”
to the GRX-5100.
High Voltage Cables
Verify Frame
Wire Ground
Low Voltage
Cable
High Voltage
Cables
Cabling
Overview
High Voltage Cable Use for:
APrius (‘01-‘03)
BPrius (‘04-‘09)
C Highlander Hybrid (‘06-‘10)
DAvalon Hybrid (‘13-‘16)
Camry Hybrid (‘07-‘16)
E
Prius (‘10-‘15)
Prius V (‘12-‘16)
Prius C (‘12-‘16)
Highlander Hybrid (‘11-‘16)
Battery Charge
Active Test
Toyota NiMH Battery Rescue Charging with the GRX-5100
Quick Training Guide QT015A
Interlock
Cover
19 of 21
©Toyota Motor Sales, U.S.A., Inc., December 16, 2015

GRX-5100
Click the tabs at the top and side to view each section
HEV Workstation Cable ConnectionsCharging Process
Verify Frame
Wire Ground
Low Voltage
Cable
Cabling
Overview
Battery Charge
Active Test
Toyota NiMH Battery Rescue Charging with the GRX-5100
Quick Training Guide QT015A
Interlock Cover
On some vehicle models, there is an interlock located on the
frame wire that opens the high voltage circuit if the frame wire
is disconnected. It is not possible to charge the battery with this
interlock open, so an interlock cover is provided in drawer 2 of the
HEV Workstation. When installed, the interlock cover closes the
interlock circuit.
If the interlock cover is required, the instructions in the Repair
Manual will specify when and where to install it.
Be sure to install the interlock cover with the arrow pointing up.
Interlock cover required with:
• Prius (‘10-‘15)
• Prius V (‘12-‘16)
• Prius C (‘12-‘16)
• Highlander Hybrid (‘11-‘16)
Interlock
High Voltage
Cables
Interlock
Cover
20 of 21
©Toyota Motor Sales, U.S.A., Inc., December 16, 2015

Charging ProcessGRX-5100 Cable ConnectionsHEV Workstation
When starting the Active Test, observe the Data List
to verify that SMRB and SMRG are ON. If the SMRs
do not turn ON, IG OFF and then IG ON and start the
Active Test again.
After starting the Active Test, you
have 30 seconds to press NEXT
on the GRX-5100 control panel.
If you miss the 30-second
window, charging will abort. You
will need to cycle the ignition to
begin the procedure again.
As charging is taking place,
monitor the battery voltage.
If battery is insufciently
charged (not above minimum
voltage) after rst 10-minute
cycle, repeat the charge cycle.
Battery Charge Active Test
The Battery Charge Active Test turns on SMRB and
SMRG so the battery can be charged through the frame
wire. To locate this Active Test, navigate to Powertrain
> Hybrid Control > Active Test > Battery Charge.
Battery Charge
Active Test
Toyota NiMH Battery Rescue Charging with the GRX-5100
Quick Training Guide QT015A
Click the tabs at the top to view each section
21 of 21
©Toyota Motor Sales, U.S.A., Inc., December 16, 2015
Other manuals for GRX-5100 L
2
Table of contents
Other Midtronics Automobile Accessories manuals


