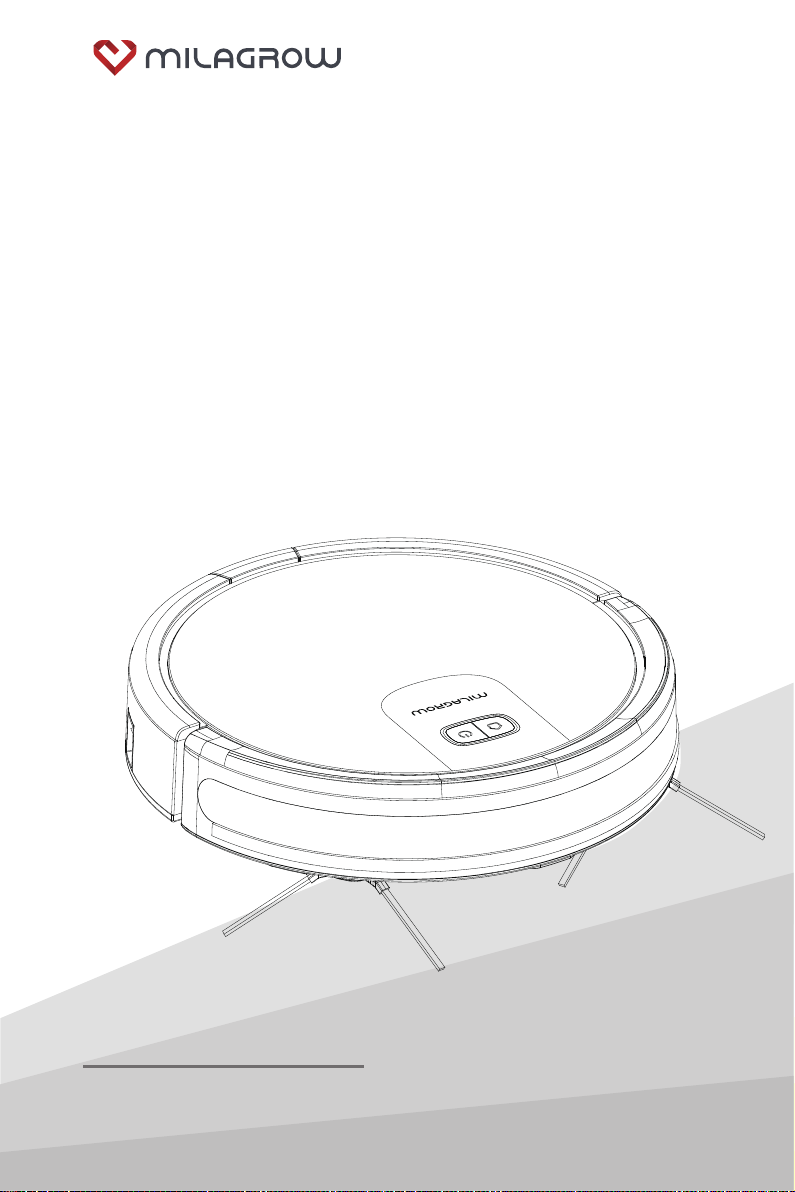
Milagrow BlackCat 21 User manual
A0 Sep 14 2020
Thank you for purchasing this product.
Please read the user guide carefully before use.
Robotic Vacuum Cleaner
User Manual
BlackCat 21/RedHawk 21

Table of Contents
Thank you for purchasing the BlackCat 21/RedHawk 21 Robotic Vacuum Cleaner.
We hope you will enjoy it!
If you have any questions about the product during use, please call our service
1. Safety Instructions………………… 2-4
2. Product Composition……………… 5-6
4. Product Use………………………… 8-13
5. Product Maintenance……………… 14-17
1.1 Instructions for use
1.2 Safety precautions
1.3 About child safety
1.4 About the batteries
1.5 Scope of use of the product
1.6 Disclaimers
2.1 Host machine and accessories
of the product
2.2 Names of parts
3. Product Installation………………… 7
4.1 Use of the host machine
4.2 Charging method
4.3 APP Operation Guide (single guide)
4.4 Instructions for Use of Wet Mop
Assembly
4.5 Instructions for Using Virtual Magnetic
Stripe Wall
5.1 Clean the charging pole pieces
5.2 Clean the dust box
5.3 Clean the middle sweeper
5.4 Clean the side brush
5.5 Clean the wheels
5.6 Clean the sensor
6.1 Troubleshooting
6. Troubleshooting……………………… 18
7. Technical Parameters……………… 19-20
- 01 -
BlackCat 21/RedHawk 21

1.1 Instructions for use
1.2 Safety precautions
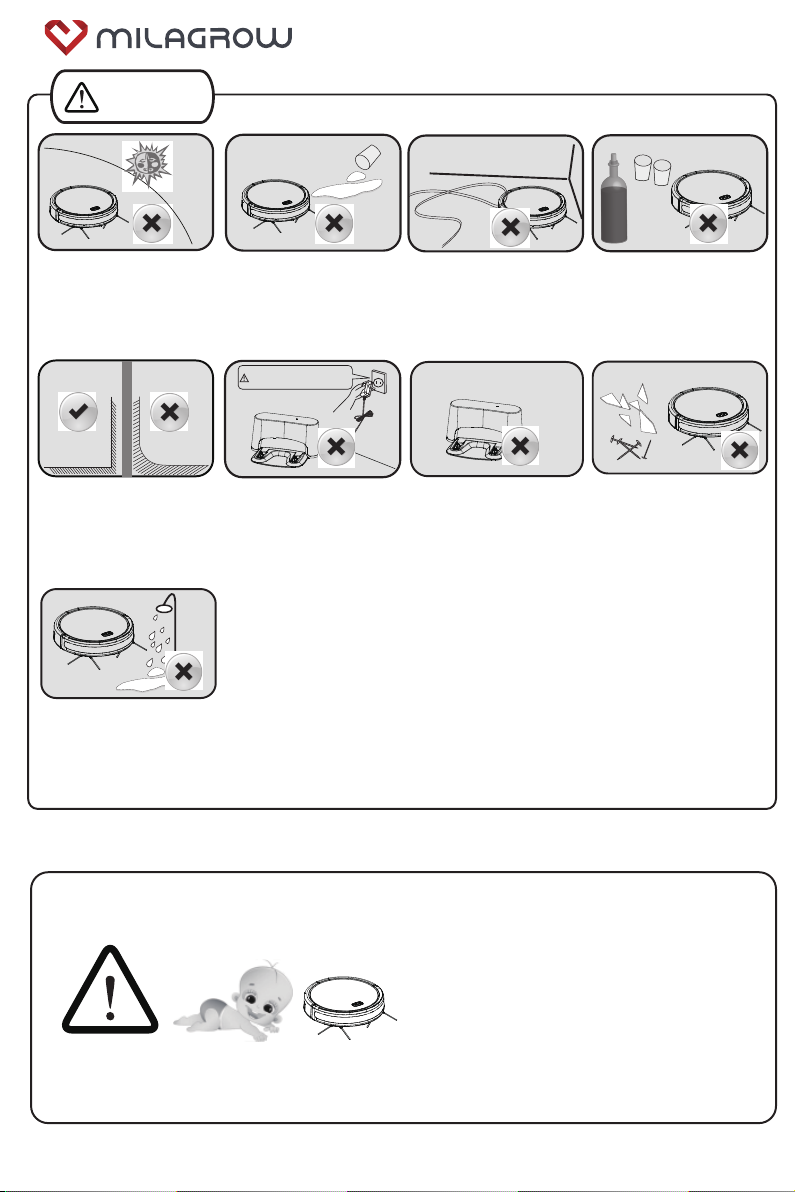
Please pay attention to the following basic safety precautions before using the product:
* Read the user manual carefully and follow the instructions in the user annual when using the product.
* Keep the user manual well for future reference.
* If you need to transfer the product to a third party, please attach the user manual along with the product.
* Any operation not in conformity to the instructions in the user manual may result in serious personal injury
or damage to the product itself.
This product can only use the adapter, batteries and charging dock
that are provided with this product. Failure to do so may result in
damage to the product, electrical shock, or fire caused by high
voltage.
Do not use this product if the host machine and accessories of this product
are found to be damaged. Contact our after-sales service department. Except
for the service technicians designated or authorized by our company, no one
may disassemble, repair or modify this product.
Unplug the product before maintenance.
Do not touch the power plug or the product when your hands are wet, as this
may result in electrical shock.
If the power cord is damaged, it must be replaced by the manufacturer, its
service department or a similar professional to avoid danger.
To prevent the product from falling accidentally, do not use this product in a
suspended place without a protective fence, which may result in personal
injury.
The user shall not replace the batteries privately.
Prevent clothing or any part of your body (hair, fingers, etc.) from getting
caught in the brush or wheel of the vacuum cleaner. Failure to do so may
result in personal injury.
Do not place the product near fire or flammable/explosive/corrosive materials.
If the user manual is missing, please contact your local dealer or call the
after-sales service department to obtain an electronic user manual.
1. Safety Instructions
Warning
- 02 -
BlackCat 21/RedHawk 21
- 03 -
* Children under the age of 8 are not allowed
to use this product. Persons with physical,
sensory or intellectual disabilities or lack of
relevant experience/knowledge cannot use the
machine unless under supervision, operating
instructions or awareness of the danger.
Children are not allowed to play with the
machine or clean/repair the machine unless
under supervision.
* Children are not allowed to play with the
product's packaging bag for fear of suffocation.
1.3 About child safety
Do not use this product
in a wet, flammable,
explosive or corrosive
environment.
Do not use this product
to suck in sharp objects
(e.g. shattered glass and
nails) for fear of damage
to the product.
This product can only be
used indoors.
Prevent the suction of
water, oil or other liquids,
which may damage the
vacuum cleaner.
Arrange scattered wires
on the floor before use
for fear of affecting
the normal operation of
the vacuum cleaner.
Remove fragile objects
before use.
When the product is
working, removal of the
charging dock will affect
the normal recharging of
the machine.
Caution
Unplug the charging dock
if it remains unused for
a long time.
The charging dock shall
be placed against the
wall and on a flat floor
for fear of affecting
product functionality.
High voltage! Please dry your hands
before operation for fear of
electrical shock!
BlackCat 21/RedHawk 21

- 04 -
1.5 Scope of use of the product
1.6 Disclaimers
Under any of the following circumstances, the product will be excluded from the scope of free warranty, but
paid repair can be provided:
A. Damage due to the user’s failure to operate the product in strict accordance with our user manual or due to
improper storage;
B. The machine or parts have exceeded the free warranty period;
C. Damage due to disassembly by those other than the maintenance personnel of our company or authorized
by our company;
D. A valid purchase voucher number cannot be provided;
E. The product model on the warranty card does not match that of the product to be repaired or is altered;
F. Damage caused by irresistible factors such as natural disasters;
G. Product failure or damage caused by unexpected factors or man-made causes (including operational errors,
liquid ingress, improper plugging/unplugging, scratching, handling, bumping, input of inappropriate voltage,
etc.)
Note: Our company provides a warranty for the product in accordance with the “National New Regulations on
Warranty”. For details, please check the warranty card provided with the product.
The product is suitable for the following floors:
Wooden floor Ceramic tile Short-staple carpet
Scope of application
1.4 About the batteries
1.Only the batteries provided by the manufacturer are applicable tothe product.
2.The batteries shall be removed when the product is discarded.
3.If you need to replace the battery of the host machine, please contact our
after-sales service department. Use of wrong batteries may cause a safety
accident.
4.If the batteries leak, prevent the contact of the liquid with the skin or
clothing. Immediately wipe it with a dry cloth and send it tothe recycling
station or designated maintenance point. Do not discard it.
5.Please properly dispose of the old batteries of the product.The batteries contain
hazardous substances harmful tothe environment. Please follow the local
environmental regulations and send them tothe designated recycling site.
-non-rechargeable batteries are not to be recharged;
-different types of batteries or new and used batteries are not to be mixed;
-batteries are to be inserted with the correct polarity;
-exhausted batteries are to be removed from the appliance and safely disposed of;
-if the appliance is to be stored unused for a long period, the batteries should be
removed;
-the supply terminals are not to be short -circuited.
BlackCat 21/RedHawk 21
- 05 -
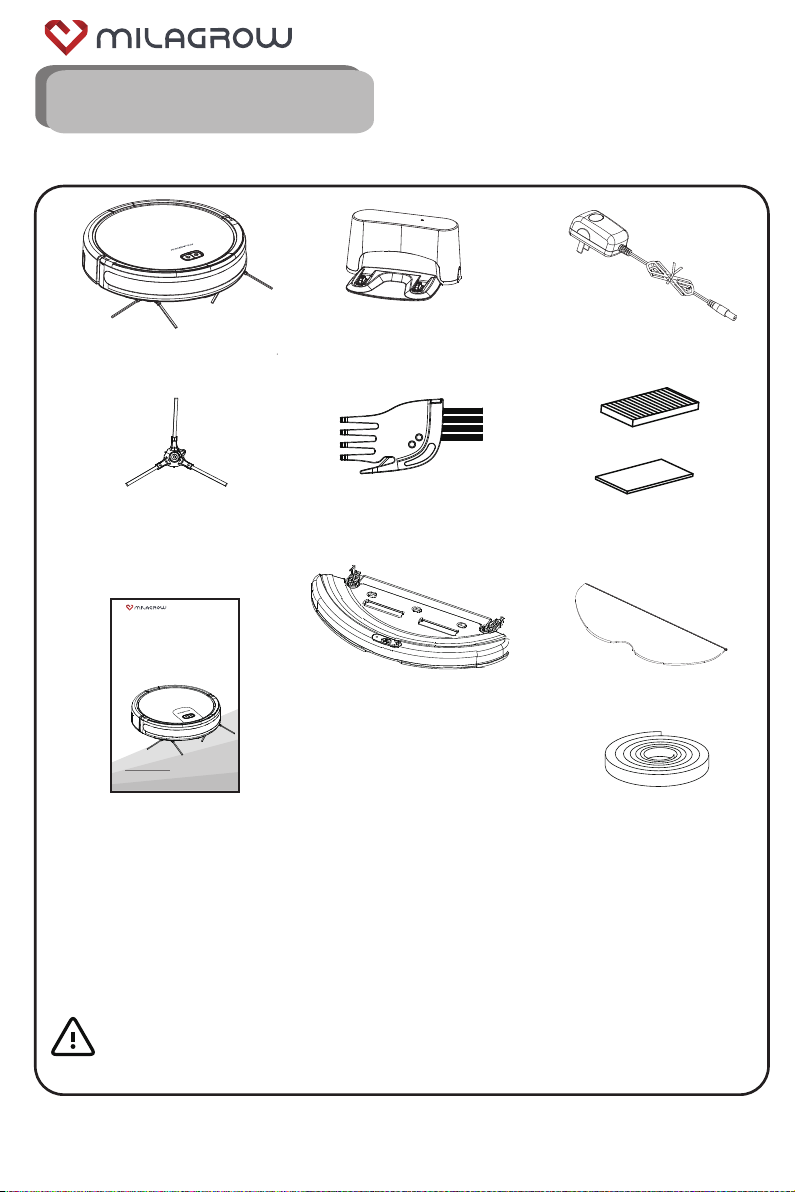
2. Product Composition
2.1 Host machine and accessories of the product
* A pair of side brushes, a filter combination and batteries have been installed in the host machine.
Tip:
Host machine×1 Charging dock×1 Power adapter×1
Edgewise sweep × 2 Cleaning brush×1
Manual ×1
Filter combination×1
Water tank ×1 Mop ×1
magnetic stripe wall ×1
A0Sep 14 2020
Thank you for purchasing this product.
Please read the user guide carefully before use.
Robotic Vacuum Cleaner
User Manual
BlackCat 21/RedHawk 21
BlackCat 21/RedHawk 21
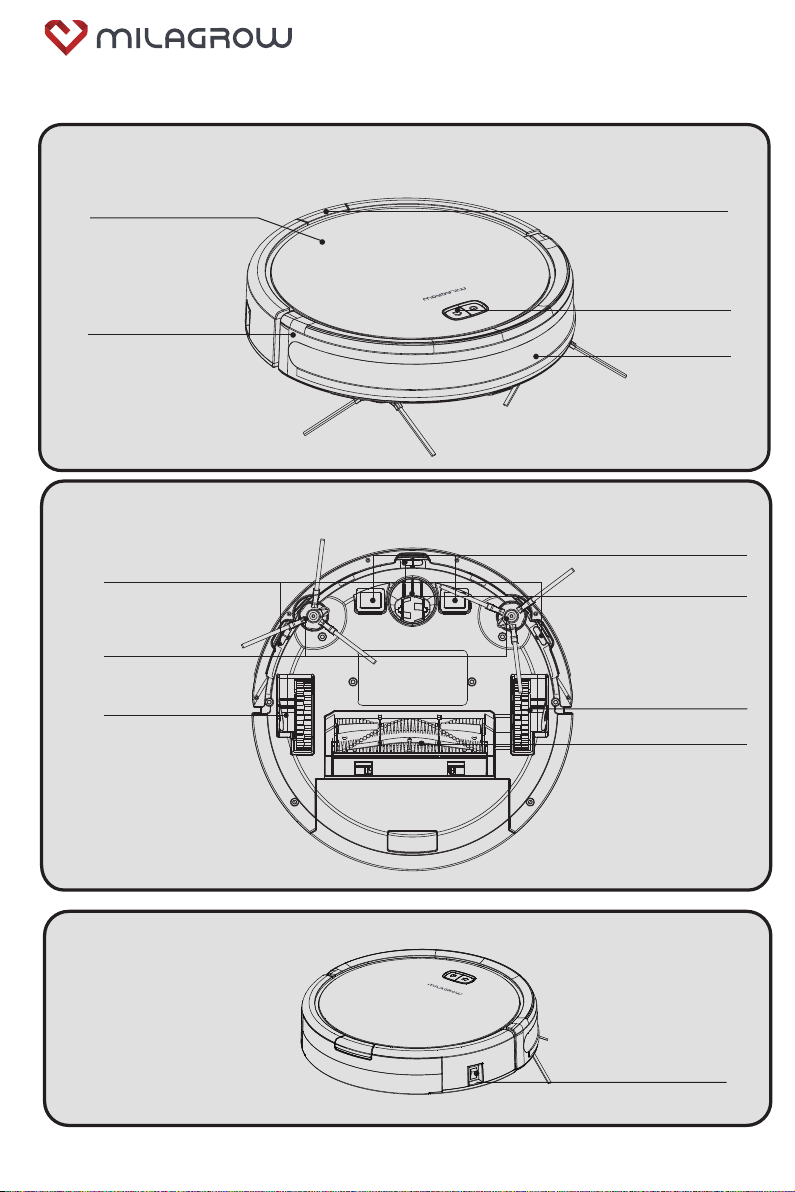
- 06 -
Front wheel
Charging pole pieces
Middle sweeping brush
Side brush
Floor inspection device
Right wheel Left wheel
Power switch
2.2 Names of parts
Front view of the machine
Bottom view of the machine
Front cover Dust box
Control key
Front shell
Signal window
BlackCat 21/RedHawk 21

- 07 -
3. Product Installation
1. Place the charging dock on a flat surface that isperpendiculartothe wall. There shall be no obstacles
within 3 meters in front and 1 meter on the left and right. Press firmly on the charging dock to attach it tothe
floor more firmly. After plugging the adapter into the power supply, insert the DC plug into the DC port of the
charging dock.
2. Connect the power adapter to the charging dock and power supply. Remember to put the adapter cable
orderly, so that it will not be entangled during the operation of the vacuum cleaner.
Power adapter
jack
Charging terminal
3.1 Charging dock installation
1
1
High voltage! Please dry your hands before
operation for fear of electrical shock!
Tip:
* Try not to place the charging dock on the carpet. It is advisable to put the charging dock in a fixed
position.
* Try not to move the charging dock in the working process of the machine, which will make it hard to
find the charging dock.
BlackCat 21/RedHawk 21

- 08 -
Power key
Recharge key
4.1 Use of the host machine
4. Product Use
4.1.2.1 Manual mode
4.1.1 Diagrams of control keys
Control Keys
Automatic
recharge
4.1.2 Working mode:
Standby
mode
Automatic
cleaning
1. Make sure that the batteries of the
vacuum cleaner are fully charged,
and turn onthe machine switch to
enter the standby state.
1. Make sure that the batteries of the
vacuum cleaner are fully charged,
and turn onthe machine switch to
enter the standby state.
2. When the vacuum cleaner is in
the standby state, press the power
key, and the vacuum cleaner will
start to clean automatically.
2. When the vacuum cleaner is in
the standby state, press the power
key, and the vacuum cleaner will
start to clean automatically.
3. When the vacuum cleaner is in the standby
state, press the recharge key, and the machine
will start to operate, with the recharge key flashing
blue, to enter the recharge mode.
3. When the vacuum cleaner is in the standby
state, press the recharge key, and the machine
will start to operate, with the recharge key flashing
blue, to enter the recharge mode.
Tips:
* To ensure work efficiency during the operation of the machine, please do not control the
machine randomly.
* The machine may have a short pause during work, so please wait patiently. The number
and time of pauses depend on the complexity of the home environment.
BlackCat 21/RedHawk 21
- 09 -
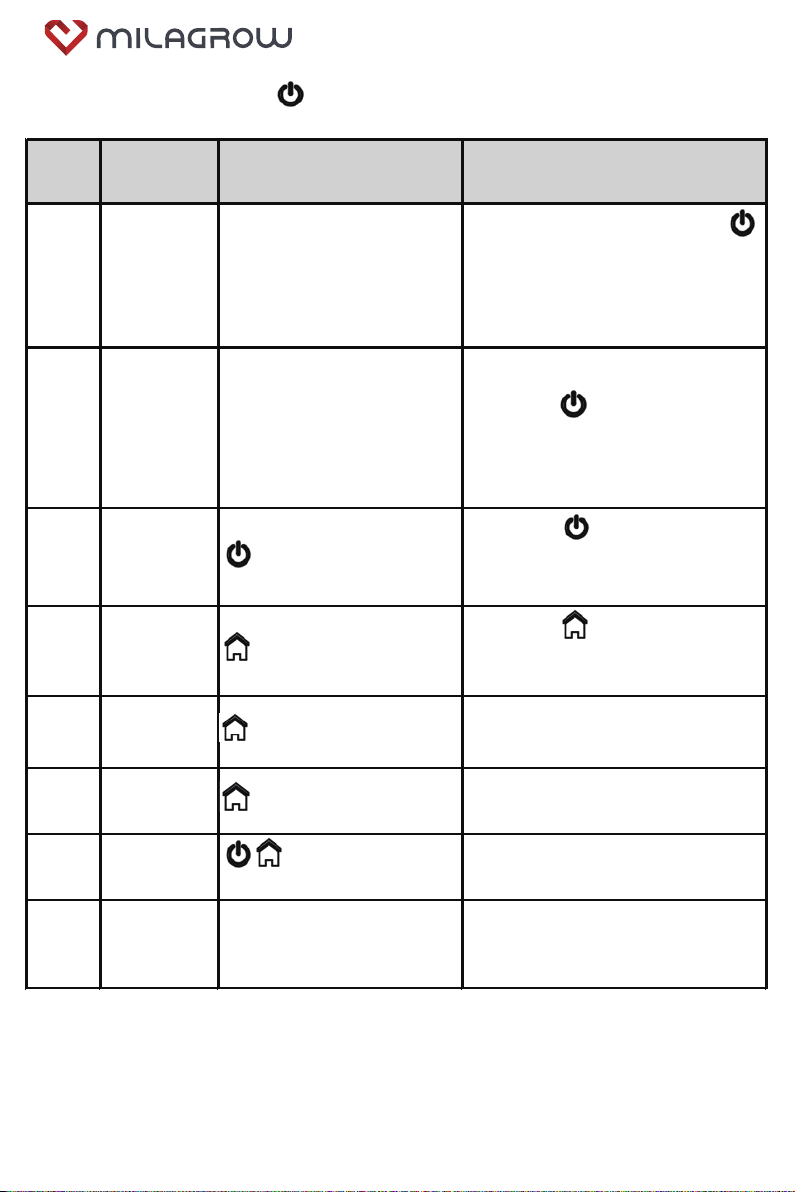
SN State Display Operation
1 Of f Light of f
1. Hav e a long pressing of the
key f or 3 seconds, and release it
when a beep is heard.
2. Turn of f the machine power
switch.
2 On Light on
1. If the power switch is turned on,
press the key .
2. If the power switch is not turned
on, turn on the power switch to
start the machine.
3 Clean Blue light normally on
Press the key on the f ront
cov er of the machine to start
cleaning.
4Search f or
recharge Blue light f lashing
Press the key on the f ront
cov er of the machine to start
recharging.
5 Charging Blue breathing light The machine is being charged on
the charging dock.
6 Full charge Blue light normally on The machine is f ully charged.
7 Error report Two red lights
f lashing Machine abnormality or f ault
8 Sleep Light of f
It goes into the sleep mode af ter
being in standby mode f or f iv e
minutes.
4.1.3 Operation guide f or key indicating light
BlackCat 21/RedHawk 21

- 10 -
4.2 Charging method
4.2.1 Manual charging:
4.2.1
High voltage! Please dry your
hands before operation for fear
of electrical shock!
1. Use the charging dock for charging:
First connect the power adapter with the charging
dock, then connect with the power supply; put the
vacuum cleaner on the charging dock tocharge (The
blue light of the recharge key flashes during charging,
and the blue light is normally on after the battery is
fully charged).
2. Charging by APP control:
Connect APP and robot, then press "charge"
on APP. Robot will find the charge station
within the valid range and charging automati-
cally.
4.2.2 Automatic charging:
Automatic charging:
In case of low battery during the operation of
the machine, the blue light of the recharge key
will flash, and the machine will enter the
recharge mode.
4.3 Use of APP (Tuya Smart)
Refer to App Operation guide, while machine is in standby mode, press the dock button and
hold for at least 4 seconds, the indicator under the very button will flash (Blue/Red), means
machine entered into WIFI connection mode.
BlackCat 21/RedHawk 21
- 11 -
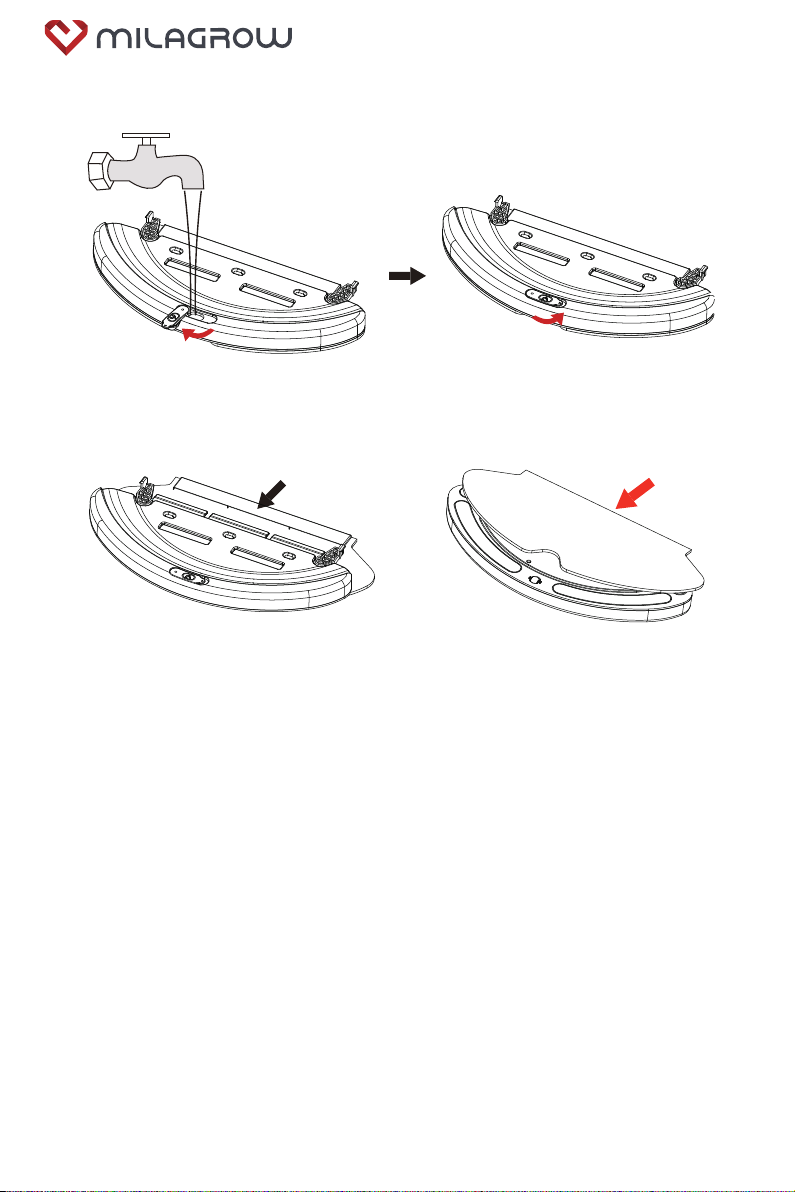
4.4 Use of Wet Mop Assembly
1. Lift the water tank cap up (the end with an arrow) and turn left or right, add water and
place the cap back;
2. As illustrated, insert the front pocket of wet mop into the buckle at the front of water
tank;
3. Affix the mop flatly to the hook and loop of water tank.
BlackCat 21/RedHawk 21
- 12 -
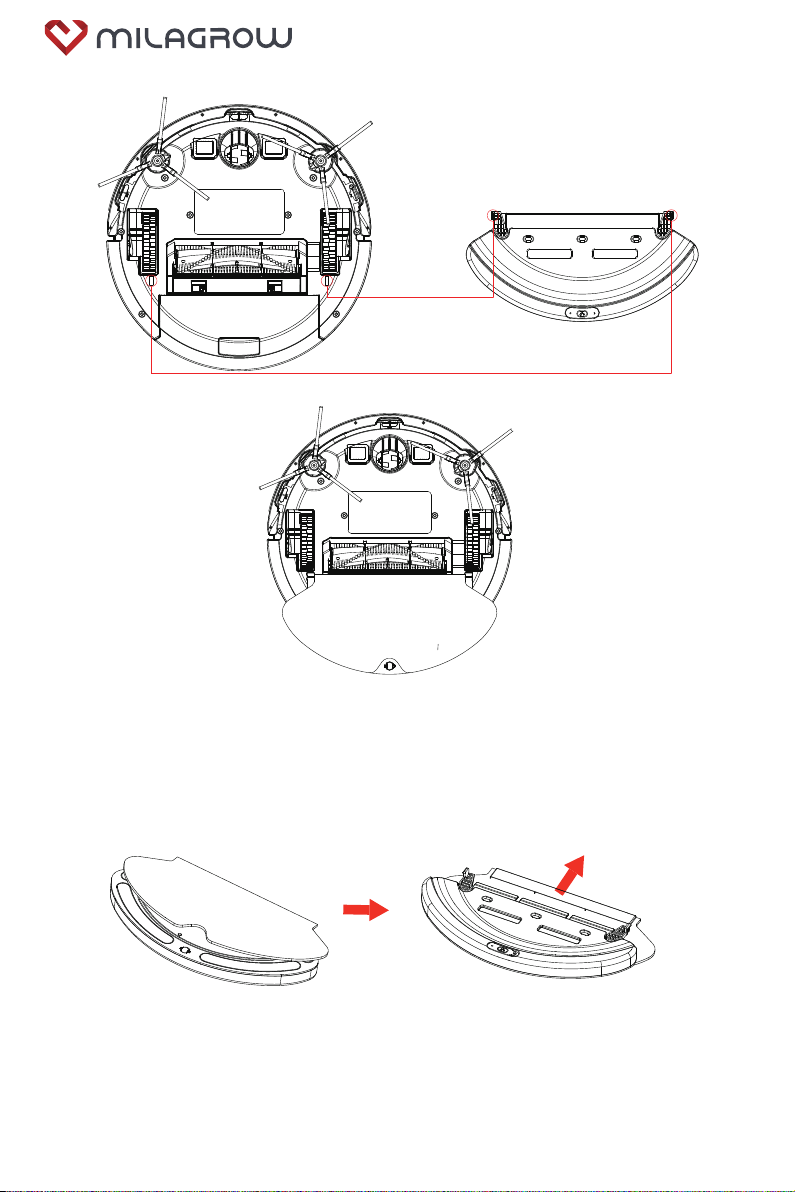
4.4.1 Installation of water tank:
4.4.2 Taking out and cleaning of wet mop:
1. Referring to the illustration for installing the water tank, take out the water tank
from the machine bottom;
2. Tear open the hook and loop open, and take out the mop along the direction as
shown in the figure;
3. Flush the mop and the water tank, and dry it naturally in shade for reuse.
1. Turn the machine upside down to the bottom, and match the buckle of water
tank with the snap-on position on the machine;
2. After the machine is placed normally, operate it normally for sweep.
BlackCat 21/RedHawk 21
- 13 -
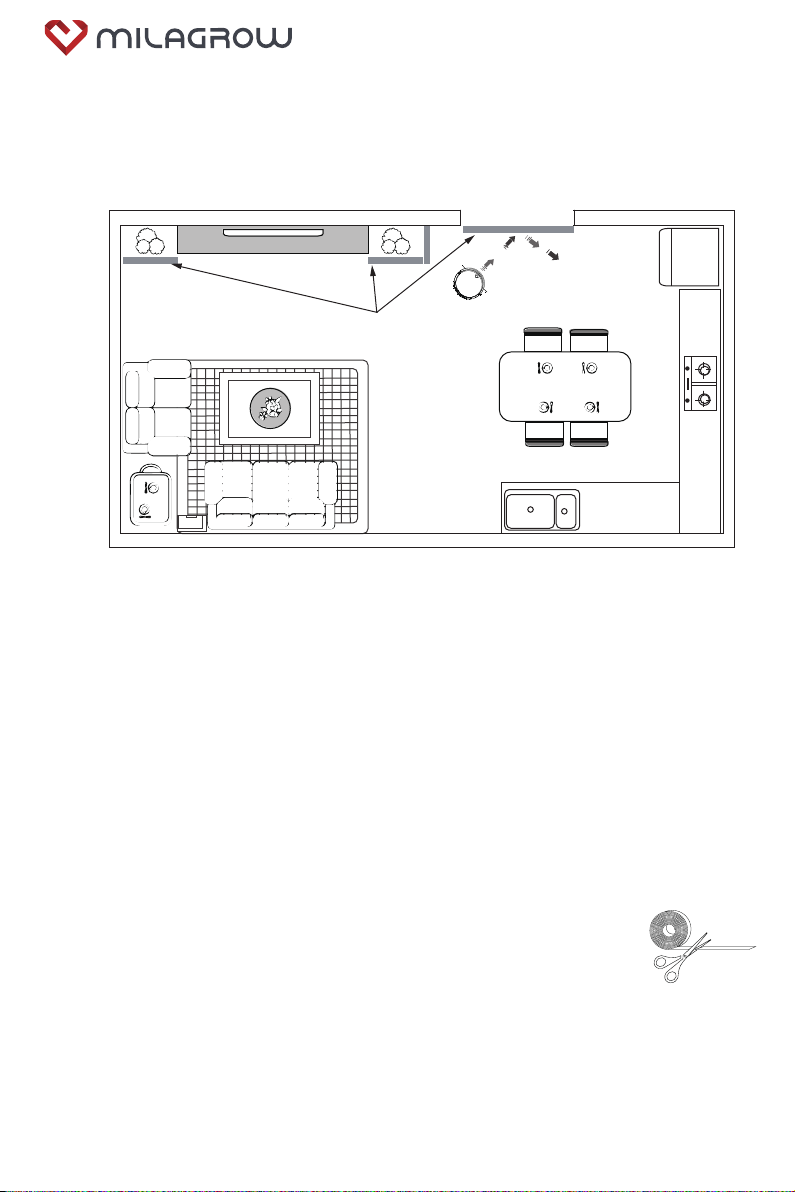
Use the Magnetic Boundary strips to quickly and easily create “no-go zones”
to keep ROBOT out of the areas you would like it to avoid.
These may include:
•Near power cords that might cause tangles
•Fragile objects that may be damaged.
•Doorway thresholds.Your robot can easily climb over most common thresholds.
However in some situations they may present a challenge.
Use the boundary strips to block off these areas.
•Around furniture with low or narrow space that may trap your robot.
Remark
1, If the Boundary strip is too long for no-go area,cut it 50cm Minimum to the
desired length so that it covers the entire perimeter of an object or
spans the length of the doorway you want to block off.
2, Place the strips on the floor or around an area rug to create
perimeters around the objects and areas you’d like to block.
NOTE: If blocking an object, place the Boundary strip
5cm in front to ensure ROBOT will not bump into it.
4.5
Use of Magnetic boundary strip
ELC
NA
Magnetic boundary strips
Attention pls!Always put the magnetic boundary strip FLAT on the ground to
make it effective.Cut off the extra length when need.
BlackCat 21/RedHawk 21
- 14 -
5.2 Clean the dust box
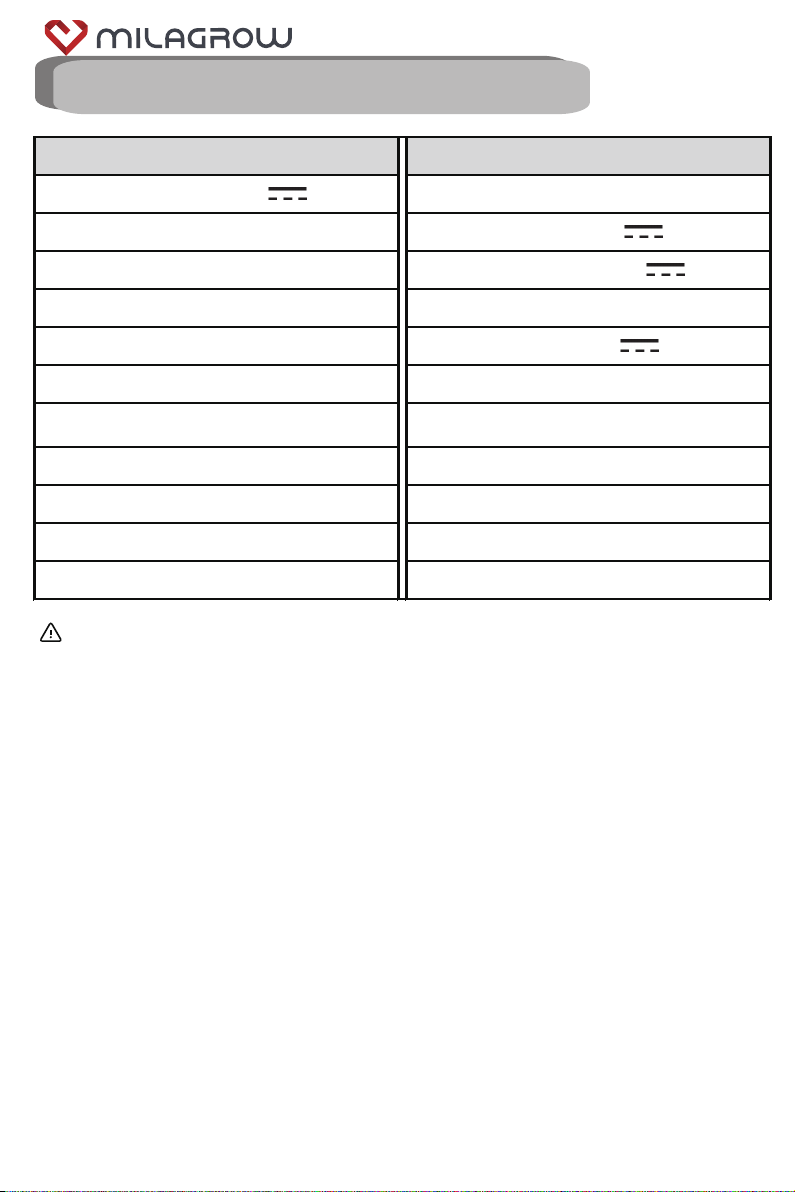
5.2.1 Install and remove the dust box
As shown in the figure above, press the “ ” key on the dust box to eject the dust box, and then remove
the dust box.
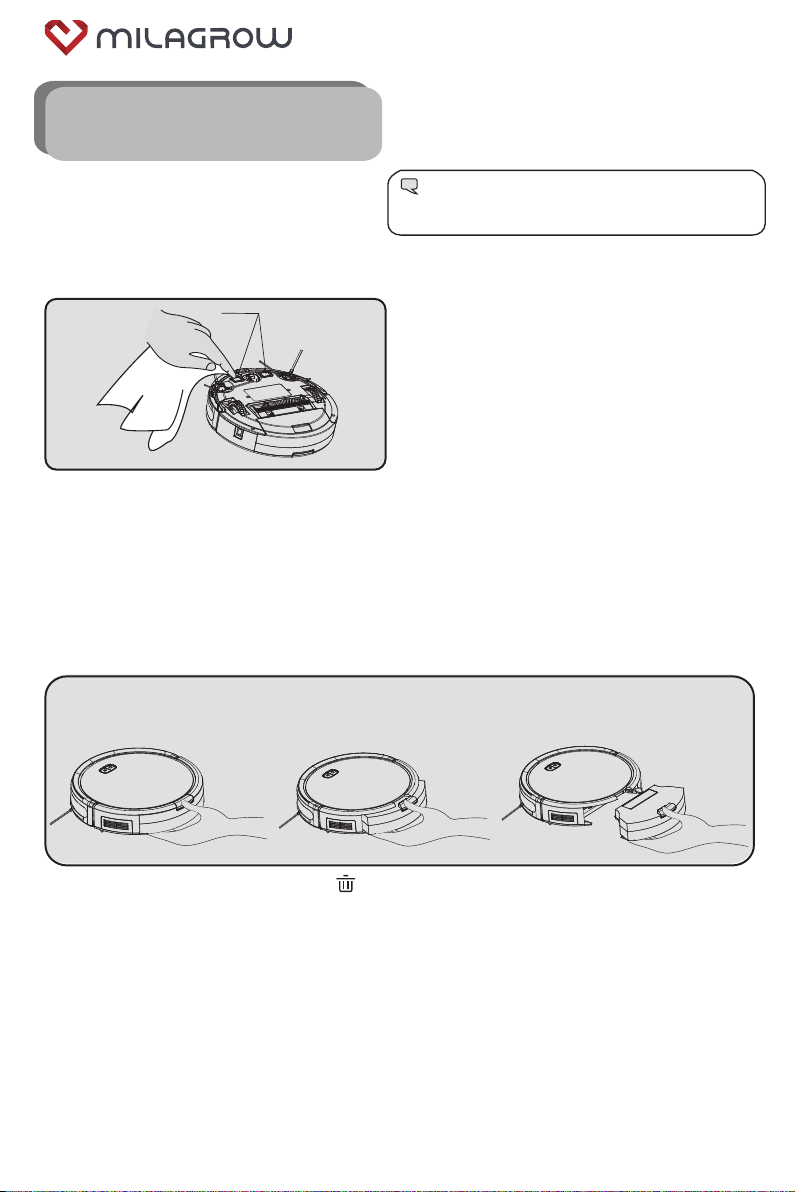
5.1 Clean the charging pole pieces
5. Product Maintenance
Charging pole pieces
Tip:
Please clean and maintain the vacuum cleaner
regularly according to the use conditions.
1. Please turn off the power switch or unplug the power cord first.
2. Please use a dry cloth to wipe them once a month.
3. Do not scrub with oil.
BlackCat 21/RedHawk 21

- 15 -
X
Cold air
Hot air
5.2.2 Clean the dust box
1. Open the dust box cover and pour out the dust.
Advice: Clean the dust box every three days at
first for the new machine, and clean it once a week
subsequently.
2. As shown above, use a cleaning brush to clean
it.
3. Remove the filter assembly and use a cleaning brush
to clear away the dust on the filter screen.
4. The inside of the dust box and the filter screen can be flushed under
running water. (Note: You need to dry it thoroughly before you can put
them back into the vacuum cleaner.)
5. After cleaning, reinstall the filter screen, close the dust box cover, and finally put the dust box into the
vacuum cleaner.thoroughly before you can put them back into the vacuum cleaner.)
BlackCat 21/RedHawk 21

- 16 -
5.3 Clean the middle sweeper
5.3.1 Remove the middle sweeper
5.3.2 Clean the middle sweeping brush
1. As shown in the figure, push the lock lever to
the middle, and lift it up.
3. Remove the middle sweeping scraper
assembly and the middle sweeping brush.
2. Grab the middle sweeping brush and lift it up.
1. As shown in the figure, please use a cleaning
brush to clean the middle sweeping soft brush
and the middle sweeping rubber brush regularly
2. As shown in the figure above, regularly clean
the hair and other entanglements on the
sweeping brush.
BlackCat 21/RedHawk 21

- 17 -
5.4 Clean the side brush
1. Use a screwdriver to remove
the screws from the side brush.
2. Remove the side brush and
clear away the hair and other
rubbish on the side brush. Then
clear away the entanglements in
the slot of the side brush.
Clean the front, left and right wheels regularly with a
cleaning brush.
(Note: The wheel shaft may be entangled by hair, cloth
strips, etc., so please clean it in time.)
It is recommended that every time
after the cleaning work is completed, a
dry cotton cloth should be used to
carefully wipe the light-transmitting
plate of the sensor to prevent dust
accumulation on it, which will affect the
performance of the product.
5.5 Clean the wheels
5.6 Clean the sensor
IR sensor
Bottom view of sensor
BlackCat 21/RedHawk 21

- 18 -
6. Troubleshooting
Fault indication by
light flashing Fault name Fault description Solution
The red light flashes
twice, and 1 beep can be
heard.
Left wheel fault The left wheel does not rotate,
as the left wheel is overloaded.
Please check whether the left wheel
of the machine gets entangled.
The red light flashes 3
times, and 1 beep can be
heard.
Right wheel fault
The right wheel does not
rotate, as the right wheel is
overloaded.
Please check whether the right
wheel of the machine gets
entangled.
The red light flashes 5
times, and 1 beep can be
heard.
Front wheel fault The front wheel is stuck and
does not rotate.
Please check whether the front
wheel gets entangled.
The red light flashes 6
times, and 1 beep can be
heard.
Floor inspection
fault or
suspension fault
Cliff or the sensor is dirty or
the machine is off the floor.
Please check whether the sensor at
the bottom of the machine is blocked
abnormally or do not leave the
machine in a suspended state.
The red light flashes 7
times, and 1 beep can be
heard.
The battery
charge level is
low
The battery charge level has
reached its lower limit (other
than recharge voltage
threshold).
Please allow the machine to return
to the charging post for recharge.
The red light flashes 8
times, and 1 beep can be
heard.
Front collision
fault
The front shell collision switch
does not reset.
Please check whether the machine
collision buffer is normal or loose.
The red light flashes 9
times, and 1 beep can be
heard.
Middle sweeper
fault The rolling brush is stuck.
Please check whether the middle
sweeping brush of the machine is
entangled by any foreign object.
The red light flashes 10
times, and 1 beep can be
heard.
Side sweeping
faultThe side brush is stuck.
Please check whether the side
sweeping brush of the machine is
entangled by any foreign object.
The red light flashes 11
times, and 1 beep can be
heard.
Wall inspection
fault
There is a problem with the
wall inspection.
Please check whether the wall
inspection transparent window is
blocked or interfered by any foreign
object.
The red light flashes 12
times, and 1 beep can be
heard.
Fan fault The fan does not rotate, and
the current is large.
Please check whether the fan blades
are loose or are entangled by any
foreign object.
Tip: If you can't eliminate the corresponding faults with the above
methods, please contact our customer service staff in time.
The red light flashes 14
times, and 1 beep can be
heard.
Charging fault The battery is damaged or the
battery cable is not in contact.
Please check whether the charging
dock power supply is normal or
replace the battery.
BlackCat 21/RedHawk 21
- 19 -
7. Technical Parameters
Our company reserves the right to make any technical or design changes to the product due to
continuous product improvement needs.
The right of interpretation belongs to our company.
Tip:
Operating voltage 14.4 V
Rated power 24 W Output Voltage 19V
Battery Lithium battery Output Current 600mA
Battery capacity 2600mAh
Charging Time 4-5 hours Input Voltage 19V
Operating hours Approx. 120 minutes
Working temperature
range 0°C 〜50°C
Operating humidity range ≤80%RH
Noise ≤65dB
Weight 3.5kg
Dimensions
Ø325*8
0
mm
Functional parameters of the host machine Functional parameters of accessories
Power adapter
Charging dock
BlackCat 21/RedHawk 21
This manual suits for next models
3
Table of contents
Other Milagrow Vacuum Cleaner manuals

Milagrow
Milagrow RoboPurifier 7.0 User manual

Milagrow
Milagrow iMap10.0 User manual

Milagrow
Milagrow BlackCat User manual

Milagrow
Milagrow Seagull Instruction manual

Milagrow
Milagrow BlackCat MGRV02 User manual

Milagrow
Milagrow Aguabot 5.0 User manual

Milagrow
Milagrow iMap Venii Max User manual

Milagrow
Milagrow iMap10.0 User manual

Milagrow
Milagrow RoboCop MGRV03 User manual

Milagrow
Milagrow Spaze Wet User manual


