Milestone International 60-D User manual


2
INTERNATIONAL INC.
POTATO SEED CUTTER
TABLE OF CONTENTS
WARRANTY.............................................................................................................................................................. 3
SAFETY INSTRUCTIONS......................................................................................................................................... 4
STORAGE AND MAINTENANCE ............................................................................................................................. 6
OPERATION............................................................................................................................................................. 7
DECALS… ................................................................................................................................................................ 8
ADJUSTMENT PROCEDURES................................................................................................................................ 11
CUTTER SETUP & STARTUP PROCEDURES........................................................................................................ 14
CALIBRATION FOR COULTERS ON HMI................................................................................................................ 16
PARTS LIST DRAWINGS
Hopper-Presizer........................................................................................................................................... 18
Sizer............................................................................................................................................................. 20
Progressive Roller Table.............................................................................................................................. 22
Coulter Blades - Sponge Drums................................................................................................................... 24
Drive System................................................................................................................................................ 26
Inspection Table........................................................................................................................................... 28
Wheels ......................................................................................................................................................... 30
Electrical....................................................................................................................................................... 32
Inside Electrical Panel.................................................................................................................................. 34
Hang-on Chip Cross Conveyor .................................................................................................................... 36
Hydraulic Diagram........................................................................................................................................ 36
Chain Belt Option ......................................................................................................................................... 38
SAMPLE TAKING & ADJUSTMENTS....................................................................................................................... 42
SEED PIECE PROFILE ADJUSTMENT TABLE ....................................................................................................... 44

3
WARRANTY
Milestone warrants that all articles of its product line will be free from defects in materials and
workmanship. Milestone’s obligation on all Pilers, Cutters, and Potato Handling Equipment shall be
limited to manufactured parts, materials, and workmanship for a period of 12 months from the date of
invoice.
On parts purchased by Milestone equipment and produced by other manufacturers, Milestone will
assist customers in making claims to the manufacturer by completing all necessary warranty claim
documents but assumes no responsibility. The ultimate responsibility for warranty on these purchased
parts rests with the original manufacturer.
This is the only warranty given by Milestone and is given in lieu of all other warranties whether
expressed or implied. Warranty will be considered null and void if, in the opinion of Milestone, the
equipment has been damaged due to misuse, abuse or has been altered in any form.
For easy reference, and when ordering parts, please refer to the Serial Number of your new Milestone
Seed Cutter.
Model Number: Serial Number:

4
SAFETY INSTRUCTIONS
A. General Information
The safety of all persons associated with farm equipment depends largely on each individual being acutely
aware of his responsibility at all times. Inspect your Milestone Potato Seed Cutter on a regular basis. It is
especially important that all operators be well trained with the safety features and functions of this equipment
prior to using equipment. Each operator will need to ensure the equipment is in proper operating condition and
under the control of qualified personnel.
Milestone is not responsible nor is it liable for damage, accidents or injury caused by
this machine.
REMEMBER!! Common sense and good safety practice always pay off.
B. Safety Instructions
Always disconnect power supply before making adjustments to your Milestone Potato Seed Cutter. Adherence
to the following safety instructions will help assure safe operation.
1. Shields
Keep all shields in place during operation.
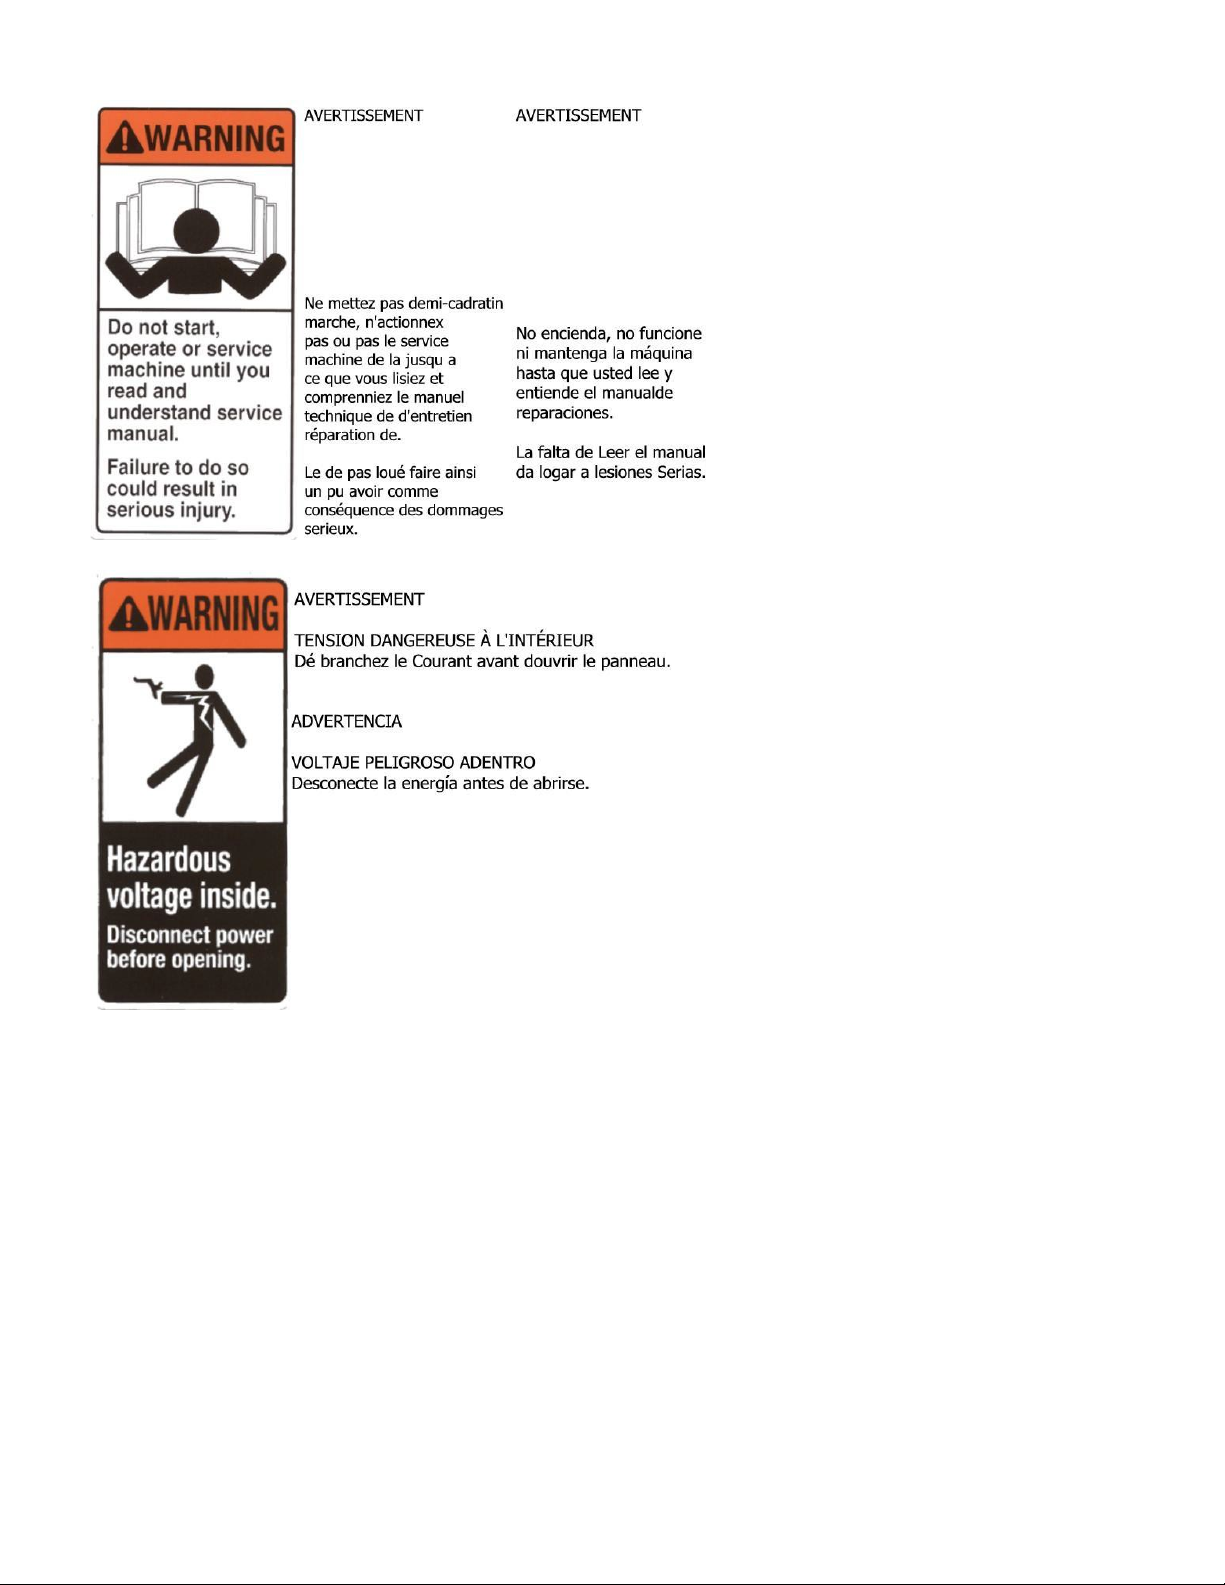
2. Decals
Safety and warning decals are placed on the equipment for your protection. Be sure everyone
operating the equipment reads and complies with the requirements stated on the decals at all times.
3. No Standing or Climbing
Do not let anyone stand or climb on the equipment at any time during operation except in designated
areas.
4. Handrails
Always use handrails when mounting or dismounting equipment. Never mount or dismount a moving
machine.
5. Equipment Support
Never work underneath or perform maintenance on a machine without first having it properly
supported. Using mechanical as well as hydraulic means to support machines is recommended.
Hydraulic systems can fail without warning and let machines or machine parts fallunexpectedly.

5
6. Clothing/Hair
Loose clothing and/or long hair can become entangled in the many moving parts. Please take
necessary precautions to avoid accidents.
7. Use Safety Equipment
Wear gloves, hard hats, and safety glasses when performing maintenance or other functions on your
Milestone Cutter.
8. Making Adjustments
Do not allow anyone to make adjustments on a machine while in operation. Stop the machine and
disconnect the power supply. Keep hands, arms, legs, and feet clear of any moving parts and power
controls.
WARNING!!
Never sharpen coulter blades with machine in motion. To sharpen coulters: Disconnect power and
remove coulter drive chains. Use a seven-inch right-angle grinder to sharpen. With the drive chains
removed, coulters will turn so an even edge can be made.
9. Clean Machines
Machine must be kept clean of debris at all times. Prevent a buildup of dirt, rocks, and debris on the
personnel platforms.
10. Maintenance/Repairs
Never perform maintenance or repairs on or under the machine without first disconnecting the power
supply. Accidents can happen when least expected.
11. Be Prepared
Never allow horseplay during the operation of the equipment. Be prepared at all times for the
unexpected.
12. Watch for Children
Be careful to watch for children at all times, especially when starting up. Remember, children like to
play around equipment.
MAKE SAFETY AN IMPORTANT PART OF YOUR OPERATION!

6
STORAGE AND MAINTENANCE
A. General Information
Proper storage of your Milestone Potato Seed Cutter when not in use will add to the life of your machine and
reduce costly repairs. Wash or steam clean the machine after the cutting season. Soil buildup will rust and
corrode many metal parts. Attention to these areas will pay off in terms of lower maintenance costs and
longevity of your Milestone Cutter.
B. Storage Suggestions
Always disconnect power supply before making adjustments to machine. Adherence to the following safety
instructions will help assure safe operation.
1. Short Term
Prior to parking the machine each night, the machine should be cleaned of debris. It should be
lubricated and visually inspected for any repairs that should be made before cutting the next day.
2. Long Term
Wash or steam all foreign matter off and disinfect your Milestone Cutter. Lubricate all chains, bearings
and fittings.
A. Slip Clutches
Cover or remove to prevent moisture from rusting and “freezing” clutches. If clutches are not
removed, back off adjusting bolts all the way.
B. Chain Belts
Belt chain should be removed, rolled loosely and stored on end, indoors, to protect them from
ultra-violet rays, moisture, and cold temperatures if the cutter is not stored indoors.
C. Roller Chain
Thoroughly clean and lubricate progressive roller cutter chain, as well as all other roller chains.
D. Covering
All rubber covered rollers, progressive table, and belts should be covered to protect from ultra-
violet rays and moisture if cutter is not stored indoors.

7
OPERATION
A. General Information
These instructions have been established after extensive field tests. They are presented as a guide to help you
adjust your cutter to obtain optimum performance. Your Milestone Potato Seed Cutter is designed and built to
cut almost any seed variety. Certain seed variety and/or size may require additional adjustments.
B. Pre-Operational Check List
1. Visual Inspection
Visually inspect your cutter to make sure all shields are in place. Make sure all belts, nuts, screws, and
setscrews are in place and properly secured.
2. Roller Chain Alignment
Check roller chain and sprocket alignment. Inspect for wear and tighten roller chain if necessary.
3. Gear Boxes
Check oil level in all gearboxes and add more oil if necessary, to bring oil level to full mark.

8
DECALS
9

10
11
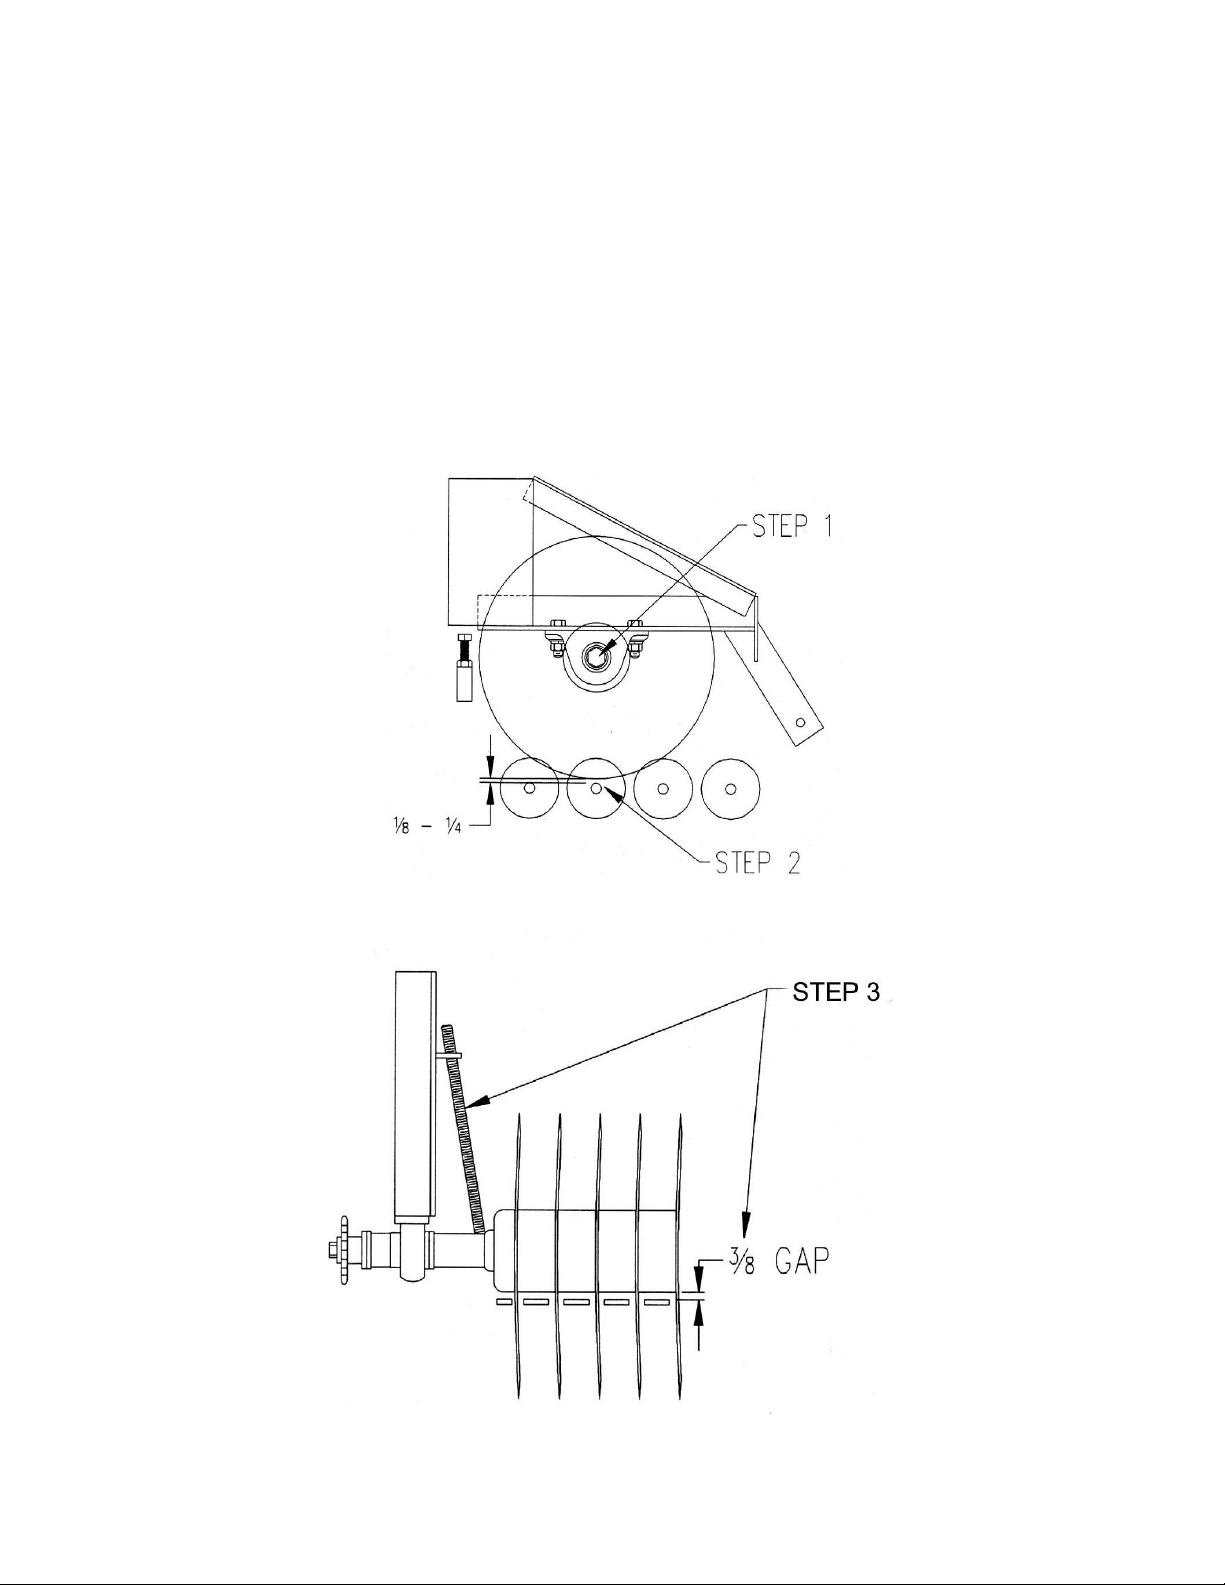
MILESTONE CUTTER ADJUSTMENT PROCEDURES
•STEP 1 Check bolt on end of coulter shafts (top & bottom) for tightness. Then remove
drive so drums turn freely.
•SETP 2 Line up center of progressive roller pipe shaft with coulter shaft. Raise or
lower coulter to ¼” (top) gap and 1/8” (bottom) gap. Make sure outside coulter blade is
same height as rest of coulter blades. CAUTION – Lowering coulter blades too low may
cause blades to cut progressive rollers.
•STEP 3 Adjust strippers to 3/8” between stripper end and coulter spacers.

12
MILESTONE CUTTER ADJUSTMENT PROCEDURES
•STEP 4 Lower top drum down on each side until a faint ticking is heard by rotating
drum towards hopper. Adjust both sides accordingly, and it is good to double check.

13
MILESTONE CUTTER ADJUSTMENT PROCEDURES
•STEP 5 Find high spot-on bottom drum and turn it to 1 o’clock position. Drop a
measuring tape down through strippers to high spot-on drum. Raise or lower drum to 1-
1/2” from bottom of stripper to high spot-on drum.
•STEP 6 Find high spot-on top drum. Turn high spot-on top drum to 6 o’clock and high
spot-on bottom drum to 12 o’clock. So, the high spots on each drum face each other. Put
drive chain on while drums are in this position.
•STEP 7 Center cross cut knife evenly between both drums.

14
CUTTER SET UP AND START UP PROCEDURES
**IMPORTANT**
CUTTER ADJUSTMENT PROCEDURES MUST BE COMPLETED FIRST
(ALL 7 STEPS)
SETTING UP CUTTER
1. Position Cutter - Confirm the following:
•
Make sure all guards are in place
•
The cutter is level from side to side.
•
Inspection table is accessible on both sides of machine
•
Everything is free from rubbing on the belts
•
Position duster (remember duster turns counter clockwise, therefore the duster must be
a little off center, towards opposite side of duster control.)
2. Ensure the coulter blades are the same distance from the back upright angle.
3. Switch on power disconnect on cutter, but do not turn the cutter on.
•
Confirm that all three lights (yellow, green and red) are lit up on the electric eye.
If
not, check and see if all the E-stops are pulled out (1 on power box and 2 up by top of
hopper. and Confirm that the coulter kill switch is attached
)
Electric Eye
Yellow---power to eye
Green--- has small amount reflection.
Red ------ has excess amount of reflection.
If there is a green light but no red, wipe off the reflector and twist the electric eye until
red appears. You can aim it by seeing red in the reflector.
4. Make sure machine is running in the right direction by switching on power supply only to
hopper/conveyors. If not running the right direction, switch line 1 and line 3 (3 phase only) in
electrical disconnect on side of electrical panel. Slow down elevator and close top sizer half
way and bottom sizer most of the way, and pre-sizer all the way.
NOW YOU'RE READY TO RUN
5. MAKE SURE NO ONE IS IN THE MACHINE
Switch on power to the entire cutter
•
Buzzer should sound.
•
Make sure the machine is running smoothly.
•
Slowly add potatoes to machine. For now, keep elevator running slow.
•
Adjust top sizer to where 7 oz. potatoes are on top and 6 oz. potatoes are on the
bottom.

15
6. Adjust the bottom sizer, drop out those potatoes which you would not like to cut in half.
7. Check the cross cut knife and make sure you are cutting the potatoes in the middle. To do
this:
•
Catch a top and bottom of the same potato and determine if they are both even.
•
Adjust by raising or lowering each side.
•
Be patient and take your time.
This is important!
8. Go to the back of cutter and take a sample. Refer to sample taking. (See Page 38)
•
Let your sample determine what adjustments need to be made.
•
Adjust cutter according to sample taking instructions.
•
Make sure those on the inspection table, cutting by hand are educated in what their
jobs are. They can change a sample if not.
9. Check the trim rollers and see what waste you are creating. You can make adjustments to
control the waste by following steps 5-8.
•
If the pieces being cut by the cross cut knife are falling through the trim rollers, make
sure you are cutting in the middle and not cutting them too small.
•
If continuing with too much waste, shut down machine and move trim rollers 1/16”
closer or speed up trim rollers.
10. Open the pre-sizer a little bit at a time until desired size is being eliminated.
11. After making all necessary adjustments,
•
Adjust the elevator speed and increase capacity until you the desired rate.
Remember,
if you over crowd the table, your quality goes down
. You must give room for the
potatoes to turn before they come to the coulter blades.
•
Make necessary adjustment to accommodate the speed.
12. Confirm duster is putting on enough dust.
•
If dust is coming out of the corner of the discharge chute, slow down the dust.
•
If not enough, adjust the dust faster.
ALWAYS TAKE SAMPLES TO MAKE NECESSARY ADJUSTMENTS
16
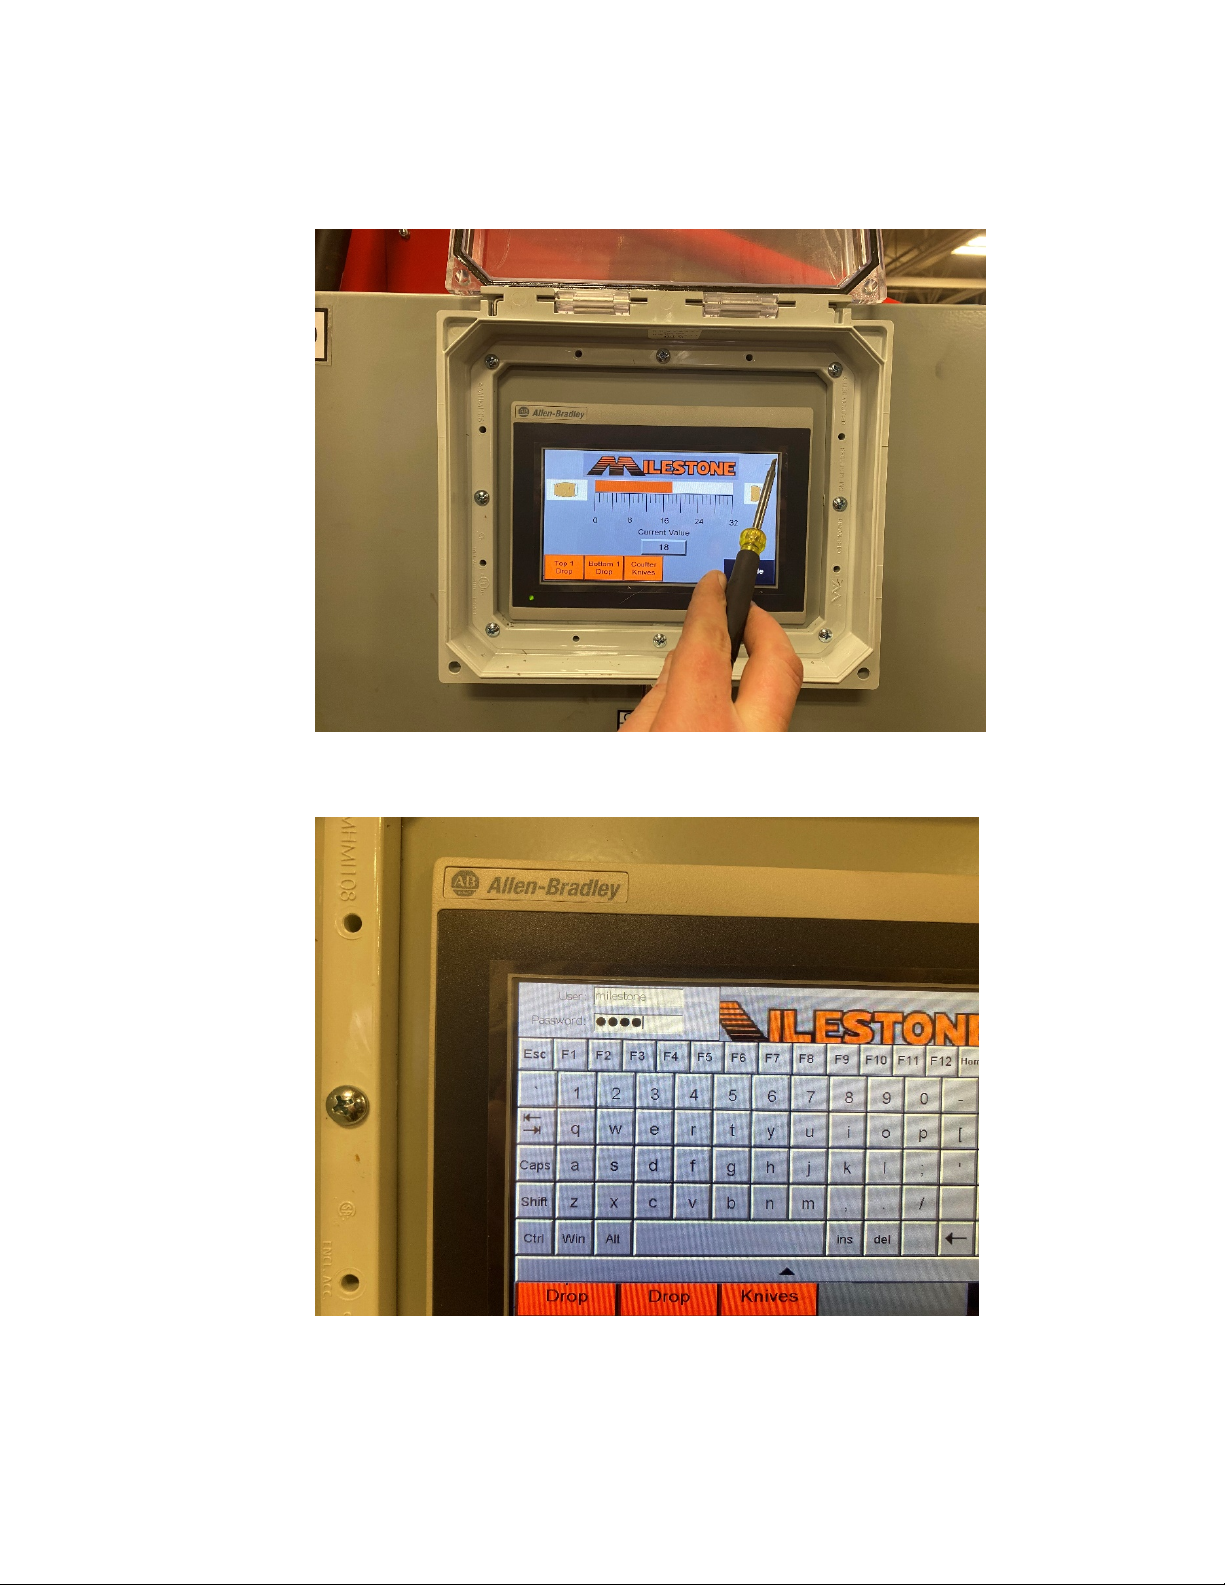
CALIBRATION FOR COULTERS ON HMI
1. Press screen on the top right corner.
2. Enter username: milestone (all small letters) and Password:
0025 and hit Enter.
17
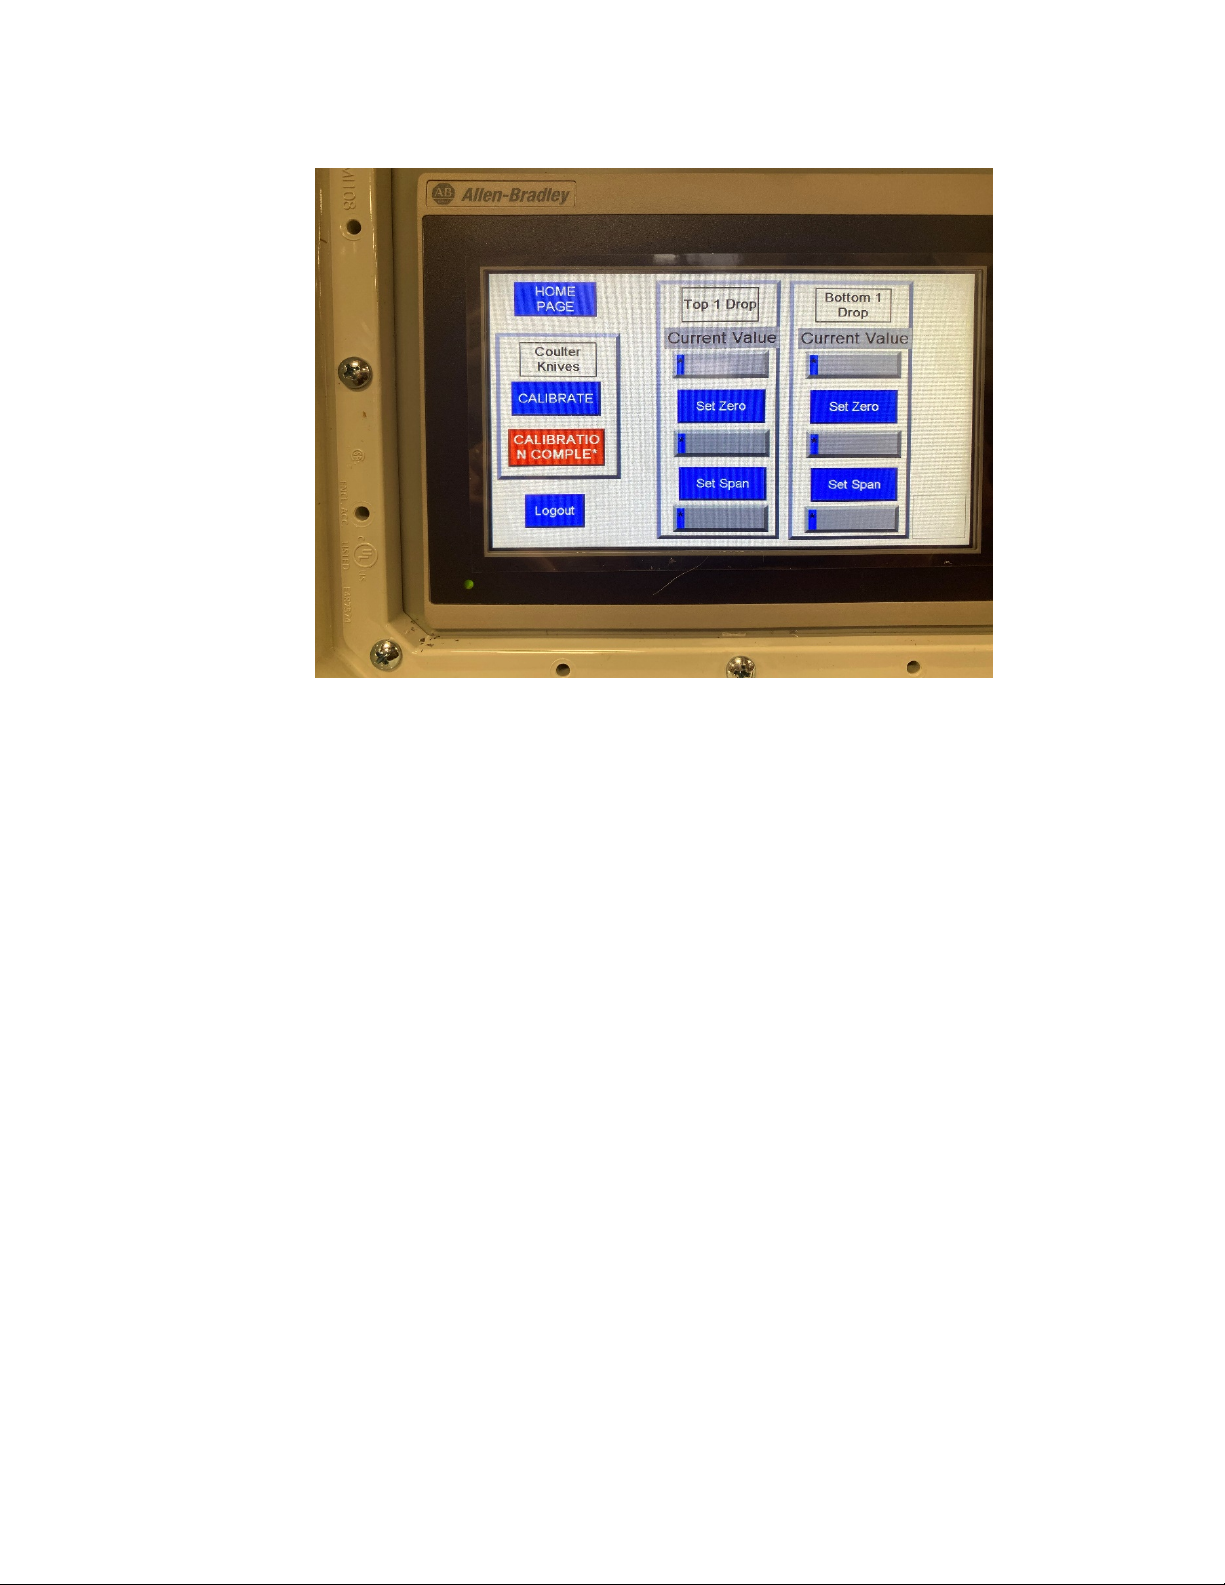
3. You will be redirected to this screen, then tap the Calibrate
button.
4. The coulter adjust motor will start on its own. It will travel to the
home Limit Switch (on the left as you are looking up at it), stop
for one second, then will travel to the end of the travel Limit
Switch (right one).
5. Once it has stopped on the far-right Limit Switch, tap the Logout
button, this will take you back to the main screen and should
have a count of 32. You then can run the coulters back to where
they need to be.
ONE DROP CALIBRATION
(Refer to last picture above)
1. Move One Drop all the way open.
2. Press Set Span button on Calibration page.
3. Move One Drop all the way closed.
4. Press Set Zero button on Calibration page.

18
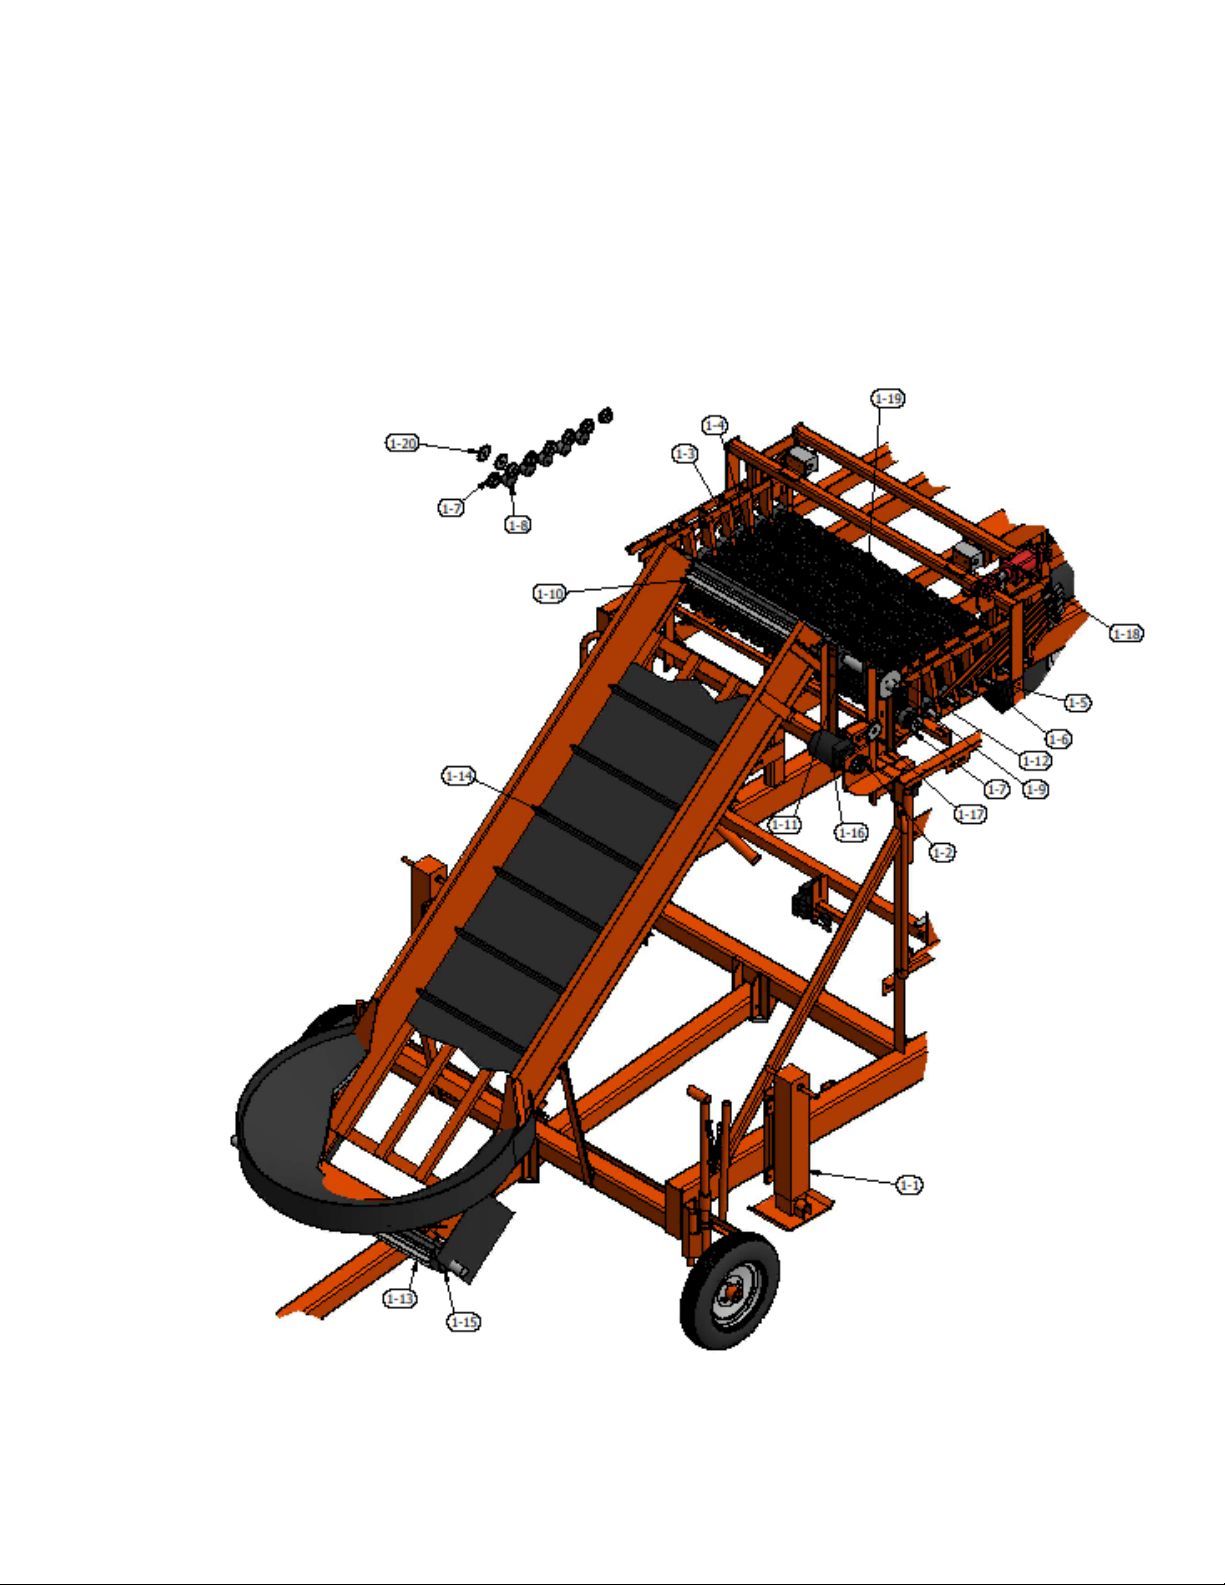
REF # DESCRIPTION 60” CUTTER
1-1 Hand Crank Jack 10,000 lbs. JACHE174
1-2 Sprocket Hydraulic Motor SP5B1516
1-3 Roller Rubber Acorn Full RUBRO035
1-4 Roller Rubber Acorn Half RUBRO032
1-5 Acorn Roller Shaft ZCUTOS061
1-6 Bearing: Tapped Base BEATB098
1-7 Sprocket Acorn Roller Driven SP5B1216
1-8 Round Chain Keeper URESL060
1-9 Hopper Drive Shaft ZCUTHS60B
1-10 Drive Self Cleaning Pulley PU304S24C
1-11 Bearing Hopper Drive BEAPB042
1-12 Sprocket Hopper Drive Shaft SP5B2816
1-13 Tail Self Cleaning Pulley PU304S24A
1-14 Cleated Belt BELCO033
1-15 Tail Pulley Bearing BEAPB054
1-16 Hydraulic Motor Hopper & Pre-Sizer Drive HYDMTE0165
1-17 Idler Sprocket SPID5017
1-18 Hydraulic Cylinder HYDCY013
1-19 Pre-Sizer Acorn Roller Assembly ZCUTPS60
1-19A Rock Roller Drive Option ZCUTOSR60
1-20 Idler Sprocket SPID5013
19

20
REF # DESCRIPTION 60” CUTTER
2-1 Shaft Star Sizer Roller ZCUTOSD61
2-2 Set Collar SETST036
2-3 Urethane Buffer Disc URERO001
2-4 Sizing Rubber Star RUBRO042A
2-5 Dirt Transition Bar ZCUTPRF60
2-6 Sight Gage ZCUTSG00
2-7 Urethane Round Chain Keeper URESL060
2-8 Sprocket Roller Drive SP5B1516
2-9 Sprocket Idler SPID5017
2-10 Hydraulic Cylinder HYDCY018
2-11 Pillow Block Bearing BEAPB042
2-12 Star Roller Assembly ZCUTOSD471
2-13 Tapped Base Bearing BEATB098
2-14 Dirt Rubber Star RUBRO043
2-15 Sizing Transition Bar ZCUTPRF60
Table of contents


