Milltronics MD-256 User manual

MD-256 Speed Sensor
April 1998
Instruction Manual
PL-543
33455430
Rev 1.0

hank you for purchasing Milltronics products. We endeavour to design
equipment that is simple to use and reliable in its operation, with the aim
of satisfying our customers' needs.
Milltronics has been designing and manufacturing process equipment since
1954. Our fields of expertise include ultrasonic and capacitance level
measurement, in-line weighing of dry bulk solids and motion sensing.
Milltronics is established world wide through associate offices and
representatives. Our network is continually being refined to provide our
customers with first rate sales information, engineering assistance and after
sales support.
For more details on our products and service, please contact us and we will
provide you with a listing of the offices or representatives nearest you.
T

3 PL-543
TABLE OF CONTENTS
Specifications 4
General Operation 5
Circuit 5
Installation 6
Dimensions 6
Mounting 7
Mounting to a Tail Pulley 8
Mounting to a Bend or Snub Pulley 9
General Installation Steps 10
Interconnection (Wiring) 11
Terminals 11
Terminal Connections to Integrators 12
Maintenance 13
Inspection 13
Bearing Replacement 13

PL-543 4
SPECIFICATIONS
Power »+10 to +15V dc, 30mA (from integrator)
Ambient
Temperature »-40° to 55° C (-40°F to 131°F)
Input »Shaft rotation 0.5 to 470 rpm, bidirectional
Output »Unidirectional open collector sinking output
»+5V dc, 25mA max (to integrator)
»256 pulses per revolution
»2 to 2000Hz
Enclosure »General purpose
»Aluminum
Approval »CE
Cable (optional) »3-wire shielded, 7.5mm2(18 AWG)
»Max run 305m (1000’)
Weight »1.22 kg (2.68 lb.)

5 PL-543
GENERAL OPERATION
The MD-256 is a digitizing speed sensor for use on belt scales. It connects to the shaft of a
pulley and measures the shaft's rotation by sending pulses to the Milltronics integrator.
This speed sensor features:
»High resolution for accurate measurement
»Small size
»Light weight
»Long bearing life
CIRCUIT
256 pulses are generated for each rotation of the MD-256 shaft. These pulses are typically
fed into a Milltronics belt scale integrator. The integrator interprets the pulses and uses
them in the calculation of belt speed, flow rate, and material totalization.
Integrators with which the MD-256 works are:
»Compuscale
»Compuscale II
»Compuscale IIA
»CompuScale-III
»Compu-M
»Accumass BW-100
»Competitive integrators – consult your local Milltronics representative

PL-543 6
INSTALLATION
Installation must only be performed by qualified personnel.
DIMENSIONS
Rod ∅: 8.0mm
(5/16” )
305mm
(12.0”)
89mm (3.5”)
60mm (2.38”)
1/2" NPT conduit entrance
(optional PG13.5 adapter available)
1/2" NPT conduit entrance
(optional PG13.5 adapter available)
Shaft ∅: 15.9mm
(5/8")
111mm
4.36”
102mm
4.00”
159mm
6.25”
102mm
(4.03”)
50mm
(1.96”) 131mm
(5.16”)

7 PL-543
MOUNTING
The input shaft on the MD-256 is coupled to the rotating shaft on a belt driven pulley and is
not externally supported. The unit’s arresting rod stops it from rotating with the shaft and
can be fitted with a spring to soften sudden speed changes.
The arresting rod should only be solidly attached to the MD-256.
Fixing the rod at both ends will apply binding forces and cause
the unit’s bearings to wear prematurely.
When mounting the unit ensure that it is concentric with the pulley shaft to avoid stresses
on the unit’s bearings.
For preferred mounting locations, refer to the associated belt scale or weigh feeder
instruction manual.
Manuals for these integrators are:
Compuscale PL-216
Compuscale II PL-261
Compuscale IIA PL-281
CompuScale-III PL-367
Compu-M PL-516
Accumass BW-100 PL-531

PL-543 8
MOUNTING TO A TAIL PULLEY
Notes:
Distance “d” is the take up travel on the tail pulley
When adjusting the belt take up ensure that there is play on the arrestor rod. If the arrestor
rod is pushed against the end of its travel slot then premature bearing wear may result.
d
Angle bracket slotted
for arrestor rod
Tension spring (supplied)
Flexible conduit
MD-256
Angle bracket slotted
for arrestor rod Tension spring
Arrestor rod (cut to suit)
MD-256
Flexible conduit
Belt
89mm
3.5”
≥10mm (.375”)

9 PL-543
MOUNTING TO A BEND OR SNUB PULLEY
Notes:
When mounting to a bend or snub pulley only a 3/8” (10mm) drilled hole is required for the
arrestor rod.
Tension spring (supplied)
Stringer
Belt
Flexible conduit
MD-256
Stringer
3/8” drilled hole for
arrestor rod
Bend or Snub pulley
Tension spring
Arrestor rod (cut to suit)
90mm
3.5”
MD-256
Flexible conduit
Pulley bearing

PL-543 10
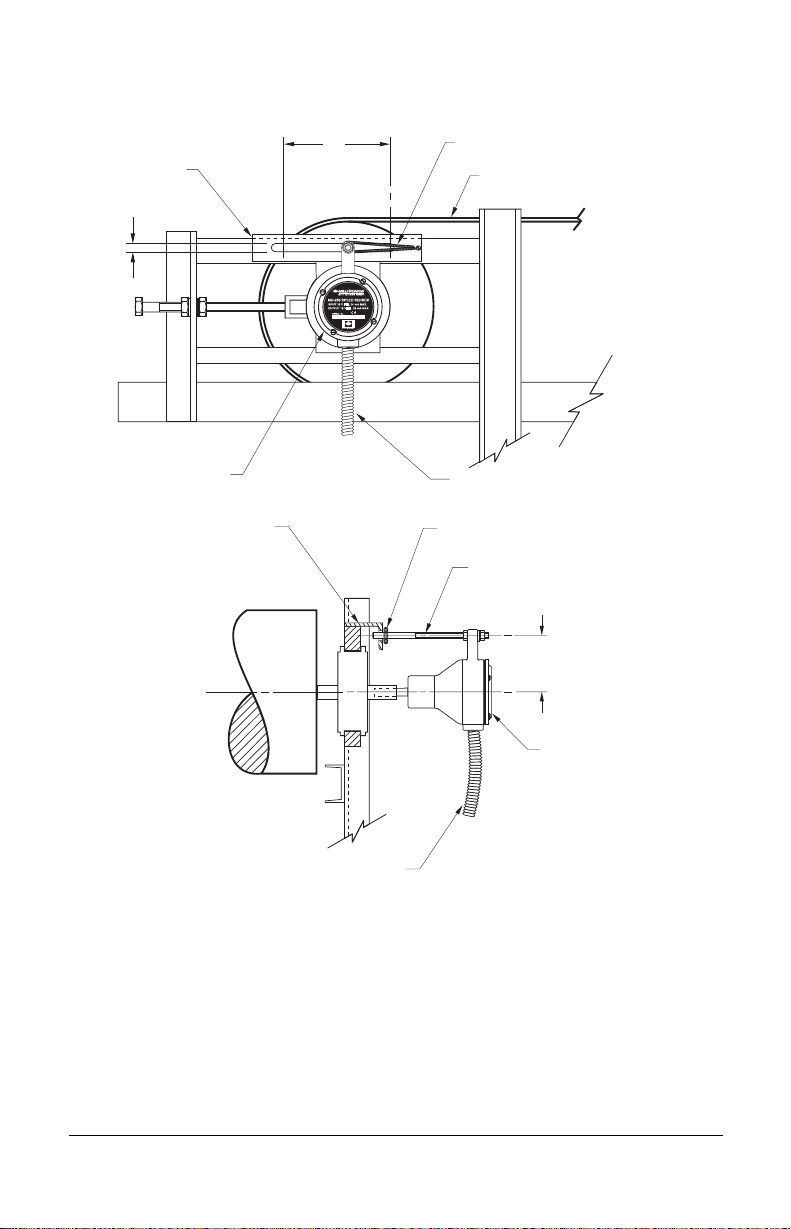
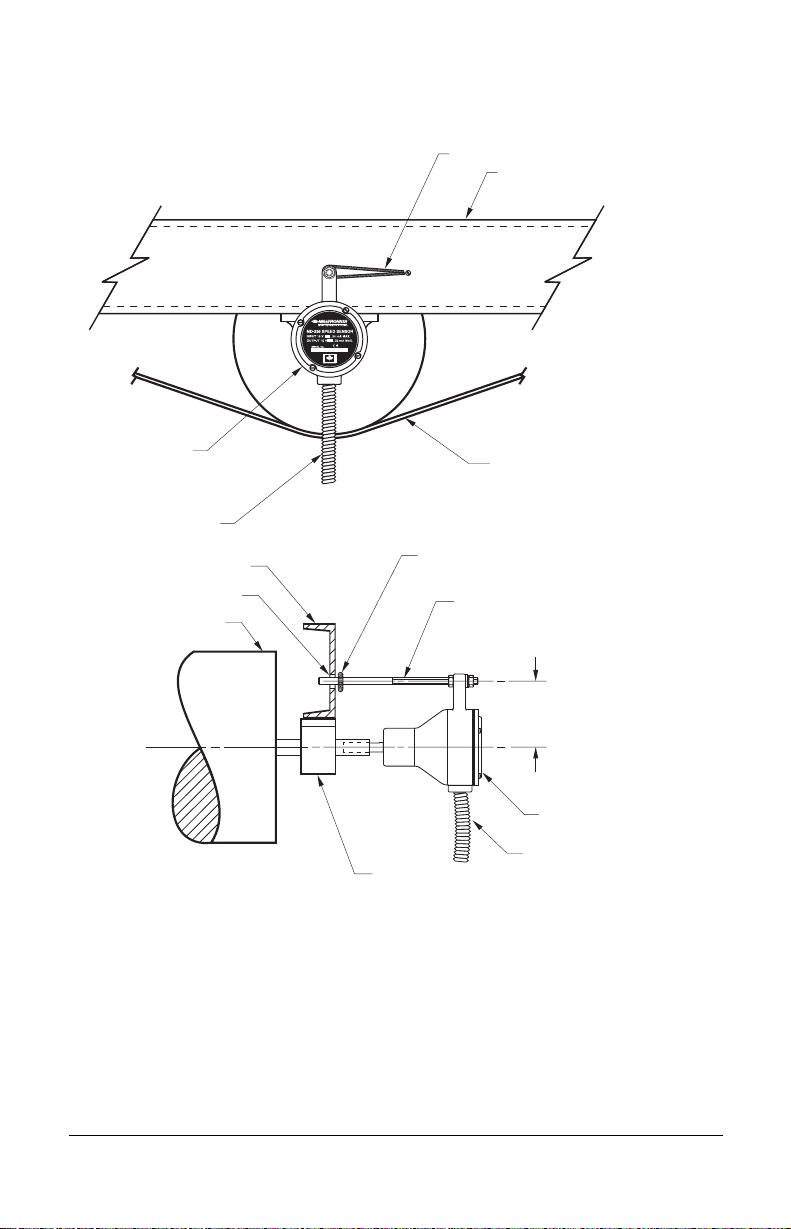
GENERAL INSTALLATION STEPS
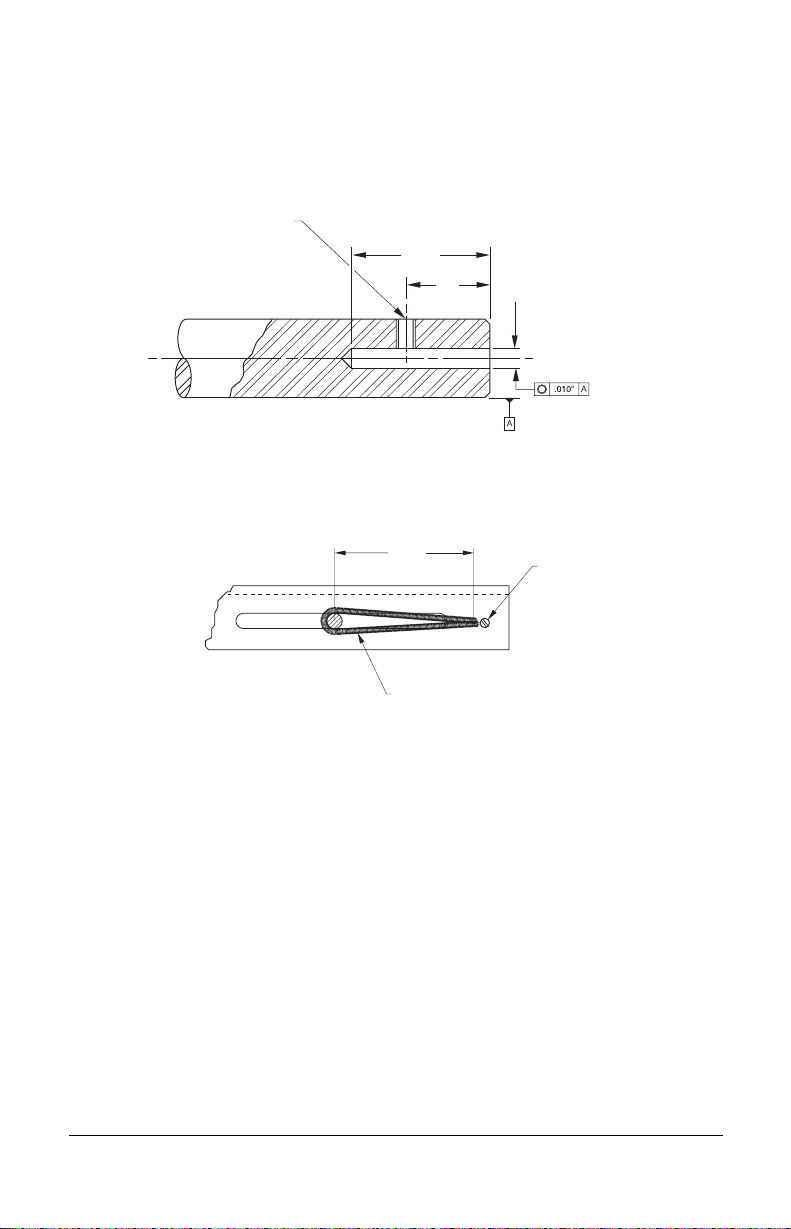
1. Drill out pulley shaft to a depth of 64mm (2.5”) concentric to its centerline. Exercise
caution and remain within specified tolerances.
2. Drill out and thread the set screw hole
3. Attach angle iron bracket to work with the arrestor rod (if mounting on a tail pulley)
4. Cut the arrestor rod to a suitable length
5. Insert the MD-256 shaft into the pulley shaft and lock with set screw on flat of shaft
6. Attach spring to arresting rod and frame
7. Encase wiring in flexible conduit to allow unit to float
8. Wire the MD-256 to the Milltronics’ integrator
See Terminal Connections to Milltronics Integrators on page 12 for terminal post
connections
The arresting rod should only be solidly attached to the MD-256. Fixing the rod at
both ends will apply binding forces and wear the unit’s bearings prematurely.
127mm
(5”)
approx.
Tension spring
Secure with bolt
or post
Angle iron bracket or
conveyor stringer
web
Example slot for
arrestor rod when
mounted to tail pulley
– use drilled hole for
snub or bend pulley
M8x1.25 (5/16-18 UNC)
set screw (by customer) 64mm
(2.5”)
25mm
(1”) 16.00mm (.630”) DIA.
16.07mm (.633”)

11 PL-543
INTERCONNECTION (WIRING)
All wiring must be done in conjunction with approved conduit, boxes and fittings and
to procedures in accordance with all governing regulations.
Interconnection between the unit and the integrator should be made with 3-wire shielded, 18
AWG cable. Ground the shield at the integrator end ONLY.
Flexible conduit is recommended so that excess stress
is not applied to the shaft bearings.
TERMINALS
1 – +15V dc
The positive power supply from the integrator connection
2 – Clockwise Speed out
The positive output connection of the measurement loop. This output is
only used when the sensor is rotating clockwise.
3 – Counter-Clockwise Speed out
The positive output connection of the measurement loop. This output is
only used when the sensor is rotating counter-clockwise.
4 – Common
The common connection used as a reference point with the integrator
GND – Ground
A ground connection. Do not use this ground for the cable shield.
Ground the cable shield at the integrator end only!

PL-543 12
TERMINAL CONNECTIONS TO MILLTRONICS INTEGRATORS
MD-256 1
+15V 2
CW 3
CCW 4
Cmn GND
Compuscale 1 2 2 4 N/C
Compu II 15 16 16 14 N/C
Compu IIA 12 13 13 14 N/C
Compu-M 11 12 12 13 N/C
Compu III 30 31 31 32 N/C
Accumass BW-100 8 7 7 6 N/C
Determine the pulley shaft rotation on the end of the pulley shaft to which the MD-256 is
attached.
If the pulley shaft is rotating clockwise then connect the appropriate wire to terminal 2.
If the pulley shaft is rotating counter clockwise then connect the appropriate wire to
terminal 3.
Do not connect terminals two and three at the same time.
N/C indicates that the terminal is not normally connected.

13 PL-543
MAINTENANCE
INSPECTION
Periodically the cover should be removed and the enclosure and circuit board should be
cleaned if dust or grime builds up. If cleaning is required, disconnect the power and use a
vacuum cleaner and a clean, dry paint brush. While the cover is off check all electrical
contacts for corrosion and evidence of arcing.
Bearing wear is detected by excess play or sound. If the bearings exhibit excess play or
produce an unreasonably loud sound then they should be replaced.
BEARING REPLACEMENT
The unit’s bearings should be periodically checked for corrosion, wear, and seizing. The
bearings' life depends on the mounting, the severity of the application and the surrounding
environment. Sealed bearings are used so that lubrication is not required.
The bearing will wear prematurely if there is any force applied to the MD-256 body. Ensure
that only flexible conduit is used on the unit and that it is not exerting force on the unit.
E
Printed circuit board
Mounting
screws
A
D
C
D
F
Shaft

PL-543 14
Replacement Procedure
To replace the bearings when they are worn follow these steps.
Removing the Bearings
1. Remove the MD-256 cover
2. Remove the wiring from the terminal block
3. Remove the unit from its installation
4. Unscrew the circuit board fixing screws
5. Remove the circuit board and store in a static-free bag or equivalent “safe” area.
6. Remove the first bearing’s C clip (part A) using retaining ring pliers
7. Gently drift the unit’s shaft out of the housing. One bearing should come with the shaft
and one should remain in the housing.
8. Pull the bearing off the shaft
9. Drift out the bearing and rawhide seal (part F) from the housing
10. Clean the housing with a rag
Replacing the Bearings
1. Warm the housing in hot water to expand the metal
2. Remove from the water and completely dry with a clean rag
3. Insert the rawhide seal (part F) into the housing
4. Slide one of the new bearings (part D) into the housing. Ensure it fits snugly against
the end of the housing
5. Slide the second bearing onto the unit’s shaft
6. Gently drift the shaft back into place. It is in place when you can see the groove for the
C clip (part A). Do not damage the pin on the end of the shaft as that is required to turn
the encoder.
7. Replace the C clip (part A)
8. Replace the circuit board and ensure correct alignment of the rubber coupling and the
shaft pins.
9. Replace the mounting screws for the circuit board
10. Reconnect to the installation
11. Rewire the terminal block
12. Replace the MD-256 cover
Replacement Parts
Part numbers and suppliers for the user-serviceable parts in the MD-256 are:
Part Supplier Part Number
Boston Bearings, 1623DCBearings (parts D)
Nice Bearings 16232RS
C Clip (part A) True Arc R3000-137
C Clip (parts C) True Arc R3100-62
Rubber Connector (part E) Milltronics 24300051
Dust Seal (part F) Chicago Seals 6141
Other manuals for MD-256
1
Table of contents
Other Milltronics Accessories manuals
Popular Accessories manuals by other brands

PCB Piezotronics
PCB Piezotronics 352C33 Installation and operating manual

Hella
Hella CLEO 7040 Installation instructions and instructions for use

Hall Research Technologies
Hall Research Technologies EMX-HD-AUD user manual

ring
ring 5B28S5 MANUAL & SAFETY INSTRUCTIONS

sun control
sun control Catalina installation manual

Echo
Echo AUDIOFIRE 2 owner's manual