manuals.online logo
Brands
  1. Home
  2. •
  3. Brands
  4. •
  5. MIMAKI
  6. •
  7. Printer
  8. •
  9. MIMAKI TS55 User manual

MIMAKI TS55 User manual

1/2
When the Machine Is Not Used for a
Long Time
When the machine is not going to be used for a week or
more, use the cleaning function for storage to clean the
head nozzles and ink discharge passage. Then, place the
machine in storage.
• Always use the machine with the main power
turned "ON". The function preventing nozzle clog-
ging operates automatically to protect the head of
the nozzle.
• The head nozzle may result in nozzle clogging if
the main power switch is left OFF for a long time.
Check the items on the right beforehand.
Is [NEAR END] or [INK END] displayed?
• The cleaning solution or ink is absorbed when the nozzles
are washed.
At this time, if the state of "INK END" or "NEAR END" is
detected, the nozzle washing operation cannot start.
• In case of INK END etc., replace with a new bottle.
• When the warning message "Check waste ink" is
indicated, check the waste ink tank and perform
operations by referring to P.4-26 "If a Waste Ink
Tank Confirmation Message Appears" according
to the situation.
1In LOCAL mode, select [MENU] >
[MAINTENANCE], then press the [ENTER]
key.
• The Maintenance menu is displayed.
2Select [STATION MAINT.] > [CUSTODY
WASH] ,then press the [ENTER] key.
• The carriage moves over the platen.
3When "WIPER CLEANING" is indicated on
the display, open the front cover.
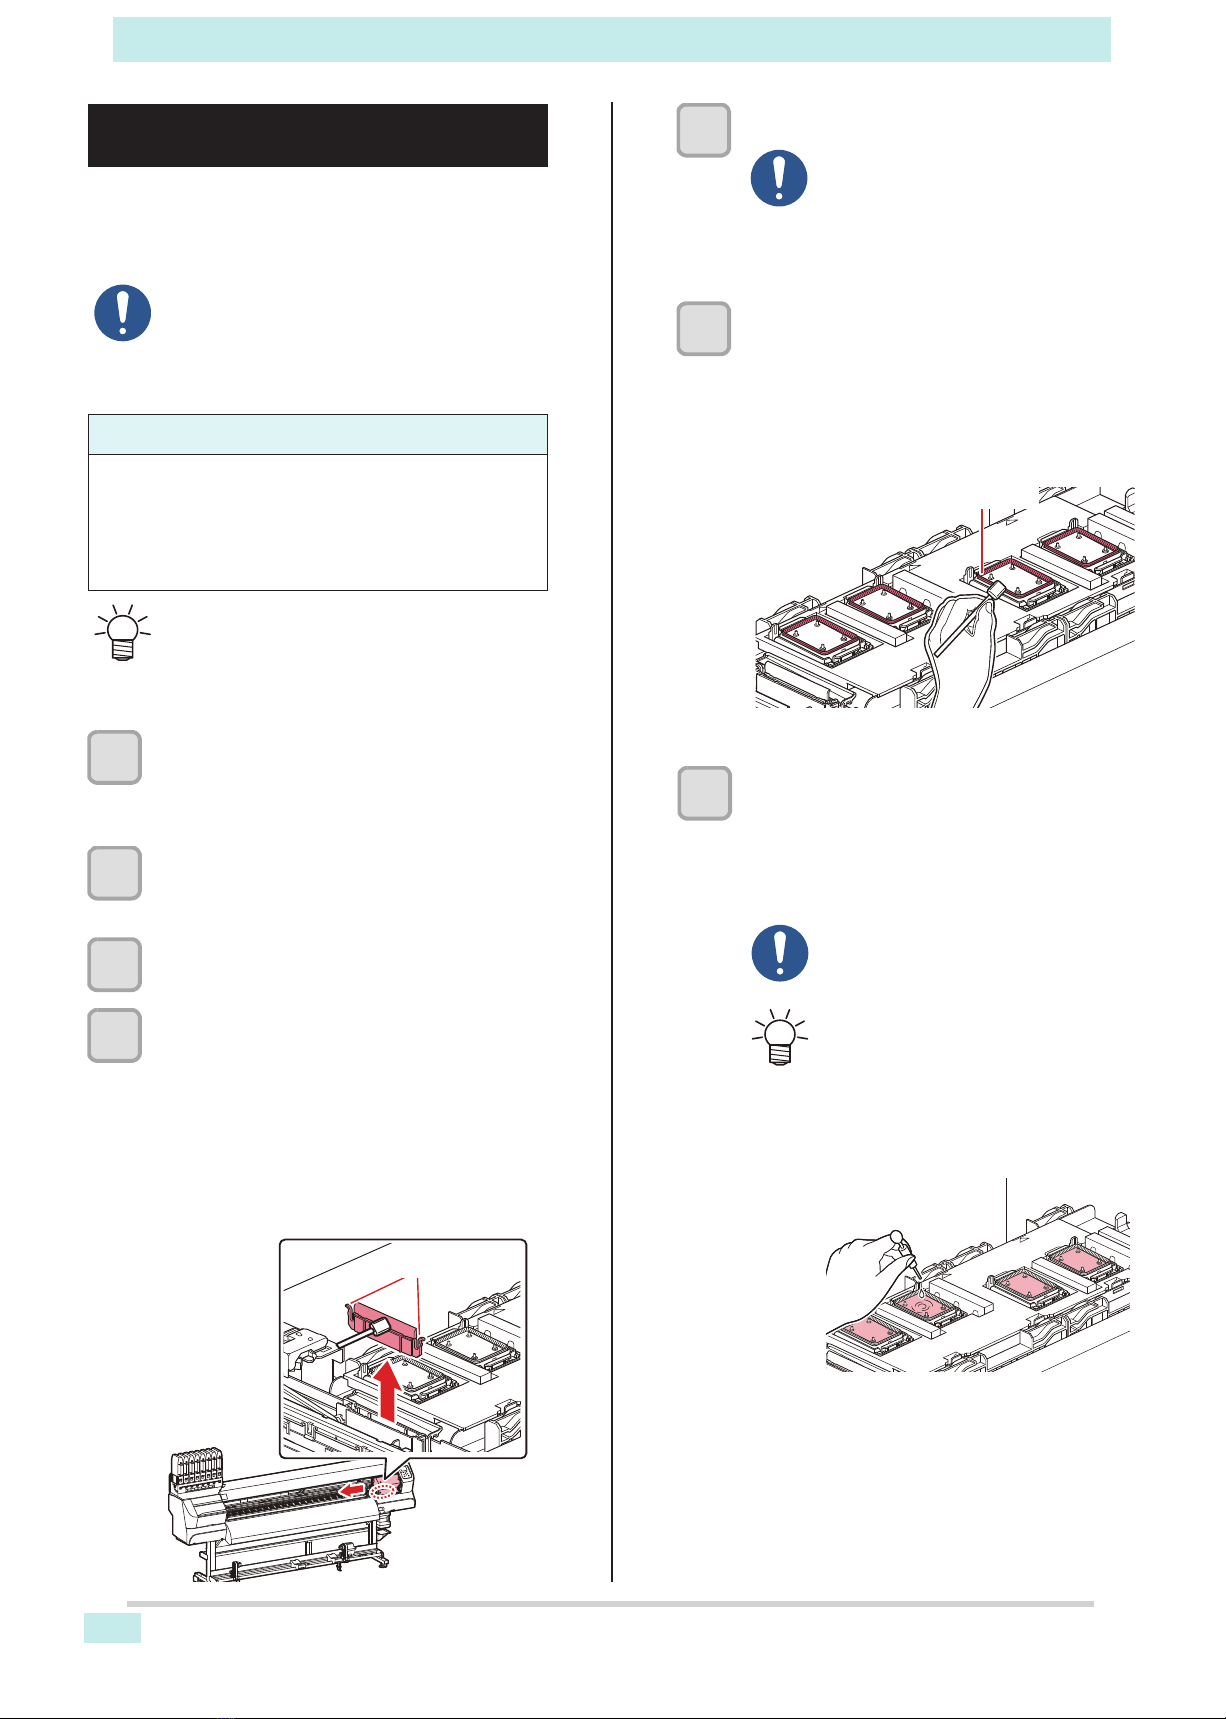
4Clean the wiper.
(1)Open the front cover, and then pull it out by
holding the protrusions at both ends of the
wiper.
(2)Clean with a clean stick dipped in cleaning
solution for maintenance.
Wipe off so that cleaning solution for
maintenance will not remain.
(3)Insert it in the original position by holding the
protrusions at both ends of the wiper.
Protrusion
5Press the [ENTER] key.
6Clean the cap rubber.
• Wipe off the ink sticking to the cap rubber with a
clean stick dipped in cleaning solution for
maintenance.
• Wipe off so that cleaning solution for maintenance
will not remain.
• At this time, the discharge passage is cleaned
automatically.
• Until wiper cleaning is competed, [COM-
PLETED (NEXT): ENT] is displayed on
the screen. After completing operations
up to step 5, press the [ENTER] key. If
you press the [ENTER] key before
cleaning is completed, the machine
moves to the next washing procedure.
Cap Rubber
7Close the front cover, and press the
[ENTER] key.
• When the cleaning liquid cartridge is enabled, the
cap is automatically filled with cleaning solution.
• When the cap is full of cleaning solution, cleaning
solution confirmation instructions are displayed.
• If the front cover is not closed, the cap is
not automatically filled with cleaning
solution. If the front cover is open, make
sure you close it.
• When the cleaning liquid cartridge is not
enabled, the cap is not automatically
filled with cleaning solution.
Open the front cover and fill the cap with
the maintenance cleaning solution using
a dropper.
After filling up the cleaning solution, per-
form operations from step 11.
2/2
8
When a message is displayed, open the
front cover and check the amount of
cleaning solution in the cap.
•If the cleaning solution is not full of cap, fill the cap
with the maintenance cleaning solution with a
dropper.
9
Close the front cover, and press the
[ENTER] key.
10
Set how long the cleaning solution should
remain.
• Set value: 1 to 99 min. (1 minute increments)
11
Press the [ENTER] key.
• The nozzles are washed.
• When the nozzles have been completely washed,
the head moves to the maintenance position.
12
Fill up the cap with cleaning solution for
maintenance.
• When the cleaning liquid cartridge is enabled, the
cap is automatically filled with cleaning solution.
• If the front cover is not closed, the cap is
not automatically filled with cleaning
solution. If the front cover is open, make
sure you close it.
• When the cleaning liquid cartridge is not
enabled, the cap is not automatically
filled with cleaning solution.
Open the front cover and use the drop-
per to fill up the cap with cleaning solu-
tion until it is almost overflowing from the
cap.
After filling up the cleaning solution, per-
form operations from step 16.
13
When an "Operations complete" message
is displayed, open the front cover and
check the amount of cleaning solution in
the cap.
•If the cleaning solution is not full of cap, fill the cap
with the maintenance cleaning solution with a
dropper.
14
Close the front cover, and press the
[ENTER] key.
• After its initial operation, the machine returns to
the display in step 2.

Other MIMAKI Printer manuals

MIMAKI UCJV300 User manual

MIMAKI

MIMAKI UCJV300 User manual

MIMAKI TxF150-75 User manual

MIMAKI

MIMAKI TxF150-75 User manual

MIMAKI JV4-180 User manual

MIMAKI

MIMAKI JV4-180 User manual

MIMAKI JFX500-2131 Reference guide

MIMAKI

MIMAKI JFX500-2131 Reference guide

MIMAKI UJF-7151 plus User manual

MIMAKI

MIMAKI UJF-7151 plus User manual

MIMAKI JFX500-2131 User manual

MIMAKI

MIMAKI JFX500-2131 User manual

MIMAKI Tx500-1800B User manual

MIMAKI

MIMAKI Tx500-1800B User manual

MIMAKI SWJ-320 S2 User manual

MIMAKI

MIMAKI SWJ-320 S2 User manual

MIMAKI JV33-260 User manual

MIMAKI

MIMAKI JV33-260 User manual

MIMAKI GP-1810 User manual

MIMAKI

MIMAKI GP-1810 User manual

MIMAKI CJV Series User manual

MIMAKI

MIMAKI CJV Series User manual

MIMAKI JV33-260 Assembly instructions

MIMAKI

MIMAKI JV33-260 Assembly instructions

MIMAKI JFX500-2131 Maintenance manual

MIMAKI

MIMAKI JFX500-2131 Maintenance manual

MIMAKI TX500-1800DS User manual

MIMAKI

MIMAKI TX500-1800DS User manual

MIMAKI JV5-130S User manual

MIMAKI

MIMAKI JV5-130S User manual

MIMAKI Tx500-1800B Maintenance manual

MIMAKI

MIMAKI Tx500-1800B Maintenance manual

MIMAKI JFX 200-2513 User manual

MIMAKI

MIMAKI JFX 200-2513 User manual

MIMAKI UJF-605CII User manual

MIMAKI

MIMAKI UJF-605CII User manual

MIMAKI UCJV300-75 User manual

MIMAKI

MIMAKI UCJV300-75 User manual

MIMAKI JV5-130S User manual

MIMAKI

MIMAKI JV5-130S User manual

MIMAKI JV330 Series User manual

MIMAKI

MIMAKI JV330 Series User manual

MIMAKI TextileJet Tx2-1600 Series User manual

MIMAKI

MIMAKI TextileJet Tx2-1600 Series User manual

MIMAKI UCJV300 User manual

MIMAKI

MIMAKI UCJV300 User manual

MIMAKI ML Tiger-1800B MKII User manual

MIMAKI

MIMAKI ML Tiger-1800B MKII User manual

Popular Printer manuals by other brands

Canon imagePROGRAF iPF8100 brochure

Canon

Canon imagePROGRAF iPF8100 brochure

Canon imagePROGRAF TA-30 Online manual

Canon

Canon imagePROGRAF TA-30 Online manual

Brother HL-4040CDN - Color Laser Printer parts reference list

Brother

Brother HL-4040CDN - Color Laser Printer parts reference list

Citizen JR20-M01 user manual

Citizen

Citizen JR20-M01 user manual

Canon imageCLASS X LBP1238 Service manual

Canon

Canon imageCLASS X LBP1238 Service manual

FujiFilm Apeos C7070 reference guide

FujiFilm

FujiFilm Apeos C7070 reference guide

Xerox Colour 560 Printer Specifications

Xerox

Xerox Colour 560 Printer Specifications

Epson LQ-860 - Impact Printer Product information

Epson

Epson LQ-860 - Impact Printer Product information

IBM SureMark 4610 Service manual

IBM

IBM SureMark 4610 Service manual

Epson Stylus PHOTO 1290 Daily use manual

Epson

Epson Stylus PHOTO 1290 Daily use manual

Matrix UV Series manual

Matrix

Matrix UV Series manual

Kyocera Ecosys FS-3820N Operation guide

Kyocera

Kyocera Ecosys FS-3820N Operation guide

Lexmark C734dn printing guide

Lexmark

Lexmark C734dn printing guide

Kyocera FS-3040MFP Operation guide

Kyocera

Kyocera FS-3040MFP Operation guide

Brightek E16 Quick install

Brightek

Brightek E16 Quick install

Brother DCP-J1200W Quick setup guide

Brother

Brother DCP-J1200W Quick setup guide

DataCard CP80 Plus Service manual

DataCard

DataCard CP80 Plus Service manual

Develop ineo 3301P user guide

Develop

Develop ineo 3301P user guide

manuals.online logo
manuals.online logoBrands
  • About & Mission
  • Contact us
  • Privacy Policy
  • Terms and Conditions

Copyright 2025 Manuals.Online. All Rights Reserved.