Mini Gadgets OmniXAirFreshener User manual

1 Version 1.0
OmniX Air Freshener Hidden
Camera
SKU: OmniXAirFreshener

2 Version 1.0
THANK YOU FOR PURCHASING THE
OMNIXAIRFRESHENER HIDDEN CAMERA
Please read this manual before operating the camera
and keep it handy.
Your purchase should include:
1 x OmniXAirFreshener
1 x Manual
1 x A/V Cable
1 x Remote
1 x Wall Charger
4 x Batteries
1 x 16GB MicroSD Card
1 x MicroSD Card Reader

3 Version 1.0
GET FAMILIAR WITH YOUR OMNIXAIRFRESHENER
HIDDEN CAMERA

4 Version 1.0

5 Version 1.0
OPERATING THE CAMERA
HOW TO TURN ON THE CAMERA
1. Point the remote at the device and press the
power button on the remote. The Green light
will blink once and then the Red light will blink
3 more times and turn off (if motion is detected
immediately). The device is now in motion
detection mode.
NOTE: If the light doesn’t come on, try many
different angles when pressing the power button
and pointing it at the front/top of the unit.
NOTE: Do not hold down the power button, press
and release the button only.
2. To put the device into standby mode, stop
motion recording by pressing the motion
detection button one time. The Green light will
come on, and the device will be in standby
mode.

6 Version 1.0
HOW TO RECORD VIDEO
1. When the camera is in Standby Mode, press the
“Video Button.” (The Indicator LED will flash
two times.)
2. Once the Green Indicator LED turns off, the
camera is now recording video.
HOW TO STOP RECORDING VIDEO
1. While the camera is recording video, press the
“Video Button”. (The Green Indicator LED will
turn on.)
2. The camera has now stopped recording and is
now in Standby Mode.
HOW TO TAKE PICTURES
1. When the camera is in Standby Mode, press the
“Photo Button.” The green light will turn red
while the photo is being taken.
2. Once the photo is taken, the light will turn back
to green and once again be in standby mode.

7 Version 1.0
HOW TO RECORD MOTION DETECTION
1. When the camera is in Standby Mode press the
“Motion Detection Button.”
2. If motion is detected, the Red light will flash 2
times and turn off.
3. If there is no motion after 1 minute, the device
will return to detection standby mode until
motion is detected again. While waiting, the
Green light will be on.
NOTE: If you activate motion detection and there is no
motion currently in front of the camera, there will be no
indication you have entered into motion mode. The green
light will simply remain on. If you wish to confirm that
you have entered into motion detection mode, wave your
hand in front of the camera lens and the unit will flash
the red light 2 times and then the light will turn off
confirming that the device detected your motion and is
now recording video.
HOW TO STOP RECORDING MOTION DETECTION

8 Version 1.0
1. While the camera is recording motion detection
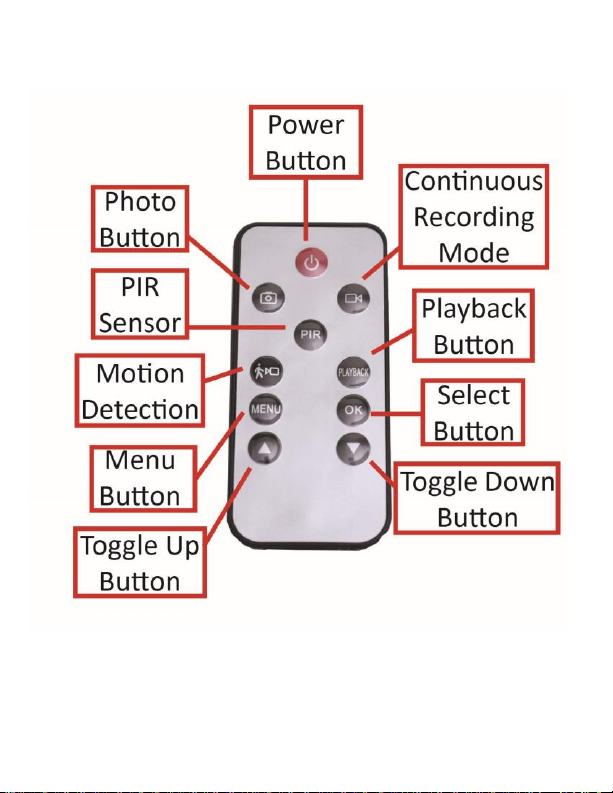
press the “Motion Detection Button.” (The
Green Indicator LED will turn on.)
2. The camera has stopped recording motion
detection and is now in Standby Mode.
HOW TO USE PIR SENSOR (If Applicable)
Note: The “Motion Detection” mode and “PIR” mode
work similarly in that they detect motion. The “Motion
Detection” mode relies on the camera itself to detect
motion, while the “PIR” mode relies on the PIR sensors
to detect motion. “PIR” represents “passive infrared
sensor”, which relies on measures of infrared light to
detect motion.
Note: Only OmniX Products have a PIR sensor installed.
OmniEye products do not come with this feature,
unless you specially requested such a feature upon
purchasing.
1. While the camera is in Standby Mode, press the
“PIR Sensor” button.
2. If motion is detected, the indicator light will
flash, then turn off.

9 Version 1.0
3. The device is now in PIR sensor mode.
4. If you wish to turn it off PIR sensor mode, press
the “PIR Sensor” button once more. The
indicator light will flash, and the camera is now
in standby mode.
CHANGING YOUR DEVICE SETTINGS (INCLUDING THE
DATE/TIME STAMP)
Your OmniXAirFreshener comes with an A/V cable that
is used to connect the device to a monitor/TV so that
you can adjust various settings.
1. Connect your device to a monitor/TV using the
provided A/V Cable.
2. Power on the device.
3. Press the motion detection button to stop
recording.
4. Press the “MENU” button on the remote.
5. A menu will display on the screen with various
options (Use OK, UP, Down, and Menu on the
remote to navigate the menu system):

10 Version 1.0
a. Resolution –Select from different
resolutions
b. Time Stamp –Use this option to enable
or disable the date/time stamp on
videos
c. Loop Record –Choose whether you
want the device to automatically
overwrite the oldest file on the memory
card if the memory becomes full.
d. Video Time –When in continuous
recording mode, this setting determines
how long video files will be before the
current recording is stopped and a new
recording is started.
e. Audio Record (if applicable) –If you
purchased your device with audio
recording capabilities, you can turn
audio recording ON or OFF here.
f. Motion Detection –Adjust motion
detection sensitivity here
g. Setup –Enter this menu for additional
settings

11 Version 1.0
h. Setup -> Format –Use this to format
your MicroSD card. All data on the disk
will be permanently erased.
i. Setup -> Language –Choose your
language
j. Setup -> TV Output –Select between
NTSC or PAL for video output. We
recommend you do not adjust this
setting.
k. Setup -> Light Freq –Select different
light frequencies. We recommend that
you do not adjust this setting.
l. Setup -> Date Format –Choose from
various date/time formats
(MM/DD/YYYY, DD/MM,YYYY, Etc.)
m. Setup -> Date Input –Set the current
date
n. Setup -> Time Input –Set the current
time in military format
o. Setup -> System Reset –Use the is to
factory reset the device

12 Version 1.0
p. Setup -> FW Upgrade –This is not active
on this device
q. Setup -> FW Version –Displays the
firmware version of the device.

13 Version 1.0
RETRIEVE THE FILES TO YOUR PC
1. Remove the MicroSD Card from the device and
plug it into your computer using the supplied
card reader.
2. Locate “Removable Disk” inside the (My)
Computer folder.
AutoPlay Removable Disk > Open folder
to view files

14 Version 1.0
Or…
Go to Start > Computer > Removable Disk
3. Open the Removable Disk drive.
4. Open the [folder name] folder.
5. Double click the file you want to view.
VLC Player is recommended for
watching videos

15 Version 1.0
TROUBLESHOOTING
THE DEVICE WON’T TURN ON
Make sure the power cable is securely plugged
into a functioning electrical outlet or the
battery is charged.
THE DEVICE HAS CRASHED
Press the reset button one time while the
device is on.
DEVICE CONTINUALLY RECORDS IN MOTION MODE
Motion detection is measured by changing
pixels during recording. Any kind of motion
including shifting shadows or changing lighting
conditions can set off motion detection. Try
adjusting the motion detection sensitivity via
the setup menu.
OTHER PROBLEMS
Call our technical support at 770–694–6923

16 Version 1.0
SPECIFICATIONS
Video
Resolution
1920x1080
Video Format
.MP4
Frames per
Second
Up to 30 FPS
Vision Angle
65°
Battery Life
Up to 30 days in PIR mode
20 Hours Continuous Recording
Motion
Detection & PIR
Sensor
8 meters for straight-line
distance
Photo
Resolution
2560x1920
Photo Format
.JPG
Type of Memory
External MicroSD Card
Memory
Capacity
Up to 128GB with special
formatting. See
http://mgidownloads.com. Go to
Product Manuals -> 64GB SD
Card Formatting.zip

17 Version 1.0
Recording Usage
10mins per 1GB
USB Interface
2.0 USB
Player Software
VLC recommended
Video
Compression
H.264

18 Version 1.0

19 Version 1.0

20 Version 1.0
QUALITY CONTROL CHECKLIST
☐Remote
☐_____GB MicroSD Card
☐MicroSD Card Reader
☐Wall Charger
☐A/V Cable
☐Manual
☐OmniX Air Freshener
QC Tech:____________________________________
Date: ______________________________
Table of contents
Other Mini Gadgets Air Cleaner manuals
Popular Air Cleaner manuals by other brands

3M
3M Filtrete FAP-C01 Series manual

HoMedics
HoMedics AP-T40-GB instruction manual

SONNENKOENIG
SONNENKOENIG OFFICE NEW YORK user manual

Flanders
Flanders Precisionaire SAR-1 Specifications

Johnson Controls Unitary Products
Johnson Controls Unitary Products M10PAC1625 owner's manual

InovaAir
InovaAir AirClean E20 Plus user manual