manuals.online logo
Brands
  1. Home
  2. •
  3. Brands
  4. •
  5. Minolta
  6. •
  7. Printer
  8. •
  9. Minolta MAGICOLOR 6100 User manual

Minolta MAGICOLOR 6100 User manual

This manual suits for next models

2

Other Minolta Printer manuals

Minolta PageWorks Pro 18 User manual

Minolta

Minolta PageWorks Pro 18 User manual

Minolta magicolor 2210 User manual

Minolta

Minolta magicolor 2210 User manual

Minolta PagePro 1250W User manual

Minolta

Minolta PagePro 1250W User manual

Minolta PageWorks Pro 25 User manual

Minolta

Minolta PageWorks Pro 25 User manual

Minolta PagePro 1100 User manual

Minolta

Minolta PagePro 1100 User manual

Minolta RP609Z User manual

Minolta

Minolta RP609Z User manual

Minolta PagePro 8 User manual

Minolta

Minolta PagePro 8 User manual

Minolta MAGICOLOR 3300 User manual

Minolta

Minolta MAGICOLOR 3300 User manual

Minolta CF2002 User manual

Minolta

Minolta CF2002 User manual

Minolta magicolor 7300 User manual

Minolta

Minolta magicolor 7300 User manual

Minolta Magicolor 2300 DL User manual

Minolta

Minolta Magicolor 2300 DL User manual

Minolta PagePro 1100 User manual

Minolta

Minolta PagePro 1100 User manual

Minolta CF911P User manual

Minolta

Minolta CF911P User manual

Minolta PageWorks Pro 20 Manual

Minolta

Minolta PageWorks Pro 20 Manual

Minolta Magicolor 2200 User manual

Minolta

Minolta Magicolor 2200 User manual

Minolta Magicolor 3100 Series User manual

Minolta

Minolta Magicolor 3100 Series User manual

Minolta magicolor 2300 Series User manual

Minolta

Minolta magicolor 2300 Series User manual

Minolta magicolor 330 User manual

Minolta

Minolta magicolor 330 User manual

Minolta PageWorks Pro 18 User manual

Minolta

Minolta PageWorks Pro 18 User manual

Minolta Demand Print System C6501 User manual

Minolta

Minolta Demand Print System C6501 User manual

Minolta Color PageWorks 0990-7701-02 User manual

Minolta

Minolta Color PageWorks 0990-7701-02 User manual

Minolta MAGICOLOR 2 User manual

Minolta

Minolta MAGICOLOR 2 User manual

Minolta QMS PageWorks/Pro 1100 User manual

Minolta

Minolta QMS PageWorks/Pro 1100 User manual

Minolta Di251 User manual

Minolta

Minolta Di251 User manual

Popular Printer manuals by other brands

Evolis Elypso user guide

Evolis

Evolis Elypso user guide

Lexmark 522n - C Color Laser Printer Service manual

Lexmark

Lexmark 522n - C Color Laser Printer Service manual

Panduit COUGAR LS9Q Operator's manual

Panduit

Panduit COUGAR LS9Q Operator's manual

Olivetti PG L2140 Operation guide

Olivetti

Olivetti PG L2140 Operation guide

Samsung SL-M2820DW user manual

Samsung

Samsung SL-M2820DW user manual

Kyocera FS-9530DN specification

Kyocera

Kyocera FS-9530DN specification

Canon LASER SHOT LBP-1210 Specifications

Canon

Canon LASER SHOT LBP-1210 Specifications

Canon PIXMA PRO-1 Series Getting started

Canon

Canon PIXMA PRO-1 Series Getting started

Canon LBP113w Getting started

Canon

Canon LBP113w Getting started

Lexmark Infoprint 1332 user manual

Lexmark

Lexmark Infoprint 1332 user manual

Epson M1120 user guide

Epson

Epson M1120 user guide

TransAct POSJET 1500 Spare parts

TransAct

TransAct POSJET 1500 Spare parts

Telpar MTP-1500 user manual

Telpar

Telpar MTP-1500 user manual

Star DP8340 SERIES user manual

Star

Star DP8340 SERIES user manual

MGI JETVARNISH 3DS user manual

MGI

MGI JETVARNISH 3DS user manual

Kyocera TASKalfa PA4500ci Operation guide

Kyocera

Kyocera TASKalfa PA4500ci Operation guide

Emaar EP-360 user manual

Emaar

Emaar EP-360 user manual

Fujitsu DL7400 user manual

Fujitsu

Fujitsu DL7400 user manual

manuals.online logo
manuals.online logoBrands
  • About & Mission
  • Contact us
  • Privacy Policy
  • Terms and Conditions

Copyright 2025 Manuals.Online. All Rights Reserved.

 



®


Crown, magicolor, the MINOLTA-QMS logo, and the Crown-II logo are registered trademarks of MINOLTA-
QMS, Inc., registered in the United States Patent and Trademark Office.

The digitally encoded software included with your Print System is Copyrighted © 2000 by MINOLTA-QMS,
Inc. All Rights Reserved. This software may not be reproduced, modified, displayed, transferred, or copied
in any form or in any manner or on any media, in whole or in part, without the express written permission
of MINOLTA-QMS, Inc.

This manual is Copyrighted © 2000 by MINOLTA-QMS, Inc., One Magnum Pass, Mobile, AL 36618. All
Rights Reserved. This manual may not be copied in whole or in part, nor transferred to any other media or
language, without the express written permission of MINOLTA-QMS, Inc.

 

This kit includes all the hardware necessary to convert a
magicolor
6100 DeskLaser to
a
magicolor
6100 Crown Print System.
MINOLTA-QMS Crown is a proprietary, multitasking printer operating system, which
allows MINOLTA-QMS to adapt advanced printer software to the evolving printing
needs of users in many different environments. Crown provides true multitasking
capabilities, Emulation Sensing Processor (ESP) technology, simultaneous interface
operation (SIO), compile-ahead technology, compressed data formats, automatic jam
recovery, and context switching. For a complete discussion of Crown features, refer to
your magicolor
6100
Print System Reference
manual.

In addition to this guide, the upgrade kit contains the following items. Make sure that
you have all of these items before proceeding with the installation. Report any dis-
crepancies to your MINOLTA-QMS vendor.

magicolor
6100 Crown Print System controller board
Controller memory (DIMM)
Anti-static wrist strap
Product labels
magicolor
6100
Print System Installation Guide
magicolor 6100
Print System Operation
manual
magicolor
6100
Documentation
CD-ROM (includes the
Installation Guide
,
Opera-
tion
,
Options
, and
Reference
manuals in PDF format as well as other MINOLTA-
QMS information)

Software Utilities
CD-ROM
See the README.TXT file in the root directory of the CD-ROM for more informa-
tion.
Warranty card




Converting your
magicolor
6100 DeskLaser printer to a magicolor 6100 Crown Print
System involves two steps:
1 Replacing the controller board.
2 Applying the new product labels.
▲Caution
:
It’s very important to protect the printer controller board from electrostatic
damage while performing this conversion.
If you have an anti-static wrist strap, attach one end of it to your wrist and the other
end to any convenient electrical ground. The bare metal chassis of equipment, such
as on the back of a computer, is suitable if it is plugged in but turned off. Never attach
the wrist strap to any piece of equipment with an electrical current present. Turn off all
power switches first. Plastic, rubber, wood, painted metal surfaces, and telephones
are not acceptable grounding points. The printer isn’t an acceptable grounding point
either because it must be unplugged before you perform this task.
If you don’t have an anti-static wrist strap, discharge your body’s static electric
charge by touching a grounded surface before you handle any printer boards or
components and before removing the controller board cover. Handle the controller
board carefully, and try to handle it by the edges only. If you must walk around before
completing this task, discharge your body’s static electric charge again before
touching the printer controller board.

1 Turn off the printer, remove the power cord, and disconnect all interface
cables from the printer.


 
2 Remove the controller board from the printer.
Loosen two screws, one on each end of the I/O connector panel, and, using the
tab on the lower side of the connector panel, pull the controller board from the
printer.
3 Position the controller board on a flat surface so the controller board lies
flat and the I/O connector panel is facing you.
4 Remove the new controller board from its packaging.
5 Carefully remove the RAM DIMMs from the old controller board.
a Using both thumbs, pull the
latches (one on each side of
the DIMM connector) outward.
b Lift the DIMM straight out of the
DIMM connector.
6 Remove any DIMMs you pur-
chased separately from their
packaging.
»Note:
Observe the keyed side of
the DIMM to align it with the
connector.



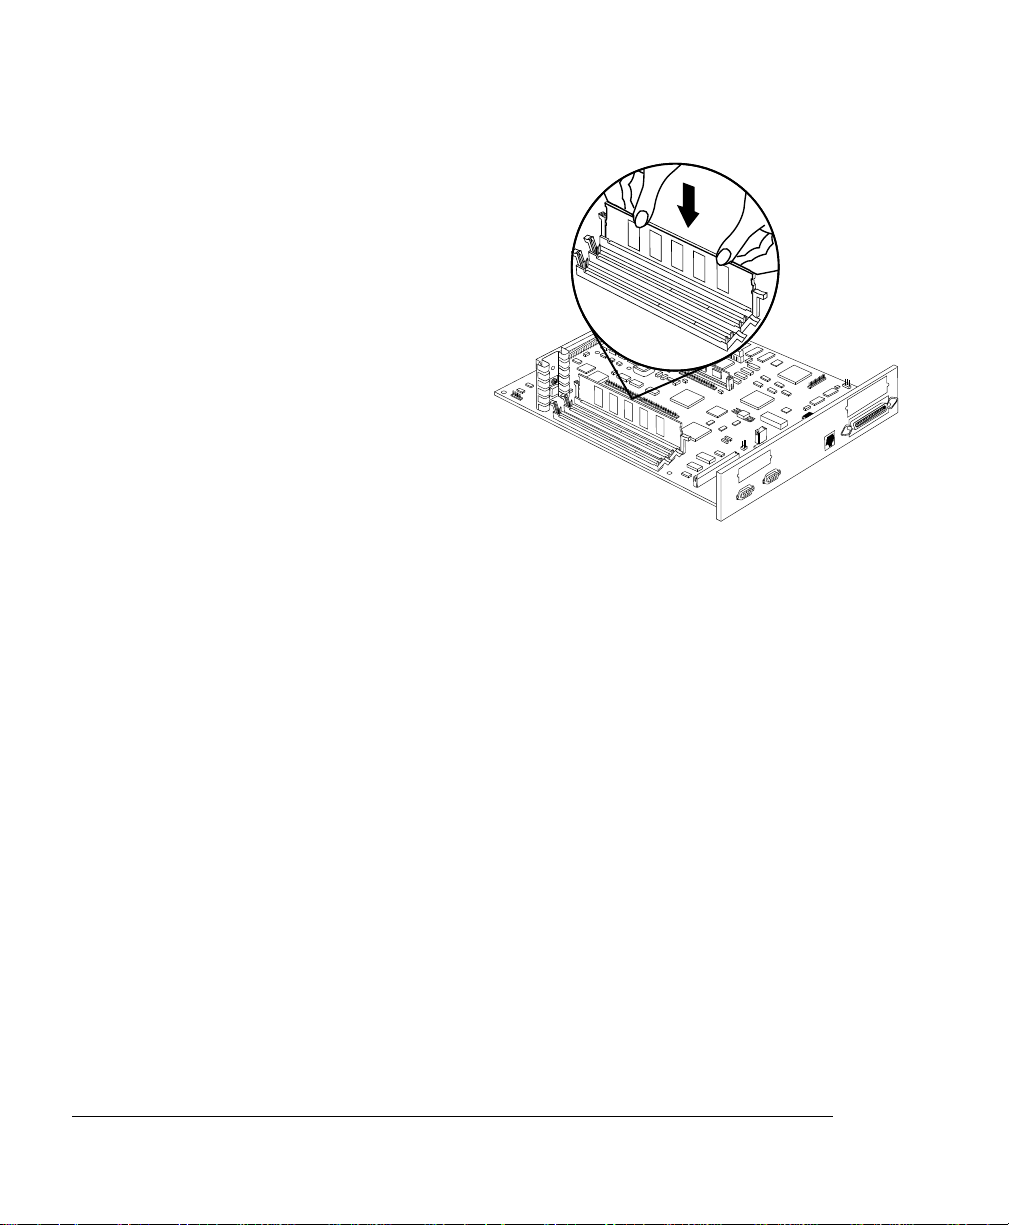
7 Insert each DIMM straight down
into the DIMM connector until
the latches snap into the locked
position.
When seated, the DIMM stands
upright, firmly in place. If you can-
not snap the DIMM into place, do
not force it. Reposition it, making
sure that the bottom of the DIMM is
seated completely in the connector.
8 Repeat steps 6–7 for each
additional DIMM that you install.
9 If you purchased any other
options, such as an internal hard
disk or Time-of-Day Clock, install
them now.
Refer to the appropriate chapter(s) of your
magicolor 6100 Print System Options
manual for instructions.
10 Reinstall the controller board into the printer.
Gently slide the controller board into the printer until it is fully seated, and then
tighten the two screws.
11 Reconnect all interface cables.
12 Reconnect the power cord, and turn on the printer.
»Note:
In compliance with UL guidelines, “The appliance inlet is considered to be
the main disconnect device.”
9brdmti.eps
IIIIIIIIIIIIIIIIIIIIIIIIIIIIIIIIIIIIIIIIIIIIIII IIIIIIIIIIIIIIIIIIIIIIIIIIIIIIIIIII IIIIIIIII
................................................ ........................ ..........
................................................ ........................ ..........
................................................ ........................ ..........
................................................ ........................ ..........


 
13 Check the startup page.
After the printer warms up, a startup page similar to the one shown below prints.
The startup page indicates that the printer has successfully been converted from a
magicolor
6100 DeskLaser to a
magicolor
6100 Crown Print System. Verify that
the memory and options that were installed are correctly identified on the startup
page.






Remove existing labels and apply the
magicolor
6100 logo and the
dataplate label to the printer as shown in the following diagram:




 
!"""
 #

If you have any questions or problems during the conversion, refer to appendix A,
“Customer Support,” in your new
magicolor
6100 Print System documentation to find
out how to contact MINOLTA-QMS.

 !"#
If you haven’t already done so, install the
magicolor
6100 Print System printer driver.
The printer driver is located on the magicolor 6100
Software Utilities
CD-ROM. See
the
Connecting Your MINOLTA-QMS Print System
manual for instructions on installing
the printer driver.
$ % "#
If you don’t have a
magicolor
6100 DeskLaser printer connected to you PC or net-
work, you can remove the installed printer driver. To do so:
1 From the Start menu select Programs, and then select MINOLTA-QMS
Printer Utilities.
2 From the submenu select Uninstall.
3 Select the
magicolor
6100 DeskLaser from the list box, and then select
Uninstall.
4 Follow the on-screen instructions to complete the printer driver removal.
