Minshine OLED-01 User manual

Display OLED-01
1
Smart eBike
Display
User guide
Model: OLED-01

Display OLED-01
2
Catalog
1About the User Manual ...........................................................................................................................3
2Technical Parameters ..............................................................................................................................4
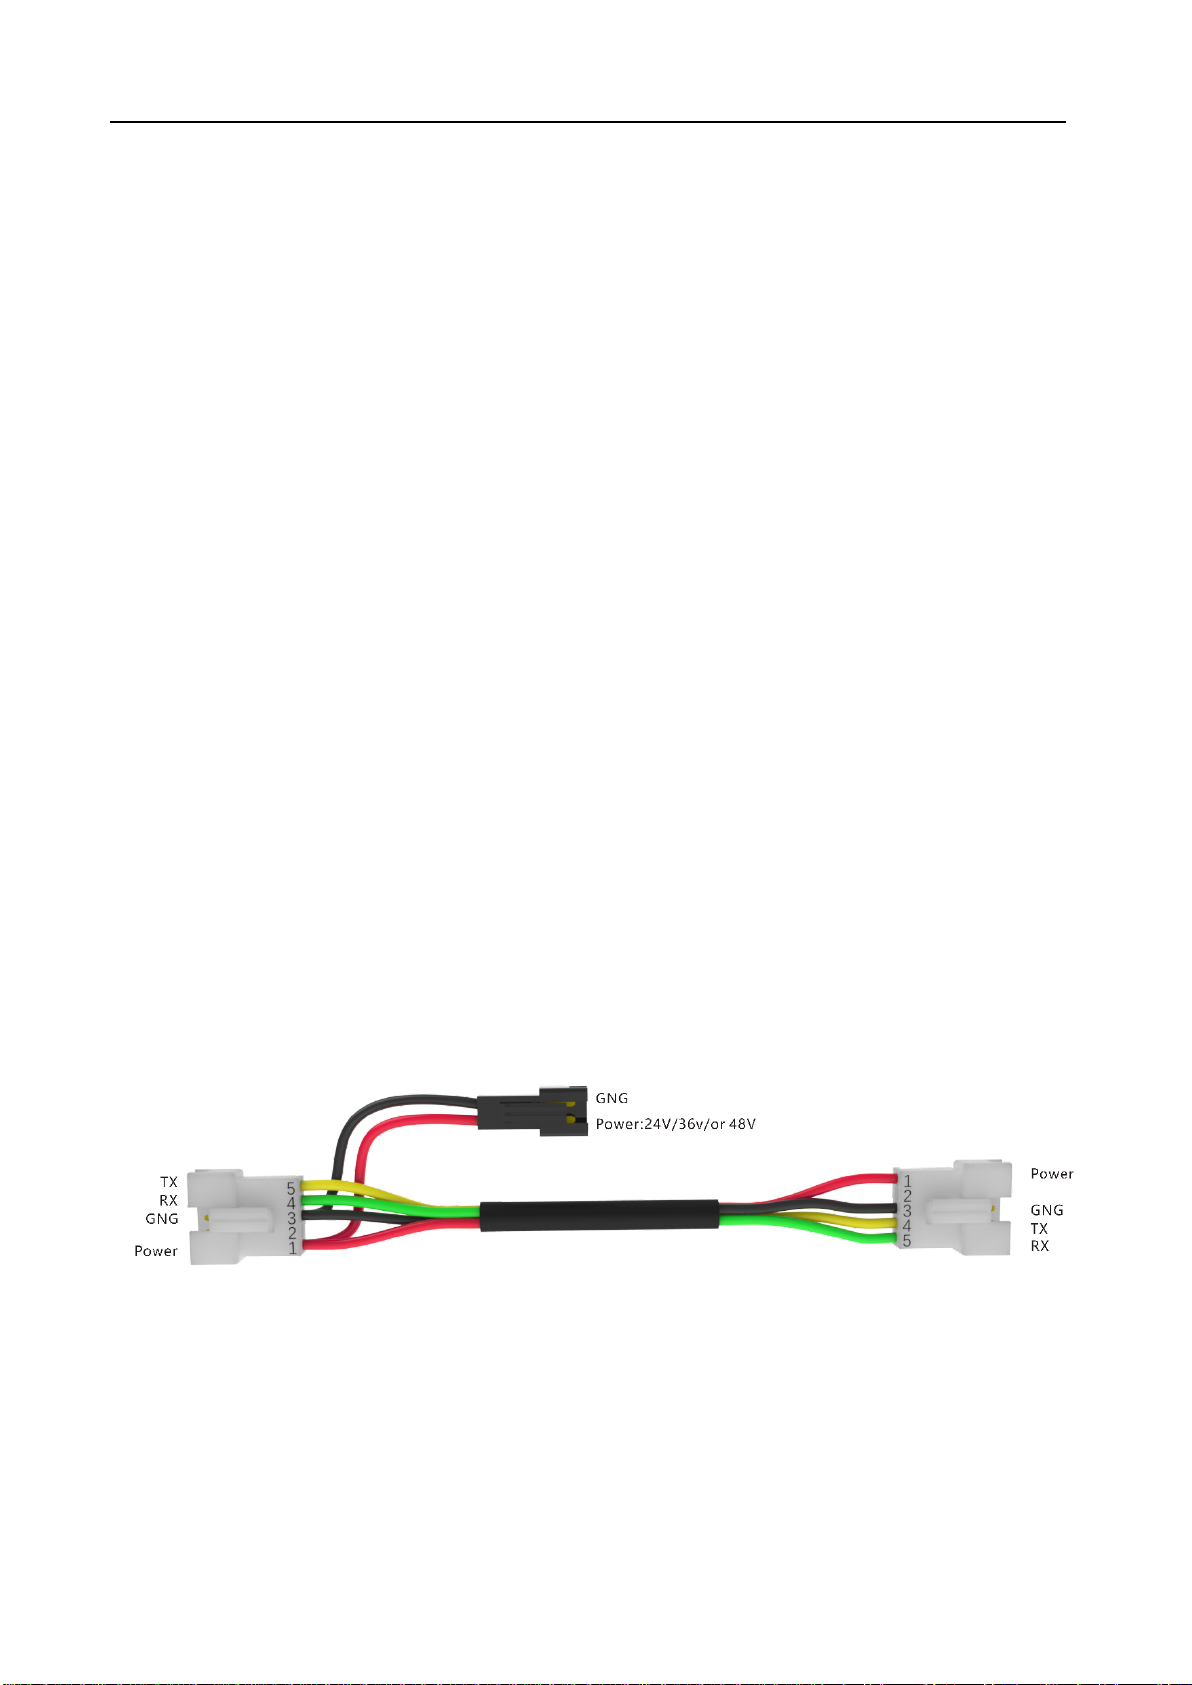
3Installation Instruction ............................................................................................................................4
4Features...................................................................................................................................................5
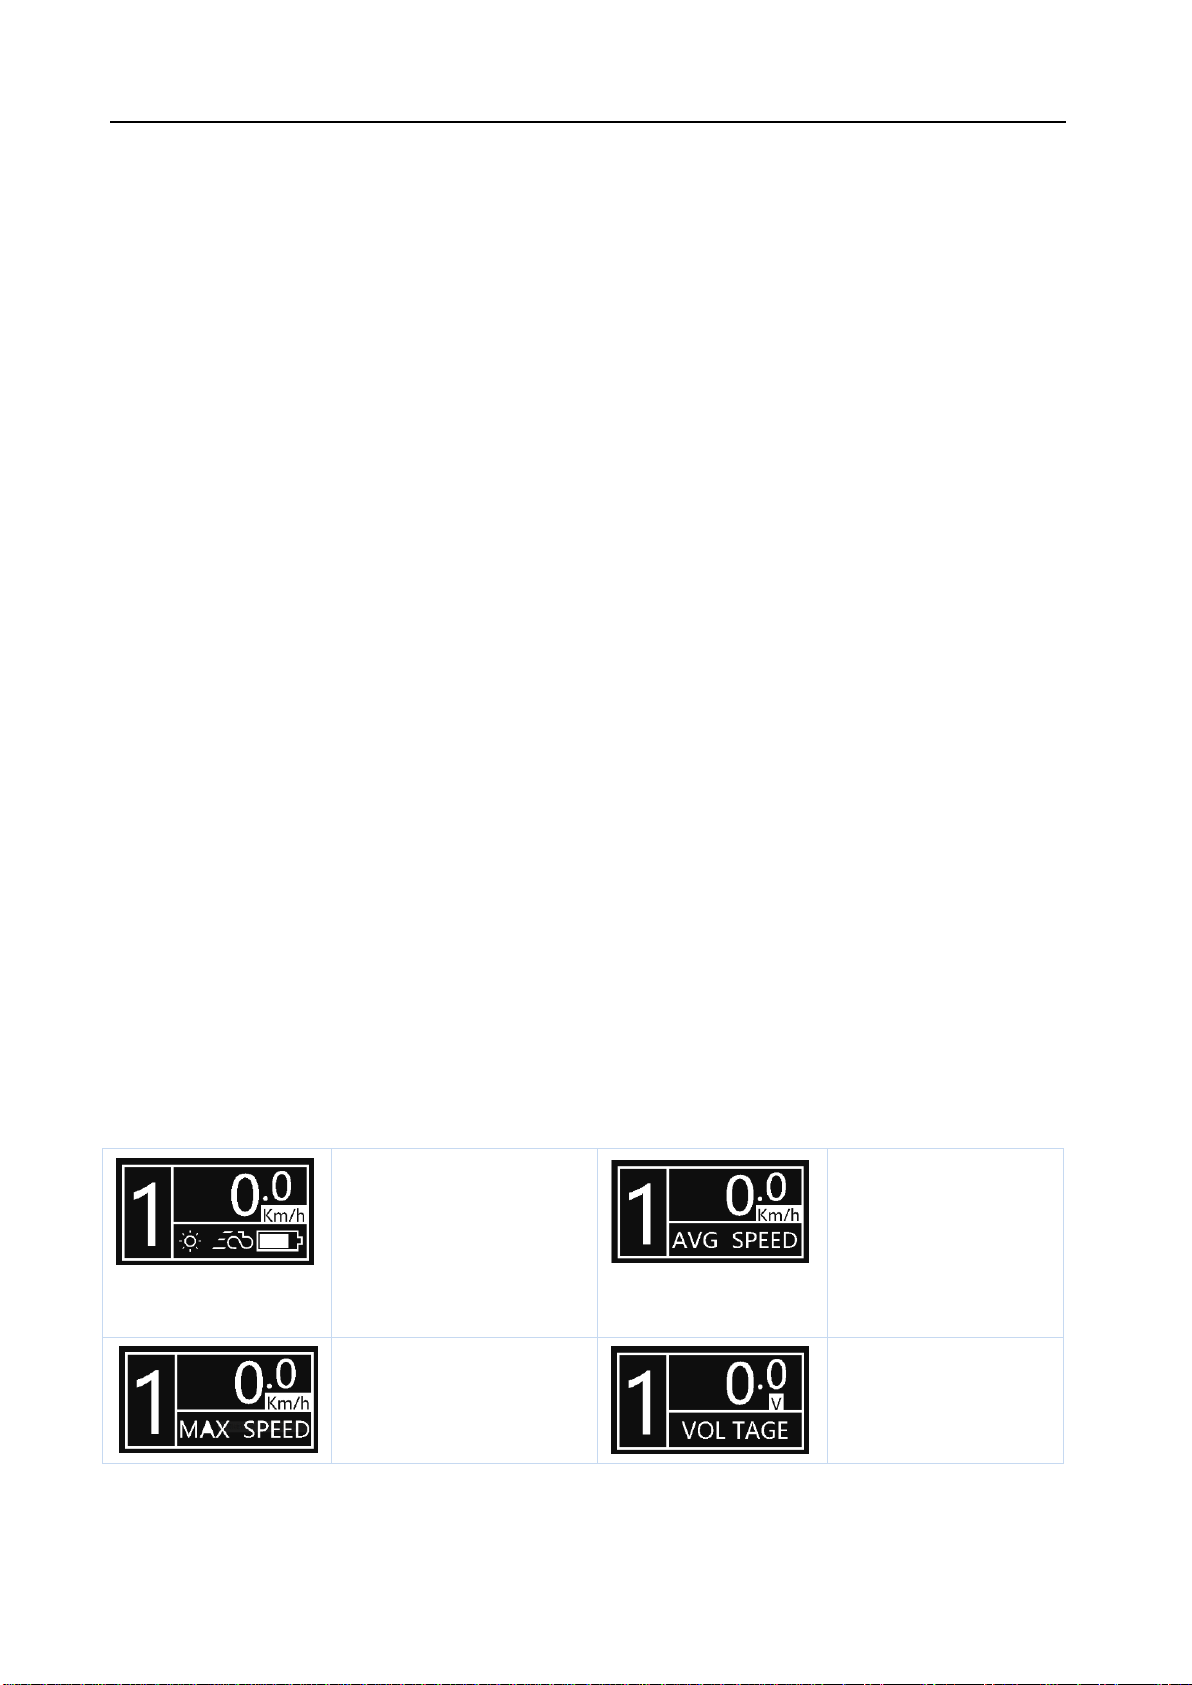
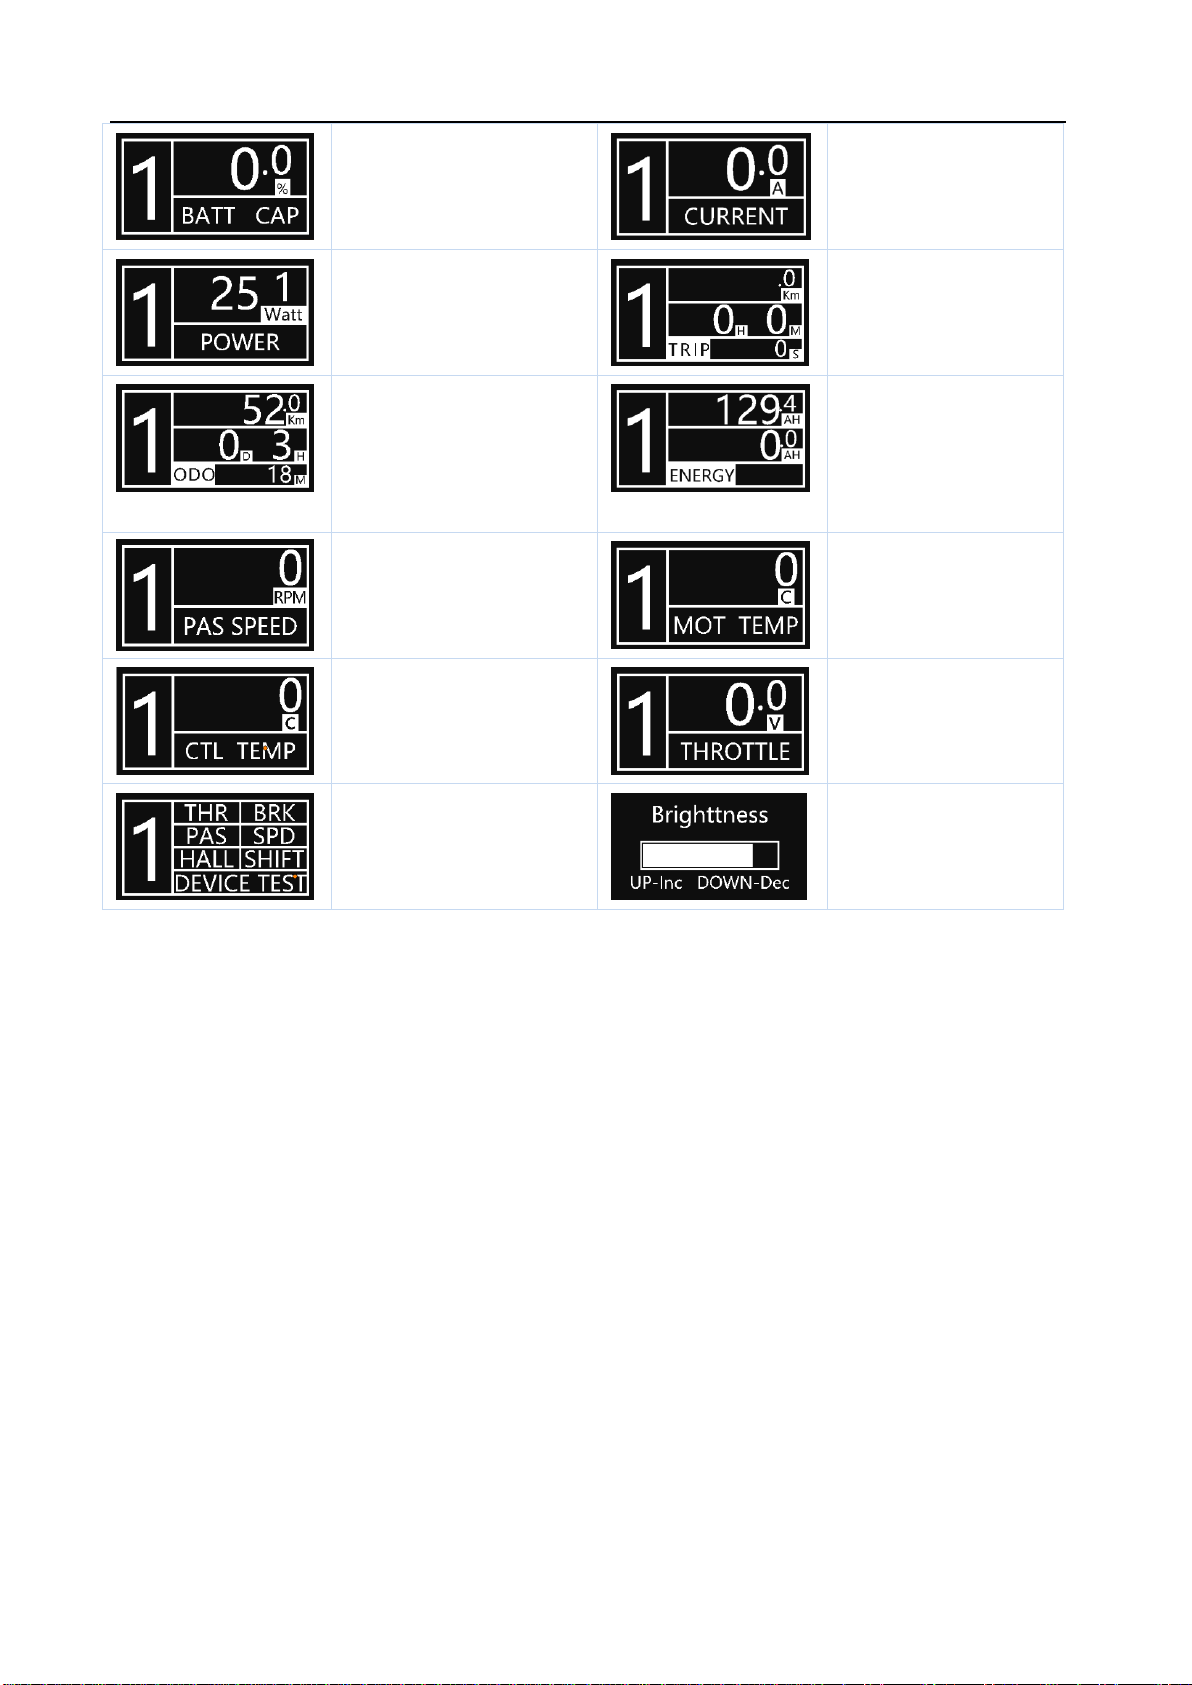
5Display Interface......................................................................................................................................5
➢Working Display Interface....................................................................................................................5
6Normal Operation.................................................................................................................................... 6
➢Power On..............................................................................................................................................6
➢PAS Level change..................................................................................................................................6
➢Display interface switch .......................................................................................................................7
➢Cruise On/Off .......................................................................................................................................7
➢Light On/off..........................................................................................................................................7
➢Power Off .............................................................................................................................................7
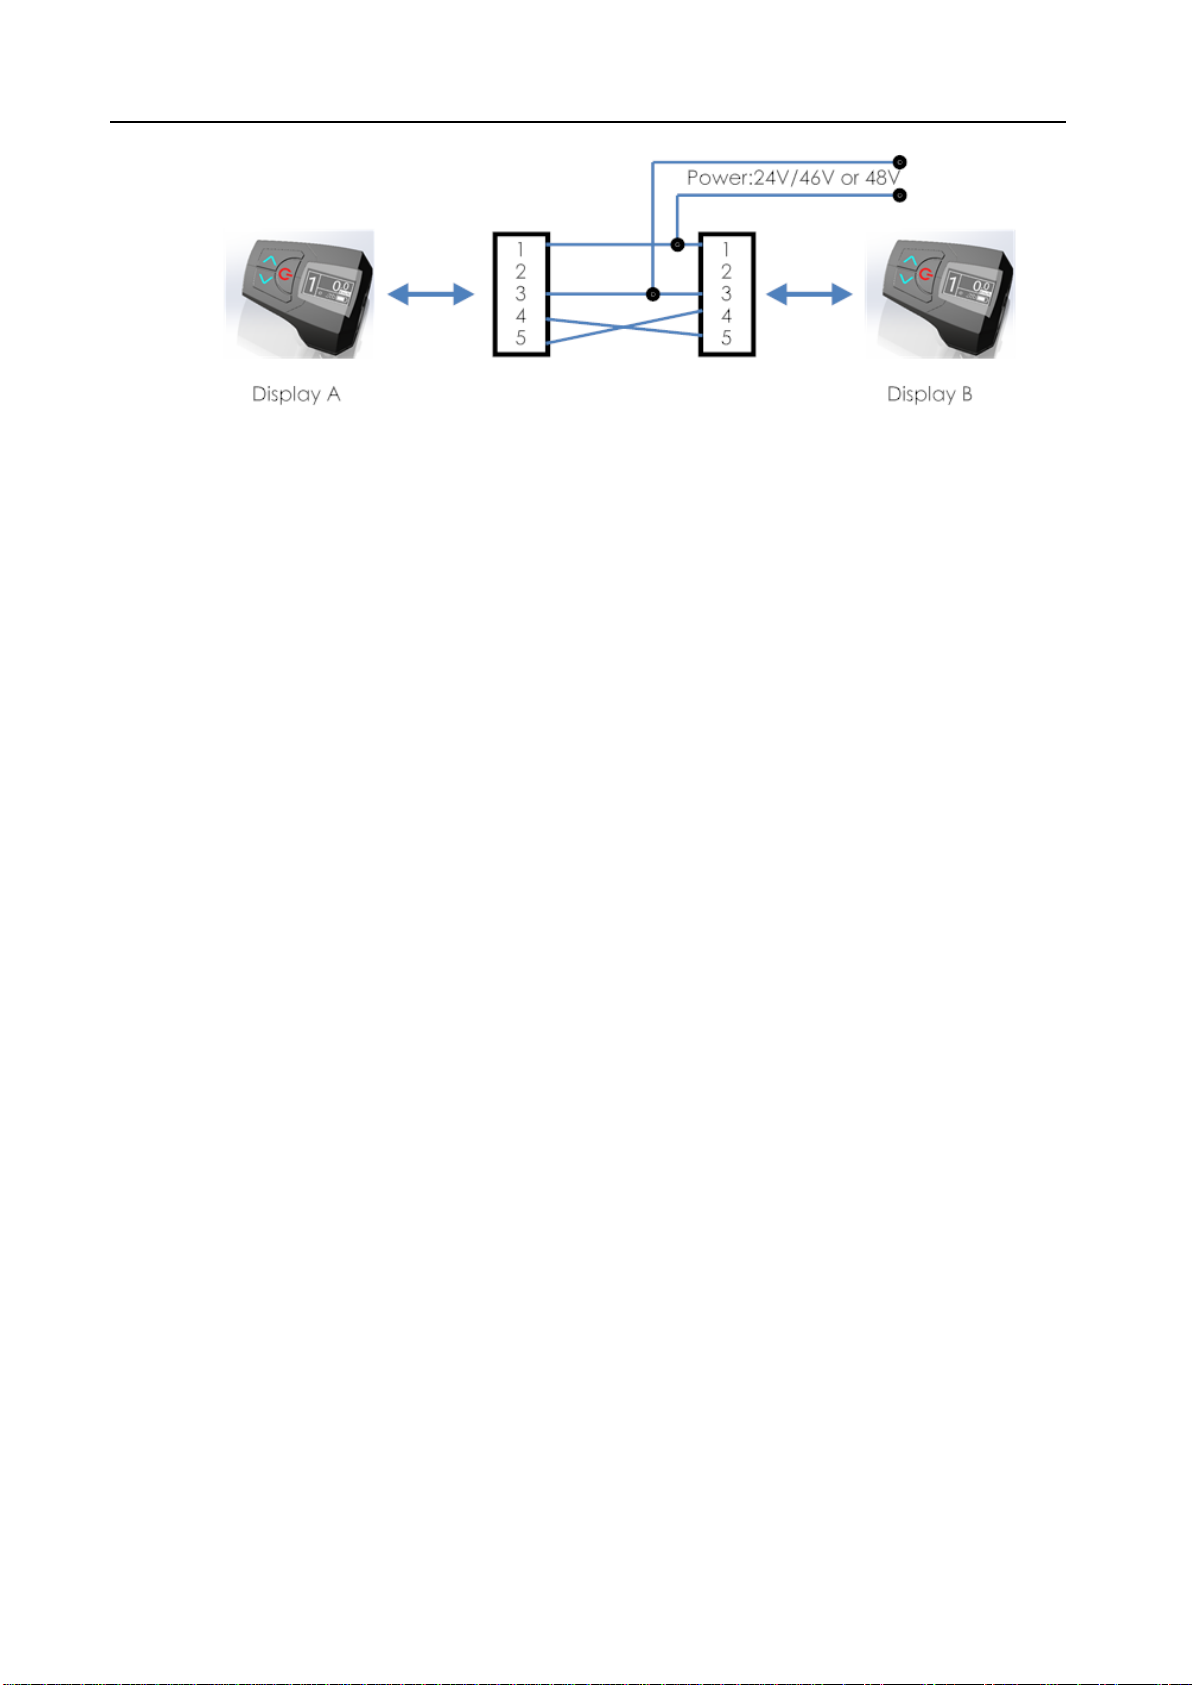
7Display Copy ............................................................................................................................................7
8Whats the Setting Synchro ......................................................................................................................8
9PC APP......................................................................................................................................................8
10 MOBILE APP .........................................................................................................................................8
11 Quality assurance and Warranty scope ...............................................................................................9
12 Appendix A (System menu)................................................................................................................10
13 Appendix B (Warning message) .........................................................................................................13
14 Appendix C (Error message)...............................................................................................................14
15 Appendix D (FAQ)...............................................................................................................................15

Display OLED-01
3
1 About the User Manual
★This manual contains important safety, performance. Read it carefully and completely before
taking the first ride.
★This manual is based on the general purpose. some of the content may not be applicable
due to software updates or customization.
★Important safety instructions:
Do not try to connect with E-bike controller which is incompatible with this display,
otherwise , will damage the display or controller.
★Shut the battery off on time and stop the bike if some ERROR info show on screen.
★The copyright of all the APPs related with display are belong to us, get permission
from us first before running these APPs, Any damage caused by the use of illegal
APPs will out of warranty.

Display OLED-01
4
2 Technical Parameters
◆Power: 24 - 48VDC /10 ma
◆Screen: Graphic dot matrix OLED
◆Screen Color: White/Blue /Yellow, default is White
◆Button: Transparent silicon rubber with LED Backlight
◆LED Backlight: Power Button : Red ,
Up and Down button :Blue/Green/White
◆Fix Position: Left or right of handlebar
◆Communication: UART
◆Material: ABS
◆Ingress Protection: IP64
◆Size:
3 Installation Instruction
This display can be fixed either left or right on the handlebar of bike ,Check the FIX POSITION menu item first
(see 8. Setting menu ) , change this setting due to the position want to fix ; adjust to an appropriate visual angle.
Tighten all the connectors. And connect it with controller .

Display OLED-01
5
4 Features
OLED-01 is a control panel for eBike with Graphic dot matrix OLED screen ,Transparent silicon
rubber keyboard with LED backlight, digital communicating interface , 15 different screen
interface can be show to help user to check all the information come from bike,; Transparent
silicon rubber keyboard with LED backlight feedback a nice feeling while operating; This display
offers total 84 pieces menu items foe user to set the parameters related with the ebike.
Different screen can be switched by pressing button for user to check the info come from ebike
on screen, such as below:
◆Speed (Real-time speed,Average speed and Max speed)
◆PAS Level , Light OnOff, Cruise OnOff
◆Battery Voltage and Battery Capacity
◆Trip, ODO , and theAccumulative energy consumption
◆Real time Current and Power
◆Motor Temperature and controller Temperature
◆PAS speed
◆Throttle real time voltage
◆Device test interface for user to check the status of all the peripheral such as
Brake ,Throttle ,Hall of motor ,Pas sensor ,Speed sensor, ,Shift sensor ;
◆Screen brightness adjust
◆Warning and Error blinking show
◆large amount of menu items for user to set the parameters related with the bike ;
5 Display Interface
➢Working Display Interface
It has 16 different display interface totally, each display interface can be blocked according to user demands;
How to block screen see 7.menu
Screen1
PAS Level
Real time speed
Light on off indicator
Cruise status indicator
Battery indicator
Screen 2
PAS Level
Average speed
Screen 3
PAS Level
Max speed
Screen 4
PAS Level
Battery Voltage

Display OLED-01
6
Screen5
PAS Level
Battery Capacity
Screen 6
PAS Level
Current
Screen 7
PAS Level
Power
Screen 8
PAS Level
TRIP
Screen 9
PAS Level
ODO
Screen 10
PAS Level
ENRRGY
(Accumulative energy
consumption)
Screen 11
PAS Level
PEDAL SPEED
Screen 11
PAS Level
Motor temperature
Screen 13
PAS Level
Controller temperature
Screen 14
PAS Level
Throttle Voltage
Screen 15
PAS Level
Device test
Screen 16
PAS Level
Brightness Adjust
6 Normal Operation
➢Power On
◆Long press the Power button 3 seconds to turn on the display
◆Display will automatic start a synchronization process with controller.(There have 2 copy of the bike setting
one is stored in display and other is stored in controller, must make the both copy is same);
◆If you want to Enter Menu setting interface , long press POWER and UP button , if not , it will auto enter
working interface after 3 seconds
➢PAS Level change
Press UP or DOWN button can change the PAS level, bike will stop if Level come to Zero;

Display OLED-01
7
➢Display interface switch
Press POWER button can switch Display interface
➢Cruise On/Off
Long press DOWN button , bike will run with 6km/h when bike is IDEL, the CRUISE indicator will blink
Long press DOWN button , bike will enter CRUISE Stature when bike is moving , the CRUISE indicator will
blink
➢Light On/off
Long press UP button , turn the light on, the LIGHT indicator will blink , Long press again , turn the light off;
➢Power Off
Long press the Power button 3 seconds to turn on the display , display will shut the power off .
Notice: Display will automatic shut the power off when bike is idel for some minutes , this parameter can be set
by user;
FOR YOUR SAFETY, SHUT THE BATTERY OFF WHEN POWER THE DISPLAY OFF ,
7 Display Copy
This is a quick and efficient method when user want to transfer the setting s from Display A to Display B.
Before start , user should build a cable (COPY CABLE)or buy one from us . the cable as below:
(Copy Cable)
Setp 1 : Connecting the both 2 displays with COPY CABLE
Setp 2 : Connecting the COPY CABLE with 24v or 36v or 48v battery or other power supply

Display OLED-01
8
Setp 3 :Power on display A or display B , some guide message will show on screen, do it as the guide.
Setp 4: Long press DOWN button will receive settings from other , Long press UP will send settings to
other
8 Whats the Setting Synchro
There have 2 same copy of key bike settings stored in controller and display memory , controller and
display will automatic validate each other on power period ,if the key bike settings is not same ,
controller or display will start a parameter exchanging process between them;
Setting Synchro : Controller
Controller will send key bike settings to display
Setting Synchro : Display
Display will send key bike settings to controller
Setting Synchro : Display Once
Display will send key bike settings to controller only one time
9 PC APP
For some professional users, ,user can download an APP from our website , get permission from us first
before run this APP
10 MOBILE APP
For some professional users, ,user can download an APP from our website , get permission from us first
before run this APP

Display OLED-01
9
11 Quality assurance and Warranty scope
◆The warranty time is 24 months from the shipping time.
◆Responsible for all faults arising during normal operation that are caused by a quality defect.
◆The following will either void or fall outside the scope of the warranty
➢If the display is disassembled
➢Damage due to incorrect installation or operations
➢Housing or cable is broken
➢Outside of the warranty period
➢The fault or damage is caused by the force majeure

Display OLED-01
10
12 Appendix A (System menu)
This is all the menu item preset in the display , maybe some functions is invisible for bike because some
functions are invalid for your bike, also some settings are invalid even you had changed it because some
functions need extra hardware option .
Notice , incorrect set will cause system can’t work, you can select DEFAULT menu item to restore all the setting;
Main Menu
Menu Item
Value range
Default
Remark
Normal
WheelSize
4”—30”
26”
Define the the size of wheel
Unit
Metric , British
Metric
Speed measurement unit
FixPostion
Right, Left
Left
Accord to fix position on handbar
RideMode
Smooth, Sport,
Extreme
Smooth
Ride mode
AutoLight
Disable , Enable
Disable
Need extra hardware
MaxSpeed
10km/h-40km/h
25km/h
Max speed of bike
MaxPushSpeed
4km/h-10km/h
6km/h
when bike is idel, Long press
DOWN button , bike will run with
this speed
Cruise
Disable, Enable
Enbale
Energy Recover
Disable, Enable
Disable
Need extra hardware
AutoPowerOffTime
5-20Minute
10Minute
Display will turn the system off
when bike is idle in these
minutes
WarnShowMode
Disable, Enable
Enable
Warning message show
Display Attrib
Slave, Master
Slave
See 8. Display copy
Setting Synchro
Controller,
Display, Display
Once
Controller
See 9 whats the Setting
Synchro
Battery
Voltage
24V,36V,48V. or
others
36V
nominal voltage of battery
Empty
These
settings are
related with the
battery equipped
on bike;
35V
20%Cap
37.3V
40%Cap
37.9V
60%Cap
38.7V
80%Cap
40V
Full
42V
Controller
Max Current
10A-30A
15A
Low Cut Voltage
18V-50V
34V
TEMP Sensor
Disable, Enable
Disable

Display OLED-01
11
Motor
Motor Hall
HallLess,Hall
Motor Gear
GearLess, Gear
Pole Pairs
Reduction Ratio
Speed Sensor
0-60
0
The speed sensor built-in motor
0-No speed sensor inside the
motor
1-60,the number of signals when
motor rotate one circle
TEMPSensor
Disable, Enable
Disable
Display
Enable
Disable, Enable
Enable
Level Count
3-6
5
AutoL evel
Disable, Enable
Disable
Invalid
Level1_Speed
5-40km/h
10 km/h
Limit the speed according to the
PAS Level
Level2_Speed
5-40km/h
15 km/h
Level3_Speed
5-40km/h
18 km/h
Level4_Speed
5-40km/h
20 km/h
Level5_Speed
5-40km/h
25 km/h
Level6_Speed
5-40km/h
30 km/h
PAS
Sensor
Enable
Disable, Enable
Enable
Magic Count
4-64
24
Direction
Auto , Low , High
Max Speed
10-300RPM
Start Count
1-50
Throtttle
DriveMode
Disable, Enable
Enable
MinVoltage
500mv –3500mv
1300mv
MaxVoltage
500mv –3500mv
3300mv
Accessory
BrakeType
Low , High
Low
SpeedSensor
0-60
0- No speed sensor
1-60,the number of signals when
wheel rotate one circle
Shit sensor
Disable, Enable
Disable
Screen
Warning Show
Disable, Enable
Enable
Enable or disable the screen
interface show
AVG Speed
Disable, Enable
Enable
MAX Speed
Disable, Enable
Enable
BATT Voltage
Disable, Enable
Enable
BATT Capacity
Disable, Enable
Enable
Current
Disable, Enable
Enable

Display OLED-01
12
Power
Disable, Enable
Enable
Trip
Disable, Enable
Enable
ODO
Disable, Enable
Enable
Energy
Disable, Enable
Enable
PAS Speed
Disable, Enable
Disable
Motor TEMP
Disable, Enable
Disable
Controller TEMP
Disable, Enable
Disable
Throttle VOL
Disable, Enable
Disable
Device Test
Disable, Enable
Enable
Brightness
Disable, Enable
Enable
Default
Restore the default settings
SAVE
Save all setting to display
ABOUT
Show serial number

Display OLED-01
13
13 Appendix B (Warning message)
These message will blink show on screen when warning event happened , user can skip it by press any button
abnormal communication between display and controller
Solve: check the cable and connect again
Current now is more than rated current
Solve: try to reduce the power
The speed sensor is broken
Voltage is low than limited low-cut voltage, it means the battery is empty
Solve: charge the battery
The Hall of motor is broken, if the system is on double mode , system will auto
switch to no hall mode, if not, System will stop working
Motor temperature is over than limited value, system will reduce of shut off the
power
Solve: try to reduce the power
Controller temperature is over than limited value, system will reduce of shut off
the power
Solve: try to reduce the power

Display OLED-01
14
14 Appendix C (Error message)
Bike will stop work if these error event happened, and ,These messages show on screen can help user to
find the common fault out.
there have 3 possibilities if this error happened
1. User grip the throttle during on power-on period ,
Solve: release it and power again
2. Throttle or the interface on controller are broken
Solve: Remove the throttle , and power on , if this error happened again, means
controller interface is broken, if not , means Throttle is broken
This error only show on power on period and It means the controller MCU is broken
Solve: check the cable first and if this error happened again when power on again ,it
means controller is broken
This error only show on power on period and It means display can’t build a stable
communication with controller
Solve: check the cable first and if this error happened again when power on again , it
means the either controller or display is broken
This is a Serious error , it means there have a short circuit problem in the controller,
user should power off the battery stop use bike immediately
Solve: return bike back to factory
This error only show on bike startup period.
It means system can’t get response from motor when try to start the motor.
Solve: Check the connecter between motor and controller , connect it again
This error means there have a short circuit problem in the motor
Solve: return bike back to factory

Display OLED-01
15
15 Appendix D (FAQ)
Q:Why can not turn on the display even press the POWR button with long time?
A:Make sure battery is power on , then check the cable is well connected with the controller.
Q:How to deal with ERROR message ?
A:Power off the system and try to Contact the e-bike maintenance station in time.
Q: System Can not work after changing some settings?
A: Enter Menu and select the DEFAULT item , then will restore factory settings;
Table of contents
Other Minshine Bicycle Accessories manuals
Popular Bicycle Accessories manuals by other brands

Kettler
Kettler SE3610 Training and operating instructions

HMM Diagnostics
HMM Diagnostics ANT smartLAB combo user manual

Garmin
Garmin Edge 1000 owner's manual

VDO Cyclecomputing
VDO Cyclecomputing MC1.0 instruction manual

Silva
Silva 37313-2 Full version manual

Miche
Miche Revox DX RC 38 Manual of maintenance and use