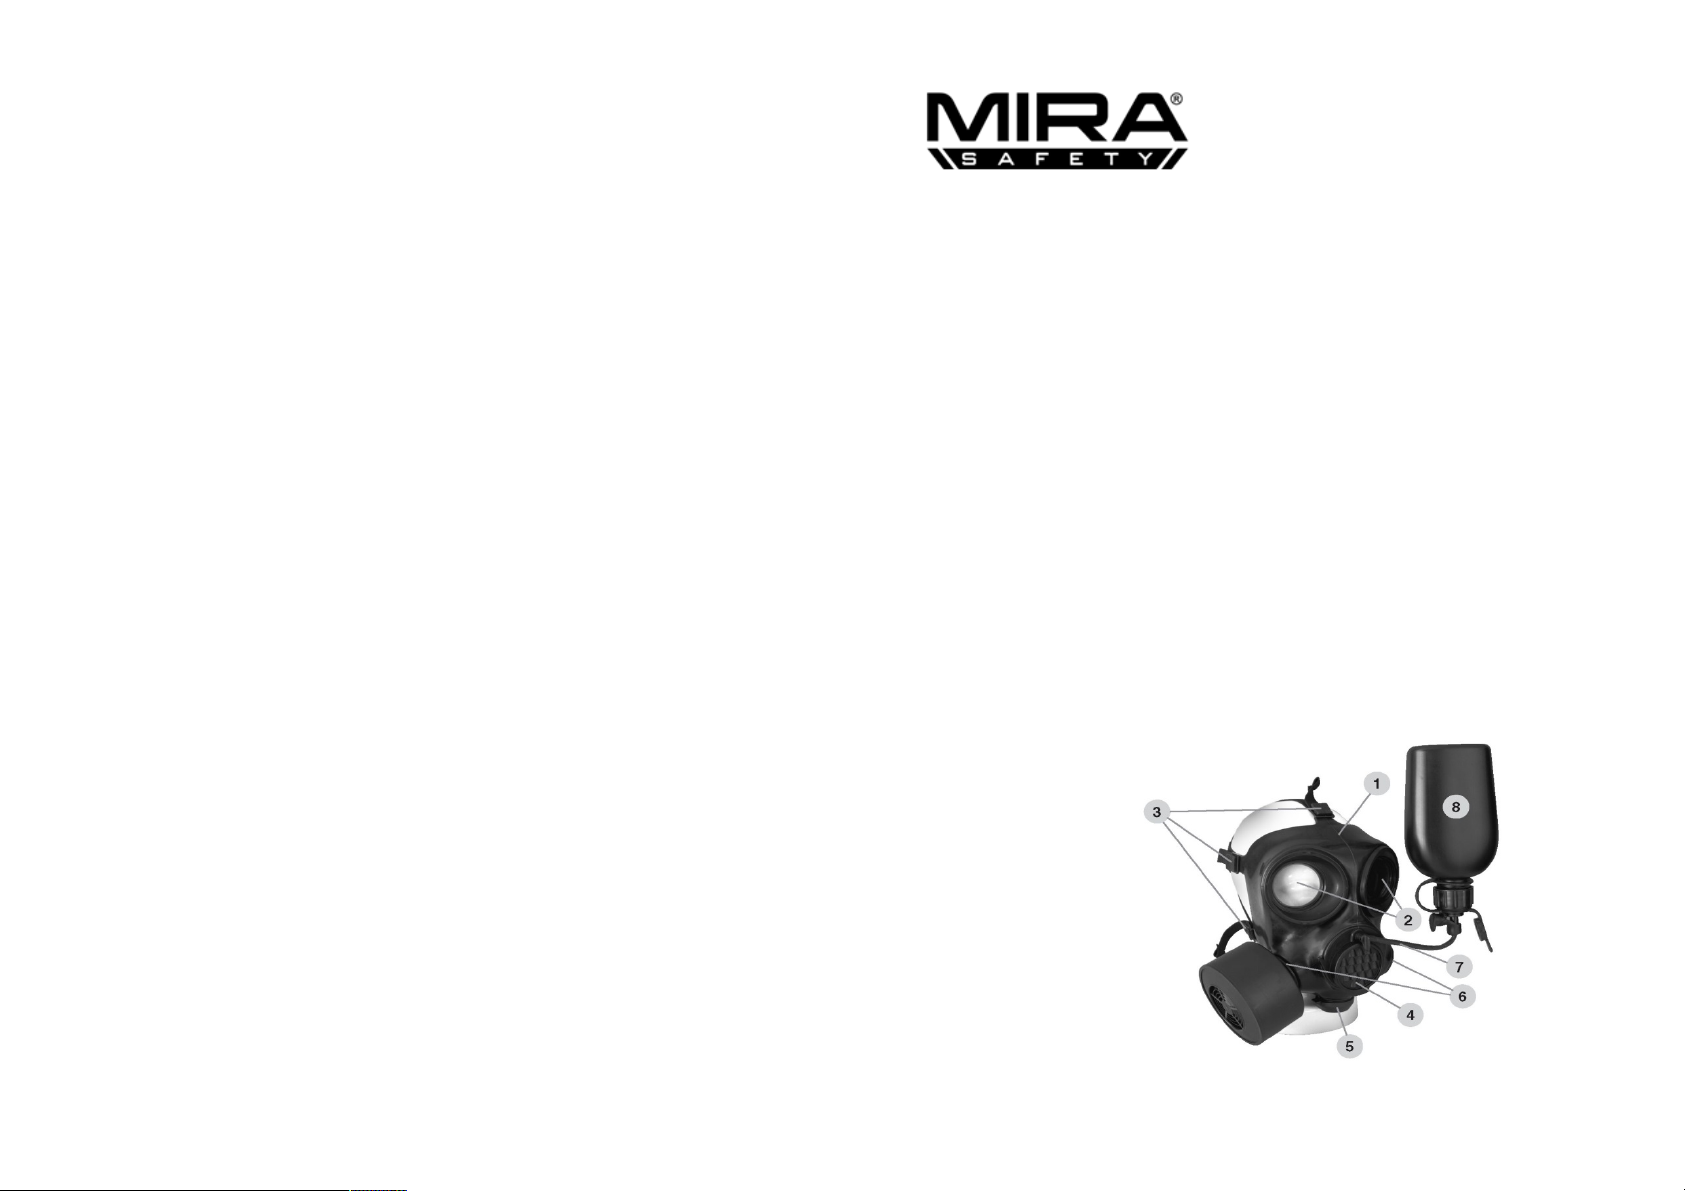
TECHNICAL SPECIFICATIONS
The facepiece is made of a harmless rubber with high-level resistance to TIC/CWA penetration. The
inner mask is made from a special hypoallergenic compound that ensures excellent tightness and
avoids exhaled air contact with the visor to prevent fogging. It also reduces the CO2content inside
the mask, which along with its favorable inhalation/exhalation breathing resistance decreases the
physiological burden on the user.
The speech diaphragm ensures at least 95% intelligibility of talk. The mask is equipped with a five-
point rubber-textile head harness.
The CM-7M mask is produced in three sizes: Size 1 is the smallest and size three is the largest
.
For
proper functioning, the user’s face should be smooth and free of facial hair or other hindrances where
the gasket seals against the skin. The mask allows the use of dioptric glasses via spectacle insertion in
a rubber slip in the facepiece (above the visor). Spectacles must be ordered separately (not a standard
part of the mask).
Fit a filter to the mask by screwing it to the left or right inhalation chamber. The unused chamber
(without filter) is sealed with an inhalation chamber plug. It is necessary to ensure the plug is
properly screwed on and tightened. Inhalation chambers of the CM-7M mask are fitted with RD
40x1/7” thread according to the EN 148-1 standard.
Before use, the user must verify whether the filter thread (or breathing apparatus type) is compatible
with the inhalation chamber thread.
Selection of a suitable filter depends on the type and concentration of the toxic agent. The CM-7M
mask equipped with a filter is only suitable for use in an environment containing at least 17%
oxygen. If oxygen content is lower, a breathing apparatus must be used instead of a filter. Review
filter user guides for principles of filter selection and application.
The CM-7M mask meets all requirements of class 3 of the EN 136 standard.
!
DONNING PROCEDURE
Take the mask out of the package and release each fastening strap as much as possible. Insert your
hands into the mask and stretch the bottom and side fastening straps aside (Fig. 1). Put your chin
into the mask and pull the harness over your head (Fig. 2). Make sure that the harness net is placed
on the back of your head. Tighten the mask by symmetrically tightening the straps (Fig. 3). Begin
by tightening the bottom straps, then the middle ones and finish with the one on top. When the mask
is well positioned, its pressure on your face is soft and regular.
When using the spectacle insertion piece, insert the ends of the spectacle holder into the apertures
in the facepiece’s upper internal rubber ledge. The apertures enable positioning of the spectacles in
two vertical positions. Test for correct positioning of the spectacle insertion piece before use.
Lenses are not provided with the mask.
!
Fig. 1 Fig. 2 Fig.
3
!
!
!
!
!
!
!
!
!
!
!
MASK TIGHTNESS TEST
After donning the mask, perform a tightness test. Seal the inhalation chamber aperture (filter
connection aperture) with your palm and inhale deeply. If the mask is tight and well positioned,
under-pressure will occur under the facepiece. Potential leakage is indicated by suction of the
ambient air into the facepiece and a decrease of under-pressure inside the mask. If this happens,
check and tighten the harness straps. Repeat the test two or three times until an appropriate seal is
achieved.
A mask tightness check must be performed after every cleaning or exhalation valve replacement.
!
CONNECTING THE FILTER
Remove the mask’s upper closing lid and the bottom cover of the filter. Screw the filter to the
inhalation chamber and gently tighten so that the front of the filter thread fastens to the surface of
the sealing ring in the inhalation chamber. Inhale and check whether air flows easily through the
filter. Verify the filter/inhalation chamber connection is tight. Exhale, then cover the filter input
aperture with the bottom cover or your palm and try to inhale. Inhalation is not possible if the
connection is tight. Release the filter input aperture after finishing the test, and the mask is ready
for use. If the filter is not in use close the filter input aperture with the bottom cover and the output
aperture with the lid.
When using a breathing apparatus follow the breathing apparatus instructions.
!
DOFFING PROCEDURE
Release harness straps by pulling the fastening buckles away from your head. Take the exhalation
chamber of the mask (Fig. 4) and pull the mask up over your head (Fig. 5).
!
!
Fig. 4 Fig.
5