Miris SONICATOR User manual

Miris SONICATOR™
USER MANUAL

Miris SONICATOR™User Manual
2
READ THE MANUAL BEFORE USING THE INSTRUMENT
PREFACE
Thank you for choosing the Miris SONICATOR™. Please read this manual carefully before starting to use the
instrument.
Miris SONICATOR™is used to prepare milk samples for macronutrient analysis using a Miris mid-infrared liquid
analyser (Miris HMA™ - Human Milk Analyzer, Miris DMA™ - Dairy Milk Analyzer). By the application of high-
frequency ultrasonic waves, the milk sample will be homogenised in a simple and convenient manner.
© Copyright 2016 MIRIS AB, all rights reserved. This manual is protected by copyright. Distribution and copying in any form of the content is
prohibited without the explicit and written consent of MIRIS AB. The trademarks mentioned in this manual are the property of the respective
owners. Pictures by Elin Hedström and Agnes Abrahamson.
Manufacturer contact information
address
web
e-mail
telephone
Document information
name
ID
revision
issue date
article number
Miris SONICATOR™User Manual
M&S003-15a
1.0
16 May 2017
36-06-101
Product information
name
article number
software version
standard
Miris SONICATOR™
08-04-101
08-04-102
1.3
European Commission
Directive
EMC 2014/30/EU

Miris SONICATOR™User Manual
3
TABLE OF CONTENT
PREFACE .................................................................................................................................................................. 2
TABLE OF CONTENT................................................................................................................................................. 3
IMPORTANT USER INFORMATION .......................................................................................................................... 4
INTENDED USE OF THE MIRIS SONICATOR™....................................................................................................... 4
WARRANTIES AND DUTIES .................................................................................................................................. 4
SAFETY INFORMATION........................................................................................................................................ 4
MIRIS SONICATOR™ USER GUIDE............................................................................................................................ 5
Chapter 1 INSTALLATION .................................................................................................................................... 5
Chapter 2 SETTINGS ............................................................................................................................................ 7
Chapter 3 OPERATING THE MIRIS SONICATOR™ ................................................................................................ 9
Chapter 4 CLEANING ROUTINES........................................................................................................................ 11
Chapter 5 TROUBLESHOOTING AND PROBLEM SOLVING................................................................................. 13
ABOUT MIRIS SONICATOR™.................................................................................................................................. 14
TECHNICAL SPECIFICATIONS ............................................................................................................................. 14
WORKING PRINCIPLE OF THE INSTRUMENT ..................................................................................................... 14

Miris SONICATOR™User Manual
4
IMPORTANT USER INFORMATION
INTENDED USE OF THE MIRIS SONICATOR™
Miris SONICATOR™reduces the particle size distribution in milk, making the milk sample more homogenous. This
device is intended for use in laboratories by laboratory personnel.
WARRANTIES AND DUTIES
By operating this Miris SONICATOR™, the USER and MIRIS agree to the following responsibilities, which constitute
contractual warranties and conditions between MIRIS and USER for the maximum benefit and usefulness of the
Miris SONICATOR™.
MIRIS AB WARRANTS THAT IT:
•Knows of no defects in the construction of the Miris SONICATOR™ or its materials used
•Will replace or repair the Miris SONICATOR™according to the guarantee in the product warranty
USER WARRANTS THAT:
•The Miris SONICATOR™will be used according to the instructions given in the user manual
•The Miris SONICATOR™will not be altered without written approval of MIRIS AB
•MIRIS will be notified immediately if any injury occurs in any association with the Miris SONICATOR™,
and will be allowed prompt and thorough examination of the Miris SONICATOR™in question
•MIRIS will not be held responsible in cases of injury arising from use of the Miris SONICATOR™:
a. When the Miris SONICATOR™is not used according to the instructions in this manual
b. When MIRIS is not notified within 5 days of said injury
SAFETY INFORMATION
To avoid damaging the Miris SONICATOR™, please read this information before installing or using the instrument.
Always keep the protective cover of the Input voltage selector in place
Never open the unit by removing the screws of the main body
Keep the probe securely tightened in place
Never leave milk residues on the probe
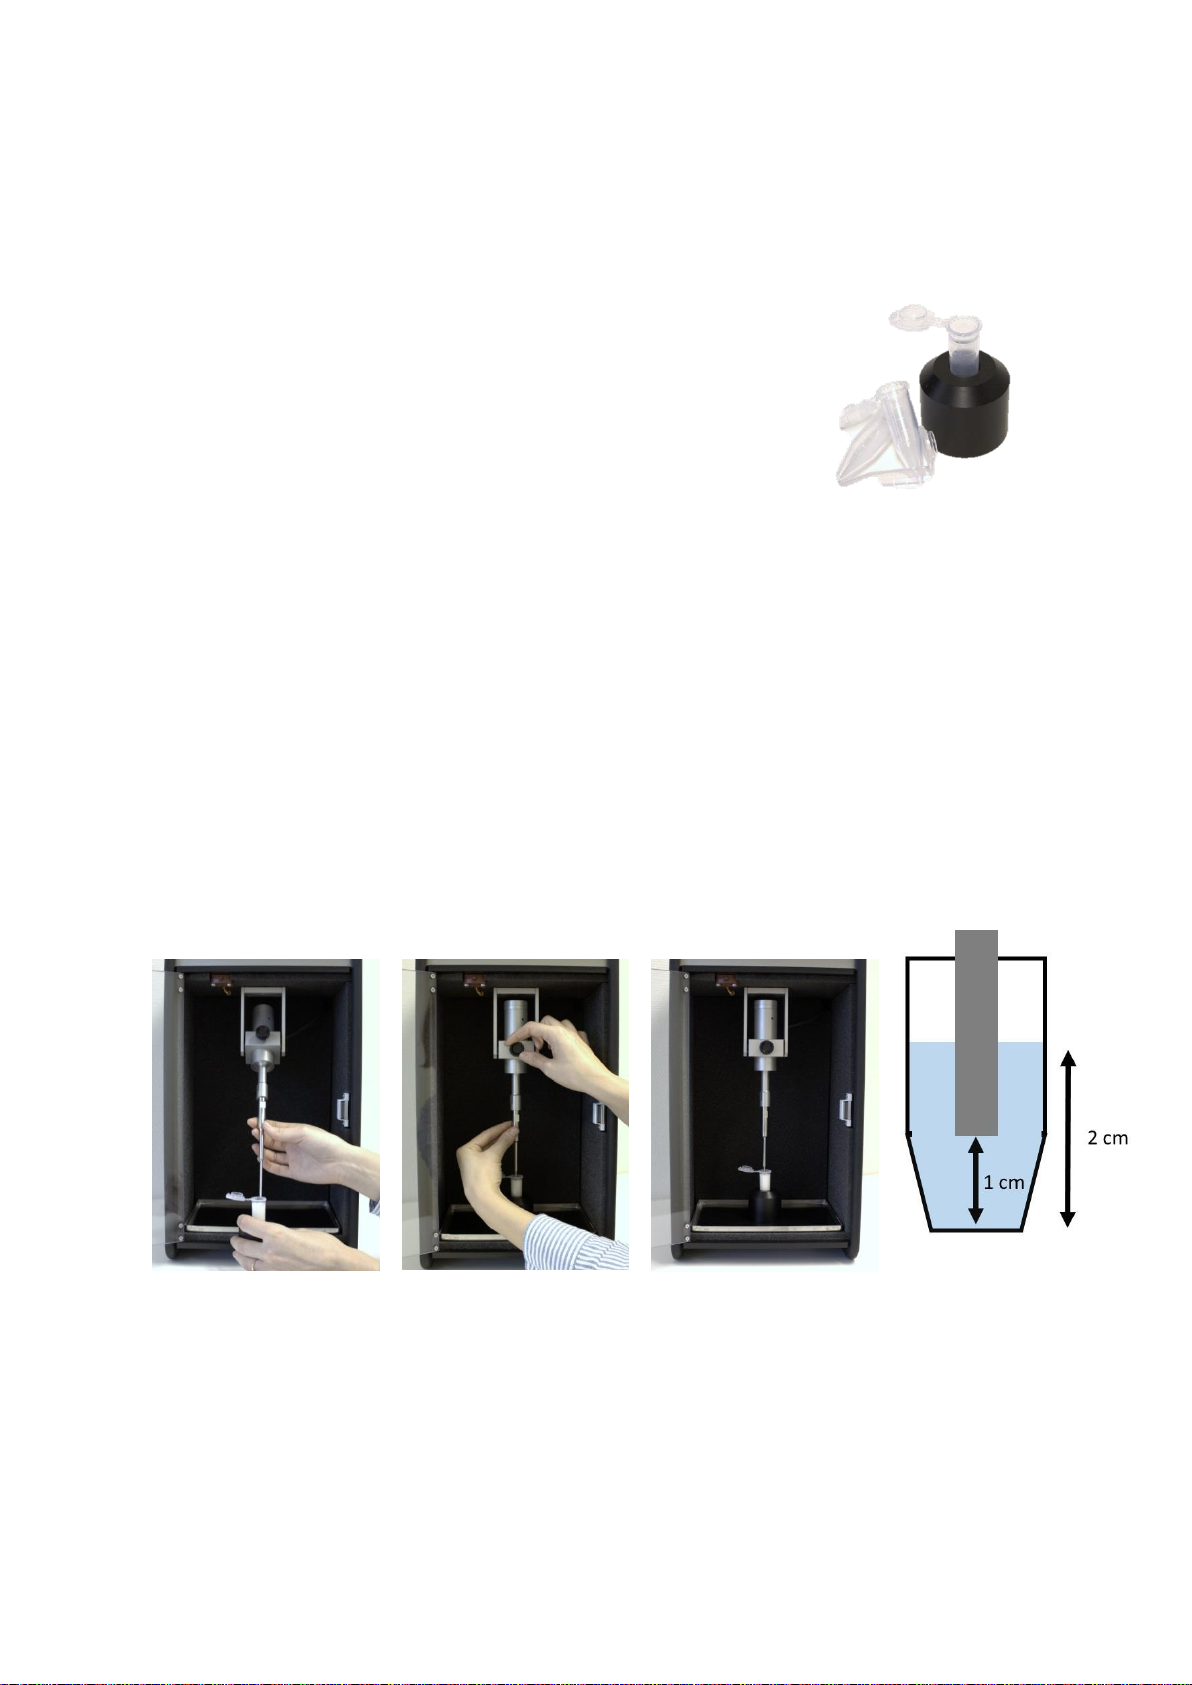
Plastic sample containers are recommended, glassware may be pierced
Only use Miris SONICATOR™for processing milk, no other liquids
Never allow the probe to vibrate in air
Never allow the vibrating probe tip to contact anything but the milk sample
Always use input voltage 110/240 V @ 50/60 Hz, according to the settings of the voltage selector
MIRIS AB can only guarantee the function and performance of the Miris SONICATOR™when it is properly used
and maintained as described in this manual.

Miris SONICATOR™User Manual
5
MIRIS SONICATOR™ USER GUIDE
Chapter 1 INSTALLATION
THE MIRIS SONICATOR™
Figure 1. Front of the Miris SONICATOR™
Figure 2. Back of the Miris SONICATOR™
1. Door
2. Display
3. Height adjustment screw
4. Probe
5. Tray
6. Input voltage selector 110 V/240 V
7. On/off button
8. Power connector
Figure 3. The Miris SONICATOR™display
9. LCD display
10. Cancel button
Cancellation
11. Navigation buttons
Left
Right
Up
Down
12. OK button
Confirmation

Miris SONICATOR™User Manual
6
ELECTRICAL REQUIREMENTS
Miris SONICATOR™requires 50/60 Hz at 110 V or 240 V, depending on the settings of the Input voltage selector
(see Figure 2).
Note! Ensure the proper setting of the Input voltage selector before connecting Miris SONICATOR™to a power
source. See Chapter 2, Electrical settings.
INSTRUMENT PLACEMENT
Miris SONICATOR™should be placed in an area that is free from dust, dirt, explosives, corrosive fumes, and
extremes of temperature and humidity.
Place the instrument on a stable work bench or similar.
Avoid draft and vibrations.
Never place the instrument in direct sunlight.
THE START-UP PROCEDURE
Plug the power cable into the power connector at the back of the Miris SONICATOR™and connect it to a power
source.
Turn on the instrument by pressing the on/off button at the back.
After an automatic initialising sequence of a few seconds, the Miris SONICATOR™is now ready to use.
Optional: Change language settings, see instructions in Chapter 2.
To operate the Miris SONICATOR™, follow the instructions in Chapter 3.
PROBE PROCESSING CAPACITY
Two probe sizes are available with Miris SONICATOR™. For efficient homogenisation, it is important to not exceed
the processing capacity of the probe.
The 3 mm diameter tip can process milk volumes between 3 and 10 ml. Recommended for human milk.
The 6 mm diameter tip can process milk volumes between 10 and 50 ml.

Miris SONICATOR™User Manual
7
Chapter 2 SETTINGS
THE SETTINGS MENU
Figure 4 shows a schematic view of the settings menu. Navigate the menu by pressing the left and right
navigation buttons (see Figure 3). Use the up and down navigation buttons to change the settings within
each menu. Press the green OK button to confirm a setting.
Figure 4. A schematic view of the Miris SONICATOR™ menu system. From the main menu on the right, use the right navigation button to
move through the menu. Press the down navigation button to change the settings within each menu option. To set values for e.g. quantity,
the underscore indicates which digit is active.
Set quantity
For each milk sample to be processed, set quantity in ml corresponding to the sample volume. This setting must
be correct for each sample in order to get the correct processing time.
Opening the menu option Quantity, the current quantity (ml) setting is presented. To set a new quantity, change
each digit at a time by pressing the up/down navigation button to increase/decrease the number. Move on to
the next digit by pressing the right-hand navigation button. The underscore indicates which digit is active. Press
the OK button when done to confirm the new setting.
Time/Quantity
Time/quantity is set at manufacture, depending on the application of the Miris SONICATOR™:
Miris SONICATOR™for dairy milk is set to 1.0 s/ml
Miris SONICATOR™for human milk is set to 1.5 s/ml
To adjust, open the menu option Time/quantity where the current time/quantity (s/ml) is presented. To set a
new time/quantity, change each digit at a time by pressing the up/down navigation button to increase/decrease
the number. Move on to the next digit by pressing the right navigation button. The underscore indicates which
digit is active. Press the OK button when done to confirm the new setting.
MAIN MENU
Current
quantity
Start √
Menu >
Set quantity
Quantity
050 ml
Time/
Quantity
1.5 s/ml
Set language
English
Swedish
German
French
Spanish
Autostart
Off
On
Tip diameter
3 mm
6 mm
Set backlight
Backlight 100 %

Miris SONICATOR™User Manual
8
Set language
Set the desired language. Choose from English, Swedish, German, French and Spanish.
To set language, open the menu option Language and navigate through the menu using the left or right
navigation button until the desired language is presented. Press the OK button to confirm.
Autostart
When autostart is activated (On), Miris SONICATOR™will start automatically when the door is closed. When
autostart is deactivated (Off), Miris SONICATOR™will need to be started manually by pressing the OK button.
Autostart is deactivated as default. To activate autostart, open the menu option Autostart and select On. Press
the OK button to confirm.
Tip diameter
Correct tip diameter setting is set at manufacture.
If probe size is altered, set the probe tip diameter according to the size of the mounted probe. Press the OK
button (√) to confirm.
Set backlight
Set the backlight level of the display. Open the menu option Backlight, the current backlight (%) is presented.
To set a different backlight, change one digit at a time by pressing the up/down navigation button to
increase/decrease the number. Move on to the next digit by pressing the right-hand navigation button. The
underscore indicates which digit is active. Press the OK button when done to confirm the new setting.
ELECTRICAL SETTINGS
Set the correct voltage on the Input voltage selector at the back of the Miris SONICATOR™(see Figure 2).
Before changing the electrical settings, turn off the Miris SONICATOR™and detach the power plug. Remove the
screw holding the protective cover and carefully turn the switch. When finished, put the protective cover back.

Miris SONICATOR™User Manual
9
Chapter 3 OPERATING THE MIRIS SONICATOR™
Turn on the Miris SONICATOR™. See Chapter 1 for start-up procedure and Chapter 2 for settings.
MILK PREPARATION
1. Warm the milk to 35-40°C (98-104oF) using a water bath. Use a
thermometer to check sample temperature. If milk fat is stuck on the
inside of the container, gently swirl the sample to incorporate the fat.
2. Transfer the milk to a test tube suitable for the sample volume, leaving
some extra space for sample movement. Use a test tube which will
give a depth of at least 2 cm milk in the tube, see Figure 9. If using the
conical tubes supplied in the start kit, the tube holder is necessary to
keep the tube upright and stable, see Figure 5. If using other conical
tubes, please ensure the stability. If using a flat bottom or skirted tube,
a tube holder or tube rack may not be necessary.
SAMPLE PLACEMENT
3. Place the test tube with the milk sample in the Miris SONICATOR™by moving the probe towards you
and immerse the probe into the milk sample, see Figure 6.
4. Adjust the probe height from the bottom of the tube by unfastening the height adjustment screw to
move the probe up and down, see Figure 7. Fasten the height adjustment screw when done.
Note! If the probe is lowered to an insufficient depth the sample will foam and/or splash, which
should be avoided.
5. Centre the probe in the tube, see Figure 8.
Figure 6. Place the test tube and
immerse the probe into the
sample.
Figure 7. Adjust the height of the
probe.
Figure 8. Centre the probe in the
sample.
Figure 9. A schematic view of the
probe placement in the milk
sample. Allow at least 2 cm sample
height and place the probe 1 cm
from the bottom of the tube.
Figure 5. Test tube and tube
holder supplied in the start kit.

Miris SONICATOR™User Manual
10
MILK HOMOGENISATION
6. Set the sample quantity (volume in ml) in the menu. Correct quantity settings are important to ensure
proper homogenisation.
7. If autostart is on, close the door to start the processing.
8. If autostart is off, close the door and press the OK button to start the processing.
9. The remaining processing time will be counted down on the display. The processing can be stopped at
any time by pressing the Cancel button . Opening the door at any time will also stop the processing.
10. When the processing is finished, open the door and remove the sample from the Miris SONICATOR™.
11. Wipe the probe with a tissue.
12. Polish the probe tip using emery cloth.
The milk sample is now homogenised and ready for macronutrient analysis by a Miris HMA™ or Miris DMA™.
When finished using the Miris SONICATOR™ for the day, follow the cleaning instructions in Chapter 4.

Miris SONICATOR™User Manual
11
Chapter 4 CLEANING ROUTINES
Miris CLEANER™and emery cloth are necessary for proper maintenance of the instrument.
REQUIRED CONSUMABLES
Miris CLEANER™
Description: Cleaning agent (liquid concentrate).
Application: For cleaning of the Miris SONICATOR™ probe and surfaces.
Storage: Store the concentrate dark, at room temperature (20-30°C), sealed in
the container in which it is supplied. Store the diluted solution in glass or plastic
containers, out of direct sunlight. Keep away from foodstuff and animal feed.
Instructions: Dilute 50 ml concentrate (1 tube) with 950 ml distilled or
deionized water and mix. Warm to 40°C before use and follow instructions in
the section Cleaning of the instrument.
The estimated time for preparation is 20 minutes for mixing the ingredients and to warm the solution to 40°C.
The ready to use dilution should have no colour and faint odour (soapy, chemical).
Materials provided:
Materials required but not provided:
Liquid concentrate in 50 ml container
1000 ml glass or plastic container
950 ml distilled or deionized water
Water bath at 40°C
Do not use if the liquid is cloudy or precipitations are visible.
Use before: Expiry date for unopened tubes is 1 year from production date. Use solution within 3 months of
preparation.
Environment and health: Small spillages may be flushed away with plenty of water to a drain or sewer. Miris
CLEANER™is biodegradable. Ready biodegradability by OECD 301E (ISO method 7287 - 1986(E)).
Non-hazardous. In case of contact with eyes, rinse immediately with plenty of clean, flowing water. Seek medical
attention if there is persistent irritation. In case of contact with skin, rinse immediately with plenty of clean,
flowing water. Seek medical attention if there is persistent irritation. If ingested, drink copious amounts of fresh
water and seek immediate medical attention. Do not promote vomiting.
Emery cloth
Description: Fine grit emery cloth.
Application: For polishing the Miris SONICATOR™ probe tip.
Figure 10. Miris CLEANER™.
Figure 11. Fine grit emery cloth.

Miris SONICATOR™User Manual
12
CLEANING OF THE INSTRUMENT
To maintain the homogenisation efficiency of the Miris SONICATOR™, it is important to clean and polish the
probe after each use. Homogenisation efficiency is determined by the capability of the probe to transmit energy
into the milk, and this capability will degrade in proportion to the degree of roughness of the tip surface. Any
erosion of the probe tip, visible as dark spots or a ring round the outer edge of the tip, must therefore be removed
by careful polishing with fine grit emery cloth. Polish off the eroded part only and no more, or the probe will
wear out quicker.
Probe cleaning
Wipe off the probe after every milk sample
using a tissue.
Clean the probe with a cloth dampened with
Miris CLEANER™after finishing for the day.
Polish the tip (the flat end) of the probe with an
emery cloth after each use, see Figure 12.
Make sure to polish the probe evenly, avoiding
bevelled edges, and to completely remove any
milk residues, see Figure 13.
Figure 12. Probe tip polishing with
fine grit emery cloth.
Figure 13. Properly polished probe
tip.
Instrument surface
Clean the instrument surface and the tray using a cloth dampened with Miris CLEANER™.
If necessary, a mild disinfectant can be used to clean the probe and the instrument surfaces.

Miris SONICATOR™User Manual
13
Chapter 5 TROUBLESHOOTING AND PROBLEM SOLVING
If any problem occur that you are unable to solve by referring to this manual, please contact your distributor or
MIRIS AB. When doing so, please include the serial number and software version of your instrument. The serial
number is printed on the label placed at the back of the Miris SONICATOR™. Software version of the Miris
SONICATOR™is shown on the instrument display when the instrument is starting up.
Table 1. Trouble shooting guide.
Error
Cause
Action
If the error persists
Error
messages
“LOW POWER
CHECK PROBE”
The frequency of
the probe is
outside
acceptable limits
The contact
surfaces of the
probe are dirty
The probe is too
short/worn-out
Make sure the probe is properly
attached
Remove the probe and clean the
top using a cloth dampened with
Miris CLEANER™
or your local distributor to buy a
new probe
Problem
solving
No response when
pressing the
buttons
Restart the instrument by
pressing the on/off button
Problem
solving
Foamy sample,
uneven
homogenisation
The probe is
immersed at an
insufficient depth
Uneven probe tip
Milk residues on
the probe tip
Eroded probe tip
Press cancel to interrupt the
current processing, adjust
distance of the probe to the
bottom of the tube and start the
processing again
Clean and polish the probe tip as
described in Chapter 4
Consider increasing the
sample volume size
Contact Miris
local distributor to buy a
new probe

Miris SONICATOR™User Manual
14
ABOUT MIRIS SONICATOR™
TECHNICAL SPECIFICATIONS
Table 2. Technical specifications of the Miris SONICATOR™
Dimensions (HxWxB)
52.5 x 36.5 x 24.5 cm
Weight
11 kg
Power supply requirement
110 V/140 V @ 50/60 Hz, Average 70 VA, 6.3 AT
Display
LCD
Probe
Titanium
Probe size
Length 115 mm, diameter Ø 6 mm
Length 138 mm, diameter Ø 3 mm
Probe processing capacity
Ø 6 mm:10-50 ml
Ø 3 mm:3-10 ml
Standards
CE, LVD, EMC, FCC
ENVIRONMENTAL
OPERATIONAL
NOT OPERATIONAL
Temperature
0°C (32°F) to 50°C (122°F)
Humidity
10-80% not condensed
20-80 % not condensed
WORKING PRINCIPLE OF THE INSTRUMENT
PRINCIPLE OF OPERATION
Miris SONICATOR™is an ultrasonic device that creates a sound wave in the top of the titanium probe using
clamped piezoelectric discs driven by a power amplifier. The waveform propagates through the tuned probe
horn to finally make the probe tip oscillate in the length direction. The energy released creates a phenomenon
called cavitation. The cavitation causes air bubbles to implode, releasing kinetic energy that will break large fat
globules into smaller ones. Small fat globules have less creaming tendencies and stay homogenously distributed
in the milk.
The instrument will search for the resonance frequency of the probe when the first processing is started after a
power-up. This will take a few seconds and is noted as a delayed start. The instrument will retain the frequency
found and subsequent processing will start promptly. The information is lost at power-off.
MILK HOMOGENIZATION
Fat and proteins are the main structural elements of the milk system, and their chemical characteristics affect
the milk as a solution. Milk fat is considered an oil-in-water emulsion, with fat droplets covered by a hydrophilic
membrane. The milk proteins are considered to be a colloidal solution or dispersion in the milk plasma. Time,
temperature and gravitation are some parameters that affect the chemical characteristics of these components,
i.e. the milk fat will separate when allowed to stand, known as creaming [1]. Creaming of milk fat is faster at low
temperatures due to cold agglutination [2].
Miris SONICATOR™homogenises the milk using the cavitation phenomenon. Cavitation is the formation and
collapse of air bubbles caused by pressure fluctuations. The collapse of air bubbles releases shock waves, causing
damage to the surrounding particles [1]. The energy output from the Miris SONICATOR™ is approximately 20J/s
per ml of milk.
In milk, cavitation causes disruption of milk fat globules into smaller ones, and proteins are adsorbed onto the
fat droplets, which improves the stability of the fat globules [1]. Ultrasound is more efficient when combined
with heating [2].
References
[1] P. Walstra, J. Wouters, T. Geurts. Dairy Science and Techonology, second edition, Taylor and Francis Group,
Boca Raton, 2006.
[2] M. F. Ertugay, M. Sengul, M.Sengul, “Effect of Ultrasound Treatment on Milk Homogenisation and Particle
Size Distribution of Fat”, Turkish Journal of Veterinary Animal Science, vol. 28, pp. 303-308, 2004.
Table of contents
Other Miris Laboratory Equipment manuals